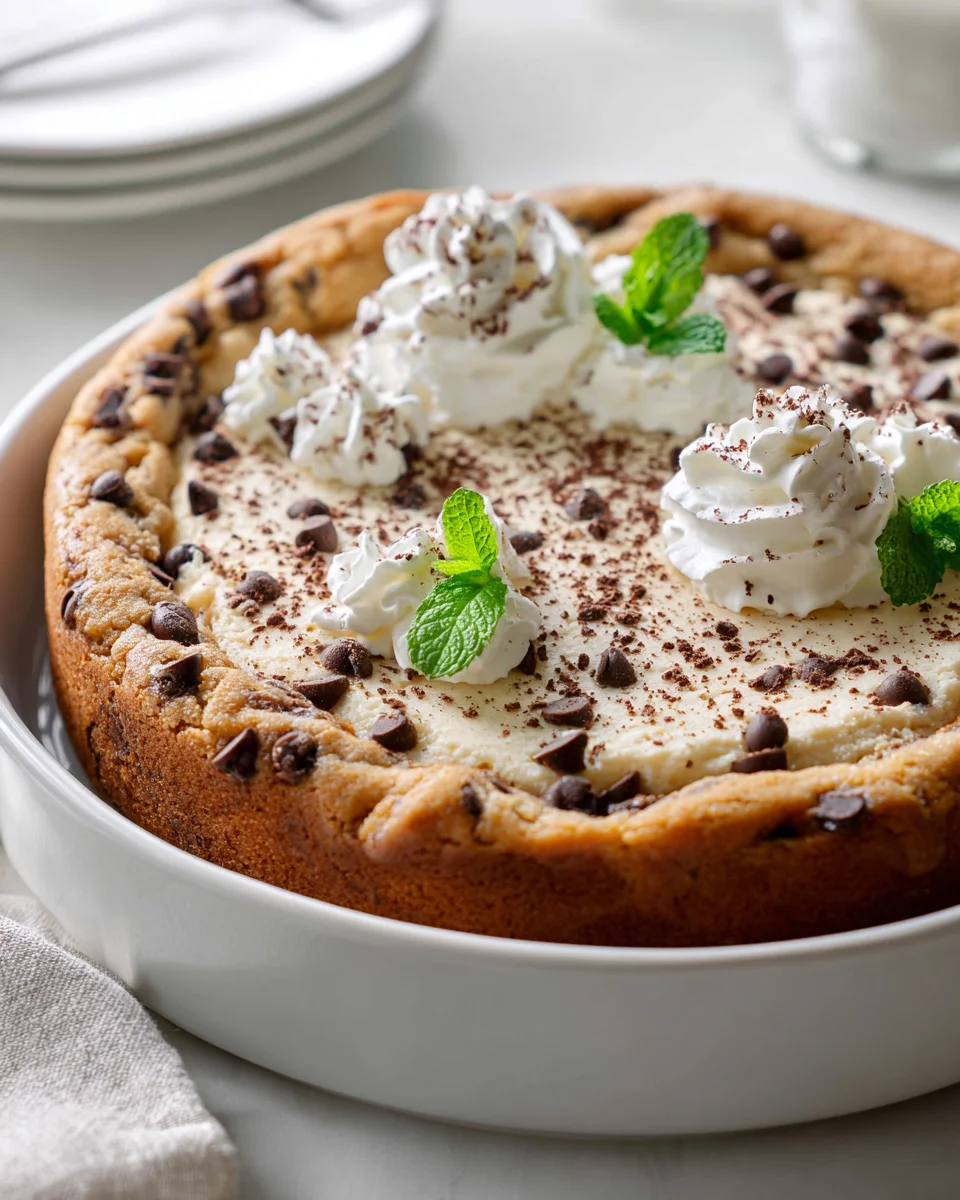
Skillet Cookie Cheesecake
Oh boy, do I have a treat for you today! When I first dreamed up the Skillet Cookie Cheesecake, I knew it was going to be something special, but I didn’t realize just how much you’d all fall head over heels for it. This isn’t just any dessert; it’s a glorious mashup of two absolute titans of the sweet world: the warm, gooey, oh-so-satisfying cookie and the rich, velvety smooth, tangy cheesecake. What makes it so utterly irresistible, you ask? Well, we’re baking it all in one convenient skillet, which means minimal fuss and maximum impact! You get that perfectly chewy, slightly crispy cookie crust on the bottom, followed by a thick, luxurious layer of creamy cheesecake, all baked to golden perfection. Trust me, your friends and family will be begging for this recipe once they take a bite. It’s comforting, indulgent, and surprisingly simple to whip up. Get ready to experience dessert nirvana!

Ingredient Notes
Oh, this Skillet Cookie Cheesecake is such a showstopper, and it all starts with the right ingredients! I’ve found that using high-quality components truly makes all the difference in achieving that perfect balance of chewy cookie and creamy cheesecake. Here’s what you’ll need to gather:
- Cookie Dough Base: My absolute favorite for this dish is a good quality, ready-to-bake chocolate chip cookie dough. You’ll need about 16-20 ounces (one standard package). I love the convenience, but if you’re feeling ambitious, a homemade batch works wonderfully too. The key here is for it to be rich and sturdy enough to form a delicious crust.
- Substitution Tip: Feel free to experiment with other cookie dough flavors! Peanut butter cookie dough offers a fantastic nutty twist, or a double chocolate chunk for an extra decadent experience. If you’re looking for a gluten-free option, many brands now offer excellent gluten-free cookie doughs that bake up beautifully.
- Full-Fat Cream Cheese: This is non-negotiable for a truly luscious cheesecake filling. You’ll need two 8-ounce blocks (16 ounces total). Please, for the love of creamy desserts, make sure it’s full-fat and, crucially, softened to room temperature. This helps achieve a silky-smooth batter without lumps.
- Granulated Sugar: For sweetening our cheesecake filling. About 1/2 cup usually does the trick to complement the sweetness of the cookie crust without making it overly cloying.
- Large Eggs: You’ll need two large eggs. Like the cream cheese, it’s best if these are at room temperature. They act as a binder and help create that classic smooth, custardy texture.
- Pure Vanilla Extract: A good teaspoon of vanilla extract elevates the flavor profile of the cheesecake immensely. Don’t skimp on this!
- Substitution Tip: If you’re out of vanilla, almond extract can offer a lovely, albeit different, flavor. Just use half the amount as it’s quite potent.
- Sour Cream or Heavy Cream: About 1/4 cup of either will add an extra layer of richness and tanginess to the cheesecake, ensuring it’s incredibly moist and smooth. Again, room temperature is ideal here.
- Optional Toppings: While amazing on its own, this Skillet Cookie Cheesecake practically begs for toppings! Think caramel sauce, chocolate fudge, fresh berries, whipped cream, or a sprinkle of flaky sea salt.
Step-by-Step Instructions
Alright, let’s get baking! This process is quite straightforward, but paying attention to a few details will ensure your Skillet Cookie Cheesecake turns out absolutely perfect every time.
- Prep Your Skillet and Oven: First things first, preheat your oven to 350°F (175°C). While it’s heating, grab a 9 or 10-inch cast iron skillet. I like to lightly grease the bottom and sides with a bit of butter or non-stick spray, just to ensure easy serving later.
- Form the Cookie Crust: Unwrap your cookie dough. If it’s a log, slice it, or if it’s pre-portioned, arrange the pieces in the bottom of your prepared skillet. Using your hands or the back of a spoon, press the dough evenly into the bottom and up the sides of the skillet, creating about a 1-inch high rim. This forms the perfect sturdy base for our cheesecake.
- Par-Bake the Cookie Crust: Place the skillet with the cookie dough in the preheated oven and bake for about 10-12 minutes. You’re looking for it to be lightly golden and just set. This crucial step prevents the cookie layer from becoming soggy once the cheesecake filling is added. Once par-baked, remove it from the oven and set it aside to cool slightly while you prepare the filling. Don’t turn off your oven yet!
- Prepare the Cheesecake Filling: In a large mixing bowl, using an electric mixer, beat the softened cream cheese on medium speed until it’s completely smooth and creamy, with no lumps. This usually takes 2-3 minutes.
- Add Sugar and Vanilla: Gradually add the granulated sugar to the cream cheese, continuing to beat until it’s well combined and fluffy. Scrape down the sides of the bowl to ensure everything is incorporated. Mix in the vanilla extract.
- Incorporate Eggs and Cream: Reduce the mixer speed to low. Add the eggs one at a time, mixing just until each egg is combined before adding the next. Be careful not to overmix at this stage, as too much air can cause cracks in your cheesecake. Finally, gently mix in the sour cream or heavy cream until just combined and the batter is smooth.
- Assemble and Bake: Pour the cheesecake filling evenly over the par-baked cookie crust in your skillet. Gently tap the skillet on the counter a few times to release any air bubbles.
- Bake the Cheesecake: Place the skillet back into the oven. I like to reduce the oven temperature slightly to 325°F (160°C) for the cheesecake portion, as this helps prevent cracking. Bake for 35-45 minutes, or until the edges are set but the center still has a slight wobble when you gently shake the skillet.
- Cooling is Key: This is arguably the most important step for a perfect cheesecake! Once baked, turn off the oven but leave the skillet inside with the oven door slightly ajar for about an hour. This slow cooling prevents drastic temperature changes that can lead to cracks. After an hour, remove the skillet from the oven and let it cool completely on a wire rack at room temperature.
- Chill Thoroughly: Once cooled to room temperature, cover the skillet loosely with plastic wrap and refrigerate for at least 4 hours, or ideally, overnight. Chilling is essential for the cheesecake to fully set and achieve its perfect texture.
- Serve and Enjoy: Once thoroughly chilled, your Skillet Cookie Cheesecake is ready to be devoured! You can serve slices directly from the skillet, or carefully cut and remove portions. I love serving it slightly warmed with a scoop of vanilla ice cream and a drizzle of caramel.
Tips & Suggestions
Making this Skillet Cookie Cheesecake is such a joy, and I’ve picked up a few tricks over the years that I think will help you make yours absolutely perfect. Here are my top tips and some fun suggestions:
- Room Temperature Ingredients are Your Best Friend: I can’t stress this enough! Ensuring your cream cheese, eggs, and sour/heavy cream are at room temperature is the single most important tip for a lump-free, silky-smooth cheesecake batter. Cold ingredients won’t emulsify properly and will leave you with a lumpy mess.
- Don’t Overmix the Cheesecake Batter: Once you add the eggs, mix just until they are incorporated. Overmixing incorporates too much air, which expands during baking and then collapses during cooling, leading to unsightly cracks. A slow, gentle mix is all you need.
- Slow and Steady Cooling Wins the Race: Cheesecake is notorious for cracking if cooled too quickly. The oven-off, door-ajar method is my go-to. It allows the cheesecake to gradually adjust to room temperature, minimizing stress on its delicate structure. Patience truly pays off here.
- The Skillet Matters: A cast iron skillet is ideal for this recipe because it retains heat so well, ensuring an evenly baked cookie crust and cheesecake. A 9 or 10-inch skillet works perfectly for the quantities listed. If you use a different size, you may need to adjust baking times.
- Serving Temperature: While delicious chilled, I personally love serving slices of this Skillet Cookie Cheesecake slightly warmed. A quick zap in the microwave for 15-20 seconds per slice can bring out the gooey cookie texture and make the cheesecake filling extra creamy. It’s divine with a scoop of ice cream!
- Get Creative with Toppings: This dessert is a fantastic canvas! Beyond the classic caramel and chocolate, consider fresh fruit (strawberries, raspberries), chopped nuts (pecans, walnuts), a sprinkle of shredded coconut, or even a dollop of lemon curd for a tangy contrast. The possibilities are endless.
- Variations on the Cookie: Don’t feel confined to chocolate chip! A peanut butter cookie crust with a chocolate swirl cheesecake filling would be incredible, or an oatmeal cookie crust with a spiced cheesecake. Let your imagination run wild!
Storage
Once you’ve made this incredible Skillet Cookie Cheesecake, you’ll want to make sure any leftovers are stored properly to keep them fresh and delicious.
- Refrigeration: This cheesecake must be stored in the refrigerator. Once completely cooled and chilled, cover the skillet tightly with plastic wrap or transfer individual slices to an airtight container. It will keep beautifully in the fridge for 3-4 days.
- Freezing: If you want to enjoy this treat for longer, it freezes wonderfully! You can freeze the entire skillet (ensure it’s completely cool, then wrap tightly in plastic wrap and then foil) or individual slices. For slices, wrap each piece in plastic wrap, then place them in a freezer-safe bag or container. It will last in the freezer for up to 1 month. Thaw overnight in the refrigerator before serving.
Final Thoughts
And there you have it – your very own incredible Skillet Cookie Cheesecake! I truly believe this isn’t just another dessert; it’s an experience. The magic of combining that warm, gooey, straight-from-the-oven cookie base with a luscious, creamy cheesecake topping is simply unparalleled. It’s the best of both worlds, offering that comforting crunch and chew alongside a smooth, decadent richness in every single bite.
I hope you’ll give this Skillet Cookie Cheesecake a try because it’s genuinely a showstopper that’s surprisingly easy to achieve. Whether you’re sharing it with friends and family, or enjoying a generous slice (or three!) all to yourself, this dessert promises to bring smiles and satisfy even the most serious sweet cravings. Get ready to fall in love with the ultimate dessert mashup!
Decadent Skillet Cookie Cheesecake: Easy Dessert Recipe
- Total Time: 1 hour 5 minutes
- Yield: 8 servings 1x
Description
Indulge in the ultimate dessert mashup with this Decadent Skillet Cookie Cheesecake, featuring a chewy cookie crust topped with a rich cheesecake filling. It’s surprisingly simple to make and perfect for sharing with friends and family!
Ingredients
- 16–20 ounces ready-to-bake chocolate chip cookie dough
- two 8-ounce blocks full-fat cream cheese, softened
- 1/2 cup granulated sugar
- 2 large eggs, at room temperature
- 1 teaspoon pure vanilla extract
- 1/4 cup sour cream or heavy cream, at room temperature
- Optional toppings: caramel sauce, chocolate fudge, fresh berries, whipped cream, flaky sea salt
Instructions
- Preheat your oven to 350°F (175°C) and lightly grease a 9 or 10-inch cast iron skillet.
- Unwrap your cookie dough and press it evenly into the bottom and up the sides of the skillet, creating about a 1-inch high rim.
- Par-bake the cookie crust in the preheated oven for about 10-12 minutes until lightly golden and just set.
- In a large mixing bowl, beat the softened cream cheese on medium speed until smooth and creamy, about 2-3 minutes.
- Gradually add the granulated sugar to the cream cheese and mix until well combined and fluffy. Mix in the vanilla extract.
- Reduce the mixer speed to low and add the eggs one at a time, mixing just until each is combined. Gently mix in the sour cream or heavy cream until smooth.
- Pour the cheesecake filling evenly over the par-baked cookie crust and gently tap the skillet to release air bubbles.
- Bake the cheesecake at 325°F (160°C) for 35-45 minutes, until the edges are set but the center has a slight wobble.
- Turn off the oven and leave the skillet inside with the door slightly ajar for about an hour to cool slowly.
- Once cooled to room temperature, cover the skillet loosely with plastic wrap and refrigerate for at least 4 hours or overnight.
- Serve slices directly from the skillet or carefully cut and remove portions, optionally warming slightly before serving.
- Prep Time: 15 mins
- Cook Time: 50 mins
- Category: Dessert
- Method: Baking
- Cuisine: American
Nutrition
- Serving Size: 1 slice
- Calories: 350
- Sugar: 20 g
- Sodium: 300 mg
- Fat: 20 g
- Saturated Fat: 10 g
- Unsaturated Fat: 8 g
- Trans Fat: 0 g
- Carbohydrates: 30 g
- Fiber: 1 g
- Protein: 5 g
- Cholesterol: 70 mg
Keywords: Ensure all ingredients are at room temperature for a smooth batter. Avoid overmixing after adding eggs to prevent cracks. A cast iron skillet is ideal for even baking.