Easy Cheese Danish – the very words conjure images of flaky pastry, creamy filling, and a dusting of sweet confectioner’s sugar. Have you ever craved a bakery-worthy treat without the bakery trip (or the bakery price tag)? Well, you’re in luck! This recipe unlocks the secret to creating incredibly delicious cheese danishes right in your own kitchen, and the best part? It’s surprisingly simple.
The history of the Danish pastry, or “wienerbrød” as it’s known in Denmark, is a fascinating tale of culinary exchange. While often associated with Denmark, its roots trace back to Austrian bakers who brought their techniques to Copenhagen in the mid-19th century. Over time, Danish bakers adapted and perfected the recipe, creating the iconic pastry we know and love today. The cheese danish, a delightful variation, adds a creamy, tangy element that elevates the experience.
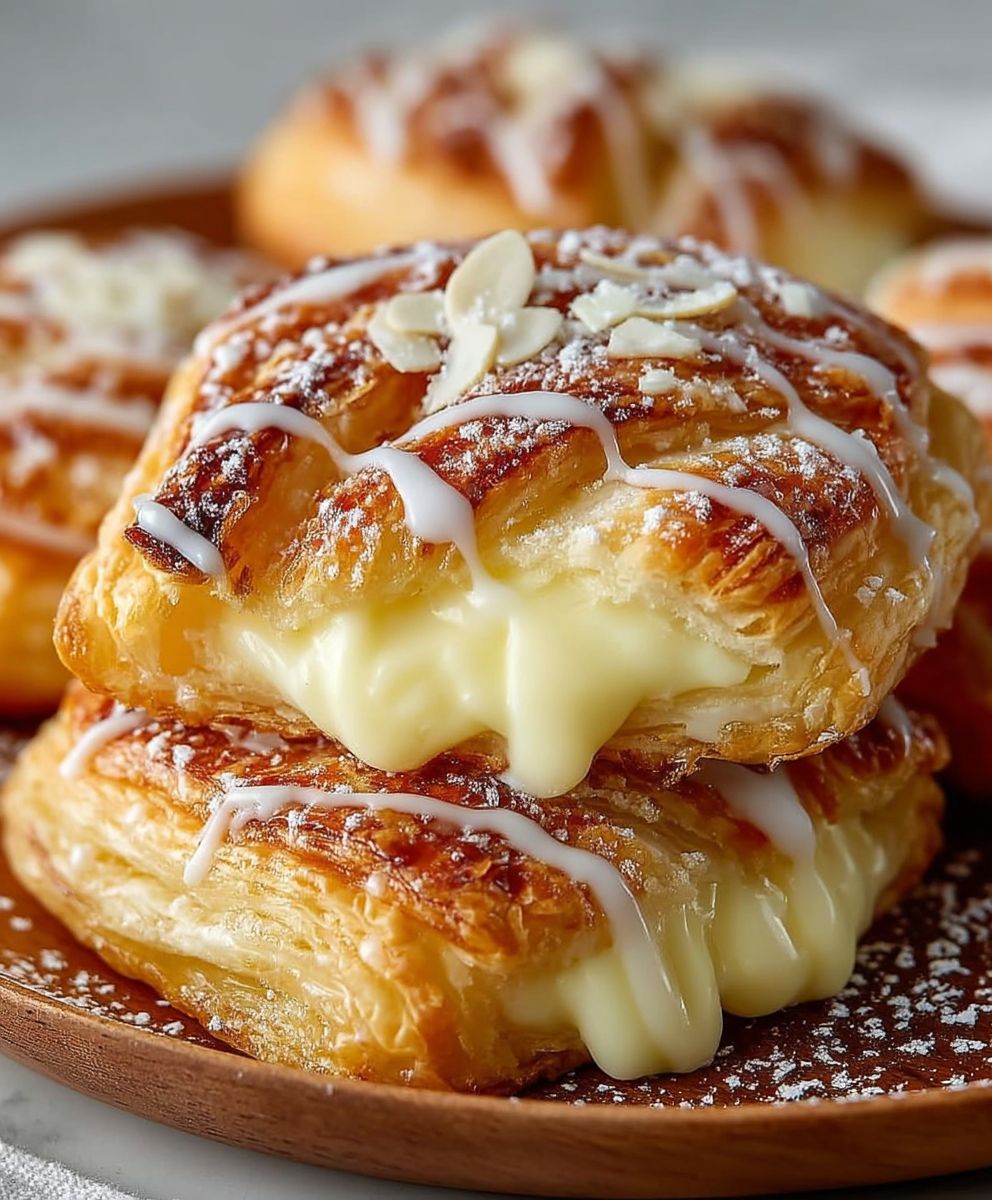
What makes the easy cheese danish so irresistible? It’s the perfect combination of textures and flavors. The buttery, flaky pastry gives way to a smooth, rich cheese filling that’s both sweet and slightly tart. People adore this treat because it’s comforting, satisfying, and relatively quick to prepare, especially with this simplified recipe. Whether you’re looking for a delightful breakfast pastry, a sweet afternoon snack, or an impressive dessert to share, these homemade cheese danishes are guaranteed to be a crowd-pleaser. Get ready to impress your friends and family with your newfound baking skills!

Ingredients:
- 1 package (8 ounces) refrigerated crescent roll dough
- 4 ounces cream cheese, softened
- 1/4 cup granulated sugar
- 1/2 teaspoon vanilla extract
- 1 egg, beaten
- Optional toppings: fruit preserves (such as apricot, raspberry, or strawberry), sliced almonds, powdered sugar
Preparing the Cream Cheese Filling
Okay, let’s start with the heart of our Easy Cheese Danish – the creamy, dreamy filling! This is where the magic happens, and it’s surprisingly simple to whip up.
- Soften the Cream Cheese: This is crucial! You want your cream cheese to be nice and soft so it blends smoothly with the other ingredients. If you’re short on time, you can microwave it for about 15-20 seconds, but keep a close eye on it to prevent it from melting. Room temperature is always best, though.
- Combine Cream Cheese and Sugar: In a medium-sized bowl, add your softened cream cheese and granulated sugar. Now, grab your electric mixer (a hand mixer works great for this) and beat the cream cheese and sugar together until they are light and fluffy. This usually takes about 2-3 minutes. You want to make sure there are no lumps of cream cheese remaining.
- Add Vanilla Extract: Pour in the vanilla extract. The vanilla adds a lovely warmth and depth of flavor to the filling. Mix it in until it’s fully incorporated. Don’t overmix at this point.
- Set Aside: Once the filling is smooth and creamy, set it aside while we prepare the crescent roll dough.
Preparing the Crescent Roll Dough
Now for the fun part – working with the crescent roll dough! This is what gives our Danish that flaky, buttery texture. Don’t be intimidated; it’s super easy to handle.
- Preheat Oven: Preheat your oven to 375°F (190°C). This is important to ensure the Danish bakes evenly and the crescent rolls get that golden-brown color we’re looking for.
- Unroll the Dough: Carefully unroll the crescent roll dough onto a lightly floured surface. You’ll have one large sheet of dough.
- Seal the Perforations: Gently pinch together the perforations (the pre-cut lines) in the dough to create one solid sheet. This will prevent the filling from leaking out during baking. You can use your fingers to press along the seams, ensuring they are well sealed.
- Cut into Rectangles: Using a sharp knife or pizza cutter, cut the dough into 8 equal rectangles. This will give you 8 individual Danish pastries.
Assembling the Cheese Danish
This is where we bring everything together! Get ready to create some deliciousness.
- Place Dough on Baking Sheet: Line a baking sheet with parchment paper. This will prevent the Danish from sticking and make cleanup a breeze. Place the 8 dough rectangles onto the prepared baking sheet, spacing them evenly apart.
- Add the Cream Cheese Filling: Spoon a generous dollop of the cream cheese filling onto the center of each dough rectangle. Don’t overfill them, or the filling might spill out during baking. Aim for about 1-2 tablespoons per rectangle.
- Fold Over the Dough: Gently fold one corner of each rectangle over the filling to the opposite corner, creating a triangle shape. Press the edges together slightly to seal them. You can also leave them open-faced if you prefer.
- Egg Wash: In a small bowl, whisk the egg. Brush the tops of the Danish with the beaten egg. This will give them a beautiful golden-brown sheen.
Baking the Cheese Danish
Almost there! Now it’s time to bake these beauties to perfection.
- Bake: Place the baking sheet in the preheated oven and bake for 12-15 minutes, or until the Danish are golden brown and the filling is set. Keep a close eye on them, as baking times can vary depending on your oven.
- Cool Slightly: Once the Danish are baked, remove them from the oven and let them cool on the baking sheet for a few minutes before transferring them to a wire rack to cool completely.
Adding Toppings (Optional)
This is where you can get creative and customize your Easy Cheese Danish! Here are a few ideas to get you started:
- Fruit Preserves: Once the Danish have cooled slightly, you can top them with your favorite fruit preserves. Apricot, raspberry, and strawberry are all delicious choices. Simply spoon a small amount of preserves onto the center of each Danish.
- Sliced Almonds: Sprinkle sliced almonds over the top of the Danish for added crunch and flavor. You can add them before or after baking.
- Powdered Sugar: Dust the cooled Danish with powdered sugar for a classic and elegant finish. This is a simple way to add a touch of sweetness.
- Icing: Make a simple glaze by whisking together powdered sugar with a little milk or lemon juice. Drizzle the glaze over the cooled Danish.
Tips and Tricks for Perfect Cheese Danish
Here are a few extra tips to ensure your Easy Cheese Danish turns out perfectly every time:
- Don’t Overmix the Filling: Overmixing the cream cheese filling can result in a runny consistency. Mix just until the ingredients are combined.
- Use Cold Dough: Cold crescent roll dough is easier to work with. If the dough gets too warm, it will become sticky and difficult to handle.
- Seal the Edges Well: Make sure to seal the edges of the Danish well to prevent the filling from leaking out during baking.
- Adjust Baking Time: Baking times may vary depending on your oven. Keep a close eye on the Danish and adjust the baking time as needed.
- Store Properly: Store leftover Danish in an airtight container at room temperature for up to 2 days.
- Make Ahead: You can prepare the cream cheese filling ahead of time and store it in the refrigerator for up to 24 hours.
- Experiment with Flavors: Feel free to experiment with different flavors and toppings. Try adding lemon zest to the cream cheese filling or using different types of fruit preserves.
Serving Suggestions
These Easy Cheese Danish are perfect for breakfast, brunch, or a sweet treat any time of day. Here are a few serving suggestions:
- Serve Warm: Serve the Danish warm for the best flavor and texture.
- Pair with Coffee or Tea: Enjoy them with a cup of coffee or tea.
- Add a Side of Fruit: Serve them with a side of fresh fruit for a complete and balanced breakfast.
- Bring to a Potluck: These Danish are a crowd-pleaser and are perfect for bringing to a potluck or party.
Variations
Want to mix things up a bit? Here are some fun variations you can try:
- Lemon Cheese Danish: Add 1 teaspoon of lemon zest to the cream cheese filling for a bright and citrusy flavor.
- Chocolate Chip Cheese Danish: Stir 1/4 cup of mini chocolate chips into the cream cheese filling.
- Apple Cheese Danish: Top the cream cheese filling with thinly sliced apples before baking.
- Nutella Cheese Danish: Spread a thin layer of Nutella on the dough before adding the cream cheese filling.
Troubleshooting
Encountering issues? Here’s some help:
- Filling is too runny: Make sure your cream cheese is not too warm. Also, avoid overmixing the filling.
- Dough is sticky: The dough may be too warm. Place it in the refrigerator for a few minutes to chill it.
- Danish are not browning: Make sure your oven is preheated to the correct temperature. You can also brush the tops of the Danish with an egg wash for a golden-brown color.
- Filling is leaking out: Make sure to seal the edges of the Danish well. Also, avoid overfilling them.
Nutritional Information (Approximate)
Please note that the nutritional information is an estimate and may vary depending on the specific ingredients used.
- Calories: Approximately 200-250 per Danish
- Fat: 12-15 grams
- Saturated Fat: 7-9 grams
- Cholesterol: 50-60 mg
- Sodium: 200-250 mg
- Carbohydrates

Conclusion:
And there you have it! Our Easy Cheese Danish recipe is more than just a quick breakfast treat; it’s a guaranteed crowd-pleaser that brings a touch of bakery magic right into your kitchen. I truly believe this recipe is a must-try because it delivers incredible flavor and that satisfying flaky texture without demanding hours of your time or advanced baking skills. It’s the perfect solution for busy mornings, last-minute brunch gatherings, or simply when you crave something sweet and comforting.
What makes this recipe so special is its versatility. While the classic cheese filling is undeniably delicious, don’t be afraid to experiment and make it your own! For a fruity twist, try swirling in a spoonful of your favorite jam – raspberry, apricot, or strawberry would all be fantastic choices. Or, if you’re a chocolate lover (like me!), add a drizzle of melted chocolate over the finished danishes for an extra decadent touch. You could even incorporate a sprinkle of chopped nuts, like almonds or pecans, for added texture and flavor.
Serving suggestions are endless! These Easy Cheese Danishes are wonderful served warm, straight from the oven, with a cup of coffee or tea. They also pair beautifully with fresh fruit, such as berries or sliced peaches, for a light and refreshing breakfast or dessert. For a more substantial brunch, consider serving them alongside scrambled eggs, bacon, and a side salad. And if you happen to have any leftovers (though I doubt you will!), they can be stored in an airtight container at room temperature for a day or two, or in the refrigerator for up to a week. Just warm them up slightly before serving to restore their deliciousness.
But the real magic of this recipe lies in its simplicity. I designed it to be accessible to bakers of all skill levels, from beginners to seasoned pros. The ingredients are readily available, the instructions are clear and concise, and the results are consistently delicious. I’ve made these danishes countless times, and they always come out perfectly. I’m confident that you’ll have the same success!
So, what are you waiting for? Gather your ingredients, preheat your oven, and get ready to experience the joy of homemade Easy Cheese Danish. I promise you won’t be disappointed. This recipe is a game-changer, and I’m so excited for you to try it.
Once you’ve given it a go, I’d absolutely love to hear about your experience! Did you stick to the classic recipe, or did you add your own creative twist? What did your family and friends think? Share your photos, comments, and variations in the comments section below. Your feedback is invaluable, and it helps me to continue creating recipes that you’ll love. Happy baking, and enjoy your delicious homemade Easy Cheese Danish! I am sure that you will love this Easy Cheese Danish recipe as much as I do.
Easy Cheese Danish: The Simplest Recipe You'll Ever Need
Easy cheese danishes made with crescent roll dough and a creamy filling. Add fruit preserves or almonds for extra flavor. Great for breakfast, brunch, or dessert!
By: LilyCategory: BreakfastDifficulty: EasyCuisine: AmericanYield: 8 danishesDietary: VegetarianIngredients
Instructions
Recipe Notes
- Don’t overmix the cream cheese filling.
- Use cold crescent roll dough for easier handling.
- Seal the edges of the Danish well to prevent filling leakage.
- Adjust baking time as needed based on your oven.
- Store leftover Danish in an airtight container at room temperature for up to 2 days.
- The cream cheese filling can be prepared ahead of time and stored in the refrigerator for up to 24 hours.
- Experiment with different flavors and toppings.
Frequently Asked Questions
→ How do I ensure the bread stays moist?Use fresh, ripe ingredients and avoid overmixing the batter. Store in an airtight container.→ Can I substitute ingredients?Yes, you can substitute similar ingredients while maintaining the basic ratios for best results.→ How long does this bread keep?Store tightly wrapped at room temperature for 2-3 days, or refrigerate for up to a week.→ What if I don't have all the spices?You can adjust spices to taste or substitute with similar warming spices.→ Can I freeze this bread?Yes, wrap individual slices and freeze for up to 3 months. Thaw at room temperature before serving.