• Skip to primary navigation
  • Skip to main content
  • Skip to primary sidebar
Homesmad

Homesmad

  • Home
  • Breakfast & Brunch
  • Appetizers & Snacks
  • Dinner
  • Dessert
  • About
  • Privacy Policy
  • Contact
Homesmad
  • Home
  • Breakfast & Brunch
  • Appetizers & Snacks
  • Dinner
  • Dessert
  • About
  • Privacy Policy
  • Contact

Easy Cream Cheese Crescent Pumpkins: Delicious Fall Dessert

October 10, 2025 by Lily author

Crescent Pumpkins With Cream Cheese And Pumpkin Pie Filling is more than just a dessert; it’s a delightful celebration of autumn’s most beloved flavors, nestled within a convenient, flaky package. As the leaves begin to turn golden and a crisp coolness fills the air, our culinary thoughts often drift to comforting treats that evoke warmth and nostalgia. Pumpkin, of course, stands as the undeniable icon of the fall season, gracing tables from festive Halloween gatherings to cherished Thanksgiving feasts. While classic pumpkin pie holds a sacred spot in our hearts, I’ve always been keen to explore innovative yet accessible ways to enjoy this versatile ingredient.

Why You’ll Adore This Autumnal Delight

This particular recipe takes the familiar, spiced essence of traditional pumpkin pie and elevates it with the luxurious, tangy creaminess of a smooth cream cheese filling. All of this delectable goodness is then enveloped in the golden-brown embrace of a tender, buttery crescent roll. The result is a dessert that beautifully balances a melt-in-your-mouth crust with a rich, spiced interior that’s both familiar and excitingly new. Its incredible convenience, thanks to the clever use of store-bought crescent dough, transforms a seemingly elaborate treat into something surprisingly simple to prepare, making it perfect for busy weeknights or impromptu gatherings.

The harmonious combination of textures – the flaky pastry, the smooth cream cheese, and the spiced pumpkin filling – creates a truly irresistible experience. Preparing these charming Crescent Pumpkins With Cream Cheese And Pumpkin Pie Filling is a fantastic way to bring smiles to any autumn table, offering a bite-sized piece of seasonal joy that everyone will adore.

Easy Cream Cheese Crescent Pumpkins: Delicious Fall Dessert this RECIPE

Ingredients:

  • For the Cream Cheese Pumpkin Filling:
    • One (8-ounce) package full-fat cream cheese, softened to room temperature. I always recommend full-fat for that rich, decadent flavor, but a reduced-fat version could work in a pinch if you’re looking to lighten things up a bit.
    • 1/4 cup granulated sugar. This provides just the right amount of sweetness to balance the tang of the cream cheese and the natural earthiness of the pumpkin.
    • 1 teaspoon pumpkin pie spice. This blend typically includes cinnamon, nutmeg, ginger, and cloves, bringing all those quintessential fall flavors together. If you don’t have a pre-made blend, you can use 1/2 teaspoon cinnamon, 1/4 teaspoon nutmeg, and a pinch each of ginger and cloves.
    • 1/2 teaspoon pure vanilla extract. A good quality vanilla extract really brightens all the other flavors.
    • Approximately 2/3 of a 15-ounce can of pumpkin pie filling (not pure pumpkin puree). It’s crucial to use pumpkin pie filling as it’s already seasoned and sweetened, saving us a step and ensuring consistent flavor. We’ll reserve the remaining 1/3 of the can for our delightful glaze.
  • For the Crescent Dough and Egg Wash:
    • Two (8-count) cans refrigerated crescent roll dough. Any reputable brand will do. These readily available rolls are the magic shortcut that makes this recipe incredibly quick and easy.
    • 1 large egg, beaten (for egg wash, optional but highly recommended). This simple wash gives our finished Crescent Pumpkins a beautiful golden sheen and helps them brown evenly.
  • For the Pumpkin Glaze:
    • 1 cup powdered sugar (confectioners’ sugar), sifted. Sifting helps prevent lumps, ensuring a super smooth glaze.
    • The remaining 1/3 of the 15-ounce can of pumpkin pie filling. This ties the glaze flavor perfectly to our internal filling.
    • 2-3 tablespoons milk or heavy cream. Start with two and add more as needed, a teaspoon at a time, to achieve your desired glaze consistency. Heavy cream will yield a richer, thicker glaze, while milk will make it lighter.
  • Optional Garnishes:
    • Pecan halves or a sprinkle of extra pumpkin pie spice.
    • Small pretzel sticks for a cute “stem” effect after baking.

Preparation of the Cream Cheese Pumpkin Filling

Let’s get started on the heart of our Crescent Pumpkins With Cream Cheese And Pumpkin Pie Filling – the luscious, spiced filling! This step is incredibly straightforward, but paying attention to a few details will ensure a smooth, velvety texture that’s simply irresistible.

  1. Soften the Cream Cheese: First things first, make sure your 8-ounce package of cream cheese is truly at room temperature. This is absolutely critical for achieving a lump-free, smooth filling. If your cream cheese is still cold, it won’t blend properly and you’ll end up with little chilly chunks, which we definitely want to avoid. I usually take it out of the fridge at least an hour before I plan to start baking. If you’re in a hurry, you can unwrap it, cut it into smaller cubes, and microwave it on low power (about 50%) for 15-20 second intervals, checking and flipping it until it’s softened but not melted.
  2. Cream the Base Ingredients: In a medium-sized mixing bowl, combine the softened cream cheese, 1/4 cup granulated sugar, 1 teaspoon pumpkin pie spice, and 1/2 teaspoon pure vanilla extract. Using an electric mixer (either a stand mixer with the paddle attachment or a hand mixer) on medium speed, beat these ingredients together until they are completely smooth and light. This usually takes about 2-3 minutes. Scrape down the sides of the bowl frequently with a rubber spatula to ensure everything is thoroughly incorporated. We’re aiming for a consistency that’s fluffy and airy, which will contribute to a wonderfully light filling inside our crescent rolls.
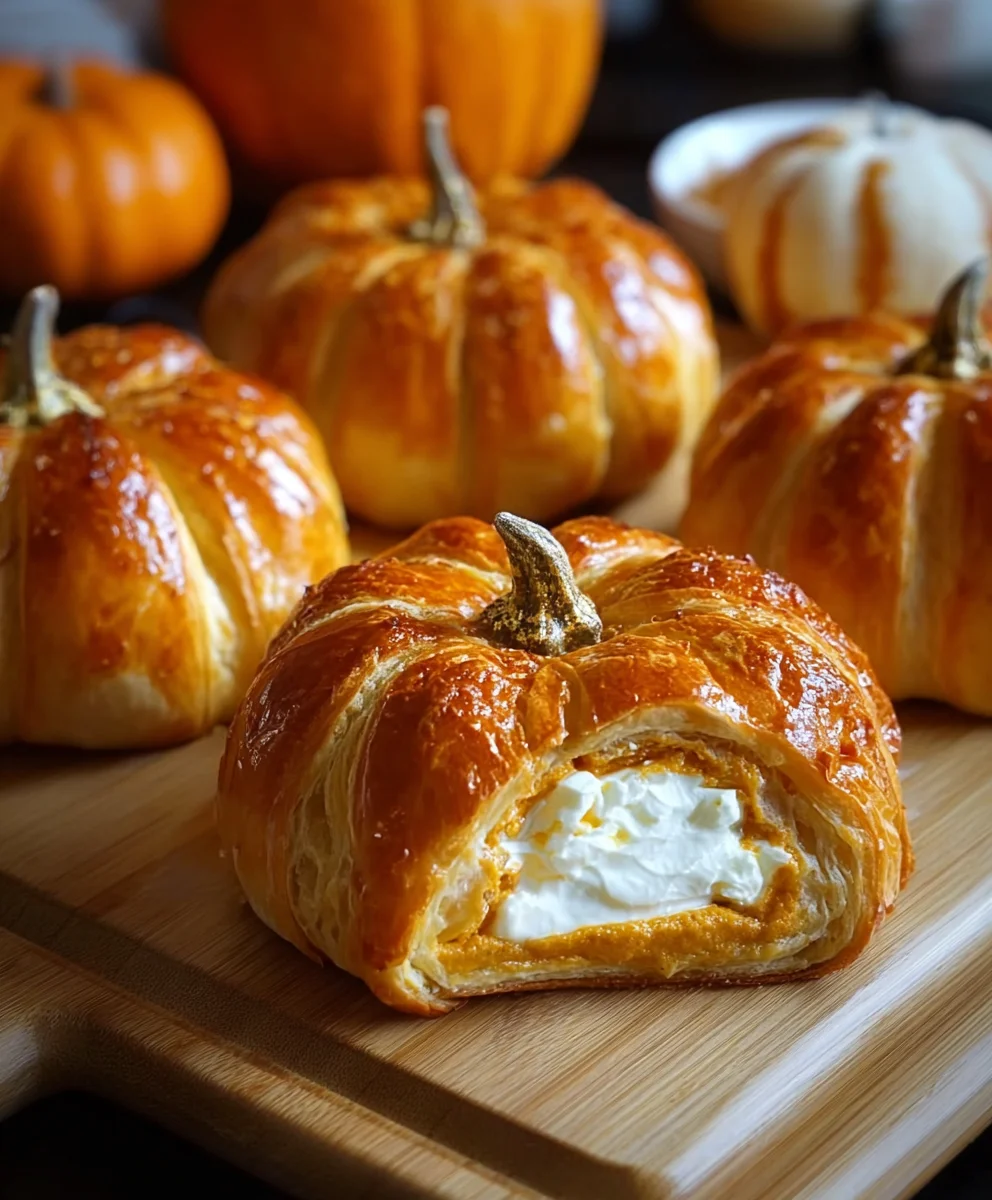
  3. Incorporate the Pumpkin Pie Filling: Now, carefully measure out about 2/3 of your 15-ounce can of pumpkin pie filling. Remember, this is the pre-seasoned and sweetened pumpkin pie filling, not plain pumpkin puree! Gently fold this portion of the pumpkin pie filling into your cream cheese mixture. I prefer to do this by hand with a spatula rather than the electric mixer to avoid overmixing, which can sometimes make the filling too thin. Mix until just combined and there are no streaks of plain cream cheese visible. The mixture should be a lovely pale orange color, thick, and wonderfully fragrant with those warming fall spices.
  4. Taste and Adjust: This is my favorite part! Take a tiny spoonful and give it a taste. Do you prefer it a little sweeter? Add another teaspoon of granulated sugar. Want a stronger spice kick? Sprinkle in a tiny bit more pumpkin pie spice. This is your chance to customize the flavor profile to your liking. Once you’re happy with the taste, set the filling aside. If your kitchen is particularly warm and the filling seems a bit too soft, you can pop it in the refrigerator for 15-20 minutes to firm up slightly, which will make it easier to handle during assembly.
  5. Prepare for Assembly: While our filling is ready, let’s get our baking environment set up. Preheat your oven to 375°F (190°C). Line a large baking sheet with parchment paper or a silicone baking mat. This step is a lifesaver, preventing sticking and making cleanup a breeze. Having everything prepared beforehand makes the assembly process smooth and enjoyable.

Assembling the Crescent Pumpkins

This is where the magic happens, turning simple crescent roll dough into charming little Crescent Pumpkins With Cream Cheese And Pumpkin Pie Filling. The shaping process is quite forgiving, so don’t worry if your first few aren’t perfectly uniform – they’ll still be absolutely delicious!

  1. Unroll the Crescent Dough: Carefully unroll one can of refrigerated crescent roll dough onto your prepared baking sheet or a clean, lightly floured surface. You’ll notice the dough is typically perforated into 8 triangles. Gently separate these triangles along the perforations. Be mindful not to stretch the dough too much as you separate them, as we want to maintain their original shape as much as possible for easier rolling.
  2. Portion the Filling: For each crescent triangle, you’ll want approximately 1 to 1.5 tablespoons of the cream cheese pumpkin filling. Don’t be tempted to overfill, as this can lead to the filling oozing out during baking, making a bit of a mess. It’s better to have slightly less filling and a well-sealed “pumpkin” than an overflowing one.
  3. Place the Filling: Take one separated crescent triangle. Place a dollop of the filling onto the wider, unperforated end of the triangle. Spread it gently in a small log shape, leaving a small margin along the edges to ensure you can seal the dough effectively. You don’t want the filling to go all the way to the very edge of the dough.
  4. Roll and Shape: Now for the fun part!
    1. Starting from the wider end where the filling is, carefully roll the crescent dough upwards towards the pointed tip. Try to keep the roll relatively snug, tucking in any filling that tries to escape.
    2. Once you’ve rolled it into a crescent shape, gently take the two ends of the rolled crescent and bring them towards each other, curving them slightly to form a more enclosed, rounded shape – much like a pumpkin or a small snail shell. Press the ends together lightly to help them adhere.
    3. Next, gently flatten the top and bottom of your rounded crescent just a tiny bit with your fingers. This gives it a flatter base and top, enhancing the “pumpkin” illusion.
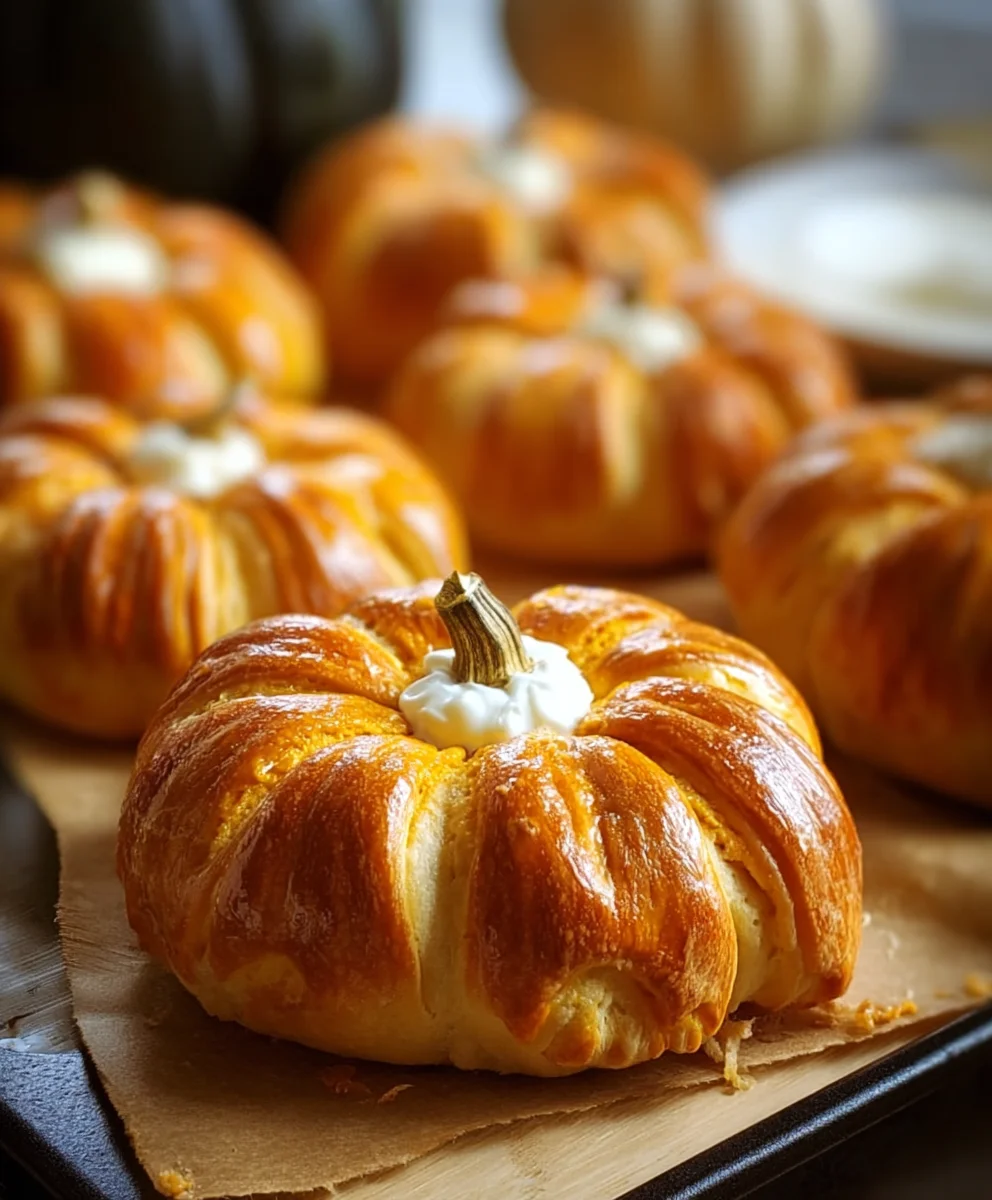
    4. Finally, to create those iconic pumpkin ridges, you can very gently use the side of your finger or a thin, blunt knife to press small indentations around the sides of your shaped crescent. Don’t press too hard, just enough to suggest the segments of a pumpkin. This step really helps sell the “Crescent Pumpkins” name!
  5. Arrange on Baking Sheet: Place each shaped “pumpkin” onto your parchment-lined baking sheet, making sure to leave about 1 to 2 inches of space between each one. This allows them room to puff up and spread slightly without merging into one giant pumpkin blob during baking. Repeat this process with the remaining crescent dough triangles and filling from the first can.
  6. Egg Wash Application (Optional, but Recommended): In a small bowl, lightly beat your large egg. Using a pastry brush, gently brush the top and sides of each assembled crescent pumpkin with the beaten egg. This egg wash isn’t just for looks; it helps create that beautiful, glossy golden-brown crust and contributes to a slightly crisper exterior, adding another layer of texture to our delicious treat.
  7. Repeat for Second Can: If your baking sheet isn’t large enough for all 16 crescent pumpkins, you may need to use a second baking sheet or bake them in batches. If baking in batches, keep the second can of crescent dough in the refrigerator until you’re ready to unroll it. You want the dough to stay cool and firm for easier handling. Remember to apply the egg wash to the second batch as well.

Baking the Crescent Pumpkins

Now comes the aroma-filling part! Baking our Crescent Pumpkins With Cream Cheese And Pumpkin Pie Filling will fill your kitchen with the most delightful scents of warm pastry and autumn spices. Patience is key here, but the wait is absolutely worth it!

  1. Preheat and Bake: Your oven should already be preheated to 375°F (190°C) from our earlier preparation steps. Carefully transfer your baking sheet(s) with the assembled crescent pumpkins into the preheated oven. Place them on the middle rack for optimal, even heat distribution.
  2. Bake Until Golden: Bake for 12 to 15 minutes. The exact baking time can vary slightly depending on your oven, so keep a close eye on them. You’re looking for the crescent pumpkins to become beautifully puffed up and achieve a rich, golden-brown color on their tops and bottoms. The egg wash will contribute significantly to this lovely hue.
  3. Rotate for Evenness (Optional but Recommended): Around the halfway mark (after about 6-7 minutes), if you notice that one side of your baking sheet is browning faster than the other, you can carefully rotate the baking sheet 180 degrees. This helps ensure that all your Crescent Pumpkins bake evenly and achieve that consistent golden perfection across the entire batch.
  4. Check for Doneness: If you’re unsure, you can gently lift one with a spatula to check the underside – it should also be golden brown. The filling inside will be hot and slightly bubbling, indicating it’s thoroughly cooked through. The pastry itself should be flaky and light.
  5. Cooling Process: Once your Crescent Pumpkins are perfectly golden and baked to perfection, carefully remove the baking sheet from the oven. Allow them to cool on the baking sheet for about 5 minutes. This initial cooling period helps them firm up slightly, making them easier to transfer without breaking.
  6. Transfer to Wire Rack: After the initial cooling period on the baking sheet, carefully transfer the warm crescent pumpkins to a wire cooling rack. This is a crucial step! Cooling them on a wire rack allows air to circulate all around them, preventing the bottoms from becoming soggy due to trapped steam. Let them cool completely before glazing, or at least until they are just slightly warm to the touch. This typically takes about 20-30 minutes. If you try to glaze them while they’re too hot, the glaze will simply melt and run off, making for a messy rather than perfectly adorned treat.

Making the Pumpkin Glaze and Finishing Touches

The final flourish! This delightful pumpkin glaze not only adds another layer of flavor but also gives our Crescent Pumpkins With Cream Cheese And Pumpkin Pie Filling a beautiful, professional finish. And of course, we’ll talk about those cute garnishes!

  1. Prepare the Glaze Base: In a small bowl, combine the 1 cup of sifted powdered sugar with the remaining 1/3 of the 15-ounce can of pumpkin pie filling. Sifting the powdered sugar beforehand is a small but mighty step that prevents any annoying lumps in your glaze, ensuring a perfectly smooth and flowing consistency.
  2. Achieve Desired Consistency: Begin by adding 2 tablespoons of milk or heavy cream to the mixture. Whisk everything together thoroughly with a small whisk or a fork until it’s completely smooth and free of lumps. At this point, assess the consistency. We’re aiming for a glaze that is thick enough to coat the back of a spoon but still thin enough to drizzle beautifully. If it seems too thick, add the remaining tablespoon of milk or cream, a tiny splash at a time, whisking well after each addition until you reach your desired drizzling consistency. Remember, it’s much easier to add more liquid than to thicken it up, so go slowly!
  3. Taste Test the Glaze: Just like with the filling, give your glaze a quick taste. It should be sweet with a distinct pumpkin flavor. If you want a little more spice kick, you could add a tiny pinch of extra pumpkin pie spice to the glaze as well.
  4. Glazing the Crescent Pumpkins: Once your Crescent Pumpkins are cooled (at least to a barely warm temperature), it’s time to glaze them. You have a couple of options here:
    1. Drizzling Method: For an elegant look, use a spoon to drizzle the glaze decoratively back and forth over the tops of each pumpkin. The crisscross pattern often looks very appealing.
    2. Spreading Method: For a more substantial coating, you can use a small offset spatula or the back of a spoon to spread a thin, even layer of glaze over the entire top surface of each crescent pumpkin. This method ensures every bite is infused with that lovely pumpkin glaze.

    Let any excess glaze drip off, and allow the glaze to set for about 10-15 minutes before serving or adding garnishes.

  5. Add Optional Garnishes: This is where you can really make your Crescent Pumpkins pop visually!
    • Pecan Halves: While the glaze is still slightly wet, gently press a pecan half onto the top of each glazed pumpkin. This adds a lovely nutty crunch and a beautiful aesthetic.
    • Pretzel Stems: For an undeniably adorable touch, break small pretzel sticks into 1-inch pieces and gently insert one into the top of each pumpkin, where a stem would naturally be. This adds a playful, rustic charm and a hint of salty contrast.
    • Extra Spice: A very light dusting of extra pumpkin pie spice or ground cinnamon over the glaze can add another layer of visual appeal and aromatic warmth.
  6. Serving Suggestions: Your Crescent Pumpkins With Cream Cheese And Pumpkin Pie Filling are now ready to be enjoyed! They are absolutely fantastic served slightly warm, allowing the filling to be wonderfully soft and comforting. They also hold up beautifully at room temperature, making them perfect for potlucks, brunches, or an autumn-themed dessert spread. I love them with a cup of hot coffee or tea on a crisp morning!
  7. Storage: If you happen to have any leftovers (a rare occurrence in my house!), store them in an airtight container in the refrigerator for up to 3-4 days. While they are best enjoyed fresh, you can gently warm them in the microwave for 10-15 seconds or a low oven for a few minutes to bring back some of their initial warmth and tenderness.

Easy Cream Cheese Crescent Pumpkins: Delicious Fall Dessert

Conclusion:

As we wrap up our culinary journey with this delightful recipe, I truly hope you’re feeling as inspired and eager to get baking as I am! This isn’t just another seasonal treat; it’s a meticulously crafted symphony of flavors and textures designed to bring comfort and joy to your table. From the very first flaky bite, you’ll understand why I can’t stop raving about it. The golden-brown exterior of the crescent roll, baked to airy perfection, provides the ideal contrast to the rich, creamy, and wonderfully spiced interior. It’s that exquisite blend of a tender, buttery crust with a lusciously smooth filling that elevates this dessert from simple to absolutely unforgettable. Trust me when I say, the ease of preparation belies the sophisticated taste it delivers, making it an absolute triumph for both novice bakers and seasoned kitchen enthusiasts alike. It’s a recipe that promises to deliver a smile with every single serving, a true testament to the magic that happens when simple ingredients come together in perfect harmony.

What makes this particular recipe an undeniable must-try, you ask? Well, it’s the ingenious combination that truly sets it apart. We’re not just making pumpkin pastries; we’re crafting a dessert that marries the convenience and delightful texture of store-bought crescent rolls with a homemade, heartwarming filling that’s bursting with the quintessential flavors of autumn. The creamy tang of the cream cheese filling provides a brilliant counterpoint to the sweet, spiced warmth of the pumpkin pie filling. It’s a balance that prevents any single flavor from overwhelming the palate, ensuring each bite is perfectly harmonious. This is the kind of treat that effortlessly transforms a regular afternoon coffee into a special occasion, or a simple family dinner into a celebratory feast. It’s festive enough for holiday gatherings but simple enough for a cozy weekend indulgence. It’s also incredibly versatile, appealing to a wide range of tastes, making it a reliable crowd-pleaser that will have everyone asking for the recipe.

Elevate Your Experience: Serving Suggestions & Creative Variations

While these delicious pastries are absolutely fantastic straight out of the oven, warm and fragrant, there are so many ways to customize and enhance your experience. For a truly decadent treat, I highly recommend serving them with a generous dollop of freshly whipped cream, perhaps infused with a hint of vanilla or maple syrup. Alternatively, a scoop of premium vanilla bean ice cream melting slightly over the warm pastry creates an incredible hot-and-cold sensation that is simply divine. A light dusting of powdered sugar or a sprinkle of cinnamon sugar just before serving adds a beautiful aesthetic touch and an extra layer of sweetness. For those with a sweet tooth, a drizzle of warm caramel sauce or a thin glaze made from powdered sugar and a splash of milk or cream cheese provides an extra dimension of richness that is utterly irresistible.

But don’t stop there! The beauty of this recipe lies in its adaptability. You can easily put your own unique spin on it. Consider stirring in a handful of finely chopped pecans or walnuts into the pumpkin pie filling for an added textural crunch and nutty flavor. A little extra spice, like a pinch of ground ginger, cloves, or even a touch of cardamom, can deepen the autumnal essence. For a chocolate lover’s twist, try folding in some mini chocolate chips into the cream cheese layer before spreading it – the combination of pumpkin, cream cheese, and chocolate is surprisingly delightful! If you’re feeling adventurous, a simple cream cheese glaze (powdered sugar, a touch of softened cream cheese, and a bit of milk) drizzled over the baked pastries once cooled can add another layer of creamy sweetness. And remember, you can always adjust the level of sweetness in the pumpkin pie filling to suit your preference, adding a touch more brown sugar or maple syrup if you desire a sweeter outcome. The possibilities for creative expression are truly endless, allowing you to tailor this recipe perfectly to your taste.

Your Turn: Try the Crescent Pumpkins With Cream Cheese And Pumpkin Pie Filling!

Now, it’s your turn to experience the magic! I truly hope I’ve convinced you to give this incredible recipe a try. Imagine the aroma filling your kitchen as these golden beauties bake, the anticipation building with every passing minute. There’s something incredibly satisfying about creating something so delicious with your own hands, especially when the results are as spectacular as these. So, gather your ingredients, set aside a little time, and embark on this delicious baking adventure. I promise you, you won’t regret it. The flaky, buttery crust combined with the luscious, spiced filling makes the Crescent Pumpkins With Cream Cheese And Pumpkin Pie Filling an absolute triumph that you’ll want to make again and again.

I am genuinely excited for you to discover the joy of making and tasting these delightful treats. And once you do, I would absolutely love to hear about your experience! Did you stick to the original recipe, or did you venture into some of the suggested variations? What did your family and friends think? Did you serve them with whipped cream or ice cream? Please don’t hesitate to share your thoughts, your successes, and even your creative modifications in the comments section below. Tag me in your photos on social media – I adore seeing your culinary creations come to life! Your feedback and shared experiences inspire me and our entire community. So go ahead, preheat that oven, embrace the wonderful flavors of the season, and let’s make some unforgettable memories in the kitchen together. Happy baking!


Easy Cream Cheese Crescent Pumpkins: Delicious Fall Dessert

Easy Cream Cheese Crescent Pumpkins: Delicious Fall Dessert

Crescent Pumpkins With Cream Cheese And Pumpkin Pie Filling is a delightful celebration of autumn’s most beloved flavors, nestled within a convenient, flaky package. These treats balance a melt-in-your-mouth crust with a rich, spiced interior.

Prep Time
30 Minutes

Cook Time
15 Minutes

Total Time
30 Minutes

Servings
8 servings

Ingredients

  • 1 (8 oz.) can refrigerated crescent rolls
  • 5 oz. softened cream cheese
  • 2 tablespoons sugar
  • 1 teaspoon vanilla extract
  • ¾ cup pumpkin puree
  • 1 tablespoon corn starch
  • 2 tablespoons packed light-brown sugar
  • 2 tablespoons granulated sugar
  • ¾ teaspoon ground cinnamon
  • ¼ teaspoon ground ginger
  • ¼ teaspoon nutmeg
  • 1/8 teaspoon allspice
  • 1 egg yolk
  • ½ teaspoon vanilla extract
  • 2 ½ tablespoons melted butter
  • 1 large egg, beaten (for egg wash, optional)

Instructions

  1. Step 1
    In a medium bowl, combine ¾ cup pumpkin puree, 1 tablespoon corn starch, 2 tablespoons light-brown sugar, 2 tablespoons granulated sugar, ¾ teaspoon ground cinnamon, ¼ teaspoon ground ginger, ¼ teaspoon nutmeg, 1/8 teaspoon allspice, 1 egg yolk, ½ teaspoon vanilla extract, and 2 ½ tablespoons melted butter. Mix thoroughly until well combined and smooth. Set this mixture aside.
  2. Step 2
    In a separate medium-sized mixing bowl, beat 5 oz. softened cream cheese with 2 tablespoons sugar and 1 teaspoon vanilla extract using an electric mixer on medium speed until completely smooth and light, about 2-3 minutes. Scrape down the sides of the bowl frequently to ensure even incorporation.
  3. Step 3
    Gently fold the prepared spiced pumpkin puree mixture into the cream cheese mixture using a spatula until just combined and no streaks of plain cream cheese are visible. Taste and adjust sweetness or spice if desired. If the filling seems too soft, you can refrigerate it for 15-20 minutes to firm up slightly.
  4. Step 4
    Preheat oven to 375°F (190°C). Line a large baking sheet with parchment paper. Unroll the can of crescent roll dough and separate it into 8 triangles. Place 1 to 1.5 tablespoons of the combined cream cheese pumpkin filling onto the wider end of each triangle. Roll the dough upwards towards the pointed tip. Bring the two ends of the rolled crescent towards each other to form a rounded shape, pressing gently to adhere. Lightly flatten the top and bottom, then gently press small indentations around the sides to create pumpkin-like ridges. Place on the prepared baking sheet, leaving 1-2 inches of space between each.
  5. Step 5
    If using, gently brush the top and sides of each assembled crescent pumpkin with the beaten egg wash. Transfer the baking sheet to the preheated oven and bake for 12 to 15 minutes, or until the crescent pumpkins are beautifully puffed up and achieve a rich, golden-brown color. For even baking, you may rotate the baking sheet halfway through. Remove from oven and cool on the baking sheet for 5 minutes, then transfer to a wire cooling rack to cool completely before serving.

Important Information

Nutrition Facts (Per Serving)

It is important to consider this information as approximate and not to use it as definitive health advice.

Allergy Information

Please check ingredients for potential allergens and consult a health professional if in doubt.

« Previous Post
Warm Up with Best Creamy Spicy Jalapeno Popper Chicken Soup
Next Post »
Amazing Beef Main Dish: Easy Non-Alcoholic Meal Idea

If you enjoyed this…

Healthy Cookie Dough Bark: A Guilt-Free Dessert Recipe

Delicious Snowman Peanut Butter Cookies Recipe for Winter Fun!

Key Lime Pound Cake: The Ultimate Recipe for a Tangy Dessert

Primary Sidebar

Browse by Diet

BreakfastDinnerLunchDessertAppetizer

Sweet Peach Yogurt Parfait Delight

One of my fondest memories is from a lazy summer afternoon spent at my grandmother’s house. The sun filtered through the kitchen window, casting a warm glow over the table where she would create her culinary magic. It was during one of those blissful moments that I first tasted her Peach Yogurt Parfait with Honey and Granola. The sweet aroma of ripe peaches mingling with creamy yogurt and the crunch of granola was nothing short of heavenly. It felt like summer captured in a bowl, and I still remember the joy of diving in with a spoon, each layer revealing a new burst of flavor.

When I think about that parfait, I can almost hear the gentle hum of the bees outside, reminding me of the floral notes that honey brings to every bite. The vibrant yellows and soft oranges of the peaches contrast beautifully with the creamy white yogurt and the golden crunch of granola. It’s a dish that not only looks delightful but also tastes like a celebration of fresh, wholesome ingredients.

What makes my version of this Peach Yogurt Parfait special is the careful balance of flavors and textures. I use ripe, juicy peaches, drizzled with locally sourced honey, and a homemade granola that’s bursting with nuts and seeds for an extra crunch. It’s a simple dish, but every layer is crafted with love and attention.

Let me show you exactly how to make this delightful parfait, so you can bring a bit of that summer magic into your kitchen!

Sweet Peach Yogurt Parfait Delight

Why You’ll Love This Recipe

  • Delightfully creamy texture from the Greek yogurt, paired with the juicy sweetness of fresh peaches.
  • Ready in under 20 minutes, making it a quick and satisfying breakfast or snack option.
  • Budget-friendly, using common ingredients that you may already have in your pantry.
  • Customizable with your favorite granola and nuts, allowing you to tailor each parfait to your taste.
  • Perfectly balanced flavors with the bright acidity of lemon juice and the sweetness of honey enhancing the peaches.

Ingredients

  • For the Parfait:
  • 2 cups plain Greek yogurt (or vanilla yogurt for a sweeter option)
  • 2 large ripe peaches, diced (about 2 cups)
  • 1 tablespoon fresh lemon juice (to prevent browning of peaches)
  • 2 tablespoons honey (plus more for drizzling)
  • 1 teaspoon vanilla extract (optional for extra flavor)
  • For the Granola:
  • 1 cup granola (store-bought or homemade; see notes for a simple granola recipe)
  • 1/4 cup sliced almonds (optional for added crunch)
  • 1/4 cup shredded coconut (optional for added flavor)

Let’s dive into some key ingredients that make this Peach Yogurt Parfait so delightful! First, the Greek yogurt is not only creamy but also packed with protein, making it a satisfying option for breakfast or a snack. If you’re looking for a sweeter option, you can easily substitute it with vanilla yogurt, though it may alter the overall flavor balance. Next, the ripe peaches are the star of the show; their natural sweetness shines through, so I recommend choosing peaches that yield slightly to pressure, indicating they’re perfectly ripe. If peaches aren’t in season, feel free to use nectarines or even frozen peaches—just thaw them before use. Finally, honey adds a lovely floral sweetness that ties everything together. If you prefer, maple syrup can serve as a delicious substitute.

Step-by-Step Instructions

  1. Start by preparing the peaches. Wash them thoroughly, then slice and dice them into bite-sized pieces. In a medium bowl, toss the diced peaches with 1 tablespoon of fresh lemon juice to prevent browning. Set aside for about 5 minutes while the lemon juice works its magic.
  2. In a separate bowl, combine the Greek yogurt, 2 tablespoons of honey, and 1 teaspoon of vanilla extract if using. Stir the mixture until smooth and thoroughly blended. This should take about a minute. Avoid overmixing to maintain the creaminess of the yogurt.
  3. Now it’s time to layer your parfait. Grab a clear glass or bowl to showcase your beautiful creation. Start with a generous spoonful of the yogurt mixture at the bottom—about 1/4 cup will do. Use a spoon to spread it evenly.
  4. Add a layer of the diced peaches over the yogurt, ensuring they cover the yogurt completely. You might want to use about half of what you have prepared—roughly 1 cup. This layer should be visually appealing, so arrange the peaches neatly.
  5. Sprinkle 1/4 cup of granola over the peaches. This adds a delightful crunch. Make sure to distribute it evenly to ensure every bite has that satisfying texture. Avoid packing it down too tightly, as you want it to maintain its crunch.
  6. Repeat the layers: spoon in another 1/4 cup of yogurt, followed by another cup of peaches, and another sprinkle of granola. You should have at least two layers, but feel free to add more depending on your glass size.
  7. Finish off your parfait with a drizzle of honey on top for added sweetness and a touch of elegance. If you’re using sliced almonds or shredded coconut, sprinkle them on top now. It adds a lovely visual contrast and extra flavor.
  8. Serve immediately or refrigerate for up to 30 minutes before serving to allow the flavors to meld together. However, I recommend enjoying it fresh to maintain the granola’s crunch.

Pro Tips for the Best Peach Yogurt Parfait With Honey And Granola

  • Make sure to choose ripe peaches for the best flavor and texture. A common mistake is using unripe fruit, which can lead to a less enjoyable parfait. Look for peaches that are fragrant and slightly soft to the touch.
  • Use a clear glass to assemble your parfait; this not only makes for a beautiful presentation but also allows you to see the colorful layers, which adds to the enjoyment of eating it.
  • For an even creamier texture, consider whipping the Greek yogurt with a hand mixer for a couple of minutes before layering. This small adjustment makes a huge difference in mouthfeel.
  • Be mindful of the granola-to-yogurt ratio. Too much granola can overwhelm the parfait, while too little can make it feel too creamy. Aim for about 1/4 cup of granola per layer for the perfect balance.
  • If you’re making this for a gathering, consider preparing the yogurt and peaches ahead of time and layering them just before serving. This ensures the granola stays crunchy!

Variations & Serving Ideas

There are so many ways to get creative with your Peach Yogurt Parfait! For a tropical twist, swap out the peaches for mangoes or pineapples and top with coconut flakes. If you prefer a berry flavor, mix in some blueberries or strawberries with the peaches for added color and taste. For a nutty version, incorporate chopped walnuts or pecans instead of almonds.

As for serving ideas, this parfait pairs beautifully with a side of scrambled eggs for a hearty breakfast or fresh fruit salad for a light lunch. You might also enjoy it alongside whole grain toast with almond butter for an energizing snack. The contrast of flavors and textures will elevate your meal experience!

Storage, Make-Ahead & Reheating

The Peach Yogurt Parfait is best enjoyed fresh, but you can prepare some components ahead of time. Store the layered parfait in an airtight container in the refrigerator for up to 24 hours. However, be cautious; the granola may lose its crunch if stored too long. You can freeze the yogurt and peach mixture for up to 2 months; just remember to thaw it in the refrigerator overnight before serving.

If you plan to enjoy this dish the next day, it can taste even better as the flavors meld together. Just remember to add the granola right before serving to keep its delightful crunch!

Frequently Asked Questions

Can I make Peach Yogurt Parfait With Honey And Granola ahead of time?

Yes — in fact, it tastes even better the next day as the flavors meld. However, I recommend waiting to add the granola until just before serving to maintain its crunch.

What can I substitute for Greek yogurt?

If you prefer a lighter option, you can substitute Greek yogurt with regular yogurt or a dairy-free alternative like coconut yogurt. Just remember that this may alter the creaminess and flavor profile slightly.

Can I use frozen peaches for this parfait?

Absolutely! Just make sure to thaw the frozen peaches before using them. They will still add great flavor, though the texture may be slightly softer than fresh peaches.

How do I make the parfait vegan?

To make a vegan version, substitute the Greek yogurt with a plant-based yogurt alternative, and replace honey with maple syrup or agave nectar. This keeps the parfait sweet while adhering to a vegan diet.

What other fruits can I use in this recipe?

You can mix and match fruits based on your preference. Try using strawberries, blueberries, raspberries, or even bananas. Just make sure to adjust the lemon juice as needed to prevent browning.

Sweet Peach Yogurt Parfait Delight

Final Thoughts

The Peach Yogurt Parfait with Honey and Granola is a delightful blend of creamy yogurt, sweet peaches, and crunchy granola that creates a satisfying and nourishing treat. Each layer bursts with flavor, making it a perfect choice for breakfast or a light dessert.

This is the kind of recipe I come back to again and again, especially when I want something refreshing and wholesome to start my day. The harmony of sweet and tart flavors, combined with the delightful crunch, never fails to lift my spirits!

I encourage you to give this parfait a try and indulge in its comforting goodness. Feel free to share your results or even add your own twist—perhaps a sprinkle of cinnamon or a handful of nuts. Enjoy creating your perfect parfait!

Print
clock clock iconcutlery cutlery iconflag flag iconfolder folder iconinstagram instagram iconpinterest pinterest iconfacebook facebook iconprint print iconsquares squares iconheart heart iconheart solid heart solid icon

Peach Yogurt Parfait


  • Author: Lily author
  • Total Time: 15 minutes
  • Yield: 4 servings 1x
Pin Recipe
Print Recipe

Description

This Peach Yogurt Parfait combines creamy Greek yogurt, juicy peaches, and crunchy granola for a delightful treat. It’s a perfect breakfast or snack that captures the essence of summer in every bite.


Ingredients

Scale
  • For the Parfait:
  • 2 cups plain Greek yogurt (or vanilla yogurt for a sweeter option)
  • 2 large ripe peaches, diced (about 2 cups)
  • 1 tablespoon fresh lemon juice (to prevent browning of peaches)
  • 2 tablespoons honey (plus more for drizzling)
  • 1 teaspoon vanilla extract (optional for extra flavor)
  • For the Granola:
  • 1 cup granola (store-bought or homemade; see notes for a simple granola recipe)
  • 1/4 cup sliced almonds (optional for added crunch)
  • 1/4 cup shredded coconut (optional for added flavor)

Instructions

  1. Start by preparing the peaches. Wash them thoroughly, then slice and dice them into bite-sized pieces. In a medium bowl, toss the diced peaches with 1 tablespoon of fresh lemon juice to prevent browning. Set aside for about 5 minutes while the lemon juice works its magic.
  2. In a separate bowl, combine the Greek yogurt, 2 tablespoons of honey, and 1 teaspoon of vanilla extract if using. Stir the mixture until smooth and thoroughly blended. This should take about a minute. Avoid overmixing to maintain the creaminess of the yogurt.
  3. Now it’s time to layer your parfait. Grab a clear glass or bowl to showcase your beautiful creation. Start with a generous spoonful of the yogurt mixture at the bottom—about 1/4 cup will do. Use a spoon to spread it evenly.
  4. Add a layer of the diced peaches over the yogurt, ensuring they cover the yogurt completely. You might want to use about half of what you have prepared—roughly 1 cup. This layer should be visually appealing, so arrange the peaches neatly.
  5. Sprinkle 1/4 cup of granola over the peaches. This adds a delightful crunch. Make sure to distribute it evenly to ensure every bite has that satisfying texture. Avoid packing it down too tightly, as you want it to maintain its crunch.
  6. Repeat the layers: spoon in another 1/4 cup of yogurt, followed by another cup of peaches, and another sprinkle of granola. You should have at least two layers, but feel free to add more depending on your glass size.
  7. Finish off your parfait with a drizzle of honey on top for added sweetness and a touch of elegance. If you’re using sliced almonds or shredded coconut, sprinkle them on top now. It adds a lovely visual contrast and extra flavor.
  8. Serve immediately or refrigerate for up to 30 minutes before serving to allow the flavors to meld together. However, I recommend enjoying it fresh to maintain the granola’s crunch.
  • Prep Time: 15 mins
  • Cook Time: 0 mins
  • Category: Breakfast
  • Method: No-cook
  • Cuisine: American

Nutrition

  • Serving Size: 1 parfait
  • Calories: 250
  • Sugar: 20 g
  • Sodium: 50 mg
  • Fat: 5 g
  • Saturated Fat: 2 g
  • Unsaturated Fat: 3 g
  • Trans Fat: 0 g
  • Carbohydrates: 40 g
  • Fiber: 3 g
  • Protein: 10 g
  • Cholesterol: 10 mg

Keywords: Choose ripe peaches for the best flavor and texture. Use a clear glass for a beautiful presentation. For creaminess, consider whipping the yogurt before layering. Be mindful of the granola-to-yogurt ratio. Prepare yogurt and peaches ahead of time for gatherings, layering just before serving.

Did you make this recipe?

Share a photo and tag us — we can't wait to see what you've made!

Sun-Kissed Frozen Orange Cream Slush

As a child, summer days felt like they lasted forever. I remember the sticky heat wrapping around me as I played outside, my laughter mingling with the sounds of the neighborhood. But nothing could cool me down quite like the moment I’d spot my grandmother, laboring over her blender, whipping up her famous Frozen Orange Creamsicle Slush. That vibrant orange treat, with its frosty texture and sweet citrus aroma, was like a burst of sunshine in a cup. Just one sip, and I could feel the coolness wash over me, sparking pure joy.

This Frozen Orange Creamsicle Slush has a way of making you feel like a kid again. Its creamy, dreamy consistency is a delightful balance of bright orange and soft vanilla, inviting you to dive right in. The refreshing tang of orange dances on your tongue, while the smooth creaminess envelops you in a comforting embrace. It’s a nostalgic treat that’s perfect for hot summer afternoons or anytime you need a little pick-me-up.

What makes my version of this slush stand out is the addition of a hint of vanilla bean, which elevates the flavor and adds an extra layer of richness. Plus, it’s super easy to whip up with just a few simple ingredients that you probably already have on hand! So, if you’re ready to relive those sun-soaked memories, let me show you exactly how to make it.

Sun-Kissed Frozen Orange Cream Slush

Why You’ll Love This Recipe

  • Each slush is a perfect blend of creamy vanilla and zesty orange, creating a nostalgic flavor reminiscent of summer days.
  • This refreshing treat is ready in under 15 minutes, making it an ideal quick dessert for unexpected guests or hot afternoons.
  • With just 8 simple ingredients, it’s budget-friendly, ensuring you don’t have to break the bank to enjoy a delicious slush.
  • The slush has a perfectly smooth texture, thanks to the combination of ice and ice cream, providing a delightful contrast to the bright citrus flavors.
  • It’s highly customizable; you can easily adjust the sweetness and add fresh herbs for a unique twist that suits your taste.

Ingredients

  • 2 cups orange juice (freshly squeezed or store-bought)
  • 1 cup vanilla ice cream
  • 1 cup crushed ice
  • 1/2 cup milk (whole or 2%)
  • 1/4 cup granulated sugar (adjust based on sweetness preference)
  • 1 teaspoon vanilla extract
  • Zest of 1 orange (for added flavor)
  • Fresh orange slices and mint leaves (for garnish)

The star of this Frozen Orange Creamsicle Slush is the orange juice, which provides the vibrant, citrusy base. Freshly squeezed juice will yield the brightest flavor, but store-bought options can be just as convenient. If you’re opting for store-bought, choose 100% pure juice with no added sugars for the best results. Another essential ingredient is the vanilla ice cream; it adds creaminess and sweetness. You can substitute it with dairy-free ice cream if you’re looking for a vegan option. Whole or 2% milk complements the ice cream, creating a smooth blend. If you want a lower-calorie version, almond or oat milk can be good alternatives.

Lastly, the granulated sugar can be adjusted based on your sweetness preference. If you prefer a more natural sweetener, consider using honey or agave syrup. The orange zest enhances the flavor profile, providing an aromatic pop that brings the whole slush together. Don’t skip it! It adds an extra layer of brightness that makes this slush truly special.

Step-by-Step Instructions

  1. Start by preparing your ingredients. Gather 2 cups of orange juice, 1 cup of vanilla ice cream, and 1 cup of crushed ice. Make sure the ice is finely crushed, as larger chunks can make blending difficult.
  2. In a blender, combine the orange juice, vanilla ice cream, crushed ice, and 1/2 cup of milk. Add 1/4 cup of granulated sugar and 1 teaspoon of vanilla extract. If you like a sweeter slush, consider adding a bit more sugar at this stage.
  3. Add the zest of 1 orange to the blender. This step is crucial for enhancing the citrus flavor of your slush. Make sure not to include the bitter white pith—only the flavorful zest.
  4. Blend the mixture on medium-high speed for about 30-45 seconds. Stop once the ingredients are fully combined and the slush has a smooth, even consistency. If you notice large chunks of ice, blend for an additional 10-15 seconds. Avoid over-blending, as this can make the slush too liquidy.
  5. Once blended, taste the slush. If it needs more sweetness, add a little more sugar and blend for a few more seconds. If it’s too thick, you can add a splash of milk to reach your desired consistency.
  6. Pour the slush into glasses. This recipe typically serves 4, but you can easily double it for larger gatherings. Use a spoon to help guide the slush into the glasses if needed.
  7. Garnish each serving with fresh orange slices and mint leaves. The mint not only adds a pop of color but also a refreshing aroma that complements the citrus flavors beautifully.
  8. Serve immediately and enjoy! If you’ve made extra, you can refrigerate it for a short time, but it’s best enjoyed fresh.

Pro Tips for the Best Frozen Orange Creamsicle Slush

  • Don’t skip the orange zest! It’s a game-changer for flavor. Always zest before juicing to make it easier.
  • Use a high-powered blender for the best texture. A standard blender may struggle with ice, leading to uneven consistency. If you have a food processor, that can work too, but ensure the ice is finely crushed.
  • Adjust the ice-to-liquid ratio carefully. If your slush is too thick, it won’t blend well. Start with less ice and add more until you reach your preferred texture.
  • Be cautious with the sugar! Always start with the lower amount, as you can easily add more, but it’s hard to fix an overly sweet slush.
  • For a fun twist, consider adding a splash of coconut milk or a handful of fresh fruit like strawberries or pineapple. This not only enhances the flavor but also adds a beautiful color contrast.

Variations & Serving Ideas

There are countless ways to put a spin on your Frozen Orange Creamsicle Slush. Consider making a tropical version by adding in some pineapple juice or coconut milk for a delightful tropical twist. If you’re feeling adventurous, try incorporating a handful of frozen mango or peach slices for added sweetness. For a lighter version, swap out the vanilla ice cream for Greek yogurt for a creamy yet tangy alternative.

As for serving ideas, this refreshing slush pairs wonderfully with light summer dishes like grilled chicken skewers, fish tacos, or a simple salad topped with citrus vinaigrette. The bright, zesty flavors of the slush complement these dishes perfectly, making them an ideal pairing for a sunny day.

Storage, Make-Ahead & Reheating

This Frozen Orange Creamsicle Slush is best enjoyed fresh, but if you have leftovers, you can store them in an airtight container in the fridge for up to 2 days. Just keep in mind that the slush may lose some of its texture over time as the ice melts. It doesn’t freeze well, as the ice will turn into a solid block. If you must freeze it, blend again after thawing to restore the slushy consistency. This treat is best the day you make it, as the flavors meld together beautifully overnight, enhancing its deliciousness.

Frequently Asked Questions

Can I make Frozen Orange Creamsicle Slush ahead of time?

Yes — in fact, it tastes even better the next day as the flavors meld. However, it’s best to enjoy it fresh, as the texture can change if stored for too long. If you need to prepare it ahead, keep it in the fridge and re-blend before serving.

What kind of orange juice should I use?

For the best flavor, use freshly squeezed orange juice. However, if you’re short on time, opt for 100% pure store-bought juice without added sugars. This will ensure that your slush remains flavorful and refreshing.

Can I substitute the vanilla ice cream?

Absolutely! If you’re looking for a dairy-free option, coconut milk ice cream or a non-dairy vanilla ice cream can work wonderfully. They will still provide the creamy texture and sweetness you desire.

How can I adjust the sweetness of my slush?

You can easily adjust the sweetness by modifying the amount of sugar added. Start with 1/4 cup and taste the mixture before blending. If you prefer it sweeter, add more sugar gradually until it reaches your desired level.

What should I do if my slush is too thick?

If your slush is too thick, simply add a splash of milk or orange juice and blend again. This will help achieve a more drinkable consistency while maintaining the slushy texture. Adjust gradually to reach your preferred thickness.

Sun-Kissed Frozen Orange Cream Slush

Final Thoughts

The Frozen Orange Creamsicle Slush is a delightful blend of refreshing citrus and creamy goodness, making it a perfect treat for warm days or any time you crave a taste of nostalgia. The way the bright orange flavor dances with the creamy texture truly elevates this slush, transforming it into a satisfying escape from the everyday.

This is the kind of recipe I come back to again and again, especially when I’m looking to cool down or impress guests at a summer gathering. It’s simple to make and always brings smiles all around! I encourage you to try this recipe for yourself—don’t hesitate to share your results or even put your own spin on it. Happy slushing!

Print
clock clock iconcutlery cutlery iconflag flag iconfolder folder iconinstagram instagram iconpinterest pinterest iconfacebook facebook iconprint print iconsquares squares iconheart heart iconheart solid heart solid icon

Frozen Orange Creamsicle Slush


  • Author: Lily author
  • Total Time: 15 minutes
  • Yield: 4 servings 1x
Pin Recipe
Print Recipe

Description

This Frozen Orange Creamsicle Slush is a refreshing treat that combines creamy vanilla and zesty orange flavors. Perfect for hot summer days, it brings back nostalgic memories with every sip.


Ingredients

Scale
  • 2 cups orange juice (freshly squeezed or store-bought)
  • 1 cup vanilla ice cream
  • 1 cup crushed ice
  • 1/2 cup milk (whole or 2%)
  • 1/4 cup granulated sugar (adjust based on sweetness preference)
  • 1 teaspoon vanilla extract
  • Zest of 1 orange (for added flavor)
  • Fresh orange slices and mint leaves (for garnish)

Instructions

  1. Start by preparing your ingredients. Gather 2 cups of orange juice, 1 cup of vanilla ice cream, and 1 cup of crushed ice. Make sure the ice is finely crushed, as larger chunks can make blending difficult.
  2. In a blender, combine the orange juice, vanilla ice cream, crushed ice, and 1/2 cup of milk. Add 1/4 cup of granulated sugar and 1 teaspoon of vanilla extract. If you like a sweeter slush, consider adding a bit more sugar at this stage.
  3. Add the zest of 1 orange to the blender. This step is crucial for enhancing the citrus flavor of your slush. Make sure not to include the bitter white pith—only the flavorful zest.
  4. Blend the mixture on medium-high speed for about 30-45 seconds. Stop once the ingredients are fully combined and the slush has a smooth, even consistency. If you notice large chunks of ice, blend for an additional 10-15 seconds. Avoid over-blending, as this can make the slush too liquidy.
  5. Once blended, taste the slush. If it needs more sweetness, add a little more sugar and blend for a few more seconds. If it’s too thick, you can add a splash of milk to reach your desired consistency.
  6. Pour the slush into glasses. This recipe typically serves 4, but you can easily double it for larger gatherings. Use a spoon to help guide the slush into the glasses if needed.
  7. Garnish each serving with fresh orange slices and mint leaves. The mint not only adds a pop of color but also a refreshing aroma that complements the citrus flavors beautifully.
  8. Serve immediately and enjoy! If you’ve made extra, you can refrigerate it for a short time, but it's best enjoyed fresh.
  • Prep Time: 15 min
  • Cook Time: 0 min
  • Category: Dessert
  • Method: Blending
  • Cuisine: American

Nutrition

  • Serving Size: 1 serving
  • Calories: 200
  • Sugar: 30 g
  • Sodium: 50 mg
  • Fat: 5 g
  • Saturated Fat: 3 g
  • Unsaturated Fat: 2 g
  • Trans Fat: 0 g
  • Carbohydrates: 40 g
  • Fiber: 1 g
  • Protein: 2 g
  • Cholesterol: 20 mg

Keywords: Don't skip the orange zest! It's a game-changer for flavor. Always zest before juicing to make it easier.

Did you make this recipe?

Share a photo and tag us — we can't wait to see what you've made!

Zesty Lemon Poppy Seed Delight

One rainy afternoon, I found myself in my grandmother’s cozy kitchen, the kind that always smelled like warmth and love. She was whipping up her famous Lemon Poppy Seed Loaf, a recipe that had been passed down through generations. As the batter came together, the zesty aroma of fresh lemons filled the air, mingling perfectly with the nutty fragrance of poppy seeds. I can still picture her, apron-clad, as she expertly drizzled a vibrant citrus icing over the loaf, creating a glossy, sun-kissed finish that beckoned us to dive in. It was a moment that sparked my own passion for baking, and this recipe has become a cherished staple in my home ever since.

When you take a bite of this Lemon Poppy Seed Loaf, it’s like a burst of sunshine on your palate. The loaf is beautifully golden, with a tender crumb that melts in your mouth. Each slice is speckled with tiny poppy seeds, adding a delightful crunch that contrasts beautifully with the tangy sweetness of the lemon. And that citrus icing? It’s the finishing touch that elevates this loaf from ordinary to extraordinary, with its bright, zesty flavor dancing on your taste buds.

This recipe stands out because it embraces simplicity while delivering on flavor. I’ve added a hint of vanilla to the batter, enhancing the overall taste and making it even more indulgent. Trust me, once you make this Lemon Poppy Seed Loaf With Citrus Icing, it’ll become a go-to in your baking repertoire.

So, let me show you exactly how to make it!

Zesty Lemon Poppy Seed Delight

Why You’ll Love This Recipe

  • Moist and tender crumb that melts in your mouth, thanks to the perfect balance of butter and buttermilk.
  • Bright, zesty lemon flavor paired with crunchy poppy seeds, creating a delightful texture and taste experience.
  • Easy to whip up in just about an hour, perfect for last-minute gatherings or a cozy afternoon treat.
  • Budget-friendly with everyday ingredients, making it an accessible option for all home bakers.
  • The citrus icing adds a sweet tang that elevates the loaf, turning a simple recipe into a showstopper!

Ingredients

  • 1 ½ cups (190g) all-purpose flour
  • 1 teaspoon baking powder
  • ½ teaspoon baking soda
  • ½ teaspoon salt
  • 3 tablespoons poppy seeds
  • ½ cup (115g) unsalted butter, softened to room temperature
  • 1 cup (200g) granulated sugar
  • 2 large eggs
  • 1 teaspoon vanilla extract
  • 1 teaspoon lemon zest (from about 1 medium lemon)
  • ½ cup (120ml) buttermilk
  • 2 tablespoons fresh lemon juice

For the Citrus Icing:

  • 1 cup (120g) powdered sugar
  • 2 tablespoons fresh lemon juice
  • 1 tablespoon orange juice
  • 1 teaspoon lemon zest (for garnish, optional)

Let’s dive into the key ingredients that make this Lemon Poppy Seed Loaf so special. The all-purpose flour provides the structure and base for the loaf, while the baking powder and baking soda ensure it rises perfectly, giving the loaf a light texture. For a gluten-free variation, you could substitute the flour with a gluten-free all-purpose blend. Poppy seeds not only add a delightful crunch but also contribute to the unique flavor profile that pairs well with the citrus notes.

Unsalted butter is crucial for achieving the buttery richness that makes this loaf so moist. If you’re looking for a dairy-free option, coconut oil or a vegan butter can be used instead. The buttermilk is another essential component, providing acidity that activates the baking soda for a fluffy texture. If you don’t have buttermilk on hand, you can easily make a substitute by mixing ½ cup of milk with 1 tablespoon of vinegar or lemon juice and letting it sit for about 5 minutes.

Step-by-Step Instructions

  1. Preheat your oven to 350°F (175°C). Grease a 9×5-inch loaf pan or line it with parchment paper for easy removal later.
  2. In a medium mixing bowl, whisk together 1 ½ cups of all-purpose flour, 1 teaspoon of baking powder, ½ teaspoon of baking soda, ½ teaspoon of salt, and 3 tablespoons of poppy seeds. This helps to evenly distribute the baking agents and ensures a uniform rise.
  3. In a large mixing bowl, cream together ½ cup of softened unsalted butter and 1 cup of granulated sugar using an electric mixer on medium speed for about 3-4 minutes, until the mixture is light and fluffy. Make sure to scrape down the sides of the bowl occasionally.
  4. Add 2 large eggs, 1 teaspoon of vanilla extract, and 1 teaspoon of lemon zest to the creamed butter and sugar, mixing until fully combined. You want a smooth consistency, so ensure there are no lumps of butter.
  5. In a small bowl, combine ½ cup of buttermilk and 2 tablespoons of fresh lemon juice. Alternately add the dry ingredients and buttermilk mixture to the butter mixture, starting and ending with the dry ingredients. Mix just until combined; do not overmix, as this can lead to a dense loaf.
  6. Pour the batter into the prepared loaf pan. Smooth the top with a spatula, ensuring it’s even. Bake in the preheated oven for 50-60 minutes, or until a toothpick inserted in the center comes out clean. The edges should be lightly golden brown, and the center should feel just set.
  7. Once baked, remove the loaf from the oven and allow it to cool in the pan for about 10 minutes. Then, transfer it to a wire rack to cool completely. Resist the urge to slice too soon, as it will be crumbly if it’s still warm.
  8. While the loaf is cooling, prepare the citrus icing. In a medium bowl, whisk together 1 cup of powdered sugar, 2 tablespoons of fresh lemon juice, and 1 tablespoon of orange juice until smooth. If the icing is too thick, you can add a little more juice to reach your desired consistency.
  9. Once the loaf is completely cool, drizzle the citrus icing over the top. If you like, sprinkle with an additional teaspoon of lemon zest for an extra pop of flavor and color.

Pro Tips for the Best Lemon Poppy Seed Loaf With Citrus Icing

  • Be careful not to overmix your batter; this is a common mistake that can lead to a dense loaf. Mix just until the dry ingredients are incorporated for a light and fluffy texture.
  • Use room temperature ingredients, especially the butter and eggs. This helps to create a smoother batter and ensures even baking. Take your eggs out of the fridge about 30 minutes before you start.
  • For a more pronounced lemon flavor, consider adding a little lemon extract in addition to the zest and juice. Just a half teaspoon can elevate the citrus notes significantly.
  • When measuring your flour, spoon it into the measuring cup and level it off with a knife instead of scooping directly from the bag. This prevents packing and ensures you don’t end up with a dry loaf.
  • Invest in a good quality loaf pan; it makes a difference in heat distribution, which ensures even baking. If your pan is dark-coated, reduce the oven temperature by 25°F to prevent over-browning.

Variations & Serving Ideas

For a delightful twist, consider adding blueberries or raspberries to the batter for a fruity burst of flavor. You can also experiment with different citrus fruits—try lime or grapefruit zest and juice for a refreshing change. For a healthier option, substitute half of the all-purpose flour with whole wheat flour for added fiber without compromising too much on texture.

This Lemon Poppy Seed Loaf pairs beautifully with a light salad, such as a mixed greens salad with a vinaigrette, or a cup of tea for a cozy afternoon treat. It also complements a creamy cheese platter, as the acidity of the loaf balances rich cheeses perfectly. Lastly, a scoop of vanilla ice cream on the side creates a delightful contrast of temperatures and flavors!

Storage, Make-Ahead & Reheating

This Lemon Poppy Seed Loaf can be stored at room temperature for up to 3 days if wrapped tightly in plastic wrap. If you want to keep it longer, it freezes well for up to 3 months. To freeze, wrap the loaf tightly in plastic wrap and then in aluminum foil to prevent freezer burn.

When you’re ready to enjoy it again, simply thaw it in the fridge overnight. Reheat individual slices in the microwave for 15-20 seconds or in a toaster oven until warmed through. Interestingly, many people find that this loaf tastes even better the next day, as the flavors have time to meld!

Frequently Asked Questions

Can I make Lemon Poppy Seed Loaf With Citrus Icing ahead of time?

Yes — in fact, it tastes even better the next day! You can make the loaf a day in advance, allowing the flavors to develop. Just be sure to store it in an airtight container to maintain its moisture.

Can I substitute the poppy seeds?

Absolutely! If you don’t have poppy seeds on hand or prefer an alternative, you can use sesame seeds for a similar crunch or omit them entirely for a smooth loaf.

What can I use instead of buttermilk?

If you don’t have buttermilk, you can easily create a substitute by mixing ½ cup of milk (dairy or plant-based) with 1 tablespoon of vinegar or lemon juice. Let it sit for 5 minutes before using in the recipe.

How can I make this recipe gluten-free?

To make a gluten-free version of this Lemon Poppy Seed Loaf, substitute the all-purpose flour with a gluten-free all-purpose flour blend. Just ensure that the blend contains a binding agent like xanthan gum for the best results.

What is the best way to store leftover loaf?

Leftover Lemon Poppy Seed Loaf should be stored in an airtight container at room temperature for up to 3 days. For longer storage, wrap it tightly and freeze for up to 3 months. Thaw it before serving for the best texture.

Zesty Lemon Poppy Seed Delight

Final Thoughts

The Lemon Poppy Seed Loaf with Citrus Icing is truly a delightful treat that brings a burst of brightness to any occasion. The zesty lemon flavor combined with the subtle crunch of poppy seeds creates a satisfying balance, while the citrus icing adds a touch of sweetness that perfectly complements the loaf’s tanginess.

This is the kind of recipe I come back to again and again, especially when I want to brighten up a gloomy day or celebrate a small victory. The aroma that fills the kitchen as it bakes is absolutely heavenly! I encourage you to give this recipe a try; you might just find it becoming a beloved staple in your home. Don’t forget to share your results or even add your own unique twist—I can’t wait to see what you create!

Print
clock clock iconcutlery cutlery iconflag flag iconfolder folder iconinstagram instagram iconpinterest pinterest iconfacebook facebook iconprint print iconsquares squares iconheart heart iconheart solid heart solid icon

Lemon Poppy Seed Loaf


  • Author: Lily author
  • Total Time: 21 minute
  • Yield: 1 loaf 1x
Pin Recipe
Print Recipe

Description

This Lemon Poppy Seed Loaf is a delightful treat that combines zesty lemon flavor with crunchy poppy seeds. Topped with a citrus icing, it’s perfect for any occasion.


Ingredients

Scale
  • 1 ½ cups (190g) all-purpose flour
  • 1 teaspoon baking powder
  • ½ teaspoon baking soda
  • ½ teaspoon salt
  • 3 tablespoons poppy seeds
  • ½ cup (115g) unsalted butter, softened to room temperature
  • 1 cup (200g) granulated sugar
  • 2 large eggs
  • 1 teaspoon vanilla extract
  • 1 teaspoon lemon zest (from about 1 medium lemon)
  • ½ cup (120ml) buttermilk
  • 2 tablespoons fresh lemon juice
  • 1 cup (120g) powdered sugar
  • 2 tablespoons fresh lemon juice
  • 1 tablespoon orange juice
  • 1 teaspoon lemon zest (for garnish, optional)

Instructions

  1. Preheat your oven to 350°F (175°C). Grease a 9×5-inch loaf pan or line it with parchment paper for easy removal later.
  2. In a medium mixing bowl, whisk together 1 ½ cups of all-purpose flour, 1 teaspoon of baking powder, ½ teaspoon of baking soda, ½ teaspoon of salt, and 3 tablespoons of poppy seeds. This helps to evenly distribute the baking agents and ensures a uniform rise.
  3. In a large mixing bowl, cream together ½ cup of softened unsalted butter and 1 cup of granulated sugar using an electric mixer on medium speed for about 3-4 minutes, until the mixture is light and fluffy. Make sure to scrape down the sides of the bowl occasionally.
  4. Add 2 large eggs, 1 teaspoon of vanilla extract, and 1 teaspoon of lemon zest to the creamed butter and sugar, mixing until fully combined. You want a smooth consistency, so ensure there are no lumps of butter.
  5. In a small bowl, combine ½ cup of buttermilk and 2 tablespoons of fresh lemon juice. Alternately add the dry ingredients and buttermilk mixture to the butter mixture, starting and ending with the dry ingredients. Mix just until combined; do not overmix, as this can lead to a dense loaf.
  6. Pour the batter into the prepared loaf pan. Smooth the top with a spatula, ensuring it’s even. Bake in the preheated oven for 50-60 minutes, or until a toothpick inserted in the center comes out clean. The edges should be lightly golden brown, and the center should feel just set.
  7. Once baked, remove the loaf from the oven and allow it to cool in the pan for about 10 minutes. Then, transfer it to a wire rack to cool completely. Resist the urge to slice too soon, as it will be crumbly if it’s still warm.
  8. While the loaf is cooling, prepare the citrus icing. In a medium bowl, whisk together 1 cup of powdered sugar, 2 tablespoons of fresh lemon juice, and 1 tablespoon of orange juice until smooth. If the icing is too thick, you can add a little more juice to reach your desired consistency.
  9. Once the loaf is completely cool, drizzle the citrus icing over the top. If you like, sprinkle with an additional teaspoon of lemon zest for an extra pop of flavor and color.
  • Prep Time: 15 mins
  • Cook Time: 50-60 mins
  • Category: Dessert
  • Method: Baking
  • Cuisine: American

Nutrition

  • Serving Size: 1 slice
  • Calories: 200
  • Sugar: 15 g
  • Sodium: 150 mg
  • Fat: 8 g
  • Saturated Fat: 5 g
  • Unsaturated Fat: 3 g
  • Trans Fat: 0 g
  • Carbohydrates: 30 g
  • Fiber: 1 g
  • Protein: 3 g
  • Cholesterol: 40 mg

Keywords: Be careful not to overmix your batter; this is a common mistake that can lead to a dense loaf. Use room temperature ingredients for a smoother batter and even baking.

Did you make this recipe?

Share a photo and tag us — we can't wait to see what you've made!

  • Privacy Policy
  • Terms Of Service
  • Contact
  • About
  • GDPR

Copyright © 2025 Homesmad