Spicy Jalapeno Popper Chicken Soup is not just another weeknight meal; it’s a culinary revelation that takes a beloved appetizer and transforms it into the ultimate comforting bowl. Have you ever wished you could bottle the addictive flavors of a crispy, cheesy, and just-spicy-enough jalapeño popper? Well, I believe I’ve found the answer! This incredible soup captures that quintessential flavor profile, delivering a creamy, satisfying experience with every spoonful.
While the traditional jalapeño popper itself is a modern American classic, often gracing party platters and game day spreads, this soup reimagines its essence into a hearty, wholesome dish. It’s the perfect fusion of two comfort food giants: the familiar warmth of chicken soup and the exciting kick of a cheesy, spicy bite. People adore this dish for its brilliant balance – the rich, velvety broth cuts through the vibrant heat of the jalapeños, while tender chunks of chicken and melted cheese create an irresistible texture and depth of flavor. It’s a truly unique spin on chicken soup, offering both the warmth we crave on a chilly evening and the adventurous zest we sometimes seek in our cooking. I promise, after one taste of this Spicy Jalapeno Popper Chicken Soup, you’ll understand why it’s quickly becoming a new favorite in my home.

Ingredients:
- For the Chicken:
- 1.5 – 2 pounds boneless, skinless chicken thighs or breasts, cut into 1-inch pieces or cooked and shredded. I personally love chicken thighs for their tenderness and flavor in a soup, but breasts work beautifully too if you prefer a leaner option!
- 1 tablespoon olive oil or avocado oil. This helps with searing the chicken and ensuring it doesn’t stick.
- 1/2 teaspoon salt. We’ll season in layers, so don’t overdo it initially!
- 1/4 teaspoon freshly ground black pepper.
- 1/2 teaspoon garlic powder.
- 1/2 teaspoon onion powder. These powders give an extra boost of savory flavor to our chicken.
- For the Bacon and Aromatics:
- 8-10 slices thick-cut bacon, diced. Thick-cut bacon yields glorious crispy bits and plenty of flavorful fat.
- 1 large yellow onion, finely diced. The backbone of so many delicious soups!
- 4-5 cloves garlic, minced. Don’t be shy with the garlic; it adds so much depth.
- 2-4 fresh jalapeños, seeded and minced (adjust to your spice preference). We’re making a “Spicy” Jalapeno Popper Soup, after all, so don’t be afraid to embrace the heat! Remove the seeds and membranes for less heat, leave some in for more.
- 1 tablespoon unsalted butter (if needed after rendering bacon fat). Sometimes you need a little extra fat to get those aromatics perfectly softened.
- For the Soup Base and Creaminess:
- 1/4 cup all-purpose flour. This is going to create our roux, the thickener for our luscious soup.
- 6 cups low-sodium chicken broth. Using low-sodium allows us to control the salt content precisely.
- 8 ounces cream cheese, softened and cut into cubes. This is where the “popper” magic truly happens, bringing that irresistible creamy, tangy element.
- 1/2 cup heavy cream. For an extra touch of luxuriousness and richness.
- 1 cup shredded sharp cheddar cheese. Classic jalapeño popper flavor!
- 1 cup shredded Monterey Jack cheese (or additional cheddar). Monterey Jack melts beautifully and adds a lovely mild, creamy texture.
- 1/2 cup pickled jalapeño slices, drained and roughly chopped (optional, for extra tang and heat). These add a different dimension of jalapeño flavor – a little briny and bright!
- For the Spices and Seasoning:
- 1 teaspoon ground cumin. Adds an earthy, warm undertone that complements the other flavors.
- 1 teaspoon chili powder. Contributes a mild, complex pepper flavor.
- 1/2 teaspoon smoked paprika. For that wonderful smoky depth, echoing the bacon and roasted peppers often found in poppers.
- 1/4 teaspoon cayenne pepper (optional, for extra kick). For those who truly love the heat, this is your secret weapon!
- Salt and freshly ground black pepper to taste. Always taste and adjust as you go!
- Optional Mix-ins and Garnishes:
- 1 (4-ounce) can diced green chilies, drained. For a milder pepper flavor and extra texture.
- 1/2 cup corn (fresh, frozen, or canned). Adds a touch of sweetness and lovely color.
- 1/2 cup black beans, rinsed and drained. Makes the soup even heartier and adds an earthy dimension.
- Fresh cilantro, chopped. For brightness and a fresh herbaceous note.
- Green onions, sliced. Another fresh element and a mild oniony crunch.
- Extra shredded cheese. Because, why not?
- Crushed tortilla chips or crispy fried onions. For an amazing textural contrast and crunch!
Preparing the Core Components
-
Crisp Up the Bacon and Render Fat
Grab a large, heavy-bottomed pot or Dutch oven, because that’s where all the magic is going to happen! We’re starting with our diced thick-cut bacon. Toss it into the cold pot and set your stove to medium heat. Starting bacon in a cold pot allows the fat to render slowly and evenly, resulting in perfectly crispy bacon. Let that bacon cook slowly, stirring occasionally, until it’s beautifully golden brown and wonderfully crispy, having rendered most of its fat. This usually takes about 8-10 minutes, but keep a watchful eye on it, as bacon can go from perfect to burnt in a flash! Once it’s done, use a slotted spoon to carefully transfer the crispy bacon bits to a plate lined with paper towels. We’ll save these glorious morsels for garnish later – they’re little flavor bombs! Now, here’s a crucial step: don’t discard that precious bacon fat! We’re going to use about 2 tablespoons of it to cook our aromatics and sear the chicken, infusing them with incredible smoky flavor right from the start. If you have more than that, feel free to spoon out the excess, saving it for another delicious use, or just leave it if you don’t mind an even richer soup base. Less cleanup, more flavor!
-
Sear the Chicken for Flavor
While the bacon is crisping, or immediately after you’ve removed it, it’s time to prepare our chicken. If you’re using boneless, skinless chicken thighs or breasts, cut them into approximately 1-inch pieces. I find that smaller pieces cook faster and integrate better into the soup, making every spoonful delicious, but you can also cook them whole and shred them later if you prefer. In a separate medium-sized bowl, toss your chicken pieces with a tablespoon of olive oil, 1/2 teaspoon of salt, 1/4 teaspoon of black pepper, 1/2 teaspoon of garlic powder, and 1/2 teaspoon of onion powder. Give it a good mix with your hands or a spoon to ensure every piece is evenly seasoned. Now, back to our pot. If you’ve got enough bacon fat in there (about 1 tablespoon), you can use that. If not, add a tablespoon of olive oil or a knob of unsalted butter. Increase the heat to medium-high. Add the seasoned chicken to the pot in a single layer, making sure not to overcrowd it. If your pot isn’t large enough, work in batches. You want to hear that wonderful sizzle! We’re aiming to get a nice, golden-brown sear on the chicken, which helps to lock in its juices and develop a deeper, more complex flavor. Cook for about 3-4 minutes per side, until lightly browned. It doesn’t need to be cooked through completely at this stage, as it will finish cooking gently in the soup later. Once seared, remove the chicken from the pot and set it aside with the crispy bacon. This searing step is absolutely crucial for developing deep, savory flavors that will make your soup sing!
-
Sauté the Aromatics and Fresh Jalapeños
With your pot still on medium heat, and hopefully with a tablespoon or two of that lovely bacon fat (or a bit of added butter if needed), it’s time to build the foundational flavor base for our soup. Add your finely diced yellow onion to the pot. Sauté the onion for about 5-7 minutes, stirring occasionally, until it becomes wonderfully translucent and softened. You’ll notice it start to release its natural sugars and sweeten up, which is exactly what we want for a balanced flavor profile. Next, toss in your minced garlic and your fresh minced jalapeños. Now, for the jalapeños, remember you’re the chef here and you’re in complete control of the heat! If you like things fiery and bold, feel free to leave a few seeds in. If you prefer a milder, more approachable warmth, make sure to remove all the seeds and the white membrane from the jalapeños before mincing. Cook these for another 1-2 minutes, stirring constantly, until the garlic is wonderfully fragrant. Be careful not to burn the garlic, as burnt garlic can impart a bitter and unpleasant flavor to your beautiful soup. The kitchen should be smelling absolutely incredible by now, a true testament to the deliciousness that’s about to unfold!
Building the Flavorful Base
-
Creating a Perfect Roux for Thickness
This is where our soup starts to get its luxurious, velvety thickness. Sprinkle the 1/4 cup of all-purpose flour evenly over your sautéed onions, garlic, and jalapeños. Stir it constantly with a wooden spoon or whisk for about 1-2 minutes. You’re aiming for a pale blonde color, not dark brown. This cooking time is super important as it helps to cook out the raw flour taste, which can otherwise make your soup taste pasty. The flour will absorb all the fat in the pot and form a paste-like consistency, clinging to all those delicious aromatics. A well-cooked roux is the secret to a silky, lump-free, and perfectly thickened soup, so take your time with this step! It’s the foundation of your soup’s body.
-
Gradually Whisk in the Broth
Now, for a bit of a workout! Gradually, and I mean gradually, whisk in the 6 cups of low-sodium chicken broth. I always recommend starting by adding just about a cup of the broth first, whisking vigorously to fully incorporate the roux and create a smooth slurry. This initial small addition helps to prevent lumps. Once that’s lump-free and a smooth paste, slowly pour in the remaining broth, whisking continuously as you add it. This slow, steady addition and continuous whisking technique is your best friend for preventing lumps and ensuring a perfectly smooth, silky base for our Spicy Jalapeno Popper Chicken Soup. Bring the mixture to a gentle simmer, stirring occasionally, and let it cook for about 5 minutes until it begins to thicken slightly. The simmering allows the starches in the flour to fully activate and thicken the soup to a lovely consistency.
-
Introducing the Cream Cheese for Tangy Creaminess
Now for the true star of the “popper” flavor – cream cheese! Ensure your 8 ounces of cream cheese are softened and cut into small cubes. This preparation is a small but mighty step, as softened, cubed cream cheese melts much more easily and evenly into the hot liquid. Reduce the heat to low. Add the cubed cream cheese to the gently simmering broth, whisking constantly until it’s completely melted and smoothly incorporated into the soup. This step can take a few minutes, so be patient and keep whisking. If you try to add cold or large chunks of cream cheese, it might take longer to melt and could potentially clump, leaving you with less-than-desirable pockets of cream cheese. Gentle heat and continuous whisking are absolutely key here for achieving a beautifully creamy, uniform texture without any lumps. The tang from the cream cheese is essential to that authentic popper experience!
-
Layering in the Spices and Seasoning the Soup
With the cream cheese beautifully incorporated, it’s time to layer in even more flavor with our carefully selected spices. Add the 1 teaspoon of ground cumin, 1 teaspoon of chili powder, and 1/2 teaspoon of smoked paprika. If you’re feeling brave and want that extra kick to live up to the “Spicy” in our title, now’s the perfect time to stir in the 1/4 teaspoon of cayenne pepper. Give everything a really good stir to ensure the spices are evenly distributed throughout the soup. Let it gently simmer for another 5-10 minutes. This simmering time is vital as it allows the spices to “bloom” – meaning their flavors intensify and meld beautifully with the rich soup base, deepening the overall flavor profile. After this simmering, give the soup a taste. This is your moment to be the chef! Adjust your salt and freshly ground black pepper as needed. Remember, we added some salt when we seasoned the chicken, and the bacon also contributes saltiness, so always taste before adding more! You want a perfectly balanced flavor that hits all the right notes.
Simmering and Enriching the Soup
-
Return the Chicken and Add Pickled Jalapeños (Optional)
Carefully add your seared chicken pieces back into the pot. If you’re including the optional pickled jalapeño slices for an extra layer of tang and a different kind of heat, now’s the time to stir those in too. The pickled jalapeños add a wonderful bright, slightly acidic note that beautifully complements the richness of the soup and really drives home that “popper” flavor. Allow the soup to continue to simmer gently for about 10-15 minutes, or until the chicken is fully cooked through and incredibly tender. If you opted to cook whole chicken breasts and plan to shred them, now would be the time to remove them from the soup, shred them with two forks, and then return the shredded chicken to the pot. This gentle simmer also allows all the amazing flavors to truly marry together, creating a harmonious and incredibly comforting soup that’s bursting with taste.
-
Stir in Heavy Cream and Cheeses for Ultimate Creaminess
Reduce the heat to very low. This is important to prevent the cheese from seizing. Pour in the 1/2 cup of heavy cream and stir it in gently until fully combined. Then, add the 1 cup of shredded sharp cheddar cheese and 1 cup of shredded Monterey Jack cheese (or whatever additional shredded cheese you chose). Stir continuously until all the cheese is completely melted and beautifully incorporated into the soup, creating a velvety, luxurious texture that will have you swooning. It’s absolutely crucial to keep the heat very low during this step to prevent the cheese from clumping, seizing, or becoming stringy and oily. We’re aiming for smooth, melty, cheesy goodness that perfectly emulsifies into the soup, making every spoonful an absolute delight!
-
Consider Optional Mix-ins for Extra Heartiness
If you’re using any of the optional mix-ins like canned diced green chilies, corn (fresh, frozen, or canned), or rinsed and drained black beans, stir them into the soup now. Allow them to heat through for just a few minutes, stirring occasionally. These additions can add wonderful extra texture, layer in more subtle flavors, and make the soup even more hearty and substantial, transforming it into a full meal. I personally love how corn adds a delightful hint of sweetness that balances the spice, and black beans give it a lovely, earthy depth, complementing the spicy and cheesy elements perfectly. This is your chance to customize your Spicy Jalapeno Popper Chicken Soup to your heart’s content!
Finishing Touches and Serving
-
The All-Important Final Taste Test and Adjustments
This is perhaps one of the most important steps in any recipe, so don’t skip it! Give your Spicy Jalapeno Popper Chicken Soup a final, discerning taste. Does it need more salt to really make the flavors pop? A pinch more freshly ground black pepper for a bit of bite? Maybe a tiny dash of cayenne if you’re feeling adventurous and want to crank up the heat even further? Perhaps a squeeze of fresh lime juice for an unexpected but wonderful burst of brightness that cuts through the richness? Don’t be shy about making it absolutely perfect for your palate. Remember, every batch can be slightly different due to variations in ingredients or your specific spice preferences, so tasting and adjusting is crucial for a truly personalized and delicious experience. Make it your perfect soup!
-
Prepare for Serving
With your soup perfectly seasoned and irresistibly creamy, it’s time to ladle the steaming hot soup into individual bowls. This soup is wonderfully rich and satisfying on its own, a meal in a bowl, but the garnishes truly elevate it to another level and make it feel like a restaurant-quality meal right in the comfort of your home. It’s an experience, not just a meal!
-
Garnish Generously for the Ultimate Experience
Now for the fun part – dressing up your soup! This is where you bring it all together. Sprinkle each serving generously with those reserved crispy bacon bits from earlier. They add incredible flavor and a delightful crunch. Add a liberal sprinkle of fresh chopped cilantro and/or sliced green onions for a vibrant pop of freshness, herbaceousness, and color that brightens up the rich soup. If you like, a little extra shredded cheddar cheese melted on top or a generous dollop of cool sour cream or plain Greek yogurt would be absolutely delightful, adding another layer of creaminess and a tangy counterpoint. For an added textural crunch that mimics the crispy coating of a traditional popper, consider crushing a few tortilla chips over the top or using some crispy fried onions. These garnishes aren’t just for looks; they add crucial layers of flavor, texture, and visual appeal that enhance every single spoonful of your incredible Spicy Jalapeno Popper Chicken Soup. Enjoy every warming, comforting, wonderfully cheesy, and perfectly spicy bite! You’ve earned it!
Conclusion:
And there you have it, my friends! We’ve reached the delicious finale of our journey through this incredible recipe. If you’ve been following along, your taste buds are likely already tingling with anticipation, and for good reason. This isn’t just another chicken soup; it’s an experience, a symphony of flavors that manages to be both comforting and exciting all at once. I genuinely believe that my Spicy Jalapeno Popper Chicken Soup is a must-try for anyone who appreciates a hearty, flavorful meal with a bit of a kick. It takes all the beloved elements of classic jalapeno poppers – the creamy, cheesy richness, the undeniable warmth of a subtle spice, and the irresistible crunch – and transforms them into a soul-satisfying bowl of soup.
What makes this soup so exceptionally good, and why do I wholeheartedly recommend you dive in? Firstly, it’s the perfect balance. We’ve meticulously crafted a recipe that ensures every spoonful delivers that quintessential cream cheese tang, the gooey stretch of cheddar, and a gentle heat from the fresh jalapenos, all wrapped up in a savory chicken broth. It’s rich without being heavy, spicy without being overwhelming, and comforting in a way that feels like a warm hug on a chilly evening. Imagine coming home after a long day to a simmering pot of this goodness; the aroma alone is enough to melt away any stress. It’s incredibly satisfying, packed with tender chicken and those delightful bits of crispy bacon, making it a complete meal that truly nourishes both body and soul. Trust me, once you taste this Spicy Jalapeno Popper Chicken Soup, you’ll understand why it’s quickly become a beloved staple in my kitchen and will undoubtedly become one in yours too.
Elevate Your Experience: Serving Suggestions & Creative Variations
Now that you’re convinced (I hope!), let’s talk about how to truly make this soup sing, and how to personalize it to your heart’s content. While it’s utterly fantastic on its own, a few simple additions can take your soup experience to the next level. For a textural contrast and an extra layer of flavor, I always recommend a generous sprinkle of crispy bacon bits right before serving. A dollop of cool sour cream or Greek yogurt swirled on top provides a beautiful creamy counterpoint to the spice, and a handful of freshly chopped cilantro or green onions adds a vibrant freshness. For those who love a bit of crunch, crushed tortilla chips or even some homemade croutons are excellent choices. And of course, never shy away from an extra sprinkle of shredded cheddar or Monterey Jack cheese – because can you ever really have too much cheese?
Make It Your Own: Unleash Your Culinary Creativity!
But the beauty of home cooking lies in personalization, doesn’t it? Don’t hesitate to play around with this recipe to suit your own preferences or whatever you have on hand.
For a spicier kick: If you’re a true heat seeker, feel free to leave more of the seeds and ribs in your jalapenos, or even add a pinch of cayenne pepper or a dash of your favorite hot sauce. For a milder version, simply remove all seeds and membranes from the jalapenos, or even substitute a portion with milder green chilies.
Creaminess factor: If you prefer an even thicker, richer soup, a splash of heavy cream stirred in at the end can work wonders.
Protein swap: While shredded chicken is classic, this soup is also fantastic with ground chicken or turkey, or even plant-based chicken substitutes for a vegetarian twist.
Veggie boost: Feel free to toss in other vegetables like corn, black beans, diced bell peppers, or even a handful of fresh spinach at the very end for an extra nutritional punch.
Cheese variety: Experiment with different cheese blends like pepper jack for an extra layer of spice, or a smoked cheddar for a deeper, more robust flavor.
This recipe is incredibly forgiving and truly invites you to make it your own signature dish.
So, what are you waiting for? Gather your ingredients, roll up your sleeves, and prepare to create something truly magnificent. I wholeheartedly encourage you to try this Spicy Jalapeno Popper Chicken Soup in your own kitchen. It’s more than just a recipe; it’s an invitation to experience comfort, flavor, and the joy of a truly memorable meal. Once you’ve savored every last spoonful, I would absolutely love to hear about your experience! Please come back and share your thoughts, your triumphant successes, and any creative twists you added in the comments section below. Your feedback and personal stories are what truly make this community vibrant. Happy cooking, everyone!
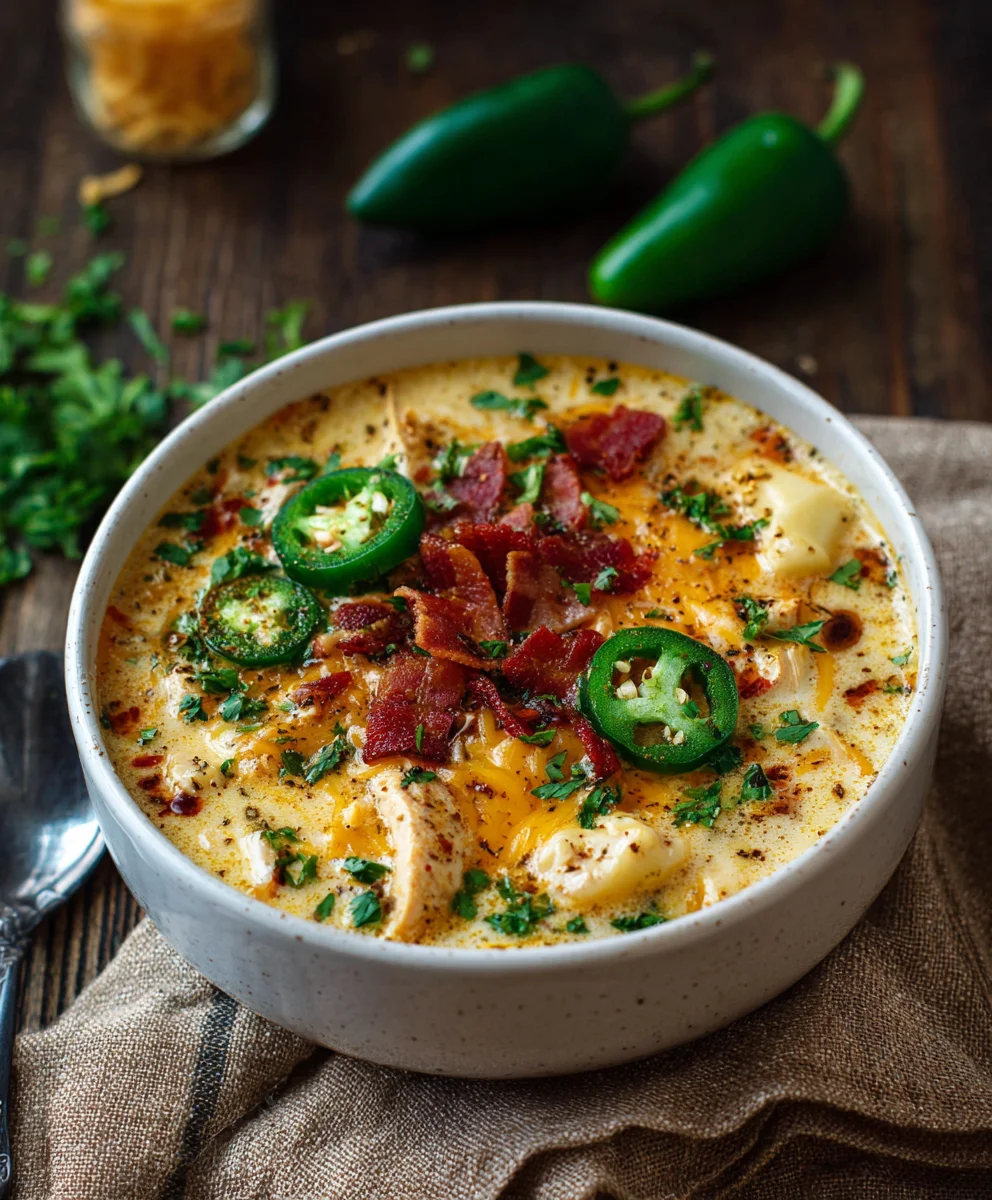
Creamy Spicy Jalapeno Popper Chicken Soup
Spicy Jalapeno Popper Chicken Soup transforms a beloved appetizer into the ultimate comforting bowl. This culinary revelation captures the addictive flavors of a crispy, cheesy, and just-spicy-enough jalapeño popper, delivering a creamy, satisfying experience. It’s a unique spin on chicken soup, offering warmth, adventurous zest, and a brilliant balance of rich, velvety broth with vibrant heat, tender chicken, and melted cheese.
Ingredients
-
1 tablespoon olive oil
-
1 medium onion, diced
-
3 cloves garlic, minced
-
2 large jalapeños, seeds removed and diced (adjust to spice preference)
-
1 pound boneless, skinless chicken breasts
-
4 cups chicken broth
-
1 cup heavy cream (can substitute half with low-fat milk)
-
1 teaspoon ground cumin
-
1 teaspoon paprika
-
Salt and pepper to taste
-
1 cup cream cheese, softened
-
1 cup shredded cheddar cheese
-
½ cup crumbled beef bacon (optional)
-
Fresh cilantro for garnish
Instructions
-
Step 1
Cut chicken breasts into 1-inch pieces. Heat 1 tablespoon olive oil in a large pot over medium-high heat. Season chicken with salt and pepper, then sear until lightly browned (3-4 mins per side). Remove chicken from pot and set aside. -
Step 2
In the same pot, add diced onion and sauté over medium heat until translucent and softened (5-7 minutes). Add minced garlic and diced jalapeños; cook for another 1-2 minutes until fragrant. -
Step 3
Pour in 4 cups chicken broth. Bring to a gentle simmer. Reduce heat to low, then add softened cream cheese (cut into cubes) and whisk constantly until completely melted and smoothly incorporated into the soup. -
Step 4
Stir in 1 teaspoon ground cumin and 1 teaspoon paprika. Return the seared chicken pieces to the pot. Allow soup to gently simmer for 10-15 minutes, or until chicken is fully cooked and tender, and flavors have melded. -
Step 5
Reduce heat to very low. Pour in 1 cup heavy cream (or use half low-fat milk). Stir gently until combined. Add 1 cup shredded cheddar cheese, stirring continuously until all cheese is melted and smoothly incorporated. -
Step 6
Taste the soup and adjust salt and pepper as needed. Ladle hot soup into bowls. Garnish generously with ½ cup crumbled beef bacon (optional) and fresh cilantro.
Important Information
Nutrition Facts (Per Serving)
It is important to consider this information as approximate and not to use it as definitive health advice.
Allergy Information
Please check ingredients for potential allergens and consult a health professional if in doubt.