• Skip to primary navigation
  • Skip to main content
  • Skip to primary sidebar
Homesmad

Homesmad

  • Home
  • Breakfast & Brunch
  • Appetizers & Snacks
  • Dinner
  • Dessert
  • About
  • Privacy Policy
  • Contact
Homesmad
  • Home
  • Breakfast & Brunch
  • Appetizers & Snacks
  • Dinner
  • Dessert
  • About
  • Privacy Policy
  • Contact

Sweet & Savory Maple Chicken Beef Bacon Sliders Recipe

October 7, 2025 by Lily author

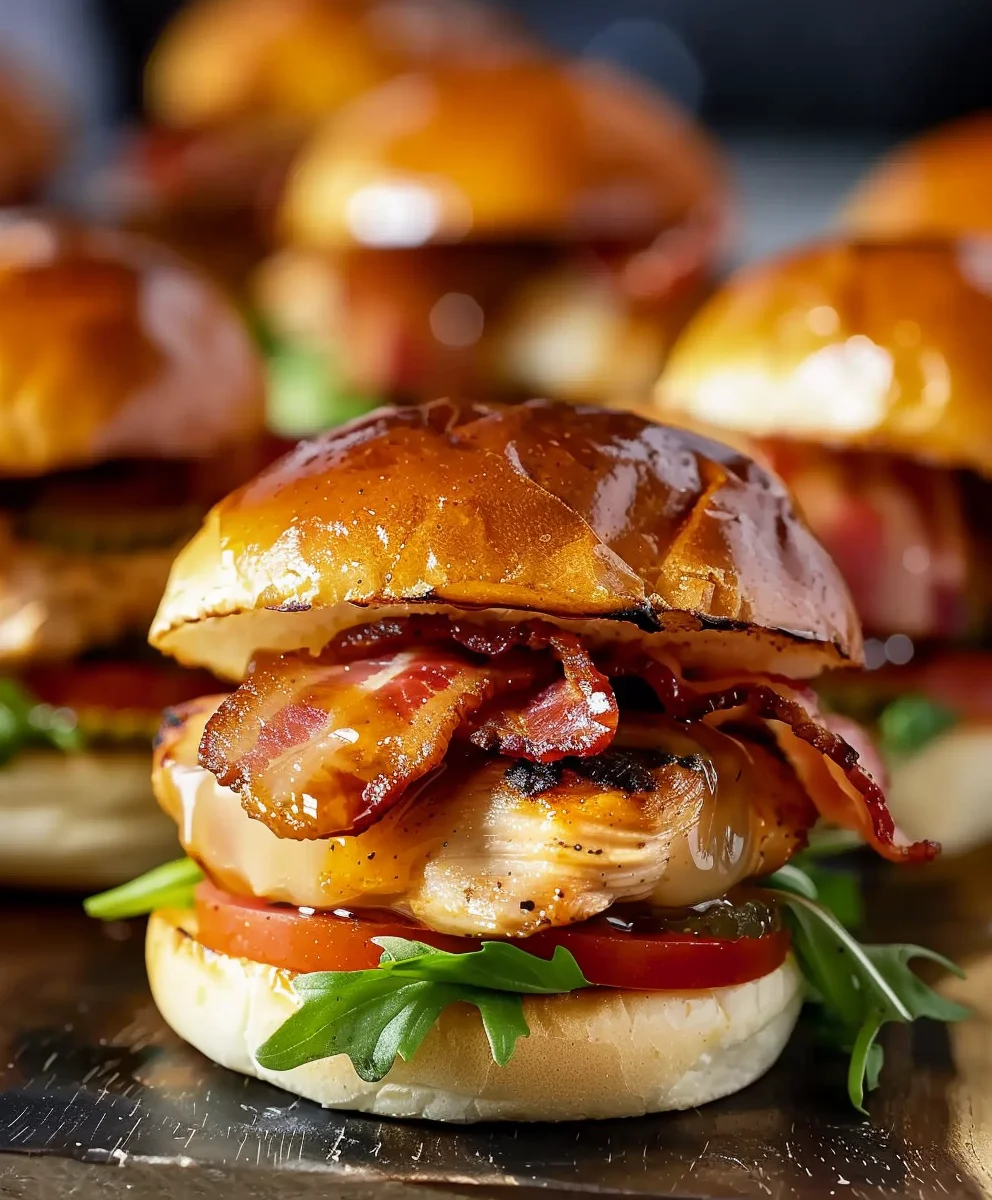
Maple Chicken Beef Bacon Sliders are not just a dish; they are an experience, a miniature masterpiece designed to ignite your taste buds and become the undisputed star of any gathering. Imagine biting into the perfect harmony of smoky beef, tender chicken, crispy bacon, and the undeniable allure of a sweet maple glaze, all nestled within a soft, pillowy bun. It’s a flavor sensation that promises to be both comforting and excitingly gourmet, leaving a lasting impression on everyone who tries it.

While the humble slider historically began its journey as a simple, small hamburger patty, revolutionizing fast food convenience, today’s culinary landscape has fully embraced this delightful format, elevating it to spectacular new heights. These particular sliders represent that delicious evolution, combining premium ingredients into a truly unforgettable symphony of textures and tastes. People universally adore these Maple Chicken Beef Bacon Sliders because they offer an incredible balance: the rich umami of beef, the lean succulence of chicken, the irresistible crunch and saltiness of bacon, all beautifully complemented by the sticky, sweet notes of maple. They are incredibly versatile – perfect as a sophisticated appetizer, a fun party snack, or a creative, deconstructed dinner for the family. Their convenient size makes them utterly irresistible and wonderfully easy to enjoy, inviting everyone to savor multiple layers of deliciousness without the commitment of a full-sized meal.

Sweet & Savory Maple Chicken Beef Bacon Sliders Recipe this RECIPE

Ingredients:

  • For the Maple Chicken:
    • 1.5 pounds boneless, skinless chicken thighs, trimmed of excess fat
    • ½ cup pure maple syrup, divided
    • ¼ cup soy sauce (or tamari for a gluten-free option)
    • 2 cloves garlic, minced very finely
    • 1 tablespoon fresh ginger, grated (peeled first, of course!)
    • 1 tablespoon apple cider vinegar
    • 1 teaspoon Dijon mustard
    • ½ teaspoon freshly ground black pepper
    • 1 tablespoon olive oil (for cooking)
  • For the Crispy Beef Bacon:
    • 12-16 slices beef bacon (standard cut or thick-cut, depending on your preference)
  • For the Creamy Maple-Dijon Drizzle:
    • ½ cup mayonnaise (full-fat for the best richness)
    • 1 tablespoon pure maple syrup
    • 1 teaspoon Dijon mustard
    • ¼ teaspoon smoked paprika
    • 1 teaspoon apple cider vinegar
    • Pinch of salt and freshly ground black pepper, to taste
  • For Assembling the Sliders:
    • 12-16 slider buns (brioche buns work wonderfully for their richness and slight sweetness, complementing the maple chicken beef bacon sliders perfectly)
    • 4-6 slices cheddar or Monterey Jack cheese, sliced into quarters to fit the buns (optional, but highly recommended for an extra layer of flavor)
    • ½ cup thinly sliced red onion, soaked in ice water for 10 minutes then drained (to reduce sharpness)
    • 12-16 small butter lettuce leaves or a handful of mixed greens
    • ½ cup dill pickle chips or thinly sliced dill pickles
    • Optional garnish: fresh chives or parsley, finely chopped

Preparation of the Maple Chicken:

Creating succulent, flavorful maple chicken is the heart of these amazing Maple Chicken Beef Bacon Sliders. We’ll start with a marinade that infuses the chicken with a delightful balance of sweet, savory, and tangy notes, then cook it to perfection.

  1. Marinating the Chicken:

    In a medium-sized non-reactive bowl or a large resealable plastic bag, combine ¼ cup of the pure maple syrup, soy sauce, minced garlic, grated ginger, apple cider vinegar, Dijon mustard, and black pepper. Whisk or shake vigorously until all ingredients are well combined and the maple syrup is fully incorporated. This mixture is our beautiful, aromatic marinade.

    Add the trimmed chicken thighs to the marinade, ensuring each piece is thoroughly coated. I prefer using chicken thighs for sliders because they stay incredibly juicy and tender even when sliced or shredded, which is ideal for a small sandwich like our Maple Chicken Beef Bacon Sliders. If you’re using chicken breasts, you might want to slice them horizontally first to create thinner cutlets, ensuring they absorb more flavor and cook more evenly. Once coated, cover the bowl or seal the bag and refrigerate for at least 30 minutes, but ideally for 2 to 4 hours. If you’re planning ahead, you can even let them marinate overnight for maximum flavor penetration, just don’t go much longer than 12 hours as the acid in the vinegar can start to break down the protein too much.

  2. Cooking the Maple Chicken:

    When you’re ready to cook, remove the chicken from the refrigerator and let it sit at room temperature for about 15-20 minutes. This helps the chicken cook more evenly. Heat the olive oil in a large skillet or cast-iron pan over medium-high heat. You want the pan to be nice and hot to get a good sear on the chicken.

    Carefully remove the chicken thighs from the marinade, letting any excess drip off. Discard the remaining marinade – it’s served its purpose and we don’t want to use it for anything else after raw chicken has been in it. Place the chicken thighs in the hot skillet, ensuring not to overcrowd the pan. If necessary, cook in batches. Sear for 4-6 minutes per side, or until the chicken is beautifully golden brown and cooked through. The internal temperature should reach 165°F (74°C) when measured with a meat thermometer at the thickest part.

    Once the chicken is cooked, remove it from the skillet and place it on a clean cutting board. Tent it loosely with aluminum foil and let it rest for 5-10 minutes. This resting period is absolutely crucial for juicy chicken, as it allows the juices to redistribute throughout the meat rather than escaping when you cut into it. After resting, you can either thinly slice the chicken against the grain or roughly chop it into bite-sized pieces, whichever you prefer for your Maple Chicken Beef Bacon Sliders.

    In the same skillet (no need to clean it if there aren’t burnt bits), add the remaining ¼ cup of pure maple syrup. Bring it to a gentle simmer, scraping up any browned bits from the bottom of the pan. Let it reduce slightly until it forms a light glaze, about 2-3 minutes. This will be a wonderful additional drizzle for our chicken. Toss the cooked and sliced/chopped chicken in this maple glaze to coat it lightly, adding an extra layer of sweet and sticky goodness.

Crisping the Beef Bacon:

No Maple Chicken Beef Bacon Sliders would be complete without perfectly crispy beef bacon! This step is straightforward but key to achieving that satisfying crunch and smoky flavor.

  1. Cooking the Beef Bacon:

    There are two main methods for cooking beef bacon: stovetop or oven. For consistently crispy results with less mess, I often lean towards the oven method, especially when cooking a larger quantity like we are for our sliders.

    Oven Method (Recommended): Preheat your oven to 400°F (200°C). Line a large baking sheet with parchment paper or aluminum foil for easy cleanup. Arrange the beef bacon slices in a single layer on the prepared baking sheet, ensuring they don’t overlap too much. This allows for even cooking and crisping. Bake for 15-20 minutes, or until the bacon is beautifully crispy and golden brown. Cooking time can vary depending on the thickness of your bacon and your oven, so keep a close eye on it, especially towards the end.

    Stovetop Method: If you prefer the stovetop, place the beef bacon slices in a large skillet (cast iron works beautifully) over medium heat. Cook until crispy, flipping occasionally, about 8-12 minutes. The key here is to not rush it; medium heat allows the fat to render slowly, resulting in crispier bacon.

  2. Draining and Preparing:

    Once the beef bacon is crispy to your liking, carefully remove it from the pan or baking sheet and place it on a plate lined with paper towels. This will help absorb any excess grease, leaving us with perfectly crisp, less greasy strips for our Maple Chicken Beef Bacon Sliders. Let it cool for a few minutes, then you can either leave the strips whole or break them into smaller, more slider-friendly pieces. I often find breaking them into halves or thirds makes for easier eating on a slider.

Crafting the Creamy Maple-Dijon Drizzle:

This simple yet incredibly flavorful sauce adds a wonderful creamy texture and a punch of complementary flavors that truly elevate our Maple Chicken Beef Bacon Sliders. It’s sweet, tangy, and a little smoky – just perfect!

  1. Mixing the Drizzle:

    In a small bowl, combine the mayonnaise, the additional tablespoon of pure maple syrup, Dijon mustard, smoked paprika, apple cider vinegar, salt, and freshly ground black pepper. Whisk everything together thoroughly until the sauce is completely smooth and creamy.

    Taste and adjust the seasonings as needed. Do you want it a little sweeter? Add a touch more maple syrup. Prefer a bit more tang? A tiny splash more apple cider vinegar will do the trick. The smoked paprika is subtle but adds a fantastic depth that complements both the maple and the beef bacon so well. This drizzle can be made ahead of time and stored in an airtight container in the refrigerator for up to 3-4 days, making your assembly process even quicker.

Assembling the Maple Chicken Beef Bacon Sliders:

Now for the fun part – bringing all these delicious components together to create our irresistible Maple Chicken Beef Bacon Sliders! The order of assembly can impact the overall experience, so I’ll walk you through my preferred layering for maximum flavor and structural integrity.

  1. Preparing the Buns:

    Preheat your oven or a large skillet to a medium temperature. Slice your slider buns in half horizontally. For an extra touch of deliciousness, lightly toast the cut sides of the buns. You can do this by placing them cut-side down in a dry skillet for 1-2 minutes until lightly golden, or under a broiler for 30-60 seconds (watch them carefully, they can burn quickly!). Toasting adds a lovely texture and prevents the buns from getting soggy from the fillings.

    If you’re using cheese, place the quartered cheese slices on the bottom halves of the toasted buns. You can pop them back into a warm oven or microwave for a few seconds to slightly melt the cheese, making it wonderfully gooey and ready to embrace the warm chicken.

  2. Layering the Sliders:

    We’re going for a balance of textures and flavors in every bite.

    1. Bottom Bun & Drizzle: Start with the bottom half of each toasted slider bun (with melted cheese, if using). Spread a generous dollop of our creamy Maple-Dijon Drizzle on the bottom bun. This acts as a delicious flavor anchor and a moisture barrier.
    2. Maple Chicken: Next, pile a good portion of the warm, maple-glazed chicken onto the sauce. Don’t be shy here; this is the star of the show!
    3. Crispy Beef Bacon: Lay 1-2 pieces of your crispy beef bacon over the chicken. The saltiness and crunch of the bacon provide a perfect counterpoint to the tender chicken.
    4. Freshness & Crunch: Add a few thin slices of the red onion (remember, we soaked them to mellow their bite) and a couple of dill pickle chips. These add a crucial element of acidity and freshness, cutting through the richness of the chicken and bacon, making each Maple Chicken Beef Bacon Slider incredibly balanced.
    5. Top Bun & Drizzle: Spread another thin layer of the Maple-Dijon Drizzle on the inside of the top bun.
    6. Completing the Slider: Place a small butter lettuce leaf or a few mixed greens on top of the pickles, then gently cap with the top bun. The lettuce adds a final whisper of crispness and a pop of color.
  3. Serving Your Maple Chicken Beef Bacon Sliders:

    Serve these magnificent Maple Chicken Beef Bacon Sliders immediately while everything is still warm and the flavors are at their peak. They make fantastic appetizers for a gathering, or a fun and satisfying main course alongside a simple side salad or some sweet potato fries. If desired, garnish with a sprinkle of fresh chopped chives or parsley for a touch of herbaceous brightness. Enjoy the incredible harmony of sweet maple, savory chicken, smoky beef bacon, and tangy freshness in every bite! These truly are a delightful treat.

Sweet & Savory Maple Chicken Beef Bacon Sliders Recipe

Conclusion:

And there you have it, folks! We’ve journeyed through the creation of what I firmly believe will become a new staple in your culinary repertoire. These aren’t just any ordinary bite-sized treats; they are a symphony of flavors and textures, meticulously designed to delight your taste buds and impress your guests without demanding hours of your precious time. We’re talking about that irresistible blend of savory and sweet, the satisfying crunch, and the juicy, tender fillings that make every single Maple Chicken Beef Bacon Sliders a miniature masterpiece. I’m truly excited for you to experience the magic of this recipe.

Why These Sliders Are an Absolute Game-Changer

What makes these sliders an absolute must-try? It’s simple: they hit all the right notes. Imagine the richness of seasoned ground beef, perfectly complemented by the subtle sweetness of maple-glazed chicken, all brought together by the irresistible crispness of bacon. Nestled in a soft slider bun, with melted cheese adding that gooey, comforting element, it’s a flavor profile that’s both familiar and excitingly new. I designed this recipe to be approachable for cooks of all skill levels, ensuring that even if you’re new to the kitchen, you can achieve spectacular results. The combination of ingredients isn’t just random; it’s a thoughtful pairing that creates a harmonious and unforgettable experience. They’re perfect for those moments when you want something special, but don’t want to be tied to the stove for hours. Trust me, the aroma alone as these cook will have everyone eagerly anticipating the first bite. It’s a dish that manages to be both comforting and gourmet, striking that perfect balance for any occasion, from a casual family dinner to a festive gathering. The sheer satisfaction of watching friends and family reach for seconds, or even thirds, is what truly makes this recipe a winner in my book.

Serving Suggestions to Elevate Your Slider Experience

While these sliders are undeniably stars on their own, how you serve them can truly enhance the entire meal. For a casual weeknight dinner, I love serving them alongside a vibrant, crisp coleslaw or some perfectly seasoned sweet potato fries – the sweetness of the fries really plays beautifully with the maple notes in the sliders. If you’re hosting a game day party or a casual get-together, consider arranging them on a large platter with an assortment of dipping sauces: perhaps a tangy BBQ sauce, a creamy ranch, or even a spicy sriracha mayo for those who like a little kick. They make fantastic appetizers, easy for guests to grab and enjoy while mingling. For a more substantial meal, a simple green salad with a light vinaigrette can provide a refreshing counterpoint to the richness of the sliders. Don’t forget a bowl of your favorite pickles on the side – that briny crunch is always a welcome addition! And for a truly indulgent touch, a side of crispy onion rings offers another delightful texture contrast that I often find myself craving alongside these savory beauties. Experiment with different side dishes to discover your ultimate combination!

Unleash Your Creativity: Exciting Variations!

One of the things I adore about cooking is the freedom to experiment, and this recipe offers plenty of room for your own creative spin. Don’t be afraid to make it your own!

  • Cheese Choices: While cheddar is a classic, try experimenting with pepper jack for a subtle spice, provolone for a meltier, milder taste, or even smoked gouda for an extra layer of smoky depth. The type of cheese can dramatically alter the overall flavor profile, so have fun exploring!
  • Veggies & Toppings: Caramelized onions add a wonderful sweetness and depth, perfectly harmonizing with the maple. Sautéed mushrooms can bring an earthy richness. For a fresh element, thinly sliced tomatoes or crisp lettuce can be tucked into the buns. A slice of dill pickle or a pickled jalapeño can cut through the richness beautifully, offering a tangy or spicy bite.
  • Spicy Kick: If you’re a fan of heat, a dash of cayenne pepper to your beef mixture, or a thin slice of jalapeño within the slider, can really wake up the palate and add an exciting zing.
  • Bun Alternatives: For those avoiding gluten, simply swap out traditional slider buns for gluten-free options. You could even use large lettuce leaves as wraps for a low-carb alternative, turning these into savory, handheld bites without the bread.
  • Herb Infusion: A sprinkle of fresh thyme or rosemary mixed into the beef patty can add an aromatic dimension, elevating the savory notes.

Remember, the kitchen is your playground! These variations allow you to tailor the Maple Chicken Beef Bacon Sliders to your exact preferences, ensuring that every batch you make is uniquely yours and reflects your personal taste.

Your Turn to Create and Share!

Now that you’ve got all the tips, tricks, and inspiration, it’s your moment to shine! I wholeheartedly encourage you to roll up your sleeves, gather your ingredients, and give these incredible sliders a try. Don’t just read about them; experience the joy of making and tasting them for yourself. There’s a distinct satisfaction that comes from creating something delicious with your own hands, especially when it’s met with rave reviews from family and friends. It’s more than just a recipe; it’s an invitation to create lasting memories around the table.

Once you’ve made these Maple Chicken Beef Bacon Sliders, I would absolutely love to hear about your experience! Did you stick to the recipe, or did you venture into some exciting variations? What were your favorite serving suggestions? Please share your stories, your photos, and your invaluable feedback. Your culinary adventures inspire me and our entire cooking community. Tag us in your posts or leave a comment below – let’s celebrate the deliciousness together! Happy cooking, and I can’t wait to see what amazing creations you come up with. Your insights and shared joy truly make this culinary journey even more rewarding for all of us.


Maple Chicken Beef Bacon Sliders

Maple Chicken Beef Bacon Sliders

Maple Chicken Beef Bacon Sliders are a harmonious blend of smoky beef, tender chicken, crispy bacon, and a sweet maple-Dijon glaze, all nestled in a soft bun. These irresistible sliders offer a perfect balance of savory, sweet, and tangy flavors, making them an ideal appetizer, party snack, or a fun family meal.

Prep Time
30 Minutes
Cook Time
25 Minutes
Total Time
55 Minutes
Servings
6 sliders

Ingredients

  • 1 lb boneless, skinless chicken breasts
  • 1/4 cup maple syrup
  • 2 tbsp Dijon mustard
  • 1 tbsp olive oil
  • 6 slices beef bacon
  • 6 slider buns
  • 1 cup arugula
  • Salt to taste
  • Black pepper to taste

Instructions

  1. Step 1
    In a bowl, combine 2 tbsp maple syrup, 1 tbsp Dijon mustard, salt, and pepper. Add chicken breasts, ensuring they are well coated. Marinate for at least 30 minutes in the refrigerator.
  2. Step 2
    Heat olive oil in a skillet over medium-high heat. Remove chicken from marinade (discard marinade). Cook chicken for 4-6 minutes per side, until cooked through (internal temperature 165°F). Remove, let rest for 5-10 minutes, then slice or chop. In the same skillet, add the remaining 2 tbsp maple syrup and 1 tbsp Dijon mustard. Simmer briefly to create a light glaze. Toss the cooked chicken in this glaze.
  3. Step 3
    Preheat oven to 400°F (200°C). Line a baking sheet with parchment paper. Arrange beef bacon slices in a single layer. Bake for 15-20 minutes, or until crispy. Drain on paper towels.
  4. Step 4
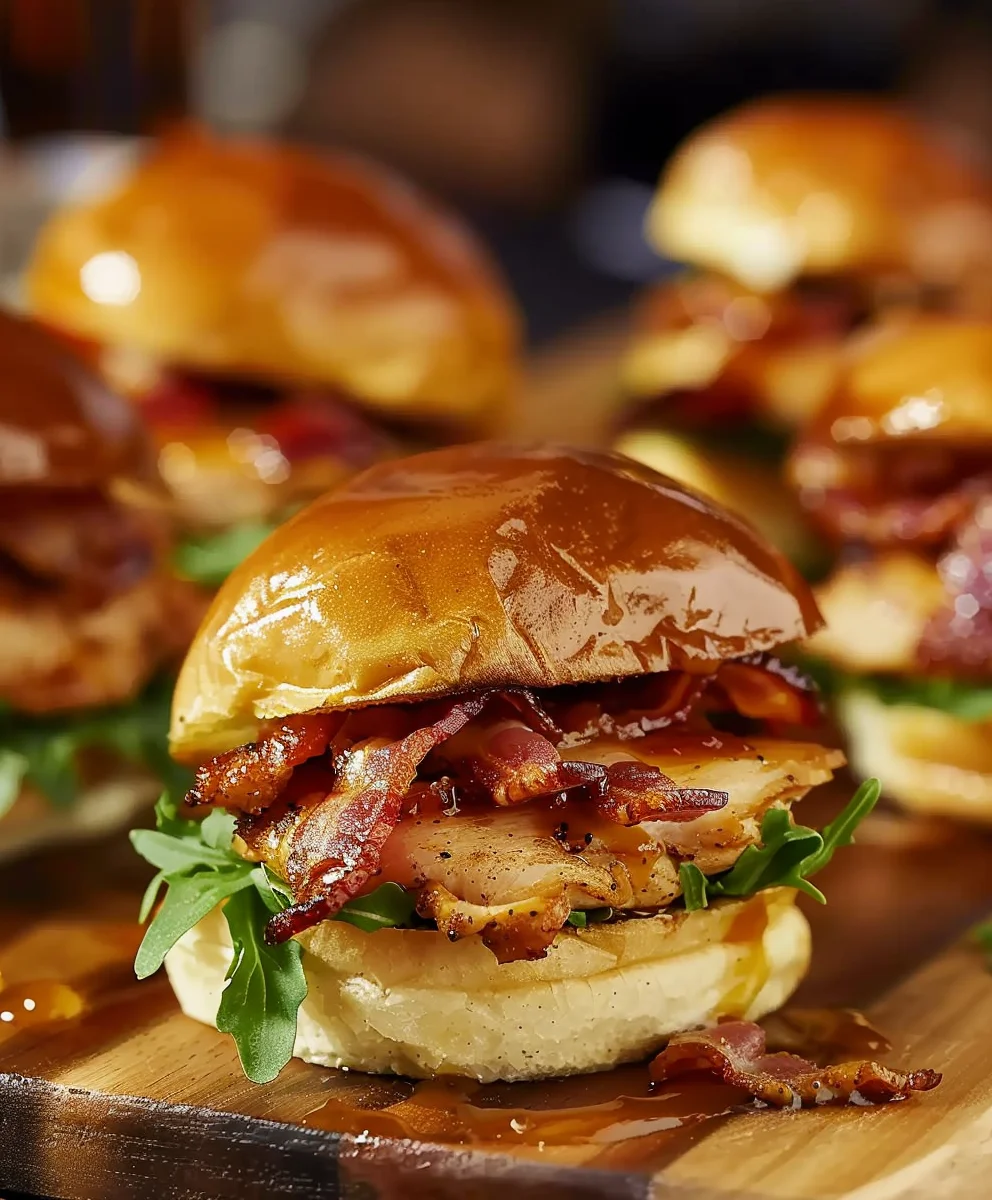
    Lightly toast slider buns. On the bottom half of each bun, layer the maple-glazed chicken, crispy beef bacon, and fresh arugula. Season with additional salt and pepper if desired. Cap with the top half of the bun. Serve immediately.

Important Information

Nutrition Facts (Per Serving)

It is important to consider this information as approximate and not to use it as definitive health advice.

Allergy Information

Please check ingredients for potential allergens and consult a health professional if in doubt.

« Previous Post
Mouthwatering One Pot Lasagna Soup: Dinner's Never Been Easier!
Next Post »
Delicious Breakfast Fried Rice Recipe for a Great Start

If you enjoyed this…

Melt-in-Your-Mouth Cheesy Chicken Crescent Rolls Recipe!

Irresistible Keto Philly Cheesesteak Rolls: Easy & Delicious!

Delicious Teriyaki Salmon Rice Taco Bowls with Pickled Veggies

Primary Sidebar

Browse by Diet

BreakfastDinnerLunchDessertAppetizer

Sweet Peach Yogurt Parfait Delight

One of my fondest memories is from a lazy summer afternoon spent at my grandmother’s house. The sun filtered through the kitchen window, casting a warm glow over the table where she would create her culinary magic. It was during one of those blissful moments that I first tasted her Peach Yogurt Parfait with Honey and Granola. The sweet aroma of ripe peaches mingling with creamy yogurt and the crunch of granola was nothing short of heavenly. It felt like summer captured in a bowl, and I still remember the joy of diving in with a spoon, each layer revealing a new burst of flavor.

When I think about that parfait, I can almost hear the gentle hum of the bees outside, reminding me of the floral notes that honey brings to every bite. The vibrant yellows and soft oranges of the peaches contrast beautifully with the creamy white yogurt and the golden crunch of granola. It’s a dish that not only looks delightful but also tastes like a celebration of fresh, wholesome ingredients.

What makes my version of this Peach Yogurt Parfait special is the careful balance of flavors and textures. I use ripe, juicy peaches, drizzled with locally sourced honey, and a homemade granola that’s bursting with nuts and seeds for an extra crunch. It’s a simple dish, but every layer is crafted with love and attention.

Let me show you exactly how to make this delightful parfait, so you can bring a bit of that summer magic into your kitchen!

Sweet Peach Yogurt Parfait Delight

Why You’ll Love This Recipe

  • Delightfully creamy texture from the Greek yogurt, paired with the juicy sweetness of fresh peaches.
  • Ready in under 20 minutes, making it a quick and satisfying breakfast or snack option.
  • Budget-friendly, using common ingredients that you may already have in your pantry.
  • Customizable with your favorite granola and nuts, allowing you to tailor each parfait to your taste.
  • Perfectly balanced flavors with the bright acidity of lemon juice and the sweetness of honey enhancing the peaches.

Ingredients

  • For the Parfait:
  • 2 cups plain Greek yogurt (or vanilla yogurt for a sweeter option)
  • 2 large ripe peaches, diced (about 2 cups)
  • 1 tablespoon fresh lemon juice (to prevent browning of peaches)
  • 2 tablespoons honey (plus more for drizzling)
  • 1 teaspoon vanilla extract (optional for extra flavor)
  • For the Granola:
  • 1 cup granola (store-bought or homemade; see notes for a simple granola recipe)
  • 1/4 cup sliced almonds (optional for added crunch)
  • 1/4 cup shredded coconut (optional for added flavor)

Let’s dive into some key ingredients that make this Peach Yogurt Parfait so delightful! First, the Greek yogurt is not only creamy but also packed with protein, making it a satisfying option for breakfast or a snack. If you’re looking for a sweeter option, you can easily substitute it with vanilla yogurt, though it may alter the overall flavor balance. Next, the ripe peaches are the star of the show; their natural sweetness shines through, so I recommend choosing peaches that yield slightly to pressure, indicating they’re perfectly ripe. If peaches aren’t in season, feel free to use nectarines or even frozen peaches—just thaw them before use. Finally, honey adds a lovely floral sweetness that ties everything together. If you prefer, maple syrup can serve as a delicious substitute.

Step-by-Step Instructions

  1. Start by preparing the peaches. Wash them thoroughly, then slice and dice them into bite-sized pieces. In a medium bowl, toss the diced peaches with 1 tablespoon of fresh lemon juice to prevent browning. Set aside for about 5 minutes while the lemon juice works its magic.
  2. In a separate bowl, combine the Greek yogurt, 2 tablespoons of honey, and 1 teaspoon of vanilla extract if using. Stir the mixture until smooth and thoroughly blended. This should take about a minute. Avoid overmixing to maintain the creaminess of the yogurt.
  3. Now it’s time to layer your parfait. Grab a clear glass or bowl to showcase your beautiful creation. Start with a generous spoonful of the yogurt mixture at the bottom—about 1/4 cup will do. Use a spoon to spread it evenly.
  4. Add a layer of the diced peaches over the yogurt, ensuring they cover the yogurt completely. You might want to use about half of what you have prepared—roughly 1 cup. This layer should be visually appealing, so arrange the peaches neatly.
  5. Sprinkle 1/4 cup of granola over the peaches. This adds a delightful crunch. Make sure to distribute it evenly to ensure every bite has that satisfying texture. Avoid packing it down too tightly, as you want it to maintain its crunch.
  6. Repeat the layers: spoon in another 1/4 cup of yogurt, followed by another cup of peaches, and another sprinkle of granola. You should have at least two layers, but feel free to add more depending on your glass size.
  7. Finish off your parfait with a drizzle of honey on top for added sweetness and a touch of elegance. If you’re using sliced almonds or shredded coconut, sprinkle them on top now. It adds a lovely visual contrast and extra flavor.
  8. Serve immediately or refrigerate for up to 30 minutes before serving to allow the flavors to meld together. However, I recommend enjoying it fresh to maintain the granola’s crunch.

Pro Tips for the Best Peach Yogurt Parfait With Honey And Granola

  • Make sure to choose ripe peaches for the best flavor and texture. A common mistake is using unripe fruit, which can lead to a less enjoyable parfait. Look for peaches that are fragrant and slightly soft to the touch.
  • Use a clear glass to assemble your parfait; this not only makes for a beautiful presentation but also allows you to see the colorful layers, which adds to the enjoyment of eating it.
  • For an even creamier texture, consider whipping the Greek yogurt with a hand mixer for a couple of minutes before layering. This small adjustment makes a huge difference in mouthfeel.
  • Be mindful of the granola-to-yogurt ratio. Too much granola can overwhelm the parfait, while too little can make it feel too creamy. Aim for about 1/4 cup of granola per layer for the perfect balance.
  • If you’re making this for a gathering, consider preparing the yogurt and peaches ahead of time and layering them just before serving. This ensures the granola stays crunchy!

Variations & Serving Ideas

There are so many ways to get creative with your Peach Yogurt Parfait! For a tropical twist, swap out the peaches for mangoes or pineapples and top with coconut flakes. If you prefer a berry flavor, mix in some blueberries or strawberries with the peaches for added color and taste. For a nutty version, incorporate chopped walnuts or pecans instead of almonds.

As for serving ideas, this parfait pairs beautifully with a side of scrambled eggs for a hearty breakfast or fresh fruit salad for a light lunch. You might also enjoy it alongside whole grain toast with almond butter for an energizing snack. The contrast of flavors and textures will elevate your meal experience!

Storage, Make-Ahead & Reheating

The Peach Yogurt Parfait is best enjoyed fresh, but you can prepare some components ahead of time. Store the layered parfait in an airtight container in the refrigerator for up to 24 hours. However, be cautious; the granola may lose its crunch if stored too long. You can freeze the yogurt and peach mixture for up to 2 months; just remember to thaw it in the refrigerator overnight before serving.

If you plan to enjoy this dish the next day, it can taste even better as the flavors meld together. Just remember to add the granola right before serving to keep its delightful crunch!

Frequently Asked Questions

Can I make Peach Yogurt Parfait With Honey And Granola ahead of time?

Yes — in fact, it tastes even better the next day as the flavors meld. However, I recommend waiting to add the granola until just before serving to maintain its crunch.

What can I substitute for Greek yogurt?

If you prefer a lighter option, you can substitute Greek yogurt with regular yogurt or a dairy-free alternative like coconut yogurt. Just remember that this may alter the creaminess and flavor profile slightly.

Can I use frozen peaches for this parfait?

Absolutely! Just make sure to thaw the frozen peaches before using them. They will still add great flavor, though the texture may be slightly softer than fresh peaches.

How do I make the parfait vegan?

To make a vegan version, substitute the Greek yogurt with a plant-based yogurt alternative, and replace honey with maple syrup or agave nectar. This keeps the parfait sweet while adhering to a vegan diet.

What other fruits can I use in this recipe?

You can mix and match fruits based on your preference. Try using strawberries, blueberries, raspberries, or even bananas. Just make sure to adjust the lemon juice as needed to prevent browning.

Sweet Peach Yogurt Parfait Delight

Final Thoughts

The Peach Yogurt Parfait with Honey and Granola is a delightful blend of creamy yogurt, sweet peaches, and crunchy granola that creates a satisfying and nourishing treat. Each layer bursts with flavor, making it a perfect choice for breakfast or a light dessert.

This is the kind of recipe I come back to again and again, especially when I want something refreshing and wholesome to start my day. The harmony of sweet and tart flavors, combined with the delightful crunch, never fails to lift my spirits!

I encourage you to give this parfait a try and indulge in its comforting goodness. Feel free to share your results or even add your own twist—perhaps a sprinkle of cinnamon or a handful of nuts. Enjoy creating your perfect parfait!

Print
clock clock iconcutlery cutlery iconflag flag iconfolder folder iconinstagram instagram iconpinterest pinterest iconfacebook facebook iconprint print iconsquares squares iconheart heart iconheart solid heart solid icon

Peach Yogurt Parfait


  • Author: Lily author
  • Total Time: 15 minutes
  • Yield: 4 servings 1x
Pin Recipe
Print Recipe

Description

This Peach Yogurt Parfait combines creamy Greek yogurt, juicy peaches, and crunchy granola for a delightful treat. It’s a perfect breakfast or snack that captures the essence of summer in every bite.


Ingredients

Scale
  • For the Parfait:
  • 2 cups plain Greek yogurt (or vanilla yogurt for a sweeter option)
  • 2 large ripe peaches, diced (about 2 cups)
  • 1 tablespoon fresh lemon juice (to prevent browning of peaches)
  • 2 tablespoons honey (plus more for drizzling)
  • 1 teaspoon vanilla extract (optional for extra flavor)
  • For the Granola:
  • 1 cup granola (store-bought or homemade; see notes for a simple granola recipe)
  • 1/4 cup sliced almonds (optional for added crunch)
  • 1/4 cup shredded coconut (optional for added flavor)

Instructions

  1. Start by preparing the peaches. Wash them thoroughly, then slice and dice them into bite-sized pieces. In a medium bowl, toss the diced peaches with 1 tablespoon of fresh lemon juice to prevent browning. Set aside for about 5 minutes while the lemon juice works its magic.
  2. In a separate bowl, combine the Greek yogurt, 2 tablespoons of honey, and 1 teaspoon of vanilla extract if using. Stir the mixture until smooth and thoroughly blended. This should take about a minute. Avoid overmixing to maintain the creaminess of the yogurt.
  3. Now it’s time to layer your parfait. Grab a clear glass or bowl to showcase your beautiful creation. Start with a generous spoonful of the yogurt mixture at the bottom—about 1/4 cup will do. Use a spoon to spread it evenly.
  4. Add a layer of the diced peaches over the yogurt, ensuring they cover the yogurt completely. You might want to use about half of what you have prepared—roughly 1 cup. This layer should be visually appealing, so arrange the peaches neatly.
  5. Sprinkle 1/4 cup of granola over the peaches. This adds a delightful crunch. Make sure to distribute it evenly to ensure every bite has that satisfying texture. Avoid packing it down too tightly, as you want it to maintain its crunch.
  6. Repeat the layers: spoon in another 1/4 cup of yogurt, followed by another cup of peaches, and another sprinkle of granola. You should have at least two layers, but feel free to add more depending on your glass size.
  7. Finish off your parfait with a drizzle of honey on top for added sweetness and a touch of elegance. If you’re using sliced almonds or shredded coconut, sprinkle them on top now. It adds a lovely visual contrast and extra flavor.
  8. Serve immediately or refrigerate for up to 30 minutes before serving to allow the flavors to meld together. However, I recommend enjoying it fresh to maintain the granola’s crunch.
  • Prep Time: 15 mins
  • Cook Time: 0 mins
  • Category: Breakfast
  • Method: No-cook
  • Cuisine: American

Nutrition

  • Serving Size: 1 parfait
  • Calories: 250
  • Sugar: 20 g
  • Sodium: 50 mg
  • Fat: 5 g
  • Saturated Fat: 2 g
  • Unsaturated Fat: 3 g
  • Trans Fat: 0 g
  • Carbohydrates: 40 g
  • Fiber: 3 g
  • Protein: 10 g
  • Cholesterol: 10 mg

Keywords: Choose ripe peaches for the best flavor and texture. Use a clear glass for a beautiful presentation. For creaminess, consider whipping the yogurt before layering. Be mindful of the granola-to-yogurt ratio. Prepare yogurt and peaches ahead of time for gatherings, layering just before serving.

Did you make this recipe?

Share a photo and tag us — we can't wait to see what you've made!

Sun-Kissed Frozen Orange Cream Slush

As a child, summer days felt like they lasted forever. I remember the sticky heat wrapping around me as I played outside, my laughter mingling with the sounds of the neighborhood. But nothing could cool me down quite like the moment I’d spot my grandmother, laboring over her blender, whipping up her famous Frozen Orange Creamsicle Slush. That vibrant orange treat, with its frosty texture and sweet citrus aroma, was like a burst of sunshine in a cup. Just one sip, and I could feel the coolness wash over me, sparking pure joy.

This Frozen Orange Creamsicle Slush has a way of making you feel like a kid again. Its creamy, dreamy consistency is a delightful balance of bright orange and soft vanilla, inviting you to dive right in. The refreshing tang of orange dances on your tongue, while the smooth creaminess envelops you in a comforting embrace. It’s a nostalgic treat that’s perfect for hot summer afternoons or anytime you need a little pick-me-up.

What makes my version of this slush stand out is the addition of a hint of vanilla bean, which elevates the flavor and adds an extra layer of richness. Plus, it’s super easy to whip up with just a few simple ingredients that you probably already have on hand! So, if you’re ready to relive those sun-soaked memories, let me show you exactly how to make it.

Sun-Kissed Frozen Orange Cream Slush

Why You’ll Love This Recipe

  • Each slush is a perfect blend of creamy vanilla and zesty orange, creating a nostalgic flavor reminiscent of summer days.
  • This refreshing treat is ready in under 15 minutes, making it an ideal quick dessert for unexpected guests or hot afternoons.
  • With just 8 simple ingredients, it’s budget-friendly, ensuring you don’t have to break the bank to enjoy a delicious slush.
  • The slush has a perfectly smooth texture, thanks to the combination of ice and ice cream, providing a delightful contrast to the bright citrus flavors.
  • It’s highly customizable; you can easily adjust the sweetness and add fresh herbs for a unique twist that suits your taste.

Ingredients

  • 2 cups orange juice (freshly squeezed or store-bought)
  • 1 cup vanilla ice cream
  • 1 cup crushed ice
  • 1/2 cup milk (whole or 2%)
  • 1/4 cup granulated sugar (adjust based on sweetness preference)
  • 1 teaspoon vanilla extract
  • Zest of 1 orange (for added flavor)
  • Fresh orange slices and mint leaves (for garnish)

The star of this Frozen Orange Creamsicle Slush is the orange juice, which provides the vibrant, citrusy base. Freshly squeezed juice will yield the brightest flavor, but store-bought options can be just as convenient. If you’re opting for store-bought, choose 100% pure juice with no added sugars for the best results. Another essential ingredient is the vanilla ice cream; it adds creaminess and sweetness. You can substitute it with dairy-free ice cream if you’re looking for a vegan option. Whole or 2% milk complements the ice cream, creating a smooth blend. If you want a lower-calorie version, almond or oat milk can be good alternatives.

Lastly, the granulated sugar can be adjusted based on your sweetness preference. If you prefer a more natural sweetener, consider using honey or agave syrup. The orange zest enhances the flavor profile, providing an aromatic pop that brings the whole slush together. Don’t skip it! It adds an extra layer of brightness that makes this slush truly special.

Step-by-Step Instructions

  1. Start by preparing your ingredients. Gather 2 cups of orange juice, 1 cup of vanilla ice cream, and 1 cup of crushed ice. Make sure the ice is finely crushed, as larger chunks can make blending difficult.
  2. In a blender, combine the orange juice, vanilla ice cream, crushed ice, and 1/2 cup of milk. Add 1/4 cup of granulated sugar and 1 teaspoon of vanilla extract. If you like a sweeter slush, consider adding a bit more sugar at this stage.
  3. Add the zest of 1 orange to the blender. This step is crucial for enhancing the citrus flavor of your slush. Make sure not to include the bitter white pith—only the flavorful zest.
  4. Blend the mixture on medium-high speed for about 30-45 seconds. Stop once the ingredients are fully combined and the slush has a smooth, even consistency. If you notice large chunks of ice, blend for an additional 10-15 seconds. Avoid over-blending, as this can make the slush too liquidy.
  5. Once blended, taste the slush. If it needs more sweetness, add a little more sugar and blend for a few more seconds. If it’s too thick, you can add a splash of milk to reach your desired consistency.
  6. Pour the slush into glasses. This recipe typically serves 4, but you can easily double it for larger gatherings. Use a spoon to help guide the slush into the glasses if needed.
  7. Garnish each serving with fresh orange slices and mint leaves. The mint not only adds a pop of color but also a refreshing aroma that complements the citrus flavors beautifully.
  8. Serve immediately and enjoy! If you’ve made extra, you can refrigerate it for a short time, but it’s best enjoyed fresh.

Pro Tips for the Best Frozen Orange Creamsicle Slush

  • Don’t skip the orange zest! It’s a game-changer for flavor. Always zest before juicing to make it easier.
  • Use a high-powered blender for the best texture. A standard blender may struggle with ice, leading to uneven consistency. If you have a food processor, that can work too, but ensure the ice is finely crushed.
  • Adjust the ice-to-liquid ratio carefully. If your slush is too thick, it won’t blend well. Start with less ice and add more until you reach your preferred texture.
  • Be cautious with the sugar! Always start with the lower amount, as you can easily add more, but it’s hard to fix an overly sweet slush.
  • For a fun twist, consider adding a splash of coconut milk or a handful of fresh fruit like strawberries or pineapple. This not only enhances the flavor but also adds a beautiful color contrast.

Variations & Serving Ideas

There are countless ways to put a spin on your Frozen Orange Creamsicle Slush. Consider making a tropical version by adding in some pineapple juice or coconut milk for a delightful tropical twist. If you’re feeling adventurous, try incorporating a handful of frozen mango or peach slices for added sweetness. For a lighter version, swap out the vanilla ice cream for Greek yogurt for a creamy yet tangy alternative.

As for serving ideas, this refreshing slush pairs wonderfully with light summer dishes like grilled chicken skewers, fish tacos, or a simple salad topped with citrus vinaigrette. The bright, zesty flavors of the slush complement these dishes perfectly, making them an ideal pairing for a sunny day.

Storage, Make-Ahead & Reheating

This Frozen Orange Creamsicle Slush is best enjoyed fresh, but if you have leftovers, you can store them in an airtight container in the fridge for up to 2 days. Just keep in mind that the slush may lose some of its texture over time as the ice melts. It doesn’t freeze well, as the ice will turn into a solid block. If you must freeze it, blend again after thawing to restore the slushy consistency. This treat is best the day you make it, as the flavors meld together beautifully overnight, enhancing its deliciousness.

Frequently Asked Questions

Can I make Frozen Orange Creamsicle Slush ahead of time?

Yes — in fact, it tastes even better the next day as the flavors meld. However, it’s best to enjoy it fresh, as the texture can change if stored for too long. If you need to prepare it ahead, keep it in the fridge and re-blend before serving.

What kind of orange juice should I use?

For the best flavor, use freshly squeezed orange juice. However, if you’re short on time, opt for 100% pure store-bought juice without added sugars. This will ensure that your slush remains flavorful and refreshing.

Can I substitute the vanilla ice cream?

Absolutely! If you’re looking for a dairy-free option, coconut milk ice cream or a non-dairy vanilla ice cream can work wonderfully. They will still provide the creamy texture and sweetness you desire.

How can I adjust the sweetness of my slush?

You can easily adjust the sweetness by modifying the amount of sugar added. Start with 1/4 cup and taste the mixture before blending. If you prefer it sweeter, add more sugar gradually until it reaches your desired level.

What should I do if my slush is too thick?

If your slush is too thick, simply add a splash of milk or orange juice and blend again. This will help achieve a more drinkable consistency while maintaining the slushy texture. Adjust gradually to reach your preferred thickness.

Sun-Kissed Frozen Orange Cream Slush

Final Thoughts

The Frozen Orange Creamsicle Slush is a delightful blend of refreshing citrus and creamy goodness, making it a perfect treat for warm days or any time you crave a taste of nostalgia. The way the bright orange flavor dances with the creamy texture truly elevates this slush, transforming it into a satisfying escape from the everyday.

This is the kind of recipe I come back to again and again, especially when I’m looking to cool down or impress guests at a summer gathering. It’s simple to make and always brings smiles all around! I encourage you to try this recipe for yourself—don’t hesitate to share your results or even put your own spin on it. Happy slushing!

Print
clock clock iconcutlery cutlery iconflag flag iconfolder folder iconinstagram instagram iconpinterest pinterest iconfacebook facebook iconprint print iconsquares squares iconheart heart iconheart solid heart solid icon

Frozen Orange Creamsicle Slush


  • Author: Lily author
  • Total Time: 15 minutes
  • Yield: 4 servings 1x
Pin Recipe
Print Recipe

Description

This Frozen Orange Creamsicle Slush is a refreshing treat that combines creamy vanilla and zesty orange flavors. Perfect for hot summer days, it brings back nostalgic memories with every sip.


Ingredients

Scale
  • 2 cups orange juice (freshly squeezed or store-bought)
  • 1 cup vanilla ice cream
  • 1 cup crushed ice
  • 1/2 cup milk (whole or 2%)
  • 1/4 cup granulated sugar (adjust based on sweetness preference)
  • 1 teaspoon vanilla extract
  • Zest of 1 orange (for added flavor)
  • Fresh orange slices and mint leaves (for garnish)

Instructions

  1. Start by preparing your ingredients. Gather 2 cups of orange juice, 1 cup of vanilla ice cream, and 1 cup of crushed ice. Make sure the ice is finely crushed, as larger chunks can make blending difficult.
  2. In a blender, combine the orange juice, vanilla ice cream, crushed ice, and 1/2 cup of milk. Add 1/4 cup of granulated sugar and 1 teaspoon of vanilla extract. If you like a sweeter slush, consider adding a bit more sugar at this stage.
  3. Add the zest of 1 orange to the blender. This step is crucial for enhancing the citrus flavor of your slush. Make sure not to include the bitter white pith—only the flavorful zest.
  4. Blend the mixture on medium-high speed for about 30-45 seconds. Stop once the ingredients are fully combined and the slush has a smooth, even consistency. If you notice large chunks of ice, blend for an additional 10-15 seconds. Avoid over-blending, as this can make the slush too liquidy.
  5. Once blended, taste the slush. If it needs more sweetness, add a little more sugar and blend for a few more seconds. If it’s too thick, you can add a splash of milk to reach your desired consistency.
  6. Pour the slush into glasses. This recipe typically serves 4, but you can easily double it for larger gatherings. Use a spoon to help guide the slush into the glasses if needed.
  7. Garnish each serving with fresh orange slices and mint leaves. The mint not only adds a pop of color but also a refreshing aroma that complements the citrus flavors beautifully.
  8. Serve immediately and enjoy! If you’ve made extra, you can refrigerate it for a short time, but it's best enjoyed fresh.
  • Prep Time: 15 min
  • Cook Time: 0 min
  • Category: Dessert
  • Method: Blending
  • Cuisine: American

Nutrition

  • Serving Size: 1 serving
  • Calories: 200
  • Sugar: 30 g
  • Sodium: 50 mg
  • Fat: 5 g
  • Saturated Fat: 3 g
  • Unsaturated Fat: 2 g
  • Trans Fat: 0 g
  • Carbohydrates: 40 g
  • Fiber: 1 g
  • Protein: 2 g
  • Cholesterol: 20 mg

Keywords: Don't skip the orange zest! It's a game-changer for flavor. Always zest before juicing to make it easier.

Did you make this recipe?

Share a photo and tag us — we can't wait to see what you've made!

Zesty Lemon Poppy Seed Delight

One rainy afternoon, I found myself in my grandmother’s cozy kitchen, the kind that always smelled like warmth and love. She was whipping up her famous Lemon Poppy Seed Loaf, a recipe that had been passed down through generations. As the batter came together, the zesty aroma of fresh lemons filled the air, mingling perfectly with the nutty fragrance of poppy seeds. I can still picture her, apron-clad, as she expertly drizzled a vibrant citrus icing over the loaf, creating a glossy, sun-kissed finish that beckoned us to dive in. It was a moment that sparked my own passion for baking, and this recipe has become a cherished staple in my home ever since.

When you take a bite of this Lemon Poppy Seed Loaf, it’s like a burst of sunshine on your palate. The loaf is beautifully golden, with a tender crumb that melts in your mouth. Each slice is speckled with tiny poppy seeds, adding a delightful crunch that contrasts beautifully with the tangy sweetness of the lemon. And that citrus icing? It’s the finishing touch that elevates this loaf from ordinary to extraordinary, with its bright, zesty flavor dancing on your taste buds.

This recipe stands out because it embraces simplicity while delivering on flavor. I’ve added a hint of vanilla to the batter, enhancing the overall taste and making it even more indulgent. Trust me, once you make this Lemon Poppy Seed Loaf With Citrus Icing, it’ll become a go-to in your baking repertoire.

So, let me show you exactly how to make it!

Zesty Lemon Poppy Seed Delight

Why You’ll Love This Recipe

  • Moist and tender crumb that melts in your mouth, thanks to the perfect balance of butter and buttermilk.
  • Bright, zesty lemon flavor paired with crunchy poppy seeds, creating a delightful texture and taste experience.
  • Easy to whip up in just about an hour, perfect for last-minute gatherings or a cozy afternoon treat.
  • Budget-friendly with everyday ingredients, making it an accessible option for all home bakers.
  • The citrus icing adds a sweet tang that elevates the loaf, turning a simple recipe into a showstopper!

Ingredients

  • 1 ½ cups (190g) all-purpose flour
  • 1 teaspoon baking powder
  • ½ teaspoon baking soda
  • ½ teaspoon salt
  • 3 tablespoons poppy seeds
  • ½ cup (115g) unsalted butter, softened to room temperature
  • 1 cup (200g) granulated sugar
  • 2 large eggs
  • 1 teaspoon vanilla extract
  • 1 teaspoon lemon zest (from about 1 medium lemon)
  • ½ cup (120ml) buttermilk
  • 2 tablespoons fresh lemon juice

For the Citrus Icing:

  • 1 cup (120g) powdered sugar
  • 2 tablespoons fresh lemon juice
  • 1 tablespoon orange juice
  • 1 teaspoon lemon zest (for garnish, optional)

Let’s dive into the key ingredients that make this Lemon Poppy Seed Loaf so special. The all-purpose flour provides the structure and base for the loaf, while the baking powder and baking soda ensure it rises perfectly, giving the loaf a light texture. For a gluten-free variation, you could substitute the flour with a gluten-free all-purpose blend. Poppy seeds not only add a delightful crunch but also contribute to the unique flavor profile that pairs well with the citrus notes.

Unsalted butter is crucial for achieving the buttery richness that makes this loaf so moist. If you’re looking for a dairy-free option, coconut oil or a vegan butter can be used instead. The buttermilk is another essential component, providing acidity that activates the baking soda for a fluffy texture. If you don’t have buttermilk on hand, you can easily make a substitute by mixing ½ cup of milk with 1 tablespoon of vinegar or lemon juice and letting it sit for about 5 minutes.

Step-by-Step Instructions

  1. Preheat your oven to 350°F (175°C). Grease a 9×5-inch loaf pan or line it with parchment paper for easy removal later.
  2. In a medium mixing bowl, whisk together 1 ½ cups of all-purpose flour, 1 teaspoon of baking powder, ½ teaspoon of baking soda, ½ teaspoon of salt, and 3 tablespoons of poppy seeds. This helps to evenly distribute the baking agents and ensures a uniform rise.
  3. In a large mixing bowl, cream together ½ cup of softened unsalted butter and 1 cup of granulated sugar using an electric mixer on medium speed for about 3-4 minutes, until the mixture is light and fluffy. Make sure to scrape down the sides of the bowl occasionally.
  4. Add 2 large eggs, 1 teaspoon of vanilla extract, and 1 teaspoon of lemon zest to the creamed butter and sugar, mixing until fully combined. You want a smooth consistency, so ensure there are no lumps of butter.
  5. In a small bowl, combine ½ cup of buttermilk and 2 tablespoons of fresh lemon juice. Alternately add the dry ingredients and buttermilk mixture to the butter mixture, starting and ending with the dry ingredients. Mix just until combined; do not overmix, as this can lead to a dense loaf.
  6. Pour the batter into the prepared loaf pan. Smooth the top with a spatula, ensuring it’s even. Bake in the preheated oven for 50-60 minutes, or until a toothpick inserted in the center comes out clean. The edges should be lightly golden brown, and the center should feel just set.
  7. Once baked, remove the loaf from the oven and allow it to cool in the pan for about 10 minutes. Then, transfer it to a wire rack to cool completely. Resist the urge to slice too soon, as it will be crumbly if it’s still warm.
  8. While the loaf is cooling, prepare the citrus icing. In a medium bowl, whisk together 1 cup of powdered sugar, 2 tablespoons of fresh lemon juice, and 1 tablespoon of orange juice until smooth. If the icing is too thick, you can add a little more juice to reach your desired consistency.
  9. Once the loaf is completely cool, drizzle the citrus icing over the top. If you like, sprinkle with an additional teaspoon of lemon zest for an extra pop of flavor and color.

Pro Tips for the Best Lemon Poppy Seed Loaf With Citrus Icing

  • Be careful not to overmix your batter; this is a common mistake that can lead to a dense loaf. Mix just until the dry ingredients are incorporated for a light and fluffy texture.
  • Use room temperature ingredients, especially the butter and eggs. This helps to create a smoother batter and ensures even baking. Take your eggs out of the fridge about 30 minutes before you start.
  • For a more pronounced lemon flavor, consider adding a little lemon extract in addition to the zest and juice. Just a half teaspoon can elevate the citrus notes significantly.
  • When measuring your flour, spoon it into the measuring cup and level it off with a knife instead of scooping directly from the bag. This prevents packing and ensures you don’t end up with a dry loaf.
  • Invest in a good quality loaf pan; it makes a difference in heat distribution, which ensures even baking. If your pan is dark-coated, reduce the oven temperature by 25°F to prevent over-browning.

Variations & Serving Ideas

For a delightful twist, consider adding blueberries or raspberries to the batter for a fruity burst of flavor. You can also experiment with different citrus fruits—try lime or grapefruit zest and juice for a refreshing change. For a healthier option, substitute half of the all-purpose flour with whole wheat flour for added fiber without compromising too much on texture.

This Lemon Poppy Seed Loaf pairs beautifully with a light salad, such as a mixed greens salad with a vinaigrette, or a cup of tea for a cozy afternoon treat. It also complements a creamy cheese platter, as the acidity of the loaf balances rich cheeses perfectly. Lastly, a scoop of vanilla ice cream on the side creates a delightful contrast of temperatures and flavors!

Storage, Make-Ahead & Reheating

This Lemon Poppy Seed Loaf can be stored at room temperature for up to 3 days if wrapped tightly in plastic wrap. If you want to keep it longer, it freezes well for up to 3 months. To freeze, wrap the loaf tightly in plastic wrap and then in aluminum foil to prevent freezer burn.

When you’re ready to enjoy it again, simply thaw it in the fridge overnight. Reheat individual slices in the microwave for 15-20 seconds or in a toaster oven until warmed through. Interestingly, many people find that this loaf tastes even better the next day, as the flavors have time to meld!

Frequently Asked Questions

Can I make Lemon Poppy Seed Loaf With Citrus Icing ahead of time?

Yes — in fact, it tastes even better the next day! You can make the loaf a day in advance, allowing the flavors to develop. Just be sure to store it in an airtight container to maintain its moisture.

Can I substitute the poppy seeds?

Absolutely! If you don’t have poppy seeds on hand or prefer an alternative, you can use sesame seeds for a similar crunch or omit them entirely for a smooth loaf.

What can I use instead of buttermilk?

If you don’t have buttermilk, you can easily create a substitute by mixing ½ cup of milk (dairy or plant-based) with 1 tablespoon of vinegar or lemon juice. Let it sit for 5 minutes before using in the recipe.

How can I make this recipe gluten-free?

To make a gluten-free version of this Lemon Poppy Seed Loaf, substitute the all-purpose flour with a gluten-free all-purpose flour blend. Just ensure that the blend contains a binding agent like xanthan gum for the best results.

What is the best way to store leftover loaf?

Leftover Lemon Poppy Seed Loaf should be stored in an airtight container at room temperature for up to 3 days. For longer storage, wrap it tightly and freeze for up to 3 months. Thaw it before serving for the best texture.

Zesty Lemon Poppy Seed Delight

Final Thoughts

The Lemon Poppy Seed Loaf with Citrus Icing is truly a delightful treat that brings a burst of brightness to any occasion. The zesty lemon flavor combined with the subtle crunch of poppy seeds creates a satisfying balance, while the citrus icing adds a touch of sweetness that perfectly complements the loaf’s tanginess.

This is the kind of recipe I come back to again and again, especially when I want to brighten up a gloomy day or celebrate a small victory. The aroma that fills the kitchen as it bakes is absolutely heavenly! I encourage you to give this recipe a try; you might just find it becoming a beloved staple in your home. Don’t forget to share your results or even add your own unique twist—I can’t wait to see what you create!

Print
clock clock iconcutlery cutlery iconflag flag iconfolder folder iconinstagram instagram iconpinterest pinterest iconfacebook facebook iconprint print iconsquares squares iconheart heart iconheart solid heart solid icon

Lemon Poppy Seed Loaf


  • Author: Lily author
  • Total Time: 14 minute
  • Yield: 1 loaf 1x
Pin Recipe
Print Recipe

Description

This Lemon Poppy Seed Loaf is a delightful treat that combines zesty lemon flavor with crunchy poppy seeds. Topped with a citrus icing, it’s perfect for any occasion.


Ingredients

Scale
  • 1 ½ cups (190g) all-purpose flour
  • 1 teaspoon baking powder
  • ½ teaspoon baking soda
  • ½ teaspoon salt
  • 3 tablespoons poppy seeds
  • ½ cup (115g) unsalted butter, softened to room temperature
  • 1 cup (200g) granulated sugar
  • 2 large eggs
  • 1 teaspoon vanilla extract
  • 1 teaspoon lemon zest (from about 1 medium lemon)
  • ½ cup (120ml) buttermilk
  • 2 tablespoons fresh lemon juice
  • 1 cup (120g) powdered sugar
  • 2 tablespoons fresh lemon juice
  • 1 tablespoon orange juice
  • 1 teaspoon lemon zest (for garnish, optional)

Instructions

  1. Preheat your oven to 350°F (175°C). Grease a 9×5-inch loaf pan or line it with parchment paper for easy removal later.
  2. In a medium mixing bowl, whisk together 1 ½ cups of all-purpose flour, 1 teaspoon of baking powder, ½ teaspoon of baking soda, ½ teaspoon of salt, and 3 tablespoons of poppy seeds. This helps to evenly distribute the baking agents and ensures a uniform rise.
  3. In a large mixing bowl, cream together ½ cup of softened unsalted butter and 1 cup of granulated sugar using an electric mixer on medium speed for about 3-4 minutes, until the mixture is light and fluffy. Make sure to scrape down the sides of the bowl occasionally.
  4. Add 2 large eggs, 1 teaspoon of vanilla extract, and 1 teaspoon of lemon zest to the creamed butter and sugar, mixing until fully combined. You want a smooth consistency, so ensure there are no lumps of butter.
  5. In a small bowl, combine ½ cup of buttermilk and 2 tablespoons of fresh lemon juice. Alternately add the dry ingredients and buttermilk mixture to the butter mixture, starting and ending with the dry ingredients. Mix just until combined; do not overmix, as this can lead to a dense loaf.
  6. Pour the batter into the prepared loaf pan. Smooth the top with a spatula, ensuring it’s even. Bake in the preheated oven for 50-60 minutes, or until a toothpick inserted in the center comes out clean. The edges should be lightly golden brown, and the center should feel just set.
  7. Once baked, remove the loaf from the oven and allow it to cool in the pan for about 10 minutes. Then, transfer it to a wire rack to cool completely. Resist the urge to slice too soon, as it will be crumbly if it’s still warm.
  8. While the loaf is cooling, prepare the citrus icing. In a medium bowl, whisk together 1 cup of powdered sugar, 2 tablespoons of fresh lemon juice, and 1 tablespoon of orange juice until smooth. If the icing is too thick, you can add a little more juice to reach your desired consistency.
  9. Once the loaf is completely cool, drizzle the citrus icing over the top. If you like, sprinkle with an additional teaspoon of lemon zest for an extra pop of flavor and color.
  • Prep Time: 15 mins
  • Cook Time: 50-60 mins
  • Category: Dessert
  • Method: Baking
  • Cuisine: American

Nutrition

  • Serving Size: 1 slice
  • Calories: 200
  • Sugar: 15 g
  • Sodium: 150 mg
  • Fat: 8 g
  • Saturated Fat: 5 g
  • Unsaturated Fat: 3 g
  • Trans Fat: 0 g
  • Carbohydrates: 30 g
  • Fiber: 1 g
  • Protein: 3 g
  • Cholesterol: 40 mg

Keywords: Be careful not to overmix your batter; this is a common mistake that can lead to a dense loaf. Use room temperature ingredients for a smoother batter and even baking.

Did you make this recipe?

Share a photo and tag us — we can't wait to see what you've made!

  • Privacy Policy
  • Terms Of Service
  • Contact
  • About
  • GDPR

Copyright © 2025 Homesmad