Grilled Cheese Burrito—just the name itself sparks joy and curiosity, doesn’t it? I am absolutely thrilled to share with you a recipe that takes two beloved comfort food icons and marries them into one unbelievably delicious, handheld masterpiece. We all know and love the classic grilled cheese sandwich, a quintessential American comfort food, revered for its crispy bread and molten cheese interior. Then there’s the versatile burrito, a staple of Mexican and Tex-Mex cuisine, packed with savory fillings. The genius of combining these two culinary giants into a single Grilled Cheese Burrito lies in its ultimate satisfaction.
A Modern Comfort Food Fusion
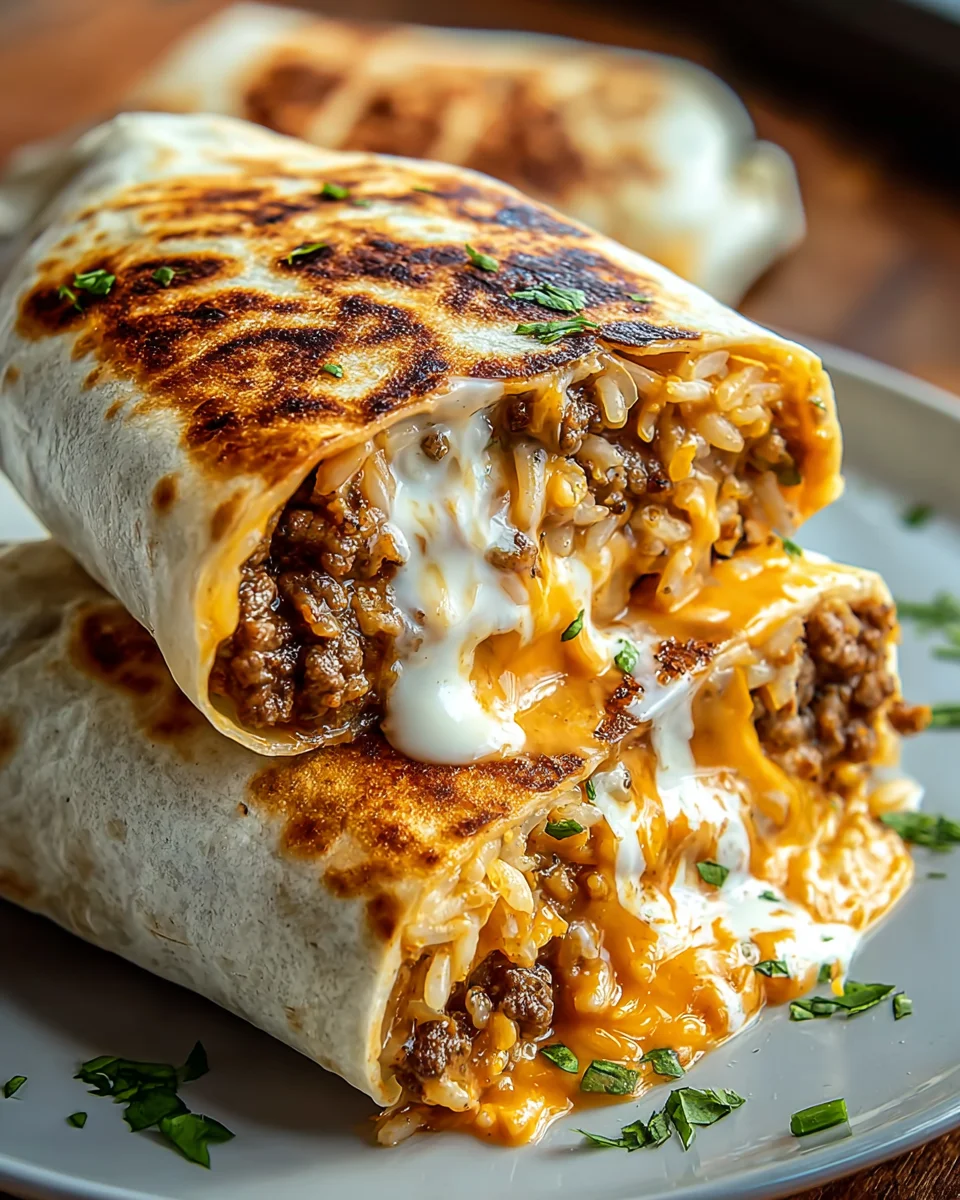
This isn’t just another fusion dish; it’s an experience. Imagine a perfectly golden, buttery tortilla, grilled to crispy perfection on the outside, encasing a generous layer of melted, stretchy cheese that adheres lovingly to a hearty filling of your choice. It’s the kind of dish that offers a delightful textural contrast with every bite—crunchy, creamy, and wonderfully soft all at once. People adore this creation not only for its incredible taste but also for its convenience and the sheer comfort it provides. It’s perfect for a quick lunch, a satisfying dinner, or even a fun brunch option. Get ready to elevate your meal game with this truly irresistible recipe!
Ingredients:
- For the Savory Beef Filling:
- 1.5 lbs (about 680g) 80/20 ground beef (for maximum flavor and juiciness)
- 1 large yellow onion, finely diced
- 4 cloves garlic, minced
- 2 tablespoons olive oil (or a neutral cooking oil)
- 1 packet (about 1 oz/28g) taco seasoning, or 2-3 tablespoons of your favorite homemade blend
- 1 teaspoon ground cumin
- 0.5 teaspoon smoked paprika
- 0.25 cup (60ml) water or beef broth
- 2 tablespoons tomato paste
- Salt and freshly ground black pepper to taste
- Optional: 1/4 cup (60g) finely diced red bell pepper for extra sweetness and crunch
- For the Zesty Cilantro Lime Rice:
- 1 cup (185g) long-grain white rice (like Basmati or Jasmine)
- 2 cups (470ml) chicken broth or water
- 0.5 teaspoon salt
- 0.25 cup (about 10g) fresh cilantro, finely chopped
- 1-2 tablespoons fresh lime juice (from about 1 medium lime), to taste
- For the Creamy Refried Beans:
- 1 can (15 oz/425g) refried beans (I prefer traditional or fat-free)
- 2 tablespoons water or milk (to loosen consistency)
- Optional: 1/4 teaspoon garlic powder, a pinch of cumin
- For the Burrito Assembly:
- 8 large (10-12 inch) flour tortillas (ensure they are fresh and pliable)
- 2 cups (about 220g) shredded Monterey Jack cheese, Colby Jack, or a Mexican blend (divided for inside and outside)
- 0.5 cup (120g) sour cream or Mexican crema
- 0.5 cup (120g) salsa (your favorite chunky red or pico de gallo)
- Optional additions: sliced pickled jalapeños, diced avocado, hot sauce
- For the “Grilled Cheese” Finish:
- 2 tablespoons unsalted butter, softened (for brushing tortillas, if not using cheese directly on pan)
- Extra shredded cheese for the crispy outer layer (we already accounted for 2 cups above, but you might want a little more if you love a super cheesy crust)
Preparing the Savory Beef Filling
-
Begin with BROWNING the Beef: Place a large skillet or Dutch oven over medium-high heat. Once hot, add your 1.5 lbs of 80/20 ground beef. Break it up with a wooden spoon or spatula. We’re looking to brown it deeply, creating those wonderful caramelized bits that pack so much flavor. This usually takes about 5-7 minutes.
Tip for Flavor:
Don’t rush this step! Those browned bits on the bottom of the pan, known as fond, are pure flavor gold. They’ll release later when we add liquids.
- Drain the Fat: Once the beef is thoroughly browned, tilt the pan and carefully drain off any excess fat. This prevents your filling from becoming greasy. You can use a spoon to hold the beef back or transfer it to a colander lined with paper towels for a quick drain. Return the beef to the pan.
-
Sauté Aromatics: Reduce the heat to medium. Add the 2 tablespoons of olive oil to the pan (if needed, if there’s still a tiny bit of rendered fat, you might skip this). Toss in your finely diced yellow onion. Sauté, stirring occasionally, until the onion softens and becomes translucent, which should take about 5-7 minutes.
Aromatic Bliss:
This is where the kitchen starts to smell absolutely incredible! The softened onions provide a sweet base for our filling.
- Introduce Garlic and Spices: Add the minced garlic to the pan and cook for another minute until fragrant. Be careful not to burn it! Immediately after, stir in the taco seasoning blend, ground cumin, and smoked paprika. Cook these spices for about 30 seconds, stirring constantly. This “toasting” of the spices truly awakens their flavors.
- Build Depth with Tomato Paste and Liquid: Stir in the 2 tablespoons of tomato paste. Cook it for about 1-2 minutes, pressing it against the bottom of the pan. This caramelizes the paste, deepening its flavor. Then, pour in the 0.25 cup of water or beef broth, scraping up any browned bits (the fond!) from the bottom of the pan. This deglazing step adds immense flavor to the sauce.
- Simmer and Season: Bring the mixture to a gentle simmer. Reduce the heat to low, cover the pan, and let it cook for at least 10-15 minutes, allowing all the flavors to meld beautifully. If you’re adding the optional diced red bell pepper, stir it in now. Taste the filling and adjust with salt and freshly ground black pepper as needed. I always recommend tasting a small spoonful to ensure it’s perfectly seasoned. Remove from heat and set aside.
Preparing the Zesty Cilantro Lime Rice
- Rinse the Rice: In a fine-mesh sieve, rinse the 1 cup of long-grain white rice under cold running water until the water runs clear. This step removes excess starch, preventing sticky rice.
- Cook the Rice: Combine the rinsed rice, 2 cups of chicken broth or water, and 0.5 teaspoon of salt in a medium saucepan. Bring the mixture to a boil over high heat. Once boiling, immediately reduce the heat to low, cover the saucepan tightly, and let it simmer for 15 minutes without lifting the lid.
- Rest and Fluff: After 15 minutes, remove the saucepan from the heat, but keep the lid on. Let the rice rest for another 5-10 minutes. This allows the steam to finish cooking the rice evenly and makes it light and fluffy.
- Add the Zest: Uncover the rice and fluff it gently with a fork. Stir in the finely chopped fresh cilantro and 1-2 tablespoons of fresh lime juice. Taste and add more lime juice if you prefer a stronger citrus kick. This rice is so vibrant and really brightens up the burrito!
Warming the Refried Beans and Tortillas
- Heat the Refried Beans: Transfer the can of refried beans to a small saucepan. Add 2 tablespoons of water or milk to loosen them up slightly. Stir in optional garlic powder and a pinch of cumin if desired. Heat over low-medium heat, stirring frequently, until warmed through and smooth, about 5-7 minutes. You want them spreadable, not stiff.
-
Warm the Tortillas: This is a crucial step for pliable, easy-to-roll burritos that won’t crack. You have a few options:
- Microwave Method: Wrap a stack of 2-3 tortillas in a damp paper towel and microwave for 20-30 seconds until warm and flexible. Repeat with remaining tortillas.
- Skillet Method: Heat a dry skillet over medium heat. Warm each tortilla for about 15-20 seconds per side, just until they are soft and slightly bubbly.
- Oven Method: Wrap the entire stack of tortillas in foil and warm in a 250°F (120°C) oven for 10-15 minutes.
The Goal: We want them warm enough to fold without tearing, but not crispy. Keep them covered with a clean kitchen towel to retain warmth and moisture while you assemble.
Assembling Your Grilled Cheese Burritos
- Set Up Your Assembly Line: Clear a clean workspace. Arrange all your components: warm tortillas, beef filling, cilantro lime rice, warm refried beans, shredded cheese, sour cream, salsa, and any other desired fillings. Having everything within reach makes the process smooth and enjoyable.
- Lay the Foundation: Place one warm tortilla on your work surface. Spread about 2-3 tablespoons of the warm refried beans evenly over the bottom third of the tortilla, leaving a good 1-inch border on the sides. This bean layer acts as a “glue” and adds incredible flavor and texture.
-
Layer the Fillings:
- Next, spoon about 0.25 cup of the cilantro lime rice over the beans.
- Follow with 0.5 cup (or a generous scoop) of the savory beef filling.
- Sprinkle about 2 tablespoons of shredded cheese directly on top of the beef. The cheese will melt slightly and help bind everything.
- Add a dollop (about 1 tablespoon) of sour cream and a tablespoon of salsa.
- If using, add a few slices of pickled jalapeños or diced avocado now.
Don’t Overfill!
This is key to a successful burrito fold. It’s tempting to pile everything on, but resist! A properly filled burrito is easier to roll and grill.
-
Mastering the Burrito Fold: This takes a little practice, but you’ll get the hang of it!
- Fold the bottom edge of the tortilla up and over the filling, tucking it in snugly.
- Fold the left and right sides of the tortilla inward towards the center. You should now have a neat package.
- While maintaining tension, tightly roll the burrito upwards from the bottom. Keep it snug as you roll to ensure all the delicious fillings stay put. The goal is a compact, cylindrical shape.
Set the rolled burrito seam-side down on a plate. Repeat with the remaining tortillas and fillings.
The “Grilled Cheese” Grand Finale
- Prepare Your Grilling Surface: Heat a large non-stick skillet or a cast-iron pan over medium heat. You want it hot enough to melt cheese and crisp a tortilla, but not so hot that it burns the cheese quickly.
-
The FIRST Cheese Crust (This is the magic!):
- Once your pan is hot, sprinkle about 0.25 cup of shredded cheese directly onto the dry, hot skillet in the rough shape of your burrito. You want a good, even layer.
- Immediately place one assembled burrito, seam-side down, directly on top of the melting cheese.
- Using a spatula, gently press down on the burrito for about 2-3 minutes. You’re looking for the cheese to melt, bubble, and form a golden-brown, crispy crust onto the tortilla. This is your “grilled cheese” element coming to life!
Watch Closely:
Cheese can go from perfectly golden to burnt quickly. Keep an eye on it! A spatula can help you peek underneath.
-
The SECOND Cheese Crust:
- Carefully lift the burrito with a spatula. The bottom should now be beautifully golden and cheesy.
- If there’s any remaining loose cheese from the first side, scrape it up or discard.
- Sprinkle another 0.25 cup of shredded cheese onto a clean spot in the pan (or clean the pan quickly with a paper towel if too much burnt cheese).
- Place the burrito, with its newly formed crispy side up, onto the fresh melting cheese. Press down again for another 2-3 minutes until the second side is also golden brown and crispy.
Alternative Method (Less Messy, Still Cheesy): If you prefer less direct cheese-on-pan action, you can lightly butter or mayonnaise the outside of your rolled burrito, then press it into a plate of shredded cheese (about 1/4 cup per side). Then, grill the burrito directly in a lightly oiled pan until golden and crispy on both sides, and the cheese has melted onto the tortilla. This creates a more conventional grilled cheese crust.
-
Serve Immediately: Once both sides are perfectly golden and crispy, remove the Grilled Cheese Burrito from the pan. For the ultimate enjoyment, I love to slice them in half diagonally right away. The warm, gooey interior contrasting with the crispy, cheesy exterior is truly something special. Serve with extra salsa, sour cream, or guacamole on the side.
Enjoy Your Masterpiece!
You’ve just created a truly epic meal that combines the best of two worlds. Dig in!

Well, my friends, we’ve reached the exciting end of our culinary journey, and I genuinely hope you’re as thrilled about this recipe as I am. If you’ve followed along, you already know that this isn’t just any meal; it’s a game-changer. What makes this recipe a true must-try is its ingenious fusion of two beloved comfort food titans. We’re talking about the irresistible crunch and golden perfection of a classic grilled cheese sandwich, harmoniously married with the hearty, flavorful embrace of a savory burrito. It’s a symphony of textures and tastes, delivering that deeply satisfying, gooey cheese pull you crave, wrapped around a treasure trove of your favorite fillings. I truly believe this combination creates an experience that transcends the ordinary, offering both the nostalgic warmth of familiar flavors and the excitement of something wonderfully new and innovative. It’s comforting, it’s bold, and it’s surprisingly straightforward to achieve culinary greatness in your own kitchen.
The beauty of this creation lies not just in its incredible taste, but also in its incredible versatility. Once you master the basic technique, your kitchen becomes a playground of endless possibilities. When it comes to serving, a classic side of crunchy tortilla chips and your favorite salsa is always a winner. But why stop there? Imagine pairing your creation with a vibrant, fresh pico de gallo, a dollop of cool sour cream or Greek yogurt, or even some creamy, homemade guacamole. For a touch of freshness, a simple side salad with a zesty vinaigrette would cut through the richness beautifully, making it a perfectly balanced meal. Don’t forget the pickled jalapeños or onions for that delightful tangy kick!
Now, let’s talk variations, because this is where the real fun begins and you can truly make this recipe your own. For the protein, consider swapping the ground beef for spicy shredded chicken, slow-cooked carnitas, or even a plant-based crumble for a vegetarian delight. Black beans and corn are fantastic additions regardless of your protein choice, adding texture and earthy sweetness. If you’re feeling adventurous, scramble some eggs with a sprinkle of cheese and a strip of crispy bacon for an epic breakfast version. The cheese choice is also entirely up to you! While a sharp cheddar and Monterey Jack blend is fantastic, feel free to experiment with pepper jack for a spicy kick, smoked gouda for depth, or even a touch of cream cheese for extra creaminess. Don’t be afraid to load up on sautéed onions and bell peppers for added sweetness and crunch, or wilted spinach for a healthy boost. A drizzle of chipotle mayo, a dash of your favorite hot sauce, or a tangy avocado crema can elevate the flavor profile even further. This is your canvas; paint it with the flavors you love most. Whether you call it a quesadilla-burrito hybrid or simply the ultimate comfort food, this Grilled Cheese Burrito is designed for customization.
So, what are you waiting for? I wholeheartedly encourage you to roll up your sleeves, gather your ingredients, and dive into making this incredible dish. Trust me, the aroma alone as it sizzles in the pan, crisping to golden perfection, is enough to get your mouth watering. There’s a profound satisfaction in creating something this delicious from scratch, something that combines all those irresistible elements into one perfect package. This isn’t just a meal; it’s the ultimate comfort food experience, and I truly believe this Grilled Cheese Burrito recipe will become a staple in your kitchen. Once you’ve had a taste of this fusion masterpiece, you’ll wonder how you ever lived without it. Please, when you make it, share your culinary triumphs with me! I absolutely love seeing your creations, your unique twists, and hearing about your experiences. Snap a photo, tell me your favorite variations, and let’s celebrate the joy of good food together. Happy cooking, and get ready to indulge in something truly spectacular!
Easy Grilled Cheese Burrito – Crispy & Cheesy Perfection!
The Grilled Cheese Burrito combines two beloved comfort food icons into one unbelievably delicious, handheld masterpiece. Imagine a perfectly golden, buttery tortilla, grilled to crispy perfection on the outside, encasing a generous layer of melted, stretchy cheese that adheres lovingly to a hearty filling of seasoned beef, rice, and zesty sauces. This fusion dish offers a delightful textural contrast with every bite—crunchy, creamy, and wonderfully soft all at once, perfect for a quick lunch, satisfying dinner, or fun brunch.
Ingredients
Instructions
Important Information
Nutrition Facts (Per Serving)
It is important to consider this information as approximate and not to use it as definitive health advice.
Allergy Information
Please check ingredients for potential allergens and consult a health professional if in doubt.


