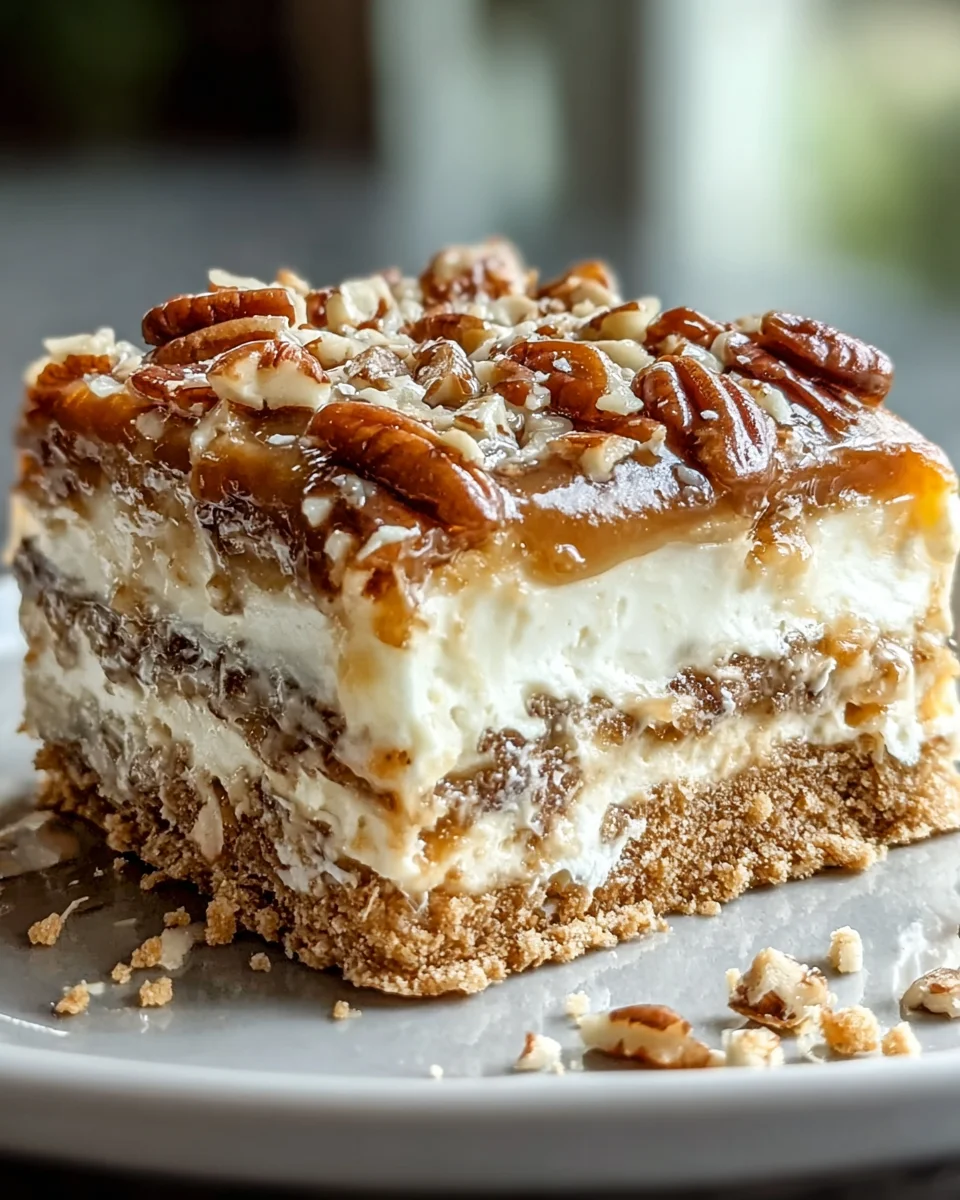
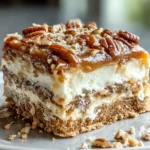
Pecan Pie Lasagna A No Bake Dream Dessert
Oh my goodness, friends, prepare yourselves for a dessert revelation! I’m so excited to introduce you to Pecan Pie Lasagna A No Bake Dream Dessert, a creation so utterly brilliant, it’s going to completely transform your dessert game. Forget everything you thought you knew about traditional pecan pie or savory lasagnas – this dish takes the best of both worlds and combines them into something truly spectacular.
What makes this recipe so special, you ask? Well, for starters, it’s a no-bake wonder! That’s right, you get all the rich, nutty, sweet deliciousness of a classic pecan pie without ever having to turn on your oven. This means less fuss, less heat in the kitchen, and more time enjoying the anticipation of this incredible treat. Plus, it’s a lasagna! But not the kind with beef and cheese; this is a decadent layered dessert, making it a unique and impressive showstopper for any gathering or just a fantastic indulgence for yourself. It’s a clever fusion that delivers all the comfort of a homemade pie with the fun, shareable format of a layered dessert.
I promise you, readers, you are going to absolutely adore this dessert. It’s incredibly easy to assemble, yet tastes like something you slaved over for hours. You’ll love how the contrasting textures and flavors come together: a crunchy crust (think graham cracker or shortbread), a creamy, luscious middle layer that melts in your mouth, and a gooey, caramelized pecan topping that screams comfort and holiday cheer. It’s perfect for when you’re craving that classic pecan pie taste but want something a little lighter, a little quicker, and definitely more exciting. Get ready to impress everyone (and yourself!) with this unbelievably delicious, stress-free dessert that’s about to become your new favorite!
Ingredient Notes
Oh, this Pecan Pie Lasagna is truly a dream dessert, and what makes it even better is that it’s no-bake! Getting the right ingredients is key to achieving those delicious layers that mimic a classic pecan pie, but in a refreshing, chilled form. Here’s what you’ll need and some thoughts on substitutions.
- Graham Cracker Crumbs: These form the buttery base of our lasagna. I find that a good quality graham cracker provides that perfect slightly sweet, slightly spiced crunch.
- Substitutions: If you’re not a fan of graham crackers, you could absolutely use crushed Nilla wafers, shortbread cookies, or even gingersnaps for a different flavor profile. Just make sure to adjust the amount of melted butter slightly, as some cookies absorb more than others.
- Melted Butter: Unsalted is my go-to for controlling the saltiness, but salted works too if you prefer a slight salty kick in your crust. It binds the crumbs together beautifully.
- Cream Cheese: Full-fat cream cheese, softened to room temperature, is essential for our creamy, tangy middle layer. It needs to be soft enough to whip smooth, without any lumps.
- Substitutions: Mascarpone cheese could be a delightful, slightly richer alternative. Just ensure it’s at room temperature as well.
- Powdered Sugar (Confectioners’ Sugar): This sweetens our cream cheese layer and helps achieve that silky-smooth texture without any graininess.
- Whipped Topping: A tub of frozen whipped topping, thawed, makes this dessert incredibly easy. It’s light, airy, and stable.
- Substitutions: If you prefer, you can certainly make your own homemade whipped cream. I’d recommend stabilizing it slightly with a touch of powdered sugar or a teaspoon of cornstarch per cup of heavy cream to help it hold its shape longer.
- Instant Vanilla or Butterscotch Pudding Mix: This is where a lot of the classic “pie” flavor comes in for our layers. Instant pudding makes it super quick to prepare.
- Substitutions: While vanilla or butterscotch are excellent choices that complement pecan pie flavors, feel free to experiment with a cheesecake-flavored instant pudding mix for an even more decadent experience. Chocolate could work too, if you like chocolate pecan pie!
- Cold Milk: Essential for preparing the instant pudding. Whole milk will yield the creamiest pudding, but any percentage will work.
- Pecans: Chopped pecans are non-negotiable for a pecan pie lasagna! I like to give them a quick toast in a dry pan for a few minutes before adding them to the filling; it really deepens their flavor.
- Brown Sugar: This provides that characteristic deep, molasses-like sweetness that’s synonymous with pecan pie filling.
- Corn Syrup (or Maple Syrup): Light corn syrup gives the pecan filling its classic gooey texture and shine.
- Substitutions: If you prefer to avoid corn syrup, pure maple syrup is an excellent non-alcohol alternative that will lend a wonderful, complementary flavor, though the texture might be slightly less thick.
- Vanilla Extract: A good quality vanilla extract ties all the flavors together in both the cream cheese and pecan layers.
Step-by-Step Instructions
Let’s get this dreamy Pecan Pie Lasagna assembled! Remember, patience with chilling is key for the perfect slice. I usually start with preparing my ingredients and ensuring everything is at the right temperature.
- Prepare the Crust:
- First, I grab my graham crackers and crush them into fine crumbs. You can do this easily in a food processor or by placing them in a Ziploc bag and crushing them with a rolling pin.
- Then, I melt the butter and combine it with the graham cracker crumbs in a medium bowl until the crumbs are evenly moistened.
- Press this mixture firmly into the bottom of a 9×13-inch baking dish. Use the bottom of a glass or your knuckles to get a really compact and even layer. Pop it into the freezer for about 15 minutes while you prepare the next layers; this helps it set quickly.
- Make the Cream Cheese Layer:
- In a large mixing bowl, I beat the softened cream cheese with the powdered sugar until it’s light, fluffy, and completely smooth, with no lumps. A hand mixer makes this super easy.
- Gently fold in about half of your thawed whipped topping into the cream cheese mixture. Be careful not to deflate the whipped topping too much.
- Spread this creamy mixture evenly over the chilled graham cracker crust. I use an offset spatula for a smooth finish. Place the dish back in the refrigerator while you move to the next step.
- Whip Up the Pudding Layer:
- In another bowl, I whisk together the instant pudding mix with the cold milk. Keep whisking for about 2-3 minutes until the pudding starts to thicken significantly. It should be quite thick.
- Carefully spread this thickened pudding layer over the cream cheese layer in your dish. Return to the fridge.
- Create the No-Bake Pecan Pie Topping:
- In a saucepan over medium heat, I combine the brown sugar, corn syrup (or maple syrup), and butter. Stir constantly until the butter is melted and the sugar is dissolved, and the mixture comes to a gentle simmer. Let it simmer for just 1-2 minutes, stirring.
- Remove from heat and stir in the chopped pecans and vanilla extract. Allow this mixture to cool for about 10-15 minutes, stirring occasionally, so it doesn’t melt the layers beneath it when you spread it. It will thicken as it cools.
- Once cooled slightly, carefully spoon and spread the pecan topping evenly over the pudding layer.
- Final Layer and Chill:
- Gently spread the remaining whipped topping over the pecan layer.
- At this point, you can optionally sprinkle a few extra chopped pecans on top for garnish, or even a drizzle of caramel sauce if you’re feeling extra decadent!
- Cover the dish loosely with plastic wrap and refrigerate for at least 4-6 hours, but preferably overnight. This chilling time is crucial for the layers to set properly, making it easy to slice and serve cleanly.
Tips & Suggestions
I’ve made my fair share of no-bake desserts, and I’ve picked up a few tricks along the way that I think will really elevate your Pecan Pie Lasagna experience. These little details can make all the difference!
- Chilling is Your Best Friend: I cannot stress this enough – do not rush the chilling time! For truly clean, beautiful slices, I always aim for at least 6 hours, or even better, overnight. This allows all the layers to firm up and meld together beautifully. If you try to cut it too soon, your layers might squish and blur.
- For Cleaner Slices: Before slicing and serving, I always recommend dipping your knife in hot water and wiping it clean between each cut. This creates super neat edges, making each piece look perfectly professional and appetizing.
- Toasting Pecans: This is a small step that yields big flavor! I like to lightly toast my pecans in a dry skillet over medium-low heat for about 5-7 minutes, stirring frequently, until they’re fragrant. Be careful not to burn them! Let them cool before adding to your filling. It brings out their natural nuttiness and adds depth to the pecan topping.
- Customizing Pudding Flavors: While vanilla or butterscotch are classic choices, don’t be afraid to experiment! A cheesecake-flavored instant pudding mix would make this even richer. For a subtle twist, a banana cream pudding could be surprisingly good, or even a sugar-free pudding if you’re watching sugar intake.
- Adding a Pinch of Spice: For an extra layer of warmth, I sometimes stir a tiny pinch (about 1/4 teaspoon) of ground cinnamon or nutmeg into the cream cheese layer, or even into the pecan topping mixture. It enhances the “pie” feel.
- Garnish Galore: Don’t forget the presentation! A sprinkle of additional toasted pecans, a light dusting of powdered sugar, or a delicate drizzle of caramel sauce over each slice just before serving truly elevates this dessert from delicious to absolutely stunning.
- Room Temperature Ingredients: For the cream cheese layer, ensure your cream cheese is at room temperature. This is essential for achieving a smooth, lump-free consistency. If it’s too cold, you’ll end up with stubborn lumps.
Storage
This Pecan Pie Lasagna is a fantastic make-ahead dessert, which I absolutely love for gatherings! Proper storage ensures it stays fresh and delicious.
- Refrigeration: Because of the cream cheese, pudding, and whipped topping layers, this dessert absolutely needs to be stored in the refrigerator. I always keep it covered loosely with plastic wrap or aluminum foil to prevent it from drying out or absorbing any refrigerator odors. It will stay fresh and delicious for 3-4 days when stored correctly.
- Freezing: I generally don’t recommend freezing this dessert. While some no-bake desserts can handle it, the texture of the whipped topping and the instant pudding can become a bit watery or grainy upon thawing, especially with multiple layers. The pecan topping might also lose some of its desired chewiness. For the best experience, I always suggest enjoying it fresh from the refrigerator within a few days of making it.

Final Thoughts
There you have it! I truly believe that my Pecan Pie Lasagna A No Bake Dream Dessert is a game-changer when it comes to satisfying those sweet cravings, especially during busy times. It’s not every day you stumble upon a dessert that captures all the comforting, nutty, caramel-like flavors of a classic pecan pie, yet requires no oven time at all. This incredible creation brings together layers of creamy goodness, crunchy pecans, and that signature sweet depth, all without the fuss of baking. Trust me, once you experience the delightful simplicity and rich taste of this Pecan Pie Lasagna A No Bake Dream Dessert, you’ll wonder how you ever lived without it. It’s truly a dream come true for anyone seeking an effortless yet utterly impressive dessert. Give it a try – your taste buds (and your schedule!) will thank you!
Easy No-Bake Pecan Pie Lasagna – Your Dream Dessert!
- Total Time: 30 minutes
- Yield: 12 servings
Description
This Pecan Pie Lasagna is a no-bake dessert that combines the rich flavors of classic pecan pie with the fun of a layered treat. It’s easy to assemble and perfect for any gathering or indulgence.
Ingredients
- Graham Cracker Crumbs
- Melted Butter
- Cream Cheese
- Powdered Sugar (Confectioners' Sugar)
- Whipped Topping
- Instant Vanilla or Butterscotch Pudding Mix
- Cold Milk
- Pecans
- Brown Sugar
- Corn Syrup (or Maple Syrup)
- Vanilla Extract
Instructions
- Prepare the Crust: First, crush the graham crackers into fine crumbs. Melt the butter and combine it with the graham cracker crumbs until evenly moistened. Press this mixture into the bottom of a 9×13-inch baking dish and freeze for about 15 minutes.
- Make the Cream Cheese Layer: Beat the softened cream cheese with the powdered sugar until light and fluffy. Gently fold in half of the thawed whipped topping and spread this mixture over the chilled crust. Refrigerate while preparing the next layer.
- Whip Up the Pudding Layer: Whisk together the instant pudding mix with the cold milk until thickened. Spread this pudding layer over the cream cheese layer and return to the fridge.
- Create the No-Bake Pecan Pie Topping: In a saucepan, combine the brown sugar, corn syrup (or maple syrup), and butter. Stir until melted and simmer for 1-2 minutes. Remove from heat, stir in the chopped pecans and vanilla extract, and let cool slightly before spreading over the pudding layer.
- Final Layer and Chill: Spread the remaining whipped topping over the pecan layer. Optionally garnish with extra chopped pecans or caramel sauce. Cover loosely with plastic wrap and refrigerate for at least 4-6 hours, preferably overnight.
- Prep Time: 30 mins
- Cook Time: 0 mins
- Category: Dessert
- Method: No-Bake
- Cuisine: American
Nutrition
- Serving Size: 1 slice
- Calories: 350
- Sugar: 25 g
- Sodium: 150 mg
- Fat: 20 g
- Saturated Fat: 10 g
- Unsaturated Fat: 8 g
- Trans Fat: 0 g
- Carbohydrates: 40 g
- Fiber: 2 g
- Protein: 4 g
- Cholesterol: 30 mg
Keywords: Chilling is crucial for clean slices. Toasting pecans enhances their flavor. Feel free to experiment with pudding flavors and add a pinch of spice for warmth.