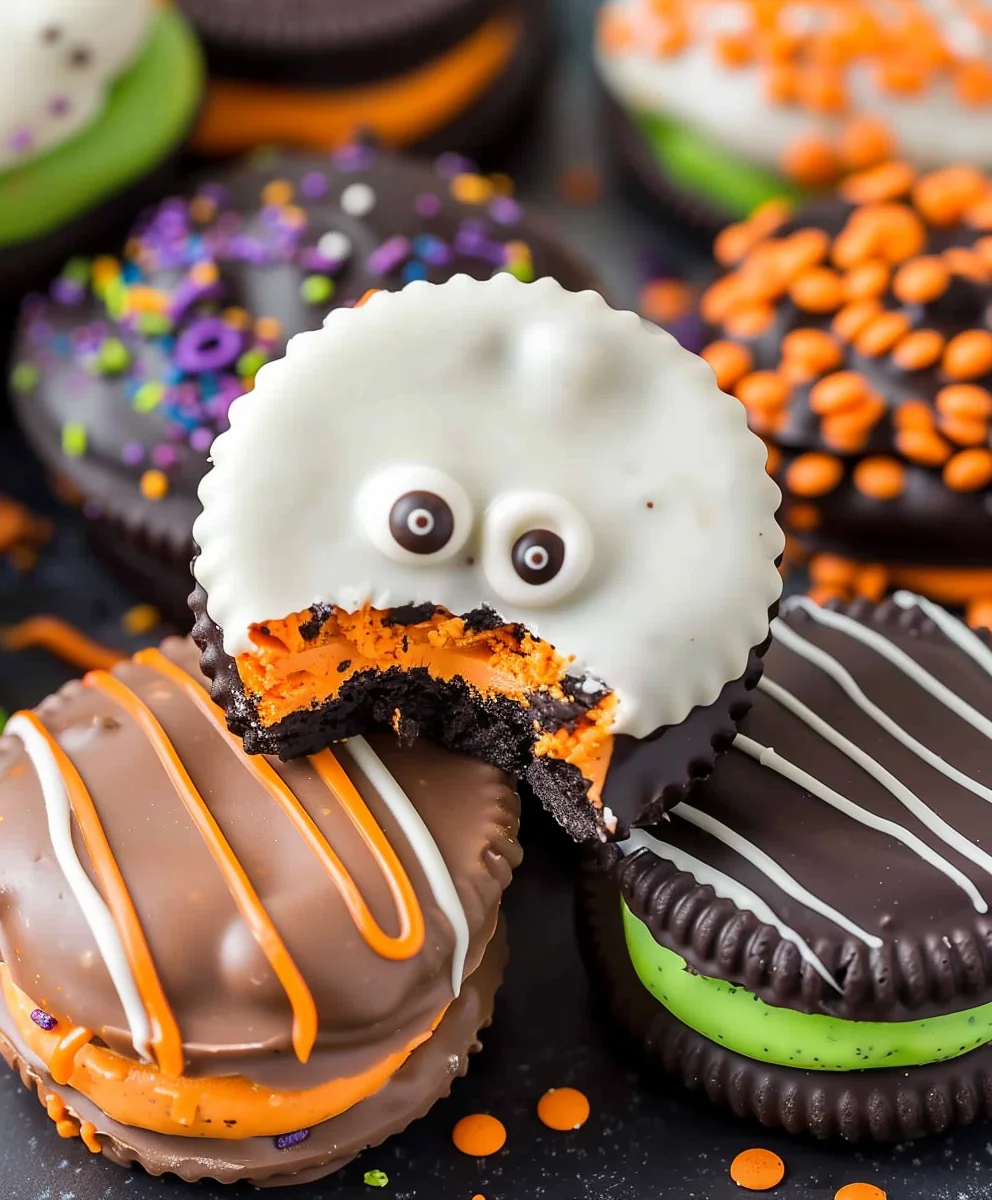
Easy Spooky Chocolate Covered Halloween Dipped Oreos are an absolute game-changer for your Halloween festivities, transforming a simple cookie into a spectacularly festive delight with minimal effort. As the crisp autumn air settles and leaves begin to change, our thoughts invariably turn to the joy of seasonal traditions and, of course, delicious holiday confections. While Halloween often conjures images of elaborate costumes and thrilling trick-or-treating adventures, there’s a unique charm in crafting homemade treats that bring smiles and a touch of spooky fun to the season.
This particular recipe masterfully captures the essence of modern Halloween enjoyment, combining the universally adored Oreo cookie with a vibrant, festive chocolate coating and a dash of playful, eerie charm. People absolutely adore these treats because they offer that irresistible crunch of an Oreo contrasted beautifully with a smooth, sweet chocolate shell, all achieved without ever needing to turn on your oven. They are wonderfully convenient, undeniably delicious, and incredibly customizable, making them the ultimate no-bake dessert for any Halloween gathering or a delightful family activity. Prepare to delight everyone with these truly enchanting Easy Spooky Chocolate Covered Halloween Dipped Oreos!
Ingredients:
- One standard package of your favorite Oreo cookies. I find the classic original Oreos work beautifully, but if you’re a fan of a thicker treat, double-stuffed Oreos are also a fantastic choice! This usually gives you about 36-40 cookies to work with.
- 12 oz (approximately 340g) high-quality white melting chocolate or candy melts. These are specifically designed for easy melting and a smooth finish, which is crucial for our vibrant Halloween colors.
- 12 oz (approximately 340g) good quality dark chocolate melting wafers or candy melts. This provides a wonderful contrast and is perfect for a classic spooky look or for intricate drizzles.
- Food-grade gel food coloring in Halloween-appropriate shades: Orange, Purple, Green, and Black. It is absolutely essential to use oil-based or specific candy food coloring. Water-based food coloring will cause your melting chocolate to seize and become unusable.
- An assortment of Halloween-themed sprinkles:
- Orange and black jimmies or sugar strands.
- Purple and green nonpareils for a fine, speckled look.
- Fun Halloween-shaped sprinkles like tiny ghosts, pumpkins, bats, or skulls.
- Edible glitter in silver, gold, or iridescent (optional, for that extra magical sparkle!).
- Plenty of edible googly eyes in various sizes. These are my absolute favorite for bringing our spooky treats to life with a touch of playful charm!
- Popsicle sticks or lollipop sticks (optional, if you prefer to make your dipped Oreos into convenient “pops” for easy handling and display).
- Vegetable shortening or refined coconut oil (about 1-2 teaspoons per batch of melting chocolate, if needed to thin the consistency slightly. Use very sparingly as too much can affect setting).
Preparation & Melting Chocolate
- Prepare Your Workspace: Before you even think about melting chocolate, let’s get organized! Lay out several sheets of parchment paper or silicone baking mats on your baking sheets or a large flat surface. This will be where your beautiful Easy Spooky Chocolate Covered Halloween Dipped Oreos will rest and set. Trust me, having this ready makes the dipping process so much smoother and less messy.
- Gather Your Tools: You’ll want a few microwave-safe bowls (at least two to three, especially if you’re doing multiple colors simultaneously), sturdy spoons or silicone spatulas for stirring, a few toothpicks or a small skewer for intricate details later, and small bowls or ramekins for your various sprinkles. A deep, narrow bowl is often best for dipping the Oreos, as it allows for full submersion without using an excessive amount of chocolate.
- Melt the White Chocolate Base: Place about half of your white melting chocolate or candy melts into a microwave-safe bowl. Heat it in the microwave in 30-second intervals, stirring thoroughly after each interval. Patience is key here! Chocolate can go from perfectly melted to scorched and clumpy in seconds. Continue heating and stirring until the chocolate is smooth and completely melted, with no lumps remaining. If it seems a little too thick, add about ½ to 1 teaspoon of vegetable shortening or coconut oil and stir until fully incorporated. This will slightly thin the chocolate, making it easier to dip and ensuring a smoother coating.
- Color the White Chocolate: Once your white chocolate is perfectly melted and smooth, divide it into separate small bowls – one for each color you plan to use (orange, purple, green). Keep a portion of white chocolate uncolored if you plan to use it for drizzling or specific white details. Add a tiny amount of your chosen oil-based gel food coloring to each bowl. Start with a very small dab on a toothpick, stir it in completely, and then add more if you want a deeper, more vibrant hue. Remember, a little goes a long way, especially with gel colors! Continue to stir until the color is uniform and streak-free. If at any point the colored chocolate starts to thicken, you can pop it back into the microwave for 10-15 seconds and stir again.
- Melt the Dark Chocolate: In a separate microwave-safe bowl, melt your dark chocolate melting wafers using the same gentle 30-second interval method described in step 3. Stir diligently after each interval until it’s velvety smooth. If you find it’s too thick for dipping, a small amount of shortening or coconut oil can be added here too, but dark chocolate tends to be a bit more fluid than white chocolate. This dark chocolate will be wonderful for classic black-dipped Oreos or for making striking contrast drizzles later.
Dipping & Decorating the Oreos
- Prepare for Dipping: Have your melted, colored chocolates ready alongside your various bowls of sprinkles and edible googly eyes. If you’re using lollipop sticks, carefully insert one into the cream filling of each Oreo before you start dipping. This makes handling much easier!
- The Dipping Technique: Pick up an Oreo (either by hand or by its stick). Gently submerge the entire cookie into one of your chosen melted chocolates. I usually find that a deep, narrow bowl is perfect for this, as it allows me to completely cover the cookie without needing an excessive amount of chocolate. Use a fork or a dipping tool to carefully turn the cookie to ensure it’s fully coated.
- Remove Excess Chocolate: This is a crucial step for a professional-looking finish! Lift the chocolate-covered Oreo out of the bowl and gently tap your hand holding the fork/stick against the side of the bowl. Allow the excess chocolate to drip off. You want a nice, even coating, not a thick blob. You can also carefully scrape the bottom of the cookie lightly against the rim of the bowl. This helps create a neat edge and prevents a “foot” of chocolate from forming around the base when it sets. Achieving that perfect, smooth coating is key to truly Easy Spooky Chocolate Covered Halloween Dipped Oreos!
- Place on Parchment & Apply Primary Sprinkles: Immediately after removing the excess chocolate, carefully place the dipped Oreo onto your prepared parchment paper. While the chocolate is still wet and tacky, generously sprinkle your desired Halloween sprinkles over the top. Don’t be shy! This is where the fun really begins. You can do a single color of nonpareils, a mix of jimmies, or even those adorable Halloween-shaped sprinkles. If you want to cover the entire top, sprinkle away! If you’re going for a half-dipped look, you can carefully dip only half the cookie, or only sprinkle half.
- Attach Googly Eyes (if desired): If you’re adding googly eyes, gently press them onto the wet chocolate right after sprinkling. The wet chocolate acts as the perfect edible glue. Place them strategically to create funny or spooky faces! Two eyes are classic, but three or more can be wonderfully whimsical for a truly spooky effect.
- Repeat and Refrigerate: Continue this process, dipping and decorating all your Oreos with your various colors and sprinkles. Once a baking sheet is full, carefully transfer it to the refrigerator for about 10-15 minutes, or until the chocolate is completely set and firm to the touch. This chilling step ensures your chocolate hardens beautifully and quickly. If you’re in a cooler environment, they might even set at room temperature, but the fridge guarantees a speedy set.
Adding Spooky Details & Finishing Touches
- Prepare Drizzle Chocolate: Once your base-dipped Oreos are set, it’s time to add even more flair! You can use any remaining melted chocolate from your previous colors, or melt a fresh small batch of dark chocolate, white chocolate, or even another spooky color like black. For drizzling, the chocolate needs to be a bit thinner than for dipping. If it feels too thick, add just a tiny bit more shortening or coconut oil (⅛ to ¼ teaspoon at a time) and stir until it flows smoothly off a spoon.
- Creating Drizzles: Transfer your drizzling chocolate into a small Ziploc bag, snip a tiny corner off the bag (and I mean TINY – you can always make it bigger, but you can’t make it smaller!), or use a decorating bag with a very small round tip. Hold the bag a few inches above the set Oreos and move it back and forth in a zigzag motion, allowing thin lines of chocolate to fall across the cookies. You can do contrasting colors, like white drizzle over a dark purple Oreo, or dark chocolate over an orange one. Get creative with your patterns! You can also drizzle the entire tray of set cookies at once for efficiency.
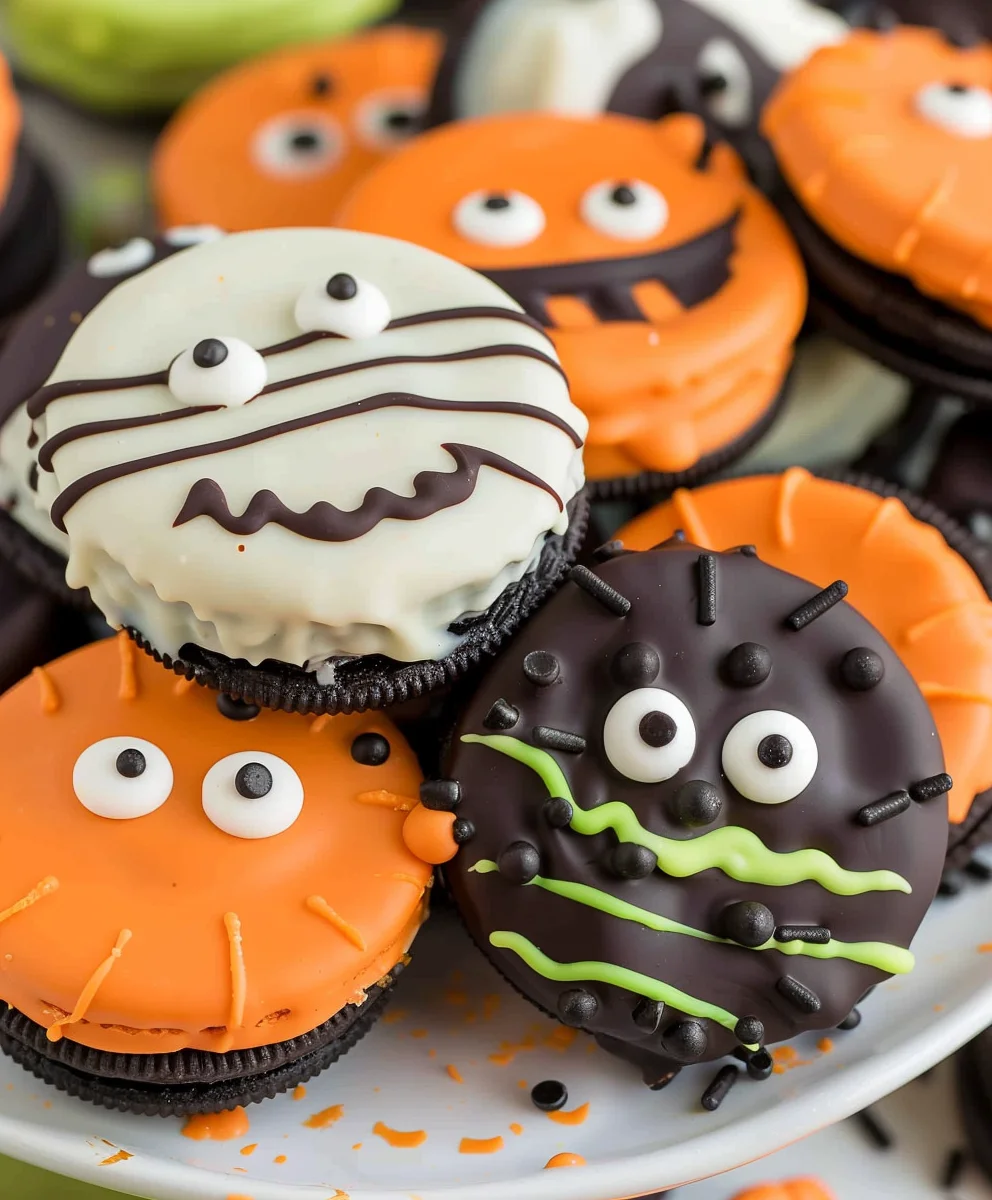
- Mummy Oreos: For a super cute mummy effect, dip your Oreos in white chocolate and let them set. Then, using a tiny snip on a bag of another batch of white chocolate, drizzle thin lines back and forth across the cookie, leaving a small gap in the middle. While this drizzle is still wet, carefully place two edible googly eyes in the gap. Let them set again. They’re adorable!
- Spiderweb Oreos: These are a classic! Dip your Oreo in dark chocolate and place it on the parchment. Immediately, while the dark chocolate is still very wet, take a bag of melted white chocolate (or a contrasting color) and pipe a small spiral pattern on top of the wet dark chocolate. Then, grab a toothpick and starting from the center of the spiral, drag the toothpick outwards towards the edge of the cookie, creating a beautiful spiderweb effect. Repeat this around the cookie, wiping your toothpick clean between each drag for crisp lines. It’s surprisingly easy and looks incredibly impressive for these Easy Spooky Chocolate Covered Halloween Dipped Oreos.
- Adding Edible Glitter: If you’re using edible glitter, gently brush or dust it onto your set, decorated Oreos for an extra magical shimmer. This is often best applied once all chocolate is fully set.
- Final Setting Time: Once all your desired decorations are complete, allow your Easy Spooky Chocolate Covered Halloween Dipped Oreos to set completely. Depending on your room temperature and how much chocolate you’ve used, this can take anywhere from 30 minutes to an hour at room temperature, or just another 10-15 minutes in the refrigerator. Ensure they are completely firm before handling or storing.
- Storage: Store your beautiful creations in an airtight container at room temperature for up to two weeks, or in the refrigerator if your home is particularly warm. If stacking, it’s a good idea to place a piece of parchment paper between layers to prevent sticking. These make fantastic party favors, Halloween treats, or just a fun, spooky snack to enjoy yourself! You’ll be amazed at how simple it is to create such a striking and delicious Halloween treat.
Conclusion:
And there you have it, folks! We’ve journeyed together through the delightful process of crafting some truly memorable Halloween treats. I genuinely believe that this recipe for our Easy Spooky Chocolate Covered Halloween Dipped Oreos is an absolute winner, destined to become a staple in your autumnal celebrations. What makes them so irresistible? It’s the perfect trifecta of simplicity, visual appeal, and undeniable deliciousness. Imagine biting into that crisp chocolate shell, perfectly contrasting with the creamy filling and crunchy cookie within – it’s a textural dream. These aren’t just snacks; they’re tiny canvases of edible art that are incredibly fun to make, whether you’re a seasoned baker or just dipping your toes into the world of festive treats. They offer that wonderful blend of homemade charm and professional polish, all without requiring any advanced culinary skills. That’s right, even the most kitchen-shy individuals can pull these off with spectacular results, much to the delight of anyone lucky enough to try them.
The beauty of these dipped Oreos extends far beyond their immediate enjoyment. They are incredibly versatile, making them perfect for almost any Halloween-themed gathering or gifting occasion. For your next Halloween party, arrange them artfully on a tiered serving platter alongside other themed snacks like gummy worms and candy corn. Their vibrant colors and playful designs will instantly elevate your spread and draw appreciative gasps from guests. Consider individually wrapping them in small clear treat bags tied with festive ribbons; they make fantastic party favors, thoughtful gifts for teachers, or delightful additions to your local trick-or-treaters’ haul if you’re feeling extra generous this year. They also work wonderfully as a surprise in lunchboxes during the spooky season, bringing a little cheer to school days. Don’t limit yourself to just a single design; mix and match your sprinkles and colors to create a truly diverse and eye-catching array that showcases your creativity.
Endless Creativity: Serving Suggestions & Variations
And speaking of creativity, let’s talk variations! While our core recipe for the Easy Spooky Chocolate Covered Halloween Dipped Oreos is fantastic as is, there’s a whole world of possibilities waiting to be explored. Instead of just orange and black, why not introduce vibrant green or purple candy melts to your palette? You could swirl two or three colors together for a marbled effect that looks incredibly intricate but is surprisingly easy to achieve. For those who love a bit of extra sparkle, edible glitter dust can be brushed onto the still-wet chocolate for a truly magical sheen. Or, for a different textural experience, try crushing up some leftover candy corn or other Halloween candies and sprinkling them over the chocolate before it sets. If you’re feeling adventurous, a tiny drop of peppermint extract or orange zest added to your melted chocolate can introduce an exciting flavor twist that will surprise and delight. And who says it has to be just Oreos? While they are undoubtedly classic, this dipping technique works beautifully with other cookies like Nutter Butters (imagine them as mummified peanuts!) or even shortbread cookies for a slightly different base. The sky’s the limit when it comes to personalizing these delightful treats, allowing you to tailor them perfectly to your taste and aesthetic, ensuring every bite is a delightful surprise.
So, my friends, I implore you: don’t just read about these wonderful creations. Grab your ingredients, gather your enthusiasm, and set aside a little time to bring these fantastic treats to life in your own kitchen. You’ll find the process incredibly rewarding, and the smiles they bring to faces will be priceless. Whether you’re making them with your kids, for your friends, or simply for your own enjoyment, these chocolate-covered delights are sure to add an extra layer of magic to your Halloween season. They are an experience to be savored, from the joy of their creation to the last delicious crumb.
Please, snap a photo, share your experience, and tell me all about the fun you had making them and the reactions they received. You can share your pictures and stories in the comments section below – I’m always so thrilled to connect with fellow food enthusiasts and see your unique twists on my recipes. Let’s make this Halloween the most deliciously spooky one yet, filled with laughter, good company, and plenty of these irresistible, homemade delights. Happy dipping, everyone!
Easy Spooky Chocolate Covered Halloween Dipped Oreos
Transform simple Oreo cookies into spectacular Halloween treats with minimal effort. This no-bake recipe combines classic Oreos with vibrant chocolate coatings and playful, eerie charm, perfect for any Halloween gathering or family activity.
Ingredients
-
1 standard package (36-40) Oreo cookies
-
12 oz white melting chocolate or candy melts
-
12 oz dark chocolate melting wafers or candy melts
-
Oil-based gel food coloring (orange, purple, green, black)
-
Assorted Halloween sprinkles (jimmies, nonpareils, shaped sprinkles)
-
Edible glitter (optional)
-
Edible googly eyes (various sizes)
-
Popsicle or lollipop sticks (optional)
-
1-2 tsp vegetable shortening or refined coconut oil (optional, for thinning chocolate)
Instructions
-
Step 1
Line baking sheets with parchment paper. Gather microwave-safe bowls, spoons, toothpicks, and small containers for sprinkles. Deep, narrow bowls work best for dipping. -
Step 2
Melt half of the white chocolate in a microwave-safe bowl in 30-second intervals, stirring until smooth. If too thick, add ½-1 tsp shortening or coconut oil. -
Step 3
Divide melted white chocolate into separate bowls (for orange, purple, green). Add oil-based gel food coloring, stirring until uniform. Keep some white chocolate uncolored for details. -
Step 4
Melt dark chocolate in a separate bowl using 30-second intervals, stirring until smooth. Thin with shortening or coconut oil if needed. -
Step 5
Have all melted chocolates, sprinkles, and googly eyes ready. (Optional: Insert popsicle sticks into Oreos for easy handling). -
Step 6
Submerge each Oreo completely into a chosen melted chocolate color. Use a fork or dipping tool. -
Step 7
Lift the Oreo and gently tap off excess chocolate against the bowl rim for a smooth, even coating. Lightly scrape the bottom edge. -
Step 8
Immediately place dipped Oreo on parchment paper. While chocolate is wet, generously apply Halloween sprinkles. -
Step 9
(Optional): Gently press edible googly eyes onto the wet chocolate. -
Step 10
Repeat for all Oreos. Refrigerate baking sheets for 10-15 minutes until chocolate is completely set. -
Step 11
Melt remaining chocolate or a fresh small batch for drizzling. Thin with a tiny bit more shortening or coconut oil if too thick. -
Step 12
Transfer drizzle chocolate to a piping bag (or Ziploc with snipped corner). Drizzle in zigzag patterns over set Oreos. -
Step 13
For Mummy Oreos: Dip in white chocolate, set. Drizzle thin white chocolate lines, leaving a gap. Place two googly eyes in the gap while wet. Let set. -
Step 14
For Spiderweb Oreos: Dip Oreo in dark chocolate. While wet, pipe a white chocolate spiral. Drag a toothpick from the center outwards to create a web pattern, wiping clean between drags. -
Step 15
(Optional): Dust edible glitter onto set, decorated Oreos for shimmer. -
Step 16
Allow all decorations to set completely (10-15 minutes in fridge or 30-60 minutes at room temperature). -
Step 17
Store your Easy Spooky Chocolate Covered Halloween Dipped Oreos in an airtight container at room temperature for up to two weeks, or in the refrigerator. Use parchment between layers if stacking.
Important Information
Nutrition Facts (Per Serving)
It is important to consider this information as approximate and not to use it as definitive health advice.
Allergy Information
Please check ingredients for potential allergens and consult a health professional if in doubt.