• Skip to primary navigation
  • Skip to main content
  • Skip to primary sidebar
Homesmad

Homesmad

  • Home
  • Breakfast & Brunch
  • Appetizers & Snacks
  • Dinner
  • Dessert
  • About
  • Privacy Policy
  • Contact
Homesmad
  • Home
  • Breakfast & Brunch
  • Appetizers & Snacks
  • Dinner
  • Dessert
  • About
  • Privacy Policy
  • Contact

High Protein Creamy Beef Pasta: Quick Weeknight Dinner

September 22, 2025 by Lily author

High Protein Creamy Beef Pasta Recipe For Quick Weeknight Dinners is precisely what I, and I suspect many of you, are constantly seeking after a demanding day. Imagine arriving home, weary but hungry, with the clock ticking and the desire for something truly satisfying yet surprisingly swift to prepare. I am absolutely thrilled to share a recipe that banishes the dilemma of choosing between a quick meal and a nutritious one.

While the rich tapestry of pasta dishes has graced tables for centuries, offering unparalleled comfort, this modern interpretation elevates the classic creamy beef pasta by focusing on a crucial element: high protein. People genuinely adore this dish not only for its incredible convenience but also for its delightful sensory experience. Picture tender, savory beef infused with a blend of herbs, enveloped in a luxuriously creamy sauce that coats every single strand of pasta perfectly, delivering both incredible flavor and a deeply satisfying texture. It’s the ultimate hearty embrace in a bowl, designed to keep you feeling full and energized long after the last bite.

This High Protein Creamy Beef Pasta Recipe For Quick Weeknight Dinners isn’t just a meal; it’s a testament to how easily healthy, comforting, and delicious food can fit into even the busiest of schedules, proving that you never have to compromise on taste for efficiency.

High Protein Creamy Beef Pasta: Quick Weeknight Dinner this RECIPE

Ingredients:

  • For the Beef and Sauce:
    • 1 tablespoon olive oil
    • 1.5 pounds lean ground beef (90/10 or 93/7 for a high-protein option)
    • 1 large yellow onion, finely diced
    • 4-5 cloves garlic, minced
    • 1 teaspoon dried oregano
    • 1 teaspoon dried basil
    • 1/2 teaspoon smoked paprika (optional, for depth of flavor)
    • 1/4 teaspoon red pepper flakes (adjust to your spice preference)
    • 1 (28-ounce) can crushed tomatoes (or diced tomatoes, if you prefer a chunkier sauce)
    • 1 cup beef broth (low sodium preferred)
    • 4 ounces cream cheese, softened and cut into cubes (full-fat for ultimate creaminess)
    • 1/2 cup heavy cream (or half-and-half for a slightly lighter version)
    • Salt and freshly ground black pepper to taste
  • For the Pasta:
    • 1 pound short pasta, such as penne, rotini, cavatappi, or campanelle (these shapes hold the creamy sauce beautifully)
    • 1 tablespoon olive oil (for cooking pasta, optional)
    • Salt for pasta water
  • For Serving and Garnish:
    • 1/2 cup grated Parmesan cheese, plus more for serving
    • 1/4 cup fresh parsley, chopped (for garnish, adds freshness and color)
    • Extra red pepper flakes (optional, for those who love a kick)

Preparation and Browning the Beef

This is where we lay the foundation for our incredibly flavorful and High Protein Creamy Beef Pasta Recipe For Quick Weeknight Dinners. Proper browning of the beef is key to developing deep, savory notes.

  1. Heat the Skillet: Place a large, heavy-bottomed skillet or Dutch oven over medium-high heat. Add 1 tablespoon of olive oil and let it shimmer. The goal here is to get the pan nice and hot so that when the beef hits it, it immediately starts to brown rather than steam.

  2. Brown the Ground Beef: Add the 1.5 pounds of lean ground beef to the hot skillet. Break it up with a wooden spoon or spatula. You want to cook the beef, stirring occasionally, until it’s completely browned and no longer pink. This usually takes about 7-10 minutes. Don’t rush this step; those browned bits at the bottom of the pan are flavor gold!

    Tip for Browning Beef:

    For the best browning, avoid overcrowding the pan. If you’re using a smaller skillet or cooking a very large batch, consider browning the beef in two batches. This ensures a beautiful sear on the meat rather than steaming it, which can happen if there’s too much moisture in the pan.

  3. Drain Excess Fat: Once the beef is thoroughly browned, carefully tilt the pan and use a spoon to drain off any excess fat. Since we’re using lean ground beef, there might not be a lot, but removing it helps keep the sauce from becoming greasy. You can discard this fat or save it for other cooking if you wish.

  4. Sauté Aromatics: Reduce the heat to medium. Add the finely diced large yellow onion to the skillet with the browned beef. Cook, stirring occasionally, for about 5-7 minutes, or until the onion softens and becomes translucent. The natural sugars in the onion will caramelize slightly, adding another layer of sweetness and depth to our dish.

    Next, add the minced garlic, dried oregano, dried basil, smoked paprika (if using), and red pepper flakes (if using) to the skillet. Cook for just 1 minute more, stirring constantly, until the spices become fragrant. Be careful not to burn the garlic, as burnt garlic can turn bitter and ruin the flavor profile of your sauce. This quick sauté helps to bloom the spices, releasing their full aromatic potential and infusing them into the beef and onions.

Building the Rich Sauce Base

Now that our aromatics are fragrant and our beef is perfectly browned, it’s time to create the luscious sauce that defines this High Protein Creamy Beef Pasta Recipe For Quick Weeknight Dinners. This step focuses on developing a deep, robust tomato flavor.

  1. Deglaze the Pan: Pour in the 1 cup of beef broth. Using your wooden spoon, scrape up any browned bits that are stuck to the bottom of the skillet. This process, called deglazing, captures all those incredibly flavorful fond bits and incorporates them into your sauce, significantly enhancing its richness. Let the broth simmer for 1-2 minutes, reducing slightly.

  2. Add Tomatoes: Stir in the 1 (28-ounce) can of crushed tomatoes. If you prefer a slightly chunkier sauce, diced tomatoes work wonderfully here too. Bring the mixture to a gentle simmer, then reduce the heat to low, cover the skillet partially (leaving a small gap for steam to escape), and let it simmer for at least 15-20 minutes. This slow simmering time is crucial for allowing the flavors to meld and deepen, transforming simple ingredients into a complex, comforting sauce. Stir occasionally to prevent sticking.

    Why Simmering is Essential:

    Simmering allows the acidity of the tomatoes to mellow out and their sweetness to concentrate. It also gives the dried herbs ample time to rehydrate and infuse their flavors throughout the sauce, creating a harmonious base for our creamy elements.

Achieving Ultimate Creaminess

Here’s where the “creamy” in our High Protein Creamy Beef Pasta Recipe For Quick Weeknight Dinners truly comes to life. The addition of cream cheese and heavy cream transforms the robust tomato and beef base into a silky, indulgent sauce that clings beautifully to every strand of pasta.

  1. Incorporate Cream Cheese: Uncover the skillet and increase the heat slightly to medium-low. Add the softened 4 ounces of cream cheese (cut into cubes) to the simmering sauce. Stir continuously until the cream cheese is fully melted and smoothly incorporated into the sauce. This might take a few minutes, but patience is key for a lump-free, velvety texture. The cream cheese adds a wonderful tang and an incredible richness that can’t be replicated by just cream.

  2. Stir in Heavy Cream: Once the cream cheese is completely blended, pour in the 1/2 cup of heavy cream. Stir well to combine. Let the sauce gently simmer for another 2-3 minutes, just enough time for it to heat through and thicken slightly. Avoid bringing it to a rolling boil after adding the cream, as this can sometimes cause dairy to separate. We want a smooth, cohesive sauce.

  3. Season to Perfection: Taste the sauce and season generously with salt and freshly ground black pepper. Remember that the pasta water will be salted, and Parmesan cheese will be added later, which also contributes salinity, so season the sauce judiciously. You might be surprised at how much salt it can take to truly make the flavors sing. Adjust other seasonings like red pepper flakes if you desire more heat, or a pinch more oregano/basil if you feel it needs more herbaceousness.

    This rich, creamy beef sauce is the heart of our quick weeknight dinner, promising satisfying flavors in every bite.

Cooking the Pasta

While our luxurious beef sauce is simmering and melding its flavors, we’ll get the pasta ready. The key to perfect pasta is proper salting of the water, ensuring the pasta itself is well-seasoned from the inside out.

  1. Boil Water: Bring a large pot of generously salted water to a rolling boil. It should taste like the ocean! The general rule of thumb is 1-2 tablespoons of salt for every gallon of water. This is incredibly important for seasoning the pasta itself, as it won’t absorb much flavor once it’s coated in the sauce.

  2. Cook the Pasta: Add the 1 pound of short pasta (such as penne, rotini, cavatappi, or campanelle) to the boiling water. Stir occasionally to prevent the pasta from sticking together. Cook according to package directions until al dente. Al dente means “to the tooth”—it should be firm but still have a slight bite to it, not mushy. Overcooked pasta will fall apart in the sauce and won’t hold up to the creamy richness.

  3. Reserve Pasta Water: Before draining the pasta, ladle out about 1 to 1.5 cups of the starchy pasta water. This “liquid gold” is incredibly useful for adjusting the consistency of your sauce later if needed. The starch in the water helps to emulsify the sauce, making it even creamier and allowing it to cling better to the pasta.

  4. Drain Pasta: Drain the cooked pasta well in a colander. Do not rinse the pasta, as this washes away the starches that help the sauce adhere. A little bit of the residual cooking water is actually a good thing as it further aids in the emulsification process when combined with the sauce.

Combining and Finishing

The final steps bring everything together into a cohesive, comforting dish. This is where the magic happens and our High Protein Creamy Beef Pasta Recipe For Quick Weeknight Dinners transforms from individual components into a harmonious meal.

  1. Add Pasta to Sauce: Immediately transfer the drained pasta directly into the skillet with the creamy beef sauce. Toss everything together vigorously until every piece of pasta is thoroughly coated in the rich, savory sauce. This step is crucial for ensuring that each bite is packed with flavor.

  2. Stir in Cheese: Add 1/2 cup of grated Parmesan cheese to the pasta and sauce mixture. Stir until the cheese is melted and fully incorporated. The Parmesan cheese adds an extra layer of salty, nutty flavor and contributes to the overall creaminess of the dish, creating a truly irresistible texture. If the sauce seems a bit too thick at this point, add a splash or two of the reserved pasta water, stirring until you reach your desired consistency. This starchy water helps to create a luscious, emulsified sauce that coats the pasta beautifully.

    Important Note on Consistency:

    The consistency of your creamy beef pasta is a matter of personal preference. Some prefer it very saucy, while others like a thicker coating. Don’t hesitate to use that reserved pasta water to adjust it to your liking. It’s an invaluable tool for ensuring your pasta isn’t too dry or too watery.

  3. Final Seasoning Check: Give the entire dish one final taste test. Adjust salt, pepper, or any other seasonings as needed. Sometimes, the addition of pasta and cheese can mellow out the flavors a bit, so a final seasoning check is always a good idea to ensure everything is perfectly balanced.

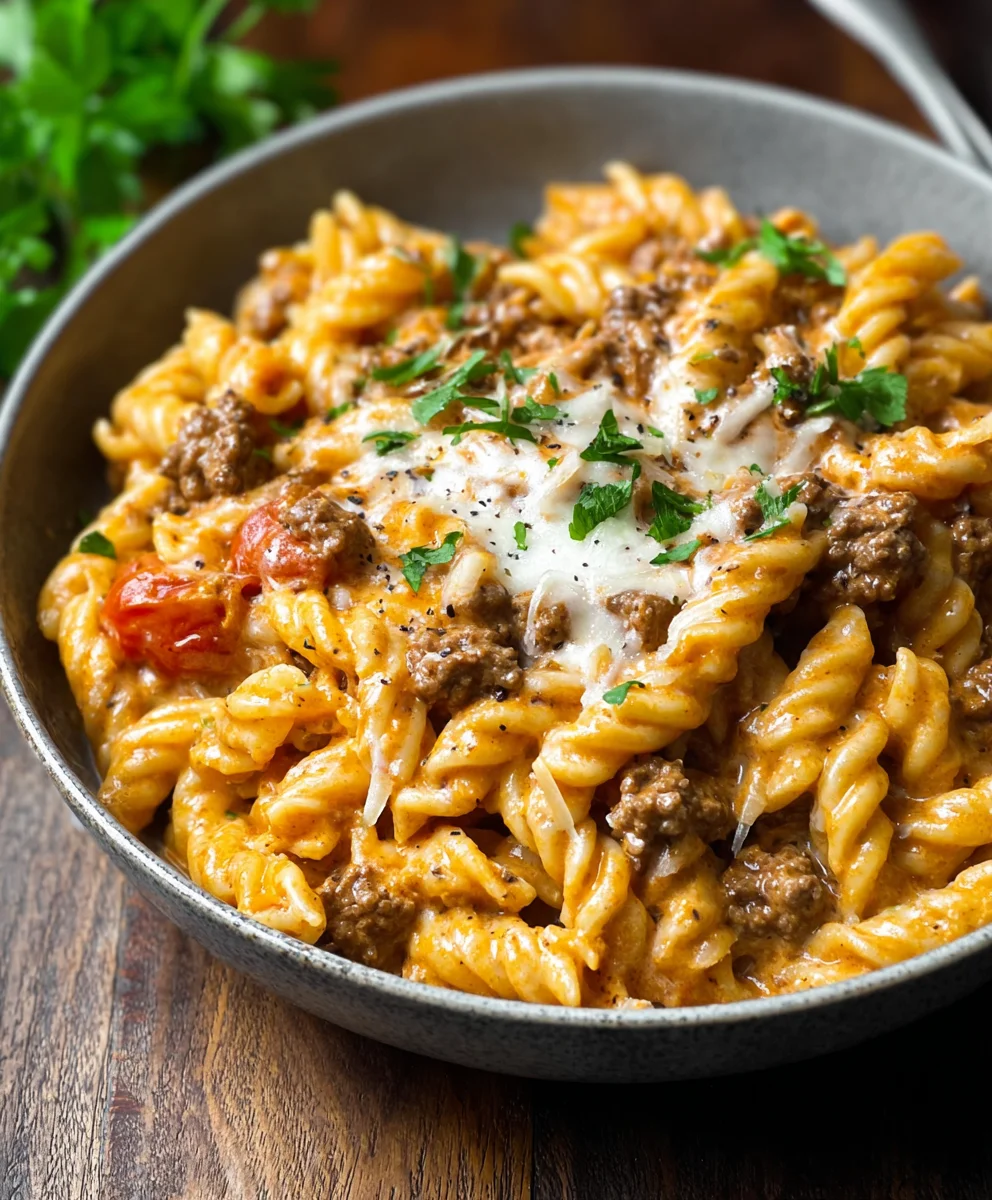
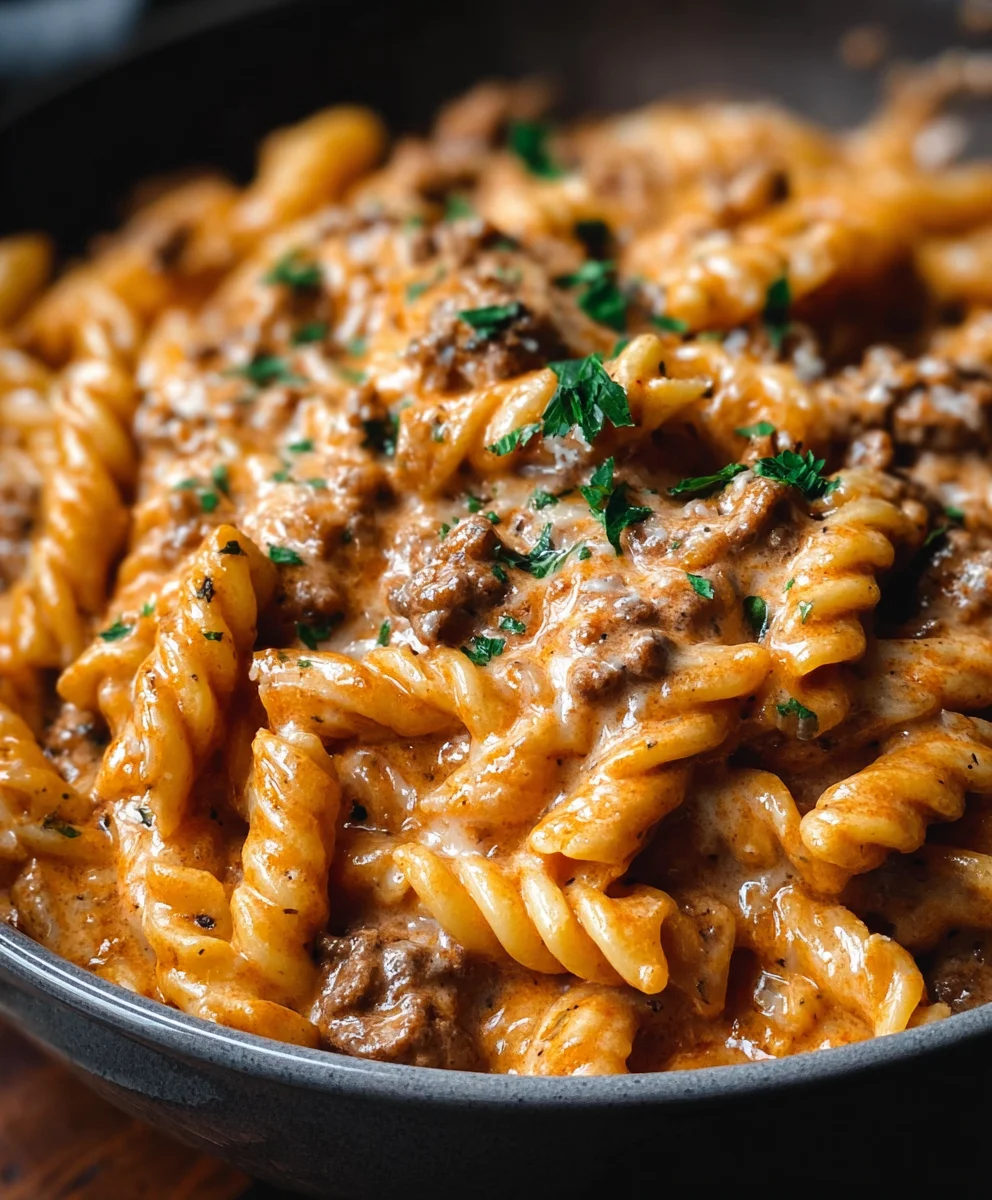
  4. Garnish and Serve: Divide the warm High Protein Creamy Beef Pasta among serving bowls. Garnish generously with fresh chopped parsley, which adds a vibrant color and a burst of herbaceous freshness that cuts through the richness of the sauce. Offer extra grated Parmesan cheese and red pepper flakes on the side for those who wish to customize their individual servings. This dish is best served immediately, ensuring the pasta is perfectly coated and the sauce is at its peak creaminess.

    This High Protein Creamy Beef Pasta Recipe For Quick Weeknight Dinners is not just a meal; it’s a comforting experience, designed to bring satisfaction and a delightful burst of flavor to your table with minimal fuss. Enjoy every hearty, creamy bite!

High Protein Creamy Beef Pasta: Quick Weeknight Dinner

Conclusion:

So, there you have it! I truly believe this is more than just another dinner idea; it’s a game-changer for anyone juggling a busy schedule without wanting to compromise on flavor or nutrition. When you’re craving something hearty, comforting, and utterly delicious, this recipe delivers on all fronts. Imagine sinking your fork into perfectly cooked pasta, coated in a rich, savory cream sauce, studded with tender, seasoned beef, and just the right amount of cheese melding everything together. It’s an experience that feels indulgent, yet you know it’s providing you with the protein you need to power through your evening or recover from a tough workout. I’ve personally found myself turning to this dish time and time again because it consistently hits the spot, offering that perfect balance of warmth, richness, and satisfaction that makes a weeknight meal truly special. It effortlessly transforms what could be a mundane dinner into an exciting culinary moment right in your own kitchen. This isn’t just a quick fix; it’s a genuinely delightful meal that will leave you feeling completely content and fueled.

One of the things I love most about this particular pasta dish is its incredible versatility. While the core recipe for this High Protein Creamy Beef Pasta Recipe For Quick Weeknight Dinners is absolutely stellar as written, don’t hesitate to make it your own! For serving suggestions, I often pair it with a simple, crisp green salad dressed with a light vinaigrette to cut through the richness, or some crusty garlic bread for dipping into that luscious sauce – because who can resist extra carbs when they’re this good? If you’re looking to sneak in more vegetables, feel free to toss in a handful of fresh spinach right at the end; its vibrant green will wilt beautifully into the warm pasta. Sautéed mushrooms, diced bell peppers, or even some grated zucchini can also be incorporated while browning the beef for added fiber and nutrients. If beef isn’t your preference, this recipe is remarkably adaptable. Ground chicken or turkey makes an excellent lean alternative, or for a vegetarian twist, consider using crumbled plant-based mince or a robust mix of lentils and finely chopped walnuts. You can even vary the pasta shape – penne, fusilli, rotini, or even spaghetti work wonderfully, each offering a slightly different textural experience. Want more heat? A pinch of red pepper flakes stirred in with the garlic or a dash of your favorite hot sauce at the table will do the trick. For an extra layer of creaminess or a slightly different tang, a dollop of cream cheese or even Greek yogurt (stirred in off the heat to prevent curdling) can be delightful additions. Don’t be afraid to play with the cheese, either; a mix of Parmesan and a little shredded mozzarella can add an irresistible gooey pull.

Ultimately, my hope is that you give this wonderful recipe a try. It truly embodies what I believe home cooking should be: accessible, delicious, and incredibly rewarding. I promise you, the aroma filling your kitchen will be enough to make your mouth water, and that first forkful will confirm why this dish has become a staple for me. Once you’ve experienced the ease and incredible flavor of this meal, I would absolutely love to hear about it! Did you make any exciting substitutions? What were your favorite additions? Did your family rave about it as much as mine does? Please share your culinary adventures in the comments below, or better yet, snap a photo and tag me on social media. Your feedback and creative twists inspire not just me, but our entire cooking community. So go ahead, gather your ingredients, set aside a few minutes, and treat yourself to a truly satisfying and fuss-free dinner. You deserve it! Happy cooking!

Frequently Asked Questions:

How can I make this High Protein Creamy Beef Pasta Recipe gluten-free?

Making this recipe gluten-free is incredibly simple! The main adjustment you’ll need to make is to use your favorite gluten-free pasta. There are many excellent brands available today made from corn, rice, or legumes that hold up well in creamy sauces. Just follow the package directions for cooking time. Ensure any broth you use is also certified gluten-free, and you’re all set to enjoy a delicious, gluten-free version!

Can I use a different type of meat for this recipe?

Absolutely! While ground beef is fantastic here, this recipe is wonderfully versatile. Ground chicken or ground turkey are excellent leaner alternatives and will cook similarly. For a vegetarian option, you could use a plant-based ground meat substitute, or even a mix of cooked lentils and finely chopped mushrooms or walnuts to provide a hearty texture and depth of flavor.

How long does the High Protein Creamy Beef Pasta Recipe last in the fridge?

When stored properly in an airtight container, your creamy beef pasta will stay fresh in the refrigerator for 3-4 days. It makes for excellent leftovers, and the flavors often deepen even more overnight!

Can I freeze this creamy beef pasta?

Freezing creamy pasta dishes can be a bit tricky because dairy-based sauces sometimes separate or become grainy when thawed. While you can freeze it, the texture might not be as smooth as fresh. If you do freeze it, make sure it’s in an airtight, freezer-safe container for up to 2-3 months. Thaw overnight in the fridge and reheat gently on the stovetop, adding a splash of milk or broth if needed to restore creaminess.

What can I add to make this pasta dish spicier?

If you love a little kick, there are a few easy ways to spice things up! You can add a pinch or two of red pepper flakes when you sauté the garlic and onion, which will infuse the oil with heat. A dash of your favorite hot sauce stirred into the sauce or drizzled over individual servings also works wonders. For a smoky heat, a little chipotle powder can be a great addition.

Is there a dairy-free option for this High Protein Creamy Beef Pasta Recipe?

Yes, you can certainly adapt this recipe to be dairy-free! Instead of traditional heavy cream, look for dairy-free heavy cream alternatives made from oats, coconut, or cashews (ensure they are unsweetened). You’ll also need to use a dairy-free cheese substitute, or simply omit the cheese entirely and rely on the richness of the dairy-free cream. Ensure your broth is also dairy-free.

How can I make this dish even healthier?

There are several ways to boost the nutritional value! Use lean ground beef (90/10 or higher) or opt for ground turkey or chicken. Increase the vegetable content by adding more spinach, mushrooms, bell peppers, or zucchini. You can also swap half of the heavy cream for milk (dairy or non-dairy) or even a portion of pureed cottage cheese (for added protein and creaminess without as much fat). Serving it with a large side salad is also a fantastic way to round out the meal.


High Protein Creamy Beef Pasta: Quick Weeknight Dinner

High Protein Creamy Beef Pasta: Quick Weeknight Dinner

A high-protein creamy beef pasta recipe for quick weeknight dinners. This satisfying meal combines savory beef with a rich, creamy sauce and tender pasta, designed for busy schedules without compromising taste or nutrition.

Prep Time
15 Minutes

Cook Time
35 Minutes

Total Time
50 Minutes

Servings
4 servings

Ingredients

  • 8 oz penne pasta
  • 1 lb lean ground beef
  • 1 medium onion, chopped
  • 2 cloves garlic, minced
  • 1 can (15 oz) diced tomatoes (with juices)
  • 1 cup low-sodium beef broth
  • 1/2 cup plain Greek yogurt
  • 1/4 cup grated Parmesan cheese
  • 1 tbsp Italian seasoning
  • Salt and pepper to taste
  • Fresh basil or parsley for garnish
  • Olive oil

Instructions

  1. Step 1
    Heat olive oil in a large skillet over medium-high heat. Add ground beef, breaking it up, and cook until browned (7-10 minutes). Drain excess fat. Add chopped onion and cook until softened (5-7 minutes). Stir in minced garlic and Italian seasoning; cook for 1 minute until fragrant.
  2. Step 2
    Pour in beef broth, scraping up any browned bits from the pan. Simmer for 1-2 minutes. Stir in diced tomatoes. Bring to a gentle simmer, then reduce heat to low, cover partially, and let simmer for 15-20 minutes, stirring occasionally.
  3. Step 3
    Remove skillet from heat. Stir in plain Greek yogurt until completely smooth and incorporated. Season generously with salt and pepper to taste.
  4. Step 4
    Meanwhile, bring a large pot of generously salted water to a rolling boil. Add penne pasta and cook according to package directions until al dente. Reserve 1 to 1.5 cups of the starchy pasta water before draining the pasta. Do not rinse.
  5. Step 5
    Add the drained pasta directly to the skillet with the sauce. Toss vigorously to coat. Stir in Parmesan cheese until melted. If the sauce is too thick, add splashes of reserved pasta water until desired consistency is reached. Perform a final taste test and adjust seasonings as needed.
  6. Step 6
    Garnish with fresh basil or parsley. Serve immediately, offering extra Parmesan cheese on the side if desired.

Important Information

Nutrition Facts (Per Serving)

It is important to consider this information as approximate and not to use it as definitive health advice.

Allergy Information

Please check ingredients for potential allergens and consult a health professional if in doubt.

« Previous Post
Korean Ground Beef Bowl: A Delicious and Easy Recipe
Next Post »
Healthy Chickpea Feta Avocado Salad: Fresh & Flavorful

If you enjoyed this…

Salisbury Meatballs Mashed Potatoes: A Comfort Food Classic Recipe

Chicken Bacon Ranch Casserole: A Deliciously Easy Recipe for Dinner

Creamy Gochujang Udon Noodles: A Quick & Delicious Recipe

Primary Sidebar

Browse by Diet

BreakfastDinnerLunchDessertAppetizer

Sweet Peach Yogurt Parfait Delight

One of my fondest memories is from a lazy summer afternoon spent at my grandmother’s house. The sun filtered through the kitchen window, casting a warm glow over the table where she would create her culinary magic. It was during one of those blissful moments that I first tasted her Peach Yogurt Parfait with Honey and Granola. The sweet aroma of ripe peaches mingling with creamy yogurt and the crunch of granola was nothing short of heavenly. It felt like summer captured in a bowl, and I still remember the joy of diving in with a spoon, each layer revealing a new burst of flavor.

When I think about that parfait, I can almost hear the gentle hum of the bees outside, reminding me of the floral notes that honey brings to every bite. The vibrant yellows and soft oranges of the peaches contrast beautifully with the creamy white yogurt and the golden crunch of granola. It’s a dish that not only looks delightful but also tastes like a celebration of fresh, wholesome ingredients.

What makes my version of this Peach Yogurt Parfait special is the careful balance of flavors and textures. I use ripe, juicy peaches, drizzled with locally sourced honey, and a homemade granola that’s bursting with nuts and seeds for an extra crunch. It’s a simple dish, but every layer is crafted with love and attention.

Let me show you exactly how to make this delightful parfait, so you can bring a bit of that summer magic into your kitchen!

Sweet Peach Yogurt Parfait Delight

Why You’ll Love This Recipe

  • Delightfully creamy texture from the Greek yogurt, paired with the juicy sweetness of fresh peaches.
  • Ready in under 20 minutes, making it a quick and satisfying breakfast or snack option.
  • Budget-friendly, using common ingredients that you may already have in your pantry.
  • Customizable with your favorite granola and nuts, allowing you to tailor each parfait to your taste.
  • Perfectly balanced flavors with the bright acidity of lemon juice and the sweetness of honey enhancing the peaches.

Ingredients

  • For the Parfait:
  • 2 cups plain Greek yogurt (or vanilla yogurt for a sweeter option)
  • 2 large ripe peaches, diced (about 2 cups)
  • 1 tablespoon fresh lemon juice (to prevent browning of peaches)
  • 2 tablespoons honey (plus more for drizzling)
  • 1 teaspoon vanilla extract (optional for extra flavor)
  • For the Granola:
  • 1 cup granola (store-bought or homemade; see notes for a simple granola recipe)
  • 1/4 cup sliced almonds (optional for added crunch)
  • 1/4 cup shredded coconut (optional for added flavor)

Let’s dive into some key ingredients that make this Peach Yogurt Parfait so delightful! First, the Greek yogurt is not only creamy but also packed with protein, making it a satisfying option for breakfast or a snack. If you’re looking for a sweeter option, you can easily substitute it with vanilla yogurt, though it may alter the overall flavor balance. Next, the ripe peaches are the star of the show; their natural sweetness shines through, so I recommend choosing peaches that yield slightly to pressure, indicating they’re perfectly ripe. If peaches aren’t in season, feel free to use nectarines or even frozen peaches—just thaw them before use. Finally, honey adds a lovely floral sweetness that ties everything together. If you prefer, maple syrup can serve as a delicious substitute.

Step-by-Step Instructions

  1. Start by preparing the peaches. Wash them thoroughly, then slice and dice them into bite-sized pieces. In a medium bowl, toss the diced peaches with 1 tablespoon of fresh lemon juice to prevent browning. Set aside for about 5 minutes while the lemon juice works its magic.
  2. In a separate bowl, combine the Greek yogurt, 2 tablespoons of honey, and 1 teaspoon of vanilla extract if using. Stir the mixture until smooth and thoroughly blended. This should take about a minute. Avoid overmixing to maintain the creaminess of the yogurt.
  3. Now it’s time to layer your parfait. Grab a clear glass or bowl to showcase your beautiful creation. Start with a generous spoonful of the yogurt mixture at the bottom—about 1/4 cup will do. Use a spoon to spread it evenly.
  4. Add a layer of the diced peaches over the yogurt, ensuring they cover the yogurt completely. You might want to use about half of what you have prepared—roughly 1 cup. This layer should be visually appealing, so arrange the peaches neatly.
  5. Sprinkle 1/4 cup of granola over the peaches. This adds a delightful crunch. Make sure to distribute it evenly to ensure every bite has that satisfying texture. Avoid packing it down too tightly, as you want it to maintain its crunch.
  6. Repeat the layers: spoon in another 1/4 cup of yogurt, followed by another cup of peaches, and another sprinkle of granola. You should have at least two layers, but feel free to add more depending on your glass size.
  7. Finish off your parfait with a drizzle of honey on top for added sweetness and a touch of elegance. If you’re using sliced almonds or shredded coconut, sprinkle them on top now. It adds a lovely visual contrast and extra flavor.
  8. Serve immediately or refrigerate for up to 30 minutes before serving to allow the flavors to meld together. However, I recommend enjoying it fresh to maintain the granola’s crunch.

Pro Tips for the Best Peach Yogurt Parfait With Honey And Granola

  • Make sure to choose ripe peaches for the best flavor and texture. A common mistake is using unripe fruit, which can lead to a less enjoyable parfait. Look for peaches that are fragrant and slightly soft to the touch.
  • Use a clear glass to assemble your parfait; this not only makes for a beautiful presentation but also allows you to see the colorful layers, which adds to the enjoyment of eating it.
  • For an even creamier texture, consider whipping the Greek yogurt with a hand mixer for a couple of minutes before layering. This small adjustment makes a huge difference in mouthfeel.
  • Be mindful of the granola-to-yogurt ratio. Too much granola can overwhelm the parfait, while too little can make it feel too creamy. Aim for about 1/4 cup of granola per layer for the perfect balance.
  • If you’re making this for a gathering, consider preparing the yogurt and peaches ahead of time and layering them just before serving. This ensures the granola stays crunchy!

Variations & Serving Ideas

There are so many ways to get creative with your Peach Yogurt Parfait! For a tropical twist, swap out the peaches for mangoes or pineapples and top with coconut flakes. If you prefer a berry flavor, mix in some blueberries or strawberries with the peaches for added color and taste. For a nutty version, incorporate chopped walnuts or pecans instead of almonds.

As for serving ideas, this parfait pairs beautifully with a side of scrambled eggs for a hearty breakfast or fresh fruit salad for a light lunch. You might also enjoy it alongside whole grain toast with almond butter for an energizing snack. The contrast of flavors and textures will elevate your meal experience!

Storage, Make-Ahead & Reheating

The Peach Yogurt Parfait is best enjoyed fresh, but you can prepare some components ahead of time. Store the layered parfait in an airtight container in the refrigerator for up to 24 hours. However, be cautious; the granola may lose its crunch if stored too long. You can freeze the yogurt and peach mixture for up to 2 months; just remember to thaw it in the refrigerator overnight before serving.

If you plan to enjoy this dish the next day, it can taste even better as the flavors meld together. Just remember to add the granola right before serving to keep its delightful crunch!

Frequently Asked Questions

Can I make Peach Yogurt Parfait With Honey And Granola ahead of time?

Yes — in fact, it tastes even better the next day as the flavors meld. However, I recommend waiting to add the granola until just before serving to maintain its crunch.

What can I substitute for Greek yogurt?

If you prefer a lighter option, you can substitute Greek yogurt with regular yogurt or a dairy-free alternative like coconut yogurt. Just remember that this may alter the creaminess and flavor profile slightly.

Can I use frozen peaches for this parfait?

Absolutely! Just make sure to thaw the frozen peaches before using them. They will still add great flavor, though the texture may be slightly softer than fresh peaches.

How do I make the parfait vegan?

To make a vegan version, substitute the Greek yogurt with a plant-based yogurt alternative, and replace honey with maple syrup or agave nectar. This keeps the parfait sweet while adhering to a vegan diet.

What other fruits can I use in this recipe?

You can mix and match fruits based on your preference. Try using strawberries, blueberries, raspberries, or even bananas. Just make sure to adjust the lemon juice as needed to prevent browning.

Sweet Peach Yogurt Parfait Delight

Final Thoughts

The Peach Yogurt Parfait with Honey and Granola is a delightful blend of creamy yogurt, sweet peaches, and crunchy granola that creates a satisfying and nourishing treat. Each layer bursts with flavor, making it a perfect choice for breakfast or a light dessert.

This is the kind of recipe I come back to again and again, especially when I want something refreshing and wholesome to start my day. The harmony of sweet and tart flavors, combined with the delightful crunch, never fails to lift my spirits!

I encourage you to give this parfait a try and indulge in its comforting goodness. Feel free to share your results or even add your own twist—perhaps a sprinkle of cinnamon or a handful of nuts. Enjoy creating your perfect parfait!

Print
clock clock iconcutlery cutlery iconflag flag iconfolder folder iconinstagram instagram iconpinterest pinterest iconfacebook facebook iconprint print iconsquares squares iconheart heart iconheart solid heart solid icon

Peach Yogurt Parfait


  • Author: Lily author
  • Total Time: 15 minutes
  • Yield: 4 servings 1x
Pin Recipe
Print Recipe

Description

This Peach Yogurt Parfait combines creamy Greek yogurt, juicy peaches, and crunchy granola for a delightful treat. It’s a perfect breakfast or snack that captures the essence of summer in every bite.


Ingredients

Scale
  • For the Parfait:
  • 2 cups plain Greek yogurt (or vanilla yogurt for a sweeter option)
  • 2 large ripe peaches, diced (about 2 cups)
  • 1 tablespoon fresh lemon juice (to prevent browning of peaches)
  • 2 tablespoons honey (plus more for drizzling)
  • 1 teaspoon vanilla extract (optional for extra flavor)
  • For the Granola:
  • 1 cup granola (store-bought or homemade; see notes for a simple granola recipe)
  • 1/4 cup sliced almonds (optional for added crunch)
  • 1/4 cup shredded coconut (optional for added flavor)

Instructions

  1. Start by preparing the peaches. Wash them thoroughly, then slice and dice them into bite-sized pieces. In a medium bowl, toss the diced peaches with 1 tablespoon of fresh lemon juice to prevent browning. Set aside for about 5 minutes while the lemon juice works its magic.
  2. In a separate bowl, combine the Greek yogurt, 2 tablespoons of honey, and 1 teaspoon of vanilla extract if using. Stir the mixture until smooth and thoroughly blended. This should take about a minute. Avoid overmixing to maintain the creaminess of the yogurt.
  3. Now it’s time to layer your parfait. Grab a clear glass or bowl to showcase your beautiful creation. Start with a generous spoonful of the yogurt mixture at the bottom—about 1/4 cup will do. Use a spoon to spread it evenly.
  4. Add a layer of the diced peaches over the yogurt, ensuring they cover the yogurt completely. You might want to use about half of what you have prepared—roughly 1 cup. This layer should be visually appealing, so arrange the peaches neatly.
  5. Sprinkle 1/4 cup of granola over the peaches. This adds a delightful crunch. Make sure to distribute it evenly to ensure every bite has that satisfying texture. Avoid packing it down too tightly, as you want it to maintain its crunch.
  6. Repeat the layers: spoon in another 1/4 cup of yogurt, followed by another cup of peaches, and another sprinkle of granola. You should have at least two layers, but feel free to add more depending on your glass size.
  7. Finish off your parfait with a drizzle of honey on top for added sweetness and a touch of elegance. If you’re using sliced almonds or shredded coconut, sprinkle them on top now. It adds a lovely visual contrast and extra flavor.
  8. Serve immediately or refrigerate for up to 30 minutes before serving to allow the flavors to meld together. However, I recommend enjoying it fresh to maintain the granola’s crunch.
  • Prep Time: 15 mins
  • Cook Time: 0 mins
  • Category: Breakfast
  • Method: No-cook
  • Cuisine: American

Nutrition

  • Serving Size: 1 parfait
  • Calories: 250
  • Sugar: 20 g
  • Sodium: 50 mg
  • Fat: 5 g
  • Saturated Fat: 2 g
  • Unsaturated Fat: 3 g
  • Trans Fat: 0 g
  • Carbohydrates: 40 g
  • Fiber: 3 g
  • Protein: 10 g
  • Cholesterol: 10 mg

Keywords: Choose ripe peaches for the best flavor and texture. Use a clear glass for a beautiful presentation. For creaminess, consider whipping the yogurt before layering. Be mindful of the granola-to-yogurt ratio. Prepare yogurt and peaches ahead of time for gatherings, layering just before serving.

Did you make this recipe?

Share a photo and tag us — we can't wait to see what you've made!

Sun-Kissed Frozen Orange Cream Slush

As a child, summer days felt like they lasted forever. I remember the sticky heat wrapping around me as I played outside, my laughter mingling with the sounds of the neighborhood. But nothing could cool me down quite like the moment I’d spot my grandmother, laboring over her blender, whipping up her famous Frozen Orange Creamsicle Slush. That vibrant orange treat, with its frosty texture and sweet citrus aroma, was like a burst of sunshine in a cup. Just one sip, and I could feel the coolness wash over me, sparking pure joy.

This Frozen Orange Creamsicle Slush has a way of making you feel like a kid again. Its creamy, dreamy consistency is a delightful balance of bright orange and soft vanilla, inviting you to dive right in. The refreshing tang of orange dances on your tongue, while the smooth creaminess envelops you in a comforting embrace. It’s a nostalgic treat that’s perfect for hot summer afternoons or anytime you need a little pick-me-up.

What makes my version of this slush stand out is the addition of a hint of vanilla bean, which elevates the flavor and adds an extra layer of richness. Plus, it’s super easy to whip up with just a few simple ingredients that you probably already have on hand! So, if you’re ready to relive those sun-soaked memories, let me show you exactly how to make it.

Sun-Kissed Frozen Orange Cream Slush

Why You’ll Love This Recipe

  • Each slush is a perfect blend of creamy vanilla and zesty orange, creating a nostalgic flavor reminiscent of summer days.
  • This refreshing treat is ready in under 15 minutes, making it an ideal quick dessert for unexpected guests or hot afternoons.
  • With just 8 simple ingredients, it’s budget-friendly, ensuring you don’t have to break the bank to enjoy a delicious slush.
  • The slush has a perfectly smooth texture, thanks to the combination of ice and ice cream, providing a delightful contrast to the bright citrus flavors.
  • It’s highly customizable; you can easily adjust the sweetness and add fresh herbs for a unique twist that suits your taste.

Ingredients

  • 2 cups orange juice (freshly squeezed or store-bought)
  • 1 cup vanilla ice cream
  • 1 cup crushed ice
  • 1/2 cup milk (whole or 2%)
  • 1/4 cup granulated sugar (adjust based on sweetness preference)
  • 1 teaspoon vanilla extract
  • Zest of 1 orange (for added flavor)
  • Fresh orange slices and mint leaves (for garnish)

The star of this Frozen Orange Creamsicle Slush is the orange juice, which provides the vibrant, citrusy base. Freshly squeezed juice will yield the brightest flavor, but store-bought options can be just as convenient. If you’re opting for store-bought, choose 100% pure juice with no added sugars for the best results. Another essential ingredient is the vanilla ice cream; it adds creaminess and sweetness. You can substitute it with dairy-free ice cream if you’re looking for a vegan option. Whole or 2% milk complements the ice cream, creating a smooth blend. If you want a lower-calorie version, almond or oat milk can be good alternatives.

Lastly, the granulated sugar can be adjusted based on your sweetness preference. If you prefer a more natural sweetener, consider using honey or agave syrup. The orange zest enhances the flavor profile, providing an aromatic pop that brings the whole slush together. Don’t skip it! It adds an extra layer of brightness that makes this slush truly special.

Step-by-Step Instructions

  1. Start by preparing your ingredients. Gather 2 cups of orange juice, 1 cup of vanilla ice cream, and 1 cup of crushed ice. Make sure the ice is finely crushed, as larger chunks can make blending difficult.
  2. In a blender, combine the orange juice, vanilla ice cream, crushed ice, and 1/2 cup of milk. Add 1/4 cup of granulated sugar and 1 teaspoon of vanilla extract. If you like a sweeter slush, consider adding a bit more sugar at this stage.
  3. Add the zest of 1 orange to the blender. This step is crucial for enhancing the citrus flavor of your slush. Make sure not to include the bitter white pith—only the flavorful zest.
  4. Blend the mixture on medium-high speed for about 30-45 seconds. Stop once the ingredients are fully combined and the slush has a smooth, even consistency. If you notice large chunks of ice, blend for an additional 10-15 seconds. Avoid over-blending, as this can make the slush too liquidy.
  5. Once blended, taste the slush. If it needs more sweetness, add a little more sugar and blend for a few more seconds. If it’s too thick, you can add a splash of milk to reach your desired consistency.
  6. Pour the slush into glasses. This recipe typically serves 4, but you can easily double it for larger gatherings. Use a spoon to help guide the slush into the glasses if needed.
  7. Garnish each serving with fresh orange slices and mint leaves. The mint not only adds a pop of color but also a refreshing aroma that complements the citrus flavors beautifully.
  8. Serve immediately and enjoy! If you’ve made extra, you can refrigerate it for a short time, but it’s best enjoyed fresh.

Pro Tips for the Best Frozen Orange Creamsicle Slush

  • Don’t skip the orange zest! It’s a game-changer for flavor. Always zest before juicing to make it easier.
  • Use a high-powered blender for the best texture. A standard blender may struggle with ice, leading to uneven consistency. If you have a food processor, that can work too, but ensure the ice is finely crushed.
  • Adjust the ice-to-liquid ratio carefully. If your slush is too thick, it won’t blend well. Start with less ice and add more until you reach your preferred texture.
  • Be cautious with the sugar! Always start with the lower amount, as you can easily add more, but it’s hard to fix an overly sweet slush.
  • For a fun twist, consider adding a splash of coconut milk or a handful of fresh fruit like strawberries or pineapple. This not only enhances the flavor but also adds a beautiful color contrast.

Variations & Serving Ideas

There are countless ways to put a spin on your Frozen Orange Creamsicle Slush. Consider making a tropical version by adding in some pineapple juice or coconut milk for a delightful tropical twist. If you’re feeling adventurous, try incorporating a handful of frozen mango or peach slices for added sweetness. For a lighter version, swap out the vanilla ice cream for Greek yogurt for a creamy yet tangy alternative.

As for serving ideas, this refreshing slush pairs wonderfully with light summer dishes like grilled chicken skewers, fish tacos, or a simple salad topped with citrus vinaigrette. The bright, zesty flavors of the slush complement these dishes perfectly, making them an ideal pairing for a sunny day.

Storage, Make-Ahead & Reheating

This Frozen Orange Creamsicle Slush is best enjoyed fresh, but if you have leftovers, you can store them in an airtight container in the fridge for up to 2 days. Just keep in mind that the slush may lose some of its texture over time as the ice melts. It doesn’t freeze well, as the ice will turn into a solid block. If you must freeze it, blend again after thawing to restore the slushy consistency. This treat is best the day you make it, as the flavors meld together beautifully overnight, enhancing its deliciousness.

Frequently Asked Questions

Can I make Frozen Orange Creamsicle Slush ahead of time?

Yes — in fact, it tastes even better the next day as the flavors meld. However, it’s best to enjoy it fresh, as the texture can change if stored for too long. If you need to prepare it ahead, keep it in the fridge and re-blend before serving.

What kind of orange juice should I use?

For the best flavor, use freshly squeezed orange juice. However, if you’re short on time, opt for 100% pure store-bought juice without added sugars. This will ensure that your slush remains flavorful and refreshing.

Can I substitute the vanilla ice cream?

Absolutely! If you’re looking for a dairy-free option, coconut milk ice cream or a non-dairy vanilla ice cream can work wonderfully. They will still provide the creamy texture and sweetness you desire.

How can I adjust the sweetness of my slush?

You can easily adjust the sweetness by modifying the amount of sugar added. Start with 1/4 cup and taste the mixture before blending. If you prefer it sweeter, add more sugar gradually until it reaches your desired level.

What should I do if my slush is too thick?

If your slush is too thick, simply add a splash of milk or orange juice and blend again. This will help achieve a more drinkable consistency while maintaining the slushy texture. Adjust gradually to reach your preferred thickness.

Sun-Kissed Frozen Orange Cream Slush

Final Thoughts

The Frozen Orange Creamsicle Slush is a delightful blend of refreshing citrus and creamy goodness, making it a perfect treat for warm days or any time you crave a taste of nostalgia. The way the bright orange flavor dances with the creamy texture truly elevates this slush, transforming it into a satisfying escape from the everyday.

This is the kind of recipe I come back to again and again, especially when I’m looking to cool down or impress guests at a summer gathering. It’s simple to make and always brings smiles all around! I encourage you to try this recipe for yourself—don’t hesitate to share your results or even put your own spin on it. Happy slushing!

Print
clock clock iconcutlery cutlery iconflag flag iconfolder folder iconinstagram instagram iconpinterest pinterest iconfacebook facebook iconprint print iconsquares squares iconheart heart iconheart solid heart solid icon

Frozen Orange Creamsicle Slush


  • Author: Lily author
  • Total Time: 15 minutes
  • Yield: 4 servings 1x
Pin Recipe
Print Recipe

Description

This Frozen Orange Creamsicle Slush is a refreshing treat that combines creamy vanilla and zesty orange flavors. Perfect for hot summer days, it brings back nostalgic memories with every sip.


Ingredients

Scale
  • 2 cups orange juice (freshly squeezed or store-bought)
  • 1 cup vanilla ice cream
  • 1 cup crushed ice
  • 1/2 cup milk (whole or 2%)
  • 1/4 cup granulated sugar (adjust based on sweetness preference)
  • 1 teaspoon vanilla extract
  • Zest of 1 orange (for added flavor)
  • Fresh orange slices and mint leaves (for garnish)

Instructions

  1. Start by preparing your ingredients. Gather 2 cups of orange juice, 1 cup of vanilla ice cream, and 1 cup of crushed ice. Make sure the ice is finely crushed, as larger chunks can make blending difficult.
  2. In a blender, combine the orange juice, vanilla ice cream, crushed ice, and 1/2 cup of milk. Add 1/4 cup of granulated sugar and 1 teaspoon of vanilla extract. If you like a sweeter slush, consider adding a bit more sugar at this stage.
  3. Add the zest of 1 orange to the blender. This step is crucial for enhancing the citrus flavor of your slush. Make sure not to include the bitter white pith—only the flavorful zest.
  4. Blend the mixture on medium-high speed for about 30-45 seconds. Stop once the ingredients are fully combined and the slush has a smooth, even consistency. If you notice large chunks of ice, blend for an additional 10-15 seconds. Avoid over-blending, as this can make the slush too liquidy.
  5. Once blended, taste the slush. If it needs more sweetness, add a little more sugar and blend for a few more seconds. If it’s too thick, you can add a splash of milk to reach your desired consistency.
  6. Pour the slush into glasses. This recipe typically serves 4, but you can easily double it for larger gatherings. Use a spoon to help guide the slush into the glasses if needed.
  7. Garnish each serving with fresh orange slices and mint leaves. The mint not only adds a pop of color but also a refreshing aroma that complements the citrus flavors beautifully.
  8. Serve immediately and enjoy! If you’ve made extra, you can refrigerate it for a short time, but it's best enjoyed fresh.
  • Prep Time: 15 min
  • Cook Time: 0 min
  • Category: Dessert
  • Method: Blending
  • Cuisine: American

Nutrition

  • Serving Size: 1 serving
  • Calories: 200
  • Sugar: 30 g
  • Sodium: 50 mg
  • Fat: 5 g
  • Saturated Fat: 3 g
  • Unsaturated Fat: 2 g
  • Trans Fat: 0 g
  • Carbohydrates: 40 g
  • Fiber: 1 g
  • Protein: 2 g
  • Cholesterol: 20 mg

Keywords: Don't skip the orange zest! It's a game-changer for flavor. Always zest before juicing to make it easier.

Did you make this recipe?

Share a photo and tag us — we can't wait to see what you've made!

Zesty Lemon Poppy Seed Delight

One rainy afternoon, I found myself in my grandmother’s cozy kitchen, the kind that always smelled like warmth and love. She was whipping up her famous Lemon Poppy Seed Loaf, a recipe that had been passed down through generations. As the batter came together, the zesty aroma of fresh lemons filled the air, mingling perfectly with the nutty fragrance of poppy seeds. I can still picture her, apron-clad, as she expertly drizzled a vibrant citrus icing over the loaf, creating a glossy, sun-kissed finish that beckoned us to dive in. It was a moment that sparked my own passion for baking, and this recipe has become a cherished staple in my home ever since.

When you take a bite of this Lemon Poppy Seed Loaf, it’s like a burst of sunshine on your palate. The loaf is beautifully golden, with a tender crumb that melts in your mouth. Each slice is speckled with tiny poppy seeds, adding a delightful crunch that contrasts beautifully with the tangy sweetness of the lemon. And that citrus icing? It’s the finishing touch that elevates this loaf from ordinary to extraordinary, with its bright, zesty flavor dancing on your taste buds.

This recipe stands out because it embraces simplicity while delivering on flavor. I’ve added a hint of vanilla to the batter, enhancing the overall taste and making it even more indulgent. Trust me, once you make this Lemon Poppy Seed Loaf With Citrus Icing, it’ll become a go-to in your baking repertoire.

So, let me show you exactly how to make it!

Zesty Lemon Poppy Seed Delight

Why You’ll Love This Recipe

  • Moist and tender crumb that melts in your mouth, thanks to the perfect balance of butter and buttermilk.
  • Bright, zesty lemon flavor paired with crunchy poppy seeds, creating a delightful texture and taste experience.
  • Easy to whip up in just about an hour, perfect for last-minute gatherings or a cozy afternoon treat.
  • Budget-friendly with everyday ingredients, making it an accessible option for all home bakers.
  • The citrus icing adds a sweet tang that elevates the loaf, turning a simple recipe into a showstopper!

Ingredients

  • 1 ½ cups (190g) all-purpose flour
  • 1 teaspoon baking powder
  • ½ teaspoon baking soda
  • ½ teaspoon salt
  • 3 tablespoons poppy seeds
  • ½ cup (115g) unsalted butter, softened to room temperature
  • 1 cup (200g) granulated sugar
  • 2 large eggs
  • 1 teaspoon vanilla extract
  • 1 teaspoon lemon zest (from about 1 medium lemon)
  • ½ cup (120ml) buttermilk
  • 2 tablespoons fresh lemon juice

For the Citrus Icing:

  • 1 cup (120g) powdered sugar
  • 2 tablespoons fresh lemon juice
  • 1 tablespoon orange juice
  • 1 teaspoon lemon zest (for garnish, optional)

Let’s dive into the key ingredients that make this Lemon Poppy Seed Loaf so special. The all-purpose flour provides the structure and base for the loaf, while the baking powder and baking soda ensure it rises perfectly, giving the loaf a light texture. For a gluten-free variation, you could substitute the flour with a gluten-free all-purpose blend. Poppy seeds not only add a delightful crunch but also contribute to the unique flavor profile that pairs well with the citrus notes.

Unsalted butter is crucial for achieving the buttery richness that makes this loaf so moist. If you’re looking for a dairy-free option, coconut oil or a vegan butter can be used instead. The buttermilk is another essential component, providing acidity that activates the baking soda for a fluffy texture. If you don’t have buttermilk on hand, you can easily make a substitute by mixing ½ cup of milk with 1 tablespoon of vinegar or lemon juice and letting it sit for about 5 minutes.

Step-by-Step Instructions

  1. Preheat your oven to 350°F (175°C). Grease a 9×5-inch loaf pan or line it with parchment paper for easy removal later.
  2. In a medium mixing bowl, whisk together 1 ½ cups of all-purpose flour, 1 teaspoon of baking powder, ½ teaspoon of baking soda, ½ teaspoon of salt, and 3 tablespoons of poppy seeds. This helps to evenly distribute the baking agents and ensures a uniform rise.
  3. In a large mixing bowl, cream together ½ cup of softened unsalted butter and 1 cup of granulated sugar using an electric mixer on medium speed for about 3-4 minutes, until the mixture is light and fluffy. Make sure to scrape down the sides of the bowl occasionally.
  4. Add 2 large eggs, 1 teaspoon of vanilla extract, and 1 teaspoon of lemon zest to the creamed butter and sugar, mixing until fully combined. You want a smooth consistency, so ensure there are no lumps of butter.
  5. In a small bowl, combine ½ cup of buttermilk and 2 tablespoons of fresh lemon juice. Alternately add the dry ingredients and buttermilk mixture to the butter mixture, starting and ending with the dry ingredients. Mix just until combined; do not overmix, as this can lead to a dense loaf.
  6. Pour the batter into the prepared loaf pan. Smooth the top with a spatula, ensuring it’s even. Bake in the preheated oven for 50-60 minutes, or until a toothpick inserted in the center comes out clean. The edges should be lightly golden brown, and the center should feel just set.
  7. Once baked, remove the loaf from the oven and allow it to cool in the pan for about 10 minutes. Then, transfer it to a wire rack to cool completely. Resist the urge to slice too soon, as it will be crumbly if it’s still warm.
  8. While the loaf is cooling, prepare the citrus icing. In a medium bowl, whisk together 1 cup of powdered sugar, 2 tablespoons of fresh lemon juice, and 1 tablespoon of orange juice until smooth. If the icing is too thick, you can add a little more juice to reach your desired consistency.
  9. Once the loaf is completely cool, drizzle the citrus icing over the top. If you like, sprinkle with an additional teaspoon of lemon zest for an extra pop of flavor and color.

Pro Tips for the Best Lemon Poppy Seed Loaf With Citrus Icing

  • Be careful not to overmix your batter; this is a common mistake that can lead to a dense loaf. Mix just until the dry ingredients are incorporated for a light and fluffy texture.
  • Use room temperature ingredients, especially the butter and eggs. This helps to create a smoother batter and ensures even baking. Take your eggs out of the fridge about 30 minutes before you start.
  • For a more pronounced lemon flavor, consider adding a little lemon extract in addition to the zest and juice. Just a half teaspoon can elevate the citrus notes significantly.
  • When measuring your flour, spoon it into the measuring cup and level it off with a knife instead of scooping directly from the bag. This prevents packing and ensures you don’t end up with a dry loaf.
  • Invest in a good quality loaf pan; it makes a difference in heat distribution, which ensures even baking. If your pan is dark-coated, reduce the oven temperature by 25°F to prevent over-browning.

Variations & Serving Ideas

For a delightful twist, consider adding blueberries or raspberries to the batter for a fruity burst of flavor. You can also experiment with different citrus fruits—try lime or grapefruit zest and juice for a refreshing change. For a healthier option, substitute half of the all-purpose flour with whole wheat flour for added fiber without compromising too much on texture.

This Lemon Poppy Seed Loaf pairs beautifully with a light salad, such as a mixed greens salad with a vinaigrette, or a cup of tea for a cozy afternoon treat. It also complements a creamy cheese platter, as the acidity of the loaf balances rich cheeses perfectly. Lastly, a scoop of vanilla ice cream on the side creates a delightful contrast of temperatures and flavors!

Storage, Make-Ahead & Reheating

This Lemon Poppy Seed Loaf can be stored at room temperature for up to 3 days if wrapped tightly in plastic wrap. If you want to keep it longer, it freezes well for up to 3 months. To freeze, wrap the loaf tightly in plastic wrap and then in aluminum foil to prevent freezer burn.

When you’re ready to enjoy it again, simply thaw it in the fridge overnight. Reheat individual slices in the microwave for 15-20 seconds or in a toaster oven until warmed through. Interestingly, many people find that this loaf tastes even better the next day, as the flavors have time to meld!

Frequently Asked Questions

Can I make Lemon Poppy Seed Loaf With Citrus Icing ahead of time?

Yes — in fact, it tastes even better the next day! You can make the loaf a day in advance, allowing the flavors to develop. Just be sure to store it in an airtight container to maintain its moisture.

Can I substitute the poppy seeds?

Absolutely! If you don’t have poppy seeds on hand or prefer an alternative, you can use sesame seeds for a similar crunch or omit them entirely for a smooth loaf.

What can I use instead of buttermilk?

If you don’t have buttermilk, you can easily create a substitute by mixing ½ cup of milk (dairy or plant-based) with 1 tablespoon of vinegar or lemon juice. Let it sit for 5 minutes before using in the recipe.

How can I make this recipe gluten-free?

To make a gluten-free version of this Lemon Poppy Seed Loaf, substitute the all-purpose flour with a gluten-free all-purpose flour blend. Just ensure that the blend contains a binding agent like xanthan gum for the best results.

What is the best way to store leftover loaf?

Leftover Lemon Poppy Seed Loaf should be stored in an airtight container at room temperature for up to 3 days. For longer storage, wrap it tightly and freeze for up to 3 months. Thaw it before serving for the best texture.

Zesty Lemon Poppy Seed Delight

Final Thoughts

The Lemon Poppy Seed Loaf with Citrus Icing is truly a delightful treat that brings a burst of brightness to any occasion. The zesty lemon flavor combined with the subtle crunch of poppy seeds creates a satisfying balance, while the citrus icing adds a touch of sweetness that perfectly complements the loaf’s tanginess.

This is the kind of recipe I come back to again and again, especially when I want to brighten up a gloomy day or celebrate a small victory. The aroma that fills the kitchen as it bakes is absolutely heavenly! I encourage you to give this recipe a try; you might just find it becoming a beloved staple in your home. Don’t forget to share your results or even add your own unique twist—I can’t wait to see what you create!

Print
clock clock iconcutlery cutlery iconflag flag iconfolder folder iconinstagram instagram iconpinterest pinterest iconfacebook facebook iconprint print iconsquares squares iconheart heart iconheart solid heart solid icon

Lemon Poppy Seed Loaf


  • Author: Lily author
  • Total Time: 50 minute
  • Yield: 1 loaf 1x
Pin Recipe
Print Recipe

Description

This Lemon Poppy Seed Loaf is a delightful treat that combines zesty lemon flavor with crunchy poppy seeds. Topped with a citrus icing, it’s perfect for any occasion.


Ingredients

Scale
  • 1 ½ cups (190g) all-purpose flour
  • 1 teaspoon baking powder
  • ½ teaspoon baking soda
  • ½ teaspoon salt
  • 3 tablespoons poppy seeds
  • ½ cup (115g) unsalted butter, softened to room temperature
  • 1 cup (200g) granulated sugar
  • 2 large eggs
  • 1 teaspoon vanilla extract
  • 1 teaspoon lemon zest (from about 1 medium lemon)
  • ½ cup (120ml) buttermilk
  • 2 tablespoons fresh lemon juice
  • 1 cup (120g) powdered sugar
  • 2 tablespoons fresh lemon juice
  • 1 tablespoon orange juice
  • 1 teaspoon lemon zest (for garnish, optional)

Instructions

  1. Preheat your oven to 350°F (175°C). Grease a 9×5-inch loaf pan or line it with parchment paper for easy removal later.
  2. In a medium mixing bowl, whisk together 1 ½ cups of all-purpose flour, 1 teaspoon of baking powder, ½ teaspoon of baking soda, ½ teaspoon of salt, and 3 tablespoons of poppy seeds. This helps to evenly distribute the baking agents and ensures a uniform rise.
  3. In a large mixing bowl, cream together ½ cup of softened unsalted butter and 1 cup of granulated sugar using an electric mixer on medium speed for about 3-4 minutes, until the mixture is light and fluffy. Make sure to scrape down the sides of the bowl occasionally.
  4. Add 2 large eggs, 1 teaspoon of vanilla extract, and 1 teaspoon of lemon zest to the creamed butter and sugar, mixing until fully combined. You want a smooth consistency, so ensure there are no lumps of butter.
  5. In a small bowl, combine ½ cup of buttermilk and 2 tablespoons of fresh lemon juice. Alternately add the dry ingredients and buttermilk mixture to the butter mixture, starting and ending with the dry ingredients. Mix just until combined; do not overmix, as this can lead to a dense loaf.
  6. Pour the batter into the prepared loaf pan. Smooth the top with a spatula, ensuring it’s even. Bake in the preheated oven for 50-60 minutes, or until a toothpick inserted in the center comes out clean. The edges should be lightly golden brown, and the center should feel just set.
  7. Once baked, remove the loaf from the oven and allow it to cool in the pan for about 10 minutes. Then, transfer it to a wire rack to cool completely. Resist the urge to slice too soon, as it will be crumbly if it’s still warm.
  8. While the loaf is cooling, prepare the citrus icing. In a medium bowl, whisk together 1 cup of powdered sugar, 2 tablespoons of fresh lemon juice, and 1 tablespoon of orange juice until smooth. If the icing is too thick, you can add a little more juice to reach your desired consistency.
  9. Once the loaf is completely cool, drizzle the citrus icing over the top. If you like, sprinkle with an additional teaspoon of lemon zest for an extra pop of flavor and color.
  • Prep Time: 15 mins
  • Cook Time: 50-60 mins
  • Category: Dessert
  • Method: Baking
  • Cuisine: American

Nutrition

  • Serving Size: 1 slice
  • Calories: 200
  • Sugar: 15 g
  • Sodium: 150 mg
  • Fat: 8 g
  • Saturated Fat: 5 g
  • Unsaturated Fat: 3 g
  • Trans Fat: 0 g
  • Carbohydrates: 30 g
  • Fiber: 1 g
  • Protein: 3 g
  • Cholesterol: 40 mg

Keywords: Be careful not to overmix your batter; this is a common mistake that can lead to a dense loaf. Use room temperature ingredients for a smoother batter and even baking.

Did you make this recipe?

Share a photo and tag us — we can't wait to see what you've made!

  • Privacy Policy
  • Terms Of Service
  • Contact
  • About
  • GDPR

Copyright © 2025 Homesmad