• Skip to primary navigation
  • Skip to main content
  • Skip to primary sidebar
Homesmad

Homesmad

  • Home
  • Breakfast & Brunch
  • Appetizers & Snacks
  • Dinner
  • Dessert
  • About
  • Privacy Policy
  • Contact
Homesmad
  • Home
  • Breakfast & Brunch
  • Appetizers & Snacks
  • Dinner
  • Dessert
  • About
  • Privacy Policy
  • Contact

Irresistible Apple Pumpkin Muffins with Crumb Topping

November 2, 2025 by Lily author

Apple Pumpkin Muffins With Crum extractb Topping are more than just a seasonal treat; they are a delightful invitation to embrace the comforting flavors of autumn. Imagine waking up to the irresistible aroma of warm spices, sweet apples, and earthy pumpkin wafting through your home. This isn’t just any muffin; it’s a culinary hug, a perfect fusion of harvest’s finest, crowned with an irresistible, unique topping that adds a delightful textural contrast. While muffins have graced breakfast tables for centuries as a quick and convenient bread, the marriage of apple and pumpkin specifically celebrates the bountiful American harvest season, evoking cherished memories of crisp air and cozy gatherings.

I find that what truly makes these muffins a perennial favorite is their incredible balance. The moist, tender crumb of the muffin, infused with the natural sweetness of apples and the subtle earthiness of pumpkin, creates a symphony of flavors. Then, there’s that glorious Crum extractb Topping – a buttery, slightly crisp layer that elevates each bite from simple pleasure to pure indulgence. They are surprisingly easy to prepare, making them an ideal choice for a busy morning breakfast, an afternoon pick-me-up, or even a casual dessert. This particular recipe for Apple Pumpkin Muffins With Crum extractb Topping promises to become a cherished addition to your fall baking repertoire, offering warmth and joy with every single bite.

Irresistible Apple Pumpkin Muffins with Crumb Topping this RECIPE

Ingredients:

  • For the Apple Pumpkin Muffins:
    • 2 ½ cups (300g) all-purpose flour, spooned and leveled
    • 1 ½ teaspoons baking soda
    • ½ teaspoon baking powder
    • 1 teaspoon ground cinnamon
    • ½ teaspoon ground nutmeg
    • ¼ teaspoon ground cloves
    • ½ teaspoon salt
    • 1 (15-ounce) can (approx. 425g) pure pumpkin puree (not pumpkin pie filling)
    • ½ cup (120ml) unsalted butter, melted and slightly cooled
    • ½ cup (100g) granulated sugar
    • ½ cup (100g) packed light brown sugar
    • 2 large eggs, at room temperature
    • 1 teaspoon vanilla extract
    • 1 cup (approx. 150g) peeled, cored, and finely diced tart baking apples (such as Granny Smith or Honeycrisp)
  • For the Crumble Topping (essential for our Apple Pumpkin Muffins With Crumble Extract Topping):
    • ½ cup (60g) all-purpose flour
    • ¼ cup (50g) granulated sugar
    • ¼ cup (50g) packed light brown sugar
    • ½ teaspoon ground cinnamon
    • Pinch of salt
    • ¼ cup (55g) unsalted butter, very cold and cut into small cubes
    • ½ teaspoon vanilla extract (the “extract” part of our fabulous Apple Pumpkin Muffins With Crumble Extract Topping!)

Preparing Your Workspace and Preheating

Before we dive into creating these delightful Apple Pumpkin Muffins With Crumble Extract Topping, it’s crucial to set ourselves up for success. I always find that a little preparation makes the baking process so much more enjoyable and efficient. First things first, go ahead and preheat your oven to a robust 425°F (220°C). Yes, that’s a relatively high temperature to start with, and there’s a good reason for it – we’ll drop it later, but this initial burst of heat helps create those beautifully domed muffin tops we all adore. While your oven is warming up, line a standard 12-cup muffin tin with paper liners. You can lightly spray the liners with non-stick cooking spray if you wish, especially if you’re worried about sticking, though good quality liners usually prevent this. Gather all your ingredients, measuring them out and having them ready. This ‘mise en place’ approach truly streamlines the entire process, ensuring you don’t miss a beat or an ingredient. Having everything at room temperature, particularly the eggs, is also important for achieving a smooth, well-emulsified batter. Trust me, these small steps make a big difference in the final texture and taste of your homemade treats.

Crafting the Apple Pumpkin Muffin Batter

  1. Combine Dry Ingredients: In a large mixing bowl, I like to whisk together the all-purpose flour, baking soda, baking powder, ground cinnamon, ground nutmeg, ground cloves, and salt. Make sure to really get in there with your whisk and break up any lumps, ensuring all these beautiful spices are evenly distributed throughout the flour. This step is vital because it means every bite of your Apple Pumpkin Muffins With Crumble Extract Topping will have that consistent, warm, autumnal flavor. Sifting these dry ingredients can also help achieve an even lighter and fluffier muffin texture, so if you have a sifter handy, now’s the time to use it! We want our muffins to be tender and airy, not dense.
  2. Mix Wet Ingredients: In a separate, medium-sized bowl, I combine the pure pumpkin puree, melted and slightly cooled unsalted butter, granulated sugar, light brown sugar, eggs, and vanilla extract. Whisk these together until they are thoroughly combined and smooth. The brown sugar adds a wonderful depth of flavor and moisture that complements the pumpkin perfectly, while the melted butter ensures a rich, tender crumb. Make sure your eggs are at room temperature; this helps them emulsify better with the other wet ingredients, leading to a more homogenous batter. You’ll notice the mixture start to lighten in color and become quite creamy as you whisk, which is exactly what we’re looking for.
  3. Combine Wet and Dry Gently: Now, it’s time to introduce the wet ingredients to the dry ingredients. Pour the wet mixture into the bowl with the dry ingredients. Using a spatula or a wooden spoon, gently fold everything together until just combined. This is a crucial step for producing tender muffins, so please, do not overmix! Overmixing develops the gluten in the flour too much, which can lead to tough, chewy muffins, and we definitely want a delicate, soft crumb for our Apple Pumpkin Muffins With Crumble Extract Topping. A few small lumps of flour are perfectly fine and often preferred over an overmixed batter. Stop mixing as soon as you no longer see streaks of dry flour.
  4. Fold in the Diced Apples: Finally, add your finely diced tart baking apples to the batter. Gently fold them in until they are evenly distributed. I find that using tart apples like Granny Smith provides a lovely contrast to the sweetness of the pumpkin and spices, and their firmer texture holds up well during baking, ensuring you get delightful little bursts of apple goodness in every bite. Make sure your apple pieces are diced quite small, about ¼ to ½ inch, so they integrate seamlessly into the muffin texture and cook through beautifully. This addition truly elevates the flavor profile, making these Apple Pumpkin Muffins With Crumble Extract Topping irresistible.

Whipping Up the Irresistible Crumble Topping

No Apple Pumpkin Muffins With Crumble Extract Topping would be complete without its signature crunchy, sweet crown! This crumble is what truly sets these muffins apart and adds an incredible textural contrast that makes them utterly delightful. Let’s get this delicious topping ready while the muffin batter rests momentarily.

  1. Combine Dry Crumble Ingredients: In a medium bowl, measure out your all-purpose flour, granulated sugar, light brown sugar, ground cinnamon, and a pinch of salt. Take a fork or a whisk and thoroughly combine these dry ingredients. The cinnamon here will marry beautifully with the spices in the muffin itself, creating a cohesive flavor experience. The combination of granulated and brown sugar adds both crispness and a slight chewiness to the topping, which is simply fantastic.
  2. Cut in the Cold Butter: Now for the magic! Add your very cold, cubed unsalted butter to the dry mixture. Using a pastry blender, two knives, or even your fingertips, work the butter into the flour mixture until it resembles coarse crumbs. Some pieces can be a bit larger, like small peas, while others are finer. The key here is to keep the butter as cold as possible. Cold butter is essential for a crumbly, distinct topping because it melts slowly in the oven, creating pockets of steam that result in a wonderfully crisp texture. If your butter gets too warm, the topping will become paste-like rather than crumbly, so work quickly! This step is fundamental to achieving that perfect crumble for our Apple Pumpkin Muffins With Crumble Extract Topping.
  3. Incorporate the Vanilla Extract: This is where the “extract” part of our glorious “Apple Pumpkin Muffins With Crumble Extract Topping” truly shines! Once your butter is cut in and you have those beautiful coarse crumbs, drizzle in the vanilla extract. Gently mix it in with your fingers or a fork until it’s just combined. The vanilla extract isn’t just for flavor; it also helps to bind the crumbs slightly, giving them a more robust texture and infusing the topping with a warm, inviting aroma that will fill your kitchen as these muffins bake. This small addition makes a remarkable difference in the overall appeal and taste of the crumble.

Baking Your Perfect Apple Pumpkin Muffins

Now that both our delightful muffin batter and our exquisite crumble topping are ready, it’s time for the grand finale: baking! This is where the magic truly happens, transforming simple ingredients into a warm, fragrant, and utterly delicious treat. These Apple Pumpkin Muffins With Crumble Extract Topping are almost ready for their oven debut!

  1. Fill Muffin Liners: Carefully divide the muffin batter evenly among the 12 prepared muffin liners. I like to use an ice cream scoop for this, as it helps ensure each muffin is roughly the same size, which promotes even baking. Each liner should be filled about two-thirds to three-quarters full. Don’t be tempted to overfill them, as the muffins need room to rise beautifully without spilling over. We’re aiming for perfectly portioned, bakery-style muffins here!
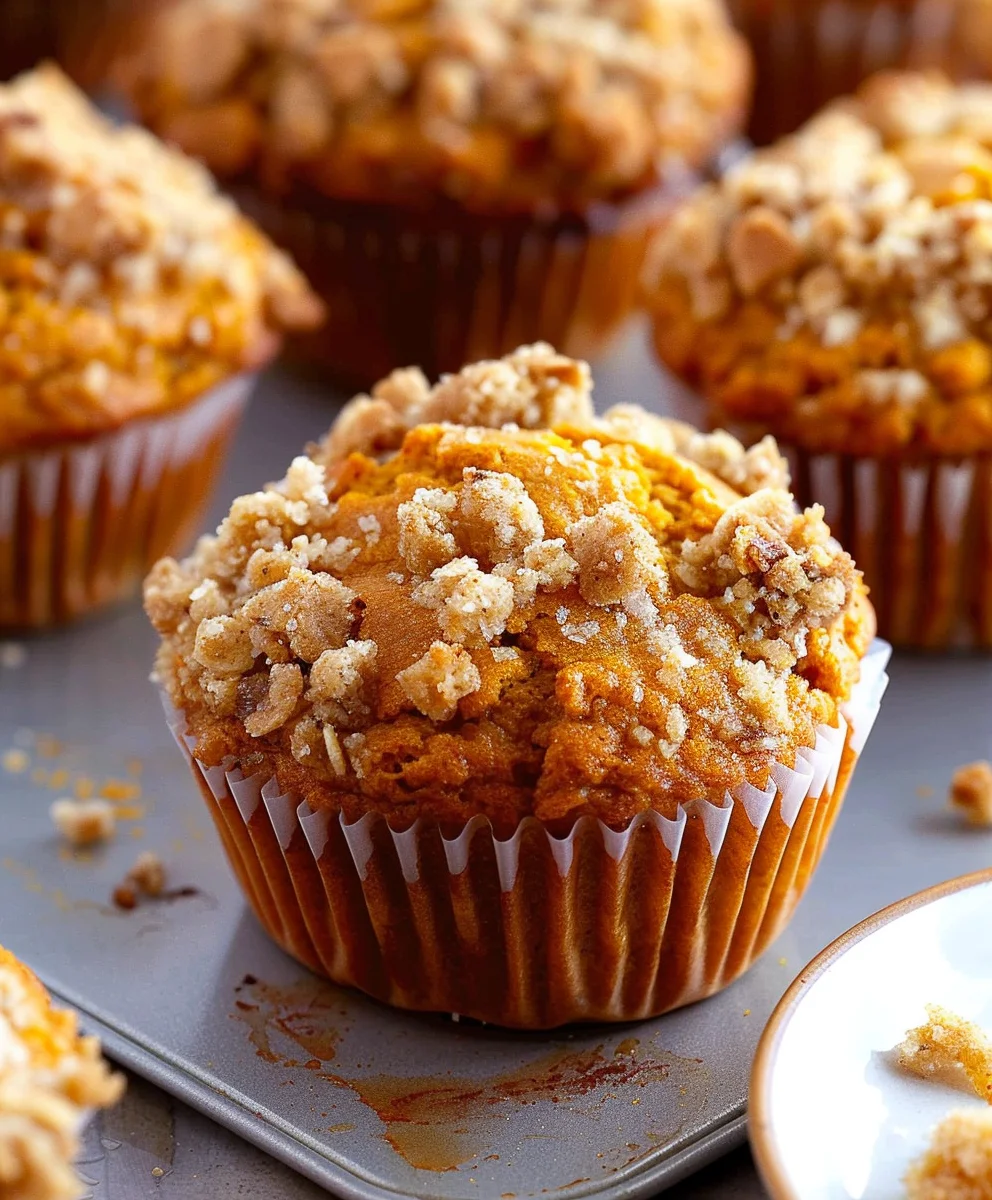
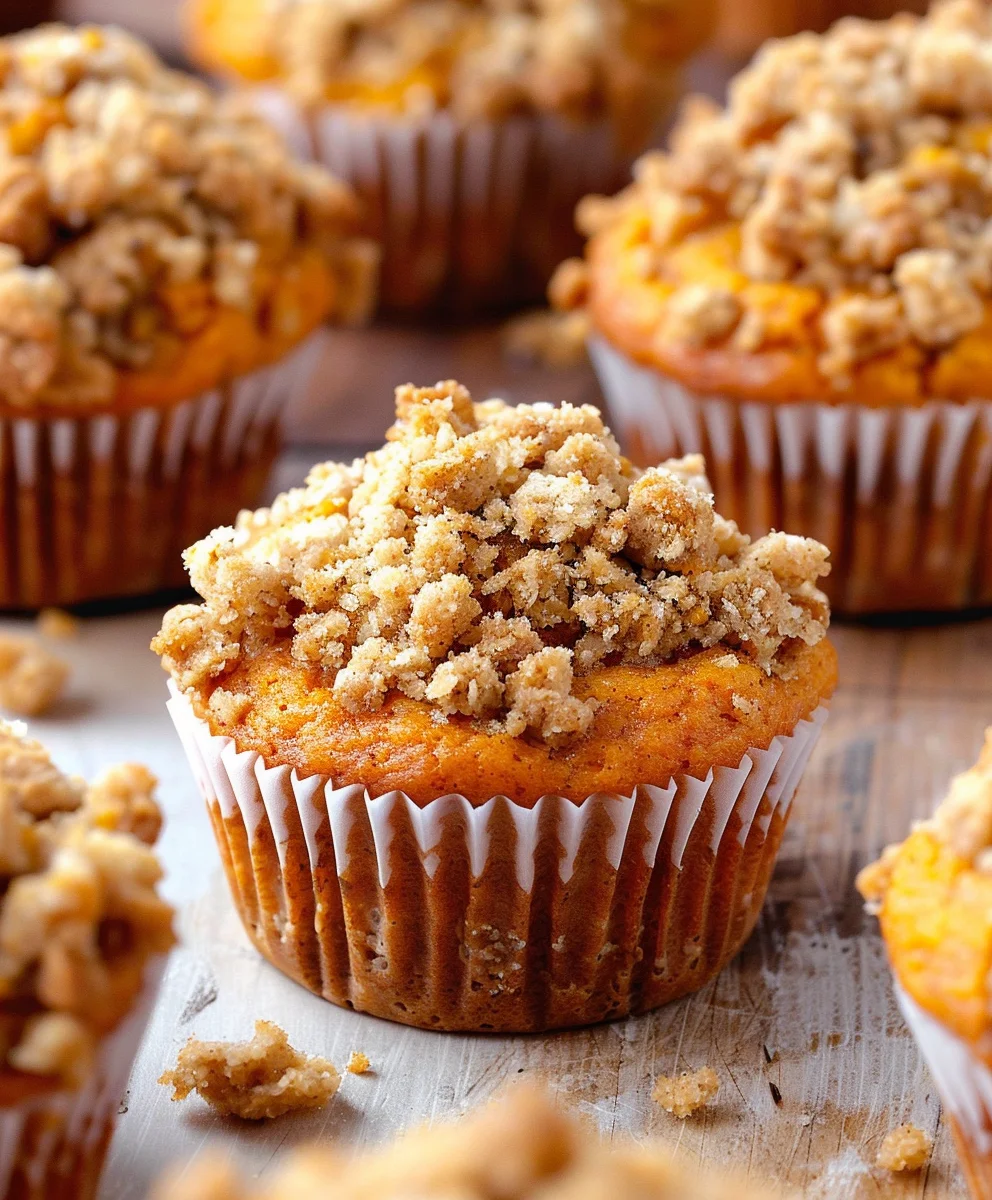
  2. Generously Top with Crumble: Now for the crowning glory! Take generous spoonfuls of your prepared crumble topping and sprinkle it over the top of each muffin. Don’t be shy here; the more crumble, the better! Gently press the crumble down ever so slightly onto the muffin batter to help it adhere, but don’t compact it too much. You want those delightful little peaks and valleys that will become wonderfully crisp and golden during baking. This crumble topping, infused with vanilla extract, is what truly defines our Apple Pumpkin Muffins With Crumble Extract Topping and adds that irresistible texture and flavor burst.
  3. Bake to Perfection: Place the muffin tin into your preheated 425°F (220°C) oven. We’re going to start baking at this higher temperature for an initial 5 minutes. This burst of heat helps the muffins rise quickly, creating those lovely tall, domed tops. After 5 minutes, without opening the oven door too much, reduce the oven temperature to 375°F (190°C) and continue baking for another 18-22 minutes, or until the muffins are golden brown and a wooden skewer or toothpick inserted into the center of a muffin comes out clean or with only a few moist crumbs attached. Every oven is a little different, so keep an eye on them during the last few minutes. The aroma filling your kitchen will be absolutely heavenly! The crumble topping should be beautifully golden and crisp.
  4. Cool and Enjoy: Once baked, carefully remove the muffin tin from the oven. Allow the Apple Pumpkin Muffins With Crumble Extract Topping to cool in the tin for about 5-10 minutes. This short cooling period helps them firm up slightly, making them easier to handle. After this initial cooling, transfer the muffins to a wire rack to cool completely. While they are certainly delicious warm, allowing them to cool completely helps the flavors meld and the texture set perfectly. Plus, the crumble topping will become even crispier as it cools. These muffins are truly a delight, perfect for a cozy breakfast, a comforting snack, or even a lovely dessert. Enjoy every single bite of your homemade autumnal masterpiece!

Irresistible Apple Pumpkin Muffins with Crumb Topping

Conclusion:

And there you have it, my friends! We’ve reached the delicious culmination of our baking journey. I truly hope you’re as excited as I am about these incredible muffins. If you’ve been searching for that perfect autumnal treat, one that effortlessly marries the sweet tang of fresh apples with the earthy warmth of pumpkin, all crowned with an irresistible crunch, then let me assure you: this recipe is an absolute game-changer. These aren’t just any ordinary baked goods; they are a symphony of textures and flavors that will undoubtedly become a staple in your kitchen. The blend of warming spices—cinnamon, nutmeg, and a hint of ginger—permeates every tender crumb, making each bite an experience that tastes exactly like comfort and joy. It’s the kind of recipe that makes your home smell divine, filling every corner with a welcoming, cozy aroma that beckons everyone to the kitchen.

What makes these particular Apple Pumpkin Muffins With Crum extractb Topping a true must-try isn’t just their incredible taste, but also their beautiful balance. The apples provide pockets of juicy sweetness and a lovely chewiness, perfectly complementing the moist, tender pumpkin base. Then, that glorious crumb topping—oh, that crumb topping!—adds a buttery, sweet, and perfectly crunchy contrast that takes these from excellent to extraordinary. It’s the golden, textured crown that elevates the entire muffin, providing that satisfying textural pop that makes you reach for another. I genuinely believe that once you experience the delightful combination of tender muffin and crispy topping, you’ll understand exactly why I rave about them so much. They’re deceptively simple to make, yet yield results that feel gourmet, making them perfect for both seasoned bakers and enthusiastic beginners alike.

Serving Suggestions & Creative Variations to Elevate Your Muffins

Now, let’s talk about how to best enjoy these autumnal delights, and perhaps even how to put your own creative spin on them! While these muffins are absolutely divine straight out of the oven, warm and fragrant, there are so many ways to savor them. Imagine starting your morning with one, still slightly warm, perhaps alongside a freshly brewed cup of coffee or a comforting mug of spiced chai. For a decadent dessert, try warming a muffin for a few seconds and serving it with a generous scoop of vanilla bean ice cream, allowing the ice cream to melt just slightly around the edges, creating a wonderful hot-and-cold sensation. A dollop of freshly whipped cream or a drizzle of maple syrup can also transform them into an elegant after-dinner treat. They also make a fantastic addition to any brunch spread, beautifully complementing savory dishes and fresh fruit alike.

But don’t stop there! The beauty of baking is in experimentation. If you’re feeling adventurous, consider folding in a handful of toasted pecans or walnuts into the muffin batter for an extra layer of nutty crunch. A teaspoon of orange zest could brighten the flavor profile, or a pinch of ground cardamom could introduce an exotic warmth. For an extra touch of decadence, a simple cream cheese glaze drizzled over the cooled muffins would be heavenly, though I personally adore the simplicity and texture of the crumb topping. You could even swap out half of the granulated sugar for brown sugar in the muffin batter to deepen the molasses notes, or use different apple varieties to subtly alter the flavor and texture. Granny Smith apples will provide a sharper tang, while Honeycrisp or Fuji will lend more sweetness and a softer bite. For those who love mini treats, simply use a mini muffin tin and adjust baking time accordingly for adorable bite-sized versions, perfect for sharing.

Your Turn: Bake, Savor, and Share!

So, now it’s your turn. I truly hope this recipe inspires you to get into the kitchen and create these wonderfully aromatic and utterly delicious muffins. There’s an unparalleled joy in baking something from scratch, especially when the results are this spectacular. Imagine the delight on the faces of your family and friends as they bite into these moist, flavorful treats, all made with your own loving hands. I encourage you to set aside some time, gather your ingredients, and immerse yourself in the delightful process. I promise you, the aroma alone will be worth the effort!

Once you’ve baked your batch of these sensational treats, I would absolutely love to hear about your experience! Did you stick to the recipe, or did you try one of the variations? What was your favorite part? Did they disappear as quickly in your household as they do in mine? Please don’t hesitate to share your thoughts, your successes, and even your photos. Your feedback and stories are what truly make this baking community so special and vibrant. Happy baking, and enjoy every single bite!


Irresistible Apple Pumpkin Muffins with Crumb Topping

Irresistible Apple Pumpkin Muffins with Crumb Topping

Apple Pumpkin Muffins with Crumb Topping are a delightful invitation to embrace the comforting flavors of autumn. Imagine waking up to the irresistible aroma of warm spices, sweet apples, and earthy pumpkin. This isn’t just any muffin; it’s a culinary hug, a perfect fusion of harvest’s finest, crowned with an irresistible, unique topping that adds a delightful textural contrast.

Prep Time
25 Minutes

Cook Time
25 Minutes

Total Time
50 Minutes

Servings
12 muffins

Ingredients

  • 3 tablespoons all-purpose flour
  • 1 ½ tablespoons unsalted butter, cold and cut into cubes
  • 1 ½ tablespoons light brown sugar
  • 2 teaspoons granulated sugar
  • Pinch salt
  • ¼ teaspoon ground cinnamon (or pumpkin pie spice)
  • 1 ½ tablespoons diced apples (optional; reserved from below)
  • 1 ½ tablespoons full fat sour cream, room temperature
  • 5 tablespoons pure canned pumpkin
  • 1 tablespoon apple juice (or orange juice or water)
  • 3 tablespoons granulated sugar
  • 2 tablespoons light brown sugar
  • 1 large egg yolk, room temperature
  • ½ teaspoon vanilla extract
  • ½ cup fresh apple, cut into small cubes (I use Honeycrisp; Dice about 1 ½ tablespoons smaller for the streusel)

Instructions

  1. Step 1
    Preheat oven to 425°F (220°C). Line a standard 12-cup muffin tin with paper liners.
  2. Step 2
    In a medium bowl, combine 3 tbsp all-purpose flour, 1½ tbsp light brown sugar, 2 tsp granulated sugar, pinch salt, and ¼ tsp ground cinnamon. Cut in 1½ tbsp cold, cubed unsalted butter until coarse crumbs form. Stir in ½ tsp vanilla extract and 1½ tbsp optional diced apples.
  3. Step 3
    In a large mixing bowl, combine the dry ingredients (3 tbsp all-purpose flour, 3 tbsp granulated sugar, 2 tbsp light brown sugar). In a separate bowl, whisk 5 tbsp pure pumpkin puree, 1½ tbsp sour cream, 1 tbsp apple juice, 1 large egg yolk, and ½ tsp vanilla extract until smooth. Pour wet mixture into dry and gently fold until just combined (do not overmix). Fold in ½ cup diced fresh apples.
  4. Step 4
    Divide batter evenly among the 12 prepared muffin liners (two-thirds to three-quarters full). Generously sprinkle crumble topping over each muffin, gently pressing it down.
  5. Step 5
    Bake at 425°F (220°C) for 5 minutes. Reduce temperature to 375°F (190°C) and continue baking for 18-22 minutes, or until golden brown and a toothpick comes out clean.
  6. Step 6
    Cool muffins in the tin for 5-10 minutes, then transfer to a wire rack to cool completely.

Important Information

Nutrition Facts (Per Serving)

It is important to consider this information as approximate and not to use it as definitive health advice.

Allergy Information

Please check ingredients for potential allergens and consult a health professional if in doubt.

« Previous Post
Warm Spiced Apple Cinnamon Snickerdoodle Cookies
Next Post »
Sausage & Cabbage Stir Fry: Quick & Flavorful Dinner!

If you enjoyed this…

Cinnamon Roll Protein Muffins: A Delicious and Healthy Recipe

Hawaiian Banana Bread: The Ultimate Tropical Recipe

Chia Seed Pudding For Kids: Easy, Healthy & Delicious Recipes

Primary Sidebar

Browse by Diet

BreakfastDinnerLunchDessertAppetizer

Sweet Peach Yogurt Parfait Delight

One of my fondest memories is from a lazy summer afternoon spent at my grandmother’s house. The sun filtered through the kitchen window, casting a warm glow over the table where she would create her culinary magic. It was during one of those blissful moments that I first tasted her Peach Yogurt Parfait with Honey and Granola. The sweet aroma of ripe peaches mingling with creamy yogurt and the crunch of granola was nothing short of heavenly. It felt like summer captured in a bowl, and I still remember the joy of diving in with a spoon, each layer revealing a new burst of flavor.

When I think about that parfait, I can almost hear the gentle hum of the bees outside, reminding me of the floral notes that honey brings to every bite. The vibrant yellows and soft oranges of the peaches contrast beautifully with the creamy white yogurt and the golden crunch of granola. It’s a dish that not only looks delightful but also tastes like a celebration of fresh, wholesome ingredients.

What makes my version of this Peach Yogurt Parfait special is the careful balance of flavors and textures. I use ripe, juicy peaches, drizzled with locally sourced honey, and a homemade granola that’s bursting with nuts and seeds for an extra crunch. It’s a simple dish, but every layer is crafted with love and attention.

Let me show you exactly how to make this delightful parfait, so you can bring a bit of that summer magic into your kitchen!

Sweet Peach Yogurt Parfait Delight

Why You’ll Love This Recipe

  • Delightfully creamy texture from the Greek yogurt, paired with the juicy sweetness of fresh peaches.
  • Ready in under 20 minutes, making it a quick and satisfying breakfast or snack option.
  • Budget-friendly, using common ingredients that you may already have in your pantry.
  • Customizable with your favorite granola and nuts, allowing you to tailor each parfait to your taste.
  • Perfectly balanced flavors with the bright acidity of lemon juice and the sweetness of honey enhancing the peaches.

Ingredients

  • For the Parfait:
  • 2 cups plain Greek yogurt (or vanilla yogurt for a sweeter option)
  • 2 large ripe peaches, diced (about 2 cups)
  • 1 tablespoon fresh lemon juice (to prevent browning of peaches)
  • 2 tablespoons honey (plus more for drizzling)
  • 1 teaspoon vanilla extract (optional for extra flavor)
  • For the Granola:
  • 1 cup granola (store-bought or homemade; see notes for a simple granola recipe)
  • 1/4 cup sliced almonds (optional for added crunch)
  • 1/4 cup shredded coconut (optional for added flavor)

Let’s dive into some key ingredients that make this Peach Yogurt Parfait so delightful! First, the Greek yogurt is not only creamy but also packed with protein, making it a satisfying option for breakfast or a snack. If you’re looking for a sweeter option, you can easily substitute it with vanilla yogurt, though it may alter the overall flavor balance. Next, the ripe peaches are the star of the show; their natural sweetness shines through, so I recommend choosing peaches that yield slightly to pressure, indicating they’re perfectly ripe. If peaches aren’t in season, feel free to use nectarines or even frozen peaches—just thaw them before use. Finally, honey adds a lovely floral sweetness that ties everything together. If you prefer, maple syrup can serve as a delicious substitute.

Step-by-Step Instructions

  1. Start by preparing the peaches. Wash them thoroughly, then slice and dice them into bite-sized pieces. In a medium bowl, toss the diced peaches with 1 tablespoon of fresh lemon juice to prevent browning. Set aside for about 5 minutes while the lemon juice works its magic.
  2. In a separate bowl, combine the Greek yogurt, 2 tablespoons of honey, and 1 teaspoon of vanilla extract if using. Stir the mixture until smooth and thoroughly blended. This should take about a minute. Avoid overmixing to maintain the creaminess of the yogurt.
  3. Now it’s time to layer your parfait. Grab a clear glass or bowl to showcase your beautiful creation. Start with a generous spoonful of the yogurt mixture at the bottom—about 1/4 cup will do. Use a spoon to spread it evenly.
  4. Add a layer of the diced peaches over the yogurt, ensuring they cover the yogurt completely. You might want to use about half of what you have prepared—roughly 1 cup. This layer should be visually appealing, so arrange the peaches neatly.
  5. Sprinkle 1/4 cup of granola over the peaches. This adds a delightful crunch. Make sure to distribute it evenly to ensure every bite has that satisfying texture. Avoid packing it down too tightly, as you want it to maintain its crunch.
  6. Repeat the layers: spoon in another 1/4 cup of yogurt, followed by another cup of peaches, and another sprinkle of granola. You should have at least two layers, but feel free to add more depending on your glass size.
  7. Finish off your parfait with a drizzle of honey on top for added sweetness and a touch of elegance. If you’re using sliced almonds or shredded coconut, sprinkle them on top now. It adds a lovely visual contrast and extra flavor.
  8. Serve immediately or refrigerate for up to 30 minutes before serving to allow the flavors to meld together. However, I recommend enjoying it fresh to maintain the granola’s crunch.

Pro Tips for the Best Peach Yogurt Parfait With Honey And Granola

  • Make sure to choose ripe peaches for the best flavor and texture. A common mistake is using unripe fruit, which can lead to a less enjoyable parfait. Look for peaches that are fragrant and slightly soft to the touch.
  • Use a clear glass to assemble your parfait; this not only makes for a beautiful presentation but also allows you to see the colorful layers, which adds to the enjoyment of eating it.
  • For an even creamier texture, consider whipping the Greek yogurt with a hand mixer for a couple of minutes before layering. This small adjustment makes a huge difference in mouthfeel.
  • Be mindful of the granola-to-yogurt ratio. Too much granola can overwhelm the parfait, while too little can make it feel too creamy. Aim for about 1/4 cup of granola per layer for the perfect balance.
  • If you’re making this for a gathering, consider preparing the yogurt and peaches ahead of time and layering them just before serving. This ensures the granola stays crunchy!

Variations & Serving Ideas

There are so many ways to get creative with your Peach Yogurt Parfait! For a tropical twist, swap out the peaches for mangoes or pineapples and top with coconut flakes. If you prefer a berry flavor, mix in some blueberries or strawberries with the peaches for added color and taste. For a nutty version, incorporate chopped walnuts or pecans instead of almonds.

As for serving ideas, this parfait pairs beautifully with a side of scrambled eggs for a hearty breakfast or fresh fruit salad for a light lunch. You might also enjoy it alongside whole grain toast with almond butter for an energizing snack. The contrast of flavors and textures will elevate your meal experience!

Storage, Make-Ahead & Reheating

The Peach Yogurt Parfait is best enjoyed fresh, but you can prepare some components ahead of time. Store the layered parfait in an airtight container in the refrigerator for up to 24 hours. However, be cautious; the granola may lose its crunch if stored too long. You can freeze the yogurt and peach mixture for up to 2 months; just remember to thaw it in the refrigerator overnight before serving.

If you plan to enjoy this dish the next day, it can taste even better as the flavors meld together. Just remember to add the granola right before serving to keep its delightful crunch!

Frequently Asked Questions

Can I make Peach Yogurt Parfait With Honey And Granola ahead of time?

Yes — in fact, it tastes even better the next day as the flavors meld. However, I recommend waiting to add the granola until just before serving to maintain its crunch.

What can I substitute for Greek yogurt?

If you prefer a lighter option, you can substitute Greek yogurt with regular yogurt or a dairy-free alternative like coconut yogurt. Just remember that this may alter the creaminess and flavor profile slightly.

Can I use frozen peaches for this parfait?

Absolutely! Just make sure to thaw the frozen peaches before using them. They will still add great flavor, though the texture may be slightly softer than fresh peaches.

How do I make the parfait vegan?

To make a vegan version, substitute the Greek yogurt with a plant-based yogurt alternative, and replace honey with maple syrup or agave nectar. This keeps the parfait sweet while adhering to a vegan diet.

What other fruits can I use in this recipe?

You can mix and match fruits based on your preference. Try using strawberries, blueberries, raspberries, or even bananas. Just make sure to adjust the lemon juice as needed to prevent browning.

Sweet Peach Yogurt Parfait Delight

Final Thoughts

The Peach Yogurt Parfait with Honey and Granola is a delightful blend of creamy yogurt, sweet peaches, and crunchy granola that creates a satisfying and nourishing treat. Each layer bursts with flavor, making it a perfect choice for breakfast or a light dessert.

This is the kind of recipe I come back to again and again, especially when I want something refreshing and wholesome to start my day. The harmony of sweet and tart flavors, combined with the delightful crunch, never fails to lift my spirits!

I encourage you to give this parfait a try and indulge in its comforting goodness. Feel free to share your results or even add your own twist—perhaps a sprinkle of cinnamon or a handful of nuts. Enjoy creating your perfect parfait!

Print
clock clock iconcutlery cutlery iconflag flag iconfolder folder iconinstagram instagram iconpinterest pinterest iconfacebook facebook iconprint print iconsquares squares iconheart heart iconheart solid heart solid icon

Peach Yogurt Parfait


  • Author: Lily author
  • Total Time: 15 minutes
  • Yield: 4 servings 1x
Pin Recipe
Print Recipe

Description

This Peach Yogurt Parfait combines creamy Greek yogurt, juicy peaches, and crunchy granola for a delightful treat. It’s a perfect breakfast or snack that captures the essence of summer in every bite.


Ingredients

Scale
  • For the Parfait:
  • 2 cups plain Greek yogurt (or vanilla yogurt for a sweeter option)
  • 2 large ripe peaches, diced (about 2 cups)
  • 1 tablespoon fresh lemon juice (to prevent browning of peaches)
  • 2 tablespoons honey (plus more for drizzling)
  • 1 teaspoon vanilla extract (optional for extra flavor)
  • For the Granola:
  • 1 cup granola (store-bought or homemade; see notes for a simple granola recipe)
  • 1/4 cup sliced almonds (optional for added crunch)
  • 1/4 cup shredded coconut (optional for added flavor)

Instructions

  1. Start by preparing the peaches. Wash them thoroughly, then slice and dice them into bite-sized pieces. In a medium bowl, toss the diced peaches with 1 tablespoon of fresh lemon juice to prevent browning. Set aside for about 5 minutes while the lemon juice works its magic.
  2. In a separate bowl, combine the Greek yogurt, 2 tablespoons of honey, and 1 teaspoon of vanilla extract if using. Stir the mixture until smooth and thoroughly blended. This should take about a minute. Avoid overmixing to maintain the creaminess of the yogurt.
  3. Now it’s time to layer your parfait. Grab a clear glass or bowl to showcase your beautiful creation. Start with a generous spoonful of the yogurt mixture at the bottom—about 1/4 cup will do. Use a spoon to spread it evenly.
  4. Add a layer of the diced peaches over the yogurt, ensuring they cover the yogurt completely. You might want to use about half of what you have prepared—roughly 1 cup. This layer should be visually appealing, so arrange the peaches neatly.
  5. Sprinkle 1/4 cup of granola over the peaches. This adds a delightful crunch. Make sure to distribute it evenly to ensure every bite has that satisfying texture. Avoid packing it down too tightly, as you want it to maintain its crunch.
  6. Repeat the layers: spoon in another 1/4 cup of yogurt, followed by another cup of peaches, and another sprinkle of granola. You should have at least two layers, but feel free to add more depending on your glass size.
  7. Finish off your parfait with a drizzle of honey on top for added sweetness and a touch of elegance. If you’re using sliced almonds or shredded coconut, sprinkle them on top now. It adds a lovely visual contrast and extra flavor.
  8. Serve immediately or refrigerate for up to 30 minutes before serving to allow the flavors to meld together. However, I recommend enjoying it fresh to maintain the granola’s crunch.
  • Prep Time: 15 mins
  • Cook Time: 0 mins
  • Category: Breakfast
  • Method: No-cook
  • Cuisine: American

Nutrition

  • Serving Size: 1 parfait
  • Calories: 250
  • Sugar: 20 g
  • Sodium: 50 mg
  • Fat: 5 g
  • Saturated Fat: 2 g
  • Unsaturated Fat: 3 g
  • Trans Fat: 0 g
  • Carbohydrates: 40 g
  • Fiber: 3 g
  • Protein: 10 g
  • Cholesterol: 10 mg

Keywords: Choose ripe peaches for the best flavor and texture. Use a clear glass for a beautiful presentation. For creaminess, consider whipping the yogurt before layering. Be mindful of the granola-to-yogurt ratio. Prepare yogurt and peaches ahead of time for gatherings, layering just before serving.

Did you make this recipe?

Share a photo and tag us — we can't wait to see what you've made!

Sun-Kissed Frozen Orange Cream Slush

As a child, summer days felt like they lasted forever. I remember the sticky heat wrapping around me as I played outside, my laughter mingling with the sounds of the neighborhood. But nothing could cool me down quite like the moment I’d spot my grandmother, laboring over her blender, whipping up her famous Frozen Orange Creamsicle Slush. That vibrant orange treat, with its frosty texture and sweet citrus aroma, was like a burst of sunshine in a cup. Just one sip, and I could feel the coolness wash over me, sparking pure joy.

This Frozen Orange Creamsicle Slush has a way of making you feel like a kid again. Its creamy, dreamy consistency is a delightful balance of bright orange and soft vanilla, inviting you to dive right in. The refreshing tang of orange dances on your tongue, while the smooth creaminess envelops you in a comforting embrace. It’s a nostalgic treat that’s perfect for hot summer afternoons or anytime you need a little pick-me-up.

What makes my version of this slush stand out is the addition of a hint of vanilla bean, which elevates the flavor and adds an extra layer of richness. Plus, it’s super easy to whip up with just a few simple ingredients that you probably already have on hand! So, if you’re ready to relive those sun-soaked memories, let me show you exactly how to make it.

Sun-Kissed Frozen Orange Cream Slush

Why You’ll Love This Recipe

  • Each slush is a perfect blend of creamy vanilla and zesty orange, creating a nostalgic flavor reminiscent of summer days.
  • This refreshing treat is ready in under 15 minutes, making it an ideal quick dessert for unexpected guests or hot afternoons.
  • With just 8 simple ingredients, it’s budget-friendly, ensuring you don’t have to break the bank to enjoy a delicious slush.
  • The slush has a perfectly smooth texture, thanks to the combination of ice and ice cream, providing a delightful contrast to the bright citrus flavors.
  • It’s highly customizable; you can easily adjust the sweetness and add fresh herbs for a unique twist that suits your taste.

Ingredients

  • 2 cups orange juice (freshly squeezed or store-bought)
  • 1 cup vanilla ice cream
  • 1 cup crushed ice
  • 1/2 cup milk (whole or 2%)
  • 1/4 cup granulated sugar (adjust based on sweetness preference)
  • 1 teaspoon vanilla extract
  • Zest of 1 orange (for added flavor)
  • Fresh orange slices and mint leaves (for garnish)

The star of this Frozen Orange Creamsicle Slush is the orange juice, which provides the vibrant, citrusy base. Freshly squeezed juice will yield the brightest flavor, but store-bought options can be just as convenient. If you’re opting for store-bought, choose 100% pure juice with no added sugars for the best results. Another essential ingredient is the vanilla ice cream; it adds creaminess and sweetness. You can substitute it with dairy-free ice cream if you’re looking for a vegan option. Whole or 2% milk complements the ice cream, creating a smooth blend. If you want a lower-calorie version, almond or oat milk can be good alternatives.

Lastly, the granulated sugar can be adjusted based on your sweetness preference. If you prefer a more natural sweetener, consider using honey or agave syrup. The orange zest enhances the flavor profile, providing an aromatic pop that brings the whole slush together. Don’t skip it! It adds an extra layer of brightness that makes this slush truly special.

Step-by-Step Instructions

  1. Start by preparing your ingredients. Gather 2 cups of orange juice, 1 cup of vanilla ice cream, and 1 cup of crushed ice. Make sure the ice is finely crushed, as larger chunks can make blending difficult.
  2. In a blender, combine the orange juice, vanilla ice cream, crushed ice, and 1/2 cup of milk. Add 1/4 cup of granulated sugar and 1 teaspoon of vanilla extract. If you like a sweeter slush, consider adding a bit more sugar at this stage.
  3. Add the zest of 1 orange to the blender. This step is crucial for enhancing the citrus flavor of your slush. Make sure not to include the bitter white pith—only the flavorful zest.
  4. Blend the mixture on medium-high speed for about 30-45 seconds. Stop once the ingredients are fully combined and the slush has a smooth, even consistency. If you notice large chunks of ice, blend for an additional 10-15 seconds. Avoid over-blending, as this can make the slush too liquidy.
  5. Once blended, taste the slush. If it needs more sweetness, add a little more sugar and blend for a few more seconds. If it’s too thick, you can add a splash of milk to reach your desired consistency.
  6. Pour the slush into glasses. This recipe typically serves 4, but you can easily double it for larger gatherings. Use a spoon to help guide the slush into the glasses if needed.
  7. Garnish each serving with fresh orange slices and mint leaves. The mint not only adds a pop of color but also a refreshing aroma that complements the citrus flavors beautifully.
  8. Serve immediately and enjoy! If you’ve made extra, you can refrigerate it for a short time, but it’s best enjoyed fresh.

Pro Tips for the Best Frozen Orange Creamsicle Slush

  • Don’t skip the orange zest! It’s a game-changer for flavor. Always zest before juicing to make it easier.
  • Use a high-powered blender for the best texture. A standard blender may struggle with ice, leading to uneven consistency. If you have a food processor, that can work too, but ensure the ice is finely crushed.
  • Adjust the ice-to-liquid ratio carefully. If your slush is too thick, it won’t blend well. Start with less ice and add more until you reach your preferred texture.
  • Be cautious with the sugar! Always start with the lower amount, as you can easily add more, but it’s hard to fix an overly sweet slush.
  • For a fun twist, consider adding a splash of coconut milk or a handful of fresh fruit like strawberries or pineapple. This not only enhances the flavor but also adds a beautiful color contrast.

Variations & Serving Ideas

There are countless ways to put a spin on your Frozen Orange Creamsicle Slush. Consider making a tropical version by adding in some pineapple juice or coconut milk for a delightful tropical twist. If you’re feeling adventurous, try incorporating a handful of frozen mango or peach slices for added sweetness. For a lighter version, swap out the vanilla ice cream for Greek yogurt for a creamy yet tangy alternative.

As for serving ideas, this refreshing slush pairs wonderfully with light summer dishes like grilled chicken skewers, fish tacos, or a simple salad topped with citrus vinaigrette. The bright, zesty flavors of the slush complement these dishes perfectly, making them an ideal pairing for a sunny day.

Storage, Make-Ahead & Reheating

This Frozen Orange Creamsicle Slush is best enjoyed fresh, but if you have leftovers, you can store them in an airtight container in the fridge for up to 2 days. Just keep in mind that the slush may lose some of its texture over time as the ice melts. It doesn’t freeze well, as the ice will turn into a solid block. If you must freeze it, blend again after thawing to restore the slushy consistency. This treat is best the day you make it, as the flavors meld together beautifully overnight, enhancing its deliciousness.

Frequently Asked Questions

Can I make Frozen Orange Creamsicle Slush ahead of time?

Yes — in fact, it tastes even better the next day as the flavors meld. However, it’s best to enjoy it fresh, as the texture can change if stored for too long. If you need to prepare it ahead, keep it in the fridge and re-blend before serving.

What kind of orange juice should I use?

For the best flavor, use freshly squeezed orange juice. However, if you’re short on time, opt for 100% pure store-bought juice without added sugars. This will ensure that your slush remains flavorful and refreshing.

Can I substitute the vanilla ice cream?

Absolutely! If you’re looking for a dairy-free option, coconut milk ice cream or a non-dairy vanilla ice cream can work wonderfully. They will still provide the creamy texture and sweetness you desire.

How can I adjust the sweetness of my slush?

You can easily adjust the sweetness by modifying the amount of sugar added. Start with 1/4 cup and taste the mixture before blending. If you prefer it sweeter, add more sugar gradually until it reaches your desired level.

What should I do if my slush is too thick?

If your slush is too thick, simply add a splash of milk or orange juice and blend again. This will help achieve a more drinkable consistency while maintaining the slushy texture. Adjust gradually to reach your preferred thickness.

Sun-Kissed Frozen Orange Cream Slush

Final Thoughts

The Frozen Orange Creamsicle Slush is a delightful blend of refreshing citrus and creamy goodness, making it a perfect treat for warm days or any time you crave a taste of nostalgia. The way the bright orange flavor dances with the creamy texture truly elevates this slush, transforming it into a satisfying escape from the everyday.

This is the kind of recipe I come back to again and again, especially when I’m looking to cool down or impress guests at a summer gathering. It’s simple to make and always brings smiles all around! I encourage you to try this recipe for yourself—don’t hesitate to share your results or even put your own spin on it. Happy slushing!

Print
clock clock iconcutlery cutlery iconflag flag iconfolder folder iconinstagram instagram iconpinterest pinterest iconfacebook facebook iconprint print iconsquares squares iconheart heart iconheart solid heart solid icon

Frozen Orange Creamsicle Slush


  • Author: Lily author
  • Total Time: 15 minutes
  • Yield: 4 servings 1x
Pin Recipe
Print Recipe

Description

This Frozen Orange Creamsicle Slush is a refreshing treat that combines creamy vanilla and zesty orange flavors. Perfect for hot summer days, it brings back nostalgic memories with every sip.


Ingredients

Scale
  • 2 cups orange juice (freshly squeezed or store-bought)
  • 1 cup vanilla ice cream
  • 1 cup crushed ice
  • 1/2 cup milk (whole or 2%)
  • 1/4 cup granulated sugar (adjust based on sweetness preference)
  • 1 teaspoon vanilla extract
  • Zest of 1 orange (for added flavor)
  • Fresh orange slices and mint leaves (for garnish)

Instructions

  1. Start by preparing your ingredients. Gather 2 cups of orange juice, 1 cup of vanilla ice cream, and 1 cup of crushed ice. Make sure the ice is finely crushed, as larger chunks can make blending difficult.
  2. In a blender, combine the orange juice, vanilla ice cream, crushed ice, and 1/2 cup of milk. Add 1/4 cup of granulated sugar and 1 teaspoon of vanilla extract. If you like a sweeter slush, consider adding a bit more sugar at this stage.
  3. Add the zest of 1 orange to the blender. This step is crucial for enhancing the citrus flavor of your slush. Make sure not to include the bitter white pith—only the flavorful zest.
  4. Blend the mixture on medium-high speed for about 30-45 seconds. Stop once the ingredients are fully combined and the slush has a smooth, even consistency. If you notice large chunks of ice, blend for an additional 10-15 seconds. Avoid over-blending, as this can make the slush too liquidy.
  5. Once blended, taste the slush. If it needs more sweetness, add a little more sugar and blend for a few more seconds. If it’s too thick, you can add a splash of milk to reach your desired consistency.
  6. Pour the slush into glasses. This recipe typically serves 4, but you can easily double it for larger gatherings. Use a spoon to help guide the slush into the glasses if needed.
  7. Garnish each serving with fresh orange slices and mint leaves. The mint not only adds a pop of color but also a refreshing aroma that complements the citrus flavors beautifully.
  8. Serve immediately and enjoy! If you’ve made extra, you can refrigerate it for a short time, but it's best enjoyed fresh.
  • Prep Time: 15 min
  • Cook Time: 0 min
  • Category: Dessert
  • Method: Blending
  • Cuisine: American

Nutrition

  • Serving Size: 1 serving
  • Calories: 200
  • Sugar: 30 g
  • Sodium: 50 mg
  • Fat: 5 g
  • Saturated Fat: 3 g
  • Unsaturated Fat: 2 g
  • Trans Fat: 0 g
  • Carbohydrates: 40 g
  • Fiber: 1 g
  • Protein: 2 g
  • Cholesterol: 20 mg

Keywords: Don't skip the orange zest! It's a game-changer for flavor. Always zest before juicing to make it easier.

Did you make this recipe?

Share a photo and tag us — we can't wait to see what you've made!

Zesty Lemon Poppy Seed Delight

One rainy afternoon, I found myself in my grandmother’s cozy kitchen, the kind that always smelled like warmth and love. She was whipping up her famous Lemon Poppy Seed Loaf, a recipe that had been passed down through generations. As the batter came together, the zesty aroma of fresh lemons filled the air, mingling perfectly with the nutty fragrance of poppy seeds. I can still picture her, apron-clad, as she expertly drizzled a vibrant citrus icing over the loaf, creating a glossy, sun-kissed finish that beckoned us to dive in. It was a moment that sparked my own passion for baking, and this recipe has become a cherished staple in my home ever since.

When you take a bite of this Lemon Poppy Seed Loaf, it’s like a burst of sunshine on your palate. The loaf is beautifully golden, with a tender crumb that melts in your mouth. Each slice is speckled with tiny poppy seeds, adding a delightful crunch that contrasts beautifully with the tangy sweetness of the lemon. And that citrus icing? It’s the finishing touch that elevates this loaf from ordinary to extraordinary, with its bright, zesty flavor dancing on your taste buds.

This recipe stands out because it embraces simplicity while delivering on flavor. I’ve added a hint of vanilla to the batter, enhancing the overall taste and making it even more indulgent. Trust me, once you make this Lemon Poppy Seed Loaf With Citrus Icing, it’ll become a go-to in your baking repertoire.

So, let me show you exactly how to make it!

Zesty Lemon Poppy Seed Delight

Why You’ll Love This Recipe

  • Moist and tender crumb that melts in your mouth, thanks to the perfect balance of butter and buttermilk.
  • Bright, zesty lemon flavor paired with crunchy poppy seeds, creating a delightful texture and taste experience.
  • Easy to whip up in just about an hour, perfect for last-minute gatherings or a cozy afternoon treat.
  • Budget-friendly with everyday ingredients, making it an accessible option for all home bakers.
  • The citrus icing adds a sweet tang that elevates the loaf, turning a simple recipe into a showstopper!

Ingredients

  • 1 ½ cups (190g) all-purpose flour
  • 1 teaspoon baking powder
  • ½ teaspoon baking soda
  • ½ teaspoon salt
  • 3 tablespoons poppy seeds
  • ½ cup (115g) unsalted butter, softened to room temperature
  • 1 cup (200g) granulated sugar
  • 2 large eggs
  • 1 teaspoon vanilla extract
  • 1 teaspoon lemon zest (from about 1 medium lemon)
  • ½ cup (120ml) buttermilk
  • 2 tablespoons fresh lemon juice

For the Citrus Icing:

  • 1 cup (120g) powdered sugar
  • 2 tablespoons fresh lemon juice
  • 1 tablespoon orange juice
  • 1 teaspoon lemon zest (for garnish, optional)

Let’s dive into the key ingredients that make this Lemon Poppy Seed Loaf so special. The all-purpose flour provides the structure and base for the loaf, while the baking powder and baking soda ensure it rises perfectly, giving the loaf a light texture. For a gluten-free variation, you could substitute the flour with a gluten-free all-purpose blend. Poppy seeds not only add a delightful crunch but also contribute to the unique flavor profile that pairs well with the citrus notes.

Unsalted butter is crucial for achieving the buttery richness that makes this loaf so moist. If you’re looking for a dairy-free option, coconut oil or a vegan butter can be used instead. The buttermilk is another essential component, providing acidity that activates the baking soda for a fluffy texture. If you don’t have buttermilk on hand, you can easily make a substitute by mixing ½ cup of milk with 1 tablespoon of vinegar or lemon juice and letting it sit for about 5 minutes.

Step-by-Step Instructions

  1. Preheat your oven to 350°F (175°C). Grease a 9×5-inch loaf pan or line it with parchment paper for easy removal later.
  2. In a medium mixing bowl, whisk together 1 ½ cups of all-purpose flour, 1 teaspoon of baking powder, ½ teaspoon of baking soda, ½ teaspoon of salt, and 3 tablespoons of poppy seeds. This helps to evenly distribute the baking agents and ensures a uniform rise.
  3. In a large mixing bowl, cream together ½ cup of softened unsalted butter and 1 cup of granulated sugar using an electric mixer on medium speed for about 3-4 minutes, until the mixture is light and fluffy. Make sure to scrape down the sides of the bowl occasionally.
  4. Add 2 large eggs, 1 teaspoon of vanilla extract, and 1 teaspoon of lemon zest to the creamed butter and sugar, mixing until fully combined. You want a smooth consistency, so ensure there are no lumps of butter.
  5. In a small bowl, combine ½ cup of buttermilk and 2 tablespoons of fresh lemon juice. Alternately add the dry ingredients and buttermilk mixture to the butter mixture, starting and ending with the dry ingredients. Mix just until combined; do not overmix, as this can lead to a dense loaf.
  6. Pour the batter into the prepared loaf pan. Smooth the top with a spatula, ensuring it’s even. Bake in the preheated oven for 50-60 minutes, or until a toothpick inserted in the center comes out clean. The edges should be lightly golden brown, and the center should feel just set.
  7. Once baked, remove the loaf from the oven and allow it to cool in the pan for about 10 minutes. Then, transfer it to a wire rack to cool completely. Resist the urge to slice too soon, as it will be crumbly if it’s still warm.
  8. While the loaf is cooling, prepare the citrus icing. In a medium bowl, whisk together 1 cup of powdered sugar, 2 tablespoons of fresh lemon juice, and 1 tablespoon of orange juice until smooth. If the icing is too thick, you can add a little more juice to reach your desired consistency.
  9. Once the loaf is completely cool, drizzle the citrus icing over the top. If you like, sprinkle with an additional teaspoon of lemon zest for an extra pop of flavor and color.

Pro Tips for the Best Lemon Poppy Seed Loaf With Citrus Icing

  • Be careful not to overmix your batter; this is a common mistake that can lead to a dense loaf. Mix just until the dry ingredients are incorporated for a light and fluffy texture.
  • Use room temperature ingredients, especially the butter and eggs. This helps to create a smoother batter and ensures even baking. Take your eggs out of the fridge about 30 minutes before you start.
  • For a more pronounced lemon flavor, consider adding a little lemon extract in addition to the zest and juice. Just a half teaspoon can elevate the citrus notes significantly.
  • When measuring your flour, spoon it into the measuring cup and level it off with a knife instead of scooping directly from the bag. This prevents packing and ensures you don’t end up with a dry loaf.
  • Invest in a good quality loaf pan; it makes a difference in heat distribution, which ensures even baking. If your pan is dark-coated, reduce the oven temperature by 25°F to prevent over-browning.

Variations & Serving Ideas

For a delightful twist, consider adding blueberries or raspberries to the batter for a fruity burst of flavor. You can also experiment with different citrus fruits—try lime or grapefruit zest and juice for a refreshing change. For a healthier option, substitute half of the all-purpose flour with whole wheat flour for added fiber without compromising too much on texture.

This Lemon Poppy Seed Loaf pairs beautifully with a light salad, such as a mixed greens salad with a vinaigrette, or a cup of tea for a cozy afternoon treat. It also complements a creamy cheese platter, as the acidity of the loaf balances rich cheeses perfectly. Lastly, a scoop of vanilla ice cream on the side creates a delightful contrast of temperatures and flavors!

Storage, Make-Ahead & Reheating

This Lemon Poppy Seed Loaf can be stored at room temperature for up to 3 days if wrapped tightly in plastic wrap. If you want to keep it longer, it freezes well for up to 3 months. To freeze, wrap the loaf tightly in plastic wrap and then in aluminum foil to prevent freezer burn.

When you’re ready to enjoy it again, simply thaw it in the fridge overnight. Reheat individual slices in the microwave for 15-20 seconds or in a toaster oven until warmed through. Interestingly, many people find that this loaf tastes even better the next day, as the flavors have time to meld!

Frequently Asked Questions

Can I make Lemon Poppy Seed Loaf With Citrus Icing ahead of time?

Yes — in fact, it tastes even better the next day! You can make the loaf a day in advance, allowing the flavors to develop. Just be sure to store it in an airtight container to maintain its moisture.

Can I substitute the poppy seeds?

Absolutely! If you don’t have poppy seeds on hand or prefer an alternative, you can use sesame seeds for a similar crunch or omit them entirely for a smooth loaf.

What can I use instead of buttermilk?

If you don’t have buttermilk, you can easily create a substitute by mixing ½ cup of milk (dairy or plant-based) with 1 tablespoon of vinegar or lemon juice. Let it sit for 5 minutes before using in the recipe.

How can I make this recipe gluten-free?

To make a gluten-free version of this Lemon Poppy Seed Loaf, substitute the all-purpose flour with a gluten-free all-purpose flour blend. Just ensure that the blend contains a binding agent like xanthan gum for the best results.

What is the best way to store leftover loaf?

Leftover Lemon Poppy Seed Loaf should be stored in an airtight container at room temperature for up to 3 days. For longer storage, wrap it tightly and freeze for up to 3 months. Thaw it before serving for the best texture.

Zesty Lemon Poppy Seed Delight

Final Thoughts

The Lemon Poppy Seed Loaf with Citrus Icing is truly a delightful treat that brings a burst of brightness to any occasion. The zesty lemon flavor combined with the subtle crunch of poppy seeds creates a satisfying balance, while the citrus icing adds a touch of sweetness that perfectly complements the loaf’s tanginess.

This is the kind of recipe I come back to again and again, especially when I want to brighten up a gloomy day or celebrate a small victory. The aroma that fills the kitchen as it bakes is absolutely heavenly! I encourage you to give this recipe a try; you might just find it becoming a beloved staple in your home. Don’t forget to share your results or even add your own unique twist—I can’t wait to see what you create!

Print
clock clock iconcutlery cutlery iconflag flag iconfolder folder iconinstagram instagram iconpinterest pinterest iconfacebook facebook iconprint print iconsquares squares iconheart heart iconheart solid heart solid icon

Lemon Poppy Seed Loaf


  • Author: Lily author
  • Total Time: 36 minute
  • Yield: 1 loaf 1x
Pin Recipe
Print Recipe

Description

This Lemon Poppy Seed Loaf is a delightful treat that combines zesty lemon flavor with crunchy poppy seeds. Topped with a citrus icing, it’s perfect for any occasion.


Ingredients

Scale
  • 1 ½ cups (190g) all-purpose flour
  • 1 teaspoon baking powder
  • ½ teaspoon baking soda
  • ½ teaspoon salt
  • 3 tablespoons poppy seeds
  • ½ cup (115g) unsalted butter, softened to room temperature
  • 1 cup (200g) granulated sugar
  • 2 large eggs
  • 1 teaspoon vanilla extract
  • 1 teaspoon lemon zest (from about 1 medium lemon)
  • ½ cup (120ml) buttermilk
  • 2 tablespoons fresh lemon juice
  • 1 cup (120g) powdered sugar
  • 2 tablespoons fresh lemon juice
  • 1 tablespoon orange juice
  • 1 teaspoon lemon zest (for garnish, optional)

Instructions

  1. Preheat your oven to 350°F (175°C). Grease a 9×5-inch loaf pan or line it with parchment paper for easy removal later.
  2. In a medium mixing bowl, whisk together 1 ½ cups of all-purpose flour, 1 teaspoon of baking powder, ½ teaspoon of baking soda, ½ teaspoon of salt, and 3 tablespoons of poppy seeds. This helps to evenly distribute the baking agents and ensures a uniform rise.
  3. In a large mixing bowl, cream together ½ cup of softened unsalted butter and 1 cup of granulated sugar using an electric mixer on medium speed for about 3-4 minutes, until the mixture is light and fluffy. Make sure to scrape down the sides of the bowl occasionally.
  4. Add 2 large eggs, 1 teaspoon of vanilla extract, and 1 teaspoon of lemon zest to the creamed butter and sugar, mixing until fully combined. You want a smooth consistency, so ensure there are no lumps of butter.
  5. In a small bowl, combine ½ cup of buttermilk and 2 tablespoons of fresh lemon juice. Alternately add the dry ingredients and buttermilk mixture to the butter mixture, starting and ending with the dry ingredients. Mix just until combined; do not overmix, as this can lead to a dense loaf.
  6. Pour the batter into the prepared loaf pan. Smooth the top with a spatula, ensuring it’s even. Bake in the preheated oven for 50-60 minutes, or until a toothpick inserted in the center comes out clean. The edges should be lightly golden brown, and the center should feel just set.
  7. Once baked, remove the loaf from the oven and allow it to cool in the pan for about 10 minutes. Then, transfer it to a wire rack to cool completely. Resist the urge to slice too soon, as it will be crumbly if it’s still warm.
  8. While the loaf is cooling, prepare the citrus icing. In a medium bowl, whisk together 1 cup of powdered sugar, 2 tablespoons of fresh lemon juice, and 1 tablespoon of orange juice until smooth. If the icing is too thick, you can add a little more juice to reach your desired consistency.
  9. Once the loaf is completely cool, drizzle the citrus icing over the top. If you like, sprinkle with an additional teaspoon of lemon zest for an extra pop of flavor and color.
  • Prep Time: 15 mins
  • Cook Time: 50-60 mins
  • Category: Dessert
  • Method: Baking
  • Cuisine: American

Nutrition

  • Serving Size: 1 slice
  • Calories: 200
  • Sugar: 15 g
  • Sodium: 150 mg
  • Fat: 8 g
  • Saturated Fat: 5 g
  • Unsaturated Fat: 3 g
  • Trans Fat: 0 g
  • Carbohydrates: 30 g
  • Fiber: 1 g
  • Protein: 3 g
  • Cholesterol: 40 mg

Keywords: Be careful not to overmix your batter; this is a common mistake that can lead to a dense loaf. Use room temperature ingredients for a smoother batter and even baking.

Did you make this recipe?

Share a photo and tag us — we can't wait to see what you've made!

  • Privacy Policy
  • Terms Of Service
  • Contact
  • About
  • GDPR

Copyright © 2025 Homesmad