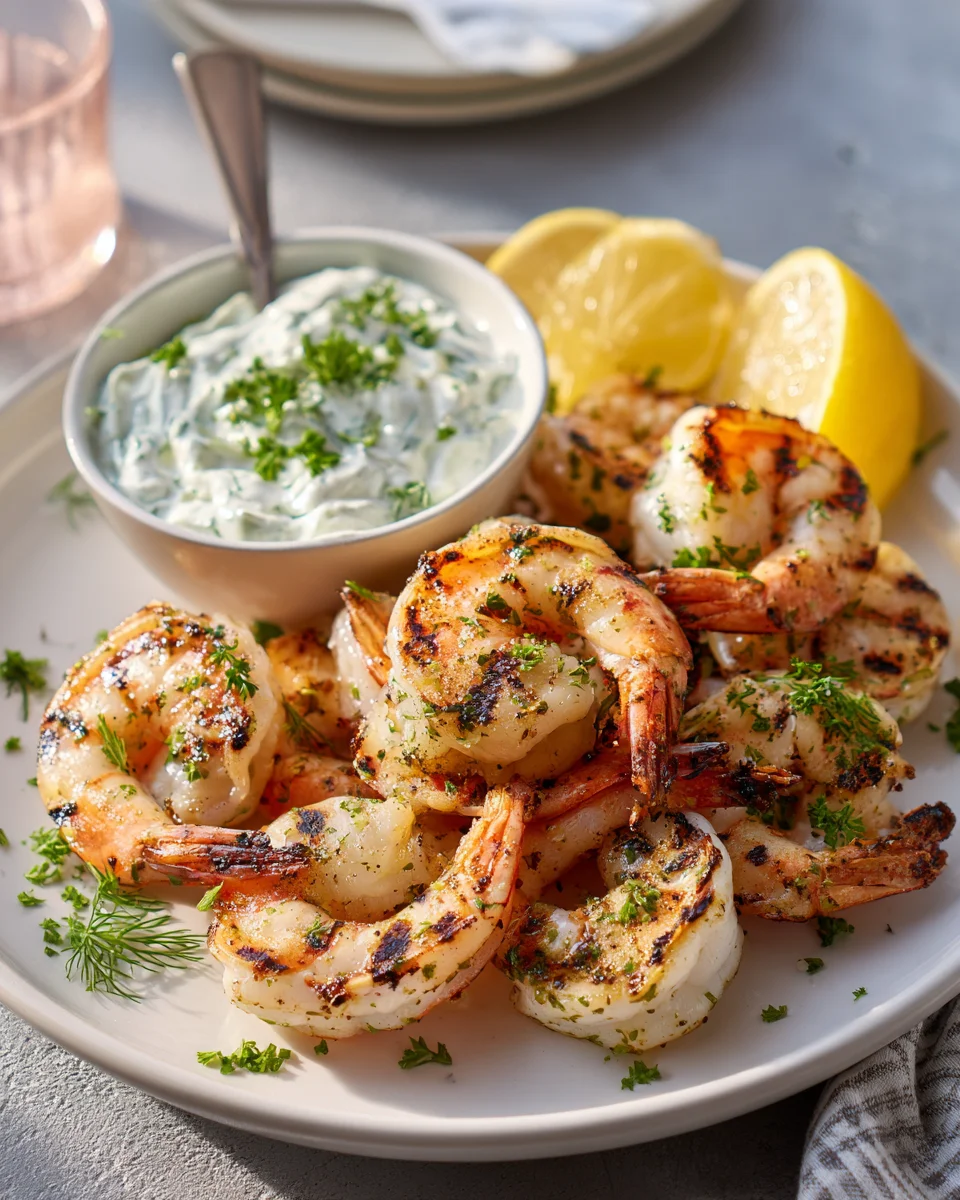
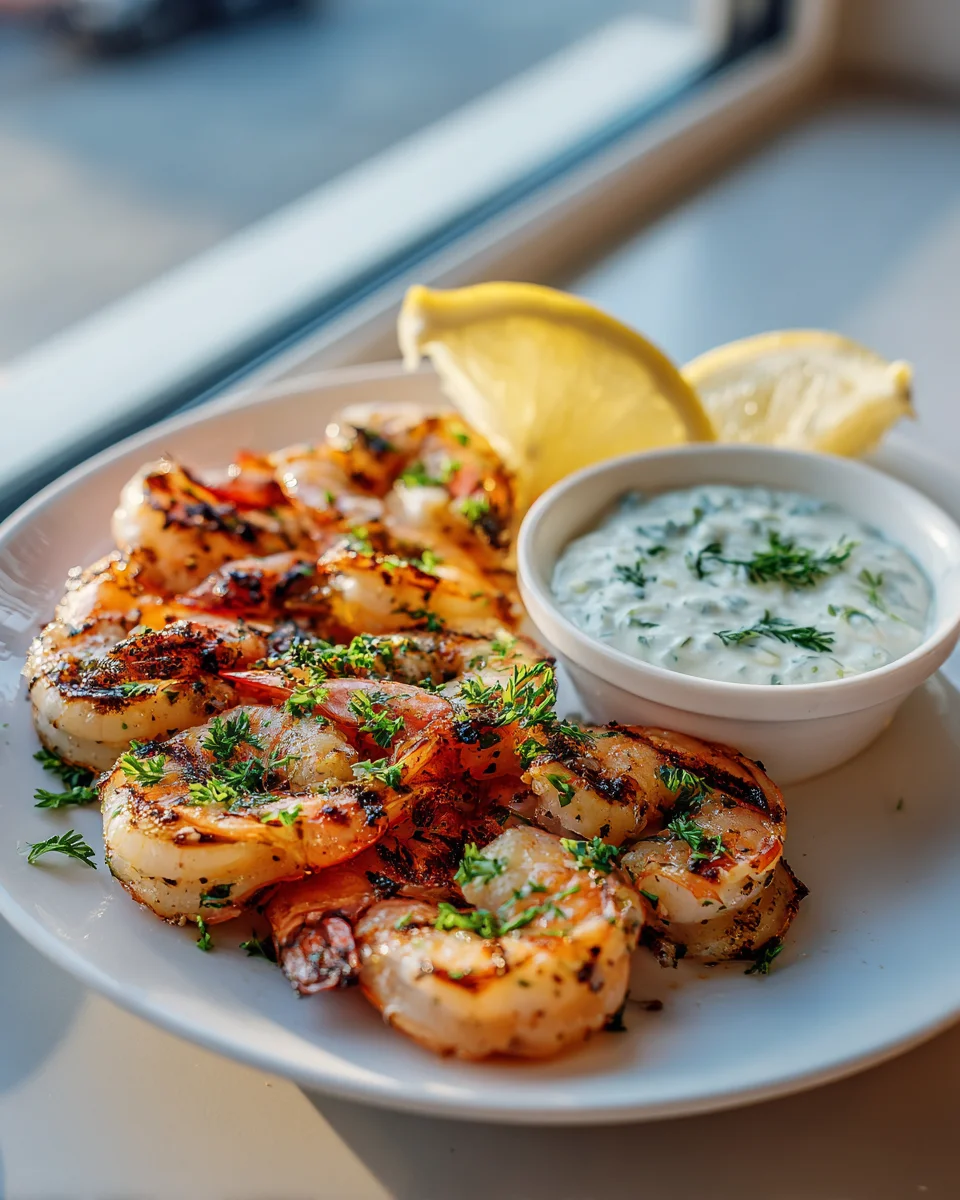
Mediterranean Grilled Shrimp With Tzatziki
Oh, do I have a treat for you today! Get ready to transport your taste buds straight to the sunny shores of the Mediterranean with my absolute favorite Mediterranean Grilled Shrimp With Tzatziki. This isn’t just another shrimp recipe; it’s a vibrant, fresh, and utterly delicious experience that I know you’re going to fall head over heels for.
What makes this dish so special, you ask? Well, it’s all about the incredible balance of flavors and textures. Imagine succulent shrimp, marinated in a zesty blend of lemon, garlic, and fragrant herbs, then kissed by the grill to achieve that perfect smoky char and tender bite. But the magic doesn’t stop there! We pair it with a cooling, creamy, and tangy homemade tzatziki sauce – a delightful mix of fresh cucumber, Greek yogurt, garlic, and dill that perfectly complements the warmth and spice of the shrimp. It’s truly a match made in culinary heaven.
You’re going to love this recipe because it’s surprisingly simple to whip up, making it ideal for a quick weeknight dinner, a relaxed weekend lunch, or even an impressive appetizer for your next gathering. It’s light, healthy, and bursting with those bright, fresh flavors that instantly make you feel good. If you’re craving a taste of summer, a meal that feels both indulgent and wholesome, and something that will have everyone asking for seconds, then this Mediterranean Grilled Shrimp With Tzatziki is absolutely what you need in your life. Trust me, it’s a showstopper that’s much easier to make than it looks!
Welcome to my kitchen! Today, we’re diving into a dish that’s bursting with fresh, vibrant flavors and captures the essence of the Mediterranean: Grilled Shrimp with creamy Tzatziki. This recipe is one of my absolute favorites for a quick weeknight meal or a dazzling summer gathering. The shrimp are marinated in a zesty, herb-infused mixture and then quickly grilled to perfection, serving as a fantastic counterpoint to the cool, refreshing homemade tzatziki. It’s light, healthy, and incredibly satisfying. Let’s get started!
Ingredient Notes
Crafting delicious Mediterranean Grilled Shrimp with Tzatziki starts with selecting the right ingredients. Here’s a rundown of what you’ll need and some thoughts on substitutions.
Shrimp
- Quality is Key: I always recommend using large or jumbo shrimp (16-20 count per pound) for grilling. They’re less likely to overcook and have a great meaty texture. Look for raw, tail-on shrimp.
- Fresh vs. Frozen: Fresh shrimp, if you can get it, is fantastic, but high-quality frozen shrimp are perfectly acceptable and often more convenient. If using frozen, make sure to thaw them properly overnight in the refrigerator or under cold running water just before cooking. Avoid pre-cooked shrimp for this recipe; they won’t absorb the marinade flavors as well and will likely become rubbery when grilled.
- Preparation: I prefer to peel and devein my shrimp, leaving the tails on. The tails add a nice presentation and a built-in handle for eating!
The Marinade
- Olive Oil: A good quality extra virgin olive oil is essential. It’s the base for our marinade, helping to carry the flavors and keep the shrimp moist.
- Lemon: Fresh lemon juice and zest are non-negotiable here. The acidity brightens the flavors and tenderizes the shrimp slightly.
- Garlic: Freshly minced garlic provides that pungent, aromatic kick that’s characteristic of Mediterranean cuisine. Don’t skimp on this!
- Dried Oregano: This herb is a staple in Mediterranean cooking. If you have fresh oregano, you can definitely use it (about 1 tablespoon fresh for every teaspoon dried), but dried works beautifully here.
- Salt and Black Pepper: Simple seasonings to enhance all the other flavors.
- Substitutions/Additions: Feel free to experiment with other herbs like dried thyme, marjoram, or even a pinch of red pepper flakes for a little heat.
Tzatziki
- Greek Yogurt: This is the heart of tzatziki. Use full-fat plain Greek yogurt for the best flavor and creamy texture. I find that lower-fat versions can sometimes be a bit too thin.
- Cucumber: English or Persian cucumbers work best as they have thinner skins and fewer seeds. I always grate my cucumber and then make sure to squeeze out as much excess water as possible. This step is crucial for preventing watery tzatziki!
- Garlic: Again, fresh garlic is key for that authentic tzatziki flavor.
- Fresh Dill: Dill is the classic herb for tzatziki, providing a wonderful fresh, slightly anise-like note. If you absolutely can’t find dill, fresh mint can be a surprisingly good alternative, though it will give it a slightly different character.
- Lemon Juice: A squeeze of fresh lemon juice brightens up the tzatziki.
- Olive Oil: A drizzle of extra virgin olive oil at the end adds richness and a beautiful sheen.
- Substitutions: For a dairy-free option, you can use a plain, unsweetened coconut yogurt or almond-based Greek-style yogurt. Just be sure it’s thick and doesn’t have a strong flavor that would clash.
Step-by-Step Instructions
Let’s get cooking! Follow these simple steps to create your delicious Mediterranean Grilled Shrimp with Tzatziki.
Step 1: Prepare the Tzatziki (Best Made Ahead)
- Grate the Cucumber: Using the large holes of a box grater, grate about half of an English cucumber or one medium Persian cucumber.
- Drain the Cucumber: Place the grated cucumber in a fine-mesh sieve or wrap it in a clean kitchen towel. Press firmly to squeeze out as much excess water as possible. This is the secret to thick, creamy tzatziki!
- Combine Ingredients: In a medium bowl, combine the strained cucumber with 1.5 cups of full-fat plain Greek yogurt, 2-3 cloves of minced garlic, 2 tablespoons of chopped fresh dill, 1 tablespoon of fresh lemon juice, and a good pinch of salt and pepper.
- Chill: Stir everything together until well combined. Drizzle with a little extra virgin olive oil if desired. Cover and refrigerate for at least 30 minutes to allow the flavors to meld. Ideally, make it a few hours or even a day in advance!
Step 2: Prepare the Shrimp Marinade
- Clean the Shrimp: If your shrimp aren’t already prepared, peel and devein them, leaving the tails on. Pat them very dry with paper towels.
- Mix the Marinade: In a medium bowl, whisk together 1/4 cup of extra virgin olive oil, 2 tablespoons of fresh lemon juice, 1 tablespoon of fresh lemon zest, 3 cloves of minced garlic, 1.5 teaspoons of dried oregano, 1/2 teaspoon of salt, and 1/4 teaspoon of black pepper.
- Marinate the Shrimp: Add the prepared shrimp to the marinade, tossing to ensure all the shrimp are evenly coated. Cover the bowl and refrigerate for 20-30 minutes. Do not marinate for longer than 30 minutes, as the acidity from the lemon can start to “cook” the shrimp, making them rubbery.
Step 3: Preheat the Grill
- Set Up: Preheat your outdoor grill (gas or charcoal) to medium-high heat. If using a grill pan, preheat it over medium-high heat on your stovetop.
- Clean and Oil: Once hot, clean the grill grates with a wire brush. Lightly oil the grates by dipping a folded paper towel in a little cooking oil (like vegetable or canola) and carefully wiping the grates using tongs. This helps prevent sticking.
Step 4: Grill the Shrimp
- Skewer (Optional): If you’re worried about shrimp falling through the grates, or for easier flipping, thread the marinated shrimp onto skewers (wooden skewers should be soaked in water for 30 minutes prior to prevent burning). Don’t crowd the skewers; leave a little space between each shrimp.
- Cook: Place the shrimp directly on the hot grill grates. Grill for 2-3 minutes per side, or until the shrimp turn pink and opaque and are just cooked through. Be careful not to overcook, as shrimp cook very quickly and can become tough.
- Remove: Transfer the grilled shrimp to a serving platter.
Step 5: Serve
Serve the hot, juicy grilled shrimp immediately with generous dollops of the chilled homemade tzatziki. It’s fantastic on its own, or with warm pita bread, a fresh Greek salad, or fluffy couscous.
Tips & Suggestions
To ensure your Mediterranean Grilled Shrimp with Tzatziki is absolutely perfect every time, here are some of my go-to tips and serving suggestions.
For the Shrimp
- Don’t Over-Marinate: As mentioned, the lemon juice in the marinade is acidic. While it adds great flavor, marinating shrimp for too long (over 30 minutes) can actually start to “cook” them chemically, resulting in a rubbery texture. Stick to the recommended time for optimal results.
- Grill Temperature: Ensure your grill is hot enough. A good medium-high heat will give you a nice sear and char marks without overcooking the inside. If the grill isn’t hot enough, the shrimp will steam rather than grill.
- Keep an Eye on Them: Shrimp cook very quickly! Stay near the grill and turn them once they’ve developed a nice pink color and some char marks on one side. They’re done when they are opaque throughout.
- Skewers for Ease: If you’re grilling a lot of shrimp or find them difficult to manage on the grates, using skewers is a game-changer. Metal skewers are great, or remember to soak wooden ones for at least 30 minutes before threading the shrimp.
For the Tzatziki
- Squeeze, Squeeze, Squeeze: I cannot stress enough the importance of thoroughly draining the grated cucumber. This is the single most important step for making thick, creamy tzatziki that won’t water down.
- Make Ahead: Tzatziki benefits greatly from chilling. Making it a few hours ahead, or even the day before, allows the flavors to deepen and meld beautifully.
- Taste and Adjust: Always taste your tzatziki before serving. You might want to add a little more salt, pepper, lemon juice, or dill to suit your preference.
Serving Suggestions
- Classic Pairing: Warm pita bread is a natural partner for this dish, perfect for scooping up both the shrimp and the tzatziki.
- Light Meal: Serve alongside a simple Greek salad with fresh tomatoes, cucumbers, red onion, Kalamata olives, and feta cheese.
- Heartier Option: Pair it with fluffy couscous, quinoa, or lemon-herb rice for a more substantial meal.
- Mezze Platter: Incorporate the grilled shrimp and tzatziki into a larger Mediterranean mezze platter with hummus, olives, dolmades, and fresh vegetables.
Storage
Proper storage is important to keep your Mediterranean Grilled Shrimp and Tzatziki fresh and delicious.
Grilled Shrimp
- Refrigeration: Cooked grilled shrimp should be stored in an airtight container in the refrigerator within two hours of cooking. They will remain fresh for up to 2-3 days.
- Reheating: Reheating grilled shrimp can be tricky as they tend to become rubbery. If you must reheat, I recommend doing so gently in a pan over low heat for just a minute or two, or briefly in the microwave. Frankly, I prefer to enjoy any leftover grilled shrimp cold, perhaps chopped into a salad or served as part of a cold mezze.
- Freezing: I do not recommend freezing cooked grilled shrimp. The texture will significantly degrade upon thawing and reheating.
Tzatziki
- Refrigeration: Homemade tzatziki should also be stored in an airtight container in the refrigerator. It will stay fresh for 3-4 days.
- Separation: You might notice some liquid separating from the tzatziki after a day or two. This is normal; simply give it a good stir before serving.
- Freezing: Due to the yogurt and fresh cucumber, tzatziki does not freeze well. The texture will become grainy and watery upon thawing. It’s best enjoyed fresh within a few days of making it.
Final Thoughts
There’s just something truly special about the combination of flavors in our Mediterranean Grilled Shrimp With Tzatziki. The smoky char of perfectly grilled shrimp, paired with the cool, creamy, and herbaceous tzatziki, creates a symphony on your palate that is both refreshing and incredibly satisfying. I truly believe this dish is a testament to simple, fresh ingredients coming together to create something extraordinary. It’s a fantastic choice for a light weeknight meal or a vibrant addition to any gathering. I encourage you to whip up this amazing Mediterranean Grilled Shrimp With Tzatziki and discover a new favorite!
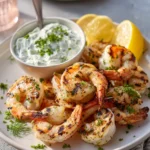
Mediterranean Grilled Shrimp with Tzatziki Sauce
- Total Time: 40 minutes
- Yield: 4 servings 1x
Description
Transport your taste buds to the Mediterranean with this vibrant and fresh grilled shrimp dish paired with a creamy tzatziki sauce. It’s a light, healthy, and utterly delicious meal perfect for any occasion.
Ingredients
- 1 pound large or jumbo shrimp (16–20 count per pound), raw, tail-on
- 1/4 cup extra virgin olive oil (for marinade)
- 2 tablespoons fresh lemon juice (for marinade)
- 1 tablespoon fresh lemon zest (for marinade)
- 3 cloves garlic, minced (for marinade)
- 1.5 teaspoons dried oregano (for marinade)
- 1/2 teaspoon salt (for marinade)
- 1/4 teaspoon black pepper (for marinade)
- 1.5 cups full-fat plain Greek yogurt (for tzatziki)
- 1 medium English cucumber or 1 Persian cucumber, grated (for tzatziki)
- 2–3 cloves garlic, minced (for tzatziki)
- 2 tablespoons fresh dill, chopped (for tzatziki)
- 1 tablespoon fresh lemon juice (for tzatziki)
- Extra virgin olive oil, for drizzling (for tzatziki)
- Salt and pepper, to taste (for tzatziki)
Instructions
- Grate the cucumber using the large holes of a box grater.
- Place the grated cucumber in a fine-mesh sieve or wrap it in a clean kitchen towel. Press firmly to squeeze out as much excess water as possible.
- In a medium bowl, combine the strained cucumber with 1.5 cups of full-fat plain Greek yogurt, 2-3 cloves of minced garlic, 2 tablespoons of chopped fresh dill, 1 tablespoon of fresh lemon juice, and a good pinch of salt and pepper.
- Stir everything together until well combined. Drizzle with a little extra virgin olive oil if desired. Cover and refrigerate for at least 30 minutes.
- If your shrimp aren't already prepared, peel and devein them, leaving the tails on. Pat them very dry with paper towels.
- In a medium bowl, whisk together 1/4 cup of extra virgin olive oil, 2 tablespoons of fresh lemon juice, 1 tablespoon of fresh lemon zest, 3 cloves of minced garlic, 1.5 teaspoons of dried oregano, 1/2 teaspoon of salt, and 1/4 teaspoon of black pepper.
- Add the prepared shrimp to the marinade, tossing to ensure all the shrimp are evenly coated. Cover the bowl and refrigerate for 20-30 minutes.
- Preheat your outdoor grill (gas or charcoal) to medium-high heat. Clean the grill grates with a wire brush and lightly oil the grates.
- If you’re worried about shrimp falling through the grates, thread the marinated shrimp onto skewers.
- Place the shrimp directly on the hot grill grates. Grill for 2-3 minutes per side, or until the shrimp turn pink and opaque.
- Transfer the grilled shrimp to a serving platter.
- Serve the hot, juicy grilled shrimp immediately with generous dollops of the chilled homemade tzatziki.
- Prep Time: 30 mins
- Cook Time: 10 mins
- Category: Dinner
- Method: Grilling
- Cuisine: Mediterranean
Nutrition
- Serving Size: 1 serving
- Calories: 300
- Sugar: 3 g
- Sodium: 600 mg
- Fat: 15 g
- Saturated Fat: 2 g
- Unsaturated Fat: 10 g
- Trans Fat: 0 g
- Carbohydrates: 10 g
- Fiber: 1 g
- Protein: 30 g
- Cholesterol: 200 mg
Keywords: Don't over-marinate the shrimp as the acidity from the lemon can make them rubbery. Make the tzatziki a few hours ahead for the best flavor.