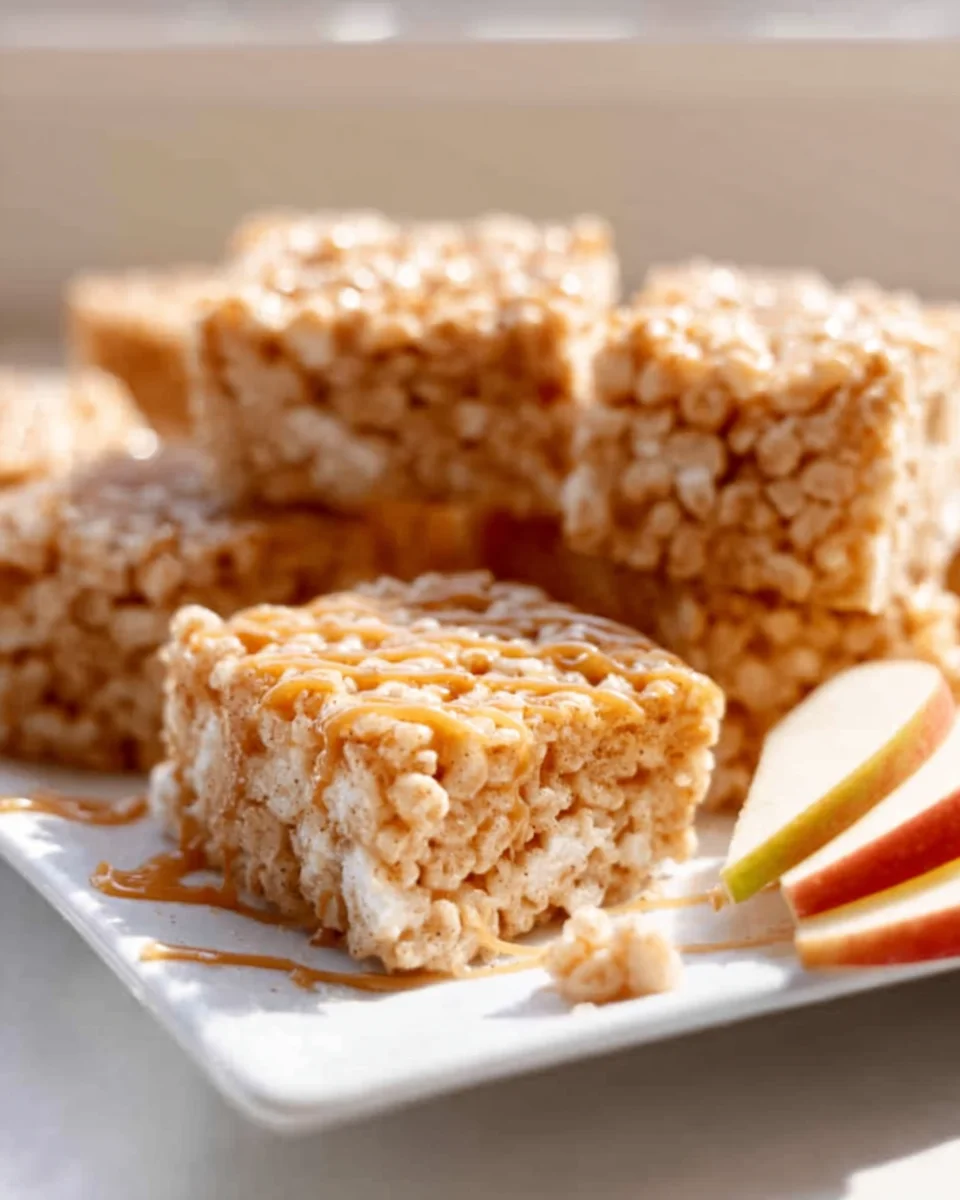
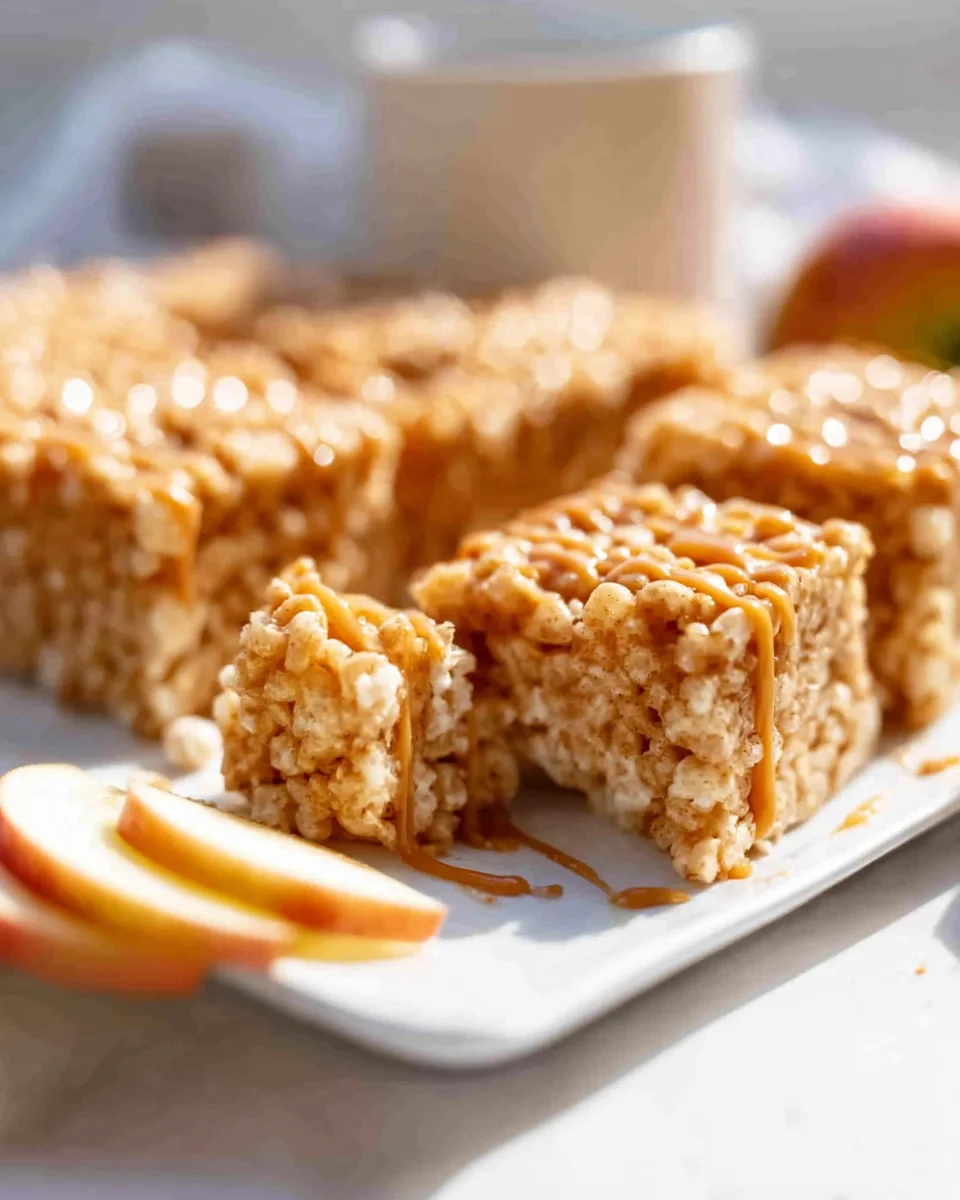
Apple Pie Rice Krispie Treats
Okay, let me just say: these Apple Pie Rice Krispie Treats are an absolute game-changer! I’m talking about taking two beloved classics – the warm, comforting embrace of an apple pie and the satisfyingly chewy crunch of a Rice Krispie treat – and blending them into one unbelievably delicious, no-bake creation. What makes this recipe so special, you ask? It’s the ingenious way we infuse all those cozy apple pie flavors, like cinnamon, nutmeg, and tender apple pieces, directly into the gooey marshmallow and crispy cereal mix. It’s the ultimate fusion without the fuss!
You are going to absolutely adore these because they deliver all the nostalgic taste of grandma’s apple pie without a single minute spent wrestling with pie crust or heating up your kitchen. They’re quick, easy, and undeniably fun – perfect for a last-minute dessert, a potluck showstopper, or just a delightful treat for yourself. Expect a delightful symphony of textures and flavors: a sweet, buttery crunch giving way to soft marshmallow, all kissed with that irresistible spiced apple essence. Trust me, these aren’t just Rice Krispie treats; they’re an experience!
Ingredient Notes
Hello, fellow treat enthusiasts! When I set out to create these Apple Pie Rice Krispie Treats, I knew I wanted to capture all the cozy, comforting flavors of a classic apple pie in a fun, no-bake format. Getting the ingredients right is key to achieving that perfect balance of chewy sweetness and warm spice. Here’s a rundown of what you’ll need and some thoughts on substitutions.
- Crispy Rice Cereal: Of course, you can’t have Rice Krispie Treats without the crispy rice cereal! I always reach for the classic brand, but any puffed rice cereal will work beautifully. Just make sure it’s fresh for maximum crunch.
- Marshmallows: Mini marshmallows are my go-to for these treats. They melt much faster and more evenly than larger ones, making the process smoother. You’ll want a generous amount to ensure a perfectly gooey texture. If you’re looking for a vegan option, many brands now offer plant-based marshmallows that melt similarly – just keep an eye on them as they might melt a little quicker.
- Unsalted Butter: Butter is essential for that rich, satisfying flavor and to prevent the treats from sticking. I prefer unsalted butter so I can control the salt content myself. If you only have salted butter, just omit the pinch of salt I suggest later. For a dairy-free alternative, a good quality vegan butter stick will work wonderfully and melt just the same.
- Apple Pie Filling: This is where the “apple pie” magic truly happens! You’ll want a can of good quality apple pie filling, diced into smaller pieces. You can either chop it roughly with a knife beforehand or give it a quick pulse in a food processor (be careful not to over-process, we want chunks!). Alternatively, if you have homemade apple pie filling on hand, that would be absolutely divine. If you wanted to get adventurous, you could even try a different fruit pie filling for a unique twist, like cherry or peach, though then they wouldn’t be apple pie treats, would they?
- Apple Pie Spice: To really nail that warm apple pie flavor, a good quality apple pie spice blend is a must. It typically includes cinnamon, nutmeg, allspice, and sometimes ginger or cardamom. If you don’t have a pre-made blend, you can easily create your own with individual spices you have in your pantry. A ratio of 2 parts cinnamon to 1 part nutmeg and a pinch of allspice usually does the trick.
- Vanilla Extract: A splash of pure vanilla extract enhances all the other flavors and adds a lovely aromatic note. Don’t skip it!
- Pinch of Salt: A tiny pinch of salt (especially if you’re using unsalted butter) helps to balance the sweetness and really makes the apple pie flavors pop. It’s a secret weapon in many sweet recipes!
- Optional Toppings: I sometimes like to add a little something extra. A drizzle of caramel sauce, a sprinkle of extra cinnamon, or even a light dusting of powdered sugar can elevate these treats. Chopped dried apples can also add an extra chew and concentrated apple flavor if you’re feeling fancy!
Step-by-Step Instructions
Making these Apple Pie Rice Krispie Treats is super straightforward and a lot of fun. I find it’s a great recipe for getting the kids involved too! Just follow these steps, and you’ll have a batch of delightful, apple-infused treats in no time.
- Prepare Your Pan: First things first, get your pan ready. I usually use a 9×13-inch baking pan. Grease it lightly with butter or cooking spray. If I’m feeling extra careful, I’ll line it with parchment paper, leaving an overhang on the sides. This makes lifting the treats out for cutting incredibly easy.
- Melt the Butter: In a large pot or Dutch oven, melt your unsalted butter over low to medium heat. You want it to melt gently, not brown. Low heat is your friend here to prevent burning.
- Add Marshmallows: Once the butter is mostly melted, add all your mini marshmallows to the pot. Stir continuously with a rubber spatula until the marshmallows are completely melted and smooth. This takes a few minutes, so be patient. Keep the heat low to avoid overcooking the marshmallows, which can make your treats hard.
- Infuse with Flavor: Remove the pot from the heat. Stir in the apple pie spice, vanilla extract, and that little pinch of salt. Mix well until everything is evenly combined and fragrant. Oh, that smell is just heavenly!
- Incorporate Apple Pie Filling: Now, add your finely diced apple pie filling to the marshmallow mixture. Stir gently but thoroughly to distribute the apple pieces evenly throughout the gooey marshmallow. We want apple in every bite!
- Fold in Cereal: Immediately add your crispy rice cereal to the pot. Working quickly, use your rubber spatula to fold the cereal into the marshmallow-apple mixture until it’s all well coated. Try not to crush the cereal too much; we want to keep that lovely crunch.
- Press into Pan: Transfer the mixture to your prepared 9×13-inch pan. Here’s a crucial tip: lightly butter your hands or the back of your spatula (or even a piece of wax paper) before pressing the mixture down. This prevents sticking. Press the mixture gently and evenly into the pan. You don’t want to compact it too much, as this can lead to hard treats. A light, even pressure is perfect for chewy results.
- Cool and Cut: Let the treats cool completely at room temperature, which usually takes about 1-2 hours. You can pop them in the fridge for about 30 minutes if you’re in a hurry, but room temperature cooling often results in a chewier texture. Once fully cooled, use the parchment paper overhang to lift the slab out of the pan onto a cutting board. Cut them into squares or rectangles of your desired size.
- Optional Toppings: If you’re adding any toppings like a caramel drizzle or an extra sprinkle of cinnamon, do it now before serving. Enjoy your delicious homemade Apple Pie Rice Krispie Treats!
Tips & Suggestions
I’ve made my fair share of Rice Krispie Treats over the years, and these Apple Pie versions have become a fast favorite. Here are some of my best tips and suggestions to ensure your batch is absolutely perfect and to maybe inspire some variations!
- Don’t Overcook the Marshmallows: This is a golden rule for chewy treats! Keep the heat low and remove them from the burner as soon as they’re smooth and fully melted. Overcooked marshmallows will result in hard, brittle treats. Nobody wants that!
- Press Gently: When you’re pressing the mixture into the pan, resist the urge to pack it down really firmly. A gentle, even press is all you need. Over-compressing the treats squeezes out air pockets, leading to a denser, harder texture. Light hands equal soft, chewy treats!
- Butter Your Tools: Seriously, butter your spatula, your hands, or even a piece of wax paper when pressing. It makes the job so much easier and prevents that sticky mess that can otherwise happen.
- Use Good Quality Apple Pie Filling: Since the apple pie filling is a star ingredient here, using a brand you love will really shine through. Chopping the apples into smaller pieces ensures a more even distribution and prevents large, clunky bites.
- Enhance the Apple Flavor: If you really want to boost that apple essence, consider adding a tiny splash (about 1/4 teaspoon) of apple extract along with the vanilla. Or, for texture, you could fold in about 1/4 cup of finely chopped dried apples with the cereal.
- Brown Butter Boost: For an extra layer of nutty flavor, you can brown the butter before adding the marshmallows. Just melt the butter over medium heat until it turns a light golden brown and smells nutty, then proceed with adding the marshmallows. This adds a wonderful depth.
- Caramel Drizzle Dream: A drizzle of store-bought or homemade caramel sauce after the treats have cooled is an absolute game-changer. It perfectly complements the apple pie flavors and makes them feel extra special.
- White Chocolate Swirl: For another elegant touch, melt some white chocolate and drizzle it over the cooled treats. You can even add a touch of extra apple pie spice to the melted white chocolate before drizzling.
- Spice it Up (or Down): Feel free to adjust the amount of apple pie spice to your liking. If you love a really pronounced spice flavor, add a little extra. If you prefer it milder, reduce it slightly.
- Freshness is Key: Make sure your crispy rice cereal is fresh. Stale cereal will result in stale-tasting treats, even if everything else is perfect.
Storage
Once you’ve made these delightful Apple Pie Rice Krispie Treats, you’ll want to make sure they stay fresh and delicious for as long as possible. Proper storage is key to maintaining that perfect chewy texture and vibrant flavor.
- Airtight Container at Room Temperature: The absolute best way to store your Apple Pie Rice Krispie Treats is in an airtight container at room temperature. Exposure to air is the enemy of fresh, chewy treats, as it causes them to dry out and become hard. I usually place a sheet of parchment paper between layers if I’m stacking them to prevent sticking.
- Shelf Life: Stored correctly, these treats will stay wonderfully fresh and chewy for up to 3-4 days. After that, they tend to start losing their softness and can become a bit firmer. I find they’re best enjoyed within the first 48 hours for optimal texture.
- Avoid the Refrigerator: While it might seem counterintuitive, I generally advise against storing Rice Krispie Treats in the refrigerator. The cold air can actually make them tough and hard, changing that lovely chewy consistency we’re aiming for. Room temperature is truly ideal.
- Freezing (If You Must): If you absolutely must store them for a longer period, you can freeze them. Wrap individual treats tightly in plastic wrap, then place them in a freezer-safe airtight container or heavy-duty freezer bag. They can be frozen for up to 1 month. To thaw, simply unwrap them and let them come to room temperature on the counter. They might lose a tiny bit of their original chewiness, but they’ll still be tasty!
- No Direct Sunlight or Heat: Keep your stored treats away from direct sunlight or any heat sources, as this can cause them to become sticky and melt. A cool, dry spot in your pantry or on your counter is perfect.
Final Thoughts
And there you have it! My take on a truly delightful and unexpected treat: Apple Pie Rice Krispie Treats. I truly believe this recipe is a must-try for anyone looking to capture the comforting essence of homemade apple pie without ever having to turn on the oven. The way the warm spices and fruity apple flavor blend with the familiar crispy, chewy texture is simply irresistible. It’s the perfect no-bake dessert for busy days, a unique addition to any potluck, or just a sweet little indulgence when you’re craving something special. I encourage you to whip up a batch of these Apple Pie Rice Krispie Treats soon; I promise you won’t be disappointed!
No-Bake Apple Pie Rice Krispie Treats – Quick & Tasty!
- Total Time: 25 minutes
- Yield: 12 servings 1x
Description
These Apple Pie Rice Krispie Treats combine the comforting flavors of apple pie with the chewy crunch of Rice Krispie treats, creating a delicious no-bake dessert. Perfect for any occasion, they deliver a delightful symphony of textures and flavors in every bite.
Ingredients
- 6 cups Crispy Rice Cereal
- 10 oz Mini Marshmallows
- 1/2 cup Unsalted Butter
- 1 can Apple Pie Filling, diced into smaller pieces
- 1 tsp Apple Pie Spice
- 1 tsp Vanilla Extract
- Pinch of Salt
- Optional Toppings: Caramel sauce, extra cinnamon, powdered sugar, chopped dried apples
Instructions
- Prepare Your Pan: Grease a 9×13-inch baking pan lightly with butter or cooking spray. Optionally, line it with parchment paper for easy removal.
- Melt the Butter: In a large pot or Dutch oven, melt the unsalted butter over low to medium heat until fully melted.
- Add Marshmallows: Stir in all the mini marshmallows and continuously stir until completely melted and smooth.
- Infuse with Flavor: Remove the pot from heat and stir in the apple pie spice, vanilla extract, and pinch of salt until well combined.
- Incorporate Apple Pie Filling: Add the finely diced apple pie filling to the marshmallow mixture and stir gently to distribute evenly.
- Fold in Cereal: Quickly add the crispy rice cereal to the pot and fold it into the marshmallow mixture until well coated.
- Press into Pan: Transfer the mixture to the prepared pan, lightly butter your hands or spatula, and press it down gently and evenly.
- Cool and Cut: Let the treats cool completely at room temperature for 1-2 hours, then lift out using parchment paper and cut into squares.
- Optional Toppings: Add any desired toppings like caramel drizzle or extra cinnamon before serving.
- Prep Time: 15 mins
- Cook Time: 10 mins
- Category: Dessert
- Method: No-Bake
- Cuisine: American
Nutrition
- Serving Size: 1 square
- Calories: 150
- Sugar: 12 g
- Sodium: 80 mg
- Fat: 5 g
- Saturated Fat: 3 g
- Unsaturated Fat: 2 g
- Trans Fat: 0 g
- Carbohydrates: 24 g
- Fiber: 1 g
- Protein: 1 g
- Cholesterol: 15 mg
Keywords: Don't overcook the marshmallows to maintain chewiness. Use good quality apple pie filling for the best flavor, and consider adding a splash of apple extract for enhanced apple flavor.