Pancake Mini Muffins: the breakfast game-changer you didn’t know you needed! Forget standing over a hot griddle flipping pancakes one by one. Imagine biting into a perfectly portioned, fluffy, and golden-brown pancake, all without the mess and fuss. These aren’t just muffins; they’re miniature pancake masterpieces, ready to revolutionize your mornings.
Pancakes themselves have a long and delicious history, with variations found in cultures around the globe. From the simple griddle cakes of ancient Rome to the delicate crepes of France, the pancake has always been a symbol of comfort and a blank canvas for culinary creativity. These Pancake Mini Muffins take that tradition and give it a modern, convenient twist.
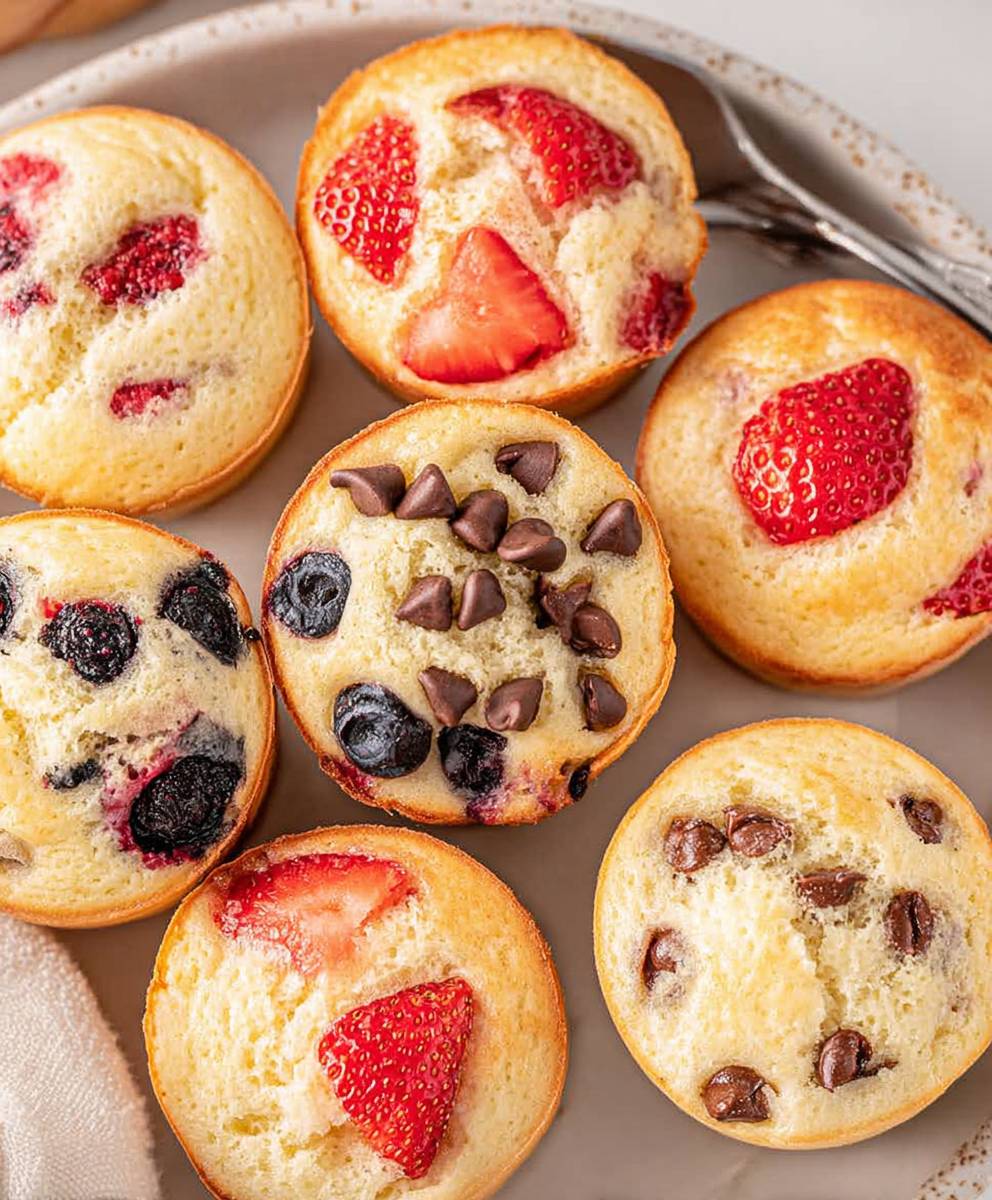
What makes these little bites so irresistible? It’s the perfect combination of fluffy texture, subtly sweet flavor, and incredible convenience. They’re ideal for busy weekdays, brunch gatherings, or even a fun snack for the kids. Plus, they’re incredibly versatile! Add your favorite mix-ins like blueberries, chocolate chips, or even a sprinkle of cinnamon for a personalized touch. Get ready to experience the joy of pancakes in a whole new, bite-sized way!

Ingredients:
- 1 ½ cups all-purpose flour
- 3 ½ teaspoons baking powder
- ¼ teaspoon salt
- 1 tablespoon granulated sugar
- 1 ¼ cups milk
- 1 large egg, lightly beaten
- 3 tablespoons unsalted butter, melted
- Optional toppings: chocolate chips, blueberries, sprinkles, chopped nuts, cooked bacon bits
- Non-stick cooking spray
Preparing the Batter:
- Combine the dry ingredients: In a large bowl, whisk together the flour, baking powder, salt, and sugar. Make sure everything is evenly distributed to ensure a consistent rise and flavor in your mini muffins. I like to use a whisk for this step to break up any clumps in the flour and baking powder.
- Incorporate the wet ingredients: In a separate bowl, whisk together the milk, egg, and melted butter. It’s important to melt the butter completely but let it cool slightly before adding it to the egg mixture. This prevents the egg from cooking prematurely.
- Combine wet and dry: Pour the wet ingredients into the bowl with the dry ingredients. Gently fold the mixture together until just combined. Be careful not to overmix! Overmixing develops the gluten in the flour, which can result in tough muffins. A few lumps are perfectly fine. The batter should be thick but pourable.
- Add your favorite toppings (optional): If you’re using any toppings like chocolate chips, blueberries, sprinkles, or chopped nuts, gently fold them into the batter now. I love adding a mix of blueberries and white chocolate chips for a sweet and tangy treat. Bacon bits are also a fantastic savory addition!
Preparing the Muffin Tin:
- Grease the muffin tin: Generously spray a mini muffin tin with non-stick cooking spray. Make sure to get into all the nooks and crannies to prevent the muffins from sticking. Alternatively, you can use mini muffin liners, but I find that spraying the tin directly works best for easy removal.
Baking the Mini Muffins:
- Fill the muffin tin: Carefully spoon the batter into the prepared mini muffin tin, filling each cup about ¾ full. This allows the muffins to rise without overflowing. I find that using a small cookie scoop or a piping bag makes this process much easier and less messy.
- Bake: Bake in a preheated oven at 375°F (190°C) for 10-12 minutes, or until a toothpick inserted into the center comes out clean. The baking time may vary slightly depending on your oven, so keep a close eye on them. The muffins should be golden brown on top.
- Cool: Remove the muffin tin from the oven and let the muffins cool in the tin for a few minutes before transferring them to a wire rack to cool completely. This prevents them from sticking to the tin and allows them to cool evenly.
Serving and Storage:
- Serve: Serve the mini pancake muffins warm or at room temperature. They’re delicious on their own or with a drizzle of maple syrup, a dollop of whipped cream, or a sprinkle of powdered sugar. They’re perfect for breakfast, brunch, snacks, or even dessert!
- Store: Store any leftover mini muffins in an airtight container at room temperature for up to 2 days or in the refrigerator for up to 5 days. You can also freeze them for longer storage. To freeze, place the muffins in a single layer on a baking sheet and freeze for about 2 hours, or until solid. Then, transfer them to a freezer bag or container. They can be stored in the freezer for up to 2 months. To thaw, simply place them in the refrigerator overnight or microwave them for a few seconds until warmed through.
Tips and Variations:
- Make it gluten-free: Substitute the all-purpose flour with a gluten-free all-purpose flour blend. Make sure the blend contains xanthan gum for proper binding.
- Add some spice: Add ½ teaspoon of ground cinnamon or nutmeg to the dry ingredients for a warm and comforting flavor.
- Get creative with toppings: Experiment with different toppings like chopped apples, bananas, raspberries, peanut butter chips, or even a streusel topping.
- Make it chocolatey: Add ¼ cup of cocoa powder to the dry ingredients for chocolate pancake muffins. You can also add chocolate chips for an extra dose of chocolate.
- Savory option: Omit the sugar and add shredded cheese, chopped ham, or cooked sausage to the batter for savory mini muffins.
- Buttermilk pancakes: Substitute the milk with buttermilk for a tangier flavor. You may need to add a little more milk to achieve the desired consistency.
- Vegan option: Substitute the milk with plant-based milk (like almond, soy, or oat milk), the egg with a flax egg (1 tablespoon of ground flaxseed mixed with 3 tablespoons of water), and the butter with vegan butter or oil.
- Don’t overmix: I can’t stress this enough! Overmixing leads to tough muffins. Gently fold the wet and dry ingredients together until just combined.
- Use a cookie scoop: A cookie scoop makes it easy to portion the batter evenly into the muffin tin.
- Preheat your oven: Make sure your oven is fully preheated before baking the muffins. This ensures that they rise properly and bake evenly.
- Test for doneness: Insert a toothpick into the center of a muffin to check for doneness. If the toothpick comes out clean, the muffins are ready.
- Cool completely: Allow the muffins to cool completely before storing them to prevent them from becoming soggy.
Troubleshooting:
- Muffins are sticking to the tin: Make sure you grease the muffin tin thoroughly with non-stick cooking spray. You can also use mini muffin liners.
- Muffins are too dry: Don’t overbake the muffins. Check for doneness after 10 minutes and remove them from the oven as soon as a toothpick inserted into the center comes out clean.
- Muffins are too dense: Don’t overmix the batter. Overmixing develops the gluten in the flour, which can result in dense muffins.
- Muffins are not rising: Make sure your baking powder is fresh. Expired baking powder will not provide enough leavening power. Also, make sure your oven is properly preheated.
- Muffins are burning on the bottom: Place a baking sheet on the rack below the muffin tin to deflect some of the heat.
Nutritional Information (approximate, per muffin):
Note: Nutritional information is an estimate and may vary based on specific ingredients and portion sizes.
- Calories: 50-70
- Fat: 2-4g
- Saturated Fat: 1-2g
- Cholesterol: 10-20mg
- Sodium: 50-70mg
- Carbohydrates: 8-10g
- Sugar: 2-4g
- Protein: 1-2g
Enjoy your delicious homemade mini pancake muffins! They’re a fun and easy treat that everyone will love.
Conclusion:
And there you have it! These Pancake Mini Muffins are truly a game-changer for breakfast, brunch, or even a quick snack. I genuinely believe this recipe is a must-try because it combines the comforting flavor of pancakes with the convenience of muffins. Who doesn’t love a portable, perfectly portioned pancake? Forget standing over a hot griddle flipping pancakes one by one – these bake up beautifully in the oven, freeing you up to enjoy your morning.
But the best part? The versatility! While these are delicious as is, the possibilities are endless. For a sweeter treat, try adding chocolate chips, blueberries, or even a swirl of Nutella to the batter before baking. If you’re feeling adventurous, consider adding a sprinkle of cinnamon or nutmeg for a warm, spiced flavor. On the savory side, you could incorporate cooked bacon bits, shredded cheese, or diced ham for a hearty and satisfying breakfast.
Serving suggestions are just as flexible. Serve them warm with a drizzle of maple syrup, a dollop of whipped cream, or a sprinkle of powdered sugar. They’re also fantastic with fresh fruit like strawberries, raspberries, or bananas. For a more substantial meal, pair them with a side of scrambled eggs, sausage, or bacon. And don’t forget the coffee or juice!
These Pancake Mini Muffins are also perfect for meal prepping. Bake a batch on Sunday and enjoy them throughout the week for a quick and easy breakfast or snack. They store well in an airtight container at room temperature for a few days, or you can freeze them for longer storage. Simply reheat them in the microwave or oven when you’re ready to enjoy.
I’ve made these for countless brunches, potlucks, and even school bake sales, and they’re always a hit. Kids and adults alike love them! They’re easy to eat, not messy, and packed with that classic pancake flavor we all crave. Plus, they’re a great way to sneak in some extra nutrients. You can easily add a spoonful of applesauce or mashed banana to the batter for added moisture and vitamins.
I truly believe that anyone can make these Pancake Mini Muffins. The recipe is simple, straightforward, and requires minimal ingredients. Even if you’re not an experienced baker, you’ll be able to whip up a batch of these delicious muffins in no time.
So, what are you waiting for? Grab your muffin tin, gather your ingredients, and get baking! I’m confident that you’ll love these Pancake Mini Muffins as much as I do. They’re the perfect combination of convenience, flavor, and versatility.
I’m so excited for you to try this recipe! And I’d love to hear about your experience. Did you make any variations? What were your favorite toppings? Share your photos and comments on my social media pages – I can’t wait to see what you create! Don’t forget to tag me so I can see your delicious creations. Happy baking!
Pancake Mini Muffins: The Perfect Bite-Sized Breakfast
Fun and easy mini pancake muffins perfect for breakfast, brunch, or a snack! Customize with your favorite toppings.
Ingredients
Instructions
Recipe Notes
- Make it gluten-free: Substitute the all-purpose flour with a gluten-free all-purpose flour blend. Make sure the blend contains xanthan gum for proper binding.
- Add some spice: Add ½ teaspoon of ground cinnamon or nutmeg to the dry ingredients for a warm and comforting flavor.
- Get creative with toppings: Experiment with different toppings like chopped apples, bananas, raspberries, peanut butter chips, or even a streusel topping.
- Make it chocolatey: Add ¼ cup of cocoa powder to the dry ingredients for chocolate pancake muffins. You can also add chocolate chips for an extra dose of chocolate.
- Savory option: Omit the sugar and add shredded cheese, chopped ham, or cooked sausage to the batter for savory mini muffins.
- Buttermilk pancakes: Substitute the milk with buttermilk for a tangier flavor. You may need to add a little more milk to achieve the desired consistency.
- Vegan option: Substitute the milk with plant-based milk (like almond, soy, or oat milk), the egg with a flax egg (1 tablespoon of ground flaxseed mixed with 3 tablespoons of water), and the butter with vegan butter or oil.
- Don’t overmix: I can’t stress this enough! Overmixing leads to tough muffins. Gently fold the wet and dry ingredients together until just combined.
- Use a cookie scoop: A cookie scoop makes it easy to portion the batter evenly into the muffin tin.
- Preheat your oven: Make sure your oven is fully preheated before baking the muffins. This ensures that they rise properly and bake evenly.
- Test for doneness: Insert a toothpick into the center of a muffin to check for doneness. If the toothpick comes out clean, the muffins are ready.
- Cool completely: Allow the muffins to cool completely before storing them to prevent them from becoming soggy.