• Skip to primary navigation
  • Skip to main content
  • Skip to primary sidebar
Homesmad

Homesmad

  • Home
  • Breakfast & Brunch
  • Appetizers & Snacks
  • Dinner
  • Dessert
  • About
  • Privacy Policy
  • Contact
Homesmad
  • Home
  • Breakfast & Brunch
  • Appetizers & Snacks
  • Dinner
  • Dessert
  • About
  • Privacy Policy
  • Contact

Pollo Loco: Spicy Mexican Chicken Rice & Queso Delight

November 10, 2025 by Lily author

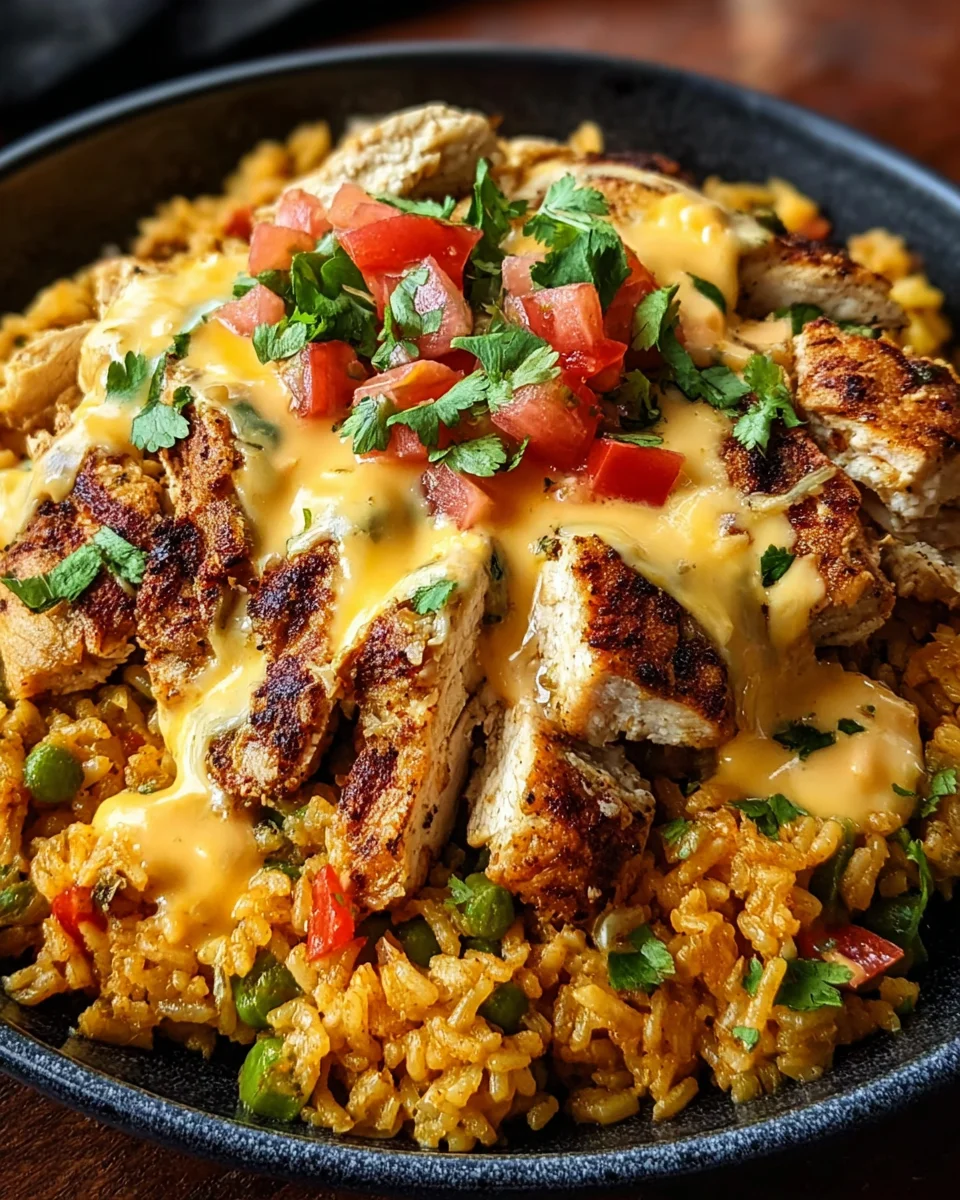
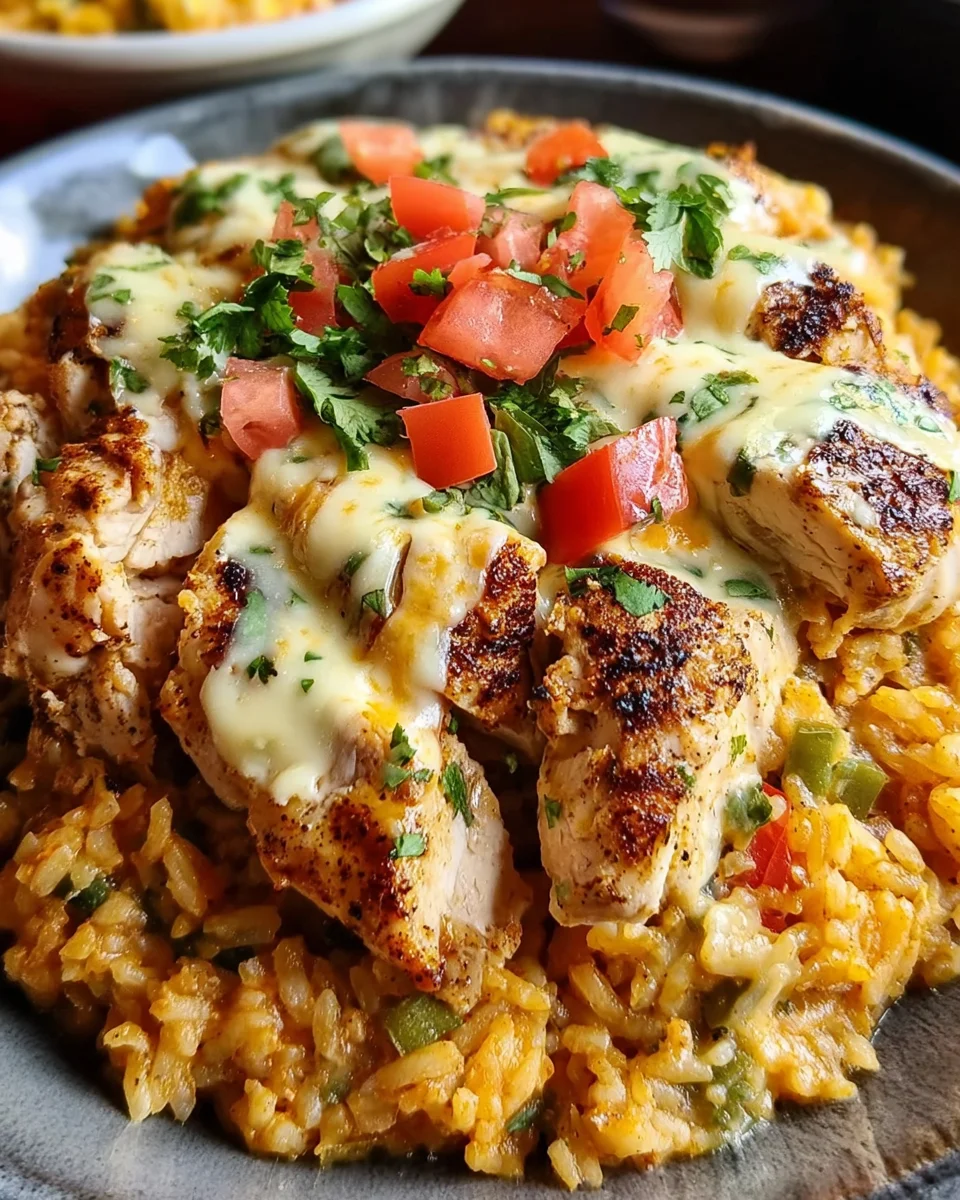
Pollo Loco Mexican Chicken Rice Queso – just reading those words probably conjures up images of perfectly marinated, flame-grilled chicken, fluffy seasoned rice, and a generous drizzle of warm, creamy queso. Am I right? There’s a reason this combination has become a beloved classic, captivating taste buds with its vibrant flavors and comforting textures. I’m incredibly excited to share with you today how to recreate that utterly satisfying experience, right in the comfort of your own home kitchen.

This isn’t just any chicken dish; it’s a celebration of bold Mexican-inspired flavors. From the smoky notes of the grilled chicken, often marinated in citrus and spices, to the savory depth of the rice and the luxurious finish of the melted cheese, each component plays a crucial role in creating a harmonious and utterly addictive meal. While the inspiration might come from a popular restaurant chain, the heart of this dish lies in traditional Mexican culinary principles – fresh ingredients, robust seasonings, and a love for food that brings people together.

Why Everyone Loves This Combination

What truly makes Pollo Loco Mexican Chicken Rice Queso a consistent crowd-pleaser? It’s the perfect balance! You get the protein-packed, tender chicken, the carb-rich, satisfying rice, and the ultimate indulgence of a rich, velvety queso sauce that coats every bite. It’s a meal that feels both wholesome and incredibly decadent, offering a fantastic blend of savory, tangy, and creamy notes. Get ready to transform your dinner routine with this irresistible recipe!

Pollo Loco: Spicy Mexican Chicken Rice & Queso Delight this RECIPE

Ingredients:

  • For the Pollo Loco Mexican Chicken:
    • Boneless, Skinless Chicken Breasts: 4 large (about 1.5 to 2 pounds total), butterflied or pounded to an even ½-inch thickness. This ensures quick and even cooking.
    • Fresh Orange Juice: ½ cup, preferably from freshly squeezed oranges for the best flavor and acidity. This is key to the authentic “Pollo Loco” tang.
    • Fresh Lime Juice: ¼ cup, also freshly squeezed. It adds a vibrant zest that balances the orange.
    • White Vinegar: 2 tablespoons. A crucial tenderizer and flavor enhancer in many Mexican marinades.
    • Achiote Paste: 1 tablespoon, crumbled or dissolved in a little hot water. This provides the signature red-orange color and a subtle earthy, peppery flavor that defines our Pollo Loco Mexican Chicken.
    • Garlic: 4 cloves, minced very finely. The aromatic backbone of the marinade.
    • Ground Cumin: 1 teaspoon. Earthy and warm, it’s essential for that classic Mexican profile.
    • Dried Mexican Oregano: 1 teaspoon, crushed between your palms. Mexican oregano has a distinct citrusy, earthy flavor compared to Mediterranean oregano.
    • Salt: 1 teaspoon, or to taste. Balances all the flavors.
    • Black Pepper: ½ teaspoon, freshly ground. Adds a gentle warmth.
    • Olive Oil: 2 tablespoons, plus extra for cooking. Used in the marinade to help carry fat-soluble flavors and for searing.
  • For the Mexican Rice:
    • Long-Grain White Rice: 1 ½ cups, such as Jasmine or Basmati. Rinsing is important for a fluffy texture.
    • Olive Oil: 1 tablespoon. For toasting the rice.
    • Yellow Onion: ½ cup, finely diced. Sautéed until translucent for sweetness.
    • Garlic: 2 cloves, minced. Adds a savory depth.
    • Tomato Paste: 2 tablespoons. This gives the rice its characteristic color and a rich, concentrated tomato flavor, a hallmark of excellent Mexican Rice.
    • Chicken Broth: 2 ¼ cups, low sodium. The primary cooking liquid, infusing flavor.
    • Water: ¼ cup, if needed, to achieve desired liquid ratio.
    • Salt: 1 teaspoon, or to taste. Essential for seasoning the rice adequately.
    • Ground Cumin: ½ teaspoon. Enhances the overall Mexican flavor profile.
    • Fresh Cilantro: ¼ cup, chopped, plus more for garnish. Stirred in at the end for freshness.
  • For the Creamy Queso Blanco:
    • White American Cheese: 1 pound (about 4 cups shredded), preferably from the deli counter, for the ultimate melt and creamy texture. This is the secret to perfect Queso Blanco.
    • Evaporated Milk: 1 (12-ounce) can. Provides a rich, creamy base without thinning the cheese flavor.
    • Diced Green Chiles: 1 (4-ounce) can, undrained. Adds a mild, tangy heat.
    • Jalapeño: 1 small, minced (seeds removed for less heat, leave for more), optional. For an extra kick.
    • Garlic Powder: ½ teaspoon. A consistent garlic flavor.
    • Onion Powder: ½ teaspoon. Adds a subtle savory depth.
    • Ground Cumin: ¼ teaspoon. Ties into the overall Mexican flavor profile.
    • Salt: ¼ teaspoon, or to taste. Essential for balancing the richness.
    • Milk (or Half-and-Half): 2-4 tablespoons, optional, for thinning if needed.
  • Optional Garnishes:
    • Fresh Cilantro, chopped
    • Lime Wedges
    • Pico de Gallo
    • Sliced Avocado or Guacamole
    • Warm Tortillas or Tortilla Chips

Prepping the Pollo Loco Mexican Chicken

  1. Prepare the Chicken: Lay your chicken breasts on a cutting board. If they are very thick, carefully butterfly them horizontally to create two thinner pieces, or place them between two sheets of plastic wrap and pound them gently with a meat mallet until they are about ½ inch thick. This ensures your Pollo Loco Mexican Chicken cooks quickly and evenly, absorbing the marinade beautifully.
  2. Whisk the Marinade: In a medium bowl, combine the fresh orange juice, fresh lime juice, white vinegar, crumbled achiote paste (if it’s a solid block, you can microwave it for a few seconds or dissolve it in a tablespoon of hot water first to make it easier to incorporate), minced garlic, ground cumin, crushed dried Mexican oregano, salt, black pepper, and 2 tablespoons of olive oil. Whisk everything thoroughly until well combined and the achiote paste is fully integrated, giving the marinade its vibrant color.
  3. Marinate the Chicken: Place the prepared chicken breasts into a large zip-top bag or a shallow dish. Pour the vibrant marinade over the chicken, making sure each piece is fully coated. Seal the bag, pressing out as much air as possible, or cover the dish. Refrigerate and let the chicken marinate for at least 30 minutes, but for the best flavor, aim for 2 to 4 hours.
    For truly tender and flavorful Pollo Loco Mexican Chicken, do not marinate for more than 4 hours, as the acidity can start to “cook” the chicken.

Cooking the Pollo Loco Mexican Chicken

  1. Preheat Your Cooking Surface: Remove the chicken from the refrigerator about 15-20 minutes before cooking to allow it to come slightly closer to room temperature. This promotes more even cooking. Heat a large grill pan, cast-iron skillet, or outdoor grill over medium-high heat. Add a tablespoon of olive oil to the pan if using a skillet or grill pan.
  2. Cook the Chicken: Once the pan is shimmering hot, carefully place the marinated chicken breasts onto the cooking surface. Be sure not to overcrowd the pan; cook in batches if necessary to ensure a good sear. Cook for 4-6 minutes per side, depending on the thickness of your chicken, until it’s beautifully golden-brown with nice char marks and cooked through. The internal temperature should reach 165°F (74°C). The citrusy marinade will caramelize slightly, creating an irresistible crust on your Pollo Loco Mexican Chicken.
  3. Rest and Slice: Transfer the cooked chicken to a cutting board and tent it loosely with foil. Let it rest for 5-10 minutes. This resting period is crucial as it allows the juices to redistribute throughout the meat, resulting in incredibly tender and moist chicken. After resting, slice the chicken against the grain into strips or dice it into bite-sized pieces, ready for your Pollo Loco Mexican Chicken Rice Queso bowl.

Crafting the Authentic Mexican Rice

  1. Rinse the Rice: Place the long-grain white rice in a fine-mesh sieve and rinse it under cold running water until the water runs clear. This step removes excess starch, preventing the rice from becoming gummy and ensuring fluffy, separate grains for your Mexican Rice. Drain well.
  2. Sauté the Aromatics: In a medium saucepan with a tight-fitting lid, heat 1 tablespoon of olive oil over medium heat. Add the finely diced yellow onion and cook for 3-5 minutes until it softens and becomes translucent, stirring occasionally. Add the minced garlic and cook for another minute until fragrant, being careful not to burn it.
  3. Toast the Rice and Tomato Paste: Add the rinsed and drained rice to the saucepan with the softened onions and garlic. Stir frequently for 3-5 minutes, toasting the rice until it turns slightly golden brown. This toasting step adds a nutty flavor and helps the grains stay separate. Stir in the tomato paste and ground cumin, cooking for 1-2 minutes more, until the tomato paste darkens slightly and coats the rice. This is where your Mexican Rice begins to get its signature color and rich flavor.
  4. Add Liquids and Simmer: Pour in the chicken broth and water, then stir in the salt. Bring the mixture to a rolling boil over medium-high heat. Once boiling, immediately reduce the heat to the lowest setting, cover the saucepan tightly with the lid, and simmer undisturbed for 18-20 minutes.
    Do not lift the lid during this cooking time; the steam trapped inside is essential for perfectly cooked Mexican Rice.
  5. Rest and Fluff: After 18-20 minutes, remove the saucepan from the heat but keep the lid on. Let the rice rest, still covered, for another 10 minutes. This allows the remaining steam to finish cooking the rice and ensures a truly fluffy texture. Finally, uncover the rice, add the chopped fresh cilantro, and gently fluff it with a fork. Your aromatic and colorful Mexican Rice is now ready.

Whipping Up the Creamy Queso Blanco

  1. Prepare the Cheese: If you bought a block of white American cheese from the deli, shred it or dice it into small pieces. Smaller pieces will melt more easily and smoothly, ensuring your Queso Blanco is perfectly creamy.
  2. Combine Liquids and Seasonings: In a medium saucepan over low heat, combine the evaporated milk, undrained diced green chiles, minced jalapeño (if using), garlic powder, onion powder, and ground cumin. Stir gently to combine. Heat the mixture until it’s warm but not boiling.
  3. Melt the Cheese Gradually: Begin adding the shredded white American cheese to the warm milk mixture in handfuls, stirring continuously with a whisk or rubber spatula. Add a little cheese at a time, allowing each batch to melt into the sauce before adding more. This gradual process prevents the cheese from clumping and ensures a silky-smooth, lump-free Queso Blanco.
  4. Achieve Creamy Consistency: Continue stirring until all the cheese has melted and the mixture is completely smooth and creamy. Season with salt to taste. If the queso is too thick, you can whisk in a tablespoon or two of regular milk or half-and-half until it reaches your desired consistency. Keep the Queso Blanco warm over very low heat, stirring occasionally, until ready to serve.
    For best results, serve this creamy queso immediately, as it tends to thicken as it cools.

    A small slow cooker set to “warm” is excellent for keeping it at the perfect consistency during a meal.

Assembling Your Pollo Loco Mexican Chicken Rice Queso Bowl

  1. Layer the Foundation: Begin by spooning a generous portion of the fluffy, flavorful Mexican Rice into the bottom of individual bowls. This acts as the perfect base, soaking up all the delicious flavors.
  2. Add the Star Chicken: Arrange several slices or diced pieces of your perfectly cooked and marinated Pollo Loco Mexican Chicken over the rice. The vibrant color and savory aroma of the chicken will immediately elevate the dish.
  3. Drench in Queso: Now for the magic! Lavishly spoon the warm, creamy Queso Blanco over the chicken and rice. Don’t be shy; this rich, cheesy sauce brings all the components of the Pollo Loco Mexican Chicken Rice Queso together in a harmonious blend of flavor and texture.
  4. Garnish and Serve: Finish your bowls with a sprinkle of fresh chopped cilantro, a squeeze of fresh lime juice from a wedge, and perhaps some vibrant pico de gallo or creamy avocado slices. Serve immediately and prepare for a truly satisfying and authentic Mexican-inspired meal that rivals your favorite restaurant!

Enjoying Your Pollo Loco Mexican Chicken Rice Queso Creation

This comprehensive recipe allows you to recreate the vibrant flavors and comforting satisfaction of a classic Pollo Loco-style meal right in your own kitchen. Each component – the citrus-marinated Pollo Loco Mexican Chicken, the rich and fluffy Mexican Rice, and the velvety smooth Queso Blanco – is designed to complement the others, creating a cohesive and incredibly delicious dish. Whether you’re making it for a weeknight dinner or a weekend feast, this meal is sure to be a crowd-pleaser and a new family favorite. The layers of savory chicken, tender rice, and decadent queso make every bite an experience, truly capturing the essence of Mexican comfort food.

Pollo Loco: Spicy Mexican Chicken Rice & Queso Delight

Conclusion:

And there you have it, my friends! After delving into the heart of this incredible dish, I truly hope you’re as excited as I am about what it brings to the table. This isn’t just another recipe; it’s an experience, a journey of flavors that will transport your taste buds straight to a vibrant fiesta. The incredible blend of tender, seasoned chicken, perfectly cooked rice, and creamy, luscious queso creates a symphony of taste that is genuinely unforgettable. It’s the kind of meal that brings smiles, sparks conversations, and leaves everyone feeling utterly satisfied. I can confidently say that if you’re looking for a dish that offers both comfort and an exciting burst of authentic Mexican-inspired flavors, this recipe absolutely needs to be at the top of your culinary list. It perfectly encapsulates everything wonderful about a hearty, flavor-packed meal, making it a definite must-try for home cooks of all skill levels.

What I particularly adore about this creation is its inherent versatility. While it shines brightly as a standalone masterpiece, there are so many delightful ways to enjoy it and truly make it your own. For a classic presentation, I highly recommend serving generous portions alongside warm, soft corn or flour tortillas, perfect for scooping up every last bit of that deliciousness. A simple side of black beans or pinto beans and a dollop of fresh guacamole or salsa fresca would complete a perfect family dinner. For those who love a hearty bowl, transform it into an epic “Pollo Loco Mexican Chicken Rice Queso” bowl by adding a generous sprinkle of fresh cilantro, diced avocado, a squeeze of lime, and maybe even a few pickled red onions for a tangy counterpoint. You could also easily repurpose leftovers (if there are any!) into delicious lunch options; imagine this chicken and rice mixture as a stellar filling for burritos, quesadillas, or even a topping for loaded nachos, where the queso melts beautifully over crispy tortilla chips. The possibilities are as endless as your imagination, allowing you to tailor each serving to suit your mood or dietary preferences.

Beyond the traditional, consider these creative variations to keep things exciting. If you’re a fan of a little extra heat, don’t hesitate to dice up some fresh jalapeños or serrano peppers and mix them into the rice or even sprinkle them over the finished dish. A smoky chipotle in adobo sauce, either blended into the chicken marinade or stirred into the queso, would also add a fantastic depth of flavor and a gentle kick. For those looking to lighten things up slightly, consider using cauliflower rice as a substitute or adding extra steamed vegetables like corn, bell peppers, or zucchini directly into the rice mix to boost the nutrient content and add more texture. While chicken is the star here, you could experiment with other proteins too; shredded pork or even seasoned ground beef would also pair wonderfully with the zesty rice and creamy queso. For a vegetarian twist, black beans or roasted sweet potatoes could easily take center stage, proving that this recipe is incredibly adaptable to various dietary needs and preferences without sacrificing an ounce of its fantastic flavor. It’s a truly forgiving recipe, encouraging you to experiment and find your perfect version.

So, now it’s your turn! I have poured my heart into sharing this recipe, and I genuinely believe it has the power to become a staple in your kitchen. Don’t just take my word for it; I wholeheartedly encourage you to roll up your sleeves, gather your ingredients, and embark on this delicious culinary adventure yourself. I promise you, the rich aromas that will fill your home and the incredible flavors that will dance on your palate will make every moment spent preparing this dish absolutely worth it. Once you’ve experienced the magic of this Pollo Loco Mexican Chicken Rice Queso, I would absolutely love to hear about it! Please come back and share your cooking experience, your serving suggestions, any creative variations you tried, or even just your general thoughts on how much you enjoyed it. Your feedback and stories are what truly inspire me and help this wonderful community of food lovers grow. Happy cooking, and bon appétit!


Pollo Loco Mexican Chicken Rice Queso

Recreate the beloved Pollo Loco Mexican Chicken Rice Queso at home! This dish features perfectly marinated, flame-grilled chicken, fluffy seasoned Mexican rice, and a generous drizzle of warm, creamy queso, captivating taste buds with vibrant flavors and comforting textures.

Prep Time
45 Minutes
Cook Time
45 Minutes
Total Time
20 Minutes
Servings
4 servings

Ingredients


Instructions


Important Information

Nutrition Facts (Per Serving)

It is important to consider this information as approximate and not to use it as definitive health advice.

Allergy Information

Please check ingredients for potential allergens and consult a health professional if in doubt.

« Previous Post
Creamy White Chicken Enchiladas Recipe - Easy & Delicious!
Next Post »
Ultimate Spicy Korean Ramen w/ Grilled Beef Cream Sauce

If you enjoyed this…

Keto Reuben In A Bowl: Delicious Low-Carb Beef Comfort Meal

Irresistible Smothered Chicken and Rice Recipe You’ll Love

Amazing Crispy Sweet Chili Chicken Recipe – Ultimate Flavor

Primary Sidebar

Browse by Diet

BreakfastDinnerLunchDessertAppetizer

Sweet Peach Yogurt Parfait Delight

One of my fondest memories is from a lazy summer afternoon spent at my grandmother’s house. The sun filtered through the kitchen window, casting a warm glow over the table where she would create her culinary magic. It was during one of those blissful moments that I first tasted her Peach Yogurt Parfait with Honey and Granola. The sweet aroma of ripe peaches mingling with creamy yogurt and the crunch of granola was nothing short of heavenly. It felt like summer captured in a bowl, and I still remember the joy of diving in with a spoon, each layer revealing a new burst of flavor.

When I think about that parfait, I can almost hear the gentle hum of the bees outside, reminding me of the floral notes that honey brings to every bite. The vibrant yellows and soft oranges of the peaches contrast beautifully with the creamy white yogurt and the golden crunch of granola. It’s a dish that not only looks delightful but also tastes like a celebration of fresh, wholesome ingredients.

What makes my version of this Peach Yogurt Parfait special is the careful balance of flavors and textures. I use ripe, juicy peaches, drizzled with locally sourced honey, and a homemade granola that’s bursting with nuts and seeds for an extra crunch. It’s a simple dish, but every layer is crafted with love and attention.

Let me show you exactly how to make this delightful parfait, so you can bring a bit of that summer magic into your kitchen!

Sweet Peach Yogurt Parfait Delight

Why You’ll Love This Recipe

  • Delightfully creamy texture from the Greek yogurt, paired with the juicy sweetness of fresh peaches.
  • Ready in under 20 minutes, making it a quick and satisfying breakfast or snack option.
  • Budget-friendly, using common ingredients that you may already have in your pantry.
  • Customizable with your favorite granola and nuts, allowing you to tailor each parfait to your taste.
  • Perfectly balanced flavors with the bright acidity of lemon juice and the sweetness of honey enhancing the peaches.

Ingredients

  • For the Parfait:
  • 2 cups plain Greek yogurt (or vanilla yogurt for a sweeter option)
  • 2 large ripe peaches, diced (about 2 cups)
  • 1 tablespoon fresh lemon juice (to prevent browning of peaches)
  • 2 tablespoons honey (plus more for drizzling)
  • 1 teaspoon vanilla extract (optional for extra flavor)
  • For the Granola:
  • 1 cup granola (store-bought or homemade; see notes for a simple granola recipe)
  • 1/4 cup sliced almonds (optional for added crunch)
  • 1/4 cup shredded coconut (optional for added flavor)

Let’s dive into some key ingredients that make this Peach Yogurt Parfait so delightful! First, the Greek yogurt is not only creamy but also packed with protein, making it a satisfying option for breakfast or a snack. If you’re looking for a sweeter option, you can easily substitute it with vanilla yogurt, though it may alter the overall flavor balance. Next, the ripe peaches are the star of the show; their natural sweetness shines through, so I recommend choosing peaches that yield slightly to pressure, indicating they’re perfectly ripe. If peaches aren’t in season, feel free to use nectarines or even frozen peaches—just thaw them before use. Finally, honey adds a lovely floral sweetness that ties everything together. If you prefer, maple syrup can serve as a delicious substitute.

Step-by-Step Instructions

  1. Start by preparing the peaches. Wash them thoroughly, then slice and dice them into bite-sized pieces. In a medium bowl, toss the diced peaches with 1 tablespoon of fresh lemon juice to prevent browning. Set aside for about 5 minutes while the lemon juice works its magic.
  2. In a separate bowl, combine the Greek yogurt, 2 tablespoons of honey, and 1 teaspoon of vanilla extract if using. Stir the mixture until smooth and thoroughly blended. This should take about a minute. Avoid overmixing to maintain the creaminess of the yogurt.
  3. Now it’s time to layer your parfait. Grab a clear glass or bowl to showcase your beautiful creation. Start with a generous spoonful of the yogurt mixture at the bottom—about 1/4 cup will do. Use a spoon to spread it evenly.
  4. Add a layer of the diced peaches over the yogurt, ensuring they cover the yogurt completely. You might want to use about half of what you have prepared—roughly 1 cup. This layer should be visually appealing, so arrange the peaches neatly.
  5. Sprinkle 1/4 cup of granola over the peaches. This adds a delightful crunch. Make sure to distribute it evenly to ensure every bite has that satisfying texture. Avoid packing it down too tightly, as you want it to maintain its crunch.
  6. Repeat the layers: spoon in another 1/4 cup of yogurt, followed by another cup of peaches, and another sprinkle of granola. You should have at least two layers, but feel free to add more depending on your glass size.
  7. Finish off your parfait with a drizzle of honey on top for added sweetness and a touch of elegance. If you’re using sliced almonds or shredded coconut, sprinkle them on top now. It adds a lovely visual contrast and extra flavor.
  8. Serve immediately or refrigerate for up to 30 minutes before serving to allow the flavors to meld together. However, I recommend enjoying it fresh to maintain the granola’s crunch.

Pro Tips for the Best Peach Yogurt Parfait With Honey And Granola

  • Make sure to choose ripe peaches for the best flavor and texture. A common mistake is using unripe fruit, which can lead to a less enjoyable parfait. Look for peaches that are fragrant and slightly soft to the touch.
  • Use a clear glass to assemble your parfait; this not only makes for a beautiful presentation but also allows you to see the colorful layers, which adds to the enjoyment of eating it.
  • For an even creamier texture, consider whipping the Greek yogurt with a hand mixer for a couple of minutes before layering. This small adjustment makes a huge difference in mouthfeel.
  • Be mindful of the granola-to-yogurt ratio. Too much granola can overwhelm the parfait, while too little can make it feel too creamy. Aim for about 1/4 cup of granola per layer for the perfect balance.
  • If you’re making this for a gathering, consider preparing the yogurt and peaches ahead of time and layering them just before serving. This ensures the granola stays crunchy!

Variations & Serving Ideas

There are so many ways to get creative with your Peach Yogurt Parfait! For a tropical twist, swap out the peaches for mangoes or pineapples and top with coconut flakes. If you prefer a berry flavor, mix in some blueberries or strawberries with the peaches for added color and taste. For a nutty version, incorporate chopped walnuts or pecans instead of almonds.

As for serving ideas, this parfait pairs beautifully with a side of scrambled eggs for a hearty breakfast or fresh fruit salad for a light lunch. You might also enjoy it alongside whole grain toast with almond butter for an energizing snack. The contrast of flavors and textures will elevate your meal experience!

Storage, Make-Ahead & Reheating

The Peach Yogurt Parfait is best enjoyed fresh, but you can prepare some components ahead of time. Store the layered parfait in an airtight container in the refrigerator for up to 24 hours. However, be cautious; the granola may lose its crunch if stored too long. You can freeze the yogurt and peach mixture for up to 2 months; just remember to thaw it in the refrigerator overnight before serving.

If you plan to enjoy this dish the next day, it can taste even better as the flavors meld together. Just remember to add the granola right before serving to keep its delightful crunch!

Frequently Asked Questions

Can I make Peach Yogurt Parfait With Honey And Granola ahead of time?

Yes — in fact, it tastes even better the next day as the flavors meld. However, I recommend waiting to add the granola until just before serving to maintain its crunch.

What can I substitute for Greek yogurt?

If you prefer a lighter option, you can substitute Greek yogurt with regular yogurt or a dairy-free alternative like coconut yogurt. Just remember that this may alter the creaminess and flavor profile slightly.

Can I use frozen peaches for this parfait?

Absolutely! Just make sure to thaw the frozen peaches before using them. They will still add great flavor, though the texture may be slightly softer than fresh peaches.

How do I make the parfait vegan?

To make a vegan version, substitute the Greek yogurt with a plant-based yogurt alternative, and replace honey with maple syrup or agave nectar. This keeps the parfait sweet while adhering to a vegan diet.

What other fruits can I use in this recipe?

You can mix and match fruits based on your preference. Try using strawberries, blueberries, raspberries, or even bananas. Just make sure to adjust the lemon juice as needed to prevent browning.

Sweet Peach Yogurt Parfait Delight

Final Thoughts

The Peach Yogurt Parfait with Honey and Granola is a delightful blend of creamy yogurt, sweet peaches, and crunchy granola that creates a satisfying and nourishing treat. Each layer bursts with flavor, making it a perfect choice for breakfast or a light dessert.

This is the kind of recipe I come back to again and again, especially when I want something refreshing and wholesome to start my day. The harmony of sweet and tart flavors, combined with the delightful crunch, never fails to lift my spirits!

I encourage you to give this parfait a try and indulge in its comforting goodness. Feel free to share your results or even add your own twist—perhaps a sprinkle of cinnamon or a handful of nuts. Enjoy creating your perfect parfait!

Print
clock clock iconcutlery cutlery iconflag flag iconfolder folder iconinstagram instagram iconpinterest pinterest iconfacebook facebook iconprint print iconsquares squares iconheart heart iconheart solid heart solid icon

Peach Yogurt Parfait


  • Author: Lily author
  • Total Time: 15 minutes
  • Yield: 4 servings 1x
Pin Recipe
Print Recipe

Description

This Peach Yogurt Parfait combines creamy Greek yogurt, juicy peaches, and crunchy granola for a delightful treat. It’s a perfect breakfast or snack that captures the essence of summer in every bite.


Ingredients

Scale
  • For the Parfait:
  • 2 cups plain Greek yogurt (or vanilla yogurt for a sweeter option)
  • 2 large ripe peaches, diced (about 2 cups)
  • 1 tablespoon fresh lemon juice (to prevent browning of peaches)
  • 2 tablespoons honey (plus more for drizzling)
  • 1 teaspoon vanilla extract (optional for extra flavor)
  • For the Granola:
  • 1 cup granola (store-bought or homemade; see notes for a simple granola recipe)
  • 1/4 cup sliced almonds (optional for added crunch)
  • 1/4 cup shredded coconut (optional for added flavor)

Instructions

  1. Start by preparing the peaches. Wash them thoroughly, then slice and dice them into bite-sized pieces. In a medium bowl, toss the diced peaches with 1 tablespoon of fresh lemon juice to prevent browning. Set aside for about 5 minutes while the lemon juice works its magic.
  2. In a separate bowl, combine the Greek yogurt, 2 tablespoons of honey, and 1 teaspoon of vanilla extract if using. Stir the mixture until smooth and thoroughly blended. This should take about a minute. Avoid overmixing to maintain the creaminess of the yogurt.
  3. Now it’s time to layer your parfait. Grab a clear glass or bowl to showcase your beautiful creation. Start with a generous spoonful of the yogurt mixture at the bottom—about 1/4 cup will do. Use a spoon to spread it evenly.
  4. Add a layer of the diced peaches over the yogurt, ensuring they cover the yogurt completely. You might want to use about half of what you have prepared—roughly 1 cup. This layer should be visually appealing, so arrange the peaches neatly.
  5. Sprinkle 1/4 cup of granola over the peaches. This adds a delightful crunch. Make sure to distribute it evenly to ensure every bite has that satisfying texture. Avoid packing it down too tightly, as you want it to maintain its crunch.
  6. Repeat the layers: spoon in another 1/4 cup of yogurt, followed by another cup of peaches, and another sprinkle of granola. You should have at least two layers, but feel free to add more depending on your glass size.
  7. Finish off your parfait with a drizzle of honey on top for added sweetness and a touch of elegance. If you’re using sliced almonds or shredded coconut, sprinkle them on top now. It adds a lovely visual contrast and extra flavor.
  8. Serve immediately or refrigerate for up to 30 minutes before serving to allow the flavors to meld together. However, I recommend enjoying it fresh to maintain the granola’s crunch.
  • Prep Time: 15 mins
  • Cook Time: 0 mins
  • Category: Breakfast
  • Method: No-cook
  • Cuisine: American

Nutrition

  • Serving Size: 1 parfait
  • Calories: 250
  • Sugar: 20 g
  • Sodium: 50 mg
  • Fat: 5 g
  • Saturated Fat: 2 g
  • Unsaturated Fat: 3 g
  • Trans Fat: 0 g
  • Carbohydrates: 40 g
  • Fiber: 3 g
  • Protein: 10 g
  • Cholesterol: 10 mg

Keywords: Choose ripe peaches for the best flavor and texture. Use a clear glass for a beautiful presentation. For creaminess, consider whipping the yogurt before layering. Be mindful of the granola-to-yogurt ratio. Prepare yogurt and peaches ahead of time for gatherings, layering just before serving.

Did you make this recipe?

Share a photo and tag us — we can't wait to see what you've made!

Sun-Kissed Frozen Orange Cream Slush

As a child, summer days felt like they lasted forever. I remember the sticky heat wrapping around me as I played outside, my laughter mingling with the sounds of the neighborhood. But nothing could cool me down quite like the moment I’d spot my grandmother, laboring over her blender, whipping up her famous Frozen Orange Creamsicle Slush. That vibrant orange treat, with its frosty texture and sweet citrus aroma, was like a burst of sunshine in a cup. Just one sip, and I could feel the coolness wash over me, sparking pure joy.

This Frozen Orange Creamsicle Slush has a way of making you feel like a kid again. Its creamy, dreamy consistency is a delightful balance of bright orange and soft vanilla, inviting you to dive right in. The refreshing tang of orange dances on your tongue, while the smooth creaminess envelops you in a comforting embrace. It’s a nostalgic treat that’s perfect for hot summer afternoons or anytime you need a little pick-me-up.

What makes my version of this slush stand out is the addition of a hint of vanilla bean, which elevates the flavor and adds an extra layer of richness. Plus, it’s super easy to whip up with just a few simple ingredients that you probably already have on hand! So, if you’re ready to relive those sun-soaked memories, let me show you exactly how to make it.

Sun-Kissed Frozen Orange Cream Slush

Why You’ll Love This Recipe

  • Each slush is a perfect blend of creamy vanilla and zesty orange, creating a nostalgic flavor reminiscent of summer days.
  • This refreshing treat is ready in under 15 minutes, making it an ideal quick dessert for unexpected guests or hot afternoons.
  • With just 8 simple ingredients, it’s budget-friendly, ensuring you don’t have to break the bank to enjoy a delicious slush.
  • The slush has a perfectly smooth texture, thanks to the combination of ice and ice cream, providing a delightful contrast to the bright citrus flavors.
  • It’s highly customizable; you can easily adjust the sweetness and add fresh herbs for a unique twist that suits your taste.

Ingredients

  • 2 cups orange juice (freshly squeezed or store-bought)
  • 1 cup vanilla ice cream
  • 1 cup crushed ice
  • 1/2 cup milk (whole or 2%)
  • 1/4 cup granulated sugar (adjust based on sweetness preference)
  • 1 teaspoon vanilla extract
  • Zest of 1 orange (for added flavor)
  • Fresh orange slices and mint leaves (for garnish)

The star of this Frozen Orange Creamsicle Slush is the orange juice, which provides the vibrant, citrusy base. Freshly squeezed juice will yield the brightest flavor, but store-bought options can be just as convenient. If you’re opting for store-bought, choose 100% pure juice with no added sugars for the best results. Another essential ingredient is the vanilla ice cream; it adds creaminess and sweetness. You can substitute it with dairy-free ice cream if you’re looking for a vegan option. Whole or 2% milk complements the ice cream, creating a smooth blend. If you want a lower-calorie version, almond or oat milk can be good alternatives.

Lastly, the granulated sugar can be adjusted based on your sweetness preference. If you prefer a more natural sweetener, consider using honey or agave syrup. The orange zest enhances the flavor profile, providing an aromatic pop that brings the whole slush together. Don’t skip it! It adds an extra layer of brightness that makes this slush truly special.

Step-by-Step Instructions

  1. Start by preparing your ingredients. Gather 2 cups of orange juice, 1 cup of vanilla ice cream, and 1 cup of crushed ice. Make sure the ice is finely crushed, as larger chunks can make blending difficult.
  2. In a blender, combine the orange juice, vanilla ice cream, crushed ice, and 1/2 cup of milk. Add 1/4 cup of granulated sugar and 1 teaspoon of vanilla extract. If you like a sweeter slush, consider adding a bit more sugar at this stage.
  3. Add the zest of 1 orange to the blender. This step is crucial for enhancing the citrus flavor of your slush. Make sure not to include the bitter white pith—only the flavorful zest.
  4. Blend the mixture on medium-high speed for about 30-45 seconds. Stop once the ingredients are fully combined and the slush has a smooth, even consistency. If you notice large chunks of ice, blend for an additional 10-15 seconds. Avoid over-blending, as this can make the slush too liquidy.
  5. Once blended, taste the slush. If it needs more sweetness, add a little more sugar and blend for a few more seconds. If it’s too thick, you can add a splash of milk to reach your desired consistency.
  6. Pour the slush into glasses. This recipe typically serves 4, but you can easily double it for larger gatherings. Use a spoon to help guide the slush into the glasses if needed.
  7. Garnish each serving with fresh orange slices and mint leaves. The mint not only adds a pop of color but also a refreshing aroma that complements the citrus flavors beautifully.
  8. Serve immediately and enjoy! If you’ve made extra, you can refrigerate it for a short time, but it’s best enjoyed fresh.

Pro Tips for the Best Frozen Orange Creamsicle Slush

  • Don’t skip the orange zest! It’s a game-changer for flavor. Always zest before juicing to make it easier.
  • Use a high-powered blender for the best texture. A standard blender may struggle with ice, leading to uneven consistency. If you have a food processor, that can work too, but ensure the ice is finely crushed.
  • Adjust the ice-to-liquid ratio carefully. If your slush is too thick, it won’t blend well. Start with less ice and add more until you reach your preferred texture.
  • Be cautious with the sugar! Always start with the lower amount, as you can easily add more, but it’s hard to fix an overly sweet slush.
  • For a fun twist, consider adding a splash of coconut milk or a handful of fresh fruit like strawberries or pineapple. This not only enhances the flavor but also adds a beautiful color contrast.

Variations & Serving Ideas

There are countless ways to put a spin on your Frozen Orange Creamsicle Slush. Consider making a tropical version by adding in some pineapple juice or coconut milk for a delightful tropical twist. If you’re feeling adventurous, try incorporating a handful of frozen mango or peach slices for added sweetness. For a lighter version, swap out the vanilla ice cream for Greek yogurt for a creamy yet tangy alternative.

As for serving ideas, this refreshing slush pairs wonderfully with light summer dishes like grilled chicken skewers, fish tacos, or a simple salad topped with citrus vinaigrette. The bright, zesty flavors of the slush complement these dishes perfectly, making them an ideal pairing for a sunny day.

Storage, Make-Ahead & Reheating

This Frozen Orange Creamsicle Slush is best enjoyed fresh, but if you have leftovers, you can store them in an airtight container in the fridge for up to 2 days. Just keep in mind that the slush may lose some of its texture over time as the ice melts. It doesn’t freeze well, as the ice will turn into a solid block. If you must freeze it, blend again after thawing to restore the slushy consistency. This treat is best the day you make it, as the flavors meld together beautifully overnight, enhancing its deliciousness.

Frequently Asked Questions

Can I make Frozen Orange Creamsicle Slush ahead of time?

Yes — in fact, it tastes even better the next day as the flavors meld. However, it’s best to enjoy it fresh, as the texture can change if stored for too long. If you need to prepare it ahead, keep it in the fridge and re-blend before serving.

What kind of orange juice should I use?

For the best flavor, use freshly squeezed orange juice. However, if you’re short on time, opt for 100% pure store-bought juice without added sugars. This will ensure that your slush remains flavorful and refreshing.

Can I substitute the vanilla ice cream?

Absolutely! If you’re looking for a dairy-free option, coconut milk ice cream or a non-dairy vanilla ice cream can work wonderfully. They will still provide the creamy texture and sweetness you desire.

How can I adjust the sweetness of my slush?

You can easily adjust the sweetness by modifying the amount of sugar added. Start with 1/4 cup and taste the mixture before blending. If you prefer it sweeter, add more sugar gradually until it reaches your desired level.

What should I do if my slush is too thick?

If your slush is too thick, simply add a splash of milk or orange juice and blend again. This will help achieve a more drinkable consistency while maintaining the slushy texture. Adjust gradually to reach your preferred thickness.

Sun-Kissed Frozen Orange Cream Slush

Final Thoughts

The Frozen Orange Creamsicle Slush is a delightful blend of refreshing citrus and creamy goodness, making it a perfect treat for warm days or any time you crave a taste of nostalgia. The way the bright orange flavor dances with the creamy texture truly elevates this slush, transforming it into a satisfying escape from the everyday.

This is the kind of recipe I come back to again and again, especially when I’m looking to cool down or impress guests at a summer gathering. It’s simple to make and always brings smiles all around! I encourage you to try this recipe for yourself—don’t hesitate to share your results or even put your own spin on it. Happy slushing!

Print
clock clock iconcutlery cutlery iconflag flag iconfolder folder iconinstagram instagram iconpinterest pinterest iconfacebook facebook iconprint print iconsquares squares iconheart heart iconheart solid heart solid icon

Frozen Orange Creamsicle Slush


  • Author: Lily author
  • Total Time: 15 minutes
  • Yield: 4 servings 1x
Pin Recipe
Print Recipe

Description

This Frozen Orange Creamsicle Slush is a refreshing treat that combines creamy vanilla and zesty orange flavors. Perfect for hot summer days, it brings back nostalgic memories with every sip.


Ingredients

Scale
  • 2 cups orange juice (freshly squeezed or store-bought)
  • 1 cup vanilla ice cream
  • 1 cup crushed ice
  • 1/2 cup milk (whole or 2%)
  • 1/4 cup granulated sugar (adjust based on sweetness preference)
  • 1 teaspoon vanilla extract
  • Zest of 1 orange (for added flavor)
  • Fresh orange slices and mint leaves (for garnish)

Instructions

  1. Start by preparing your ingredients. Gather 2 cups of orange juice, 1 cup of vanilla ice cream, and 1 cup of crushed ice. Make sure the ice is finely crushed, as larger chunks can make blending difficult.
  2. In a blender, combine the orange juice, vanilla ice cream, crushed ice, and 1/2 cup of milk. Add 1/4 cup of granulated sugar and 1 teaspoon of vanilla extract. If you like a sweeter slush, consider adding a bit more sugar at this stage.
  3. Add the zest of 1 orange to the blender. This step is crucial for enhancing the citrus flavor of your slush. Make sure not to include the bitter white pith—only the flavorful zest.
  4. Blend the mixture on medium-high speed for about 30-45 seconds. Stop once the ingredients are fully combined and the slush has a smooth, even consistency. If you notice large chunks of ice, blend for an additional 10-15 seconds. Avoid over-blending, as this can make the slush too liquidy.
  5. Once blended, taste the slush. If it needs more sweetness, add a little more sugar and blend for a few more seconds. If it’s too thick, you can add a splash of milk to reach your desired consistency.
  6. Pour the slush into glasses. This recipe typically serves 4, but you can easily double it for larger gatherings. Use a spoon to help guide the slush into the glasses if needed.
  7. Garnish each serving with fresh orange slices and mint leaves. The mint not only adds a pop of color but also a refreshing aroma that complements the citrus flavors beautifully.
  8. Serve immediately and enjoy! If you’ve made extra, you can refrigerate it for a short time, but it's best enjoyed fresh.
  • Prep Time: 15 min
  • Cook Time: 0 min
  • Category: Dessert
  • Method: Blending
  • Cuisine: American

Nutrition

  • Serving Size: 1 serving
  • Calories: 200
  • Sugar: 30 g
  • Sodium: 50 mg
  • Fat: 5 g
  • Saturated Fat: 3 g
  • Unsaturated Fat: 2 g
  • Trans Fat: 0 g
  • Carbohydrates: 40 g
  • Fiber: 1 g
  • Protein: 2 g
  • Cholesterol: 20 mg

Keywords: Don't skip the orange zest! It's a game-changer for flavor. Always zest before juicing to make it easier.

Did you make this recipe?

Share a photo and tag us — we can't wait to see what you've made!

Zesty Lemon Poppy Seed Delight

One rainy afternoon, I found myself in my grandmother’s cozy kitchen, the kind that always smelled like warmth and love. She was whipping up her famous Lemon Poppy Seed Loaf, a recipe that had been passed down through generations. As the batter came together, the zesty aroma of fresh lemons filled the air, mingling perfectly with the nutty fragrance of poppy seeds. I can still picture her, apron-clad, as she expertly drizzled a vibrant citrus icing over the loaf, creating a glossy, sun-kissed finish that beckoned us to dive in. It was a moment that sparked my own passion for baking, and this recipe has become a cherished staple in my home ever since.

When you take a bite of this Lemon Poppy Seed Loaf, it’s like a burst of sunshine on your palate. The loaf is beautifully golden, with a tender crumb that melts in your mouth. Each slice is speckled with tiny poppy seeds, adding a delightful crunch that contrasts beautifully with the tangy sweetness of the lemon. And that citrus icing? It’s the finishing touch that elevates this loaf from ordinary to extraordinary, with its bright, zesty flavor dancing on your taste buds.

This recipe stands out because it embraces simplicity while delivering on flavor. I’ve added a hint of vanilla to the batter, enhancing the overall taste and making it even more indulgent. Trust me, once you make this Lemon Poppy Seed Loaf With Citrus Icing, it’ll become a go-to in your baking repertoire.

So, let me show you exactly how to make it!

Zesty Lemon Poppy Seed Delight

Why You’ll Love This Recipe

  • Moist and tender crumb that melts in your mouth, thanks to the perfect balance of butter and buttermilk.
  • Bright, zesty lemon flavor paired with crunchy poppy seeds, creating a delightful texture and taste experience.
  • Easy to whip up in just about an hour, perfect for last-minute gatherings or a cozy afternoon treat.
  • Budget-friendly with everyday ingredients, making it an accessible option for all home bakers.
  • The citrus icing adds a sweet tang that elevates the loaf, turning a simple recipe into a showstopper!

Ingredients

  • 1 ½ cups (190g) all-purpose flour
  • 1 teaspoon baking powder
  • ½ teaspoon baking soda
  • ½ teaspoon salt
  • 3 tablespoons poppy seeds
  • ½ cup (115g) unsalted butter, softened to room temperature
  • 1 cup (200g) granulated sugar
  • 2 large eggs
  • 1 teaspoon vanilla extract
  • 1 teaspoon lemon zest (from about 1 medium lemon)
  • ½ cup (120ml) buttermilk
  • 2 tablespoons fresh lemon juice

For the Citrus Icing:

  • 1 cup (120g) powdered sugar
  • 2 tablespoons fresh lemon juice
  • 1 tablespoon orange juice
  • 1 teaspoon lemon zest (for garnish, optional)

Let’s dive into the key ingredients that make this Lemon Poppy Seed Loaf so special. The all-purpose flour provides the structure and base for the loaf, while the baking powder and baking soda ensure it rises perfectly, giving the loaf a light texture. For a gluten-free variation, you could substitute the flour with a gluten-free all-purpose blend. Poppy seeds not only add a delightful crunch but also contribute to the unique flavor profile that pairs well with the citrus notes.

Unsalted butter is crucial for achieving the buttery richness that makes this loaf so moist. If you’re looking for a dairy-free option, coconut oil or a vegan butter can be used instead. The buttermilk is another essential component, providing acidity that activates the baking soda for a fluffy texture. If you don’t have buttermilk on hand, you can easily make a substitute by mixing ½ cup of milk with 1 tablespoon of vinegar or lemon juice and letting it sit for about 5 minutes.

Step-by-Step Instructions

  1. Preheat your oven to 350°F (175°C). Grease a 9×5-inch loaf pan or line it with parchment paper for easy removal later.
  2. In a medium mixing bowl, whisk together 1 ½ cups of all-purpose flour, 1 teaspoon of baking powder, ½ teaspoon of baking soda, ½ teaspoon of salt, and 3 tablespoons of poppy seeds. This helps to evenly distribute the baking agents and ensures a uniform rise.
  3. In a large mixing bowl, cream together ½ cup of softened unsalted butter and 1 cup of granulated sugar using an electric mixer on medium speed for about 3-4 minutes, until the mixture is light and fluffy. Make sure to scrape down the sides of the bowl occasionally.
  4. Add 2 large eggs, 1 teaspoon of vanilla extract, and 1 teaspoon of lemon zest to the creamed butter and sugar, mixing until fully combined. You want a smooth consistency, so ensure there are no lumps of butter.
  5. In a small bowl, combine ½ cup of buttermilk and 2 tablespoons of fresh lemon juice. Alternately add the dry ingredients and buttermilk mixture to the butter mixture, starting and ending with the dry ingredients. Mix just until combined; do not overmix, as this can lead to a dense loaf.
  6. Pour the batter into the prepared loaf pan. Smooth the top with a spatula, ensuring it’s even. Bake in the preheated oven for 50-60 minutes, or until a toothpick inserted in the center comes out clean. The edges should be lightly golden brown, and the center should feel just set.
  7. Once baked, remove the loaf from the oven and allow it to cool in the pan for about 10 minutes. Then, transfer it to a wire rack to cool completely. Resist the urge to slice too soon, as it will be crumbly if it’s still warm.
  8. While the loaf is cooling, prepare the citrus icing. In a medium bowl, whisk together 1 cup of powdered sugar, 2 tablespoons of fresh lemon juice, and 1 tablespoon of orange juice until smooth. If the icing is too thick, you can add a little more juice to reach your desired consistency.
  9. Once the loaf is completely cool, drizzle the citrus icing over the top. If you like, sprinkle with an additional teaspoon of lemon zest for an extra pop of flavor and color.

Pro Tips for the Best Lemon Poppy Seed Loaf With Citrus Icing

  • Be careful not to overmix your batter; this is a common mistake that can lead to a dense loaf. Mix just until the dry ingredients are incorporated for a light and fluffy texture.
  • Use room temperature ingredients, especially the butter and eggs. This helps to create a smoother batter and ensures even baking. Take your eggs out of the fridge about 30 minutes before you start.
  • For a more pronounced lemon flavor, consider adding a little lemon extract in addition to the zest and juice. Just a half teaspoon can elevate the citrus notes significantly.
  • When measuring your flour, spoon it into the measuring cup and level it off with a knife instead of scooping directly from the bag. This prevents packing and ensures you don’t end up with a dry loaf.
  • Invest in a good quality loaf pan; it makes a difference in heat distribution, which ensures even baking. If your pan is dark-coated, reduce the oven temperature by 25°F to prevent over-browning.

Variations & Serving Ideas

For a delightful twist, consider adding blueberries or raspberries to the batter for a fruity burst of flavor. You can also experiment with different citrus fruits—try lime or grapefruit zest and juice for a refreshing change. For a healthier option, substitute half of the all-purpose flour with whole wheat flour for added fiber without compromising too much on texture.

This Lemon Poppy Seed Loaf pairs beautifully with a light salad, such as a mixed greens salad with a vinaigrette, or a cup of tea for a cozy afternoon treat. It also complements a creamy cheese platter, as the acidity of the loaf balances rich cheeses perfectly. Lastly, a scoop of vanilla ice cream on the side creates a delightful contrast of temperatures and flavors!

Storage, Make-Ahead & Reheating

This Lemon Poppy Seed Loaf can be stored at room temperature for up to 3 days if wrapped tightly in plastic wrap. If you want to keep it longer, it freezes well for up to 3 months. To freeze, wrap the loaf tightly in plastic wrap and then in aluminum foil to prevent freezer burn.

When you’re ready to enjoy it again, simply thaw it in the fridge overnight. Reheat individual slices in the microwave for 15-20 seconds or in a toaster oven until warmed through. Interestingly, many people find that this loaf tastes even better the next day, as the flavors have time to meld!

Frequently Asked Questions

Can I make Lemon Poppy Seed Loaf With Citrus Icing ahead of time?

Yes — in fact, it tastes even better the next day! You can make the loaf a day in advance, allowing the flavors to develop. Just be sure to store it in an airtight container to maintain its moisture.

Can I substitute the poppy seeds?

Absolutely! If you don’t have poppy seeds on hand or prefer an alternative, you can use sesame seeds for a similar crunch or omit them entirely for a smooth loaf.

What can I use instead of buttermilk?

If you don’t have buttermilk, you can easily create a substitute by mixing ½ cup of milk (dairy or plant-based) with 1 tablespoon of vinegar or lemon juice. Let it sit for 5 minutes before using in the recipe.

How can I make this recipe gluten-free?

To make a gluten-free version of this Lemon Poppy Seed Loaf, substitute the all-purpose flour with a gluten-free all-purpose flour blend. Just ensure that the blend contains a binding agent like xanthan gum for the best results.

What is the best way to store leftover loaf?

Leftover Lemon Poppy Seed Loaf should be stored in an airtight container at room temperature for up to 3 days. For longer storage, wrap it tightly and freeze for up to 3 months. Thaw it before serving for the best texture.

Zesty Lemon Poppy Seed Delight

Final Thoughts

The Lemon Poppy Seed Loaf with Citrus Icing is truly a delightful treat that brings a burst of brightness to any occasion. The zesty lemon flavor combined with the subtle crunch of poppy seeds creates a satisfying balance, while the citrus icing adds a touch of sweetness that perfectly complements the loaf’s tanginess.

This is the kind of recipe I come back to again and again, especially when I want to brighten up a gloomy day or celebrate a small victory. The aroma that fills the kitchen as it bakes is absolutely heavenly! I encourage you to give this recipe a try; you might just find it becoming a beloved staple in your home. Don’t forget to share your results or even add your own unique twist—I can’t wait to see what you create!

Print
clock clock iconcutlery cutlery iconflag flag iconfolder folder iconinstagram instagram iconpinterest pinterest iconfacebook facebook iconprint print iconsquares squares iconheart heart iconheart solid heart solid icon

Lemon Poppy Seed Loaf


  • Author: Lily author
  • Total Time: 11 minute
  • Yield: 1 loaf 1x
Pin Recipe
Print Recipe

Description

This Lemon Poppy Seed Loaf is a delightful treat that combines zesty lemon flavor with crunchy poppy seeds. Topped with a citrus icing, it’s perfect for any occasion.


Ingredients

Scale
  • 1 ½ cups (190g) all-purpose flour
  • 1 teaspoon baking powder
  • ½ teaspoon baking soda
  • ½ teaspoon salt
  • 3 tablespoons poppy seeds
  • ½ cup (115g) unsalted butter, softened to room temperature
  • 1 cup (200g) granulated sugar
  • 2 large eggs
  • 1 teaspoon vanilla extract
  • 1 teaspoon lemon zest (from about 1 medium lemon)
  • ½ cup (120ml) buttermilk
  • 2 tablespoons fresh lemon juice
  • 1 cup (120g) powdered sugar
  • 2 tablespoons fresh lemon juice
  • 1 tablespoon orange juice
  • 1 teaspoon lemon zest (for garnish, optional)

Instructions

  1. Preheat your oven to 350°F (175°C). Grease a 9×5-inch loaf pan or line it with parchment paper for easy removal later.
  2. In a medium mixing bowl, whisk together 1 ½ cups of all-purpose flour, 1 teaspoon of baking powder, ½ teaspoon of baking soda, ½ teaspoon of salt, and 3 tablespoons of poppy seeds. This helps to evenly distribute the baking agents and ensures a uniform rise.
  3. In a large mixing bowl, cream together ½ cup of softened unsalted butter and 1 cup of granulated sugar using an electric mixer on medium speed for about 3-4 minutes, until the mixture is light and fluffy. Make sure to scrape down the sides of the bowl occasionally.
  4. Add 2 large eggs, 1 teaspoon of vanilla extract, and 1 teaspoon of lemon zest to the creamed butter and sugar, mixing until fully combined. You want a smooth consistency, so ensure there are no lumps of butter.
  5. In a small bowl, combine ½ cup of buttermilk and 2 tablespoons of fresh lemon juice. Alternately add the dry ingredients and buttermilk mixture to the butter mixture, starting and ending with the dry ingredients. Mix just until combined; do not overmix, as this can lead to a dense loaf.
  6. Pour the batter into the prepared loaf pan. Smooth the top with a spatula, ensuring it’s even. Bake in the preheated oven for 50-60 minutes, or until a toothpick inserted in the center comes out clean. The edges should be lightly golden brown, and the center should feel just set.
  7. Once baked, remove the loaf from the oven and allow it to cool in the pan for about 10 minutes. Then, transfer it to a wire rack to cool completely. Resist the urge to slice too soon, as it will be crumbly if it’s still warm.
  8. While the loaf is cooling, prepare the citrus icing. In a medium bowl, whisk together 1 cup of powdered sugar, 2 tablespoons of fresh lemon juice, and 1 tablespoon of orange juice until smooth. If the icing is too thick, you can add a little more juice to reach your desired consistency.
  9. Once the loaf is completely cool, drizzle the citrus icing over the top. If you like, sprinkle with an additional teaspoon of lemon zest for an extra pop of flavor and color.
  • Prep Time: 15 mins
  • Cook Time: 50-60 mins
  • Category: Dessert
  • Method: Baking
  • Cuisine: American

Nutrition

  • Serving Size: 1 slice
  • Calories: 200
  • Sugar: 15 g
  • Sodium: 150 mg
  • Fat: 8 g
  • Saturated Fat: 5 g
  • Unsaturated Fat: 3 g
  • Trans Fat: 0 g
  • Carbohydrates: 30 g
  • Fiber: 1 g
  • Protein: 3 g
  • Cholesterol: 40 mg

Keywords: Be careful not to overmix your batter; this is a common mistake that can lead to a dense loaf. Use room temperature ingredients for a smoother batter and even baking.

Did you make this recipe?

Share a photo and tag us — we can't wait to see what you've made!

  • Privacy Policy
  • Terms Of Service
  • Contact
  • About
  • GDPR

Copyright © 2025 Homesmad