• Skip to primary navigation
  • Skip to main content
  • Skip to primary sidebar
Homesmad

Homesmad

  • Home
  • Breakfast & Brunch
  • Appetizers & Snacks
  • Dinner
  • Dessert
  • About
  • Privacy Policy
  • Contact
Homesmad
  • Home
  • Breakfast & Brunch
  • Appetizers & Snacks
  • Dinner
  • Dessert
  • About
  • Privacy Policy
  • Contact

Potato Cheese Sticks: Crispy, Tasty Homemade Snack!

October 24, 2025 by Lily author

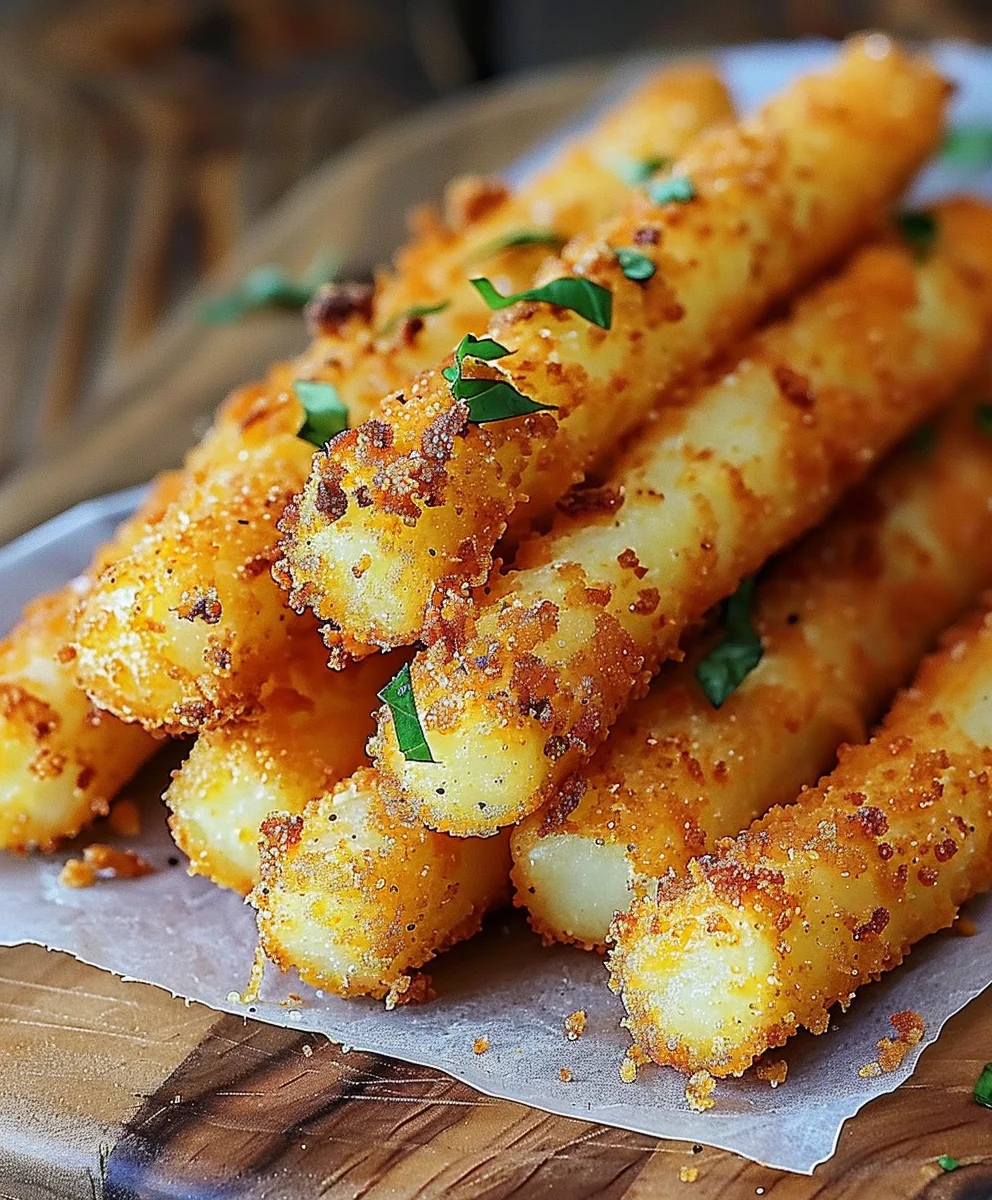
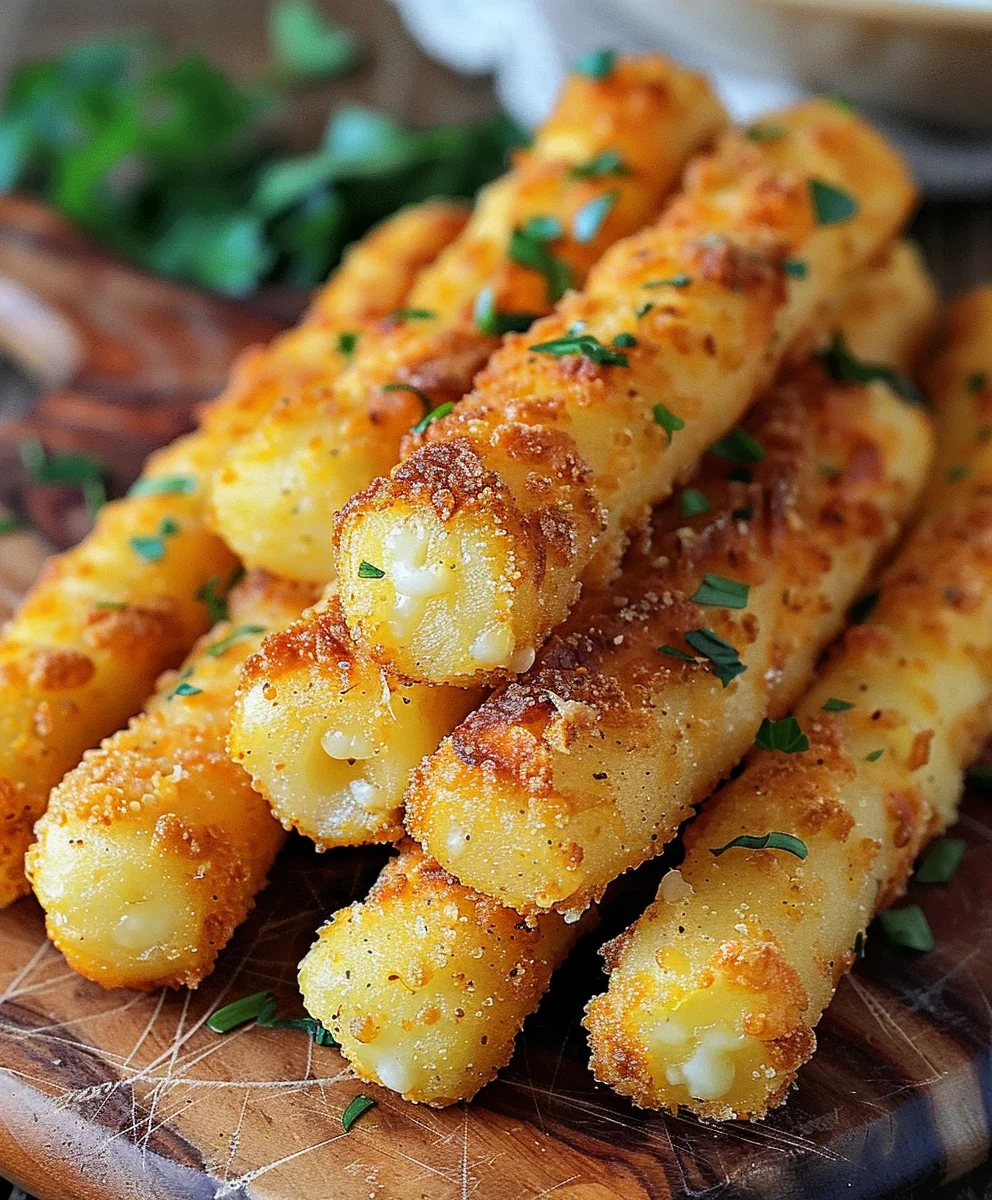
Potato Cheese Sticks Crispy And Tasty Homemade Snack – just the name itself evokes images of golden-brown perfection and a symphony of textures. Have you ever craved that ultimate comfort food, a snack that perfectly balances a delightful crunch with a warm, gooey, cheesy heart? I certainly have! This beloved combination of humble potatoes and irresistible cheese has charmed palates across cultures, evolving from simple, hearty fare into sophisticated, yet accessible, finger foods perfect for any occasion. While the exact origin of these specific sticks might be modern, the foundation of potato and cheese is a timeless pairing that transcends borders, celebrated for its versatility and comforting appeal.

People absolutely adore this dish, not just for its incredibly satisfying taste, but also for its remarkable texture. Imagine biting into a perfectly golden exterior, giving way to a soft, fluffy potato interior generously studded with melted cheese that stretches enticingly. It’s the kind of snack that disappears almost as quickly as it’s made, ideal for movie nights, game day gatherings, or simply when you desire a quick, delightful bite. Get ready to impress your family and friends as we guide you through crafting the ultimate Potato Cheese Sticks Crispy And Tasty Homemade Snack right in your own kitchen.

Potato Cheese Sticks: Crispy, Tasty Homemade Snack! this RECIPE

Ingredients:

  • For the Potato Base:
    • 3 large Russet Potatoes (about 2.5 – 3 pounds), peeled and cut into 1-inch chunks. I find Russets give the best starchy, fluffy base for our sticks.
    • 1 teaspoon Salt, plus more for seasoning the water.
    • ½ teaspoon Black Pepper, freshly ground.
    • 1 teaspoon Garlic Powder.
    • ½ teaspoon Onion Powder.
    • ½ teaspoon Paprika (smoked or sweet, your preference!).
    • ¼ teaspoon Dried Oregano or Italian Seasoning, for that extra layer of aroma.
  • For the Cheesy Heart:
    • 1 cup Shredded Mozzarella Cheese (low-moisture, part-skim works wonderfully for that classic melty pull).
    • ½ cup Shredded Sharp Cheddar Cheese (for an extra depth of flavor that complements the potato so well).
  • For the Binding and Coating:
    • ¼ cup Cornstarch (essential for binding our mixture and achieving that perfect internal texture).
    • ¼ cup All-Purpose Flour (helps absorb moisture and adds structure).
    • 2 large Eggs, whisked well with 1 tablespoon of water (this creates our vital “egg wash”).
    • 2 cups Panko Breadcrumbs (I highly recommend Panko for its superior crispiness – it’s a game-changer for these Potato Cheese Sticks Crispy And Tasty Homemade Snack).
  • For Frying:
    • 4-6 cups Vegetable Oil, Canola Oil, or Sunflower Oil (choose a neutral oil with a high smoke point, enough to submerge the sticks halfway or fully if deep-frying).

Preparation Phase 1: Prepping the Potatoes

The foundation of our incredibly delicious Potato Cheese Sticks Crispy And Tasty Homemade Snack lies in perfectly prepared potatoes. Trust me, getting this right makes all the difference in texture and flavor!

  1. Wash and Peel the Potatoes: First things first, give your potatoes a good scrub under cold running water to remove any dirt. Then, grab your peeler and remove the skin. Once peeled, cut the potatoes into roughly 1-inch chunks. This ensures they cook evenly and quickly.
  2. Boil the Potatoes: Place the potato chunks into a large pot. Fill the pot with cold water until the potatoes are completely submerged by at least an inch. Add about 1 tablespoon of salt to the water – this seasons the potatoes from the inside out and helps prevent them from tasting bland. Bring the water to a rolling boil over high heat, then reduce the heat to medium and let them simmer gently until they are fork-tender. This usually takes anywhere from 15 to 20 minutes, depending on the size of your chunks. You should be able to easily pierce them with a fork without resistance, but don’t let them get mushy. We want them cooked through, not waterlogged.
  3. Drain and Dry Thoroughly: This is a critical step for achieving crispy potato cheese sticks! Once tender, immediately drain the potatoes in a colander. Allow them to sit in the colander for a few minutes to steam dry. For an even better result, you can transfer the hot potatoes back into the empty pot, place it over low heat for about 2-3 minutes, gently shaking the pot occasionally. This helps evaporate any excess moisture, which is key to preventing soggy sticks and ensuring they crisp up beautifully during frying. Excess moisture is the enemy of crispiness!
  4. Mash the Potatoes: Once thoroughly drained and dried, transfer the potatoes to a large mixing bowl. Using a potato masher, mash them until they are completely smooth with no lumps. We’re aiming for a consistency similar to firm mashed potatoes, but without any added milk or butter. Just pure, unadulterated potato goodness. Let the mashed potatoes cool down to room temperature completely before moving on. This might take 30-60 minutes. You can even spread them out on a baking sheet to speed up the cooling process. Working with warm potatoes will make your mixture too sticky and difficult to form, and it can also start to melt the cheese prematurely. Patience here is a virtue!

Preparation Phase 2: Crafting the Cheese Stick Mixture

Now that our potatoes are perfectly prepped and cooled, it’s time to infuse them with flavor and prepare them for their cheesy transformation into the ultimate Potato Cheese Sticks Crispy And Tasty Homemade Snack.

  1. Season the Mashed Potatoes: To the cooled mashed potatoes in your large mixing bowl, add 1 teaspoon of salt, ½ teaspoon of black pepper, 1 teaspoon of garlic powder, ½ teaspoon of onion powder, ½ teaspoon of paprika, and ¼ teaspoon of dried oregano or Italian seasoning. These spices will provide a wonderful aromatic base for our sticks. Gently fold everything together until the seasonings are evenly distributed throughout the potatoes. Make sure not to overmix, as this can make the potatoes gummy.
  2. Incorporate the Cheeses: Now for the star of the show – the cheese! Add the 1 cup of shredded mozzarella cheese and ½ cup of shredded sharp cheddar cheese to the potato mixture. The mozzarella will give us that fantastic, satisfying cheese pull, while the sharp cheddar adds a lovely tangy depth of flavor that really elevates the snack. Mix gently until the cheese is just incorporated. Again, avoid overmixing to keep the texture light and fluffy.
  3. Add the Binders: Finally, sprinkle in ¼ cup of cornstarch and ¼ cup of all-purpose flour over the potato and cheese mixture. These binders are crucial for two reasons: they help absorb any remaining moisture and provide the necessary structure to hold our sticks together beautifully during frying. Gently fold them into the mixture until just combined. The mixture should be firm enough to handle and shape without being overly sticky. If it feels a bit too wet, you can add another tablespoon or two of flour or cornstarch until it reaches a manageable consistency. It should feel like a soft dough.

Preparation Phase 3: Forming the Sticks

This is where our flavorful potato and cheese mixture begins to take its iconic stick shape, getting ready for its crispy coating. This step is key to creating uniform and appealing Potato Cheese Sticks Crispy And Tasty Homemade Snack.

  1. Set Up Your Coating Stations: Before you start shaping, prepare your breading station. You’ll need three shallow dishes or plates. In the first, pour the ¼ cup of cornstarch. In the second, whisk the 2 large eggs with 1 tablespoon of water to create your egg wash. In the third, pour the 2 cups of Panko breadcrumbs. Arrange them in an assembly line: cornstarch, egg wash, breadcrumbs. This makes the coating process much more efficient and less messy.
  2. Shape the Potato Cheese Sticks: Lightly flour your hands or moisten them with a little water to prevent the mixture from sticking. Take a portion of the potato mixture, roughly the size of a golf ball (about 1.5-2 tablespoons). Gently roll it between your palms to form a log shape, about 3-4 inches long and ½-¾ inch thick. Aim for relatively consistent sizes so they cook evenly. Place the formed sticks onto a parchment-lined baking sheet as you go.
  3. Coat the Sticks: Now for the crispy exterior!
    • First, gently roll each potato stick in the cornstarch, ensuring it’s lightly coated on all sides. This initial layer helps the egg wash adhere better.
    • Next, dip the cornstarch-coated stick into the egg wash, allowing any excess to drip off. Make sure the entire stick is covered.
    • Finally, transfer the egg-washed stick to the Panko breadcrumbs. Roll and gently press the breadcrumbs onto the stick, ensuring it’s completely and generously coated. The Panko is what gives these Potato Cheese Sticks Crispy And Tasty Homemade Snack their signature crunch!

    Return the fully coated stick to the parchment-lined baking sheet. Repeat this process for all the remaining potato mixture.

  4. Chill for Firmness (Highly Recommended!): Once all your potato cheese sticks are formed and coated, place the baking sheet into the refrigerator for at least 30 minutes, or even better, in the freezer for 20 minutes. This chilling step is absolutely crucial! It allows the sticks to firm up, preventing them from falling apart in the hot oil and ensuring the cheese doesn’t melt out too quickly. A firm stick will hold its shape beautifully and achieve that perfect golden-brown crispness. You can even freeze them for longer (up to 2-3 months) in an airtight container for future snacking – just flash freeze them on the baking sheet until solid, then transfer to a freezer bag.

Cooking Phase: Frying to Perfection

The moment of truth! Frying our chilled sticks to achieve that irresistible golden, crispy exterior and perfectly melted, gooey interior is the final step in creating our ultimate Potato Cheese Sticks Crispy And Tasty Homemade Snack.

  1. Heat the Frying Oil: In a large, heavy-bottomed pot or a deep skillet, pour enough vegetable, canola, or sunflower oil to come up about 2-3 inches. You want enough oil so the sticks can be at least half-submerged, ideally fully submerged if you have a deep fryer. Place the pot over medium-high heat. The ideal frying temperature is between 350°F and 375°F (175°C – 190°C). If you have a kitchen thermometer, use it! It’s the best way to ensure consistent results. If you don’t have one, you can test the oil by dropping a small pinch of Panko breadcrumbs into it; if they immediately sizzle and turn golden within 10-15 seconds, your oil is ready. Be patient and allow the oil to heat up properly – oil that isn’t hot enough will result in greasy, soggy sticks, and oil that is too hot will burn the outside before the inside is properly heated and the cheese is melted.
  2. Fry the Potato Cheese Sticks: Carefully, and in batches, lower a few chilled potato cheese sticks into the hot oil. Do not overcrowd the pot, as this will lower the oil temperature and lead to uneven cooking and greasiness. Give each stick some space. Fry for about 3-5 minutes, turning occasionally with tongs, until they are beautifully golden brown and crispy on all sides. You’ll notice the cheese starting to bubble inside and the exterior will be wonderfully crisp. The goal is to get that perfect golden crust while the cheese inside gets delightfully melty.
  3. Drain Excess Oil: Once the sticks are golden brown and cooked to perfection, carefully remove them from the oil using a slotted spoon or tongs. Transfer them immediately to a plate lined with paper towels. The paper towels will absorb any excess oil, helping to keep them wonderfully crispy. You might even hear the satisfying sizzle and crunch as they hit the paper!
  4. Repeat and Maintain Oil Temperature: Continue frying the remaining batches, making sure the oil returns to the ideal temperature between each batch. This might mean adjusting your heat slightly. Always work in small batches for the best results.

Serving Suggestions: Enjoying Your Crispy Potato Cheese Sticks

You’ve done it! You’ve created a batch of the most incredible Potato Cheese Sticks Crispy And Tasty Homemade Snack. Now for the best part – enjoying them!

  1. Serve Immediately: These potato cheese sticks are absolutely best served hot and fresh, straight out of the fryer. That’s when their exterior is at its crispiest, and the cheese inside is at its meltiest, creating that glorious cheese pull that everyone loves.
  2. Dipping Sauces: While they are utterly delicious on their own, serving them with your favorite dipping sauces takes them to the next level. Classic ketchup is always a hit, but don’t stop there! Try a warm marinara sauce, a tangy sriracha mayo, a cool ranch dressing, or even a zesty honey mustard. Get creative with your dipping options to enhance the experience.
  3. Garnish and Enjoy: For a touch of freshness and color, you can sprinkle a little chopped fresh parsley or chives over the hot sticks just before serving. Gather your family and friends, because these homemade potato cheese sticks are perfect for sharing as an appetizer, a party snack, or a fun side dish. The combination of crispy exterior, fluffy seasoned potato, and gooey melted cheese is truly irresistible.

Leftovers and Reheating: If by some miracle you have any leftovers (it’s rare!), store them in an airtight container in the refrigerator for up to 2-3 days. To reheat and bring back some of their crispiness, I recommend popping them in an air fryer at 350°F (175°C) for 5-7 minutes, or in an oven preheated to 375°F (190°C) for 10-15 minutes, until heated through and re-crisped. Microwaving them will make them soft, so avoid that if you want to retain their texture. Enjoy your magnificent, homemade Potato Cheese Sticks Crispy And Tasty Homemade Snack!

Potato Cheese Sticks: Crispy, Tasty Homemade Snack!

Conclusion:

Well, my friends, we’ve reached the delicious end of our culinary journey together, and I truly hope you’re as excited as I am about what we’ve just explored. This isn’t just another recipe; it’s an invitation to elevate your snack game, to bring a burst of joy to your taste buds, and to create something truly special in your own kitchen. After trying this recipe, I’m confident you’ll agree that it’s an absolute game-changer. What makes these sticks so phenomenal isn’t just their incredible flavor, but also the delightful contrast in textures that makes every single bite an experience. From the moment you take that first bite, you’ll be greeted by an audible crunch that gives way to a gloriously soft, cheesy interior. The golden-brown exterior, achieved with minimal fuss, perfectly encases a warm, gooey, and utterly satisfying filling.

This recipe promises a snack that’s not only easy to prepare but also guarantees a memorable outcome every single time. It’s perfect for those spontaneous cravings, for last-minute gatherings with friends, or simply as a well-deserved treat after a long day. Imagine the sheer delight on everyone’s faces when you present a platter of these golden-brown beauties. They are universally loved, a true crowd-pleaser that transcends age groups and palates. Trust me when I say, once you’ve mastered this recipe, you’ll find yourself returning to it again and again. It embodies everything you could want in a comfort food – warm, satisfying, incredibly flavorful, and utterly delicious. It’s the kind of snack that sparks conversations and creates happy memories around the table, proving that simple ingredients can lead to extraordinary results.

Serving Suggestions to Elevate Your Snack:

Now, let’s talk about how to truly make these your own, or how to serve them for maximum impact. While they are undeniably addictive straight out of the pan, serving them with a dipping sauce takes them to another level of indulgence. Think classic ketchup for a simple, tangy kick, or perhaps a vibrant marinara sauce for an Italian-inspired twist that complements the cheesy goodness beautifully. For those who enjoy a little heat, a creamy sriracha mayo or a zesty green chutney would be phenomenal companions, adding a layer of exciting flavor. And if you’re aiming for pure decadence, a dollop of sour cream mixed with fresh chives offers a refreshing and luxurious counterpoint to the rich, cheesy delight. Don’t be afraid to experiment with different dips; part of the fun is discovering your favorite pairing and creating a personalized snack experience for yourself and your loved ones.

Creative Variations to Make Them Your Own:

Beyond the serving suggestions, these versatile delights offer a playground for culinary creativity when it comes to variations. Want to add an herbaceous note? Finely chopped fresh parsley, chives, or even a hint of rosemary can be folded into the potato mixture before shaping, imparting a wonderful aroma and taste. For a bolder flavor profile, consider incorporating a pinch of smoked paprika, a dash of garlic powder, a hint of onion powder, or even some chili flakes for a gentle warmth that builds with each bite. If you’re feeling adventurous, finely minced jalapeños or bell peppers can add a lovely crunch and a kick of fresh flavor, transforming the snack entirely. The cheese choice itself is another area for personalization; while mozzarella offers that classic stringy melt, a blend of sharp cheddar and creamy Monterey Jack can provide a richer, more complex cheesy experience. Or perhaps a little pepper jack for a spicy surprise that will wake up your taste buds! You can also play with the shapes – instead of sticks, try forming them into small nuggets, mini patties, or even cheesy balls for a different visual appeal and bite, perfect for party platters. And for those looking for a slightly healthier alternative without sacrificing flavor, these can be air-fried or baked! If you choose to air fry, a light spray of oil before cooking will help achieve that beautiful golden crisp, though you might need to adjust cooking times slightly. Baking will also yield a delicious result, perhaps a little less intensely crispy but equally flavorful and satisfying. Remember, the core appeal of these Potato Cheese Sticks Crispy And Tasty Homemade Snack remains consistent, no matter how you tweak them to your heart’s content.

Your Turn: Try, Enjoy, and Share!

So, what are you waiting for? Don’t let this incredible recipe just sit on your screen. Clear your kitchen counter, gather your ingredients, and set aside some time this week to bring these culinary masterpieces to life. I promise you, the effort is minimal, and the reward is immense. There’s something truly gratifying about creating such a delightful snack from scratch, knowing exactly what goes into it, and then watching it disappear as everyone clamors for more. Once you’ve made them, I would absolutely love to hear about your experience! Did you stick to the original recipe, or did you venture into exciting new variations? What dips did you pair them with? Please, share your pictures and your stories in the comments below, or tag me on your favorite social media platforms. Your feedback and creative twists inspire me and others in our cooking community. Let’s spread the joy of homemade goodness together and make every snack time an occasion to remember!


Potato Cheese Sticks: Crispy, Tasty Homemade Snack!

Potato Cheese Sticks: Crispy, Tasty Homemade Snack!

Indulge in crispy, tasty homemade potato cheese sticks! This beloved snack perfectly balances a delightful crunch with a warm, gooey, cheesy heart. Ideal for movie nights, gatherings, or a quick, delightful bite, these sticks will impress with their golden exterior, fluffy potato interior, and enticingly melted cheese.

Prep Time
2 Hours

Cook Time
30 Minutes

Total Time
30 Minutes

Servings
Yields 25-30 sticks

Ingredients

  • 3 large Russet Potatoes (2.5-3 lbs), peeled, 1-inch chunks
  • 1 tsp Salt (+ extra for water)
  • ½ tsp Black Pepper
  • 1 tsp Garlic Powder
  • ½ tsp Onion Powder
  • ½ tsp Paprika (smoked or sweet)
  • ¼ tsp Dried Oregano or Italian Seasoning
  • 1 cup Shredded Mozzarella Cheese
  • ½ cup Shredded Sharp Cheddar Cheese
  • ¼ cup Cornstarch (for mixture)
  • ¼ cup All-Purpose Flour (for mixture)
  • 2 large Eggs, whisked with 1 tbsp water
  • 2 cups Panko Breadcrumbs
  • ¼ cup Cornstarch (for coating)
  • 4-6 cups Neutral Frying Oil (Vegetable, Canola, or Sunflower)

Instructions

  1. Step 1
    Peel and cut potatoes into 1-inch chunks. Boil in salted water for 15-20 mins until fork-tender. Drain thoroughly, then mash until smooth. Let cool completely to room temperature (30-60 mins).
  2. Step 2
    To cooled mashed potatoes, add 1 tsp salt, ½ tsp black pepper, 1 tsp garlic powder, ½ tsp onion powder, ½ tsp paprika, and ¼ tsp oregano. Gently fold in 1 cup mozzarella and ½ cup sharp cheddar. Sprinkle in ¼ cup cornstarch and ¼ cup flour; mix until just combined and a soft dough forms.
  3. Step 3
    Set up a breading station: one shallow dish with ¼ cup cornstarch, one with whisked eggs, and one with 2 cups Panko. Lightly flour hands. Take 1.5-2 tbsp potato mixture, roll into 3-4 inch logs. Roll each log in cornstarch, then dip in egg wash, then coat generously in Panko breadcrumbs.
  4. Step 4
    Place coated sticks on a parchment-lined baking sheet. Chill in the refrigerator for at least 30 mins (or freezer for 20 mins) to firm up before frying.
  5. Step 5
    Heat 2-3 inches of frying oil in a heavy pot to 350-375°F (175-190°C). Fry chilled sticks in batches for 3-5 minutes, turning occasionally, until golden brown and crispy. Do not overcrowd. Drain on paper towels.
  6. Step 6
    Serve immediately while hot and crispy. Enjoy plain or with your favorite dipping sauces like ketchup, marinara, or sriracha mayo. Garnish with fresh parsley or chives if desired.
  7. Step 7
    Store leftovers in an airtight container for 2-3 days. Reheat in an air fryer at 350°F (175°C) for 5-7 mins, or an oven at 375°F (190°C) for 10-15 mins, to restore crispiness. Avoid microwaving.

Important Information

Nutrition Facts (Per Serving)

It is important to consider this information as approximate and not to use it as definitive health advice.

Allergy Information

Please check ingredients for potential allergens and consult a health professional if in doubt.

« Previous Post
Best Cranberry Apple Twice Baked Sweet Potatoes Recipe!
Next Post »
Easy No Bake Moose Farts: Decadent Chocolate Coconut Bites

If you enjoyed this…

Halloween Punch Recipe: Spooky & Delicious Drinks for Your Party

Crispy Roasted Potatoes with Feta & Garlic Bliss Recipe

Homemade Jalapeno Salt: Spicy & Zesty Flavor Infusion

Primary Sidebar

Browse by Diet

BreakfastDinnerLunchDessertAppetizer

Sweet Peach Yogurt Parfait Delight

One of my fondest memories is from a lazy summer afternoon spent at my grandmother’s house. The sun filtered through the kitchen window, casting a warm glow over the table where she would create her culinary magic. It was during one of those blissful moments that I first tasted her Peach Yogurt Parfait with Honey and Granola. The sweet aroma of ripe peaches mingling with creamy yogurt and the crunch of granola was nothing short of heavenly. It felt like summer captured in a bowl, and I still remember the joy of diving in with a spoon, each layer revealing a new burst of flavor.

When I think about that parfait, I can almost hear the gentle hum of the bees outside, reminding me of the floral notes that honey brings to every bite. The vibrant yellows and soft oranges of the peaches contrast beautifully with the creamy white yogurt and the golden crunch of granola. It’s a dish that not only looks delightful but also tastes like a celebration of fresh, wholesome ingredients.

What makes my version of this Peach Yogurt Parfait special is the careful balance of flavors and textures. I use ripe, juicy peaches, drizzled with locally sourced honey, and a homemade granola that’s bursting with nuts and seeds for an extra crunch. It’s a simple dish, but every layer is crafted with love and attention.

Let me show you exactly how to make this delightful parfait, so you can bring a bit of that summer magic into your kitchen!

Sweet Peach Yogurt Parfait Delight

Why You’ll Love This Recipe

  • Delightfully creamy texture from the Greek yogurt, paired with the juicy sweetness of fresh peaches.
  • Ready in under 20 minutes, making it a quick and satisfying breakfast or snack option.
  • Budget-friendly, using common ingredients that you may already have in your pantry.
  • Customizable with your favorite granola and nuts, allowing you to tailor each parfait to your taste.
  • Perfectly balanced flavors with the bright acidity of lemon juice and the sweetness of honey enhancing the peaches.

Ingredients

  • For the Parfait:
  • 2 cups plain Greek yogurt (or vanilla yogurt for a sweeter option)
  • 2 large ripe peaches, diced (about 2 cups)
  • 1 tablespoon fresh lemon juice (to prevent browning of peaches)
  • 2 tablespoons honey (plus more for drizzling)
  • 1 teaspoon vanilla extract (optional for extra flavor)
  • For the Granola:
  • 1 cup granola (store-bought or homemade; see notes for a simple granola recipe)
  • 1/4 cup sliced almonds (optional for added crunch)
  • 1/4 cup shredded coconut (optional for added flavor)

Let’s dive into some key ingredients that make this Peach Yogurt Parfait so delightful! First, the Greek yogurt is not only creamy but also packed with protein, making it a satisfying option for breakfast or a snack. If you’re looking for a sweeter option, you can easily substitute it with vanilla yogurt, though it may alter the overall flavor balance. Next, the ripe peaches are the star of the show; their natural sweetness shines through, so I recommend choosing peaches that yield slightly to pressure, indicating they’re perfectly ripe. If peaches aren’t in season, feel free to use nectarines or even frozen peaches—just thaw them before use. Finally, honey adds a lovely floral sweetness that ties everything together. If you prefer, maple syrup can serve as a delicious substitute.

Step-by-Step Instructions

  1. Start by preparing the peaches. Wash them thoroughly, then slice and dice them into bite-sized pieces. In a medium bowl, toss the diced peaches with 1 tablespoon of fresh lemon juice to prevent browning. Set aside for about 5 minutes while the lemon juice works its magic.
  2. In a separate bowl, combine the Greek yogurt, 2 tablespoons of honey, and 1 teaspoon of vanilla extract if using. Stir the mixture until smooth and thoroughly blended. This should take about a minute. Avoid overmixing to maintain the creaminess of the yogurt.
  3. Now it’s time to layer your parfait. Grab a clear glass or bowl to showcase your beautiful creation. Start with a generous spoonful of the yogurt mixture at the bottom—about 1/4 cup will do. Use a spoon to spread it evenly.
  4. Add a layer of the diced peaches over the yogurt, ensuring they cover the yogurt completely. You might want to use about half of what you have prepared—roughly 1 cup. This layer should be visually appealing, so arrange the peaches neatly.
  5. Sprinkle 1/4 cup of granola over the peaches. This adds a delightful crunch. Make sure to distribute it evenly to ensure every bite has that satisfying texture. Avoid packing it down too tightly, as you want it to maintain its crunch.
  6. Repeat the layers: spoon in another 1/4 cup of yogurt, followed by another cup of peaches, and another sprinkle of granola. You should have at least two layers, but feel free to add more depending on your glass size.
  7. Finish off your parfait with a drizzle of honey on top for added sweetness and a touch of elegance. If you’re using sliced almonds or shredded coconut, sprinkle them on top now. It adds a lovely visual contrast and extra flavor.
  8. Serve immediately or refrigerate for up to 30 minutes before serving to allow the flavors to meld together. However, I recommend enjoying it fresh to maintain the granola’s crunch.

Pro Tips for the Best Peach Yogurt Parfait With Honey And Granola

  • Make sure to choose ripe peaches for the best flavor and texture. A common mistake is using unripe fruit, which can lead to a less enjoyable parfait. Look for peaches that are fragrant and slightly soft to the touch.
  • Use a clear glass to assemble your parfait; this not only makes for a beautiful presentation but also allows you to see the colorful layers, which adds to the enjoyment of eating it.
  • For an even creamier texture, consider whipping the Greek yogurt with a hand mixer for a couple of minutes before layering. This small adjustment makes a huge difference in mouthfeel.
  • Be mindful of the granola-to-yogurt ratio. Too much granola can overwhelm the parfait, while too little can make it feel too creamy. Aim for about 1/4 cup of granola per layer for the perfect balance.
  • If you’re making this for a gathering, consider preparing the yogurt and peaches ahead of time and layering them just before serving. This ensures the granola stays crunchy!

Variations & Serving Ideas

There are so many ways to get creative with your Peach Yogurt Parfait! For a tropical twist, swap out the peaches for mangoes or pineapples and top with coconut flakes. If you prefer a berry flavor, mix in some blueberries or strawberries with the peaches for added color and taste. For a nutty version, incorporate chopped walnuts or pecans instead of almonds.

As for serving ideas, this parfait pairs beautifully with a side of scrambled eggs for a hearty breakfast or fresh fruit salad for a light lunch. You might also enjoy it alongside whole grain toast with almond butter for an energizing snack. The contrast of flavors and textures will elevate your meal experience!

Storage, Make-Ahead & Reheating

The Peach Yogurt Parfait is best enjoyed fresh, but you can prepare some components ahead of time. Store the layered parfait in an airtight container in the refrigerator for up to 24 hours. However, be cautious; the granola may lose its crunch if stored too long. You can freeze the yogurt and peach mixture for up to 2 months; just remember to thaw it in the refrigerator overnight before serving.

If you plan to enjoy this dish the next day, it can taste even better as the flavors meld together. Just remember to add the granola right before serving to keep its delightful crunch!

Frequently Asked Questions

Can I make Peach Yogurt Parfait With Honey And Granola ahead of time?

Yes — in fact, it tastes even better the next day as the flavors meld. However, I recommend waiting to add the granola until just before serving to maintain its crunch.

What can I substitute for Greek yogurt?

If you prefer a lighter option, you can substitute Greek yogurt with regular yogurt or a dairy-free alternative like coconut yogurt. Just remember that this may alter the creaminess and flavor profile slightly.

Can I use frozen peaches for this parfait?

Absolutely! Just make sure to thaw the frozen peaches before using them. They will still add great flavor, though the texture may be slightly softer than fresh peaches.

How do I make the parfait vegan?

To make a vegan version, substitute the Greek yogurt with a plant-based yogurt alternative, and replace honey with maple syrup or agave nectar. This keeps the parfait sweet while adhering to a vegan diet.

What other fruits can I use in this recipe?

You can mix and match fruits based on your preference. Try using strawberries, blueberries, raspberries, or even bananas. Just make sure to adjust the lemon juice as needed to prevent browning.

Sweet Peach Yogurt Parfait Delight

Final Thoughts

The Peach Yogurt Parfait with Honey and Granola is a delightful blend of creamy yogurt, sweet peaches, and crunchy granola that creates a satisfying and nourishing treat. Each layer bursts with flavor, making it a perfect choice for breakfast or a light dessert.

This is the kind of recipe I come back to again and again, especially when I want something refreshing and wholesome to start my day. The harmony of sweet and tart flavors, combined with the delightful crunch, never fails to lift my spirits!

I encourage you to give this parfait a try and indulge in its comforting goodness. Feel free to share your results or even add your own twist—perhaps a sprinkle of cinnamon or a handful of nuts. Enjoy creating your perfect parfait!

Print
clock clock iconcutlery cutlery iconflag flag iconfolder folder iconinstagram instagram iconpinterest pinterest iconfacebook facebook iconprint print iconsquares squares iconheart heart iconheart solid heart solid icon

Peach Yogurt Parfait


  • Author: Lily author
  • Total Time: 15 minutes
  • Yield: 4 servings 1x
Pin Recipe
Print Recipe

Description

This Peach Yogurt Parfait combines creamy Greek yogurt, juicy peaches, and crunchy granola for a delightful treat. It’s a perfect breakfast or snack that captures the essence of summer in every bite.


Ingredients

Scale
  • For the Parfait:
  • 2 cups plain Greek yogurt (or vanilla yogurt for a sweeter option)
  • 2 large ripe peaches, diced (about 2 cups)
  • 1 tablespoon fresh lemon juice (to prevent browning of peaches)
  • 2 tablespoons honey (plus more for drizzling)
  • 1 teaspoon vanilla extract (optional for extra flavor)
  • For the Granola:
  • 1 cup granola (store-bought or homemade; see notes for a simple granola recipe)
  • 1/4 cup sliced almonds (optional for added crunch)
  • 1/4 cup shredded coconut (optional for added flavor)

Instructions

  1. Start by preparing the peaches. Wash them thoroughly, then slice and dice them into bite-sized pieces. In a medium bowl, toss the diced peaches with 1 tablespoon of fresh lemon juice to prevent browning. Set aside for about 5 minutes while the lemon juice works its magic.
  2. In a separate bowl, combine the Greek yogurt, 2 tablespoons of honey, and 1 teaspoon of vanilla extract if using. Stir the mixture until smooth and thoroughly blended. This should take about a minute. Avoid overmixing to maintain the creaminess of the yogurt.
  3. Now it’s time to layer your parfait. Grab a clear glass or bowl to showcase your beautiful creation. Start with a generous spoonful of the yogurt mixture at the bottom—about 1/4 cup will do. Use a spoon to spread it evenly.
  4. Add a layer of the diced peaches over the yogurt, ensuring they cover the yogurt completely. You might want to use about half of what you have prepared—roughly 1 cup. This layer should be visually appealing, so arrange the peaches neatly.
  5. Sprinkle 1/4 cup of granola over the peaches. This adds a delightful crunch. Make sure to distribute it evenly to ensure every bite has that satisfying texture. Avoid packing it down too tightly, as you want it to maintain its crunch.
  6. Repeat the layers: spoon in another 1/4 cup of yogurt, followed by another cup of peaches, and another sprinkle of granola. You should have at least two layers, but feel free to add more depending on your glass size.
  7. Finish off your parfait with a drizzle of honey on top for added sweetness and a touch of elegance. If you’re using sliced almonds or shredded coconut, sprinkle them on top now. It adds a lovely visual contrast and extra flavor.
  8. Serve immediately or refrigerate for up to 30 minutes before serving to allow the flavors to meld together. However, I recommend enjoying it fresh to maintain the granola’s crunch.
  • Prep Time: 15 mins
  • Cook Time: 0 mins
  • Category: Breakfast
  • Method: No-cook
  • Cuisine: American

Nutrition

  • Serving Size: 1 parfait
  • Calories: 250
  • Sugar: 20 g
  • Sodium: 50 mg
  • Fat: 5 g
  • Saturated Fat: 2 g
  • Unsaturated Fat: 3 g
  • Trans Fat: 0 g
  • Carbohydrates: 40 g
  • Fiber: 3 g
  • Protein: 10 g
  • Cholesterol: 10 mg

Keywords: Choose ripe peaches for the best flavor and texture. Use a clear glass for a beautiful presentation. For creaminess, consider whipping the yogurt before layering. Be mindful of the granola-to-yogurt ratio. Prepare yogurt and peaches ahead of time for gatherings, layering just before serving.

Did you make this recipe?

Share a photo and tag us — we can't wait to see what you've made!

Sun-Kissed Frozen Orange Cream Slush

As a child, summer days felt like they lasted forever. I remember the sticky heat wrapping around me as I played outside, my laughter mingling with the sounds of the neighborhood. But nothing could cool me down quite like the moment I’d spot my grandmother, laboring over her blender, whipping up her famous Frozen Orange Creamsicle Slush. That vibrant orange treat, with its frosty texture and sweet citrus aroma, was like a burst of sunshine in a cup. Just one sip, and I could feel the coolness wash over me, sparking pure joy.

This Frozen Orange Creamsicle Slush has a way of making you feel like a kid again. Its creamy, dreamy consistency is a delightful balance of bright orange and soft vanilla, inviting you to dive right in. The refreshing tang of orange dances on your tongue, while the smooth creaminess envelops you in a comforting embrace. It’s a nostalgic treat that’s perfect for hot summer afternoons or anytime you need a little pick-me-up.

What makes my version of this slush stand out is the addition of a hint of vanilla bean, which elevates the flavor and adds an extra layer of richness. Plus, it’s super easy to whip up with just a few simple ingredients that you probably already have on hand! So, if you’re ready to relive those sun-soaked memories, let me show you exactly how to make it.

Sun-Kissed Frozen Orange Cream Slush

Why You’ll Love This Recipe

  • Each slush is a perfect blend of creamy vanilla and zesty orange, creating a nostalgic flavor reminiscent of summer days.
  • This refreshing treat is ready in under 15 minutes, making it an ideal quick dessert for unexpected guests or hot afternoons.
  • With just 8 simple ingredients, it’s budget-friendly, ensuring you don’t have to break the bank to enjoy a delicious slush.
  • The slush has a perfectly smooth texture, thanks to the combination of ice and ice cream, providing a delightful contrast to the bright citrus flavors.
  • It’s highly customizable; you can easily adjust the sweetness and add fresh herbs for a unique twist that suits your taste.

Ingredients

  • 2 cups orange juice (freshly squeezed or store-bought)
  • 1 cup vanilla ice cream
  • 1 cup crushed ice
  • 1/2 cup milk (whole or 2%)
  • 1/4 cup granulated sugar (adjust based on sweetness preference)
  • 1 teaspoon vanilla extract
  • Zest of 1 orange (for added flavor)
  • Fresh orange slices and mint leaves (for garnish)

The star of this Frozen Orange Creamsicle Slush is the orange juice, which provides the vibrant, citrusy base. Freshly squeezed juice will yield the brightest flavor, but store-bought options can be just as convenient. If you’re opting for store-bought, choose 100% pure juice with no added sugars for the best results. Another essential ingredient is the vanilla ice cream; it adds creaminess and sweetness. You can substitute it with dairy-free ice cream if you’re looking for a vegan option. Whole or 2% milk complements the ice cream, creating a smooth blend. If you want a lower-calorie version, almond or oat milk can be good alternatives.

Lastly, the granulated sugar can be adjusted based on your sweetness preference. If you prefer a more natural sweetener, consider using honey or agave syrup. The orange zest enhances the flavor profile, providing an aromatic pop that brings the whole slush together. Don’t skip it! It adds an extra layer of brightness that makes this slush truly special.

Step-by-Step Instructions

  1. Start by preparing your ingredients. Gather 2 cups of orange juice, 1 cup of vanilla ice cream, and 1 cup of crushed ice. Make sure the ice is finely crushed, as larger chunks can make blending difficult.
  2. In a blender, combine the orange juice, vanilla ice cream, crushed ice, and 1/2 cup of milk. Add 1/4 cup of granulated sugar and 1 teaspoon of vanilla extract. If you like a sweeter slush, consider adding a bit more sugar at this stage.
  3. Add the zest of 1 orange to the blender. This step is crucial for enhancing the citrus flavor of your slush. Make sure not to include the bitter white pith—only the flavorful zest.
  4. Blend the mixture on medium-high speed for about 30-45 seconds. Stop once the ingredients are fully combined and the slush has a smooth, even consistency. If you notice large chunks of ice, blend for an additional 10-15 seconds. Avoid over-blending, as this can make the slush too liquidy.
  5. Once blended, taste the slush. If it needs more sweetness, add a little more sugar and blend for a few more seconds. If it’s too thick, you can add a splash of milk to reach your desired consistency.
  6. Pour the slush into glasses. This recipe typically serves 4, but you can easily double it for larger gatherings. Use a spoon to help guide the slush into the glasses if needed.
  7. Garnish each serving with fresh orange slices and mint leaves. The mint not only adds a pop of color but also a refreshing aroma that complements the citrus flavors beautifully.
  8. Serve immediately and enjoy! If you’ve made extra, you can refrigerate it for a short time, but it’s best enjoyed fresh.

Pro Tips for the Best Frozen Orange Creamsicle Slush

  • Don’t skip the orange zest! It’s a game-changer for flavor. Always zest before juicing to make it easier.
  • Use a high-powered blender for the best texture. A standard blender may struggle with ice, leading to uneven consistency. If you have a food processor, that can work too, but ensure the ice is finely crushed.
  • Adjust the ice-to-liquid ratio carefully. If your slush is too thick, it won’t blend well. Start with less ice and add more until you reach your preferred texture.
  • Be cautious with the sugar! Always start with the lower amount, as you can easily add more, but it’s hard to fix an overly sweet slush.
  • For a fun twist, consider adding a splash of coconut milk or a handful of fresh fruit like strawberries or pineapple. This not only enhances the flavor but also adds a beautiful color contrast.

Variations & Serving Ideas

There are countless ways to put a spin on your Frozen Orange Creamsicle Slush. Consider making a tropical version by adding in some pineapple juice or coconut milk for a delightful tropical twist. If you’re feeling adventurous, try incorporating a handful of frozen mango or peach slices for added sweetness. For a lighter version, swap out the vanilla ice cream for Greek yogurt for a creamy yet tangy alternative.

As for serving ideas, this refreshing slush pairs wonderfully with light summer dishes like grilled chicken skewers, fish tacos, or a simple salad topped with citrus vinaigrette. The bright, zesty flavors of the slush complement these dishes perfectly, making them an ideal pairing for a sunny day.

Storage, Make-Ahead & Reheating

This Frozen Orange Creamsicle Slush is best enjoyed fresh, but if you have leftovers, you can store them in an airtight container in the fridge for up to 2 days. Just keep in mind that the slush may lose some of its texture over time as the ice melts. It doesn’t freeze well, as the ice will turn into a solid block. If you must freeze it, blend again after thawing to restore the slushy consistency. This treat is best the day you make it, as the flavors meld together beautifully overnight, enhancing its deliciousness.

Frequently Asked Questions

Can I make Frozen Orange Creamsicle Slush ahead of time?

Yes — in fact, it tastes even better the next day as the flavors meld. However, it’s best to enjoy it fresh, as the texture can change if stored for too long. If you need to prepare it ahead, keep it in the fridge and re-blend before serving.

What kind of orange juice should I use?

For the best flavor, use freshly squeezed orange juice. However, if you’re short on time, opt for 100% pure store-bought juice without added sugars. This will ensure that your slush remains flavorful and refreshing.

Can I substitute the vanilla ice cream?

Absolutely! If you’re looking for a dairy-free option, coconut milk ice cream or a non-dairy vanilla ice cream can work wonderfully. They will still provide the creamy texture and sweetness you desire.

How can I adjust the sweetness of my slush?

You can easily adjust the sweetness by modifying the amount of sugar added. Start with 1/4 cup and taste the mixture before blending. If you prefer it sweeter, add more sugar gradually until it reaches your desired level.

What should I do if my slush is too thick?

If your slush is too thick, simply add a splash of milk or orange juice and blend again. This will help achieve a more drinkable consistency while maintaining the slushy texture. Adjust gradually to reach your preferred thickness.

Sun-Kissed Frozen Orange Cream Slush

Final Thoughts

The Frozen Orange Creamsicle Slush is a delightful blend of refreshing citrus and creamy goodness, making it a perfect treat for warm days or any time you crave a taste of nostalgia. The way the bright orange flavor dances with the creamy texture truly elevates this slush, transforming it into a satisfying escape from the everyday.

This is the kind of recipe I come back to again and again, especially when I’m looking to cool down or impress guests at a summer gathering. It’s simple to make and always brings smiles all around! I encourage you to try this recipe for yourself—don’t hesitate to share your results or even put your own spin on it. Happy slushing!

Print
clock clock iconcutlery cutlery iconflag flag iconfolder folder iconinstagram instagram iconpinterest pinterest iconfacebook facebook iconprint print iconsquares squares iconheart heart iconheart solid heart solid icon

Frozen Orange Creamsicle Slush


  • Author: Lily author
  • Total Time: 15 minutes
  • Yield: 4 servings 1x
Pin Recipe
Print Recipe

Description

This Frozen Orange Creamsicle Slush is a refreshing treat that combines creamy vanilla and zesty orange flavors. Perfect for hot summer days, it brings back nostalgic memories with every sip.


Ingredients

Scale
  • 2 cups orange juice (freshly squeezed or store-bought)
  • 1 cup vanilla ice cream
  • 1 cup crushed ice
  • 1/2 cup milk (whole or 2%)
  • 1/4 cup granulated sugar (adjust based on sweetness preference)
  • 1 teaspoon vanilla extract
  • Zest of 1 orange (for added flavor)
  • Fresh orange slices and mint leaves (for garnish)

Instructions

  1. Start by preparing your ingredients. Gather 2 cups of orange juice, 1 cup of vanilla ice cream, and 1 cup of crushed ice. Make sure the ice is finely crushed, as larger chunks can make blending difficult.
  2. In a blender, combine the orange juice, vanilla ice cream, crushed ice, and 1/2 cup of milk. Add 1/4 cup of granulated sugar and 1 teaspoon of vanilla extract. If you like a sweeter slush, consider adding a bit more sugar at this stage.
  3. Add the zest of 1 orange to the blender. This step is crucial for enhancing the citrus flavor of your slush. Make sure not to include the bitter white pith—only the flavorful zest.
  4. Blend the mixture on medium-high speed for about 30-45 seconds. Stop once the ingredients are fully combined and the slush has a smooth, even consistency. If you notice large chunks of ice, blend for an additional 10-15 seconds. Avoid over-blending, as this can make the slush too liquidy.
  5. Once blended, taste the slush. If it needs more sweetness, add a little more sugar and blend for a few more seconds. If it’s too thick, you can add a splash of milk to reach your desired consistency.
  6. Pour the slush into glasses. This recipe typically serves 4, but you can easily double it for larger gatherings. Use a spoon to help guide the slush into the glasses if needed.
  7. Garnish each serving with fresh orange slices and mint leaves. The mint not only adds a pop of color but also a refreshing aroma that complements the citrus flavors beautifully.
  8. Serve immediately and enjoy! If you’ve made extra, you can refrigerate it for a short time, but it's best enjoyed fresh.
  • Prep Time: 15 min
  • Cook Time: 0 min
  • Category: Dessert
  • Method: Blending
  • Cuisine: American

Nutrition

  • Serving Size: 1 serving
  • Calories: 200
  • Sugar: 30 g
  • Sodium: 50 mg
  • Fat: 5 g
  • Saturated Fat: 3 g
  • Unsaturated Fat: 2 g
  • Trans Fat: 0 g
  • Carbohydrates: 40 g
  • Fiber: 1 g
  • Protein: 2 g
  • Cholesterol: 20 mg

Keywords: Don't skip the orange zest! It's a game-changer for flavor. Always zest before juicing to make it easier.

Did you make this recipe?

Share a photo and tag us — we can't wait to see what you've made!

Zesty Lemon Poppy Seed Delight

One rainy afternoon, I found myself in my grandmother’s cozy kitchen, the kind that always smelled like warmth and love. She was whipping up her famous Lemon Poppy Seed Loaf, a recipe that had been passed down through generations. As the batter came together, the zesty aroma of fresh lemons filled the air, mingling perfectly with the nutty fragrance of poppy seeds. I can still picture her, apron-clad, as she expertly drizzled a vibrant citrus icing over the loaf, creating a glossy, sun-kissed finish that beckoned us to dive in. It was a moment that sparked my own passion for baking, and this recipe has become a cherished staple in my home ever since.

When you take a bite of this Lemon Poppy Seed Loaf, it’s like a burst of sunshine on your palate. The loaf is beautifully golden, with a tender crumb that melts in your mouth. Each slice is speckled with tiny poppy seeds, adding a delightful crunch that contrasts beautifully with the tangy sweetness of the lemon. And that citrus icing? It’s the finishing touch that elevates this loaf from ordinary to extraordinary, with its bright, zesty flavor dancing on your taste buds.

This recipe stands out because it embraces simplicity while delivering on flavor. I’ve added a hint of vanilla to the batter, enhancing the overall taste and making it even more indulgent. Trust me, once you make this Lemon Poppy Seed Loaf With Citrus Icing, it’ll become a go-to in your baking repertoire.

So, let me show you exactly how to make it!

Zesty Lemon Poppy Seed Delight

Why You’ll Love This Recipe

  • Moist and tender crumb that melts in your mouth, thanks to the perfect balance of butter and buttermilk.
  • Bright, zesty lemon flavor paired with crunchy poppy seeds, creating a delightful texture and taste experience.
  • Easy to whip up in just about an hour, perfect for last-minute gatherings or a cozy afternoon treat.
  • Budget-friendly with everyday ingredients, making it an accessible option for all home bakers.
  • The citrus icing adds a sweet tang that elevates the loaf, turning a simple recipe into a showstopper!

Ingredients

  • 1 ½ cups (190g) all-purpose flour
  • 1 teaspoon baking powder
  • ½ teaspoon baking soda
  • ½ teaspoon salt
  • 3 tablespoons poppy seeds
  • ½ cup (115g) unsalted butter, softened to room temperature
  • 1 cup (200g) granulated sugar
  • 2 large eggs
  • 1 teaspoon vanilla extract
  • 1 teaspoon lemon zest (from about 1 medium lemon)
  • ½ cup (120ml) buttermilk
  • 2 tablespoons fresh lemon juice

For the Citrus Icing:

  • 1 cup (120g) powdered sugar
  • 2 tablespoons fresh lemon juice
  • 1 tablespoon orange juice
  • 1 teaspoon lemon zest (for garnish, optional)

Let’s dive into the key ingredients that make this Lemon Poppy Seed Loaf so special. The all-purpose flour provides the structure and base for the loaf, while the baking powder and baking soda ensure it rises perfectly, giving the loaf a light texture. For a gluten-free variation, you could substitute the flour with a gluten-free all-purpose blend. Poppy seeds not only add a delightful crunch but also contribute to the unique flavor profile that pairs well with the citrus notes.

Unsalted butter is crucial for achieving the buttery richness that makes this loaf so moist. If you’re looking for a dairy-free option, coconut oil or a vegan butter can be used instead. The buttermilk is another essential component, providing acidity that activates the baking soda for a fluffy texture. If you don’t have buttermilk on hand, you can easily make a substitute by mixing ½ cup of milk with 1 tablespoon of vinegar or lemon juice and letting it sit for about 5 minutes.

Step-by-Step Instructions

  1. Preheat your oven to 350°F (175°C). Grease a 9×5-inch loaf pan or line it with parchment paper for easy removal later.
  2. In a medium mixing bowl, whisk together 1 ½ cups of all-purpose flour, 1 teaspoon of baking powder, ½ teaspoon of baking soda, ½ teaspoon of salt, and 3 tablespoons of poppy seeds. This helps to evenly distribute the baking agents and ensures a uniform rise.
  3. In a large mixing bowl, cream together ½ cup of softened unsalted butter and 1 cup of granulated sugar using an electric mixer on medium speed for about 3-4 minutes, until the mixture is light and fluffy. Make sure to scrape down the sides of the bowl occasionally.
  4. Add 2 large eggs, 1 teaspoon of vanilla extract, and 1 teaspoon of lemon zest to the creamed butter and sugar, mixing until fully combined. You want a smooth consistency, so ensure there are no lumps of butter.
  5. In a small bowl, combine ½ cup of buttermilk and 2 tablespoons of fresh lemon juice. Alternately add the dry ingredients and buttermilk mixture to the butter mixture, starting and ending with the dry ingredients. Mix just until combined; do not overmix, as this can lead to a dense loaf.
  6. Pour the batter into the prepared loaf pan. Smooth the top with a spatula, ensuring it’s even. Bake in the preheated oven for 50-60 minutes, or until a toothpick inserted in the center comes out clean. The edges should be lightly golden brown, and the center should feel just set.
  7. Once baked, remove the loaf from the oven and allow it to cool in the pan for about 10 minutes. Then, transfer it to a wire rack to cool completely. Resist the urge to slice too soon, as it will be crumbly if it’s still warm.
  8. While the loaf is cooling, prepare the citrus icing. In a medium bowl, whisk together 1 cup of powdered sugar, 2 tablespoons of fresh lemon juice, and 1 tablespoon of orange juice until smooth. If the icing is too thick, you can add a little more juice to reach your desired consistency.
  9. Once the loaf is completely cool, drizzle the citrus icing over the top. If you like, sprinkle with an additional teaspoon of lemon zest for an extra pop of flavor and color.

Pro Tips for the Best Lemon Poppy Seed Loaf With Citrus Icing

  • Be careful not to overmix your batter; this is a common mistake that can lead to a dense loaf. Mix just until the dry ingredients are incorporated for a light and fluffy texture.
  • Use room temperature ingredients, especially the butter and eggs. This helps to create a smoother batter and ensures even baking. Take your eggs out of the fridge about 30 minutes before you start.
  • For a more pronounced lemon flavor, consider adding a little lemon extract in addition to the zest and juice. Just a half teaspoon can elevate the citrus notes significantly.
  • When measuring your flour, spoon it into the measuring cup and level it off with a knife instead of scooping directly from the bag. This prevents packing and ensures you don’t end up with a dry loaf.
  • Invest in a good quality loaf pan; it makes a difference in heat distribution, which ensures even baking. If your pan is dark-coated, reduce the oven temperature by 25°F to prevent over-browning.

Variations & Serving Ideas

For a delightful twist, consider adding blueberries or raspberries to the batter for a fruity burst of flavor. You can also experiment with different citrus fruits—try lime or grapefruit zest and juice for a refreshing change. For a healthier option, substitute half of the all-purpose flour with whole wheat flour for added fiber without compromising too much on texture.

This Lemon Poppy Seed Loaf pairs beautifully with a light salad, such as a mixed greens salad with a vinaigrette, or a cup of tea for a cozy afternoon treat. It also complements a creamy cheese platter, as the acidity of the loaf balances rich cheeses perfectly. Lastly, a scoop of vanilla ice cream on the side creates a delightful contrast of temperatures and flavors!

Storage, Make-Ahead & Reheating

This Lemon Poppy Seed Loaf can be stored at room temperature for up to 3 days if wrapped tightly in plastic wrap. If you want to keep it longer, it freezes well for up to 3 months. To freeze, wrap the loaf tightly in plastic wrap and then in aluminum foil to prevent freezer burn.

When you’re ready to enjoy it again, simply thaw it in the fridge overnight. Reheat individual slices in the microwave for 15-20 seconds or in a toaster oven until warmed through. Interestingly, many people find that this loaf tastes even better the next day, as the flavors have time to meld!

Frequently Asked Questions

Can I make Lemon Poppy Seed Loaf With Citrus Icing ahead of time?

Yes — in fact, it tastes even better the next day! You can make the loaf a day in advance, allowing the flavors to develop. Just be sure to store it in an airtight container to maintain its moisture.

Can I substitute the poppy seeds?

Absolutely! If you don’t have poppy seeds on hand or prefer an alternative, you can use sesame seeds for a similar crunch or omit them entirely for a smooth loaf.

What can I use instead of buttermilk?

If you don’t have buttermilk, you can easily create a substitute by mixing ½ cup of milk (dairy or plant-based) with 1 tablespoon of vinegar or lemon juice. Let it sit for 5 minutes before using in the recipe.

How can I make this recipe gluten-free?

To make a gluten-free version of this Lemon Poppy Seed Loaf, substitute the all-purpose flour with a gluten-free all-purpose flour blend. Just ensure that the blend contains a binding agent like xanthan gum for the best results.

What is the best way to store leftover loaf?

Leftover Lemon Poppy Seed Loaf should be stored in an airtight container at room temperature for up to 3 days. For longer storage, wrap it tightly and freeze for up to 3 months. Thaw it before serving for the best texture.

Zesty Lemon Poppy Seed Delight

Final Thoughts

The Lemon Poppy Seed Loaf with Citrus Icing is truly a delightful treat that brings a burst of brightness to any occasion. The zesty lemon flavor combined with the subtle crunch of poppy seeds creates a satisfying balance, while the citrus icing adds a touch of sweetness that perfectly complements the loaf’s tanginess.

This is the kind of recipe I come back to again and again, especially when I want to brighten up a gloomy day or celebrate a small victory. The aroma that fills the kitchen as it bakes is absolutely heavenly! I encourage you to give this recipe a try; you might just find it becoming a beloved staple in your home. Don’t forget to share your results or even add your own unique twist—I can’t wait to see what you create!

Print
clock clock iconcutlery cutlery iconflag flag iconfolder folder iconinstagram instagram iconpinterest pinterest iconfacebook facebook iconprint print iconsquares squares iconheart heart iconheart solid heart solid icon

Lemon Poppy Seed Loaf


  • Author: Lily author
  • Total Time: 13 minute
  • Yield: 1 loaf 1x
Pin Recipe
Print Recipe

Description

This Lemon Poppy Seed Loaf is a delightful treat that combines zesty lemon flavor with crunchy poppy seeds. Topped with a citrus icing, it’s perfect for any occasion.


Ingredients

Scale
  • 1 ½ cups (190g) all-purpose flour
  • 1 teaspoon baking powder
  • ½ teaspoon baking soda
  • ½ teaspoon salt
  • 3 tablespoons poppy seeds
  • ½ cup (115g) unsalted butter, softened to room temperature
  • 1 cup (200g) granulated sugar
  • 2 large eggs
  • 1 teaspoon vanilla extract
  • 1 teaspoon lemon zest (from about 1 medium lemon)
  • ½ cup (120ml) buttermilk
  • 2 tablespoons fresh lemon juice
  • 1 cup (120g) powdered sugar
  • 2 tablespoons fresh lemon juice
  • 1 tablespoon orange juice
  • 1 teaspoon lemon zest (for garnish, optional)

Instructions

  1. Preheat your oven to 350°F (175°C). Grease a 9×5-inch loaf pan or line it with parchment paper for easy removal later.
  2. In a medium mixing bowl, whisk together 1 ½ cups of all-purpose flour, 1 teaspoon of baking powder, ½ teaspoon of baking soda, ½ teaspoon of salt, and 3 tablespoons of poppy seeds. This helps to evenly distribute the baking agents and ensures a uniform rise.
  3. In a large mixing bowl, cream together ½ cup of softened unsalted butter and 1 cup of granulated sugar using an electric mixer on medium speed for about 3-4 minutes, until the mixture is light and fluffy. Make sure to scrape down the sides of the bowl occasionally.
  4. Add 2 large eggs, 1 teaspoon of vanilla extract, and 1 teaspoon of lemon zest to the creamed butter and sugar, mixing until fully combined. You want a smooth consistency, so ensure there are no lumps of butter.
  5. In a small bowl, combine ½ cup of buttermilk and 2 tablespoons of fresh lemon juice. Alternately add the dry ingredients and buttermilk mixture to the butter mixture, starting and ending with the dry ingredients. Mix just until combined; do not overmix, as this can lead to a dense loaf.
  6. Pour the batter into the prepared loaf pan. Smooth the top with a spatula, ensuring it’s even. Bake in the preheated oven for 50-60 minutes, or until a toothpick inserted in the center comes out clean. The edges should be lightly golden brown, and the center should feel just set.
  7. Once baked, remove the loaf from the oven and allow it to cool in the pan for about 10 minutes. Then, transfer it to a wire rack to cool completely. Resist the urge to slice too soon, as it will be crumbly if it’s still warm.
  8. While the loaf is cooling, prepare the citrus icing. In a medium bowl, whisk together 1 cup of powdered sugar, 2 tablespoons of fresh lemon juice, and 1 tablespoon of orange juice until smooth. If the icing is too thick, you can add a little more juice to reach your desired consistency.
  9. Once the loaf is completely cool, drizzle the citrus icing over the top. If you like, sprinkle with an additional teaspoon of lemon zest for an extra pop of flavor and color.
  • Prep Time: 15 mins
  • Cook Time: 50-60 mins
  • Category: Dessert
  • Method: Baking
  • Cuisine: American

Nutrition

  • Serving Size: 1 slice
  • Calories: 200
  • Sugar: 15 g
  • Sodium: 150 mg
  • Fat: 8 g
  • Saturated Fat: 5 g
  • Unsaturated Fat: 3 g
  • Trans Fat: 0 g
  • Carbohydrates: 30 g
  • Fiber: 1 g
  • Protein: 3 g
  • Cholesterol: 40 mg

Keywords: Be careful not to overmix your batter; this is a common mistake that can lead to a dense loaf. Use room temperature ingredients for a smoother batter and even baking.

Did you make this recipe?

Share a photo and tag us — we can't wait to see what you've made!

  • Privacy Policy
  • Terms Of Service
  • Contact
  • About
  • GDPR

Copyright © 2025 Homesmad