• Skip to primary navigation
  • Skip to main content
  • Skip to primary sidebar
Homesmad

Homesmad

  • Home
  • Breakfast & Brunch
  • Appetizers & Snacks
  • Dinner
  • Dessert
  • About
  • Privacy Policy
  • Contact
Homesmad
  • Home
  • Breakfast & Brunch
  • Appetizers & Snacks
  • Dinner
  • Dessert
  • About
  • Privacy Policy
  • Contact

Pumpkin French Toast: Your New Favorite Fall Breakfast

November 11, 2025 by Lily author

Pumpkin French Toast Breakfast is more than just a meal; it’s an invitation to savor the season, a truly heartwarming experience as the crisp autumn air begins to make its presence known. Imagine waking to the comforting aroma of cinnamon, nutmeg, and pumpkin mingling with the sweet scent of golden, griddled bread. This delightful dish perfectly encapsulates the magic of fall, offering a culinary embrace that makes any morning feel like a special occasion.

While the venerable tradition of French toast, or “pain perdu” as it’s known in its original French form, has graced breakfast tables for centuries as a ingenious way to transform humble stale bread into a luxurious treat, the introduction of pumpkin elevates it to an entirely new level of seasonal delight. It beautifully marries the rustic charm of a timeless classic with the vibrant, comforting flavors of the harvest season, creating a dish that feels both familiar and excitingly new.

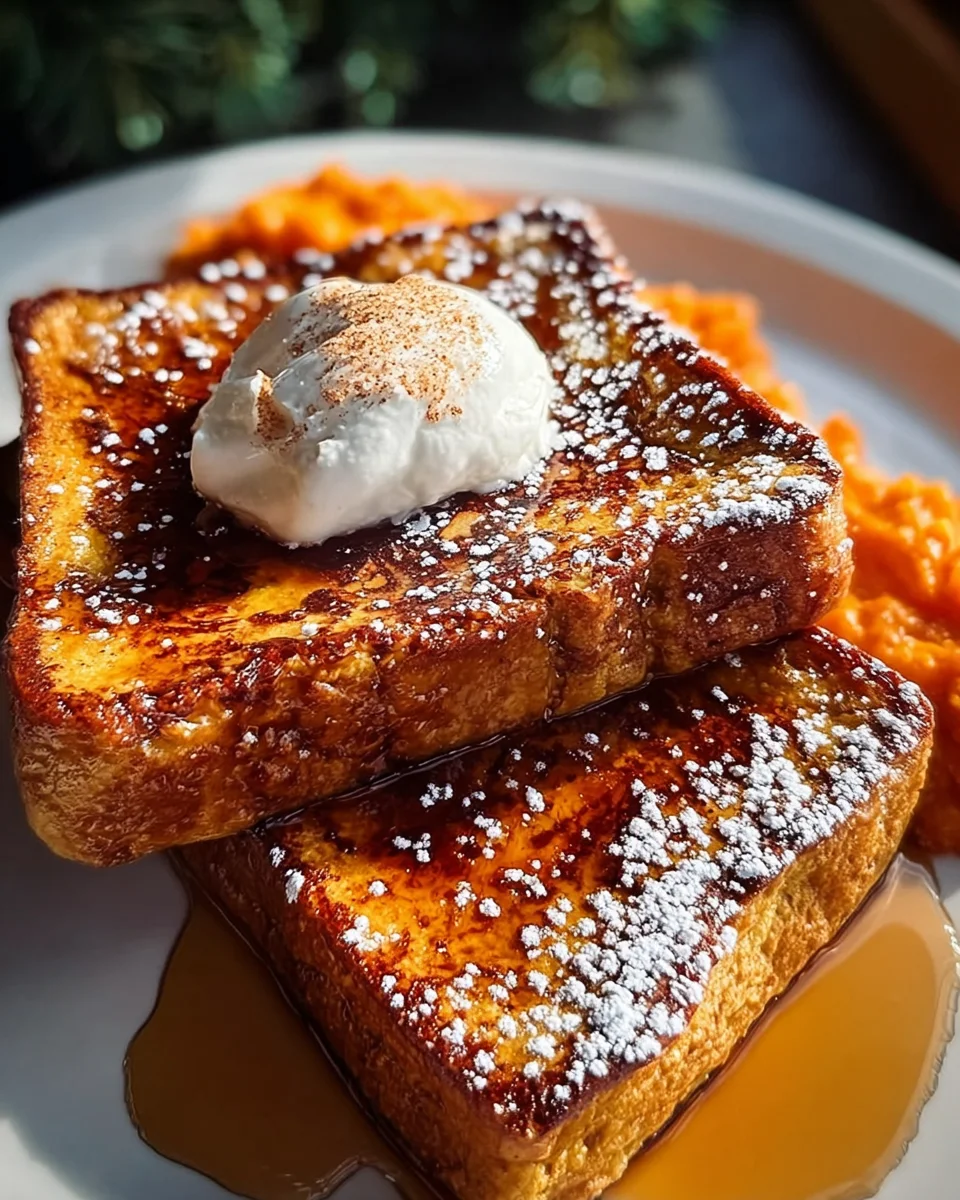
I find that people absolutely adore this breakfast for its incredibly rich, custardy interior, which is subtly spiced with that unmistakable pumpkin warmth, contrasting exquisitely with its perfectly golden-brown, slightly crisp exterior. It’s not just a feast for the taste buds; it’s a moment to pause, gather, and enjoy the simple pleasures of life. The wonderful balance of sweetness and aromatic spices ensures that every bite is a truly satisfying experience, making a proper Pumpkin French Toast Breakfast an unforgettable start to any autumn day.

Pumpkin French Toast: Your New Favorite Fall Breakfast this RECIPE

Ingredients:

  • 6-8 slices of thick-cut bread: I always recommend using a hearty bread for the best Pumpkin French Toast Breakfast experience. Brioche, challah, or even a good quality sourdough work wonderfully because their substantial texture holds up well to soaking without becoming overly soggy. I look for slices that are about 3/4 to 1 inch thick.
  • 2 large eggs: These are the binding agents for our rich custard. I find that using eggs straight from the refrigerator is perfectly fine, but some people prefer them at room temperature for a smoother blend.
  • 1/2 cup pure pumpkin puree: Make sure you’re grabbing pure pumpkin puree, not pumpkin pie filling, which already contains spices and sugar. This is the star ingredient that gives our Pumpkin French Toast its characteristic flavor and beautiful orange hue.
  • 1/2 cup whole milk: Whole milk provides a lovely richness to the custard. If you prefer, almond milk, oat milk, or even half-and-half can be excellent substitutes, each lending a slightly different nuance to the final taste and texture.
  • 2 tablespoons granulated sugar: Just a touch of sweetness to enhance the pumpkin and spice flavors. You can adjust this slightly based on your preference or the sweetness of your syrup.
  • 1 teaspoon vanilla extract: A high-quality vanilla extract is crucial here; it truly elevates the overall aroma and flavor profile of the Pumpkin French Toast Breakfast.
  • 1 teaspoon pumpkin pie spice: This pre-mixed blend typically includes cinnamon, nutmeg, ginger, and cloves, perfectly capturing the essence of autumn in every bite. If you don’t have pumpkin pie spice, you can easily make your own by combining 1/2 teaspoon cinnamon, 1/4 teaspoon ground ginger, 1/8 teaspoon ground nutmeg, and a tiny pinch of ground cloves.
  • 1/4 teaspoon ground cinnamon: I like to add a little extra cinnamon because it really complements the pumpkin and adds a warm, inviting aroma as the French toast cooks.
  • Pinch of salt: Don’t skip this! A tiny pinch of salt balances all the sweet flavors and makes them pop even more, ensuring our Pumpkin French Toast isn’t cloyingly sweet.
  • 2-3 tablespoons unsalted butter or neutral oil: For cooking. Butter lends an unbeatable rich flavor and a beautiful golden-brown crust, but a neutral oil like canola or grapeseed works perfectly if you’re avoiding dairy or prefer a lighter taste.
  • For serving (optional but highly recommended):
    • Maple syrup (pure, Grade A is my top choice!)
    • Whipped cream or coconut cream
    • Chopped pecans or walnuts
    • A dusting of powdered sugar
    • Extra sprinkle of cinnamon or pumpkin pie spice

Prepping Your Workspace:

  1. Gather Your Tools: Before I even think about cracking an egg, I like to make sure my kitchen is set up for success. I pull out a large, shallow dish (a pie plate or a 9×13 inch baking dish works perfectly for soaking the bread), a whisk, a large mixing bowl, measuring cups and spoons, and my griddle or a large non-stick frying pan. Having everything within reach makes the process so much smoother and more enjoyable.
  2. Prepare Your Cooking Surface: If you’re using an electric griddle, now is a good time to preheat it to medium heat, usually around 325-350°F (160-175°C). If you’re using a frying pan on the stovetop, I set it over medium heat so it can warm up gradually. You want a nice even heat that won’t burn the butter or French toast too quickly.

Crafting the Pumpkin French Toast Batter:

  1. Whisk the Eggs: In your large mixing bowl, I crack the two large eggs. I then use my whisk to beat them thoroughly until the yolks and whites are completely combined and slightly frothy. This initial step is essential for a smooth, uniform custard that will evenly coat our bread slices, preventing any streaks of unmixed egg in our delicious Pumpkin French Toast.
  2. Combine Wet Ingredients: Next, I pour in the pure pumpkin puree, whole milk, and vanilla extract into the bowl with the beaten eggs. I whisk vigorously until all these wet ingredients are fully incorporated. The mixture should be a beautiful, uniform orange color and completely smooth. I pay special attention here to break down any small lumps of pumpkin puree, ensuring a silky-smooth batter. A well-mixed batter is key to an exquisite Pumpkin French Toast Breakfast!
  3. Add the Dry Spices and Sweetener: Now it’s time to infuse that signature fall flavor! I add the granulated sugar, pumpkin pie spice, ground cinnamon, and that crucial pinch of salt to the wet mixture. I continue to whisk everything together until the sugar has dissolved and the spices are evenly distributed throughout the batter. I often give it a little sniff at this point – that aroma of pumpkin and spices is just heavenly and a clear sign that our Pumpkin French Toast is going to be incredibly flavorful. I make sure there are no clumps of spice, ensuring every bite will be perfectly seasoned.
  4. Pour into Soaking Dish: Once the batter is perfectly mixed, I carefully pour it into the shallow dish I prepared earlier. This wide, flat surface is ideal for evenly coating the bread slices. I make sure the batter spreads out to create a generous pool for soaking.

Preparing Your Bread for the Perfect Pumpkin French Toast:

  1. Choose Your Bread Wisely: As mentioned, thick-cut bread is your best friend here. If your bread is super fresh and soft, I sometimes like to let it sit out on the counter for a few hours, or even overnight, to become slightly stale. Slightly stale bread absorbs the custard better without disintegrating, resulting in a firm yet tender Pumpkin French Toast. If I’m in a hurry, I might even lightly toast it in a toaster or oven for a few minutes just to dry it out a bit.
  2. Soak the Bread: This is a delicate but important step. I carefully place one slice of bread into the pumpkin custard mixture, pressing it down gently to ensure it soaks up the batter evenly. I let it sit for about 15-20 seconds on each side, no longer, to avoid it becoming overly saturated and falling apart. The goal is for the bread to be thoroughly coated and just softened, not soggy. For a thicker slice, I might extend this by a few seconds. I usually do this one slice at a time, or two if my dish is wide enough and I have space to maneuver. Don’t rush this part – proper soaking makes all the difference for your Pumpkin French Toast Breakfast!
  3. Shake Off Excess Batter: Once soaked, I gently lift the bread slice, allowing any excess batter to drip back into the dish. This prevents the French toast from becoming greasy or having a thick, uncooked batter layer on the outside. A light, even coating is what we’re aiming for.

Cooking the Golden Pumpkin French Toast:

  1. Prepare the Pan: I add about 1-2 tablespoons of unsalted butter or neutral oil to my preheated griddle or frying pan. I let it melt and swirl it around to coat the cooking surface evenly. You want a thin, even layer of fat. If using butter, watch carefully to prevent it from burning; you want it lightly browned, not dark.
  2. Cook the French Toast: Carefully place the soaked bread slices onto the hot, buttered griddle or pan. I make sure not to overcrowd the pan; cooking 2-3 slices at a time is usually ideal, allowing enough space to flip them easily and ensuring even cooking. Overcrowding can lower the pan temperature and steam the French toast instead of browning it.
  3. Brown to Perfection: I cook each side for approximately 3-4 minutes, or until the Pumpkin French Toast is beautifully golden brown and slightly crispy on the exterior. You’ll know it’s ready to flip when the edges look cooked and you can easily slide a spatula underneath without sticking. I sometimes lift an edge to peek at the color. The internal temperature should be cooked through, and the custard set. The aroma filling your kitchen will be absolutely irresistible!
  4. Maintain Temperature: As I cook subsequent batches, I sometimes need to adjust the heat slightly. If the pan gets too hot, the French toast will brown too quickly on the outside before the inside is cooked. If it’s too cool, it will absorb too much fat and become greasy. I add more butter or oil as needed between batches to ensure each piece of Pumpkin French Toast gets that perfect golden crust.
  5. Keep Warm (Optional): If I’m making a larger batch for a crowd, I often place the cooked French toast on a wire rack set over a baking sheet in a warm oven (around 200°F / 93°C) while I finish cooking the remaining slices. This keeps them warm and prevents them from getting soggy, ensuring everyone enjoys a perfectly hot Pumpkin French Toast Breakfast.

Serving Your Delicious Pumpkin French Toast Breakfast:

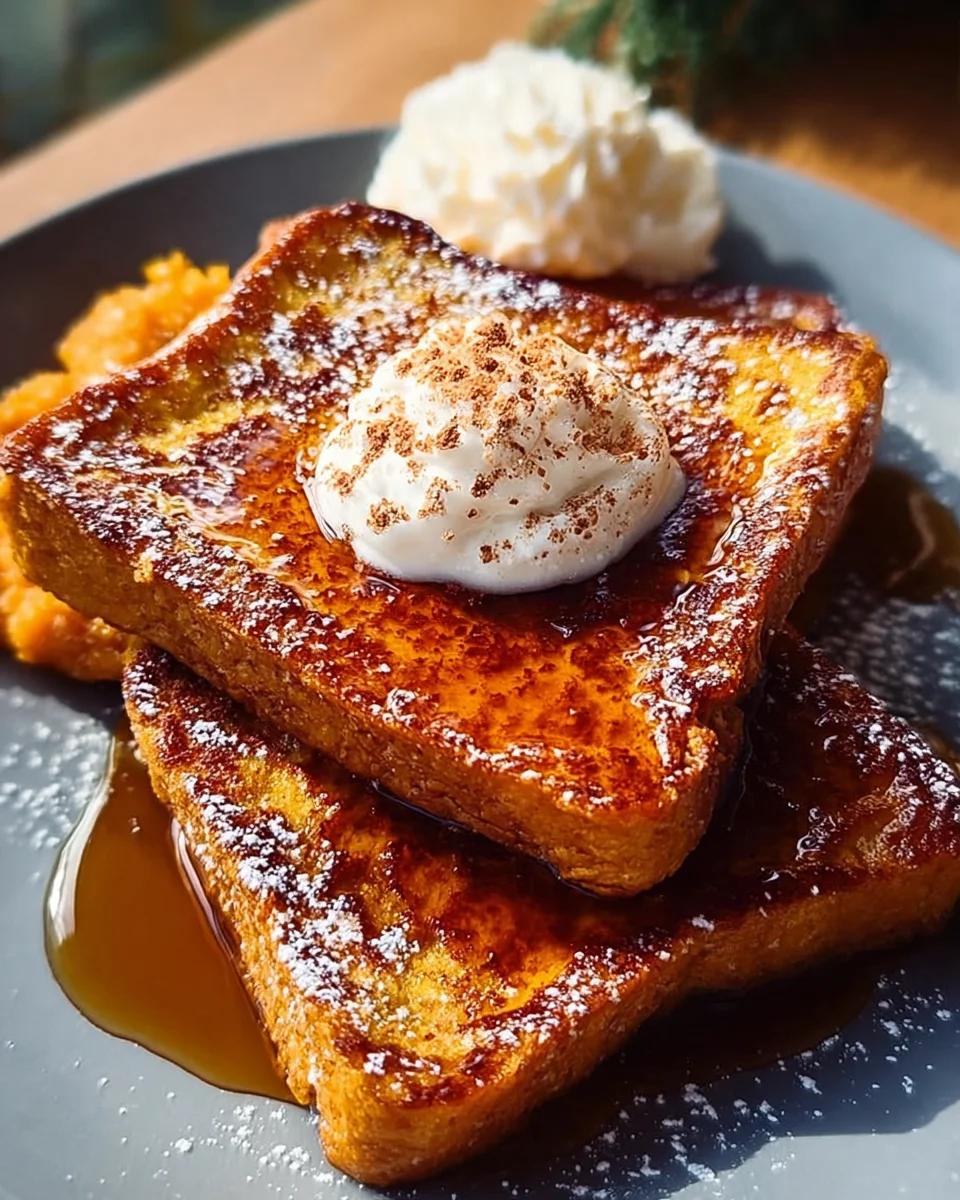
  1. Plate and Garnish: Once all your Pumpkin French Toast slices are cooked to golden perfection, it’s time for the best part – serving! I stack a few slices on each plate, creating a tempting tower.
  2. Add Your Favorite Toppings: This is where you can truly personalize your Pumpkin French Toast Breakfast. I love a generous drizzle of warm maple syrup, a dollop of freshly whipped cream (or coconut cream for a dairy-free option), and a sprinkle of crunchy chopped pecans or walnuts. A light dusting of powdered sugar and an extra pinch of cinnamon or pumpkin pie spice add a final touch of elegance and flavor. Berries, sliced bananas, or even a spoonful of apple compote can also make wonderful additions. Make your Pumpkin French Toast Breakfast an unforgettable experience!
  3. Serve Immediately: French toast is always best enjoyed fresh off the griddle, while it’s still warm and the edges are slightly crisp. Gather your loved ones and dig into this comforting, flavorful meal.

Tips for the Best Pumpkin French Toast Breakfast Experience:

Make-Ahead Batter:

I often prepare the pumpkin French toast batter the night before. I simply mix all the ingredients, cover the bowl tightly with plastic wrap, and refrigerate it. In the morning, I give it a quick whisk and it’s ready to go. This significantly cuts down on prep time during a busy morning, allowing me to enjoy a delicious Pumpkin French Toast Breakfast with minimal fuss.

Dairy-Free or Gluten-Free Options:

For a dairy-free version, I swap the whole milk for unsweetened almond milk, oat milk, or cashew milk. For gluten-free Pumpkin French Toast, I simply use a sturdy gluten-free bread. The key is still using a thick-cut variety that can hold up to soaking.

Spice Level:

If you’re a big fan of spices, feel free to increase the amount of pumpkin pie spice or add a tiny pinch of ground cloves or ginger to the batter. Conversely, if you prefer a milder flavor, you can slightly reduce the amount. I always recommend tasting a tiny bit of the batter (before adding eggs, if you want to be super cautious, or just trust your nose!) to get a sense of the spice balance.

Preventing Soggy French Toast:

The best way to prevent soggy French toast is to use slightly stale or toasted bread and to avoid over-soaking. You want the bread to absorb the custard, but not become saturated to the point of falling apart. Also, cooking at the right temperature (medium heat) is crucial for a golden exterior and a cooked-through interior without being mushy.

Leftovers:

While best fresh, leftover Pumpkin French Toast can be stored in an airtight container in the refrigerator for up to 2-3 days. I find the best way to reheat it is in a toaster oven or a regular oven at 350°F (175°C) for about 5-10 minutes, or until warmed through and slightly crisp again. This prevents it from becoming rubbery like it might in a microwave.

Why This Pumpkin French Toast Breakfast is a Must-Try:

This recipe delivers a taste of autumn in every single bite. The creamy, spiced pumpkin custard perfectly infuses into the bread, creating a wonderfully moist interior and a beautifully golden, slightly crisp exterior. It’s comforting, indulgent, and truly special, making it an ideal choice for a festive breakfast, a cozy weekend brunch, or simply when you’re craving that perfect blend of sweet pumpkin and warm spices. Trust me, once you try this Pumpkin French Toast Breakfast, it will become a cherished fall tradition!

Pumpkin French Toast: Your New Favorite Fall Breakfast

Conclusion:

Well, my friends, we’ve reached the sweet finale of our culinary journey, and I genuinely hope you’re as excited as I am about what we’ve just discussed. This isn’t just a recipe; it’s an invitation to elevate your morning routine, to infuse your kitchen with warmth, and to treat yourself and your loved ones to something truly special. I’ve poured my heart into crafting this recipe, aiming for that perfect balance of comfort, spice, and pure indulgence that so many of us crave, especially when the air turns crisp or simply when we need a little hug in a dish.

What makes this particular iteration an absolute must-try, you ask? It’s the way the bread, whatever delightful loaf you choose, transforms into a custardy dream on the inside while maintaining a gloriously golden, slightly crisp exterior. It’s the subtle yet profound blend of spices – the cozy embrace of cinnamon, the gentle hum of nutmeg, and that whisper of ginger – all mingling harmoniously with the earthy sweetness of pumpkin. Each bite is a symphony of textures and flavors, a delightful dance on your palate that begins with the comforting aroma even before the first forkful. Imagine waking up to that! It’s a breakfast that doesn’t just fill your stomach; it nourishes your soul, bringing a touch of gourmet elegance to your home kitchen without any of the fuss. Truly, there’s nothing quite like starting your day with this incredible Pumpkin French Toast Breakfast, a dish that manages to be both familiar and utterly enchanting at the same time.

Making It Yours: Serving Suggestions & Creative Variations

Now that you’re armed with the secrets to this deliciousness, let’s talk about making it uniquely yours. While a generous drizzle of real maple syrup and a dusting of powdered sugar are always a classic and perfect pairing, don’t stop there! I love to elevate my plate with a dollop of freshly whipped cream, perhaps infused with a touch of vanilla or a hint of orange zest for an extra layer of brightness. For those who enjoy a bit of crunch, consider sprinkling toasted pecans, walnuts, or even candied almonds over the top. The textural contrast is simply divine. Fresh fruit can also be a wonderful addition; think thinly sliced bananas, a handful of vibrant mixed berries, or even a compote made with apples or pears for an autumn-inspired twist.

But the fun doesn’t end with toppings! This recipe is incredibly adaptable, inviting you to experiment and personalize. If you’re feeling adventurous, try swapping out the brioche for challah bread for an even richer, more decadent texture, or use a good quality sourdough for a slight tang that beautifully complements the sweetness. For an extra punch of flavor, you could add a tiny splash of rum extract or a hint of almond extract to the batter – just a drop or two can make a surprising difference. If you’re hosting a brunch, consider making a double batch and keeping it warm in a low oven; these slices hold up beautifully. And for those seeking a gluten-free option, simply choose your favorite sturdy gluten-free bread, ensuring it’s robust enough to soak up all that custardy goodness without falling apart. You could even lean into the dessert angle by serving a single slice with a scoop of vanilla bean ice cream and a drizzle of caramel sauce for an unexpected evening treat. The possibilities truly are endless, and I encourage you to unleash your inner chef!

Your Turn to Create and Share!

My ultimate wish is that you feel inspired to roll up your sleeves, gather your ingredients, and give this wonderful recipe a try. There’s an immense joy in creating something so delightful from scratch, and I promise you, the smiles around your table will be all the reward you need. It’s more than just cooking; it’s about making memories, whether it’s a quiet morning indulgence for yourself or a lively brunch shared with cherished friends and family. Don’t be afraid to tweak it, to add your own personal flair, and to truly make this recipe your own culinary masterpiece.

Once you’ve experienced the magic of this dish, I would absolutely love to hear about it! Please, share your creations, your serving ideas, and any delightful variations you come up with. Did you discover a new favorite topping? Did you try a different type of bread that worked wonders? Your insights and experiences are incredibly valuable, not just to me, but to our entire community of food lovers. Tag me on social media if you share photos of your glorious Pumpkin French Toast Breakfast – I genuinely can’t wait to see your masterpieces and celebrate your kitchen triumphs. Happy cooking, and may your mornings be filled with deliciousness!


Pumpkin French Toast Breakfast

Pumpkin French Toast Breakfast is more than just a meal; it’s an invitation to savor the season, a truly heartwarming experience as the crisp autumn air begins to make its presence known. This delightful dish perfectly encapsulates the magic of fall, offering a culinary embrace that makes any morning feel like a special occasion.

Prep Time
15 Minutes
Cook Time
30 Minutes
Total Time
45 Minutes
Servings
4 servings

Ingredients


Instructions


Important Information

Nutrition Facts (Per Serving)

It is important to consider this information as approximate and not to use it as definitive health advice.

Allergy Information

Please check ingredients for potential allergens and consult a health professional if in doubt.

« Previous Post
Easy Strawberry Crunch Cheesecake Tacos - Must-Try Dessert!
Next Post »
Easy Mini Pumpkin Bread with Cinnamon Swirl Recipe

If you enjoyed this…

Apple Cinnamon Muffins: The Ultimate Fall Baking Recipe

Bananenbrot einfach backen: Das beste Rezept für Anfänger

Cinnamon Sugar Butter Swim Biscuits: The Ultimate Guide & Recipe

Primary Sidebar

Browse by Diet

BreakfastDinnerLunchDessertAppetizer

Sweet Peach Yogurt Parfait Delight

One of my fondest memories is from a lazy summer afternoon spent at my grandmother’s house. The sun filtered through the kitchen window, casting a warm glow over the table where she would create her culinary magic. It was during one of those blissful moments that I first tasted her Peach Yogurt Parfait with Honey and Granola. The sweet aroma of ripe peaches mingling with creamy yogurt and the crunch of granola was nothing short of heavenly. It felt like summer captured in a bowl, and I still remember the joy of diving in with a spoon, each layer revealing a new burst of flavor.

When I think about that parfait, I can almost hear the gentle hum of the bees outside, reminding me of the floral notes that honey brings to every bite. The vibrant yellows and soft oranges of the peaches contrast beautifully with the creamy white yogurt and the golden crunch of granola. It’s a dish that not only looks delightful but also tastes like a celebration of fresh, wholesome ingredients.

What makes my version of this Peach Yogurt Parfait special is the careful balance of flavors and textures. I use ripe, juicy peaches, drizzled with locally sourced honey, and a homemade granola that’s bursting with nuts and seeds for an extra crunch. It’s a simple dish, but every layer is crafted with love and attention.

Let me show you exactly how to make this delightful parfait, so you can bring a bit of that summer magic into your kitchen!

Sweet Peach Yogurt Parfait Delight

Why You’ll Love This Recipe

  • Delightfully creamy texture from the Greek yogurt, paired with the juicy sweetness of fresh peaches.
  • Ready in under 20 minutes, making it a quick and satisfying breakfast or snack option.
  • Budget-friendly, using common ingredients that you may already have in your pantry.
  • Customizable with your favorite granola and nuts, allowing you to tailor each parfait to your taste.
  • Perfectly balanced flavors with the bright acidity of lemon juice and the sweetness of honey enhancing the peaches.

Ingredients

  • For the Parfait:
  • 2 cups plain Greek yogurt (or vanilla yogurt for a sweeter option)
  • 2 large ripe peaches, diced (about 2 cups)
  • 1 tablespoon fresh lemon juice (to prevent browning of peaches)
  • 2 tablespoons honey (plus more for drizzling)
  • 1 teaspoon vanilla extract (optional for extra flavor)
  • For the Granola:
  • 1 cup granola (store-bought or homemade; see notes for a simple granola recipe)
  • 1/4 cup sliced almonds (optional for added crunch)
  • 1/4 cup shredded coconut (optional for added flavor)

Let’s dive into some key ingredients that make this Peach Yogurt Parfait so delightful! First, the Greek yogurt is not only creamy but also packed with protein, making it a satisfying option for breakfast or a snack. If you’re looking for a sweeter option, you can easily substitute it with vanilla yogurt, though it may alter the overall flavor balance. Next, the ripe peaches are the star of the show; their natural sweetness shines through, so I recommend choosing peaches that yield slightly to pressure, indicating they’re perfectly ripe. If peaches aren’t in season, feel free to use nectarines or even frozen peaches—just thaw them before use. Finally, honey adds a lovely floral sweetness that ties everything together. If you prefer, maple syrup can serve as a delicious substitute.

Step-by-Step Instructions

  1. Start by preparing the peaches. Wash them thoroughly, then slice and dice them into bite-sized pieces. In a medium bowl, toss the diced peaches with 1 tablespoon of fresh lemon juice to prevent browning. Set aside for about 5 minutes while the lemon juice works its magic.
  2. In a separate bowl, combine the Greek yogurt, 2 tablespoons of honey, and 1 teaspoon of vanilla extract if using. Stir the mixture until smooth and thoroughly blended. This should take about a minute. Avoid overmixing to maintain the creaminess of the yogurt.
  3. Now it’s time to layer your parfait. Grab a clear glass or bowl to showcase your beautiful creation. Start with a generous spoonful of the yogurt mixture at the bottom—about 1/4 cup will do. Use a spoon to spread it evenly.
  4. Add a layer of the diced peaches over the yogurt, ensuring they cover the yogurt completely. You might want to use about half of what you have prepared—roughly 1 cup. This layer should be visually appealing, so arrange the peaches neatly.
  5. Sprinkle 1/4 cup of granola over the peaches. This adds a delightful crunch. Make sure to distribute it evenly to ensure every bite has that satisfying texture. Avoid packing it down too tightly, as you want it to maintain its crunch.
  6. Repeat the layers: spoon in another 1/4 cup of yogurt, followed by another cup of peaches, and another sprinkle of granola. You should have at least two layers, but feel free to add more depending on your glass size.
  7. Finish off your parfait with a drizzle of honey on top for added sweetness and a touch of elegance. If you’re using sliced almonds or shredded coconut, sprinkle them on top now. It adds a lovely visual contrast and extra flavor.
  8. Serve immediately or refrigerate for up to 30 minutes before serving to allow the flavors to meld together. However, I recommend enjoying it fresh to maintain the granola’s crunch.

Pro Tips for the Best Peach Yogurt Parfait With Honey And Granola

  • Make sure to choose ripe peaches for the best flavor and texture. A common mistake is using unripe fruit, which can lead to a less enjoyable parfait. Look for peaches that are fragrant and slightly soft to the touch.
  • Use a clear glass to assemble your parfait; this not only makes for a beautiful presentation but also allows you to see the colorful layers, which adds to the enjoyment of eating it.
  • For an even creamier texture, consider whipping the Greek yogurt with a hand mixer for a couple of minutes before layering. This small adjustment makes a huge difference in mouthfeel.
  • Be mindful of the granola-to-yogurt ratio. Too much granola can overwhelm the parfait, while too little can make it feel too creamy. Aim for about 1/4 cup of granola per layer for the perfect balance.
  • If you’re making this for a gathering, consider preparing the yogurt and peaches ahead of time and layering them just before serving. This ensures the granola stays crunchy!

Variations & Serving Ideas

There are so many ways to get creative with your Peach Yogurt Parfait! For a tropical twist, swap out the peaches for mangoes or pineapples and top with coconut flakes. If you prefer a berry flavor, mix in some blueberries or strawberries with the peaches for added color and taste. For a nutty version, incorporate chopped walnuts or pecans instead of almonds.

As for serving ideas, this parfait pairs beautifully with a side of scrambled eggs for a hearty breakfast or fresh fruit salad for a light lunch. You might also enjoy it alongside whole grain toast with almond butter for an energizing snack. The contrast of flavors and textures will elevate your meal experience!

Storage, Make-Ahead & Reheating

The Peach Yogurt Parfait is best enjoyed fresh, but you can prepare some components ahead of time. Store the layered parfait in an airtight container in the refrigerator for up to 24 hours. However, be cautious; the granola may lose its crunch if stored too long. You can freeze the yogurt and peach mixture for up to 2 months; just remember to thaw it in the refrigerator overnight before serving.

If you plan to enjoy this dish the next day, it can taste even better as the flavors meld together. Just remember to add the granola right before serving to keep its delightful crunch!

Frequently Asked Questions

Can I make Peach Yogurt Parfait With Honey And Granola ahead of time?

Yes — in fact, it tastes even better the next day as the flavors meld. However, I recommend waiting to add the granola until just before serving to maintain its crunch.

What can I substitute for Greek yogurt?

If you prefer a lighter option, you can substitute Greek yogurt with regular yogurt or a dairy-free alternative like coconut yogurt. Just remember that this may alter the creaminess and flavor profile slightly.

Can I use frozen peaches for this parfait?

Absolutely! Just make sure to thaw the frozen peaches before using them. They will still add great flavor, though the texture may be slightly softer than fresh peaches.

How do I make the parfait vegan?

To make a vegan version, substitute the Greek yogurt with a plant-based yogurt alternative, and replace honey with maple syrup or agave nectar. This keeps the parfait sweet while adhering to a vegan diet.

What other fruits can I use in this recipe?

You can mix and match fruits based on your preference. Try using strawberries, blueberries, raspberries, or even bananas. Just make sure to adjust the lemon juice as needed to prevent browning.

Sweet Peach Yogurt Parfait Delight

Final Thoughts

The Peach Yogurt Parfait with Honey and Granola is a delightful blend of creamy yogurt, sweet peaches, and crunchy granola that creates a satisfying and nourishing treat. Each layer bursts with flavor, making it a perfect choice for breakfast or a light dessert.

This is the kind of recipe I come back to again and again, especially when I want something refreshing and wholesome to start my day. The harmony of sweet and tart flavors, combined with the delightful crunch, never fails to lift my spirits!

I encourage you to give this parfait a try and indulge in its comforting goodness. Feel free to share your results or even add your own twist—perhaps a sprinkle of cinnamon or a handful of nuts. Enjoy creating your perfect parfait!

Print
clock clock iconcutlery cutlery iconflag flag iconfolder folder iconinstagram instagram iconpinterest pinterest iconfacebook facebook iconprint print iconsquares squares iconheart heart iconheart solid heart solid icon

Peach Yogurt Parfait


  • Author: Lily author
  • Total Time: 15 minutes
  • Yield: 4 servings 1x
Pin Recipe
Print Recipe

Description

This Peach Yogurt Parfait combines creamy Greek yogurt, juicy peaches, and crunchy granola for a delightful treat. It’s a perfect breakfast or snack that captures the essence of summer in every bite.


Ingredients

Scale
  • For the Parfait:
  • 2 cups plain Greek yogurt (or vanilla yogurt for a sweeter option)
  • 2 large ripe peaches, diced (about 2 cups)
  • 1 tablespoon fresh lemon juice (to prevent browning of peaches)
  • 2 tablespoons honey (plus more for drizzling)
  • 1 teaspoon vanilla extract (optional for extra flavor)
  • For the Granola:
  • 1 cup granola (store-bought or homemade; see notes for a simple granola recipe)
  • 1/4 cup sliced almonds (optional for added crunch)
  • 1/4 cup shredded coconut (optional for added flavor)

Instructions

  1. Start by preparing the peaches. Wash them thoroughly, then slice and dice them into bite-sized pieces. In a medium bowl, toss the diced peaches with 1 tablespoon of fresh lemon juice to prevent browning. Set aside for about 5 minutes while the lemon juice works its magic.
  2. In a separate bowl, combine the Greek yogurt, 2 tablespoons of honey, and 1 teaspoon of vanilla extract if using. Stir the mixture until smooth and thoroughly blended. This should take about a minute. Avoid overmixing to maintain the creaminess of the yogurt.
  3. Now it’s time to layer your parfait. Grab a clear glass or bowl to showcase your beautiful creation. Start with a generous spoonful of the yogurt mixture at the bottom—about 1/4 cup will do. Use a spoon to spread it evenly.
  4. Add a layer of the diced peaches over the yogurt, ensuring they cover the yogurt completely. You might want to use about half of what you have prepared—roughly 1 cup. This layer should be visually appealing, so arrange the peaches neatly.
  5. Sprinkle 1/4 cup of granola over the peaches. This adds a delightful crunch. Make sure to distribute it evenly to ensure every bite has that satisfying texture. Avoid packing it down too tightly, as you want it to maintain its crunch.
  6. Repeat the layers: spoon in another 1/4 cup of yogurt, followed by another cup of peaches, and another sprinkle of granola. You should have at least two layers, but feel free to add more depending on your glass size.
  7. Finish off your parfait with a drizzle of honey on top for added sweetness and a touch of elegance. If you’re using sliced almonds or shredded coconut, sprinkle them on top now. It adds a lovely visual contrast and extra flavor.
  8. Serve immediately or refrigerate for up to 30 minutes before serving to allow the flavors to meld together. However, I recommend enjoying it fresh to maintain the granola’s crunch.
  • Prep Time: 15 mins
  • Cook Time: 0 mins
  • Category: Breakfast
  • Method: No-cook
  • Cuisine: American

Nutrition

  • Serving Size: 1 parfait
  • Calories: 250
  • Sugar: 20 g
  • Sodium: 50 mg
  • Fat: 5 g
  • Saturated Fat: 2 g
  • Unsaturated Fat: 3 g
  • Trans Fat: 0 g
  • Carbohydrates: 40 g
  • Fiber: 3 g
  • Protein: 10 g
  • Cholesterol: 10 mg

Keywords: Choose ripe peaches for the best flavor and texture. Use a clear glass for a beautiful presentation. For creaminess, consider whipping the yogurt before layering. Be mindful of the granola-to-yogurt ratio. Prepare yogurt and peaches ahead of time for gatherings, layering just before serving.

Did you make this recipe?

Share a photo and tag us — we can't wait to see what you've made!

Sun-Kissed Frozen Orange Cream Slush

As a child, summer days felt like they lasted forever. I remember the sticky heat wrapping around me as I played outside, my laughter mingling with the sounds of the neighborhood. But nothing could cool me down quite like the moment I’d spot my grandmother, laboring over her blender, whipping up her famous Frozen Orange Creamsicle Slush. That vibrant orange treat, with its frosty texture and sweet citrus aroma, was like a burst of sunshine in a cup. Just one sip, and I could feel the coolness wash over me, sparking pure joy.

This Frozen Orange Creamsicle Slush has a way of making you feel like a kid again. Its creamy, dreamy consistency is a delightful balance of bright orange and soft vanilla, inviting you to dive right in. The refreshing tang of orange dances on your tongue, while the smooth creaminess envelops you in a comforting embrace. It’s a nostalgic treat that’s perfect for hot summer afternoons or anytime you need a little pick-me-up.

What makes my version of this slush stand out is the addition of a hint of vanilla bean, which elevates the flavor and adds an extra layer of richness. Plus, it’s super easy to whip up with just a few simple ingredients that you probably already have on hand! So, if you’re ready to relive those sun-soaked memories, let me show you exactly how to make it.

Sun-Kissed Frozen Orange Cream Slush

Why You’ll Love This Recipe

  • Each slush is a perfect blend of creamy vanilla and zesty orange, creating a nostalgic flavor reminiscent of summer days.
  • This refreshing treat is ready in under 15 minutes, making it an ideal quick dessert for unexpected guests or hot afternoons.
  • With just 8 simple ingredients, it’s budget-friendly, ensuring you don’t have to break the bank to enjoy a delicious slush.
  • The slush has a perfectly smooth texture, thanks to the combination of ice and ice cream, providing a delightful contrast to the bright citrus flavors.
  • It’s highly customizable; you can easily adjust the sweetness and add fresh herbs for a unique twist that suits your taste.

Ingredients

  • 2 cups orange juice (freshly squeezed or store-bought)
  • 1 cup vanilla ice cream
  • 1 cup crushed ice
  • 1/2 cup milk (whole or 2%)
  • 1/4 cup granulated sugar (adjust based on sweetness preference)
  • 1 teaspoon vanilla extract
  • Zest of 1 orange (for added flavor)
  • Fresh orange slices and mint leaves (for garnish)

The star of this Frozen Orange Creamsicle Slush is the orange juice, which provides the vibrant, citrusy base. Freshly squeezed juice will yield the brightest flavor, but store-bought options can be just as convenient. If you’re opting for store-bought, choose 100% pure juice with no added sugars for the best results. Another essential ingredient is the vanilla ice cream; it adds creaminess and sweetness. You can substitute it with dairy-free ice cream if you’re looking for a vegan option. Whole or 2% milk complements the ice cream, creating a smooth blend. If you want a lower-calorie version, almond or oat milk can be good alternatives.

Lastly, the granulated sugar can be adjusted based on your sweetness preference. If you prefer a more natural sweetener, consider using honey or agave syrup. The orange zest enhances the flavor profile, providing an aromatic pop that brings the whole slush together. Don’t skip it! It adds an extra layer of brightness that makes this slush truly special.

Step-by-Step Instructions

  1. Start by preparing your ingredients. Gather 2 cups of orange juice, 1 cup of vanilla ice cream, and 1 cup of crushed ice. Make sure the ice is finely crushed, as larger chunks can make blending difficult.
  2. In a blender, combine the orange juice, vanilla ice cream, crushed ice, and 1/2 cup of milk. Add 1/4 cup of granulated sugar and 1 teaspoon of vanilla extract. If you like a sweeter slush, consider adding a bit more sugar at this stage.
  3. Add the zest of 1 orange to the blender. This step is crucial for enhancing the citrus flavor of your slush. Make sure not to include the bitter white pith—only the flavorful zest.
  4. Blend the mixture on medium-high speed for about 30-45 seconds. Stop once the ingredients are fully combined and the slush has a smooth, even consistency. If you notice large chunks of ice, blend for an additional 10-15 seconds. Avoid over-blending, as this can make the slush too liquidy.
  5. Once blended, taste the slush. If it needs more sweetness, add a little more sugar and blend for a few more seconds. If it’s too thick, you can add a splash of milk to reach your desired consistency.
  6. Pour the slush into glasses. This recipe typically serves 4, but you can easily double it for larger gatherings. Use a spoon to help guide the slush into the glasses if needed.
  7. Garnish each serving with fresh orange slices and mint leaves. The mint not only adds a pop of color but also a refreshing aroma that complements the citrus flavors beautifully.
  8. Serve immediately and enjoy! If you’ve made extra, you can refrigerate it for a short time, but it’s best enjoyed fresh.

Pro Tips for the Best Frozen Orange Creamsicle Slush

  • Don’t skip the orange zest! It’s a game-changer for flavor. Always zest before juicing to make it easier.
  • Use a high-powered blender for the best texture. A standard blender may struggle with ice, leading to uneven consistency. If you have a food processor, that can work too, but ensure the ice is finely crushed.
  • Adjust the ice-to-liquid ratio carefully. If your slush is too thick, it won’t blend well. Start with less ice and add more until you reach your preferred texture.
  • Be cautious with the sugar! Always start with the lower amount, as you can easily add more, but it’s hard to fix an overly sweet slush.
  • For a fun twist, consider adding a splash of coconut milk or a handful of fresh fruit like strawberries or pineapple. This not only enhances the flavor but also adds a beautiful color contrast.

Variations & Serving Ideas

There are countless ways to put a spin on your Frozen Orange Creamsicle Slush. Consider making a tropical version by adding in some pineapple juice or coconut milk for a delightful tropical twist. If you’re feeling adventurous, try incorporating a handful of frozen mango or peach slices for added sweetness. For a lighter version, swap out the vanilla ice cream for Greek yogurt for a creamy yet tangy alternative.

As for serving ideas, this refreshing slush pairs wonderfully with light summer dishes like grilled chicken skewers, fish tacos, or a simple salad topped with citrus vinaigrette. The bright, zesty flavors of the slush complement these dishes perfectly, making them an ideal pairing for a sunny day.

Storage, Make-Ahead & Reheating

This Frozen Orange Creamsicle Slush is best enjoyed fresh, but if you have leftovers, you can store them in an airtight container in the fridge for up to 2 days. Just keep in mind that the slush may lose some of its texture over time as the ice melts. It doesn’t freeze well, as the ice will turn into a solid block. If you must freeze it, blend again after thawing to restore the slushy consistency. This treat is best the day you make it, as the flavors meld together beautifully overnight, enhancing its deliciousness.

Frequently Asked Questions

Can I make Frozen Orange Creamsicle Slush ahead of time?

Yes — in fact, it tastes even better the next day as the flavors meld. However, it’s best to enjoy it fresh, as the texture can change if stored for too long. If you need to prepare it ahead, keep it in the fridge and re-blend before serving.

What kind of orange juice should I use?

For the best flavor, use freshly squeezed orange juice. However, if you’re short on time, opt for 100% pure store-bought juice without added sugars. This will ensure that your slush remains flavorful and refreshing.

Can I substitute the vanilla ice cream?

Absolutely! If you’re looking for a dairy-free option, coconut milk ice cream or a non-dairy vanilla ice cream can work wonderfully. They will still provide the creamy texture and sweetness you desire.

How can I adjust the sweetness of my slush?

You can easily adjust the sweetness by modifying the amount of sugar added. Start with 1/4 cup and taste the mixture before blending. If you prefer it sweeter, add more sugar gradually until it reaches your desired level.

What should I do if my slush is too thick?

If your slush is too thick, simply add a splash of milk or orange juice and blend again. This will help achieve a more drinkable consistency while maintaining the slushy texture. Adjust gradually to reach your preferred thickness.

Sun-Kissed Frozen Orange Cream Slush

Final Thoughts

The Frozen Orange Creamsicle Slush is a delightful blend of refreshing citrus and creamy goodness, making it a perfect treat for warm days or any time you crave a taste of nostalgia. The way the bright orange flavor dances with the creamy texture truly elevates this slush, transforming it into a satisfying escape from the everyday.

This is the kind of recipe I come back to again and again, especially when I’m looking to cool down or impress guests at a summer gathering. It’s simple to make and always brings smiles all around! I encourage you to try this recipe for yourself—don’t hesitate to share your results or even put your own spin on it. Happy slushing!

Print
clock clock iconcutlery cutlery iconflag flag iconfolder folder iconinstagram instagram iconpinterest pinterest iconfacebook facebook iconprint print iconsquares squares iconheart heart iconheart solid heart solid icon

Frozen Orange Creamsicle Slush


  • Author: Lily author
  • Total Time: 15 minutes
  • Yield: 4 servings 1x
Pin Recipe
Print Recipe

Description

This Frozen Orange Creamsicle Slush is a refreshing treat that combines creamy vanilla and zesty orange flavors. Perfect for hot summer days, it brings back nostalgic memories with every sip.


Ingredients

Scale
  • 2 cups orange juice (freshly squeezed or store-bought)
  • 1 cup vanilla ice cream
  • 1 cup crushed ice
  • 1/2 cup milk (whole or 2%)
  • 1/4 cup granulated sugar (adjust based on sweetness preference)
  • 1 teaspoon vanilla extract
  • Zest of 1 orange (for added flavor)
  • Fresh orange slices and mint leaves (for garnish)

Instructions

  1. Start by preparing your ingredients. Gather 2 cups of orange juice, 1 cup of vanilla ice cream, and 1 cup of crushed ice. Make sure the ice is finely crushed, as larger chunks can make blending difficult.
  2. In a blender, combine the orange juice, vanilla ice cream, crushed ice, and 1/2 cup of milk. Add 1/4 cup of granulated sugar and 1 teaspoon of vanilla extract. If you like a sweeter slush, consider adding a bit more sugar at this stage.
  3. Add the zest of 1 orange to the blender. This step is crucial for enhancing the citrus flavor of your slush. Make sure not to include the bitter white pith—only the flavorful zest.
  4. Blend the mixture on medium-high speed for about 30-45 seconds. Stop once the ingredients are fully combined and the slush has a smooth, even consistency. If you notice large chunks of ice, blend for an additional 10-15 seconds. Avoid over-blending, as this can make the slush too liquidy.
  5. Once blended, taste the slush. If it needs more sweetness, add a little more sugar and blend for a few more seconds. If it’s too thick, you can add a splash of milk to reach your desired consistency.
  6. Pour the slush into glasses. This recipe typically serves 4, but you can easily double it for larger gatherings. Use a spoon to help guide the slush into the glasses if needed.
  7. Garnish each serving with fresh orange slices and mint leaves. The mint not only adds a pop of color but also a refreshing aroma that complements the citrus flavors beautifully.
  8. Serve immediately and enjoy! If you’ve made extra, you can refrigerate it for a short time, but it's best enjoyed fresh.
  • Prep Time: 15 min
  • Cook Time: 0 min
  • Category: Dessert
  • Method: Blending
  • Cuisine: American

Nutrition

  • Serving Size: 1 serving
  • Calories: 200
  • Sugar: 30 g
  • Sodium: 50 mg
  • Fat: 5 g
  • Saturated Fat: 3 g
  • Unsaturated Fat: 2 g
  • Trans Fat: 0 g
  • Carbohydrates: 40 g
  • Fiber: 1 g
  • Protein: 2 g
  • Cholesterol: 20 mg

Keywords: Don't skip the orange zest! It's a game-changer for flavor. Always zest before juicing to make it easier.

Did you make this recipe?

Share a photo and tag us — we can't wait to see what you've made!

Zesty Lemon Poppy Seed Delight

One rainy afternoon, I found myself in my grandmother’s cozy kitchen, the kind that always smelled like warmth and love. She was whipping up her famous Lemon Poppy Seed Loaf, a recipe that had been passed down through generations. As the batter came together, the zesty aroma of fresh lemons filled the air, mingling perfectly with the nutty fragrance of poppy seeds. I can still picture her, apron-clad, as she expertly drizzled a vibrant citrus icing over the loaf, creating a glossy, sun-kissed finish that beckoned us to dive in. It was a moment that sparked my own passion for baking, and this recipe has become a cherished staple in my home ever since.

When you take a bite of this Lemon Poppy Seed Loaf, it’s like a burst of sunshine on your palate. The loaf is beautifully golden, with a tender crumb that melts in your mouth. Each slice is speckled with tiny poppy seeds, adding a delightful crunch that contrasts beautifully with the tangy sweetness of the lemon. And that citrus icing? It’s the finishing touch that elevates this loaf from ordinary to extraordinary, with its bright, zesty flavor dancing on your taste buds.

This recipe stands out because it embraces simplicity while delivering on flavor. I’ve added a hint of vanilla to the batter, enhancing the overall taste and making it even more indulgent. Trust me, once you make this Lemon Poppy Seed Loaf With Citrus Icing, it’ll become a go-to in your baking repertoire.

So, let me show you exactly how to make it!

Zesty Lemon Poppy Seed Delight

Why You’ll Love This Recipe

  • Moist and tender crumb that melts in your mouth, thanks to the perfect balance of butter and buttermilk.
  • Bright, zesty lemon flavor paired with crunchy poppy seeds, creating a delightful texture and taste experience.
  • Easy to whip up in just about an hour, perfect for last-minute gatherings or a cozy afternoon treat.
  • Budget-friendly with everyday ingredients, making it an accessible option for all home bakers.
  • The citrus icing adds a sweet tang that elevates the loaf, turning a simple recipe into a showstopper!

Ingredients

  • 1 ½ cups (190g) all-purpose flour
  • 1 teaspoon baking powder
  • ½ teaspoon baking soda
  • ½ teaspoon salt
  • 3 tablespoons poppy seeds
  • ½ cup (115g) unsalted butter, softened to room temperature
  • 1 cup (200g) granulated sugar
  • 2 large eggs
  • 1 teaspoon vanilla extract
  • 1 teaspoon lemon zest (from about 1 medium lemon)
  • ½ cup (120ml) buttermilk
  • 2 tablespoons fresh lemon juice

For the Citrus Icing:

  • 1 cup (120g) powdered sugar
  • 2 tablespoons fresh lemon juice
  • 1 tablespoon orange juice
  • 1 teaspoon lemon zest (for garnish, optional)

Let’s dive into the key ingredients that make this Lemon Poppy Seed Loaf so special. The all-purpose flour provides the structure and base for the loaf, while the baking powder and baking soda ensure it rises perfectly, giving the loaf a light texture. For a gluten-free variation, you could substitute the flour with a gluten-free all-purpose blend. Poppy seeds not only add a delightful crunch but also contribute to the unique flavor profile that pairs well with the citrus notes.

Unsalted butter is crucial for achieving the buttery richness that makes this loaf so moist. If you’re looking for a dairy-free option, coconut oil or a vegan butter can be used instead. The buttermilk is another essential component, providing acidity that activates the baking soda for a fluffy texture. If you don’t have buttermilk on hand, you can easily make a substitute by mixing ½ cup of milk with 1 tablespoon of vinegar or lemon juice and letting it sit for about 5 minutes.

Step-by-Step Instructions

  1. Preheat your oven to 350°F (175°C). Grease a 9×5-inch loaf pan or line it with parchment paper for easy removal later.
  2. In a medium mixing bowl, whisk together 1 ½ cups of all-purpose flour, 1 teaspoon of baking powder, ½ teaspoon of baking soda, ½ teaspoon of salt, and 3 tablespoons of poppy seeds. This helps to evenly distribute the baking agents and ensures a uniform rise.
  3. In a large mixing bowl, cream together ½ cup of softened unsalted butter and 1 cup of granulated sugar using an electric mixer on medium speed for about 3-4 minutes, until the mixture is light and fluffy. Make sure to scrape down the sides of the bowl occasionally.
  4. Add 2 large eggs, 1 teaspoon of vanilla extract, and 1 teaspoon of lemon zest to the creamed butter and sugar, mixing until fully combined. You want a smooth consistency, so ensure there are no lumps of butter.
  5. In a small bowl, combine ½ cup of buttermilk and 2 tablespoons of fresh lemon juice. Alternately add the dry ingredients and buttermilk mixture to the butter mixture, starting and ending with the dry ingredients. Mix just until combined; do not overmix, as this can lead to a dense loaf.
  6. Pour the batter into the prepared loaf pan. Smooth the top with a spatula, ensuring it’s even. Bake in the preheated oven for 50-60 minutes, or until a toothpick inserted in the center comes out clean. The edges should be lightly golden brown, and the center should feel just set.
  7. Once baked, remove the loaf from the oven and allow it to cool in the pan for about 10 minutes. Then, transfer it to a wire rack to cool completely. Resist the urge to slice too soon, as it will be crumbly if it’s still warm.
  8. While the loaf is cooling, prepare the citrus icing. In a medium bowl, whisk together 1 cup of powdered sugar, 2 tablespoons of fresh lemon juice, and 1 tablespoon of orange juice until smooth. If the icing is too thick, you can add a little more juice to reach your desired consistency.
  9. Once the loaf is completely cool, drizzle the citrus icing over the top. If you like, sprinkle with an additional teaspoon of lemon zest for an extra pop of flavor and color.

Pro Tips for the Best Lemon Poppy Seed Loaf With Citrus Icing

  • Be careful not to overmix your batter; this is a common mistake that can lead to a dense loaf. Mix just until the dry ingredients are incorporated for a light and fluffy texture.
  • Use room temperature ingredients, especially the butter and eggs. This helps to create a smoother batter and ensures even baking. Take your eggs out of the fridge about 30 minutes before you start.
  • For a more pronounced lemon flavor, consider adding a little lemon extract in addition to the zest and juice. Just a half teaspoon can elevate the citrus notes significantly.
  • When measuring your flour, spoon it into the measuring cup and level it off with a knife instead of scooping directly from the bag. This prevents packing and ensures you don’t end up with a dry loaf.
  • Invest in a good quality loaf pan; it makes a difference in heat distribution, which ensures even baking. If your pan is dark-coated, reduce the oven temperature by 25°F to prevent over-browning.

Variations & Serving Ideas

For a delightful twist, consider adding blueberries or raspberries to the batter for a fruity burst of flavor. You can also experiment with different citrus fruits—try lime or grapefruit zest and juice for a refreshing change. For a healthier option, substitute half of the all-purpose flour with whole wheat flour for added fiber without compromising too much on texture.

This Lemon Poppy Seed Loaf pairs beautifully with a light salad, such as a mixed greens salad with a vinaigrette, or a cup of tea for a cozy afternoon treat. It also complements a creamy cheese platter, as the acidity of the loaf balances rich cheeses perfectly. Lastly, a scoop of vanilla ice cream on the side creates a delightful contrast of temperatures and flavors!

Storage, Make-Ahead & Reheating

This Lemon Poppy Seed Loaf can be stored at room temperature for up to 3 days if wrapped tightly in plastic wrap. If you want to keep it longer, it freezes well for up to 3 months. To freeze, wrap the loaf tightly in plastic wrap and then in aluminum foil to prevent freezer burn.

When you’re ready to enjoy it again, simply thaw it in the fridge overnight. Reheat individual slices in the microwave for 15-20 seconds or in a toaster oven until warmed through. Interestingly, many people find that this loaf tastes even better the next day, as the flavors have time to meld!

Frequently Asked Questions

Can I make Lemon Poppy Seed Loaf With Citrus Icing ahead of time?

Yes — in fact, it tastes even better the next day! You can make the loaf a day in advance, allowing the flavors to develop. Just be sure to store it in an airtight container to maintain its moisture.

Can I substitute the poppy seeds?

Absolutely! If you don’t have poppy seeds on hand or prefer an alternative, you can use sesame seeds for a similar crunch or omit them entirely for a smooth loaf.

What can I use instead of buttermilk?

If you don’t have buttermilk, you can easily create a substitute by mixing ½ cup of milk (dairy or plant-based) with 1 tablespoon of vinegar or lemon juice. Let it sit for 5 minutes before using in the recipe.

How can I make this recipe gluten-free?

To make a gluten-free version of this Lemon Poppy Seed Loaf, substitute the all-purpose flour with a gluten-free all-purpose flour blend. Just ensure that the blend contains a binding agent like xanthan gum for the best results.

What is the best way to store leftover loaf?

Leftover Lemon Poppy Seed Loaf should be stored in an airtight container at room temperature for up to 3 days. For longer storage, wrap it tightly and freeze for up to 3 months. Thaw it before serving for the best texture.

Zesty Lemon Poppy Seed Delight

Final Thoughts

The Lemon Poppy Seed Loaf with Citrus Icing is truly a delightful treat that brings a burst of brightness to any occasion. The zesty lemon flavor combined with the subtle crunch of poppy seeds creates a satisfying balance, while the citrus icing adds a touch of sweetness that perfectly complements the loaf’s tanginess.

This is the kind of recipe I come back to again and again, especially when I want to brighten up a gloomy day or celebrate a small victory. The aroma that fills the kitchen as it bakes is absolutely heavenly! I encourage you to give this recipe a try; you might just find it becoming a beloved staple in your home. Don’t forget to share your results or even add your own unique twist—I can’t wait to see what you create!

Print
clock clock iconcutlery cutlery iconflag flag iconfolder folder iconinstagram instagram iconpinterest pinterest iconfacebook facebook iconprint print iconsquares squares iconheart heart iconheart solid heart solid icon

Lemon Poppy Seed Loaf


  • Author: Lily author
  • Total Time: 23 minute
  • Yield: 1 loaf 1x
Pin Recipe
Print Recipe

Description

This Lemon Poppy Seed Loaf is a delightful treat that combines zesty lemon flavor with crunchy poppy seeds. Topped with a citrus icing, it’s perfect for any occasion.


Ingredients

Scale
  • 1 ½ cups (190g) all-purpose flour
  • 1 teaspoon baking powder
  • ½ teaspoon baking soda
  • ½ teaspoon salt
  • 3 tablespoons poppy seeds
  • ½ cup (115g) unsalted butter, softened to room temperature
  • 1 cup (200g) granulated sugar
  • 2 large eggs
  • 1 teaspoon vanilla extract
  • 1 teaspoon lemon zest (from about 1 medium lemon)
  • ½ cup (120ml) buttermilk
  • 2 tablespoons fresh lemon juice
  • 1 cup (120g) powdered sugar
  • 2 tablespoons fresh lemon juice
  • 1 tablespoon orange juice
  • 1 teaspoon lemon zest (for garnish, optional)

Instructions

  1. Preheat your oven to 350°F (175°C). Grease a 9×5-inch loaf pan or line it with parchment paper for easy removal later.
  2. In a medium mixing bowl, whisk together 1 ½ cups of all-purpose flour, 1 teaspoon of baking powder, ½ teaspoon of baking soda, ½ teaspoon of salt, and 3 tablespoons of poppy seeds. This helps to evenly distribute the baking agents and ensures a uniform rise.
  3. In a large mixing bowl, cream together ½ cup of softened unsalted butter and 1 cup of granulated sugar using an electric mixer on medium speed for about 3-4 minutes, until the mixture is light and fluffy. Make sure to scrape down the sides of the bowl occasionally.
  4. Add 2 large eggs, 1 teaspoon of vanilla extract, and 1 teaspoon of lemon zest to the creamed butter and sugar, mixing until fully combined. You want a smooth consistency, so ensure there are no lumps of butter.
  5. In a small bowl, combine ½ cup of buttermilk and 2 tablespoons of fresh lemon juice. Alternately add the dry ingredients and buttermilk mixture to the butter mixture, starting and ending with the dry ingredients. Mix just until combined; do not overmix, as this can lead to a dense loaf.
  6. Pour the batter into the prepared loaf pan. Smooth the top with a spatula, ensuring it’s even. Bake in the preheated oven for 50-60 minutes, or until a toothpick inserted in the center comes out clean. The edges should be lightly golden brown, and the center should feel just set.
  7. Once baked, remove the loaf from the oven and allow it to cool in the pan for about 10 minutes. Then, transfer it to a wire rack to cool completely. Resist the urge to slice too soon, as it will be crumbly if it’s still warm.
  8. While the loaf is cooling, prepare the citrus icing. In a medium bowl, whisk together 1 cup of powdered sugar, 2 tablespoons of fresh lemon juice, and 1 tablespoon of orange juice until smooth. If the icing is too thick, you can add a little more juice to reach your desired consistency.
  9. Once the loaf is completely cool, drizzle the citrus icing over the top. If you like, sprinkle with an additional teaspoon of lemon zest for an extra pop of flavor and color.
  • Prep Time: 15 mins
  • Cook Time: 50-60 mins
  • Category: Dessert
  • Method: Baking
  • Cuisine: American

Nutrition

  • Serving Size: 1 slice
  • Calories: 200
  • Sugar: 15 g
  • Sodium: 150 mg
  • Fat: 8 g
  • Saturated Fat: 5 g
  • Unsaturated Fat: 3 g
  • Trans Fat: 0 g
  • Carbohydrates: 30 g
  • Fiber: 1 g
  • Protein: 3 g
  • Cholesterol: 40 mg

Keywords: Be careful not to overmix your batter; this is a common mistake that can lead to a dense loaf. Use room temperature ingredients for a smoother batter and even baking.

Did you make this recipe?

Share a photo and tag us — we can't wait to see what you've made!

  • Privacy Policy
  • Terms Of Service
  • Contact
  • About
  • GDPR

Copyright © 2025 Homesmad