• Skip to primary navigation
  • Skip to main content
  • Skip to primary sidebar
Homesmad

Homesmad

  • Home
  • Breakfast & Brunch
  • Appetizers & Snacks
  • Dinner
  • Dessert
  • About
  • Privacy Policy
  • Contact
Homesmad
  • Home
  • Breakfast & Brunch
  • Appetizers & Snacks
  • Dinner
  • Dessert
  • About
  • Privacy Policy
  • Contact

Easy Strawberry Crunch Cheesecake Tacos – Must-Try Dessert!

November 11, 2025 by Lily author

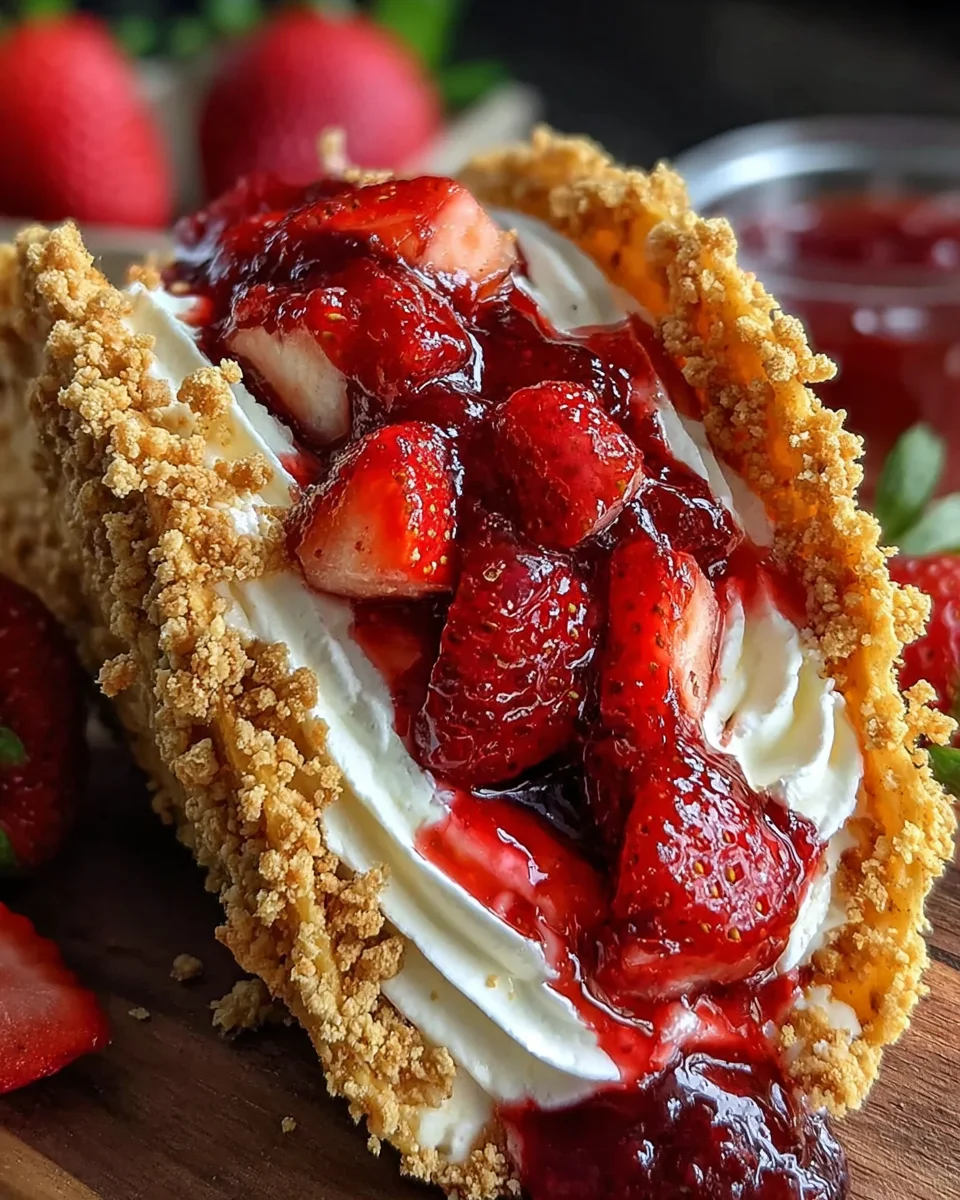
Strawberry Crunch Cheesecake Tacos are more than just a dessert; they are a delightful culinary adventure that promises to revolutionize your treat game.

I am absolutely thrilled to guide you through crafting these irresistible creations, which perfectly blend the beloved textures and flavors of a classic strawberry shortcake crunch bar with the creamy indulgence of cheesecake, all nestled in a fun, handheld taco shell. This innovative dessert sensation is a testament to the exciting possibilities when we dare to fuse our favorite sweet elements, drawing inspiration from nostalgic childhood treats and modern dessert trends.

I’ve seen firsthand how these unique tacos captivate everyone who tries them, not just because of their stunning visual appeal, but for their incredible interplay of textures: the satisfying crunch of the strawberry coating, the rich, velvety smooth cheesecake filling, and the burst of fresh strawberry flavor. It’s a joyous nod to cherished childhood memories, elevated to gourmet status, making them an instant crowd-pleaser for any gathering or a special solo treat. Get ready to fall in love with the sheer genius of Strawberry Crunch Cheesecake Tacos – I promise, they’re as fun to make as they are to devour!

Easy Strawberry Crunch Cheesecake Tacos - Must-Try Dessert! this RECIPE

Ingredients:

  • For the Strawberry Crunch Topping:

    • 1 ½ cups golden sandwich cookies (like Golden Oreos or Nilla Wafers), finely crushed
    • ½ cup freeze-dried strawberries, crushed into a fine powder (you can use a food processor or a Ziploc bag and rolling pin)
    • ¼ cup granulated sugar
    • ¼ cup unsalted butter, melted
    • 1 (3 ounce) package strawberry-flavored gelatin mix (like Jell-O)
    • 1 teaspoon vanilla extract (optional, for extra flavor depth)
  • For the Cheesecake Filling:

    • 2 (8 ounce) packages cream cheese, full-fat, softened to room temperature
    • ½ cup granulated sugar
    • 1 teaspoon vanilla extract
    • ¼ teaspoon almond extract (optional, but highly recommended for a subtle lift)
    • 1 cup heavy cream, chilled
    • 2 tablespoons powdered sugar (for stabilizing the whipped cream)
  • For the “Taco” Shells:

    • About 24-30 large vanilla wafers (like Nilla Wafers) or soft shortbread cookies, depending on size
  • For Garnish (Optional):

    • Fresh strawberries, hulled and sliced or quartered
    • Extra strawberry crunch topping

Making the Strawberry Crunch Topping

Let’s get started on perhaps the most iconic element of these delightful “Strawberry Crunch Cheesecake Tacos”—the crunch topping! This vibrant, sweet, and perfectly textured element is what truly sets this dessert apart and gives it that irresistible nostalgic appeal. Trust me, making it from scratch is incredibly satisfying and yields far superior results than any store-bought alternative. We’ll be combining a few simple ingredients to create a symphony of flavor and texture that perfectly complements our creamy cheesecake filling.

  1. Prepare the Cookie Base: First things first, grab your golden sandwich cookies or Nilla Wafers. We need to crush these into a fine crumb. You have a couple of options here:
    • Food Processor Method: If you have a food processor, this is the quickest and most efficient way. Simply add the cookies to the bowl and pulse until they form fine crumbs, almost like coarse sand. Be careful not to over-process them into a paste.
    • Ziploc Bag Method: If you don’t have a food processor, no worries! Place the cookies in a large, heavy-duty Ziploc bag, seal it well, removing as much air as possible, and then use a rolling pin or the bottom of a heavy skillet to crush them. Aim for fine crumbs, but a few slightly larger pieces are absolutely fine and can even add to the texture.

    Once crushed, transfer these beautiful golden crumbs to a medium-sized mixing bowl.

  2. Crush the Freeze-Dried Strawberries: Now, for that intense strawberry flavor and natural color! Take your freeze-dried strawberries and, again, you can use a food processor to blitz them into a fine powder. If using the Ziploc bag method, crush them just as you did the cookies, aiming for a very fine powder. The finer the powder, the more evenly the flavor will distribute. Add this vibrant pink powder to the bowl with your cookie crumbs.
  3. Combine Dry Ingredients: To the bowl containing the cookie crumbs and strawberry powder, add your ¼ cup of granulated sugar and the entire 3-ounce package of strawberry-flavored gelatin mix. The gelatin mix not only enhances the strawberry flavor but also contributes to that signature crunchy texture and eye-catching color. Stir all these dry ingredients together thoroughly with a spoon or a whisk until everything is evenly combined. You should see a beautiful, uniform pinkish-gold mixture at this point.
  4. Add Wet Ingredients: Next, pour in your ¼ cup of melted unsalted butter. If you’re using it, now is also the time to add the 1 teaspoon of vanilla extract, which adds a lovely depth to the flavor profile. Mix vigorously with a spoon or a rubber spatula until all the dry ingredients are moistened and clumpy. The mixture should resemble wet sand or small, moist clusters. These clusters are exactly what we’re looking for to create that iconic crunch!
  5. Bake for Perfection (Optional, but Recommended): For an even crispier, more defined crunch, I love to lightly bake this mixture. Spread the topping mixture evenly onto a baking sheet lined with parchment paper. Bake in a preheated oven at 300°F (150°C) for about 8-10 minutes. Keep a close eye on it, as the sugar can burn quickly. You’re looking for it to become slightly toasted and a bit firmer. Once baked, remove from the oven and let it cool completely on the baking sheet. As it cools, it will firm up and become delightfully crunchy. If you skip this step, the topping will still be delicious, but baking truly elevates the texture.
  6. Cool and Store: Allow the strawberry crunch topping to cool completely before using. If you have any larger clumps after cooling, you can gently break them apart with your fingers. Once cool, transfer it to an airtight container. It can be stored at room temperature for up to a week, or frozen for longer, making it perfect for prep-ahead planning for your “Strawberry Crunch Cheesecake Tacos”!

Preparing the Cheesecake Filling

Now that our fantastic strawberry crunch topping is ready and waiting, let’s turn our attention to the heart of these “Strawberry Crunch Cheesecake Tacos”—the luscious, creamy cheesecake filling. This filling is designed to be light yet rich, with a perfect balance of tang and sweetness, making it the ideal complement to our crunchy shells and topping. The key to a smooth, lump-free cheesecake filling is using room-temperature cream cheese and mixing ingredients in the correct order. So, let’s get that cream cheese out of the fridge!

  1. Soften the Cream Cheese: This step is non-negotiable for a silky-smooth filling. Ensure your two 8-ounce packages of full-fat cream cheese are softened to room temperature. This usually takes about 30-60 minutes out of the refrigerator. If you’re in a hurry, you can unwrap them and microwave them on low power (e.g., 50% power) for 15-30 seconds, just until soft to the touch but not melted.
  2. Whip the Heavy Cream: In a separate, chilled mixing bowl (preferably metal, as it stays colder), combine the 1 cup of chilled heavy cream with the 2 tablespoons of powdered sugar. Using a stand mixer with a whisk attachment or a handheld electric mixer, beat the cream on medium-high speed until stiff peaks form. It’s crucial not to over-whip; you want firm, airy peaks that hold their shape. Once whipped, gently set this aside in the refrigerator. This homemade whipped cream will provide the lightness and airiness to our cheesecake filling, making it almost like a mousse.
  3. Cream the Cream Cheese: In a large mixing bowl, place the softened cream cheese. Using a stand mixer with a paddle attachment or a handheld electric mixer, beat the cream cheese on medium speed for about 2-3 minutes until it is completely smooth and fluffy, with no lumps whatsoever. Scrape down the sides and bottom of the bowl frequently to ensure even creaming. This initial beating is vital for a smooth texture.
  4. Add Sugars and Extracts: Reduce the mixer speed to low and gradually add the ½ cup of granulated sugar to the cream cheese. Continue to beat until the sugar is fully incorporated and the mixture is smooth, about another 1-2 minutes. Then, add the 1 teaspoon of vanilla extract and, if using, the ¼ teaspoon of almond extract. The almond extract adds a subtle, almost cherry-like note that pairs beautifully with strawberry. Beat just until combined. Avoid overmixing once the sugar is in, as this can incorporate too much air and lead to a less dense, sometimes gritty, texture in a no-bake filling.
  5. Fold in Whipped Cream: Gently remove your whipped cream from the refrigerator. With a rubber spatula, carefully fold about one-third of the whipped cream into the cream cheese mixture until just combined. This lightens the cream cheese base. Then, add the remaining whipped cream and gently fold it in using a light, upward motion. The goal is to incorporate the whipped cream without deflating it too much. You want a light, airy, yet stable filling. The finished cheesecake filling should be thick, smooth, and fluffy.
  6. Chill the Filling: Once prepared, cover the bowl of cheesecake filling with plastic wrap and refrigerate for at least 30 minutes. This allows the filling to firm up slightly, making it easier to pipe or spread into our “taco” shells later on. A chilled filling is also more stable and holds its shape better.

Forming the “Taco” Shells

The “taco” shells are what truly make these “Strawberry Crunch Cheesecake Tacos” a fun and unique dessert experience. Instead of traditional tortillas, we’re using vanilla wafers or soft shortbread cookies, gently softened and shaped. This gives us a sturdy yet edible base that’s sweet and complements the cheesecake perfectly. This step requires a bit of patience and a gentle touch, but the result is absolutely worth it!

  1. Prepare Your Workspace: Before you start softening cookies, set up your shaping station. You’ll need something to drape the softened cookies over to create that taco shape. Excellent options include:
    • Dowel Rod or Rolling Pin: If you have a clean wooden dowel or a thin rolling pin, lay it across the top of two sturdy glasses or small bowls.
    • Muffin Tin: Flip a muffin tin upside down. The spaces between the cups create a natural “V” shape perfect for resting cookies.
    • Cooling Rack: Some cooling racks have widely spaced wires that can also work.

    Make sure your shaping tool is clean and ready. You’ll also want a plate or baking sheet lined with parchment paper nearby to place your formed shells once they’ve hardened.

  2. Softening the Cookies: This is the crucial part. We need to make the cookies pliable without making them crumbly or greasy. We’ll work with just a few cookies at a time, usually 3-4, as they firm up quickly once removed from heat.
    • Microwave Method (Recommended for speed and control): Place 3-4 vanilla wafers or shortbread cookies on a microwave-safe plate, ensuring they are not overlapping. Microwave them on high for 10-15 seconds. The exact time will depend on your microwave’s wattage and the type of cookie. You want them to be warm and bendable, but not so hot that they burn your fingers or become too fragile. They should feel slightly flexible when you pick them up.
    • Oven Method (For larger batches or if you prefer): Preheat your oven to its lowest setting, usually around 200°F (95°C) or even just “warm.” Place a single layer of cookies on a baking sheet. Heat for 3-5 minutes. Again, you’re looking for pliability. This method can sometimes make them a bit drier, so keep a close watch.

    Important Tip: Cookies will soften quickly, but also firm up quickly. Work fast and only soften a few at a time!

  3. Shaping the Taco Shells: As soon as the cookies are warm and pliable, carefully pick one up. It will be delicate! Gently drape the softened cookie over your chosen shaping tool (dowel, muffin tin ridge, etc.) to create the taco shell shape. Press down lightly in the middle to encourage the “V” shape. If the cookie cracks, don’t worry, just reshape it and try another. Sometimes, the first few are trial and error. You’ll get the hang of it!
  4. Allow to Cool and Harden: Leave the shaped cookies on your shaping tool to cool completely. As they cool, they will firm up and retain their taco shape. This usually takes about 10-15 minutes. Once completely cool and firm, carefully lift them off your shaping tool and place them on your parchment-lined plate or baking sheet.
  5. Repeat the Process: Continue softening and shaping cookies in small batches until you have enough “taco” shells for all your “Strawberry Crunch Cheesecake Tacos.” If any cookies break during shaping, don’t despair! You can always use the broken pieces as an extra topping or snack on them.
  6. Storage of Shells: Once all your shells are formed and hardened, they can be stored in an airtight container at room temperature for a day or two before filling. This allows you to prepare them in advance.

Assembling the Strawberry Crunch Cheesecake Tacos

You’ve done all the hard work: the irresistible strawberry crunch topping is waiting, the creamy cheesecake filling is chilled, and your adorable cookie “taco” shells are perfectly shaped. Now comes the most fun part—bringing all these delicious components together to create your spectacular “Strawberry Crunch Cheesecake Tacos”! This is where your culinary masterpiece takes its final form, ready to dazzle and delight.

  1. Prepare for Filling: Retrieve your chilled cheesecake filling from the refrigerator. Give it a gentle stir with a spatula to ensure it’s still smooth and pliable. For the neatest presentation and easiest application, I highly recommend transferring the cheesecake filling into a piping bag fitted with a large star tip or a round tip. If you don’t have a piping bag, a large resealable plastic bag with one corner snipped off will work just as well, or you can simply use a small spoon to carefully fill the shells.
  2. Fill the Taco Shells: Take one of your firm, shaped cookie “taco” shells. Hold it gently but firmly in one hand.
    • Piping Method: If using a piping bag, pipe a generous amount of cheesecake filling into the center of the cookie shell, starting from one end and moving to the other. You can create a lovely swirled pattern or just a smooth mound, depending on your tip. Fill it sufficiently so it looks substantial but not so much that it overflows.
    • Spoon Method: If using a spoon, carefully scoop spoonfuls of the cheesecake filling into the cookie shell, using the back of the spoon to gently spread it from end to end. Again, fill generously, but mind the edges.

    Repeat this process for all your cookie “taco” shells.

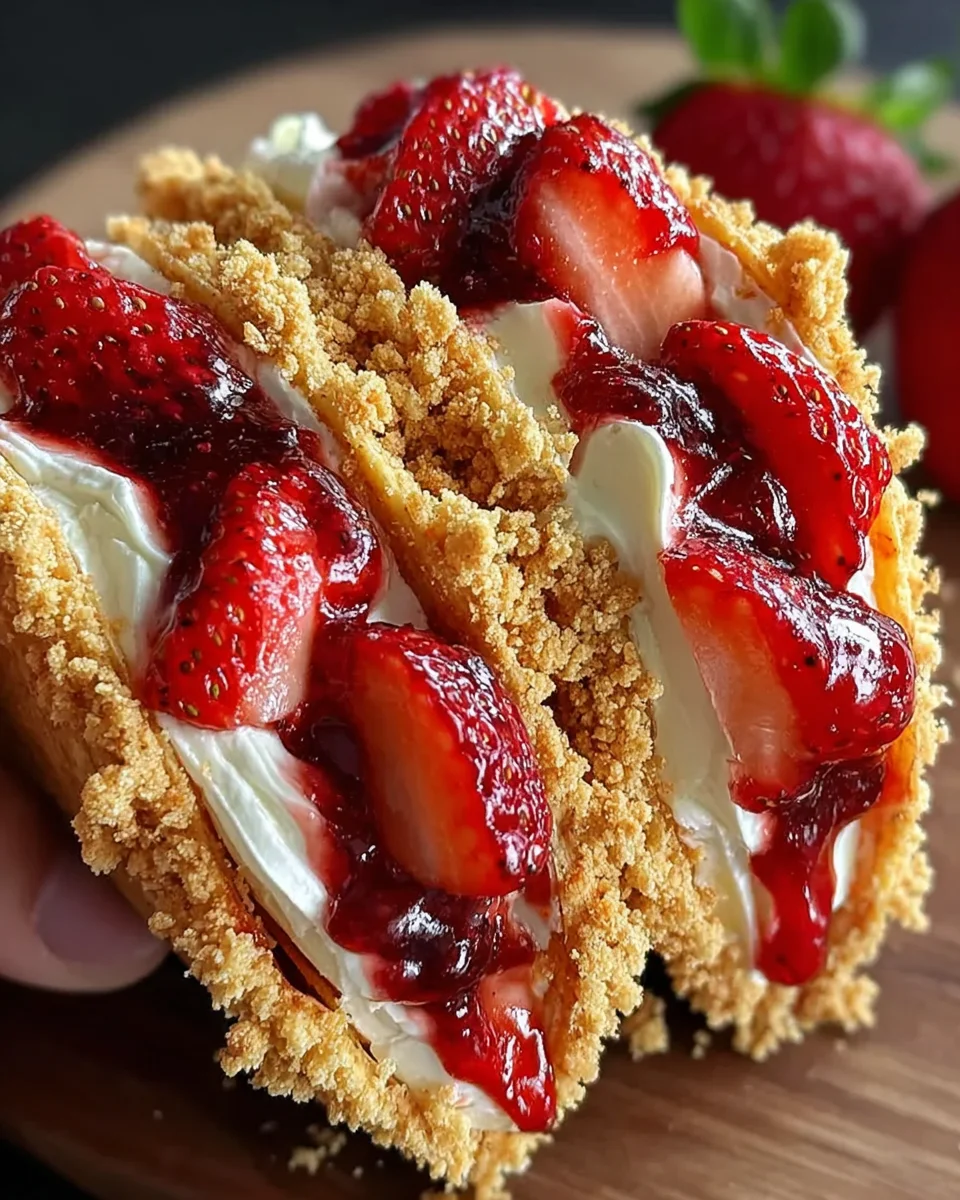
  3. Add the Strawberry Crunch: This is where the magic happens and our “Strawberry Crunch Cheesecake Tacos” get their signature finish! Once a cookie shell is filled, immediately take it over to your bowl of prepared strawberry crunch topping. You have a couple of options here:
    • Dipping Method: Gently hold the filled taco by its edges and carefully dip the exposed cheesecake filling directly into the crunch topping. Press lightly to ensure the topping adheres well.
    • Sprinkling Method: If dipping feels too messy or delicate, simply use a spoon to generously sprinkle the strawberry crunch topping over the cheesecake filling. You can also sprinkle some along the edges of the cookie for extra visual appeal and flavor.

    Ensure a good, even coating of that vibrant crunch!

  4. Garnish (Optional, but highly recommended): For an extra touch of freshness and visual appeal, consider adding a fresh strawberry garnish. Take your hulled and sliced or quartered fresh strawberries and carefully place a few pieces on top of the crunch topping on each “taco.” The bright red of the fresh strawberries truly pops against the pink crunch and white filling. You can also sprinkle a tiny bit more of the crunch topping over the fresh strawberries for a layered effect.
  5. Place on Serving Platter: As you assemble each “Strawberry Crunch Cheesecake Taco,” carefully arrange them on a serving platter or a large plate. Make sure they have a little space between them so they don’t stick together.

Chilling and Serving

Congratulations, you’ve just created a batch of magnificent “Strawberry Crunch Cheesecake Tacos”! While they look absolutely stunning already, there’s one final, crucial step to ensure they are at their absolute best: chilling. This step is vital for the flavors to meld, the cheesecake filling to fully set, and for the overall texture to reach its peak. Trust me, the wait is worth it for a truly spectacular dessert experience.

  1. The Importance of Chilling: Once all your “Strawberry Crunch Cheesecake Tacos” are assembled and beautifully garnished, it’s time to let them rest. Transfer the platter of tacos into the refrigerator. Chilling accomplishes several important things:
    • Sets the Filling: Even though it’s a no-bake filling, the cold helps the cream cheese and whipped cream mixture firm up further, ensuring it holds its shape perfectly when served and eaten.
    • Melds Flavors: Just like many other desserts, flavors develop and deepen as they chill. The strawberry, vanilla, and cheesecake notes will become more pronounced and harmonious.
    • Enhances Texture: The cold temperature will ensure the crunch topping remains crisp and distinct, contrasting beautifully with the creamy filling.
    • Prevents Soggy Shells: While the cookie shells are fairly robust, a proper chill helps the filling set quickly, reducing the chance of the cookie shells becoming soggy too fast.
  2. Chilling Time: I recommend chilling your “Strawberry Crunch Cheesecake Tacos” for at least 1-2 hours. If you have the luxury of time, an even longer chill, say 3-4 hours, or even overnight, will yield the best results. The longer they chill, the firmer and more stable the filling will be. If you’re planning ahead for a party or gathering, these are fantastic to assemble a few hours in advance, or even the morning of.
  3. When to Serve: These dessert tacos are best enjoyed cold, directly from the refrigerator. The delightful contrast of the cold, creamy filling, the crisp crunch, and the tender cookie shell is truly an experience. The fresh strawberry garnish also benefits from being chilled.
  4. Serving Suggestions: When serving, you can arrange them artfully on a platter. For an extra touch of indulgence, you could offer a light dusting of powdered sugar over the platter just before serving, or a small drizzle of strawberry sauce. However, they are perfectly delicious and impressive just as they are!
  5. Storage of Leftovers: If by some miracle you have any leftover “Strawberry Crunch Cheesecake Tacos,” store them in an airtight container in the refrigerator. They will remain delicious for 2-3 days. Be aware that over time, the cookie shells may soften slightly due to contact with the moist filling, but they will still be incredibly tasty. For optimal crunch, try to enjoy them within the first day.

There you have it! A truly unique and absolutely irresistible dessert that brings together the best of cheesecake, strawberry shortcake, and a fun taco format. These “Strawberry Crunch Cheesecake Tacos” are sure to be a showstopper and a crowd-pleaser for any occasion.

Easy Strawberry Crunch Cheesecake Tacos - Must-Try Dessert!

Conclusion:

Well, my friends, we’ve reached the sweet end of our journey, and I genuinely hope you’re as excited as I am about what we’ve created. This isn’t just another dessert recipe; it’s an experience, a delightful fusion of beloved flavors and playful presentation that truly sets it apart. The moment you take that first bite, you’ll understand exactly why these are an absolute must-try. Imagine the satisfying crunch of a perfectly crisp, golden-brown shell, giving way to an unbelievably smooth, rich, and tangy cheesecake filling that just melts in your mouth. Then, just when you think it couldn’t get any better, your palate is greeted by the sweet, vibrant burst of strawberry, complemented by that irresistibly crumbly, buttery streusel topping. It’s a symphony of textures and tastes, each component playing its part to create a truly unforgettable dessert.

I crafted this recipe with joy in mind – the joy of making something unique, the joy of sharing it with loved ones, and most importantly, the joy of indulging in something so incredibly delicious. It’s the perfect showstopper for any gathering, a whimsical treat that’s guaranteed to bring smiles and spark conversation. Forget predictable desserts; these bring a playful twist to a classic combination, making them an instant crowd-pleaser. They strike that perfect balance between refreshing fruitiness and decadent creaminess, ensuring that every bite is pure bliss. Honestly, if you’re looking to impress without spending hours slaving away, or simply want to treat yourself to something extraordinary, these are your answer.

Elevate Your Dessert Experience: Serving Suggestions & Creative Variations

Now, while the basic recipe for these wonderful treats is already stellar, part of the fun is making them your own! Presentation can really elevate the experience. For a simple yet elegant touch, arrange your finished dessert tacos on a rustic wooden board or a beautiful platter, perhaps with a scattering of fresh mint leaves or a few extra whole strawberries around them to highlight the key flavors. A very light dusting of powdered sugar just before serving adds a touch of sophistication without overwhelming the vibrant colors. If you’re feeling extra fancy, a delicate drizzle of white chocolate or even a contrasting dark chocolate ganache across the plate would provide an extra layer of visual appeal and flavor.

Unleash Your Inner Dessert Artist: Flavor Twists

The beauty of this recipe lies in its adaptability. Don’t be afraid to experiment! While strawberry is divine, imagine swapping it out for other seasonal berries. A mixed berry crunch featuring raspberries and blueberries would offer a delightful tartness, or perhaps a vibrant mango crunch for a tropical twist in the summer months. You could even play with the “crunch” component itself; instead of traditional streusel, consider using crushed vanilla wafers, graham crackers, or even finely crushed shortbread cookies mixed with freeze-dried fruit for a different textural dimension. For the cheesecake filling, a hint of lemon zest or a dash of almond extract could add another layer of complexity. During the autumn, imagine a pumpkin spice crunch cheesecake filling, topped with a cinnamon streusel and a caramel drizzle – the possibilities are truly endless!

My dearest bakers and dessert enthusiasts, I truly hope you’ll give this incredible recipe a try. The creation of these delicious Strawberry Crunch Cheesecake Tacos is not just about following steps; it’s about experiencing the joy of crafting something truly special. I’m confident that once you’ve tasted them, they’ll become a cherished addition to your recipe collection. Please, when you whip up your batch, don’t keep the deliciousness to yourself! I would absolutely love to hear about your experience. Did you stick to the classic? Did you venture into new flavor territories? Share your creations, your thoughts, and any ingenious variations you come up with. Let’s celebrate the joy of good food together! Happy baking!


Easy Strawberry Crunch Cheesecake Tacos

Revolutionize your dessert game with Strawberry Crunch Cheesecake Tacos! This delightful culinary adventure fuses the beloved textures and flavors of a classic strawberry shortcake crunch bar with creamy cheesecake, all nestled in a fun, handheld cookie taco shell. Experience the satisfying crunch, velvety smooth filling, and burst of fresh strawberry flavor.

Prep Time
30 Minutes
Cook Time
10 Minutes
Total Time
4 Hours
Servings
24 servings

Ingredients


Instructions


Important Information

Nutrition Facts (Per Serving)

It is important to consider this information as approximate and not to use it as definitive health advice.

Allergy Information

Please check ingredients for potential allergens and consult a health professional if in doubt.

« Previous Post
Best Loaded Baked Potato Soup Recipe – So Creamy & Flavorful
Next Post »
Pumpkin French Toast: Your New Favorite Fall Breakfast

If you enjoyed this…

Summer Berry Lasagna: A Delicious & Easy Dessert Recipe

Pumpkin Spice Latte Cake: The Ultimate Fall Dessert Recipe

Salted Caramel Cheesecake Cookies: The Ultimate Dessert Recipe You Need to Try

Primary Sidebar

Browse by Diet

BreakfastDinnerLunchDessertAppetizer

Sweet Peach Yogurt Parfait Delight

One of my fondest memories is from a lazy summer afternoon spent at my grandmother’s house. The sun filtered through the kitchen window, casting a warm glow over the table where she would create her culinary magic. It was during one of those blissful moments that I first tasted her Peach Yogurt Parfait with Honey and Granola. The sweet aroma of ripe peaches mingling with creamy yogurt and the crunch of granola was nothing short of heavenly. It felt like summer captured in a bowl, and I still remember the joy of diving in with a spoon, each layer revealing a new burst of flavor.

When I think about that parfait, I can almost hear the gentle hum of the bees outside, reminding me of the floral notes that honey brings to every bite. The vibrant yellows and soft oranges of the peaches contrast beautifully with the creamy white yogurt and the golden crunch of granola. It’s a dish that not only looks delightful but also tastes like a celebration of fresh, wholesome ingredients.

What makes my version of this Peach Yogurt Parfait special is the careful balance of flavors and textures. I use ripe, juicy peaches, drizzled with locally sourced honey, and a homemade granola that’s bursting with nuts and seeds for an extra crunch. It’s a simple dish, but every layer is crafted with love and attention.

Let me show you exactly how to make this delightful parfait, so you can bring a bit of that summer magic into your kitchen!

Sweet Peach Yogurt Parfait Delight

Why You’ll Love This Recipe

  • Delightfully creamy texture from the Greek yogurt, paired with the juicy sweetness of fresh peaches.
  • Ready in under 20 minutes, making it a quick and satisfying breakfast or snack option.
  • Budget-friendly, using common ingredients that you may already have in your pantry.
  • Customizable with your favorite granola and nuts, allowing you to tailor each parfait to your taste.
  • Perfectly balanced flavors with the bright acidity of lemon juice and the sweetness of honey enhancing the peaches.

Ingredients

  • For the Parfait:
  • 2 cups plain Greek yogurt (or vanilla yogurt for a sweeter option)
  • 2 large ripe peaches, diced (about 2 cups)
  • 1 tablespoon fresh lemon juice (to prevent browning of peaches)
  • 2 tablespoons honey (plus more for drizzling)
  • 1 teaspoon vanilla extract (optional for extra flavor)
  • For the Granola:
  • 1 cup granola (store-bought or homemade; see notes for a simple granola recipe)
  • 1/4 cup sliced almonds (optional for added crunch)
  • 1/4 cup shredded coconut (optional for added flavor)

Let’s dive into some key ingredients that make this Peach Yogurt Parfait so delightful! First, the Greek yogurt is not only creamy but also packed with protein, making it a satisfying option for breakfast or a snack. If you’re looking for a sweeter option, you can easily substitute it with vanilla yogurt, though it may alter the overall flavor balance. Next, the ripe peaches are the star of the show; their natural sweetness shines through, so I recommend choosing peaches that yield slightly to pressure, indicating they’re perfectly ripe. If peaches aren’t in season, feel free to use nectarines or even frozen peaches—just thaw them before use. Finally, honey adds a lovely floral sweetness that ties everything together. If you prefer, maple syrup can serve as a delicious substitute.

Step-by-Step Instructions

  1. Start by preparing the peaches. Wash them thoroughly, then slice and dice them into bite-sized pieces. In a medium bowl, toss the diced peaches with 1 tablespoon of fresh lemon juice to prevent browning. Set aside for about 5 minutes while the lemon juice works its magic.
  2. In a separate bowl, combine the Greek yogurt, 2 tablespoons of honey, and 1 teaspoon of vanilla extract if using. Stir the mixture until smooth and thoroughly blended. This should take about a minute. Avoid overmixing to maintain the creaminess of the yogurt.
  3. Now it’s time to layer your parfait. Grab a clear glass or bowl to showcase your beautiful creation. Start with a generous spoonful of the yogurt mixture at the bottom—about 1/4 cup will do. Use a spoon to spread it evenly.
  4. Add a layer of the diced peaches over the yogurt, ensuring they cover the yogurt completely. You might want to use about half of what you have prepared—roughly 1 cup. This layer should be visually appealing, so arrange the peaches neatly.
  5. Sprinkle 1/4 cup of granola over the peaches. This adds a delightful crunch. Make sure to distribute it evenly to ensure every bite has that satisfying texture. Avoid packing it down too tightly, as you want it to maintain its crunch.
  6. Repeat the layers: spoon in another 1/4 cup of yogurt, followed by another cup of peaches, and another sprinkle of granola. You should have at least two layers, but feel free to add more depending on your glass size.
  7. Finish off your parfait with a drizzle of honey on top for added sweetness and a touch of elegance. If you’re using sliced almonds or shredded coconut, sprinkle them on top now. It adds a lovely visual contrast and extra flavor.
  8. Serve immediately or refrigerate for up to 30 minutes before serving to allow the flavors to meld together. However, I recommend enjoying it fresh to maintain the granola’s crunch.

Pro Tips for the Best Peach Yogurt Parfait With Honey And Granola

  • Make sure to choose ripe peaches for the best flavor and texture. A common mistake is using unripe fruit, which can lead to a less enjoyable parfait. Look for peaches that are fragrant and slightly soft to the touch.
  • Use a clear glass to assemble your parfait; this not only makes for a beautiful presentation but also allows you to see the colorful layers, which adds to the enjoyment of eating it.
  • For an even creamier texture, consider whipping the Greek yogurt with a hand mixer for a couple of minutes before layering. This small adjustment makes a huge difference in mouthfeel.
  • Be mindful of the granola-to-yogurt ratio. Too much granola can overwhelm the parfait, while too little can make it feel too creamy. Aim for about 1/4 cup of granola per layer for the perfect balance.
  • If you’re making this for a gathering, consider preparing the yogurt and peaches ahead of time and layering them just before serving. This ensures the granola stays crunchy!

Variations & Serving Ideas

There are so many ways to get creative with your Peach Yogurt Parfait! For a tropical twist, swap out the peaches for mangoes or pineapples and top with coconut flakes. If you prefer a berry flavor, mix in some blueberries or strawberries with the peaches for added color and taste. For a nutty version, incorporate chopped walnuts or pecans instead of almonds.

As for serving ideas, this parfait pairs beautifully with a side of scrambled eggs for a hearty breakfast or fresh fruit salad for a light lunch. You might also enjoy it alongside whole grain toast with almond butter for an energizing snack. The contrast of flavors and textures will elevate your meal experience!

Storage, Make-Ahead & Reheating

The Peach Yogurt Parfait is best enjoyed fresh, but you can prepare some components ahead of time. Store the layered parfait in an airtight container in the refrigerator for up to 24 hours. However, be cautious; the granola may lose its crunch if stored too long. You can freeze the yogurt and peach mixture for up to 2 months; just remember to thaw it in the refrigerator overnight before serving.

If you plan to enjoy this dish the next day, it can taste even better as the flavors meld together. Just remember to add the granola right before serving to keep its delightful crunch!

Frequently Asked Questions

Can I make Peach Yogurt Parfait With Honey And Granola ahead of time?

Yes — in fact, it tastes even better the next day as the flavors meld. However, I recommend waiting to add the granola until just before serving to maintain its crunch.

What can I substitute for Greek yogurt?

If you prefer a lighter option, you can substitute Greek yogurt with regular yogurt or a dairy-free alternative like coconut yogurt. Just remember that this may alter the creaminess and flavor profile slightly.

Can I use frozen peaches for this parfait?

Absolutely! Just make sure to thaw the frozen peaches before using them. They will still add great flavor, though the texture may be slightly softer than fresh peaches.

How do I make the parfait vegan?

To make a vegan version, substitute the Greek yogurt with a plant-based yogurt alternative, and replace honey with maple syrup or agave nectar. This keeps the parfait sweet while adhering to a vegan diet.

What other fruits can I use in this recipe?

You can mix and match fruits based on your preference. Try using strawberries, blueberries, raspberries, or even bananas. Just make sure to adjust the lemon juice as needed to prevent browning.

Sweet Peach Yogurt Parfait Delight

Final Thoughts

The Peach Yogurt Parfait with Honey and Granola is a delightful blend of creamy yogurt, sweet peaches, and crunchy granola that creates a satisfying and nourishing treat. Each layer bursts with flavor, making it a perfect choice for breakfast or a light dessert.

This is the kind of recipe I come back to again and again, especially when I want something refreshing and wholesome to start my day. The harmony of sweet and tart flavors, combined with the delightful crunch, never fails to lift my spirits!

I encourage you to give this parfait a try and indulge in its comforting goodness. Feel free to share your results or even add your own twist—perhaps a sprinkle of cinnamon or a handful of nuts. Enjoy creating your perfect parfait!

Print
clock clock iconcutlery cutlery iconflag flag iconfolder folder iconinstagram instagram iconpinterest pinterest iconfacebook facebook iconprint print iconsquares squares iconheart heart iconheart solid heart solid icon

Peach Yogurt Parfait


  • Author: Lily author
  • Total Time: 15 minutes
  • Yield: 4 servings 1x
Pin Recipe
Print Recipe

Description

This Peach Yogurt Parfait combines creamy Greek yogurt, juicy peaches, and crunchy granola for a delightful treat. It’s a perfect breakfast or snack that captures the essence of summer in every bite.


Ingredients

Scale
  • For the Parfait:
  • 2 cups plain Greek yogurt (or vanilla yogurt for a sweeter option)
  • 2 large ripe peaches, diced (about 2 cups)
  • 1 tablespoon fresh lemon juice (to prevent browning of peaches)
  • 2 tablespoons honey (plus more for drizzling)
  • 1 teaspoon vanilla extract (optional for extra flavor)
  • For the Granola:
  • 1 cup granola (store-bought or homemade; see notes for a simple granola recipe)
  • 1/4 cup sliced almonds (optional for added crunch)
  • 1/4 cup shredded coconut (optional for added flavor)

Instructions

  1. Start by preparing the peaches. Wash them thoroughly, then slice and dice them into bite-sized pieces. In a medium bowl, toss the diced peaches with 1 tablespoon of fresh lemon juice to prevent browning. Set aside for about 5 minutes while the lemon juice works its magic.
  2. In a separate bowl, combine the Greek yogurt, 2 tablespoons of honey, and 1 teaspoon of vanilla extract if using. Stir the mixture until smooth and thoroughly blended. This should take about a minute. Avoid overmixing to maintain the creaminess of the yogurt.
  3. Now it’s time to layer your parfait. Grab a clear glass or bowl to showcase your beautiful creation. Start with a generous spoonful of the yogurt mixture at the bottom—about 1/4 cup will do. Use a spoon to spread it evenly.
  4. Add a layer of the diced peaches over the yogurt, ensuring they cover the yogurt completely. You might want to use about half of what you have prepared—roughly 1 cup. This layer should be visually appealing, so arrange the peaches neatly.
  5. Sprinkle 1/4 cup of granola over the peaches. This adds a delightful crunch. Make sure to distribute it evenly to ensure every bite has that satisfying texture. Avoid packing it down too tightly, as you want it to maintain its crunch.
  6. Repeat the layers: spoon in another 1/4 cup of yogurt, followed by another cup of peaches, and another sprinkle of granola. You should have at least two layers, but feel free to add more depending on your glass size.
  7. Finish off your parfait with a drizzle of honey on top for added sweetness and a touch of elegance. If you’re using sliced almonds or shredded coconut, sprinkle them on top now. It adds a lovely visual contrast and extra flavor.
  8. Serve immediately or refrigerate for up to 30 minutes before serving to allow the flavors to meld together. However, I recommend enjoying it fresh to maintain the granola’s crunch.
  • Prep Time: 15 mins
  • Cook Time: 0 mins
  • Category: Breakfast
  • Method: No-cook
  • Cuisine: American

Nutrition

  • Serving Size: 1 parfait
  • Calories: 250
  • Sugar: 20 g
  • Sodium: 50 mg
  • Fat: 5 g
  • Saturated Fat: 2 g
  • Unsaturated Fat: 3 g
  • Trans Fat: 0 g
  • Carbohydrates: 40 g
  • Fiber: 3 g
  • Protein: 10 g
  • Cholesterol: 10 mg

Keywords: Choose ripe peaches for the best flavor and texture. Use a clear glass for a beautiful presentation. For creaminess, consider whipping the yogurt before layering. Be mindful of the granola-to-yogurt ratio. Prepare yogurt and peaches ahead of time for gatherings, layering just before serving.

Did you make this recipe?

Share a photo and tag us — we can't wait to see what you've made!

Sun-Kissed Frozen Orange Cream Slush

As a child, summer days felt like they lasted forever. I remember the sticky heat wrapping around me as I played outside, my laughter mingling with the sounds of the neighborhood. But nothing could cool me down quite like the moment I’d spot my grandmother, laboring over her blender, whipping up her famous Frozen Orange Creamsicle Slush. That vibrant orange treat, with its frosty texture and sweet citrus aroma, was like a burst of sunshine in a cup. Just one sip, and I could feel the coolness wash over me, sparking pure joy.

This Frozen Orange Creamsicle Slush has a way of making you feel like a kid again. Its creamy, dreamy consistency is a delightful balance of bright orange and soft vanilla, inviting you to dive right in. The refreshing tang of orange dances on your tongue, while the smooth creaminess envelops you in a comforting embrace. It’s a nostalgic treat that’s perfect for hot summer afternoons or anytime you need a little pick-me-up.

What makes my version of this slush stand out is the addition of a hint of vanilla bean, which elevates the flavor and adds an extra layer of richness. Plus, it’s super easy to whip up with just a few simple ingredients that you probably already have on hand! So, if you’re ready to relive those sun-soaked memories, let me show you exactly how to make it.

Sun-Kissed Frozen Orange Cream Slush

Why You’ll Love This Recipe

  • Each slush is a perfect blend of creamy vanilla and zesty orange, creating a nostalgic flavor reminiscent of summer days.
  • This refreshing treat is ready in under 15 minutes, making it an ideal quick dessert for unexpected guests or hot afternoons.
  • With just 8 simple ingredients, it’s budget-friendly, ensuring you don’t have to break the bank to enjoy a delicious slush.
  • The slush has a perfectly smooth texture, thanks to the combination of ice and ice cream, providing a delightful contrast to the bright citrus flavors.
  • It’s highly customizable; you can easily adjust the sweetness and add fresh herbs for a unique twist that suits your taste.

Ingredients

  • 2 cups orange juice (freshly squeezed or store-bought)
  • 1 cup vanilla ice cream
  • 1 cup crushed ice
  • 1/2 cup milk (whole or 2%)
  • 1/4 cup granulated sugar (adjust based on sweetness preference)
  • 1 teaspoon vanilla extract
  • Zest of 1 orange (for added flavor)
  • Fresh orange slices and mint leaves (for garnish)

The star of this Frozen Orange Creamsicle Slush is the orange juice, which provides the vibrant, citrusy base. Freshly squeezed juice will yield the brightest flavor, but store-bought options can be just as convenient. If you’re opting for store-bought, choose 100% pure juice with no added sugars for the best results. Another essential ingredient is the vanilla ice cream; it adds creaminess and sweetness. You can substitute it with dairy-free ice cream if you’re looking for a vegan option. Whole or 2% milk complements the ice cream, creating a smooth blend. If you want a lower-calorie version, almond or oat milk can be good alternatives.

Lastly, the granulated sugar can be adjusted based on your sweetness preference. If you prefer a more natural sweetener, consider using honey or agave syrup. The orange zest enhances the flavor profile, providing an aromatic pop that brings the whole slush together. Don’t skip it! It adds an extra layer of brightness that makes this slush truly special.

Step-by-Step Instructions

  1. Start by preparing your ingredients. Gather 2 cups of orange juice, 1 cup of vanilla ice cream, and 1 cup of crushed ice. Make sure the ice is finely crushed, as larger chunks can make blending difficult.
  2. In a blender, combine the orange juice, vanilla ice cream, crushed ice, and 1/2 cup of milk. Add 1/4 cup of granulated sugar and 1 teaspoon of vanilla extract. If you like a sweeter slush, consider adding a bit more sugar at this stage.
  3. Add the zest of 1 orange to the blender. This step is crucial for enhancing the citrus flavor of your slush. Make sure not to include the bitter white pith—only the flavorful zest.
  4. Blend the mixture on medium-high speed for about 30-45 seconds. Stop once the ingredients are fully combined and the slush has a smooth, even consistency. If you notice large chunks of ice, blend for an additional 10-15 seconds. Avoid over-blending, as this can make the slush too liquidy.
  5. Once blended, taste the slush. If it needs more sweetness, add a little more sugar and blend for a few more seconds. If it’s too thick, you can add a splash of milk to reach your desired consistency.
  6. Pour the slush into glasses. This recipe typically serves 4, but you can easily double it for larger gatherings. Use a spoon to help guide the slush into the glasses if needed.
  7. Garnish each serving with fresh orange slices and mint leaves. The mint not only adds a pop of color but also a refreshing aroma that complements the citrus flavors beautifully.
  8. Serve immediately and enjoy! If you’ve made extra, you can refrigerate it for a short time, but it’s best enjoyed fresh.

Pro Tips for the Best Frozen Orange Creamsicle Slush

  • Don’t skip the orange zest! It’s a game-changer for flavor. Always zest before juicing to make it easier.
  • Use a high-powered blender for the best texture. A standard blender may struggle with ice, leading to uneven consistency. If you have a food processor, that can work too, but ensure the ice is finely crushed.
  • Adjust the ice-to-liquid ratio carefully. If your slush is too thick, it won’t blend well. Start with less ice and add more until you reach your preferred texture.
  • Be cautious with the sugar! Always start with the lower amount, as you can easily add more, but it’s hard to fix an overly sweet slush.
  • For a fun twist, consider adding a splash of coconut milk or a handful of fresh fruit like strawberries or pineapple. This not only enhances the flavor but also adds a beautiful color contrast.

Variations & Serving Ideas

There are countless ways to put a spin on your Frozen Orange Creamsicle Slush. Consider making a tropical version by adding in some pineapple juice or coconut milk for a delightful tropical twist. If you’re feeling adventurous, try incorporating a handful of frozen mango or peach slices for added sweetness. For a lighter version, swap out the vanilla ice cream for Greek yogurt for a creamy yet tangy alternative.

As for serving ideas, this refreshing slush pairs wonderfully with light summer dishes like grilled chicken skewers, fish tacos, or a simple salad topped with citrus vinaigrette. The bright, zesty flavors of the slush complement these dishes perfectly, making them an ideal pairing for a sunny day.

Storage, Make-Ahead & Reheating

This Frozen Orange Creamsicle Slush is best enjoyed fresh, but if you have leftovers, you can store them in an airtight container in the fridge for up to 2 days. Just keep in mind that the slush may lose some of its texture over time as the ice melts. It doesn’t freeze well, as the ice will turn into a solid block. If you must freeze it, blend again after thawing to restore the slushy consistency. This treat is best the day you make it, as the flavors meld together beautifully overnight, enhancing its deliciousness.

Frequently Asked Questions

Can I make Frozen Orange Creamsicle Slush ahead of time?

Yes — in fact, it tastes even better the next day as the flavors meld. However, it’s best to enjoy it fresh, as the texture can change if stored for too long. If you need to prepare it ahead, keep it in the fridge and re-blend before serving.

What kind of orange juice should I use?

For the best flavor, use freshly squeezed orange juice. However, if you’re short on time, opt for 100% pure store-bought juice without added sugars. This will ensure that your slush remains flavorful and refreshing.

Can I substitute the vanilla ice cream?

Absolutely! If you’re looking for a dairy-free option, coconut milk ice cream or a non-dairy vanilla ice cream can work wonderfully. They will still provide the creamy texture and sweetness you desire.

How can I adjust the sweetness of my slush?

You can easily adjust the sweetness by modifying the amount of sugar added. Start with 1/4 cup and taste the mixture before blending. If you prefer it sweeter, add more sugar gradually until it reaches your desired level.

What should I do if my slush is too thick?

If your slush is too thick, simply add a splash of milk or orange juice and blend again. This will help achieve a more drinkable consistency while maintaining the slushy texture. Adjust gradually to reach your preferred thickness.

Sun-Kissed Frozen Orange Cream Slush

Final Thoughts

The Frozen Orange Creamsicle Slush is a delightful blend of refreshing citrus and creamy goodness, making it a perfect treat for warm days or any time you crave a taste of nostalgia. The way the bright orange flavor dances with the creamy texture truly elevates this slush, transforming it into a satisfying escape from the everyday.

This is the kind of recipe I come back to again and again, especially when I’m looking to cool down or impress guests at a summer gathering. It’s simple to make and always brings smiles all around! I encourage you to try this recipe for yourself—don’t hesitate to share your results or even put your own spin on it. Happy slushing!

Print
clock clock iconcutlery cutlery iconflag flag iconfolder folder iconinstagram instagram iconpinterest pinterest iconfacebook facebook iconprint print iconsquares squares iconheart heart iconheart solid heart solid icon

Frozen Orange Creamsicle Slush


  • Author: Lily author
  • Total Time: 15 minutes
  • Yield: 4 servings 1x
Pin Recipe
Print Recipe

Description

This Frozen Orange Creamsicle Slush is a refreshing treat that combines creamy vanilla and zesty orange flavors. Perfect for hot summer days, it brings back nostalgic memories with every sip.


Ingredients

Scale
  • 2 cups orange juice (freshly squeezed or store-bought)
  • 1 cup vanilla ice cream
  • 1 cup crushed ice
  • 1/2 cup milk (whole or 2%)
  • 1/4 cup granulated sugar (adjust based on sweetness preference)
  • 1 teaspoon vanilla extract
  • Zest of 1 orange (for added flavor)
  • Fresh orange slices and mint leaves (for garnish)

Instructions

  1. Start by preparing your ingredients. Gather 2 cups of orange juice, 1 cup of vanilla ice cream, and 1 cup of crushed ice. Make sure the ice is finely crushed, as larger chunks can make blending difficult.
  2. In a blender, combine the orange juice, vanilla ice cream, crushed ice, and 1/2 cup of milk. Add 1/4 cup of granulated sugar and 1 teaspoon of vanilla extract. If you like a sweeter slush, consider adding a bit more sugar at this stage.
  3. Add the zest of 1 orange to the blender. This step is crucial for enhancing the citrus flavor of your slush. Make sure not to include the bitter white pith—only the flavorful zest.
  4. Blend the mixture on medium-high speed for about 30-45 seconds. Stop once the ingredients are fully combined and the slush has a smooth, even consistency. If you notice large chunks of ice, blend for an additional 10-15 seconds. Avoid over-blending, as this can make the slush too liquidy.
  5. Once blended, taste the slush. If it needs more sweetness, add a little more sugar and blend for a few more seconds. If it’s too thick, you can add a splash of milk to reach your desired consistency.
  6. Pour the slush into glasses. This recipe typically serves 4, but you can easily double it for larger gatherings. Use a spoon to help guide the slush into the glasses if needed.
  7. Garnish each serving with fresh orange slices and mint leaves. The mint not only adds a pop of color but also a refreshing aroma that complements the citrus flavors beautifully.
  8. Serve immediately and enjoy! If you’ve made extra, you can refrigerate it for a short time, but it's best enjoyed fresh.
  • Prep Time: 15 min
  • Cook Time: 0 min
  • Category: Dessert
  • Method: Blending
  • Cuisine: American

Nutrition

  • Serving Size: 1 serving
  • Calories: 200
  • Sugar: 30 g
  • Sodium: 50 mg
  • Fat: 5 g
  • Saturated Fat: 3 g
  • Unsaturated Fat: 2 g
  • Trans Fat: 0 g
  • Carbohydrates: 40 g
  • Fiber: 1 g
  • Protein: 2 g
  • Cholesterol: 20 mg

Keywords: Don't skip the orange zest! It's a game-changer for flavor. Always zest before juicing to make it easier.

Did you make this recipe?

Share a photo and tag us — we can't wait to see what you've made!

Zesty Lemon Poppy Seed Delight

One rainy afternoon, I found myself in my grandmother’s cozy kitchen, the kind that always smelled like warmth and love. She was whipping up her famous Lemon Poppy Seed Loaf, a recipe that had been passed down through generations. As the batter came together, the zesty aroma of fresh lemons filled the air, mingling perfectly with the nutty fragrance of poppy seeds. I can still picture her, apron-clad, as she expertly drizzled a vibrant citrus icing over the loaf, creating a glossy, sun-kissed finish that beckoned us to dive in. It was a moment that sparked my own passion for baking, and this recipe has become a cherished staple in my home ever since.

When you take a bite of this Lemon Poppy Seed Loaf, it’s like a burst of sunshine on your palate. The loaf is beautifully golden, with a tender crumb that melts in your mouth. Each slice is speckled with tiny poppy seeds, adding a delightful crunch that contrasts beautifully with the tangy sweetness of the lemon. And that citrus icing? It’s the finishing touch that elevates this loaf from ordinary to extraordinary, with its bright, zesty flavor dancing on your taste buds.

This recipe stands out because it embraces simplicity while delivering on flavor. I’ve added a hint of vanilla to the batter, enhancing the overall taste and making it even more indulgent. Trust me, once you make this Lemon Poppy Seed Loaf With Citrus Icing, it’ll become a go-to in your baking repertoire.

So, let me show you exactly how to make it!

Zesty Lemon Poppy Seed Delight

Why You’ll Love This Recipe

  • Moist and tender crumb that melts in your mouth, thanks to the perfect balance of butter and buttermilk.
  • Bright, zesty lemon flavor paired with crunchy poppy seeds, creating a delightful texture and taste experience.
  • Easy to whip up in just about an hour, perfect for last-minute gatherings or a cozy afternoon treat.
  • Budget-friendly with everyday ingredients, making it an accessible option for all home bakers.
  • The citrus icing adds a sweet tang that elevates the loaf, turning a simple recipe into a showstopper!

Ingredients

  • 1 ½ cups (190g) all-purpose flour
  • 1 teaspoon baking powder
  • ½ teaspoon baking soda
  • ½ teaspoon salt
  • 3 tablespoons poppy seeds
  • ½ cup (115g) unsalted butter, softened to room temperature
  • 1 cup (200g) granulated sugar
  • 2 large eggs
  • 1 teaspoon vanilla extract
  • 1 teaspoon lemon zest (from about 1 medium lemon)
  • ½ cup (120ml) buttermilk
  • 2 tablespoons fresh lemon juice

For the Citrus Icing:

  • 1 cup (120g) powdered sugar
  • 2 tablespoons fresh lemon juice
  • 1 tablespoon orange juice
  • 1 teaspoon lemon zest (for garnish, optional)

Let’s dive into the key ingredients that make this Lemon Poppy Seed Loaf so special. The all-purpose flour provides the structure and base for the loaf, while the baking powder and baking soda ensure it rises perfectly, giving the loaf a light texture. For a gluten-free variation, you could substitute the flour with a gluten-free all-purpose blend. Poppy seeds not only add a delightful crunch but also contribute to the unique flavor profile that pairs well with the citrus notes.

Unsalted butter is crucial for achieving the buttery richness that makes this loaf so moist. If you’re looking for a dairy-free option, coconut oil or a vegan butter can be used instead. The buttermilk is another essential component, providing acidity that activates the baking soda for a fluffy texture. If you don’t have buttermilk on hand, you can easily make a substitute by mixing ½ cup of milk with 1 tablespoon of vinegar or lemon juice and letting it sit for about 5 minutes.

Step-by-Step Instructions

  1. Preheat your oven to 350°F (175°C). Grease a 9×5-inch loaf pan or line it with parchment paper for easy removal later.
  2. In a medium mixing bowl, whisk together 1 ½ cups of all-purpose flour, 1 teaspoon of baking powder, ½ teaspoon of baking soda, ½ teaspoon of salt, and 3 tablespoons of poppy seeds. This helps to evenly distribute the baking agents and ensures a uniform rise.
  3. In a large mixing bowl, cream together ½ cup of softened unsalted butter and 1 cup of granulated sugar using an electric mixer on medium speed for about 3-4 minutes, until the mixture is light and fluffy. Make sure to scrape down the sides of the bowl occasionally.
  4. Add 2 large eggs, 1 teaspoon of vanilla extract, and 1 teaspoon of lemon zest to the creamed butter and sugar, mixing until fully combined. You want a smooth consistency, so ensure there are no lumps of butter.
  5. In a small bowl, combine ½ cup of buttermilk and 2 tablespoons of fresh lemon juice. Alternately add the dry ingredients and buttermilk mixture to the butter mixture, starting and ending with the dry ingredients. Mix just until combined; do not overmix, as this can lead to a dense loaf.
  6. Pour the batter into the prepared loaf pan. Smooth the top with a spatula, ensuring it’s even. Bake in the preheated oven for 50-60 minutes, or until a toothpick inserted in the center comes out clean. The edges should be lightly golden brown, and the center should feel just set.
  7. Once baked, remove the loaf from the oven and allow it to cool in the pan for about 10 minutes. Then, transfer it to a wire rack to cool completely. Resist the urge to slice too soon, as it will be crumbly if it’s still warm.
  8. While the loaf is cooling, prepare the citrus icing. In a medium bowl, whisk together 1 cup of powdered sugar, 2 tablespoons of fresh lemon juice, and 1 tablespoon of orange juice until smooth. If the icing is too thick, you can add a little more juice to reach your desired consistency.
  9. Once the loaf is completely cool, drizzle the citrus icing over the top. If you like, sprinkle with an additional teaspoon of lemon zest for an extra pop of flavor and color.

Pro Tips for the Best Lemon Poppy Seed Loaf With Citrus Icing

  • Be careful not to overmix your batter; this is a common mistake that can lead to a dense loaf. Mix just until the dry ingredients are incorporated for a light and fluffy texture.
  • Use room temperature ingredients, especially the butter and eggs. This helps to create a smoother batter and ensures even baking. Take your eggs out of the fridge about 30 minutes before you start.
  • For a more pronounced lemon flavor, consider adding a little lemon extract in addition to the zest and juice. Just a half teaspoon can elevate the citrus notes significantly.
  • When measuring your flour, spoon it into the measuring cup and level it off with a knife instead of scooping directly from the bag. This prevents packing and ensures you don’t end up with a dry loaf.
  • Invest in a good quality loaf pan; it makes a difference in heat distribution, which ensures even baking. If your pan is dark-coated, reduce the oven temperature by 25°F to prevent over-browning.

Variations & Serving Ideas

For a delightful twist, consider adding blueberries or raspberries to the batter for a fruity burst of flavor. You can also experiment with different citrus fruits—try lime or grapefruit zest and juice for a refreshing change. For a healthier option, substitute half of the all-purpose flour with whole wheat flour for added fiber without compromising too much on texture.

This Lemon Poppy Seed Loaf pairs beautifully with a light salad, such as a mixed greens salad with a vinaigrette, or a cup of tea for a cozy afternoon treat. It also complements a creamy cheese platter, as the acidity of the loaf balances rich cheeses perfectly. Lastly, a scoop of vanilla ice cream on the side creates a delightful contrast of temperatures and flavors!

Storage, Make-Ahead & Reheating

This Lemon Poppy Seed Loaf can be stored at room temperature for up to 3 days if wrapped tightly in plastic wrap. If you want to keep it longer, it freezes well for up to 3 months. To freeze, wrap the loaf tightly in plastic wrap and then in aluminum foil to prevent freezer burn.

When you’re ready to enjoy it again, simply thaw it in the fridge overnight. Reheat individual slices in the microwave for 15-20 seconds or in a toaster oven until warmed through. Interestingly, many people find that this loaf tastes even better the next day, as the flavors have time to meld!

Frequently Asked Questions

Can I make Lemon Poppy Seed Loaf With Citrus Icing ahead of time?

Yes — in fact, it tastes even better the next day! You can make the loaf a day in advance, allowing the flavors to develop. Just be sure to store it in an airtight container to maintain its moisture.

Can I substitute the poppy seeds?

Absolutely! If you don’t have poppy seeds on hand or prefer an alternative, you can use sesame seeds for a similar crunch or omit them entirely for a smooth loaf.

What can I use instead of buttermilk?

If you don’t have buttermilk, you can easily create a substitute by mixing ½ cup of milk (dairy or plant-based) with 1 tablespoon of vinegar or lemon juice. Let it sit for 5 minutes before using in the recipe.

How can I make this recipe gluten-free?

To make a gluten-free version of this Lemon Poppy Seed Loaf, substitute the all-purpose flour with a gluten-free all-purpose flour blend. Just ensure that the blend contains a binding agent like xanthan gum for the best results.

What is the best way to store leftover loaf?

Leftover Lemon Poppy Seed Loaf should be stored in an airtight container at room temperature for up to 3 days. For longer storage, wrap it tightly and freeze for up to 3 months. Thaw it before serving for the best texture.

Zesty Lemon Poppy Seed Delight

Final Thoughts

The Lemon Poppy Seed Loaf with Citrus Icing is truly a delightful treat that brings a burst of brightness to any occasion. The zesty lemon flavor combined with the subtle crunch of poppy seeds creates a satisfying balance, while the citrus icing adds a touch of sweetness that perfectly complements the loaf’s tanginess.

This is the kind of recipe I come back to again and again, especially when I want to brighten up a gloomy day or celebrate a small victory. The aroma that fills the kitchen as it bakes is absolutely heavenly! I encourage you to give this recipe a try; you might just find it becoming a beloved staple in your home. Don’t forget to share your results or even add your own unique twist—I can’t wait to see what you create!

Print
clock clock iconcutlery cutlery iconflag flag iconfolder folder iconinstagram instagram iconpinterest pinterest iconfacebook facebook iconprint print iconsquares squares iconheart heart iconheart solid heart solid icon

Lemon Poppy Seed Loaf


  • Author: Lily author
  • Total Time: 27 minute
  • Yield: 1 loaf 1x
Pin Recipe
Print Recipe

Description

This Lemon Poppy Seed Loaf is a delightful treat that combines zesty lemon flavor with crunchy poppy seeds. Topped with a citrus icing, it’s perfect for any occasion.


Ingredients

Scale
  • 1 ½ cups (190g) all-purpose flour
  • 1 teaspoon baking powder
  • ½ teaspoon baking soda
  • ½ teaspoon salt
  • 3 tablespoons poppy seeds
  • ½ cup (115g) unsalted butter, softened to room temperature
  • 1 cup (200g) granulated sugar
  • 2 large eggs
  • 1 teaspoon vanilla extract
  • 1 teaspoon lemon zest (from about 1 medium lemon)
  • ½ cup (120ml) buttermilk
  • 2 tablespoons fresh lemon juice
  • 1 cup (120g) powdered sugar
  • 2 tablespoons fresh lemon juice
  • 1 tablespoon orange juice
  • 1 teaspoon lemon zest (for garnish, optional)

Instructions

  1. Preheat your oven to 350°F (175°C). Grease a 9×5-inch loaf pan or line it with parchment paper for easy removal later.
  2. In a medium mixing bowl, whisk together 1 ½ cups of all-purpose flour, 1 teaspoon of baking powder, ½ teaspoon of baking soda, ½ teaspoon of salt, and 3 tablespoons of poppy seeds. This helps to evenly distribute the baking agents and ensures a uniform rise.
  3. In a large mixing bowl, cream together ½ cup of softened unsalted butter and 1 cup of granulated sugar using an electric mixer on medium speed for about 3-4 minutes, until the mixture is light and fluffy. Make sure to scrape down the sides of the bowl occasionally.
  4. Add 2 large eggs, 1 teaspoon of vanilla extract, and 1 teaspoon of lemon zest to the creamed butter and sugar, mixing until fully combined. You want a smooth consistency, so ensure there are no lumps of butter.
  5. In a small bowl, combine ½ cup of buttermilk and 2 tablespoons of fresh lemon juice. Alternately add the dry ingredients and buttermilk mixture to the butter mixture, starting and ending with the dry ingredients. Mix just until combined; do not overmix, as this can lead to a dense loaf.
  6. Pour the batter into the prepared loaf pan. Smooth the top with a spatula, ensuring it’s even. Bake in the preheated oven for 50-60 minutes, or until a toothpick inserted in the center comes out clean. The edges should be lightly golden brown, and the center should feel just set.
  7. Once baked, remove the loaf from the oven and allow it to cool in the pan for about 10 minutes. Then, transfer it to a wire rack to cool completely. Resist the urge to slice too soon, as it will be crumbly if it’s still warm.
  8. While the loaf is cooling, prepare the citrus icing. In a medium bowl, whisk together 1 cup of powdered sugar, 2 tablespoons of fresh lemon juice, and 1 tablespoon of orange juice until smooth. If the icing is too thick, you can add a little more juice to reach your desired consistency.
  9. Once the loaf is completely cool, drizzle the citrus icing over the top. If you like, sprinkle with an additional teaspoon of lemon zest for an extra pop of flavor and color.
  • Prep Time: 15 mins
  • Cook Time: 50-60 mins
  • Category: Dessert
  • Method: Baking
  • Cuisine: American

Nutrition

  • Serving Size: 1 slice
  • Calories: 200
  • Sugar: 15 g
  • Sodium: 150 mg
  • Fat: 8 g
  • Saturated Fat: 5 g
  • Unsaturated Fat: 3 g
  • Trans Fat: 0 g
  • Carbohydrates: 30 g
  • Fiber: 1 g
  • Protein: 3 g
  • Cholesterol: 40 mg

Keywords: Be careful not to overmix your batter; this is a common mistake that can lead to a dense loaf. Use room temperature ingredients for a smoother batter and even baking.

Did you make this recipe?

Share a photo and tag us — we can't wait to see what you've made!

  • Privacy Policy
  • Terms Of Service
  • Contact
  • About
  • GDPR

Copyright © 2025 Homesmad