• Skip to primary navigation
  • Skip to main content
  • Skip to primary sidebar
Homesmad

Homesmad

  • Home
  • Breakfast & Brunch
  • Appetizers & Snacks
  • Dinner
  • Dessert
  • About
  • Privacy Policy
  • Contact
Homesmad
  • Home
  • Breakfast & Brunch
  • Appetizers & Snacks
  • Dinner
  • Dessert
  • About
  • Privacy Policy
  • Contact

Reuben Beef Balls with Spicy Thousand Island Dip Recipe

October 26, 2025 by Lily author

Reuben Balls With Spicy Thousand Island Dipping Sauce – imagine all the iconic flavors of a classic Reuben sandwich, transformed into crispy, golden-brown, bite-sized delights! I’ve always been fascinated by the Reuben sandwich’s storied past, whether its origins lie with Reuben Kulakofsky in Omaha or Arnold Reuben in New York City. Regardless of its exact inception, this culinary icon has captured hearts and palates for generations, and I believe it’s time for its next evolution into a truly irresistible appetizer.

This recipe takes that beloved combination – tender corned beef, tangy sauerkraut, and rich Swiss cheese – and elevates it into the ultimate party appetizer or game-day snack. The irresistible crunch of the exterior gives way to a warm, savory interior that’s simply divine, offering a textural journey with every bite. But what truly sets this dish apart, making it utterly unforgettable, is the homemade Spicy Thousand Island Dipping Sauce. This piquant accompaniment perfectly complements the rich, complex flavors of the Reuben balls, adding a vibrant kick that you won’t find in your average dip. Get ready to discover why Reuben Balls With Spicy Thousand Island Dipping Sauce are about to become your new favorite way to enjoy a timeless classic with an exciting, modern twist.

Reuben Beef Balls with Spicy Thousand Island Dip Recipe this RECIPE

Ingredients:

  • For the Reuben Balls:
    • 1 tablespoon unsalted butter
    • 1 tablespoon olive oil
    • 1 cup finely diced yellow onion (about 1 medium onion)
    • 3 cloves garlic, minced
    • 1 pound cooked corned beef, very finely diced or shredded (ensure it’s well-drained if from a brine)
    • 1 ½ cups well-drained sauerkraut, squeezed dry and finely chopped
    • 1 cup shredded Swiss cheese (Gruyere works wonderfully too for extra nuttiness)
    • ½ cup cream cheese, softened
    • 2 tablespoons fresh parsley, finely chopped
    • 1 tablespoon Dijon mustard
    • 1 teaspoon Worcestershire sauce
    • ½ teaspoon black pepper, freshly ground
    • ¼ teaspoon cayenne pepper (optional, for a subtle kick)
    • Salt to taste (remember corned beef and sauerkraut are salty)
  • For the Breading:
    • 1 ½ cups all-purpose flour
    • 4 large eggs, lightly beaten with 2 tablespoons water
    • 3 cups Panko breadcrumbs (Panko provides superior crispiness)
    • Pinch of salt and black pepper for the flour and eggs
  • For Frying:
    • 6-8 cups vegetable oil, canola oil, or peanut oil (enough for 2-3 inches depth in your frying pot)
  • For the Spicy Thousand Island Dipping Sauce:
    • 1 cup good quality mayonnaise
    • ¼ cup ketchup
    • 2 tablespoons sweet pickle relish, well-drained
    • 1 tablespoon fresh lemon juice
    • 1 tablespoon Worcestershire sauce
    • 1 tablespoon finely minced red onion or shallot
    • 1 clove garlic, minced very finely or grated
    • ½ teaspoon smoked paprika
    • ½ teaspoon hot sauce (like Tabasco or Frank’s RedHot, adjust to your spice preference)
    • ¼ teaspoon black pepper, freshly ground
    • Pinch of cayenne pepper (optional, for extra heat)
    • Salt to taste

Preparing the Spicy Thousand Island Dipping Sauce

The perfect accompaniment to our savory Reuben Balls is this vibrant and zesty sauce. Making it first allows the flavors to meld beautifully while you prepare the main attraction. This dipping sauce truly elevates the Reuben Balls With Spicy Thousand Island Dipping Sauce experience.

  1. Grab a medium-sized mixing bowl. Into it, add your mayonnaise, ketchup, well-drained sweet pickle relish, fresh lemon juice, and Worcestershire sauce.
  2. Next, incorporate the finely minced red onion (or shallot for a milder flavor), the very finely minced or grated garlic clove, smoked paprika, and your chosen hot sauce. If you’re feeling adventurous and want a little extra zing, now’s the time to add that pinch of cayenne pepper.
  3. Season the mixture with freshly ground black pepper and a pinch of salt. Remember to taste as you go; the relish and ketchup already contribute some saltiness. Give everything a really good whisk until all the ingredients are thoroughly combined and the sauce is smooth and creamy.
  4. Cover the bowl tightly with plastic wrap and refrigerate for at least 30 minutes. This chilling time is crucial because it allows all the delicious flavors to fully develop and become cohesive. You can even make this sauce a day ahead for optimal flavor fusion, making your prep on the day of serving much smoother.

Preparing the Reuben Ball Filling

This is where the magic starts to happen! We’re going to build layers of classic Reuben flavors into a cohesive, delicious mixture that will form the heart of our Reuben Balls With Spicy Thousand Island Dipping Sauce. Taking your time here ensures a flavorful and well-textured filling.

  1. In a large, sturdy skillet or Dutch oven, melt the unsalted butter with the olive oil over medium heat. Once the butter is shimmering and the oil is warm, add your finely diced yellow onion. Sauté the onion gently for about 5-7 minutes, stirring occasionally, until it becomes soft, translucent, and slightly golden. We’re not looking for crispiness here, but rather a sweet, mellow base.
  2. Add the minced garlic to the pan with the softened onions. Continue to cook for another 1-2 minutes, stirring constantly, until the garlic is fragrant. Be careful not to let the garlic burn, as it can turn bitter very quickly.
  3. Remove the skillet from the heat and allow the onion and garlic mixture to cool down slightly. Transfer it to a very large mixing bowl.
  4. Now, let’s bring in the stars of the show! Add your finely diced or shredded cooked corned beef to the bowl. It’s important that your corned beef is not in large chunks; smaller pieces will integrate better into the balls and prevent them from falling apart.
  5. Next, add the well-drained and finely chopped sauerkraut. Draining the sauerkraut thoroughly is incredibly important. Excess moisture can make your Reuben balls soggy and difficult to form, so press out as much liquid as you possibly can.
  6. Stir in the shredded Swiss cheese and the softened cream cheese. The cream cheese acts as a wonderful binder and adds a luxurious creaminess to the filling, ensuring that your Reuben Balls With Spicy Thousand Island Dipping Sauce have a delightful texture.
  7. Add the fresh parsley, Dijon mustard, Worcestershire sauce, freshly ground black pepper, and the optional cayenne pepper for a little warmth.
  8. Using a strong spoon, or even your clean hands, mix all the ingredients thoroughly until everything is evenly distributed. You want to ensure that every bite of a Reuben ball delivers a balanced profile of corned beef, sauerkraut, and cheese.
  9. Taste the mixture and adjust seasoning as needed. Remember that corned beef and sauerkraut are already quite salty, so add additional salt sparingly, if at all.
  10. Cover the bowl with plastic wrap and refrigerate the filling for at least 1 hour. Chilling the mixture is a critical step because it allows the flavors to meld and, more importantly, makes the mixture firm enough to handle and form into balls without crumbling. This also helps the cream cheese to firm up, making the rolling process much easier.

Forming the Reuben Balls

With our delicious filling chilled and ready, it’s time to shape our beautiful Reuben Balls With Spicy Thousand Island Dipping Sauce. Uniformity in size is key here for even cooking.

  1. Retrieve the chilled Reuben ball filling from the refrigerator. The mixture should be firm and easy to handle.
  2. Prepare a baking sheet by lining it with parchment paper. This will be where you place the formed balls before breading.
  3. Using a small cookie scoop (about 1.5 to 2 tablespoons in size) or simply a tablespoon, scoop out portions of the filling.
  4. Roll each portion gently but firmly between the palms of your hands to form a compact ball, roughly 1.5 to 2 inches in diameter. The goal is to make them as round and smooth as possible. If the mixture feels too sticky, you can lightly moisten your hands with a little water.
  5. Place each formed ball onto the prepared baking sheet. Continue this process until all of the filling has been used. You should yield approximately 30-36 balls, depending on their size.
  6. Once all the balls are formed, place the baking sheet back into the refrigerator for another 30 minutes. This second chilling period is very important as it helps the balls maintain their shape during the breading and frying process, preventing them from falling apart in the hot oil. Do not skip this step for truly perfect Reuben Balls With Spicy Thousand Island Dipping Sauce.

Breading the Reuben Balls

Breading is what gives our Reuben balls their signature crispy exterior. We’ll be using a classic three-stage breading process, and a double-breading technique for extra crunch and protection.

  1. Set up your breading station. You’ll need three shallow dishes or pie plates arranged in a line.
    • In the first dish, place the all-purpose flour. Season the flour with a pinch of salt and black pepper and whisk to combine.
    • In the second dish, whisk the 4 large eggs with 2 tablespoons of water until well combined. Season with a pinch of salt and pepper.
    • In the third dish, place the Panko breadcrumbs.
  2. Retrieve the chilled Reuben balls from the refrigerator. Work in batches to keep the remaining balls cold.
  3. For the first breading pass:
    • Take one Reuben ball and gently roll it in the flour, ensuring it is completely coated. Tap off any excess flour.
    • Next, dip the floured ball into the egg mixture, allowing any excess egg to drip off.
    • Finally, roll the egg-coated ball in the Panko breadcrumbs, pressing gently to ensure the crumbs adhere well to all surfaces. Place the breaded ball back onto a clean baking sheet (you can reuse the parchment-lined one from earlier).
    • Repeat this process for all the Reuben balls. This first layer of breading creates a protective shell.
  4. For the second breading pass (the double breading):
    • Once all the balls have received their first coat, we’ll repeat the egg and Panko steps. Dip a first-breaded ball into the egg mixture again, letting excess drip off.
    • Immediately transfer it back to the Panko breadcrumbs, rolling and pressing firmly to create a thick, even second layer of crispy coating. This double breading step is essential for achieving an incredibly crispy crust and also helps to seal the filling, preventing any cheese from escaping during frying.
    • Place the double-breaded ball back on the baking sheet. Continue until all the Reuben balls are double-breaded.
  5. At this point, you can place the breaded balls back into the refrigerator for another 15-20 minutes, or even freeze them for later. Chilling them again before frying helps the breading set and adhere even better, reducing the chance of it falling off in the hot oil.

Cooking the Reuben Balls

Now for the grand finale – deep frying our glorious Reuben Balls With Spicy Thousand Island Dipping Sauce to golden-brown perfection! Frying creates that irresistible crispy exterior we’re looking for.

  1. In a large, heavy-bottomed pot or Dutch oven (like a cast-iron pot), pour in your chosen frying oil to a depth of about 2-3 inches. Make sure you have enough space for the oil to bubble without overflowing.
  2. Attach a deep-fry thermometer to the side of the pot, ensuring the tip is submerged in the oil but not touching the bottom.
  3. Heat the oil over medium-high heat until it reaches a temperature of 350°F (175°C). Maintaining a consistent oil temperature is crucial for perfectly cooked Reuben balls. If the oil is too cool, the balls will absorb too much oil and be greasy. If it’s too hot, the breading will burn before the interior is heated through.
  4. Carefully, and in batches (do not overcrowd the pot!), gently lower 4-6 Reuben balls into the hot oil using a slotted spoon or spider. Overcrowding the pot will cause the oil temperature to drop significantly, leading to less crispy results.
  5. Fry the Reuben balls for 3-5 minutes, turning them occasionally with your slotted spoon, until they are beautifully golden brown on all sides and look wonderfully crisp. The internal temperature will rise quickly because the filling is already cooked. We are primarily looking for that stunning exterior.
  6. Once golden brown, carefully remove the cooked Reuben balls from the oil using your slotted spoon. Allow any excess oil to drip back into the pot.
  7. Transfer the fried Reuben balls to a wire rack set over a baking sheet lined with paper towels. The wire rack allows air to circulate around the balls, helping them stay crispy while any remaining excess oil drains off onto the paper towels below.
  8. Repeat the frying process with the remaining batches of Reuben balls, allowing the oil to come back up to 350°F (175°C) between each batch.
  9. Safety Note: Always be cautious when working with hot oil. Keep a lid nearby to smother any potential oil fires, and never pour water onto hot oil.

Serving Your Delicious Reuben Balls With Spicy Thousand Island Dipping Sauce

Congratulations! You’ve created a truly spectacular appetizer. Now, it’s time to enjoy the fruits of your labor.

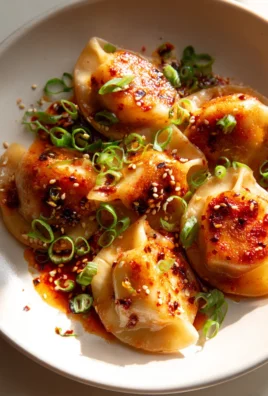
  1. Arrange your freshly fried, golden-brown Reuben balls on a serving platter. A garnish of fresh chopped parsley or a sprinkle of paprika can add a nice visual touch.
  2. Serve the hot Reuben balls immediately alongside a generous bowl of your chilled and perfectly seasoned Spicy Thousand Island Dipping Sauce. The contrast of the warm, savory balls with the cool, tangy sauce is what makes this dish truly irresistible.
  3. Encourage your guests to double-dip (if they dare!) or grab a generous dollop of sauce for each ball. These Reuben Balls With Spicy Thousand Island Dipping Sauce are best enjoyed fresh, when their exterior is at its crispiest.

Reuben Beef Balls with Spicy Thousand Island Dip Recipe

Conclusion:

Why This Recipe is a Game-Changer!

Without a doubt, I truly believe this recipe for Reuben Balls With Spicy Thousand Island Dipping Sauce is more than just a dish; it’s an experience waiting to happen in your kitchen. If you’re searching for an appetizer that will effortlessly steal the show at any gathering, or even a fun, deconstructed main course for a weeknight adventure, you’ve absolutely found your new go-to. What makes these Reuben balls so incredibly special is the perfect symphony of textures and flavors that come together in every single bite.

Imagine this: a crispy, golden-brown exterior giving way to a warm, savory interior bursting with tender corned beef, delightfully tangy sauerkraut, and incredibly melty Swiss cheese. It’s all the beloved components of a classic Reuben sandwich, but masterfully rolled and fried (or baked!) into convenient, bite-sized perfection. And let’s not forget the absolutely essential companion – our homemade Spicy Thousand Island Dipping Sauce. This isn’t just any sauce; it’s the fiery, zesty kick that perfectly cuts through the richness of the balls, elevating every single taste to pure culinary bliss. I’ve witnessed these disappear from platters faster than I can make them, and that’s always a true sign of a truly unforgettable and crowd-pleasing dish. Trust me when I say, this recipe takes comfort food to an exciting new level, offering a familiar, cherished taste with an innovative and utterly delightful twist that will have everyone asking for the recipe.

Now, while these are absolutely phenomenal served warm right out of the fryer or oven as a show-stopping appetizer for your next party, Super Bowl Sunday bash, or casual family get-together, please don’t limit your culinary imagination! For a lighter, more complete meal, I personally love serving a generous plate of these Reuben balls alongside a crisp, fresh green salad with a simple, light vinaigrette. The freshness of the greens provides a wonderful and welcome contrast to the richness of the balls. You could also pair them with a simple, creamy tomato soup for a comforting, hearty, and incredibly satisfying lunch. But let’s talk variations – because in my kitchen, cooking is all about making a recipe your very own! If you’re looking to lighten things up a bit, consider baking them instead of frying. Simply spray them generously with cooking oil and bake at 400°F (200°C) until they are beautifully golden brown and heated through, making sure to flip them halfway for even crispness. For a slightly different flavor profile, why not try swapping out a portion of the corned beef for finely shredded pastrami, or experiment with a different cheese like nutty Gruyere for an extra layer of complexity? Vegetarians don’t have to miss out on this deliciousness either! You could easily create a fantastic meat-free version by increasing the amount of sauerkraut and adding finely chopped, sautéed mushrooms or even plant-based “corned beef” alternatives to mimic the texture beautifully. And for the dipping sauce? While our spicy version is undeniably perfect and my absolute favorite, a classic creamy ranch or even a sweet and tangy honey mustard could offer a milder counterpoint if you prefer less heat. The possibilities are truly endless, allowing you to tailor this incredible dish to your personal taste and any dietary preferences you or your guests might have.

So, what are you waiting for? I wholeheartedly encourage you to roll up your sleeves, gather your ingredients, and dive into making these incredible Reuben Balls With Spicy Thousand Island Dipping Sauce this week! It’s a culinary adventure that promises big, bold flavors and even bigger smiles from everyone who tries them.

I guarantee you’ll be absolutely thrilled with the results, and so will everyone you share them with!

Once you’ve made them, I’d absolutely love to hear about your experience. Did you try a fun variation that everyone raved about? What was your favorite part of the process, or the most delicious bite? Share your photos and your wonderful cooking stories with me – nothing makes me happier than seeing you bring my recipes to life in your own unique kitchen. Let’s make some delicious, unforgettable memories together!


Reuben Beef Balls with Spicy Thousand Island Dip Recipe

Reuben Beef Balls with Spicy Thousand Island Dip Recipe

Transforming the iconic Reuben sandwich into crispy, golden-brown, bite-sized beef delights! These irresistible appetizers feature tender corned beef, tangy sauerkraut, and rich Swiss cheese, paired with a vibrant homemade Spicy Thousand Island Dipping Sauce for an unforgettable party or game-day snack.

Prep Time
30 Minutes

Cook Time
40 Minutes

Total Time
30 Minutes

Servings
30-36 balls

Ingredients

  • 1 tbsp unsalted butter
  • 1 tbsp olive oil
  • 1 cup yellow onion, diced
  • 3 cloves garlic, minced
  • 1 ½ cups cooked corned beef, finely diced or shredded
  • 1 cup sauerkraut, drained & finely chopped
  • 1 cup shredded Swiss cheese
  • 4 oz cream cheese, softened
  • 2 tbsp fresh parsley, chopped
  • 1 tbsp Dijon mustard
  • 1 tsp non-alcoholic Worcestershire sauce
  • ½ tsp black pepper
  • ¼ tsp cayenne pepper (optional)
  • Salt, to taste
  • ½ cup all-purpose flour
  • 2 large eggs, beaten
  • 1 ½ cups Panko breadcrumbs
  • Vegetable oil, for deep frying
  • ½ cup mayonnaise
  • 2 tbsp ketchup
  • 1 tbsp sweet pickle relish, drained
  • 1 tbsp fresh lemon juice
  • 1 tbsp non-alcoholic Worcestershire sauce
  • 1 tbsp minced red onion or shallot
  • 1 clove garlic, minced
  • ½ tsp smoked paprika
  • 1 tsp hot sauce (to taste)
  • ¼ tsp black pepper
  • Pinch cayenne pepper (optional)
  • Salt, to taste

Instructions

  1. Step 1
    Combine mayonnaise, ketchup, relish, lemon juice, 1 tbsp non-alcoholic Worcestershire sauce, minced red onion, minced garlic, smoked paprika, hot sauce, black pepper, and optional cayenne in a bowl. Whisk well and season with salt. Refrigerate for at least 30 minutes for flavors to meld.
  2. Step 2
    In a skillet, sauté onion in butter and olive oil until soft (5-7 mins). Add garlic, cook 1-2 mins; cool slightly. In a large bowl, combine cooled onion-garlic mix with corned beef, sauerkraut, Swiss cheese, cream cheese, parsley, Dijon, 1 tsp non-alcoholic Worcestershire sauce, black pepper, and optional cayenne. Mix thoroughly. Taste and adjust salt. Refrigerate filling for at least 1 hour to firm.
  3. Step 3
    Line a baking sheet with parchment. Scoop 1.5-2 tbsp of chilled filling per ball. Roll into compact 1.5-2 inch balls. Place on baking sheet. Refrigerate formed balls for another 30 minutes to maintain shape.
  4. Step 4
    Set up three shallow dishes: seasoned flour, beaten eggs, and Panko breadcrumbs. For the first pass, roll each ball in flour, then egg, then Panko. For the second pass (double breading), dip again in egg, then Panko, pressing firmly for a thick coat. Refrigerate breaded balls for 15-20 minutes before frying.
  5. Step 5
    Heat 2-3 inches of vegetable oil in a heavy pot to 350°F (175°C). Fry balls in batches (4-6 at a time) for 3-5 minutes, turning until golden brown and crispy. Remove with a slotted spoon and drain on a wire rack over paper towels. Repeat with remaining batches, allowing oil to return to temperature.
  6. Step 6
    Arrange freshly fried Reuben balls on a platter. Serve hot immediately with the chilled Spicy Thousand Island Dipping Sauce.

Important Information

Nutrition Facts (Per Serving)

It is important to consider this information as approximate and not to use it as definitive health advice.

Allergy Information

Please check ingredients for potential allergens and consult a health professional if in doubt.

« Previous Post
Refreshing Apple Arugula Salad: Quick, Healthy Lunch Idea
Next Post »
Homemade Werthers Caramel Popcorn: Sweet & Easy Recipe!

If you enjoyed this…

Cowboy Butter Steak Sliders: Easy & Flavorful Beef Bites!

Spicy Mexican Corn: A Delicious and Easy Recipe

Delicious Spinach and Artichoke Wonton Cups Recipe to Try!

Primary Sidebar

Browse by Diet

BreakfastDinnerLunchDessertAppetizer

Sweet Peach Yogurt Parfait Delight

One of my fondest memories is from a lazy summer afternoon spent at my grandmother’s house. The sun filtered through the kitchen window, casting a warm glow over the table where she would create her culinary magic. It was during one of those blissful moments that I first tasted her Peach Yogurt Parfait with Honey and Granola. The sweet aroma of ripe peaches mingling with creamy yogurt and the crunch of granola was nothing short of heavenly. It felt like summer captured in a bowl, and I still remember the joy of diving in with a spoon, each layer revealing a new burst of flavor.

When I think about that parfait, I can almost hear the gentle hum of the bees outside, reminding me of the floral notes that honey brings to every bite. The vibrant yellows and soft oranges of the peaches contrast beautifully with the creamy white yogurt and the golden crunch of granola. It’s a dish that not only looks delightful but also tastes like a celebration of fresh, wholesome ingredients.

What makes my version of this Peach Yogurt Parfait special is the careful balance of flavors and textures. I use ripe, juicy peaches, drizzled with locally sourced honey, and a homemade granola that’s bursting with nuts and seeds for an extra crunch. It’s a simple dish, but every layer is crafted with love and attention.

Let me show you exactly how to make this delightful parfait, so you can bring a bit of that summer magic into your kitchen!

Sweet Peach Yogurt Parfait Delight

Why You’ll Love This Recipe

  • Delightfully creamy texture from the Greek yogurt, paired with the juicy sweetness of fresh peaches.
  • Ready in under 20 minutes, making it a quick and satisfying breakfast or snack option.
  • Budget-friendly, using common ingredients that you may already have in your pantry.
  • Customizable with your favorite granola and nuts, allowing you to tailor each parfait to your taste.
  • Perfectly balanced flavors with the bright acidity of lemon juice and the sweetness of honey enhancing the peaches.

Ingredients

  • For the Parfait:
  • 2 cups plain Greek yogurt (or vanilla yogurt for a sweeter option)
  • 2 large ripe peaches, diced (about 2 cups)
  • 1 tablespoon fresh lemon juice (to prevent browning of peaches)
  • 2 tablespoons honey (plus more for drizzling)
  • 1 teaspoon vanilla extract (optional for extra flavor)
  • For the Granola:
  • 1 cup granola (store-bought or homemade; see notes for a simple granola recipe)
  • 1/4 cup sliced almonds (optional for added crunch)
  • 1/4 cup shredded coconut (optional for added flavor)

Let’s dive into some key ingredients that make this Peach Yogurt Parfait so delightful! First, the Greek yogurt is not only creamy but also packed with protein, making it a satisfying option for breakfast or a snack. If you’re looking for a sweeter option, you can easily substitute it with vanilla yogurt, though it may alter the overall flavor balance. Next, the ripe peaches are the star of the show; their natural sweetness shines through, so I recommend choosing peaches that yield slightly to pressure, indicating they’re perfectly ripe. If peaches aren’t in season, feel free to use nectarines or even frozen peaches—just thaw them before use. Finally, honey adds a lovely floral sweetness that ties everything together. If you prefer, maple syrup can serve as a delicious substitute.

Step-by-Step Instructions

  1. Start by preparing the peaches. Wash them thoroughly, then slice and dice them into bite-sized pieces. In a medium bowl, toss the diced peaches with 1 tablespoon of fresh lemon juice to prevent browning. Set aside for about 5 minutes while the lemon juice works its magic.
  2. In a separate bowl, combine the Greek yogurt, 2 tablespoons of honey, and 1 teaspoon of vanilla extract if using. Stir the mixture until smooth and thoroughly blended. This should take about a minute. Avoid overmixing to maintain the creaminess of the yogurt.
  3. Now it’s time to layer your parfait. Grab a clear glass or bowl to showcase your beautiful creation. Start with a generous spoonful of the yogurt mixture at the bottom—about 1/4 cup will do. Use a spoon to spread it evenly.
  4. Add a layer of the diced peaches over the yogurt, ensuring they cover the yogurt completely. You might want to use about half of what you have prepared—roughly 1 cup. This layer should be visually appealing, so arrange the peaches neatly.
  5. Sprinkle 1/4 cup of granola over the peaches. This adds a delightful crunch. Make sure to distribute it evenly to ensure every bite has that satisfying texture. Avoid packing it down too tightly, as you want it to maintain its crunch.
  6. Repeat the layers: spoon in another 1/4 cup of yogurt, followed by another cup of peaches, and another sprinkle of granola. You should have at least two layers, but feel free to add more depending on your glass size.
  7. Finish off your parfait with a drizzle of honey on top for added sweetness and a touch of elegance. If you’re using sliced almonds or shredded coconut, sprinkle them on top now. It adds a lovely visual contrast and extra flavor.
  8. Serve immediately or refrigerate for up to 30 minutes before serving to allow the flavors to meld together. However, I recommend enjoying it fresh to maintain the granola’s crunch.

Pro Tips for the Best Peach Yogurt Parfait With Honey And Granola

  • Make sure to choose ripe peaches for the best flavor and texture. A common mistake is using unripe fruit, which can lead to a less enjoyable parfait. Look for peaches that are fragrant and slightly soft to the touch.
  • Use a clear glass to assemble your parfait; this not only makes for a beautiful presentation but also allows you to see the colorful layers, which adds to the enjoyment of eating it.
  • For an even creamier texture, consider whipping the Greek yogurt with a hand mixer for a couple of minutes before layering. This small adjustment makes a huge difference in mouthfeel.
  • Be mindful of the granola-to-yogurt ratio. Too much granola can overwhelm the parfait, while too little can make it feel too creamy. Aim for about 1/4 cup of granola per layer for the perfect balance.
  • If you’re making this for a gathering, consider preparing the yogurt and peaches ahead of time and layering them just before serving. This ensures the granola stays crunchy!

Variations & Serving Ideas

There are so many ways to get creative with your Peach Yogurt Parfait! For a tropical twist, swap out the peaches for mangoes or pineapples and top with coconut flakes. If you prefer a berry flavor, mix in some blueberries or strawberries with the peaches for added color and taste. For a nutty version, incorporate chopped walnuts or pecans instead of almonds.

As for serving ideas, this parfait pairs beautifully with a side of scrambled eggs for a hearty breakfast or fresh fruit salad for a light lunch. You might also enjoy it alongside whole grain toast with almond butter for an energizing snack. The contrast of flavors and textures will elevate your meal experience!

Storage, Make-Ahead & Reheating

The Peach Yogurt Parfait is best enjoyed fresh, but you can prepare some components ahead of time. Store the layered parfait in an airtight container in the refrigerator for up to 24 hours. However, be cautious; the granola may lose its crunch if stored too long. You can freeze the yogurt and peach mixture for up to 2 months; just remember to thaw it in the refrigerator overnight before serving.

If you plan to enjoy this dish the next day, it can taste even better as the flavors meld together. Just remember to add the granola right before serving to keep its delightful crunch!

Frequently Asked Questions

Can I make Peach Yogurt Parfait With Honey And Granola ahead of time?

Yes — in fact, it tastes even better the next day as the flavors meld. However, I recommend waiting to add the granola until just before serving to maintain its crunch.

What can I substitute for Greek yogurt?

If you prefer a lighter option, you can substitute Greek yogurt with regular yogurt or a dairy-free alternative like coconut yogurt. Just remember that this may alter the creaminess and flavor profile slightly.

Can I use frozen peaches for this parfait?

Absolutely! Just make sure to thaw the frozen peaches before using them. They will still add great flavor, though the texture may be slightly softer than fresh peaches.

How do I make the parfait vegan?

To make a vegan version, substitute the Greek yogurt with a plant-based yogurt alternative, and replace honey with maple syrup or agave nectar. This keeps the parfait sweet while adhering to a vegan diet.

What other fruits can I use in this recipe?

You can mix and match fruits based on your preference. Try using strawberries, blueberries, raspberries, or even bananas. Just make sure to adjust the lemon juice as needed to prevent browning.

Sweet Peach Yogurt Parfait Delight

Final Thoughts

The Peach Yogurt Parfait with Honey and Granola is a delightful blend of creamy yogurt, sweet peaches, and crunchy granola that creates a satisfying and nourishing treat. Each layer bursts with flavor, making it a perfect choice for breakfast or a light dessert.

This is the kind of recipe I come back to again and again, especially when I want something refreshing and wholesome to start my day. The harmony of sweet and tart flavors, combined with the delightful crunch, never fails to lift my spirits!

I encourage you to give this parfait a try and indulge in its comforting goodness. Feel free to share your results or even add your own twist—perhaps a sprinkle of cinnamon or a handful of nuts. Enjoy creating your perfect parfait!

Print
clock clock iconcutlery cutlery iconflag flag iconfolder folder iconinstagram instagram iconpinterest pinterest iconfacebook facebook iconprint print iconsquares squares iconheart heart iconheart solid heart solid icon

Peach Yogurt Parfait


  • Author: Lily author
  • Total Time: 15 minutes
  • Yield: 4 servings 1x
Pin Recipe
Print Recipe

Description

This Peach Yogurt Parfait combines creamy Greek yogurt, juicy peaches, and crunchy granola for a delightful treat. It’s a perfect breakfast or snack that captures the essence of summer in every bite.


Ingredients

Scale
  • For the Parfait:
  • 2 cups plain Greek yogurt (or vanilla yogurt for a sweeter option)
  • 2 large ripe peaches, diced (about 2 cups)
  • 1 tablespoon fresh lemon juice (to prevent browning of peaches)
  • 2 tablespoons honey (plus more for drizzling)
  • 1 teaspoon vanilla extract (optional for extra flavor)
  • For the Granola:
  • 1 cup granola (store-bought or homemade; see notes for a simple granola recipe)
  • 1/4 cup sliced almonds (optional for added crunch)
  • 1/4 cup shredded coconut (optional for added flavor)

Instructions

  1. Start by preparing the peaches. Wash them thoroughly, then slice and dice them into bite-sized pieces. In a medium bowl, toss the diced peaches with 1 tablespoon of fresh lemon juice to prevent browning. Set aside for about 5 minutes while the lemon juice works its magic.
  2. In a separate bowl, combine the Greek yogurt, 2 tablespoons of honey, and 1 teaspoon of vanilla extract if using. Stir the mixture until smooth and thoroughly blended. This should take about a minute. Avoid overmixing to maintain the creaminess of the yogurt.
  3. Now it’s time to layer your parfait. Grab a clear glass or bowl to showcase your beautiful creation. Start with a generous spoonful of the yogurt mixture at the bottom—about 1/4 cup will do. Use a spoon to spread it evenly.
  4. Add a layer of the diced peaches over the yogurt, ensuring they cover the yogurt completely. You might want to use about half of what you have prepared—roughly 1 cup. This layer should be visually appealing, so arrange the peaches neatly.
  5. Sprinkle 1/4 cup of granola over the peaches. This adds a delightful crunch. Make sure to distribute it evenly to ensure every bite has that satisfying texture. Avoid packing it down too tightly, as you want it to maintain its crunch.
  6. Repeat the layers: spoon in another 1/4 cup of yogurt, followed by another cup of peaches, and another sprinkle of granola. You should have at least two layers, but feel free to add more depending on your glass size.
  7. Finish off your parfait with a drizzle of honey on top for added sweetness and a touch of elegance. If you’re using sliced almonds or shredded coconut, sprinkle them on top now. It adds a lovely visual contrast and extra flavor.
  8. Serve immediately or refrigerate for up to 30 minutes before serving to allow the flavors to meld together. However, I recommend enjoying it fresh to maintain the granola’s crunch.
  • Prep Time: 15 mins
  • Cook Time: 0 mins
  • Category: Breakfast
  • Method: No-cook
  • Cuisine: American

Nutrition

  • Serving Size: 1 parfait
  • Calories: 250
  • Sugar: 20 g
  • Sodium: 50 mg
  • Fat: 5 g
  • Saturated Fat: 2 g
  • Unsaturated Fat: 3 g
  • Trans Fat: 0 g
  • Carbohydrates: 40 g
  • Fiber: 3 g
  • Protein: 10 g
  • Cholesterol: 10 mg

Keywords: Choose ripe peaches for the best flavor and texture. Use a clear glass for a beautiful presentation. For creaminess, consider whipping the yogurt before layering. Be mindful of the granola-to-yogurt ratio. Prepare yogurt and peaches ahead of time for gatherings, layering just before serving.

Did you make this recipe?

Share a photo and tag us — we can't wait to see what you've made!

Sun-Kissed Frozen Orange Cream Slush

As a child, summer days felt like they lasted forever. I remember the sticky heat wrapping around me as I played outside, my laughter mingling with the sounds of the neighborhood. But nothing could cool me down quite like the moment I’d spot my grandmother, laboring over her blender, whipping up her famous Frozen Orange Creamsicle Slush. That vibrant orange treat, with its frosty texture and sweet citrus aroma, was like a burst of sunshine in a cup. Just one sip, and I could feel the coolness wash over me, sparking pure joy.

This Frozen Orange Creamsicle Slush has a way of making you feel like a kid again. Its creamy, dreamy consistency is a delightful balance of bright orange and soft vanilla, inviting you to dive right in. The refreshing tang of orange dances on your tongue, while the smooth creaminess envelops you in a comforting embrace. It’s a nostalgic treat that’s perfect for hot summer afternoons or anytime you need a little pick-me-up.

What makes my version of this slush stand out is the addition of a hint of vanilla bean, which elevates the flavor and adds an extra layer of richness. Plus, it’s super easy to whip up with just a few simple ingredients that you probably already have on hand! So, if you’re ready to relive those sun-soaked memories, let me show you exactly how to make it.

Sun-Kissed Frozen Orange Cream Slush

Why You’ll Love This Recipe

  • Each slush is a perfect blend of creamy vanilla and zesty orange, creating a nostalgic flavor reminiscent of summer days.
  • This refreshing treat is ready in under 15 minutes, making it an ideal quick dessert for unexpected guests or hot afternoons.
  • With just 8 simple ingredients, it’s budget-friendly, ensuring you don’t have to break the bank to enjoy a delicious slush.
  • The slush has a perfectly smooth texture, thanks to the combination of ice and ice cream, providing a delightful contrast to the bright citrus flavors.
  • It’s highly customizable; you can easily adjust the sweetness and add fresh herbs for a unique twist that suits your taste.

Ingredients

  • 2 cups orange juice (freshly squeezed or store-bought)
  • 1 cup vanilla ice cream
  • 1 cup crushed ice
  • 1/2 cup milk (whole or 2%)
  • 1/4 cup granulated sugar (adjust based on sweetness preference)
  • 1 teaspoon vanilla extract
  • Zest of 1 orange (for added flavor)
  • Fresh orange slices and mint leaves (for garnish)

The star of this Frozen Orange Creamsicle Slush is the orange juice, which provides the vibrant, citrusy base. Freshly squeezed juice will yield the brightest flavor, but store-bought options can be just as convenient. If you’re opting for store-bought, choose 100% pure juice with no added sugars for the best results. Another essential ingredient is the vanilla ice cream; it adds creaminess and sweetness. You can substitute it with dairy-free ice cream if you’re looking for a vegan option. Whole or 2% milk complements the ice cream, creating a smooth blend. If you want a lower-calorie version, almond or oat milk can be good alternatives.

Lastly, the granulated sugar can be adjusted based on your sweetness preference. If you prefer a more natural sweetener, consider using honey or agave syrup. The orange zest enhances the flavor profile, providing an aromatic pop that brings the whole slush together. Don’t skip it! It adds an extra layer of brightness that makes this slush truly special.

Step-by-Step Instructions

  1. Start by preparing your ingredients. Gather 2 cups of orange juice, 1 cup of vanilla ice cream, and 1 cup of crushed ice. Make sure the ice is finely crushed, as larger chunks can make blending difficult.
  2. In a blender, combine the orange juice, vanilla ice cream, crushed ice, and 1/2 cup of milk. Add 1/4 cup of granulated sugar and 1 teaspoon of vanilla extract. If you like a sweeter slush, consider adding a bit more sugar at this stage.
  3. Add the zest of 1 orange to the blender. This step is crucial for enhancing the citrus flavor of your slush. Make sure not to include the bitter white pith—only the flavorful zest.
  4. Blend the mixture on medium-high speed for about 30-45 seconds. Stop once the ingredients are fully combined and the slush has a smooth, even consistency. If you notice large chunks of ice, blend for an additional 10-15 seconds. Avoid over-blending, as this can make the slush too liquidy.
  5. Once blended, taste the slush. If it needs more sweetness, add a little more sugar and blend for a few more seconds. If it’s too thick, you can add a splash of milk to reach your desired consistency.
  6. Pour the slush into glasses. This recipe typically serves 4, but you can easily double it for larger gatherings. Use a spoon to help guide the slush into the glasses if needed.
  7. Garnish each serving with fresh orange slices and mint leaves. The mint not only adds a pop of color but also a refreshing aroma that complements the citrus flavors beautifully.
  8. Serve immediately and enjoy! If you’ve made extra, you can refrigerate it for a short time, but it’s best enjoyed fresh.

Pro Tips for the Best Frozen Orange Creamsicle Slush

  • Don’t skip the orange zest! It’s a game-changer for flavor. Always zest before juicing to make it easier.
  • Use a high-powered blender for the best texture. A standard blender may struggle with ice, leading to uneven consistency. If you have a food processor, that can work too, but ensure the ice is finely crushed.
  • Adjust the ice-to-liquid ratio carefully. If your slush is too thick, it won’t blend well. Start with less ice and add more until you reach your preferred texture.
  • Be cautious with the sugar! Always start with the lower amount, as you can easily add more, but it’s hard to fix an overly sweet slush.
  • For a fun twist, consider adding a splash of coconut milk or a handful of fresh fruit like strawberries or pineapple. This not only enhances the flavor but also adds a beautiful color contrast.

Variations & Serving Ideas

There are countless ways to put a spin on your Frozen Orange Creamsicle Slush. Consider making a tropical version by adding in some pineapple juice or coconut milk for a delightful tropical twist. If you’re feeling adventurous, try incorporating a handful of frozen mango or peach slices for added sweetness. For a lighter version, swap out the vanilla ice cream for Greek yogurt for a creamy yet tangy alternative.

As for serving ideas, this refreshing slush pairs wonderfully with light summer dishes like grilled chicken skewers, fish tacos, or a simple salad topped with citrus vinaigrette. The bright, zesty flavors of the slush complement these dishes perfectly, making them an ideal pairing for a sunny day.

Storage, Make-Ahead & Reheating

This Frozen Orange Creamsicle Slush is best enjoyed fresh, but if you have leftovers, you can store them in an airtight container in the fridge for up to 2 days. Just keep in mind that the slush may lose some of its texture over time as the ice melts. It doesn’t freeze well, as the ice will turn into a solid block. If you must freeze it, blend again after thawing to restore the slushy consistency. This treat is best the day you make it, as the flavors meld together beautifully overnight, enhancing its deliciousness.

Frequently Asked Questions

Can I make Frozen Orange Creamsicle Slush ahead of time?

Yes — in fact, it tastes even better the next day as the flavors meld. However, it’s best to enjoy it fresh, as the texture can change if stored for too long. If you need to prepare it ahead, keep it in the fridge and re-blend before serving.

What kind of orange juice should I use?

For the best flavor, use freshly squeezed orange juice. However, if you’re short on time, opt for 100% pure store-bought juice without added sugars. This will ensure that your slush remains flavorful and refreshing.

Can I substitute the vanilla ice cream?

Absolutely! If you’re looking for a dairy-free option, coconut milk ice cream or a non-dairy vanilla ice cream can work wonderfully. They will still provide the creamy texture and sweetness you desire.

How can I adjust the sweetness of my slush?

You can easily adjust the sweetness by modifying the amount of sugar added. Start with 1/4 cup and taste the mixture before blending. If you prefer it sweeter, add more sugar gradually until it reaches your desired level.

What should I do if my slush is too thick?

If your slush is too thick, simply add a splash of milk or orange juice and blend again. This will help achieve a more drinkable consistency while maintaining the slushy texture. Adjust gradually to reach your preferred thickness.

Sun-Kissed Frozen Orange Cream Slush

Final Thoughts

The Frozen Orange Creamsicle Slush is a delightful blend of refreshing citrus and creamy goodness, making it a perfect treat for warm days or any time you crave a taste of nostalgia. The way the bright orange flavor dances with the creamy texture truly elevates this slush, transforming it into a satisfying escape from the everyday.

This is the kind of recipe I come back to again and again, especially when I’m looking to cool down or impress guests at a summer gathering. It’s simple to make and always brings smiles all around! I encourage you to try this recipe for yourself—don’t hesitate to share your results or even put your own spin on it. Happy slushing!

Print
clock clock iconcutlery cutlery iconflag flag iconfolder folder iconinstagram instagram iconpinterest pinterest iconfacebook facebook iconprint print iconsquares squares iconheart heart iconheart solid heart solid icon

Frozen Orange Creamsicle Slush


  • Author: Lily author
  • Total Time: 15 minutes
  • Yield: 4 servings 1x
Pin Recipe
Print Recipe

Description

This Frozen Orange Creamsicle Slush is a refreshing treat that combines creamy vanilla and zesty orange flavors. Perfect for hot summer days, it brings back nostalgic memories with every sip.


Ingredients

Scale
  • 2 cups orange juice (freshly squeezed or store-bought)
  • 1 cup vanilla ice cream
  • 1 cup crushed ice
  • 1/2 cup milk (whole or 2%)
  • 1/4 cup granulated sugar (adjust based on sweetness preference)
  • 1 teaspoon vanilla extract
  • Zest of 1 orange (for added flavor)
  • Fresh orange slices and mint leaves (for garnish)

Instructions

  1. Start by preparing your ingredients. Gather 2 cups of orange juice, 1 cup of vanilla ice cream, and 1 cup of crushed ice. Make sure the ice is finely crushed, as larger chunks can make blending difficult.
  2. In a blender, combine the orange juice, vanilla ice cream, crushed ice, and 1/2 cup of milk. Add 1/4 cup of granulated sugar and 1 teaspoon of vanilla extract. If you like a sweeter slush, consider adding a bit more sugar at this stage.
  3. Add the zest of 1 orange to the blender. This step is crucial for enhancing the citrus flavor of your slush. Make sure not to include the bitter white pith—only the flavorful zest.
  4. Blend the mixture on medium-high speed for about 30-45 seconds. Stop once the ingredients are fully combined and the slush has a smooth, even consistency. If you notice large chunks of ice, blend for an additional 10-15 seconds. Avoid over-blending, as this can make the slush too liquidy.
  5. Once blended, taste the slush. If it needs more sweetness, add a little more sugar and blend for a few more seconds. If it’s too thick, you can add a splash of milk to reach your desired consistency.
  6. Pour the slush into glasses. This recipe typically serves 4, but you can easily double it for larger gatherings. Use a spoon to help guide the slush into the glasses if needed.
  7. Garnish each serving with fresh orange slices and mint leaves. The mint not only adds a pop of color but also a refreshing aroma that complements the citrus flavors beautifully.
  8. Serve immediately and enjoy! If you’ve made extra, you can refrigerate it for a short time, but it's best enjoyed fresh.
  • Prep Time: 15 min
  • Cook Time: 0 min
  • Category: Dessert
  • Method: Blending
  • Cuisine: American

Nutrition

  • Serving Size: 1 serving
  • Calories: 200
  • Sugar: 30 g
  • Sodium: 50 mg
  • Fat: 5 g
  • Saturated Fat: 3 g
  • Unsaturated Fat: 2 g
  • Trans Fat: 0 g
  • Carbohydrates: 40 g
  • Fiber: 1 g
  • Protein: 2 g
  • Cholesterol: 20 mg

Keywords: Don't skip the orange zest! It's a game-changer for flavor. Always zest before juicing to make it easier.

Did you make this recipe?

Share a photo and tag us — we can't wait to see what you've made!

Zesty Lemon Poppy Seed Delight

One rainy afternoon, I found myself in my grandmother’s cozy kitchen, the kind that always smelled like warmth and love. She was whipping up her famous Lemon Poppy Seed Loaf, a recipe that had been passed down through generations. As the batter came together, the zesty aroma of fresh lemons filled the air, mingling perfectly with the nutty fragrance of poppy seeds. I can still picture her, apron-clad, as she expertly drizzled a vibrant citrus icing over the loaf, creating a glossy, sun-kissed finish that beckoned us to dive in. It was a moment that sparked my own passion for baking, and this recipe has become a cherished staple in my home ever since.

When you take a bite of this Lemon Poppy Seed Loaf, it’s like a burst of sunshine on your palate. The loaf is beautifully golden, with a tender crumb that melts in your mouth. Each slice is speckled with tiny poppy seeds, adding a delightful crunch that contrasts beautifully with the tangy sweetness of the lemon. And that citrus icing? It’s the finishing touch that elevates this loaf from ordinary to extraordinary, with its bright, zesty flavor dancing on your taste buds.

This recipe stands out because it embraces simplicity while delivering on flavor. I’ve added a hint of vanilla to the batter, enhancing the overall taste and making it even more indulgent. Trust me, once you make this Lemon Poppy Seed Loaf With Citrus Icing, it’ll become a go-to in your baking repertoire.

So, let me show you exactly how to make it!

Zesty Lemon Poppy Seed Delight

Why You’ll Love This Recipe

  • Moist and tender crumb that melts in your mouth, thanks to the perfect balance of butter and buttermilk.
  • Bright, zesty lemon flavor paired with crunchy poppy seeds, creating a delightful texture and taste experience.
  • Easy to whip up in just about an hour, perfect for last-minute gatherings or a cozy afternoon treat.
  • Budget-friendly with everyday ingredients, making it an accessible option for all home bakers.
  • The citrus icing adds a sweet tang that elevates the loaf, turning a simple recipe into a showstopper!

Ingredients

  • 1 ½ cups (190g) all-purpose flour
  • 1 teaspoon baking powder
  • ½ teaspoon baking soda
  • ½ teaspoon salt
  • 3 tablespoons poppy seeds
  • ½ cup (115g) unsalted butter, softened to room temperature
  • 1 cup (200g) granulated sugar
  • 2 large eggs
  • 1 teaspoon vanilla extract
  • 1 teaspoon lemon zest (from about 1 medium lemon)
  • ½ cup (120ml) buttermilk
  • 2 tablespoons fresh lemon juice

For the Citrus Icing:

  • 1 cup (120g) powdered sugar
  • 2 tablespoons fresh lemon juice
  • 1 tablespoon orange juice
  • 1 teaspoon lemon zest (for garnish, optional)

Let’s dive into the key ingredients that make this Lemon Poppy Seed Loaf so special. The all-purpose flour provides the structure and base for the loaf, while the baking powder and baking soda ensure it rises perfectly, giving the loaf a light texture. For a gluten-free variation, you could substitute the flour with a gluten-free all-purpose blend. Poppy seeds not only add a delightful crunch but also contribute to the unique flavor profile that pairs well with the citrus notes.

Unsalted butter is crucial for achieving the buttery richness that makes this loaf so moist. If you’re looking for a dairy-free option, coconut oil or a vegan butter can be used instead. The buttermilk is another essential component, providing acidity that activates the baking soda for a fluffy texture. If you don’t have buttermilk on hand, you can easily make a substitute by mixing ½ cup of milk with 1 tablespoon of vinegar or lemon juice and letting it sit for about 5 minutes.

Step-by-Step Instructions

  1. Preheat your oven to 350°F (175°C). Grease a 9×5-inch loaf pan or line it with parchment paper for easy removal later.
  2. In a medium mixing bowl, whisk together 1 ½ cups of all-purpose flour, 1 teaspoon of baking powder, ½ teaspoon of baking soda, ½ teaspoon of salt, and 3 tablespoons of poppy seeds. This helps to evenly distribute the baking agents and ensures a uniform rise.
  3. In a large mixing bowl, cream together ½ cup of softened unsalted butter and 1 cup of granulated sugar using an electric mixer on medium speed for about 3-4 minutes, until the mixture is light and fluffy. Make sure to scrape down the sides of the bowl occasionally.
  4. Add 2 large eggs, 1 teaspoon of vanilla extract, and 1 teaspoon of lemon zest to the creamed butter and sugar, mixing until fully combined. You want a smooth consistency, so ensure there are no lumps of butter.
  5. In a small bowl, combine ½ cup of buttermilk and 2 tablespoons of fresh lemon juice. Alternately add the dry ingredients and buttermilk mixture to the butter mixture, starting and ending with the dry ingredients. Mix just until combined; do not overmix, as this can lead to a dense loaf.
  6. Pour the batter into the prepared loaf pan. Smooth the top with a spatula, ensuring it’s even. Bake in the preheated oven for 50-60 minutes, or until a toothpick inserted in the center comes out clean. The edges should be lightly golden brown, and the center should feel just set.
  7. Once baked, remove the loaf from the oven and allow it to cool in the pan for about 10 minutes. Then, transfer it to a wire rack to cool completely. Resist the urge to slice too soon, as it will be crumbly if it’s still warm.
  8. While the loaf is cooling, prepare the citrus icing. In a medium bowl, whisk together 1 cup of powdered sugar, 2 tablespoons of fresh lemon juice, and 1 tablespoon of orange juice until smooth. If the icing is too thick, you can add a little more juice to reach your desired consistency.
  9. Once the loaf is completely cool, drizzle the citrus icing over the top. If you like, sprinkle with an additional teaspoon of lemon zest for an extra pop of flavor and color.

Pro Tips for the Best Lemon Poppy Seed Loaf With Citrus Icing

  • Be careful not to overmix your batter; this is a common mistake that can lead to a dense loaf. Mix just until the dry ingredients are incorporated for a light and fluffy texture.
  • Use room temperature ingredients, especially the butter and eggs. This helps to create a smoother batter and ensures even baking. Take your eggs out of the fridge about 30 minutes before you start.
  • For a more pronounced lemon flavor, consider adding a little lemon extract in addition to the zest and juice. Just a half teaspoon can elevate the citrus notes significantly.
  • When measuring your flour, spoon it into the measuring cup and level it off with a knife instead of scooping directly from the bag. This prevents packing and ensures you don’t end up with a dry loaf.
  • Invest in a good quality loaf pan; it makes a difference in heat distribution, which ensures even baking. If your pan is dark-coated, reduce the oven temperature by 25°F to prevent over-browning.

Variations & Serving Ideas

For a delightful twist, consider adding blueberries or raspberries to the batter for a fruity burst of flavor. You can also experiment with different citrus fruits—try lime or grapefruit zest and juice for a refreshing change. For a healthier option, substitute half of the all-purpose flour with whole wheat flour for added fiber without compromising too much on texture.

This Lemon Poppy Seed Loaf pairs beautifully with a light salad, such as a mixed greens salad with a vinaigrette, or a cup of tea for a cozy afternoon treat. It also complements a creamy cheese platter, as the acidity of the loaf balances rich cheeses perfectly. Lastly, a scoop of vanilla ice cream on the side creates a delightful contrast of temperatures and flavors!

Storage, Make-Ahead & Reheating

This Lemon Poppy Seed Loaf can be stored at room temperature for up to 3 days if wrapped tightly in plastic wrap. If you want to keep it longer, it freezes well for up to 3 months. To freeze, wrap the loaf tightly in plastic wrap and then in aluminum foil to prevent freezer burn.

When you’re ready to enjoy it again, simply thaw it in the fridge overnight. Reheat individual slices in the microwave for 15-20 seconds or in a toaster oven until warmed through. Interestingly, many people find that this loaf tastes even better the next day, as the flavors have time to meld!

Frequently Asked Questions

Can I make Lemon Poppy Seed Loaf With Citrus Icing ahead of time?

Yes — in fact, it tastes even better the next day! You can make the loaf a day in advance, allowing the flavors to develop. Just be sure to store it in an airtight container to maintain its moisture.

Can I substitute the poppy seeds?

Absolutely! If you don’t have poppy seeds on hand or prefer an alternative, you can use sesame seeds for a similar crunch or omit them entirely for a smooth loaf.

What can I use instead of buttermilk?

If you don’t have buttermilk, you can easily create a substitute by mixing ½ cup of milk (dairy or plant-based) with 1 tablespoon of vinegar or lemon juice. Let it sit for 5 minutes before using in the recipe.

How can I make this recipe gluten-free?

To make a gluten-free version of this Lemon Poppy Seed Loaf, substitute the all-purpose flour with a gluten-free all-purpose flour blend. Just ensure that the blend contains a binding agent like xanthan gum for the best results.

What is the best way to store leftover loaf?

Leftover Lemon Poppy Seed Loaf should be stored in an airtight container at room temperature for up to 3 days. For longer storage, wrap it tightly and freeze for up to 3 months. Thaw it before serving for the best texture.

Zesty Lemon Poppy Seed Delight

Final Thoughts

The Lemon Poppy Seed Loaf with Citrus Icing is truly a delightful treat that brings a burst of brightness to any occasion. The zesty lemon flavor combined with the subtle crunch of poppy seeds creates a satisfying balance, while the citrus icing adds a touch of sweetness that perfectly complements the loaf’s tanginess.

This is the kind of recipe I come back to again and again, especially when I want to brighten up a gloomy day or celebrate a small victory. The aroma that fills the kitchen as it bakes is absolutely heavenly! I encourage you to give this recipe a try; you might just find it becoming a beloved staple in your home. Don’t forget to share your results or even add your own unique twist—I can’t wait to see what you create!

Print
clock clock iconcutlery cutlery iconflag flag iconfolder folder iconinstagram instagram iconpinterest pinterest iconfacebook facebook iconprint print iconsquares squares iconheart heart iconheart solid heart solid icon

Lemon Poppy Seed Loaf


  • Author: Lily author
  • Total Time: 25 minute
  • Yield: 1 loaf 1x
Pin Recipe
Print Recipe

Description

This Lemon Poppy Seed Loaf is a delightful treat that combines zesty lemon flavor with crunchy poppy seeds. Topped with a citrus icing, it’s perfect for any occasion.


Ingredients

Scale
  • 1 ½ cups (190g) all-purpose flour
  • 1 teaspoon baking powder
  • ½ teaspoon baking soda
  • ½ teaspoon salt
  • 3 tablespoons poppy seeds
  • ½ cup (115g) unsalted butter, softened to room temperature
  • 1 cup (200g) granulated sugar
  • 2 large eggs
  • 1 teaspoon vanilla extract
  • 1 teaspoon lemon zest (from about 1 medium lemon)
  • ½ cup (120ml) buttermilk
  • 2 tablespoons fresh lemon juice
  • 1 cup (120g) powdered sugar
  • 2 tablespoons fresh lemon juice
  • 1 tablespoon orange juice
  • 1 teaspoon lemon zest (for garnish, optional)

Instructions

  1. Preheat your oven to 350°F (175°C). Grease a 9×5-inch loaf pan or line it with parchment paper for easy removal later.
  2. In a medium mixing bowl, whisk together 1 ½ cups of all-purpose flour, 1 teaspoon of baking powder, ½ teaspoon of baking soda, ½ teaspoon of salt, and 3 tablespoons of poppy seeds. This helps to evenly distribute the baking agents and ensures a uniform rise.
  3. In a large mixing bowl, cream together ½ cup of softened unsalted butter and 1 cup of granulated sugar using an electric mixer on medium speed for about 3-4 minutes, until the mixture is light and fluffy. Make sure to scrape down the sides of the bowl occasionally.
  4. Add 2 large eggs, 1 teaspoon of vanilla extract, and 1 teaspoon of lemon zest to the creamed butter and sugar, mixing until fully combined. You want a smooth consistency, so ensure there are no lumps of butter.
  5. In a small bowl, combine ½ cup of buttermilk and 2 tablespoons of fresh lemon juice. Alternately add the dry ingredients and buttermilk mixture to the butter mixture, starting and ending with the dry ingredients. Mix just until combined; do not overmix, as this can lead to a dense loaf.
  6. Pour the batter into the prepared loaf pan. Smooth the top with a spatula, ensuring it’s even. Bake in the preheated oven for 50-60 minutes, or until a toothpick inserted in the center comes out clean. The edges should be lightly golden brown, and the center should feel just set.
  7. Once baked, remove the loaf from the oven and allow it to cool in the pan for about 10 minutes. Then, transfer it to a wire rack to cool completely. Resist the urge to slice too soon, as it will be crumbly if it’s still warm.
  8. While the loaf is cooling, prepare the citrus icing. In a medium bowl, whisk together 1 cup of powdered sugar, 2 tablespoons of fresh lemon juice, and 1 tablespoon of orange juice until smooth. If the icing is too thick, you can add a little more juice to reach your desired consistency.
  9. Once the loaf is completely cool, drizzle the citrus icing over the top. If you like, sprinkle with an additional teaspoon of lemon zest for an extra pop of flavor and color.
  • Prep Time: 15 mins
  • Cook Time: 50-60 mins
  • Category: Dessert
  • Method: Baking
  • Cuisine: American

Nutrition

  • Serving Size: 1 slice
  • Calories: 200
  • Sugar: 15 g
  • Sodium: 150 mg
  • Fat: 8 g
  • Saturated Fat: 5 g
  • Unsaturated Fat: 3 g
  • Trans Fat: 0 g
  • Carbohydrates: 30 g
  • Fiber: 1 g
  • Protein: 3 g
  • Cholesterol: 40 mg

Keywords: Be careful not to overmix your batter; this is a common mistake that can lead to a dense loaf. Use room temperature ingredients for a smoother batter and even baking.

Did you make this recipe?

Share a photo and tag us — we can't wait to see what you've made!

  • Privacy Policy
  • Terms Of Service
  • Contact
  • About
  • GDPR

Copyright © 2025 Homesmad