Salted Caramel Butter Bars Tasty Irresistible – the very name conjures images of golden layers, a symphony of sweet and salty, and pure indulgence. If you’re searching for a dessert that consistently steals the show, captivating every palate with its perfect balance, then look no further. I truly believe these bars represent the pinnacle of easy-to-make yet incredibly sophisticated treats. The beloved salted caramel phenomenon, a relatively modern culinary marvel, has transformed desserts, and these bars are a shining example of why this flavor profile is so universally adored.
Why These Bars Are Irresistible
What makes them so utterly captivating? It’s the harmonious dance between a tender, buttery shortbread crust and a thick, chewy layer of rich, gooey salted caramel, often finished with a delicate sprinkle of sea salt to enhance that signature contrast. Every bite offers a delightful interplay of textures and flavors that is simply unforgettable. Whether you’re preparing for a special occasion, seeking a comforting treat for a quiet evening, or needing a portable dessert for a potluck, these Salted Caramel Butter Bars Tasty Irresistible are always the answer. They are an absolute delight, promising to become a cherished addition to your baking repertoire, and I am so excited to share my go-to recipe with you today.

Ingredients:
-
For the Irresistible Shortbread Crust & Crumb Topping:
- 2 ½ cups (300g) all-purpose flour: I recommend using unbleached all-purpose flour for the best texture in our shortbread.
- 1 cup (226g) unsalted butter: This should be chilled and cut into small cubes. Keeping it cold is key to a flaky, tender crust, as it prevents the butter from fully incorporating too quickly.
- ½ cup (100g) granulated sugar: Just enough to provide a delightful sweetness without overpowering the rich butter flavor of the shortbread.
- ¼ teaspoon salt: A pinch of fine sea salt here enhances all the other flavors beautifully, truly making our crust sing.
-
For the Truly Tasty Salted Caramel Filling:
- 1 cup (226g) unsalted butter: Room temperature butter will melt more evenly, contributing to a smoother caramel.
- 1 ½ cups (300g) packed light brown sugar: Using light brown sugar adds a wonderful molasses note and deepens the caramel flavor. Make sure it’s firmly packed into your measuring cup.
- 1 (14-ounce) can (397g) sweetened condensed milk: This is our secret weapon for a lusciously thick and creamy caramel, providing both sweetness and body.
- ¼ cup (60ml) light corn syrup (optional, but highly recommended): While optional, I find this ingredient works wonders! It helps prevent the caramel from crystallizing, ensuring a silky-smooth texture, and adds a lovely chewiness.
- 1 teaspoon pure vanilla extract: Choose a good quality vanilla; it really makes a difference in the overall flavor profile of our caramel.
- 1 teaspoon sea salt flakes: This is what truly elevates our caramel from merely sweet to “Salted Caramel Butter Bars Tasty Irresistible”! Plus, extra for sprinkling at the end.
Phase 1: Preparing the Irresistible Shortbread Crust & Crumb Topping
- Preheat and Prepare: First things first, let’s get our oven ready. Preheat your oven to a cozy 350°F (175°C). While it’s warming up, line a 9×13-inch baking pan with parchment paper, making sure to leave an overhang on the sides. This little trick will make lifting your finished Salted Caramel Butter Bars out of the pan an absolute breeze! I always press the parchment paper firmly into the corners to ensure a nice, even base.
- Combine Dry Ingredients: In a large mixing bowl, whisk together your 2 ½ cups of all-purpose flour, ½ cup of granulated sugar, and ¼ teaspoon of salt. Give it a good whisk to ensure everything is evenly distributed. This dry base is the foundation for our incredibly buttery and tender shortbread.
- Cut in the Butter: Now for the star of the show – the butter! Add your 1 cup (226g) of cold, cubed unsalted butter to the dry ingredients. You can use a pastry blender, two knives, or even your fingertips for this step. The goal here is to cut the butter into the flour mixture until it resembles coarse crumbs, with some pea-sized pieces of butter still visible. Avoid overworking the dough; we want to keep the butter cold and the texture crumbly for that perfect shortbread snap. This process is crucial for achieving that melt-in-your-mouth texture that makes these Salted Caramel Butter Bars so special.
- Reserve for Crumb Topping: Once your mixture is nicely crumbly, set aside about 1 cup (approximately 150g) of this mixture. This portion will become our delightful crumb topping later, adding an extra layer of texture and flavor to the finished bars. Simply place it in a small bowl and pop it in the refrigerator to keep it chilled while we work on the base.
- Press the Crust: Take the remaining shortbread mixture and firmly press it into the bottom of your prepared 9×13-inch baking pan. I like to use the bottom of a flat glass or a measuring cup to get a really compact and even layer. The goal is a uniform thickness across the entire base. A well-pressed crust is essential for preventing a crumbly base once baked.
- Par-Bake the Crust: Slide the pan into your preheated oven and bake for 15-20 minutes, or until the edges are lightly golden and the shortbread smells heavenly. This par-baking step ensures that our crust is perfectly set and sturdy enough to hold up to the rich caramel filling. When it comes out, the aroma will already be filling your kitchen, promising the delightful treats to come. Once baked, remove the pan from the oven and set it aside to cool slightly while we prepare the luscious caramel. Keep the oven on, as we’ll be using it again shortly!
Phase 2: Crafting the Silky, Tasty Salted Caramel Filling
- Melt Butter and Sugar: In a heavy-bottomed saucepan or a Dutch oven, combine 1 cup (226g) of room temperature unsalted butter with 1 ½ cups (300g) of packed light brown sugar. Place the saucepan over medium heat, stirring occasionally, until the butter has completely melted and the brown sugar has dissolved into a smooth, glossy mixture. This should take about 3-5 minutes. The mixture will start to bubble gently, and you’ll notice a rich, sweet fragrance filling the air.
- Introduce the Condensed Milk and Corn Syrup: Once the butter and sugar are beautifully combined, pour in the entire 14-ounce can of sweetened condensed milk. Now, if you’re using it (and I heartily recommend you do for truly Irresistible Salted Caramel Butter Bars), add the ¼ cup of light corn syrup. This is where the magic begins for our smooth, non-crystalline caramel.
- Cook the Caramel to Perfection: Reduce the heat to medium-low. This is the stage where patience is your best friend. You’ll need to stir the mixture continuously with a wooden spoon or a heat-proof spatula. This constant stirring is vital to prevent the caramel from sticking to the bottom of the pan and burning, ensuring an even cook. Continue cooking for about 10-15 minutes, or until the caramel thickens considerably and takes on a beautiful, rich golden-brown hue. When it’s ready, a spoonful of the mixture should cling to the back of your spoon, and when you draw your spatula through it, it should leave a clear trail for a few seconds before the caramel slowly flows back together. Don’t rush this step! A well-cooked caramel is key to the chewiness and flavor of these Tasty Salted Caramel Butter Bars.
- Flavor with Vanilla and Sea Salt: Remove the saucepan from the heat immediately. Stir in the 1 teaspoon of pure vanilla extract and 1 teaspoon of sea salt flakes. The vanilla adds a warm, aromatic depth, while the sea salt provides that signature contrast, cutting through the sweetness and making every bite utterly craveable. Stir until the salt has dissolved and the vanilla is fully incorporated. The aroma at this point is simply divine; try not to eat it all straight from the pan!
Phase 3: Assembling and Baking Your Salted Caramel Butter Bars
- Pour the Luscious Caramel: Carefully and evenly pour the warm, silky salted caramel filling over your par-baked shortbread crust in the pan. Use an offset spatula or the back of a spoon to gently spread the caramel all the way to the edges, ensuring every square inch of our crust gets a generous coating of this golden deliciousness.
- Add the Crumb Topping: Now, retrieve that reserved crumb mixture from the refrigerator. Sprinkle it evenly over the top of the caramel layer. This topping isn’t just for looks; it adds another layer of buttery shortbread texture, making these Salted Caramel Butter Bars even more complex and satisfying. Don’t worry if some bits sink slightly into the warm caramel; that’s part of its charm.
- Final Bake: Gently place the pan back into your preheated 350°F (175°C) oven. Bake for another 20-25 minutes, or until the crumb topping is beautifully golden brown and the caramel underneath is bubbling gently around the edges. You’ll know it’s ready when the entire kitchen is filled with an absolutely intoxicating aroma of butter, sugar, and caramel. The caramel should appear set but will still be slightly soft in the center; it will firm up considerably as it cools.
- Cooling is Critical: Once baked to perfection, remove the pan from the oven. This is perhaps the hardest part: resist the urge to cut into them immediately! Place the pan on a wire rack and allow the bars to cool completely at room temperature for at least 2-3 hours. For the cleanest cuts and the best set, I actually recommend chilling the bars in the refrigerator for an additional 1-2 hours after they’ve cooled to room temperature. This patience will be richly rewarded with perfectly structured, hold-their-shape Salted Caramel Butter Bars.
Phase 4: Cooling and Serving Your Heavenly Salted Caramel Butter Bars
- Complete Cooling for Perfection: As mentioned, proper cooling is absolutely paramount for these bars. If you try to cut them while they’re still warm, the caramel will be too soft and messy, and you won’t get those beautiful, clean slices. The cooling process allows the caramel to fully set and achieve its signature chewy, yet firm, texture. After room temperature cooling, that additional chill in the refrigerator really solidifies the caramel and makes them incredibly easy to handle. Trust me, it’s worth the wait for truly Irresistible Salted Caramel Butter Bars.
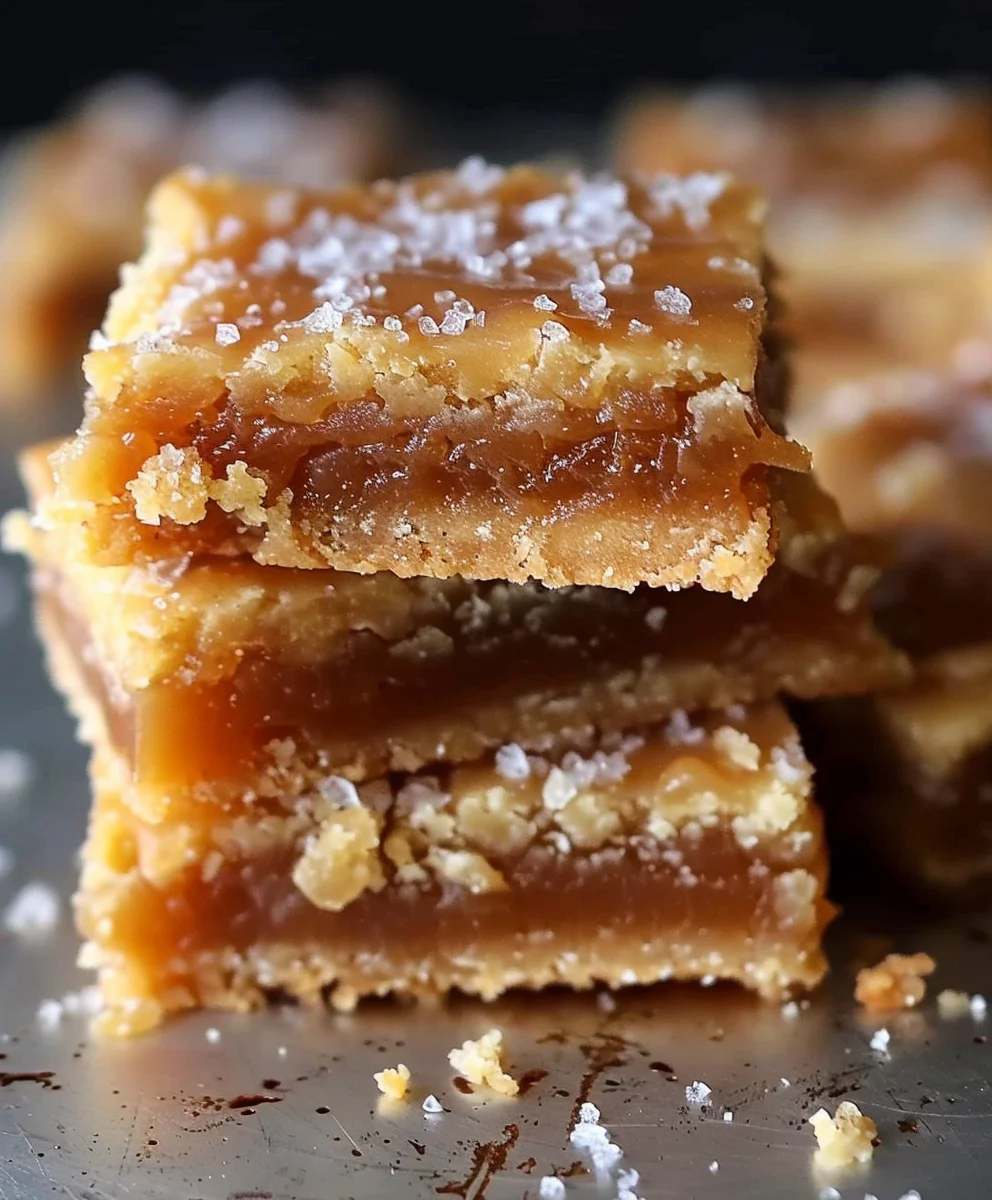
- Lift and Cut: Once your bars are completely chilled and firm, use the parchment paper overhang to carefully lift the entire slab out of the baking pan and transfer it to a large cutting board. This is where that parchment paper trick really shines! Now, using a sharp, warm knife (run it under hot water and wipe it dry between cuts for the cleanest edges), slice the bars into your desired size. I usually aim for 24 squares (6×4 arrangement), but you could go for smaller bite-sized pieces or larger, more decadent bars. Clean your knife often for the most precise cuts.
- Final Flourish: For that extra touch of gourmet sophistication and to highlight the “salted” in our “Salted Caramel Butter Bars,” sprinkle a few extra flakes of sea salt over the top of each individual bar before serving. This not only adds visual appeal but also enhances the flavor profile, giving you that perfect sweet-and-salty balance with every single bite. It’s a small step that makes a huge difference!
- Serving Suggestions: These Tasty Salted Caramel Butter Bars are absolutely glorious on their own, perhaps with a cup of hot coffee or tea. However, they are also an incredible dessert addition to any gathering, or a delightful treat to share with loved ones. You could even serve them slightly warmed with a scoop of vanilla bean ice cream for an extra indulgent experience. They make fantastic edible gifts, too!
- Storage: Store your delightful Salted Caramel Butter Bars in an airtight container at room temperature for up to 3-4 days. If you prefer a firmer texture, or if your kitchen is particularly warm, you can store them in the refrigerator for up to a week. Just bring them back to room temperature for about 15-20 minutes before serving for the best texture and flavor. They also freeze beautifully for up to 2-3 months; simply wrap individual bars tightly in plastic wrap and then aluminum foil before placing them in a freezer-safe bag or container. Thaw at room temperature when you’re ready to enjoy this irresistible treat again!

Conclusion:
And there you have it, my friends! If there’s one recipe I could implore you to try this week, one that I know will instantly become a cherished favorite in your culinary repertoire, it’s this one. I’ve shared countless recipes over the years, but few evoke such a consistent, resounding “wow!” from everyone who takes a bite. These aren’t just any ordinary dessert bars; they are a symphony of textures and flavors, a delicate dance between rich, melt-in-your-mouth butteriness, the silken depth of golden caramel, and that exquisite, palate-cleansing pop of sea salt that makes every mouthful an absolute revelation. I genuinely believe that once you experience the sheer delight of creating and tasting these beauties, you’ll understand why I rave about them so passionately.
The beauty of these bars lies not just in their incredible flavor, but also in their surprising simplicity. You don’t need to be a seasoned baker to achieve spectacular results. The process is straightforward, yielding a dessert that looks sophisticated and tastes utterly divine, yet requires minimal fuss. It’s the kind of treat that effortlessly elevates any occasion, whether you’re hosting a casual coffee morning, a festive dinner party, or simply craving something extraordinary to brighten up a mundane Tuesday afternoon. Trust me, the aroma alone as they bake will fill your home with such warmth and comfort, setting the stage for the indulgence to come. These Salted Caramel Butter Bars Tasty Irresistible qualities will make them a staple in your baking repertoire, and you’ll find yourself reaching for this recipe again and again.
Serving Suggestions & Delightful Variations:
While these bars are absolutely perfect straight from the pan, perhaps slightly cooled to allow the caramel to set, there are so many delightful ways to enjoy and customize them. For an extra special treat, try serving them ever-so-slightly warm, perhaps with a scoop of vanilla bean ice cream melting deliciously over the top. The contrast between the warm, gooey bar and the cold, creamy ice cream is simply out of this world! A drizzle of high-quality dark chocolate ganache just before serving can also add an extra layer of decadence, enhancing the rich caramel notes. Consider pairing them with a robust cup of freshly brewed coffee or a rich espresso; the bitterness perfectly complements the sweetness of the bars. They also make fantastic edible gifts, beautifully wrapped in parchment paper and tied with a simple ribbon – a homemade present that truly speaks from the heart.
Feeling adventurous? Don’t hesitate to play around with the recipe! You could incorporate a layer of toasted pecans or walnuts between the crust and the caramel for an added textural crunch and nutty flavor. A sprinkle of mini chocolate chips on top of the caramel layer before the top crust goes on would also be a fantastic addition for a chocolate-caramel twist. For a slightly different flavor profile, consider adding a hint of espresso powder to the crust for a subtle coffee note that pairs wonderfully with caramel. Or, for those who love a bit of heat, a tiny pinch of cayenne pepper mixed into the caramel can create an unexpected and intriguing spicy kick. And remember, a final, generous sprinkle of flaky sea salt right before serving is always a good idea, as it truly enhances all the flavors.
Your Baking Journey Begins Now!
I truly hope I’ve convinced you to dive headfirst into making these incredible salted caramel butter bars. They are, without a doubt, one of my absolute favorite creations, and I promise you won’t regret the small amount of effort it takes to bring such joy into your kitchen. There’s something so incredibly satisfying about baking from scratch, especially when the end result is this undeniably delicious. So, clear your counter, gather your ingredients, and set aside some time this week to treat yourself and your loved ones to this extraordinary dessert. I’m genuinely excited for you to experience the magic for yourselves.
Once you’ve baked them, I would absolutely love to hear about your experience! Did you stick to the original recipe, or did you venture into some of the variations? What did your family and friends think? Please, don’t be shy – share your thoughts, your successes, and even your questions in the comments below. Better yet, snap a photo of your magnificent creations and share them! There’s nothing I love more than seeing what you all create in your own kitchens. Happy baking, and may your homes be filled with the wonderful aroma of these irresistible salted caramel butter bars!
Salted Caramel Butter Bars: Irresistible & Tasty Dessert
These Salted Caramel Butter Bars offer a delightful symphony of sweet and salty, combining a tender, buttery shortbread crust with a thick, chewy layer of rich salted caramel, topped with a delicate sprinkle of sea salt. A truly irresistible dessert for any occasion.
Ingredients
-
1 lb (2 cups) unsalted butter, room temperature
-
1 cup granulated sugar
-
1½ cups powdered sugar
-
2 tbsp vanilla extract
-
4 cups all-purpose flour
-
1 (14 oz) bag caramel candies, unwrapped (or 2 cups soft caramel bits)
-
⅓ cup heavy cream
-
½ to 1 tsp coarse sea salt, plus more for sprinkling
Instructions
-
Step 1
Preheat oven to 350°F (175°C). Line a 9×13-inch baking pan with parchment paper. In a large bowl, combine 1 lb unsalted butter, 1 cup granulated sugar, 1½ cups powdered sugar, 2 tbsp vanilla extract, and 4 cups all-purpose flour. Mix until crumbly. Reserve 1 cup of this mixture for the crumb topping; chill. Press the remaining mixture firmly into the prepared pan. Par-bake for 15-20 minutes until lightly golden. Cool slightly, keeping the oven on. -
Step 2
In a heavy-bottomed saucepan, combine 1 (14 oz) bag caramel candies and ⅓ cup heavy cream. Melt over medium-low heat, stirring constantly, until the caramel is completely smooth. Remove from heat and stir in ½ to 1 tsp coarse sea salt until combined. -
Step 3
Pour the warm caramel filling evenly over the par-baked shortbread crust. Sprinkle the reserved chilled crumb topping evenly over the caramel layer. Return the pan to the 350°F (175°C) oven and bake for an additional 20-25 minutes, or until the crumb topping is beautifully golden brown and the caramel is bubbling gently around the edges. The caramel will still be slightly soft in the center. -
Step 4
Remove the pan from the oven and place it on a wire rack to cool completely at room temperature for at least 2-3 hours. For the cleanest cuts and best set, chill the bars in the refrigerator for an additional 1-2 hours. Use the parchment paper overhang to lift the entire slab onto a cutting board. Slice into 24 desired bars using a sharp, warm knife, wiping it clean between cuts. Sprinkle a few extra flakes of sea salt over the top of each bar before serving. Store in an airtight container at room temperature for 3-4 days or refrigerated for up to 1 week. Can be frozen for 2-3 months.
Important Information
Nutrition Facts (Per Serving)
It is important to consider this information as approximate and not to use it as definitive health advice.
Allergy Information
Please check ingredients for potential allergens and consult a health professional if in doubt.