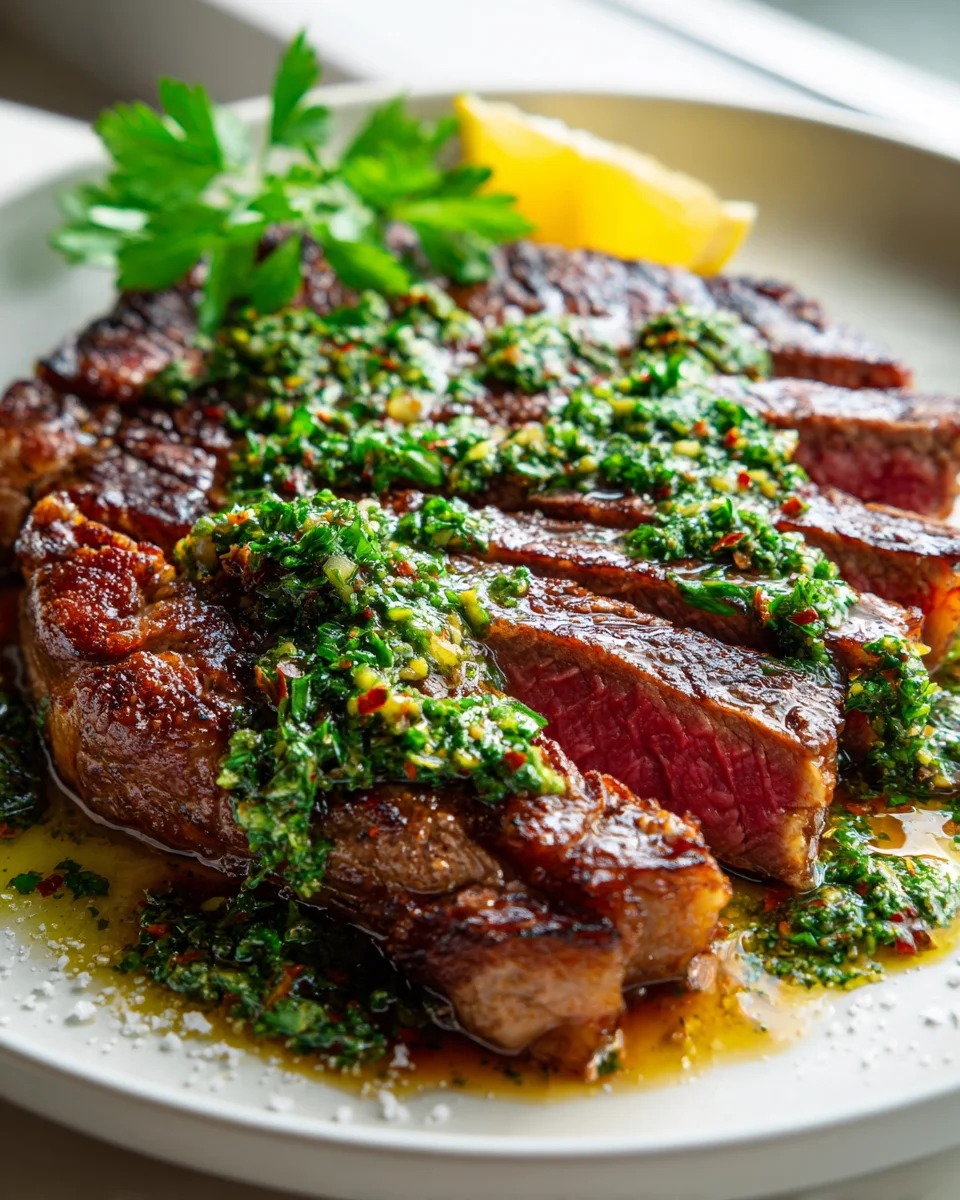
It was a chilly Sunday evening, and the kind of raindrops that make a comforting patter against the windows were falling outside. I stood in my kitchen, the aroma of sizzling steak filling the air, as I prepared my Skillet Chimichurri Steak with Butter Finish. I remember the first time I tasted this dish at a bustling Argentinian restaurant, where the vibrant green chimichurri danced on the plate beside a perfectly seared steak. The burst of garlic, parsley, and a hint of acidity from the vinegar was unforgettable.
As I cooked that night, I was reminded of how the rich, buttery finish elevates the dish to a whole new level. The steak sizzles in the skillet, its crust turning a beautiful golden brown, while the chimichurri sauce glistens invitingly. When you take that first bite, the tender meat melts in your mouth, perfectly complemented by the herbaceous and zesty notes of the chimichurri. It’s an explosion of flavors that leaves you craving more.
This recipe is special to me because it combines the simplicity of a weeknight dinner with the indulgence of a gourmet meal. My version really stands out with the addition of a luscious butter finish, enhancing the steak’s richness and making it utterly irresistible. I promise, each bite is like a warm hug on a rainy day.
Let me show you exactly how to make it.
Why You’ll Love This Recipe
- Ready in about 30 minutes, allowing you to enjoy a gourmet meal without spending hours in the kitchen.
- Juicy, tender ribeye steaks seared to perfection, complemented by a fresh, zesty chimichurri sauce that packs a flavorful punch.
- All made in one skillet, so cleanup is a breeze—fewer dishes means more time to savor your meal.
- Budget-friendly, using high-quality ingredients without breaking the bank, especially when steak is on sale.
- The rich butter finish enhances the steak’s flavor, adding a luxurious touch that feels special for any occasion.
Ingredients
- For the Chimichurri Sauce:
- 1 cup fresh parsley, finely chopped
- 1/2 cup fresh cilantro, finely chopped
- 4 cloves garlic, minced
- 1/4 cup red wine vinegar
- 1/2 cup extra virgin olive oil
- 1 teaspoon red pepper flakes (adjust for spice preference)
- 1 teaspoon dried oregano
- Salt and black pepper to taste
- For the Steak:
- 2 ribeye steaks (about 1.5 inches thick, approximately 1 pound each)
- Salt and black pepper, to taste
- 2 tablespoons vegetable oil (or canola oil)
- 4 tablespoons unsalted butter
- 2 sprigs fresh thyme (optional, for flavor)
- 2 cloves garlic, smashed (optional, for flavor)
Let’s take a closer look at some key ingredients. The ribeye steak is known for its marbling, which provides an incredibly juicy and flavorful bite. When selecting ribeye, look for steaks with a good amount of fat throughout, as this is what makes the steak so tender and rich. If ribeye isn’t available, you can substitute it with sirloin or New York strip steak, though the texture may differ slightly.
The chimichurri sauce is a vibrant blend of fresh herbs, garlic, and acidity from the red wine vinegar. This sauce not only adds a burst of flavor but also helps to tenderize the meat. When picking herbs, opt for fresh, vibrant parsley and cilantro. If you’re not a fan of cilantro, you can replace it with more parsley or even fresh basil for a different flavor profile. The extra virgin olive oil is essential for its rich taste and smooth texture, contributing to the sauce’s overall mouthfeel.
Step-by-Step Instructions
- Start by preparing the chimichurri sauce. In a medium bowl, combine the finely chopped parsley, cilantro, minced garlic, red wine vinegar, and extra virgin olive oil. Mix well until all ingredients are combined. Taste and season with red pepper flakes, salt, and black pepper. Set aside to let the flavors meld for at least 10 minutes.
- While the chimichurri is resting, prepare the steaks. Pat the ribeye steaks dry with paper towels to remove excess moisture, which helps achieve a nice sear. Season both sides generously with salt and black pepper.
- Heat a large skillet over medium-high heat and add the vegetable oil. Once the oil is shimmering (about 2 minutes), carefully place the steaks in the skillet. Cook for 5-6 minutes without moving them, allowing a crust to form. Look for a deep brown color at the edges.
- Flip the steaks using tongs and cook for an additional 5-6 minutes for medium-rare. Use a meat thermometer to check the internal temperature; it should read 130°F (54°C). If you prefer your steak more done, add 1-2 minutes more of cooking time.
- In the last minute of cooking, add the unsalted butter, smashed garlic, and thyme (if using) to the skillet. As the butter melts, use a spoon to baste the steaks with the melted butter mixture. This enriches the flavor and keeps the steaks moist. Avoid overcrowding the pan, as this can cause steaming instead of searing.
- Once cooked to your desired doneness, remove the steaks from the skillet and transfer them to a cutting board. Let them rest for 5 minutes to allow the juices to redistribute. This step is crucial for a juicy steak.
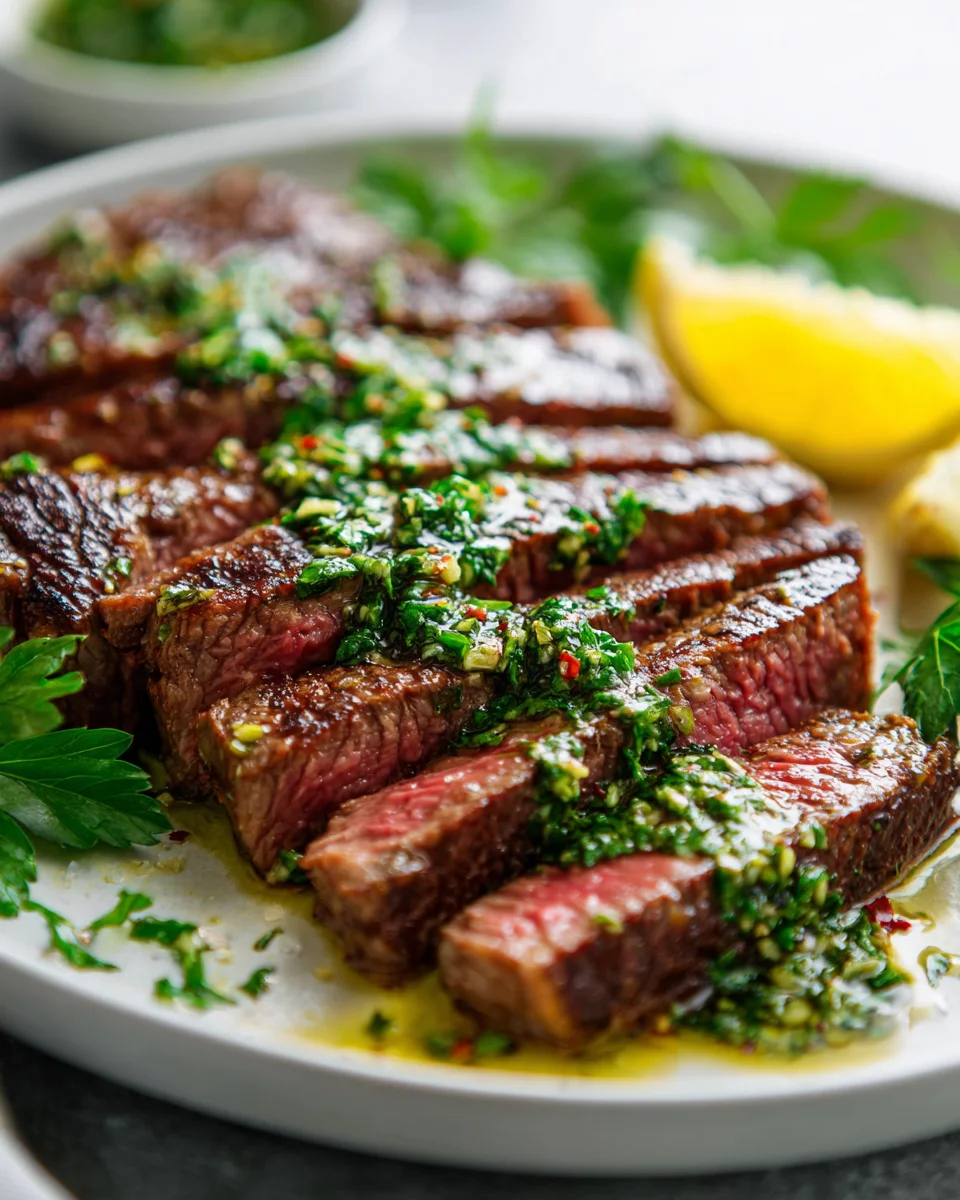
- After resting, slice the steaks against the grain and serve with the chimichurri sauce drizzled generously over the top. Enjoy your restaurant-quality meal at home!
Pro Tips for the Best Skillet Chimichurri Steak With Butter Finish
- One common mistake is not letting the steak rest after cooking. This step is essential for juicy meat, as it allows the juices to settle. Don’t skip it!
- For the best sear, make sure your skillet is hot enough before adding the steak. A properly heated pan will create that gorgeous crust, while a cold pan leads to steaming.
- If you want to elevate your chimichurri sauce, try adding a splash of lemon juice for extra brightness or a teaspoon of honey for a subtle sweetness.
- Invest in a good quality meat thermometer. This tool is invaluable for achieving your preferred doneness without cutting into the steak and losing precious juices.
- Don’t be afraid to experiment with the herbs in your chimichurri. Adding fresh mint or tarragon can introduce exciting flavors that complement the steak beautifully.
Variations & Serving Ideas
- For a spicier chimichurri, add diced jalapeños or substitute the red pepper flakes with fresh chili peppers.
- Try a citrus chimichurri by adding orange or lime zest and juice for a refreshing twist that pairs perfectly with grilled veggies.
- For a heartier option, serve the steak atop a bed of creamy mashed potatoes or polenta, allowing the chimichurri to soak into the base.
- For a low-carb meal, pair the steak with a side of roasted asparagus or sautéed spinach sautéed in garlic and olive oil.
For sides, consider serving this dish with garlic bread, which is perfect for soaking up any leftover chimichurri. A simple arugula salad with lemon vinaigrette adds a refreshing crunch. Additionally, creamy coleslaw balances the richness of the steak beautifully, and it’s easy to prepare ahead of time.
Storage, Make-Ahead & Reheating
Leftover Skillet Chimichurri Steak can be stored in the refrigerator for up to 3 days. Make sure to place it in an airtight container to keep it fresh. While I recommend enjoying the steak immediately for the best texture, you can freeze the cooked steak for up to 3 months. Wrap it tightly in plastic wrap and then place it in a freezer bag to prevent freezer burn.
When reheating, the best method is to gently warm the steak in a skillet over low heat, adding a splash of broth or water to keep it moist. Heat until warmed through, about 5-7 minutes. The flavors of the chimichurri sauce may deepen overnight, making it even more delightful the next day!
Frequently Asked Questions
Can I make Skillet Chimichurri Steak With Butter Finish ahead of time?
Yes — while the steak is best enjoyed fresh, you can prepare the chimichurri sauce ahead of time. In fact, letting it sit for a few hours or overnight enhances the flavors. Just store it in the fridge until you’re ready to use it.
What’s the best way to grill the steak instead of using a skillet?
If you prefer grilling, simply preheat your grill to high heat and oil the grates. Grill the seasoned ribeye steaks for about 4-5 minutes per side for medium-rare, basting with butter in the last minute, just like you would in a skillet.
Can I substitute the ribeye steak for another cut?
Absolutely! While ribeye is delicious due to its marbling, you can use cuts like sirloin, filet mignon, or strip steak. Just adjust cooking times based on the thickness and fat content of the steak you’re using.
What can I do if my chimichurri sauce is too bitter?
If your chimichurri sauce tastes bitter, it may be due to over-processing the herbs or using too much garlic. To balance it, add a pinch of sugar or a splash of lemon juice to enhance the flavors and cut the bitterness.
Is it necessary to use fresh herbs for the chimichurri sauce?
Final Thoughts
Skillet Chimichurri Steak With Butter Finish is a dish that perfectly balances rich, savory flavors with a vibrant, herby brightness. The addition of butter at the end elevates the steak, creating a decadent finish that’s simply irresistible.
This is the kind of recipe I come back to again and again, especially when I want to impress guests or treat myself to a special meal. The sizzle of the steak in the skillet and the aroma of the chimichurri are truly comforting.
I encourage you to try this delightful recipe for yourself! Don’t hesitate to share your results or put your own spin on it—I’d love to hear how it turns out for you!
Skillet Chimichurri Steak
- Total Time: 25 minutes
- Yield: 4 servings 1x
Description
This Skillet Chimichurri Steak features juicy ribeye steaks paired with a vibrant chimichurri sauce. The addition of a rich butter finish elevates the dish to gourmet status, making it perfect for any occasion.
Ingredients
- For the Chimichurri Sauce:
- 1 cup fresh parsley, finely chopped
- 1/2 cup fresh cilantro, finely chopped
- 4 cloves garlic, minced
- 1/4 cup red wine vinegar
- 1/2 cup extra virgin olive oil
- 1 teaspoon red pepper flakes (adjust for spice preference)
- 1 teaspoon dried oregano
- Salt and black pepper to taste
- For the Steak:
- 2 ribeye steaks (about 1.5 inches thick, approximately 1 pound each)
- Salt and black pepper, to taste
- 2 tablespoons vegetable oil (or canola oil)
- 4 tablespoons unsalted butter
- 2 sprigs fresh thyme (optional, for flavor)
- 2 cloves garlic, smashed (optional, for flavor)
Instructions
- Start by preparing the chimichurri sauce. In a medium bowl, combine the finely chopped parsley, cilantro, minced garlic, red wine vinegar, and extra virgin olive oil. Mix well until all ingredients are combined. Taste and season with red pepper flakes, salt, and black pepper. Set aside to let the flavors meld for at least 10 minutes.
- While the chimichurri is resting, prepare the steaks. Pat the ribeye steaks dry with paper towels to remove excess moisture, which helps achieve a nice sear. Season both sides generously with salt and black pepper.
- Heat a large skillet over medium-high heat and add the vegetable oil. Once the oil is shimmering (about 2 minutes), carefully place the steaks in the skillet. Cook for 5-6 minutes without moving them, allowing a crust to form. Look for a deep brown color at the edges.
- Flip the steaks using tongs and cook for an additional 5-6 minutes for medium-rare. Use a meat thermometer to check the internal temperature; it should read 130°F (54°C). If you prefer your steak more done, add 1-2 minutes more of cooking time.
- In the last minute of cooking, add the unsalted butter, smashed garlic, and thyme (if using) to the skillet. As the butter melts, use a spoon to baste the steaks with the melted butter mixture. This enriches the flavor and keeps the steaks moist. Avoid overcrowding the pan, as this can cause steaming instead of searing.
- Once cooked to your desired doneness, remove the steaks from the skillet and transfer them to a cutting board. Let them rest for 5 minutes to allow the juices to redistribute. This step is crucial for a juicy steak.
- After resting, slice the steaks against the grain and serve with the chimichurri sauce drizzled generously over the top. Enjoy your restaurant-quality meal at home!
- Prep Time: 10 mins
- Cook Time: 15 mins
- Category: Main Course
- Method: Skillet
- Cuisine: Argentinian
Nutrition
- Serving Size: 1 steak with chimichurri
- Calories: 600
- Sugar: 0 g
- Sodium: 500 mg
- Fat: 45 g
- Saturated Fat: 15 g
- Unsaturated Fat: 25 g
- Trans Fat: 0 g
- Carbohydrates: 2 g
- Fiber: 1 g
- Protein: 50 g
- Cholesterol: 120 mg
Keywords: Letting the steak rest after cooking is essential for juicy meat. Make sure your skillet is hot enough before adding the steak for the best sear.