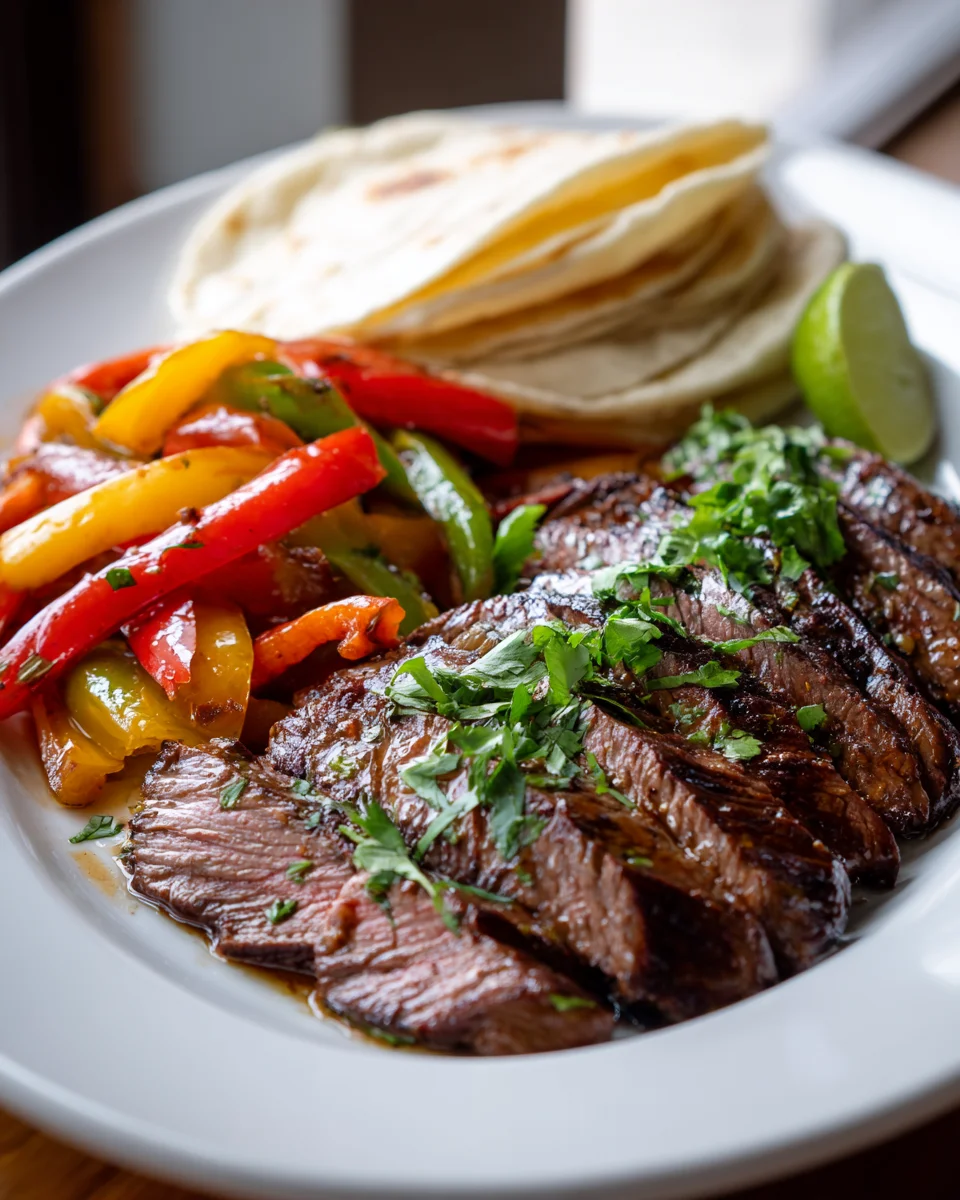
Grilled Steak Fajita Platter
Oh, get ready, because I’ve got something truly special for you today! This isn’t just any weeknight dinner; it’s a vibrant, sizzling, flavor-packed experience that will transport you straight to your favorite Tex-Mex spot, right from your own backyard or kitchen. I’m talking about my go-to Grilled Steak Fajita Platter, a dish that’s as fun to make as it is to eat!
What makes this Grilled Steak Fajita Platter stand out? Well, for starters, we’re talking about perfectly marinated slices of tender, juicy beef, kissed by the smoky char of the grill. That irresistible grilled flavor takes classic fajitas to a whole new level! Paired with sweet, caramelized bell peppers and onions, all bursting with color and freshness, it’s a feast for the eyes and the palate that you won’t soon forget.
You’re going to absolutely adore how simple it is to put together such an impressive meal. Imagine gathering around a beautiful platter, everyone building their own delicious fajitas with warm tortillas and all their favorite fixings – zesty salsa, creamy guacamole, a dollop of sour cream, or a sprinkle of cheese. It’s interactive, it’s delicious, and it’s undeniably fun! Whether you’re entertaining guests or just want to treat your family to something extraordinary, this recipe is guaranteed to be a hit. Trust me, once you try making your own Grilled Steak Fajita Platter, you’ll be hooked!

Ingredient Notes
Creating an incredible Grilled Steak Fajita Platter starts with understanding your ingredients. I’ve found that using fresh, quality components truly makes all the difference for that authentic, sizzling flavor we all love. Here’s a rundown of what I typically use and some great alternatives.
For the Steak
- The Cut: My go-to choices for fajitas are flank steak, skirt steak, or even top sirloin. These cuts are fantastic because they cook relatively quickly on a hot grill and are wonderfully tender when sliced against the grain. Flank steak offers a great beefy flavor, while skirt steak is known for absorbing marinades beautifully. If you can’t find these, a thinly sliced chuck steak could also work in a pinch, just be sure to marinate it a bit longer to tenderize.
- Marinade Essentials: The marinade is where the magic happens! I build mine around fresh lime juice (a must for tenderizing and flavor), olive oil, minced garlic, chili powder, ground cumin, smoked paprika, dried oregano, salt, and freshly ground black pepper. Sometimes I’ll add a pinch of cayenne for an extra kick.
- Non-Alcoholic Alternative: Some traditional fajita marinades might call for a splash of beer, but I always opt for delicious non-alcoholic substitutes. Instead of beer, I simply increase the amount of fresh lime juice, or add a small splash of apple cider vinegar to achieve that desirable tang and acidity without any alcohol. It works perfectly and keeps the flavors bright and vibrant.
For the Veggies
- Bell Peppers: A colorful mix of red, yellow, and green bell peppers is essential. They add sweetness, a fantastic crunch, and visual appeal to your platter. Feel free to use orange too!
- Onions: Red or yellow onions are ideal. I love how they caramelize slightly on the grill, adding a savory depth that pairs wonderfully with the steak and peppers.
- Optional Additions: Don’t hesitate to get creative with your vegetables. Sliced zucchini, mushrooms, or even a few jalapeño slices (if you like some extra heat) can be grilled alongside the peppers and onions for more variety.
For Serving
- Tortillas: Warm flour tortillas are classic, but corn tortillas are a delicious gluten-free option. I always make sure to warm them through before serving so they’re soft and pliable.
- Toppings: This is where you can truly personalize your fajita platter! My favorites include fresh salsa (pico de gallo is wonderful), creamy guacamole, a dollop of sour cream or plain Greek yogurt for a lighter option, chopped fresh cilantro, and extra lime wedges for squeezing over everything. Shredded cheese (cheddar or Monterey Jack) is also a popular addition.
- Dairy-Free Options: For those avoiding dairy, cashew cream or a quality dairy-free sour cream alternative works beautifully, or simply load up on extra guacamole and salsa!
Step-by-Step Instructions
Get ready to fire up that grill! Making Grilled Steak Fajitas is all about timing and maximizing those delicious char marks. Here’s my simple guide to whipping up a fantastic platter that will impress everyone.
Step 1: Marinate the Steak
- First things first, let’s get that steak marinating. Trim any excess fat from your flank, skirt, or sirloin steak. If your steak is very thick, you can butterfly it open or pound it slightly to an even ½ to ¾-inch thickness, ensuring even cooking.
- In a shallow dish or a large zip-top bag, combine your marinade ingredients: fresh lime juice, olive oil, minced garlic, chili powder, ground cumin, smoked paprika, dried oregano, salt, and black pepper. Stir well to combine.
- Add the steak to the marinade, making sure it’s fully coated. Seal the bag or cover the dish, and refrigerate for at least 30 minutes, but ideally 2-4 hours. For tougher cuts, you can go up to 6 hours, but I wouldn’t recommend marinating delicate cuts like skirt steak for much longer than that, as the acid can start to break down the fibers too much.
Step 2: Prepare Your Veggies
- While the steak is marinating, it’s time to prep your colorful veggies. Slice your bell peppers (red, yellow, green) and onions (red or yellow) into strips, about ¼ to ½-inch thick. Try to keep them uniform so they cook evenly on the grill.
- In a large bowl, toss the sliced peppers and onions with a tablespoon of olive oil, a pinch of salt, and a little black pepper. You can also add a sprinkle of chili powder or cumin here if you like.
Step 3: Preheat and Grill the Steak
- Preheat your grill to high heat (around 450-500°F). Make sure the grill grates are clean and lightly oiled to prevent sticking.
- Remove the steak from the marinade, letting any excess drip off. Discard the remaining marinade.
- Place the steak on the hot grill. Grill for 4-6 minutes per side for medium-rare (internal temperature 130-135°F) or until it reaches your desired doneness. You’re looking for a beautiful sear and some nice char marks.
- Once cooked, remove the steak from the grill and place it on a cutting board. Cover it loosely with foil and let it rest for at least 5-10 minutes. This resting period is crucial for juicy, tender steak!
Step 4: Grill the Veggies
- While the steak is resting, reduce your grill heat to medium-high (or simply use a cooler section of the grill).
- Place your seasoned bell peppers and onions directly on the grill grates or in a grill basket. Cook for 5-8 minutes, stirring occasionally, until they are tender-crisp and have some lovely char marks. I like mine still with a bit of bite!
Step 5: Warm the Tortillas and Slice the Steak
- While the veggies are finishing up, warm your tortillas. You can do this quickly on the grill (about 30 seconds per side), in a dry skillet on the stovetop, or wrapped in foil in the oven.
- Now for the steak: slice it against the grain into thin strips, about ¼-inch thick. Slicing against the grain is key to ensuring your fajita meat is incredibly tender and easy to chew.
Step 6: Assemble Your Platter
- Arrange the sliced steak and grilled vegetables on a large serving platter.
- Serve immediately with the warm tortillas and all your favorite toppings – salsa, guacamole, sour cream/Greek yogurt, fresh cilantro, and lime wedges. Let everyone build their own delicious fajitas!
Tips & Suggestions
I’ve made a lot of fajitas over the years, and I’ve picked up a few tricks that really elevate the experience. Here are my top tips for ensuring your Grilled Steak Fajita Platter is an absolute hit every single time.
Marinade Wisdom
- Don’t Over-Marinate: While marinating adds incredible flavor and helps tenderize, be mindful of the time, especially with acidic marinades. For flank or skirt steak, 2-4 hours is usually plenty. Longer than 6 hours can start to break down the meat too much, making it mushy rather than tender.
- Taste Your Marinade: Before adding the meat, always give your marinade a quick taste. Adjust the salt, lime, or spices if needed. Remember, this is where a lot of your flavor comes from!
Grilling Mastery
- High Heat is Key for Steak: To get that beautiful, caramelized crust on your steak, you need a very hot grill. Don’t be afraid of the heat! This quick sear locks in the juices.
- Rest Your Meat: I cannot stress this enough – resting the steak after grilling is absolutely vital. This allows the juices to redistribute throughout the meat, resulting in a much more tender and succulent bite. If you slice it immediately, all those delicious juices will run out onto your cutting board.
- Don’t Overcrowd the Grill: When grilling both the steak and veggies, make sure you leave enough space for air to circulate. Overcrowding can lower the grill temperature and steam your food instead of searing it, preventing those desirable char marks. Work in batches if necessary.
Flavor Enhancements & Serving Fun
- Slicing Against the Grain: Always, always slice your cooked steak against the grain. Look at the muscle fibers; they run in a specific direction. You want to slice perpendicular to those fibers. This shortens them, making the steak incredibly tender and easy to chew.
- Spice Level: If you love heat, consider adding a finely minced jalapeño or serrano pepper to your marinade. For a milder kick, a pinch of cayenne pepper in the marinade works wonders.
- Warm Tortillas Properly: Soft, warm tortillas are non-negotiable for fajitas. Wrapping them in foil and heating them in the oven, or a quick pass over the grill grates until pliable, makes all the difference. Keep them wrapped in a clean kitchen towel at the table to stay warm.
- The Sizzle Factor: For an authentic presentation, you can heat a cast iron skillet on the stove until it’s smoking hot. Just before serving, toss the sliced steak and grilled veggies into the hot skillet with a tiny drizzle of oil. It will sizzle wonderfully as you bring it to the table!
- Homemade Toppings: While store-bought options are fine, making your own fresh salsa or guacamole really takes your fajita platter to the next level. It’s surprisingly easy and so much more flavorful.
Storage
Leftover fajitas are a treat, and storing them properly ensures they remain delicious for future meals. Here’s how I handle any components that don’t get devoured right away.
Cooked Steak and Vegetables
- Separate Storage: I always store the cooked steak and grilled vegetables in separate airtight containers. This helps maintain their individual textures and flavors.
- Refrigeration: Place the sealed containers in the refrigerator within two hours of cooking. They will stay fresh and delicious for 3-4 days.
- Freezing (Steak Only): If you have a significant amount of leftover steak, you can freeze it. Allow the cooked, sliced steak to cool completely. Store it in a freezer-safe airtight container or heavy-duty freezer bag. It will keep well for up to 2-3 months. I don’t typically freeze the grilled vegetables as they tend to become mushy upon thawing.
Leftover Toppings
- Salsa and Guacamole: Store any leftover salsa in an airtight container in the refrigerator. Fresh guacamole is best eaten the same day, but if you must store it, press a layer of plastic wrap directly onto the surface of the guacamole (to prevent air exposure) before sealing the container. It will last about 1-2 days in the fridge, though it might brown slightly.
- Sour Cream/Greek Yogurt: Keep these in their original containers, sealed and refrigerated, according to their best-by dates.
- Tortillas: Unused warm tortillas can be stored in a zip-top bag at room temperature for a day or two, or in the refrigerator for up to a week.
Reheating Leftovers
- Steak: For best results, gently reheat the sliced steak. I often use a dry skillet over medium-low heat for a few minutes until just warmed through, being careful not to overcook and dry it out. A quick zap in the microwave is also an option, but keep the time short.
- Vegetables: The grilled vegetables can be reheated in a skillet over medium heat until warmed, or quickly microwaved.
- Combining: You can reheat the steak and veggies together in a skillet for a quick and easy meal. Add a tiny splash of water or beef broth to help create some steam and keep everything from drying out.
Final Thoughts
There’s something truly special about the Grilled Steak Fajita Platter that makes it an absolute winner in my book. From the moment that marinated beef hits the hot grill, you know you’re in for a treat. The smoky char on the steak, the perfectly tender-crisp peppers and onions, all coming together in a vibrant, sizzling display – it’s pure culinary joy.
This isn’t just a meal; it’s an experience. The Grilled Steak Fajita Platter is a celebration of bold flavors and fresh ingredients, incredibly satisfying yet surprisingly simple to master. It’s perfect for a weeknight dinner, but impressive enough for company. I promise you, once you taste the succulent grilled beef and colorful veggies, you’ll understand why this Grilled Steak Fajita Platter will quickly become a cherished favorite in your cooking repertoire. Go on, give it a try!

Sizzling Grilled Steak Fajita Platter – Perfect for Dinner!
- Total Time: 45 minutes
- Yield: 4 servings
Description
Experience the vibrant flavors of a Grilled Steak Fajita Platter that brings the taste of Tex-Mex right to your kitchen. This interactive meal is perfect for gatherings, allowing everyone to build their own delicious fajitas with fresh ingredients.
Ingredients
- Flank steak, skirt steak, or top sirloin
- Fresh lime juice
- Olive oil
- Minced garlic
- Chili powder
- Ground cumin
- Smoked paprika
- Dried oregano
- Salt
- Freshly ground black pepper
- Cayenne pepper (optional)
- Red bell peppers
- Yellow bell peppers
- Green bell peppers
- Red onions
- Yellow onions
- Zucchini (optional)
- Mushrooms (optional)
- Jalapeño slices (optional)
- Flour tortillas or corn tortillas
- Fresh salsa (pico de gallo)
- Creamy guacamole
- Sour cream or plain Greek yogurt
- Chopped fresh cilantro
- Extra lime wedges
- Shredded cheese (cheddar or Monterey Jack)
- Cashew cream or dairy-free sour cream alternative (for dairy-free options)
Instructions
- First things first, let's get that steak marinating. Trim any excess fat from your flank, skirt, or sirloin steak. If your steak is very thick, you can butterfly it open or pound it slightly to an even ½ to ¾-inch thickness, ensuring even cooking.
- In a shallow dish or a large zip-top bag, combine your marinade ingredients: fresh lime juice, olive oil, minced garlic, chili powder, ground cumin, smoked paprika, dried oregano, salt, and black pepper. Stir well to combine.
- Add the steak to the marinade, making sure it's fully coated. Seal the bag or cover the dish, and refrigerate for at least 30 minutes, but ideally 2-4 hours. For tougher cuts, you can go up to 6 hours.
- While the steak is marinating, it’s time to prep your colorful veggies. Slice your bell peppers (red, yellow, green) and onions (red or yellow) into strips, about ¼ to ½-inch thick. Try to keep them uniform so they cook evenly on the grill.
- In a large bowl, toss the sliced peppers and onions with a tablespoon of olive oil, a pinch of salt, and a little black pepper. You can also add a sprinkle of chili powder or cumin here if you like.
- Preheat your grill to high heat (around 450-500°F). Make sure the grill grates are clean and lightly oiled to prevent sticking.
- Remove the steak from the marinade, letting any excess drip off. Discard the remaining marinade.
- Place the steak on the hot grill. Grill for 4-6 minutes per side for medium-rare (internal temperature 130-135°F) or until it reaches your desired doneness. You're looking for a beautiful sear and some nice char marks.
- Once cooked, remove the steak from the grill and place it on a cutting board. Cover it loosely with foil and let it rest for at least 5-10 minutes.
- While the steak is resting, reduce your grill heat to medium-high (or simply use a cooler section of the grill).
- Place your seasoned bell peppers and onions directly on the grill grates or in a grill basket. Cook for 5-8 minutes, stirring occasionally, until they are tender-crisp and have some lovely char marks.
- While the veggies are finishing up, warm your tortillas. You can do this quickly on the grill (about 30 seconds per side), in a dry skillet on the stovetop, or wrapped in foil in the oven.
- Now for the steak: slice it against the grain into thin strips, about ¼-inch thick.
- Arrange the sliced steak and grilled vegetables on a large serving platter.
- Serve immediately with the warm tortillas and all your favorite toppings – salsa, guacamole, sour cream/Greek yogurt, fresh cilantro, and lime wedges. Let everyone build their own delicious fajitas!
- Prep Time: 15 mins
- Cook Time: 30 mins
- Category: Dinner
- Method: Grilling
- Cuisine: Tex-Mex
Nutrition
- Serving Size: 1 platter
- Calories: 600
- Sugar: 5 g
- Sodium: 800 mg
- Fat: 30 g
- Saturated Fat: 10 g
- Unsaturated Fat: 15 g
- Trans Fat: 0 g
- Carbohydrates: 45 g
- Fiber: 5 g
- Protein: 40 g
- Cholesterol: 100 mg
Keywords: Don't over-marinate the steak, especially with acidic marinades. Always slice your cooked steak against the grain for tenderness. Warm tortillas properly for the best fajita experience.