• Skip to primary navigation
  • Skip to main content
  • Skip to primary sidebar
Homesmad

Homesmad

  • Home
  • Breakfast & Brunch
  • Appetizers & Snacks
  • Dinner
  • Dessert
  • About
  • Privacy Policy
  • Contact
Homesmad
  • Home
  • Breakfast & Brunch
  • Appetizers & Snacks
  • Dinner
  • Dessert
  • About
  • Privacy Policy
  • Contact

Easy Creamy Chicken Broccoli Pasta: Perfect Family Meal

September 22, 2025 by Lily author

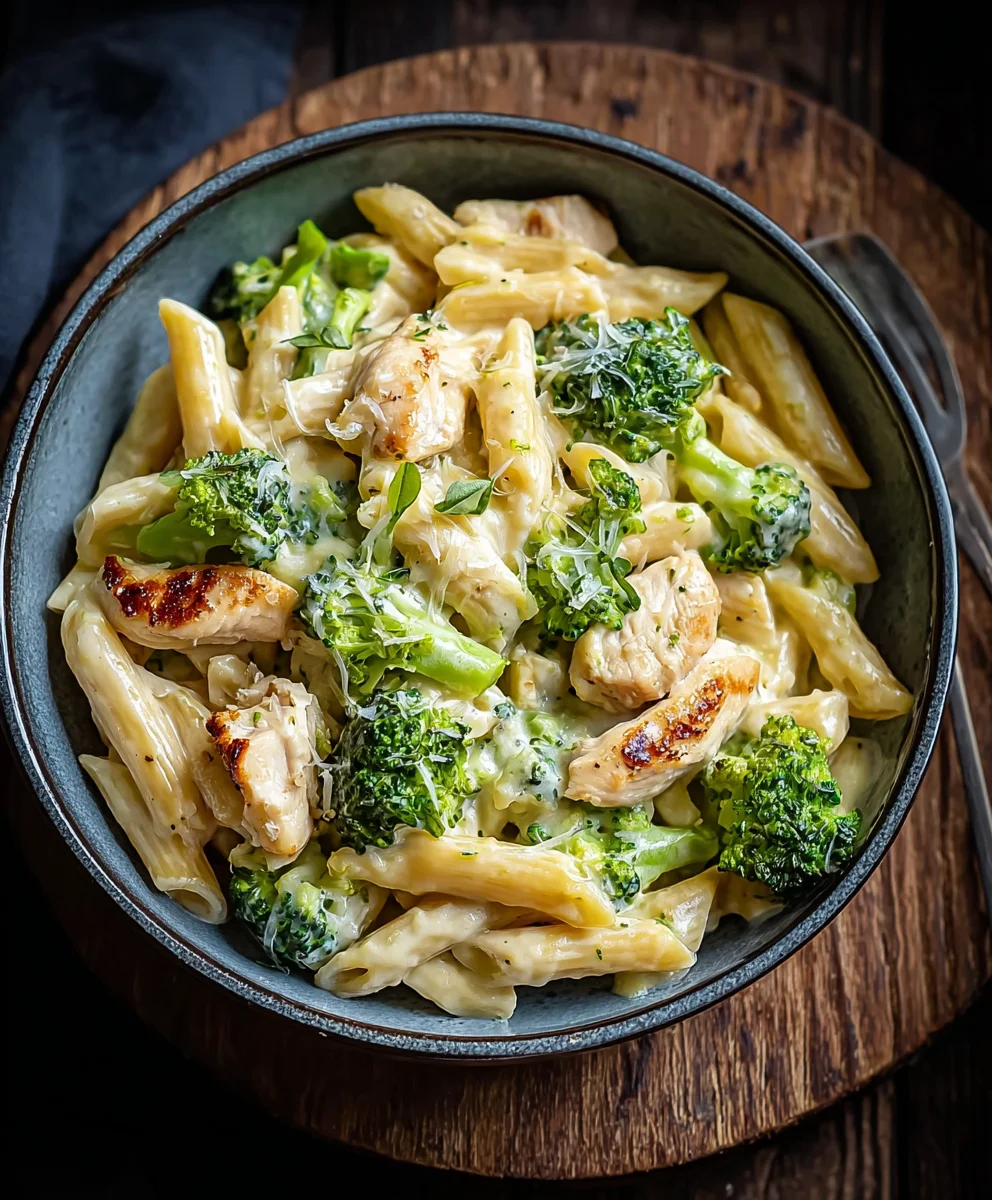
Cremige Haehnchen Brokkoli Pasta is, in my opinion, the ultimate answer to weeknight dinner dilemmas, offering both unparalleled comfort and surprisingly easy preparation. I’ve always believed that the best meals are those that nourish both body and soul, and this dish certainly fits the bill. It’s that wonderful blend of wholesome ingredients and indulgent creaminess that truly sets it apart, making it a firm family favorite in countless homes.

While perhaps not steeped in centuries of culinary tradition like some ancient Italian recipes, this modern classic has quickly carved out a special place in kitchens worldwide. It represents the perfect harmony of robust, familiar flavors with the convenient elegance of pasta dishes, adapting seamlessly into the repertoire of busy home cooks seeking delicious, yet efficient meals. It’s a testament to how simple ingredients, thoughtfully combined, can create something truly extraordinary.

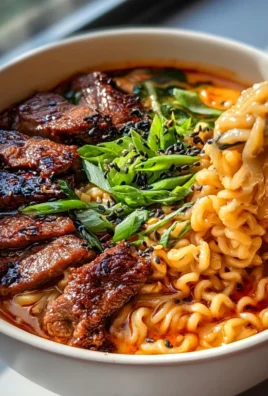
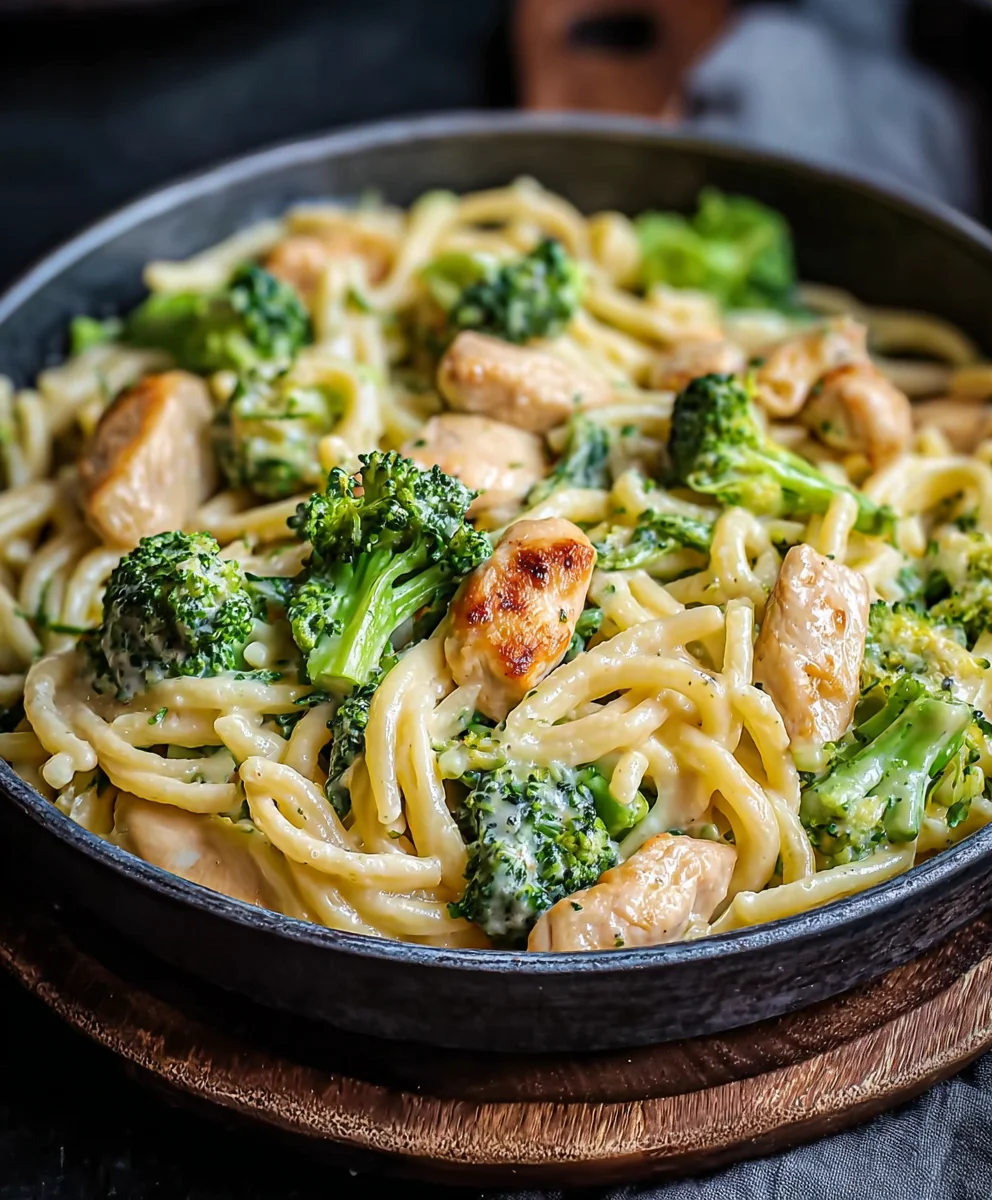
People adore this dish not just for its incredible convenience – often coming together in under 30 minutes – but for the delightful interplay of textures and tastes. Imagine tender, seasoned chicken pieces, vibrant, slightly crisp broccoli florets, and perfectly al dente pasta, all enveloped in a rich, velvety sauce that clings to every strand. It’s a complete meal that feels gourmet, yet is wonderfully unfussy. This particular Cremige Haehnchen Brokkoli Pasta recipe, I promise you, strikes the perfect balance, ensuring every forkful is a pure delight.

Easy Creamy Chicken Broccoli Pasta: Perfect Family Meal this RECIPE

Ingredients:

  • For the Pasta:
    • 400-500g Penne, Fusilli, Farfalle, or your favorite short pasta shape. I usually go for Penne because it’s great at catching all that creamy sauce!
    • Salt, for cooking the pasta. A good generous pinch is key for flavorful pasta.
  • For the Chicken:
    • 500-600g Boneless, skinless chicken breasts or thighs. Breasts are leaner, but thighs add extra juiciness.
    • 1 tablespoon Olive oil, plus a little extra for sautéing.
    • 1 teaspoon Salt.
    • ½ teaspoon Freshly ground black pepper.
    • ½ teaspoon Dried Italian herbs (oregano, basil, thyme mix).
    • ¼ teaspoon Garlic powder (optional, but I find it really enhances the flavor).
  • For the Broccoli:
    • 500g Fresh broccoli florets. Make sure they are bright green and firm.
  • For the Creamy Sauce Base:
    • 2 tablespoons Unsalted butter.
    • 1 tablespoon Olive oil.
    • 1 medium Yellow onion or 2 shallots, finely diced.
    • 3-4 cloves Garlic, minced. I love garlic, so I often lean towards four!
    • 1 tablespoon All-purpose flour. This helps thicken the sauce beautifully.
    • 500ml Chicken broth (low sodium is best, so you can control the saltiness).
    • 250ml Heavy cream (or whipping cream, at least 30% fat). This is where the “cremige” magic happens!
    • 80g Freshly grated Parmesan cheese, plus extra for serving. Skip the pre-grated stuff; fresh makes a huge difference.
    • ½ teaspoon Salt (adjust to taste after adding broth and cheese).
    • ¼ teaspoon Freshly ground black pepper.
    • Pinch of red pepper flakes (optional, for a subtle kick).
  • For Garnish (Optional but recommended):
    • 2 tablespoons Fresh parsley, chopped. Adds a lovely fresh note and color.
    • Lemon zest or a squeeze of fresh lemon juice. Brightens up the whole dish!

Vorbereitungen treffen: So gelingt die cremige Hähnchen Brokkoli Pasta von Anfang an

  1. Ich beginne immer damit, meine Zutaten vorzubereiten, das macht den Kochvorgang später viel entspannter und flüssiger. Zuerst nehme ich mir das Hähnchen vor. Die 500-600g Hähnchenbrustfilets spüle ich kurz unter kaltem Wasser ab und tupfe sie dann sehr sorgfältig mit Küchenpapier trocken. Dieser Schritt ist wirklich wichtig, denn trockenes Fleisch brät besser an und bekommt eine viel schönere goldbraune Kruste. Anschließend schneide ich das Hähnchenfleisch in mundgerechte Würfel, etwa 1,5 bis 2 cm groß. Eine gleichmäßige Größe ist entscheidend, damit das Hähnchen später gleichmäßig gart und nichts trocken oder roh bleibt. In einer mittelgroßen Schüssel würze ich die Hähnchenwürfel nun großzügig mit 1 Teelöffel Salz, einem halben Teelöffel frisch gemahlenem schwarzem Pfeffer, einem halben Teelöffel getrockneten italienischen Kräutern und einem Viertel Teelöffel Knoblauchpulver, falls ich es verwende. Ich mische alles gut durch, sodass jedes Stückchen Fleisch von den Gewürzen umhüllt ist. Die gewürzten Hähnchenwürfel stelle ich beiseite, damit die Aromen etwas einziehen können.
  2. Als Nächstes kümmere ich mich um den Brokkoli. Ich nehme etwa 500g frischen Brokkoli, wasche ihn gründlich und schneide ihn dann in kleine, mundgerechte Röschen. Den Strunk werfe ich übrigens nicht weg! Den äußeren, faserigen Teil schäle ich mit einem Sparschäler ab und schneide den inneren, zarten Teil in kleine Scheiben oder Würfel. Er ist super lecker und steckt voller Nährstoffe! In einem großen Topf bringe ich reichlich Salzwasser zum Kochen. Sobald das Wasser sprudelnd kocht, gebe ich die Brokkoliröschen und die Strunkstücke hinein und blanchiere sie für etwa 2-3 Minuten. Es ist wichtig, sie nicht zu lange zu kochen; sie sollen noch Biss haben und ihre wunderschöne, leuchtend grüne Farbe behalten. Al dente ist hier das Zauberwort! Nach dem Blanchieren gieße ich den Brokkoli sofort in ein Sieb ab und schrecke ihn unter eiskaltem Wasser ab. Dieser Schock stoppt den Garprozess augenblicklich und sorgt dafür, dass der Brokkoli nicht matschig wird und seine appetitliche Farbe behält. Ich lasse ihn gut abtropfen und stelle ihn ebenfalls beiseite.
  3. Nun sind die Aromaten an der Reihe, die meiner Cremige Hähnchen Brokkoli Pasta erst ihren Charakter verleihen. Eine mittelgroße gelbe Zwiebel oder zwei Schalotten schäle ich und würfele sie sehr fein. Für den Knoblauch schäle ich 3-4 Zehen und hacke sie entweder fein oder presse sie durch eine Knoblauchpresse. Ich persönlich finde, gehackter Knoblauch gibt ein intensiveres Aroma ab, ohne zu dominant zu wirken. Falls ich frische Petersilie zur Garnitur verwenden möchte, hacke ich jetzt etwa 2 Esslöffel davon fein und stelle sie beiseite. Und natürlich reibe ich auch die 80g frischen Parmesan. Das Reiben kurz vor der Verwendung ist ein kleiner, aber feiner Trick: Frischer Käse schmilzt viel besser und hat einen unschlagbar intensiven Geschmack im Vergleich zu bereits fertig geriebenem Parmesan aus der Packung.

Die Pasta kochen: Der Grundstein für jede gelungene Pasta Cremige Hähnchen Brokkoli Pasta

  1. Jetzt ist es Zeit, die Pasta zu kochen. Ich nehme einen sehr großen Topf und fülle ihn mit reichlich Wasser. Für etwa 400-500g Pasta benötige ich mindestens 4-5 Liter Wasser. Das ist wichtig, damit die Pasta genügend Platz hat, um sich auszudehnen und nicht zusammenklebt. Ich salze das Wasser großzügig, sobald es anfängt zu kochen – etwa 1-2 Esslöffel Salz pro Liter Wasser. Das Nudelwasser sollte so salzig wie das Meer schmecken, das ist das Geheimnis für geschmackvolle Pasta! Sobald das Wasser sprudelnd kocht, gebe ich die Penne oder meine gewählte Pastaform hinein. Ich rühre sie in den ersten Minuten immer wieder um, damit sie nicht am Topfboden kleben bleibt.
  2. Ich koche die Pasta gemäß den Anweisungen auf der Verpackung, ziehe aber in der Regel 1-2 Minuten von der angegebenen Kochzeit ab. Ich möchte, dass die Pasta al dente ist, also noch einen festen Biss hat, da sie später noch kurz in der Soße nachgart. Das ist entscheidend, um eine perfekte Textur in unserer Cremige Hähnchen Brokkoli Pasta zu erreichen. Bevor ich die Pasta abgieße, schöpfe ich etwa 250ml des stärkehaltigen Kochwassers ab und stelle es beiseite. Dieses Nudelwasser ist Gold wert für die Soße, es hilft, sie zu binden und ihr eine wunderbare Cremigkeit zu verleihen. Dann gieße ich die Pasta in einem Sieb ab und lasse sie gut abtropfen. Ein kleiner Tipp: Die Pasta nicht abschrecken! Das würde die Stärke entfernen, die wir für die Soßenbindung brauchen.

Das Hähnchen anbraten: Für Aroma und Textur in der Cremige Hähnchen Brokkoli Pasta

  1. Während die Pasta kocht oder direkt danach, beginne ich mit dem Anbraten des Hähnchens. Ich erhitze 1 Esslöffel Olivenöl in einer großen Pfanne oder einem weiten Topf bei mittlerer bis hoher Hitze. Es ist wichtig, dass die Pfanne richtig heiß ist, bevor das Hähnchen hineinkommt. Sobald das Öl leicht glänzt, gebe ich die gewürzten Hähnchenwürfel in einer einzigen Schicht in die Pfanne. Ich achte darauf, die Pfanne nicht zu überfüllen; falls nötig, brate ich das Hähnchen in zwei Durchgängen an, um sicherzustellen, dass es schön braun wird und nicht nur dünstet. Geduld ist hier der Schlüssel! Ich lasse das Hähnchen 3-4 Minuten pro Seite ungestört anbraten, bis es goldbraun und durchgegart ist.
  2. Wenn das Hähnchen eine schöne goldbraune Farbe angenommen hat und innen gar ist (ein Schnitt in ein größeres Stück sollte zeigen, dass es keine rosa Stellen mehr gibt), nehme ich es mit einem Schaumlöffel aus der Pfanne und stelle es beiseite. Die kleinen braunen Reste, die sich am Boden der Pfanne gebildet haben – das ist der Geschmacksträger! Diesen braunen Bodensatz, auch “Fond” genannt, brauchen wir unbedingt für die Soße. Er verleiht unserer Cremige Hähnchen Brokkoli Pasta eine unglaublich tiefe Geschmacksbasis.

Die cremige Soße zubereiten: Das Herzstück unserer Cremige Hähnchen Brokkoli Pasta

  1. Jetzt kommt der Moment, der unserer Pasta den Namen gibt: die cremige Soße. In derselben Pfanne, in der ich das Hähnchen angebraten habe, füge ich 2 Esslöffel Butter und einen weiteren Esslöffel Olivenöl hinzu. Ich reduziere die Hitze auf mittlere Stufe. Sobald die Butter geschmolzen ist und leicht schäumt, gebe ich die fein gewürfelten Zwiebeln (oder Schalotten) hinzu. Ich dünste sie für etwa 3-5 Minuten an, bis sie weich und glasig sind. Es ist wichtig, dass sie nicht braun werden, sondern nur ihren süßlichen Geschmack freisetzen.
  2. Als Nächstes gebe ich den gehackten Knoblauch hinzu und dünste ihn für weitere 1-2 Minuten. Vorsicht: Knoblauch brennt schnell an! Ich achte darauf, ihn nur duftend und nicht braun werden zu lassen, da er sonst bitter schmeckt. In diesem Stadium riecht es schon wunderbar in meiner Küche – die Basis für die Cremige Hähnchen Brokkoli Pasta ist gelegt.
  3. Nun streue ich 1 Esslöffel Mehl über die Zwiebel-Knoblauch-Mischung. Ich rühre es gut um und lasse es für etwa 1 Minute kochen. Das Mehl bildet eine sogenannte “Roux” mit der Butter und dem Öl, die die Soße später wunderbar bindet und für die perfekte sämige Konsistenz sorgt. Es ist wichtig, das Mehl kurz mitzukochen, um den rohen Mehlgeschmack zu entfernen.
  4. Jetzt gieße ich langsam den 500ml Hühnerbrühe unter ständigem Rühren hinzu. Ich rühre kräftig mit einem Schneebesen, um alle Klümpchen zu vermeiden und den Bodensatz von der Pfanne zu lösen – das ist der bereits erwähnte Geschmacksträger! Ich lasse die Brühe aufkochen und unter Rühren etwas eindicken. Wenn die Soße anfängt, leicht zu blubbern und sich zu verdicken, reduziere ich die Hitze wieder auf niedrig.
  5. Anschließend gieße ich die 250ml schwere Sahne hinzu und rühre alles gut um. Ich lasse die Soße sanft köcheln, bis sie die gewünschte cremige Konsistenz erreicht hat. Das dauert in der Regel 3-5 Minuten. Jetzt ist der Zeitpunkt gekommen, die Soße mit Salz, Pfeffer und einer Prise Chiliflocken, falls gewünscht, abzuschmecken. Vergiss nicht, immer wieder zu probieren! Das ist der einzige Weg, die perfekte Würze für deine Cremige Hähnchen Brokkoli Pasta zu finden.
  6. Zum Schluss rühre ich die 80g frisch geriebenen Parmesan unter. Der Käse schmilzt langsam und verbindet sich mit der Sahnesoße, was ihr eine unglaubliche Tiefe und noch mehr Cremigkeit verleiht. Ich rühre, bis der Käse vollständig geschmolzen und die Soße seidig glatt ist. Wenn die Soße zu dick erscheint, gebe ich schluckweise etwas von dem aufgehobenen Nudelwasser hinzu, bis die Konsistenz perfekt ist. Das stärkehaltige Wasser hilft nicht nur beim Verdünnen, sondern auch beim Binden der Soße und verleiht ihr einen zusätzlichen Glanz.

Zusammenfügen und vollenden: Die Cremige Hähnchen Brokkoli Pasta wird komplett

  1. Sobald die cremige Soße perfekt ist, gebe ich das angebratene Hähnchen und den blanchierten Brokkoli zurück in die Pfanne mit der Soße. Ich rühre alles vorsichtig um, sodass das Hähnchen und der Brokkoli vollständig von der köstlichen Soße umhüllt sind. Ich lasse alles nochmals 1-2 Minuten zusammen köcheln, damit sich die Aromen verbinden und das Hähnchen sowie der Brokkoli wieder warm werden.
  2. Nun ist es Zeit für die Pasta! Ich gebe die abgetropften Penne direkt zur Soße in die Pfanne. Ich rühre alles gründlich um, sodass jedes einzelne Pastastückchen mit der cremigen Hähnchen Brokkoli Soße überzogen ist. Hierbei kann ich noch einmal das restliche Nudelwasser hinzufügen, falls die Soße zu dick geworden ist und ich eine flüssigere Konsistenz wünsche. Das stärkehaltige Wasser hilft, die Soße noch besser an der Pasta haften zu lassen und sorgt für eine wunderbare Bindung.
  3. Ich probiere die gesamte Mischung noch einmal und schmecke bei Bedarf mit mehr Salz, Pfeffer oder sogar einer Prise Knoblauchpulver nach. Manchmal füge ich hier auch noch einen Spritzer frischen Zitronensaft oder etwas Zitronenabrieb hinzu. Die Säure der Zitrone durchbricht die Cremigkeit der Soße und verleiht der Cremige Hähnchen Brokkoli Pasta eine wunderbare Frische und Leichtigkeit. Ein kleiner Trick, der einen großen Unterschied macht!

Anrichten und genießen: Ihre Cremige Hähnchen Brokkoli Pasta ist fertig!

  1. Die Cremige Hähnchen Brokkoli Pasta ist jetzt servierfertig! Ich verteile sie großzügig auf tiefen Tellern. Direkt vor dem Servieren streue ich noch etwas frisch gehackte Petersilie darüber, das sorgt nicht nur für einen schönen Farbtupfer, sondern auch für eine zusätzliche frische Note.
  2. Für den letzten Schliff reibe ich gerne noch etwas extra Parmesan über jede Portion. Ein bisschen mehr Käse schadet nie, oder? Manchmal biete ich auch noch ein kleines Schälchen mit zusätzlichen Chiliflocken oder frisch gemahlenem Pfeffer an, damit jeder Gast seine Portion ganz nach eigenem Geschmack verfeinern kann.
  3. Diese Cremige Hähnchen Brokkoli Pasta schmeckt am besten, wenn sie frisch zubereitet und heiß serviert wird. Sie ist ein wahrer Genuss für die ganze Familie und ein wunderbares Soulfood, das an einem gemütlichen Abend perfekt passt. Guten Appetit!

Easy Creamy Chicken Broccoli Pasta: Perfect Family Meal

Conclusion:

And there you have it, my friends! We’ve reached the delicious conclusion of our culinary journey together, and I truly hope you’re as excited as I am about this incredible recipe. What makes this dish an absolute triumph, a true must-try in your kitchen, is its remarkable ability to blend comfort with incredible flavor, all while being surprisingly simple to execute. This isn’t just another weeknight meal; it’s a hug in a bowl, a dish that gathers everyone around the table with eager anticipation. The tender, perfectly cooked chicken, the vibrant, slightly crisp broccoli, and that unbelievably smooth, rich, and flavorful creamy sauce that coats every single strand of pasta – it’s a symphony of textures and tastes that truly sings. It’s hearty without being heavy, satisfying without being overly complicated. For me, it’s the ultimate go-to when I want something utterly delicious that doesn’t demand hours of my precious time, but still tastes like I’ve slaved away in the kitchen for ages. It’s a testament to the fact that wholesome, incredibly satisfying meals don’t have to be a monumental task.

Now, let’s talk about making this dish truly your own, because that’s where the real magic often happens. While the base recipe for this Cremige Haehnchen Brokkoli Pasta is perfection in itself, there are countless ways to tweak it to suit your palate or whatever ingredients you might have on hand. For serving, a simple sprinkle of freshly grated Parmesan or Pecorino Romano cheese is non-negotiable in my book, adding that extra layer of salty, umami goodness. A shower of fresh parsley or chives also brightens up the entire presentation and adds a lovely fresh counterpoint to the richness. If you’re feeling a bit fancy, a drizzle of high-quality olive oil just before serving can elevate it even further. Accompanying it with a crisp green salad, perhaps with a light vinaigrette, provides a wonderful contrast and helps balance the meal. And, of course, a warm, crusty baguette for soaking up every last drop of that glorious sauce? Absolutely essential.

When it comes to variations, the sky’s the limit! If you’re not a fan of chicken, this recipe works beautifully with shrimp, which cooks even faster, or even cubes of pan-fried tofu for a vegetarian twist. Don’t have broccoli? No problem! Asparagus spears, spinach (wilt it in at the very end), or even peas can be delightful substitutes or additions. For those who love a bit of heat, a pinch of red pepper flakes stirred into the sauce will give it a pleasant kick. To deepen the savory profile, consider adding sautéed mushrooms or sun-dried tomatoes (packed in oil, drained and chopped) to the mix alongside the chicken. A splash of dry white wine deglazed into the pan before adding the cream can add a sophisticated layer of flavor that you’ll adore. For a lighter version, you could swap out some of the heavy cream for milk or even a bit of chicken broth, though you might lose a touch of that luxurious richness. Alternatively, for an even creamier, cheesier sauce, stirring in some cream cheese or a different melting cheese like Gruyere can be absolutely divine. Experiment with different pasta shapes too! While I love penne or rotini for catching all that sauce, fettuccine or linguine also make for a wonderful experience, ensuring every bite is coated in creamy goodness.

So, what are you waiting for? This recipe is more than just instructions; it’s an invitation to create something truly memorable in your kitchen. I genuinely believe that once you try this dish, it will quickly become a cherished staple in your home. It’s the kind of meal that brings smiles to faces, warms bellies, and even creates happy memories. I wholeheartedly encourage you to roll up your sleeves, gather your ingredients, and give this amazing recipe a try this week. Don’t be shy – dive in and experience the magic for yourself! And when you do, please, please come back and share your experience with me. I absolutely love hearing how my recipes turn out for you all. Did you make any exciting variations? What did your family think? Snap a picture, leave a comment, or send me an email. Your feedback and culinary adventures truly make my day. Happy cooking, and I can’t wait to hear all about your delicious journey with this fantastic dish!

FAQs – People Also Ask:

Can I prepare this creamy chicken broccoli pasta ahead of time?

While the pasta is truly best enjoyed fresh, you can definitely do some prep work in advance! You can cook the chicken and chop the broccoli a day or two beforehand. Store them separately in airtight containers in the refrigerator. When you’re ready to eat, simply cook the pasta, make the sauce, and then add your pre-cooked chicken and broccoli to heat through. This significantly cuts down on active cooking time on the day you plan to serve it.

How do I store leftovers and how long do they last?

Leftovers of this creamy chicken broccoli pasta store wonderfully! Transfer any remaining pasta into an airtight container and refrigerate promptly. It will typically last for 3-4 days. When reheating, I recommend adding a splash of milk or chicken broth to help loosen the sauce and restore its creamy texture, as it tends to thicken in the fridge.

Can I use frozen broccoli instead of fresh?

Absolutely! Frozen broccoli works perfectly well in this recipe. There’s no need to thaw it beforehand; you can add it directly to the pan a few minutes earlier than you would fresh broccoli, allowing it to cook through. Just be sure to drain any excess water that might accumulate to prevent diluting your sauce.

What kind of pasta is best for this dish?

I find that medium-sized pasta shapes with nooks and crannies are ideal for catching and holding onto that delicious creamy sauce. Penne, rotini, farfalle (bow-tie), or even orecchiette are fantastic choices. However, fettuccine or linguine also work beautifully if you prefer a longer noodle, coating every strand generously.

How can I make this dish healthier or lighter?

To make it a bit healthier, you have a few options! You can reduce the amount of heavy cream and substitute part of it with milk (whole or 2%) or even chicken broth. You can also use whole wheat pasta for added fiber. Increasing the amount of broccoli or adding other vegetables like spinach, mushrooms, or bell peppers will boost the nutrient content. Using less cheese or a lower-fat cheese option can also help, though some flavor might be sacrificed.

Is this creamy chicken broccoli pasta freezer-friendly?

While technically you can freeze it, I generally don’t recommend freezing pasta dishes with a cream-based sauce. Cream sauces can sometimes separate or become a bit grainy upon thawing and reheating, affecting the texture. The pasta itself might also become softer than desired. If you must freeze it, store it in an airtight, freezer-safe container for up to 2-3 months. Reheat gently on the stovetop, stirring frequently, and be prepared to add a splash of milk or broth to revive the sauce.


Easy Creamy Chicken Broccoli Pasta: Perfect Family Meal

Easy Creamy Chicken Broccoli Pasta: Perfect Family Meal

Easy Creamy Chicken Broccoli Pasta, or Cremige Haehnchen Brokkoli Pasta, is a perfect weeknight meal offering comfort and easy preparation. This modern classic combines wholesome ingredients, tender chicken, vibrant broccoli, al dente pasta, and a rich, velvety sauce. It’s a family favorite, often ready in under 30 minutes, loved for its delightful textures and gourmet yet unfussy feel.

Prep Time
20 Minutes

Cook Time
45 Minutes

Total Time
5 Minutes

Servings
4-6 servings

Ingredients

  • 400-500g Penne or other short pasta
  • Salt, for pasta water
  • 500-600g Boneless, skinless chicken breast or thigh, cubed
  • 1 tbsp + extra Olive oil
  • 1 tsp Salt, for chicken
  • ½ tsp Black pepper, for chicken
  • ½ tsp Dried Italian herbs
  • ¼ tsp Garlic powder (optional)
  • 500g Fresh broccoli florets (and stem)
  • 2 tbsp Unsalted butter
  • 1 medium Yellow onion or 2 shallots, finely diced
  • 3-4 cloves Garlic, minced
  • 1 tbsp All-purpose flour
  • 500ml Chicken broth (low sodium)
  • 250ml Heavy cream
  • 80g Freshly grated Parmesan cheese, plus extra for serving
  • ½ tsp Salt, for sauce
  • ¼ tsp Black pepper, for sauce
  • Pinch of red pepper flakes (optional)
  • 2 tbsp Fresh parsley, chopped (optional garnish)
  • Lemon zest or juice (optional garnish)
  • 250ml Pasta cooking water (reserved)

Instructions

  1. Step 1
    Rinse and pat dry 500-600g chicken, cut into 1.5-2cm cubes. Season with 1 tsp salt, ½ tsp black pepper, ½ tsp Italian herbs, and ¼ tsp garlic powder. Wash 500g broccoli, cut into small florets, peel and dice the stem. Finely dice 1 onion/2 shallots and mince 3-4 cloves garlic. Grate 80g Parmesan.
  2. Step 2
    Bring a large pot of salted water to a boil. Blanch broccoli florets and stem pieces for 2-3 minutes until al dente. Drain, shock in ice water, then drain well and set aside.
  3. Step 3
    In the same pot, bring generously salted water to a rolling boil. Add 400-500g pasta and cook 1-2 minutes less than package directions for al dente. Before draining, reserve 250ml of starchy pasta water. Drain pasta and do not rinse.
  4. Step 4
    Heat 1 tbsp olive oil in a large pan over medium-high heat. Add seasoned chicken in a single layer, searing for 3-4 minutes per side until golden brown and cooked through. Remove chicken and set aside, leaving browned bits (fond) in the pan.
  5. Step 5
    Add 2 tbsp butter and 1 tbsp olive oil to the pan. Sauté diced onion/shallots for 3-5 minutes until soft. Add minced garlic and cook for 1-2 minutes until fragrant (do not brown). Stir in 1 tbsp all-purpose flour and cook for 1 minute to form a roux. Slowly whisk in 500ml chicken broth, scraping up the fond. Bring to a gentle boil, stirring until slightly thickened. Reduce heat to low.
  6. Step 6
    Stir in 250ml heavy cream and simmer gently for 3-5 minutes until desired creamy consistency. Season with ½ tsp salt, ¼ tsp black pepper, and an optional pinch of red pepper flakes. Stir in 80g freshly grated Parmesan until melted and smooth. If too thick, gradually add reserved pasta water to reach the perfect consistency.
  7. Step 7
    Add the browned chicken, blanched broccoli, and cooked pasta to the sauce. Stir gently to combine, ensuring everything is well coated and heated through. Taste and adjust seasoning; an optional squeeze of lemon juice adds brightness. Serve immediately, garnished with fresh parsley and extra Parmesan.

Important Information

Nutrition Facts (Per Serving)

It is important to consider this information as approximate and not to use it as definitive health advice.

Allergy Information

Please check ingredients for potential allergens and consult a health professional if in doubt.

« Previous Post
Best Creamy Spinach And Ricotta Stuffed Shells Recipe
Next Post »
Jack o' Lantern Quesadillas: A Spooky Halloween Recipe

If you enjoyed this…

Spicy Korean Ramen with Grilled Beef & Creamy Sauce

Irresistible Campbells Green Bean Casserole Recipe

Das Butter Chicken: Rich, Creamy Tomato Chicken Recipe

Primary Sidebar

Browse by Diet

BreakfastDinnerLunchDessertAppetizer

Sweet Peach Yogurt Parfait Delight

One of my fondest memories is from a lazy summer afternoon spent at my grandmother’s house. The sun filtered through the kitchen window, casting a warm glow over the table where she would create her culinary magic. It was during one of those blissful moments that I first tasted her Peach Yogurt Parfait with Honey and Granola. The sweet aroma of ripe peaches mingling with creamy yogurt and the crunch of granola was nothing short of heavenly. It felt like summer captured in a bowl, and I still remember the joy of diving in with a spoon, each layer revealing a new burst of flavor.

When I think about that parfait, I can almost hear the gentle hum of the bees outside, reminding me of the floral notes that honey brings to every bite. The vibrant yellows and soft oranges of the peaches contrast beautifully with the creamy white yogurt and the golden crunch of granola. It’s a dish that not only looks delightful but also tastes like a celebration of fresh, wholesome ingredients.

What makes my version of this Peach Yogurt Parfait special is the careful balance of flavors and textures. I use ripe, juicy peaches, drizzled with locally sourced honey, and a homemade granola that’s bursting with nuts and seeds for an extra crunch. It’s a simple dish, but every layer is crafted with love and attention.

Let me show you exactly how to make this delightful parfait, so you can bring a bit of that summer magic into your kitchen!

Sweet Peach Yogurt Parfait Delight

Why You’ll Love This Recipe

  • Delightfully creamy texture from the Greek yogurt, paired with the juicy sweetness of fresh peaches.
  • Ready in under 20 minutes, making it a quick and satisfying breakfast or snack option.
  • Budget-friendly, using common ingredients that you may already have in your pantry.
  • Customizable with your favorite granola and nuts, allowing you to tailor each parfait to your taste.
  • Perfectly balanced flavors with the bright acidity of lemon juice and the sweetness of honey enhancing the peaches.

Ingredients

  • For the Parfait:
  • 2 cups plain Greek yogurt (or vanilla yogurt for a sweeter option)
  • 2 large ripe peaches, diced (about 2 cups)
  • 1 tablespoon fresh lemon juice (to prevent browning of peaches)
  • 2 tablespoons honey (plus more for drizzling)
  • 1 teaspoon vanilla extract (optional for extra flavor)
  • For the Granola:
  • 1 cup granola (store-bought or homemade; see notes for a simple granola recipe)
  • 1/4 cup sliced almonds (optional for added crunch)
  • 1/4 cup shredded coconut (optional for added flavor)

Let’s dive into some key ingredients that make this Peach Yogurt Parfait so delightful! First, the Greek yogurt is not only creamy but also packed with protein, making it a satisfying option for breakfast or a snack. If you’re looking for a sweeter option, you can easily substitute it with vanilla yogurt, though it may alter the overall flavor balance. Next, the ripe peaches are the star of the show; their natural sweetness shines through, so I recommend choosing peaches that yield slightly to pressure, indicating they’re perfectly ripe. If peaches aren’t in season, feel free to use nectarines or even frozen peaches—just thaw them before use. Finally, honey adds a lovely floral sweetness that ties everything together. If you prefer, maple syrup can serve as a delicious substitute.

Step-by-Step Instructions

  1. Start by preparing the peaches. Wash them thoroughly, then slice and dice them into bite-sized pieces. In a medium bowl, toss the diced peaches with 1 tablespoon of fresh lemon juice to prevent browning. Set aside for about 5 minutes while the lemon juice works its magic.
  2. In a separate bowl, combine the Greek yogurt, 2 tablespoons of honey, and 1 teaspoon of vanilla extract if using. Stir the mixture until smooth and thoroughly blended. This should take about a minute. Avoid overmixing to maintain the creaminess of the yogurt.
  3. Now it’s time to layer your parfait. Grab a clear glass or bowl to showcase your beautiful creation. Start with a generous spoonful of the yogurt mixture at the bottom—about 1/4 cup will do. Use a spoon to spread it evenly.
  4. Add a layer of the diced peaches over the yogurt, ensuring they cover the yogurt completely. You might want to use about half of what you have prepared—roughly 1 cup. This layer should be visually appealing, so arrange the peaches neatly.
  5. Sprinkle 1/4 cup of granola over the peaches. This adds a delightful crunch. Make sure to distribute it evenly to ensure every bite has that satisfying texture. Avoid packing it down too tightly, as you want it to maintain its crunch.
  6. Repeat the layers: spoon in another 1/4 cup of yogurt, followed by another cup of peaches, and another sprinkle of granola. You should have at least two layers, but feel free to add more depending on your glass size.
  7. Finish off your parfait with a drizzle of honey on top for added sweetness and a touch of elegance. If you’re using sliced almonds or shredded coconut, sprinkle them on top now. It adds a lovely visual contrast and extra flavor.
  8. Serve immediately or refrigerate for up to 30 minutes before serving to allow the flavors to meld together. However, I recommend enjoying it fresh to maintain the granola’s crunch.

Pro Tips for the Best Peach Yogurt Parfait With Honey And Granola

  • Make sure to choose ripe peaches for the best flavor and texture. A common mistake is using unripe fruit, which can lead to a less enjoyable parfait. Look for peaches that are fragrant and slightly soft to the touch.
  • Use a clear glass to assemble your parfait; this not only makes for a beautiful presentation but also allows you to see the colorful layers, which adds to the enjoyment of eating it.
  • For an even creamier texture, consider whipping the Greek yogurt with a hand mixer for a couple of minutes before layering. This small adjustment makes a huge difference in mouthfeel.
  • Be mindful of the granola-to-yogurt ratio. Too much granola can overwhelm the parfait, while too little can make it feel too creamy. Aim for about 1/4 cup of granola per layer for the perfect balance.
  • If you’re making this for a gathering, consider preparing the yogurt and peaches ahead of time and layering them just before serving. This ensures the granola stays crunchy!

Variations & Serving Ideas

There are so many ways to get creative with your Peach Yogurt Parfait! For a tropical twist, swap out the peaches for mangoes or pineapples and top with coconut flakes. If you prefer a berry flavor, mix in some blueberries or strawberries with the peaches for added color and taste. For a nutty version, incorporate chopped walnuts or pecans instead of almonds.

As for serving ideas, this parfait pairs beautifully with a side of scrambled eggs for a hearty breakfast or fresh fruit salad for a light lunch. You might also enjoy it alongside whole grain toast with almond butter for an energizing snack. The contrast of flavors and textures will elevate your meal experience!

Storage, Make-Ahead & Reheating

The Peach Yogurt Parfait is best enjoyed fresh, but you can prepare some components ahead of time. Store the layered parfait in an airtight container in the refrigerator for up to 24 hours. However, be cautious; the granola may lose its crunch if stored too long. You can freeze the yogurt and peach mixture for up to 2 months; just remember to thaw it in the refrigerator overnight before serving.

If you plan to enjoy this dish the next day, it can taste even better as the flavors meld together. Just remember to add the granola right before serving to keep its delightful crunch!

Frequently Asked Questions

Can I make Peach Yogurt Parfait With Honey And Granola ahead of time?

Yes — in fact, it tastes even better the next day as the flavors meld. However, I recommend waiting to add the granola until just before serving to maintain its crunch.

What can I substitute for Greek yogurt?

If you prefer a lighter option, you can substitute Greek yogurt with regular yogurt or a dairy-free alternative like coconut yogurt. Just remember that this may alter the creaminess and flavor profile slightly.

Can I use frozen peaches for this parfait?

Absolutely! Just make sure to thaw the frozen peaches before using them. They will still add great flavor, though the texture may be slightly softer than fresh peaches.

How do I make the parfait vegan?

To make a vegan version, substitute the Greek yogurt with a plant-based yogurt alternative, and replace honey with maple syrup or agave nectar. This keeps the parfait sweet while adhering to a vegan diet.

What other fruits can I use in this recipe?

You can mix and match fruits based on your preference. Try using strawberries, blueberries, raspberries, or even bananas. Just make sure to adjust the lemon juice as needed to prevent browning.

Sweet Peach Yogurt Parfait Delight

Final Thoughts

The Peach Yogurt Parfait with Honey and Granola is a delightful blend of creamy yogurt, sweet peaches, and crunchy granola that creates a satisfying and nourishing treat. Each layer bursts with flavor, making it a perfect choice for breakfast or a light dessert.

This is the kind of recipe I come back to again and again, especially when I want something refreshing and wholesome to start my day. The harmony of sweet and tart flavors, combined with the delightful crunch, never fails to lift my spirits!

I encourage you to give this parfait a try and indulge in its comforting goodness. Feel free to share your results or even add your own twist—perhaps a sprinkle of cinnamon or a handful of nuts. Enjoy creating your perfect parfait!

Print
clock clock iconcutlery cutlery iconflag flag iconfolder folder iconinstagram instagram iconpinterest pinterest iconfacebook facebook iconprint print iconsquares squares iconheart heart iconheart solid heart solid icon

Peach Yogurt Parfait


  • Author: Lily author
  • Total Time: 15 minutes
  • Yield: 4 servings 1x
Pin Recipe
Print Recipe

Description

This Peach Yogurt Parfait combines creamy Greek yogurt, juicy peaches, and crunchy granola for a delightful treat. It’s a perfect breakfast or snack that captures the essence of summer in every bite.


Ingredients

Scale
  • For the Parfait:
  • 2 cups plain Greek yogurt (or vanilla yogurt for a sweeter option)
  • 2 large ripe peaches, diced (about 2 cups)
  • 1 tablespoon fresh lemon juice (to prevent browning of peaches)
  • 2 tablespoons honey (plus more for drizzling)
  • 1 teaspoon vanilla extract (optional for extra flavor)
  • For the Granola:
  • 1 cup granola (store-bought or homemade; see notes for a simple granola recipe)
  • 1/4 cup sliced almonds (optional for added crunch)
  • 1/4 cup shredded coconut (optional for added flavor)

Instructions

  1. Start by preparing the peaches. Wash them thoroughly, then slice and dice them into bite-sized pieces. In a medium bowl, toss the diced peaches with 1 tablespoon of fresh lemon juice to prevent browning. Set aside for about 5 minutes while the lemon juice works its magic.
  2. In a separate bowl, combine the Greek yogurt, 2 tablespoons of honey, and 1 teaspoon of vanilla extract if using. Stir the mixture until smooth and thoroughly blended. This should take about a minute. Avoid overmixing to maintain the creaminess of the yogurt.
  3. Now it’s time to layer your parfait. Grab a clear glass or bowl to showcase your beautiful creation. Start with a generous spoonful of the yogurt mixture at the bottom—about 1/4 cup will do. Use a spoon to spread it evenly.
  4. Add a layer of the diced peaches over the yogurt, ensuring they cover the yogurt completely. You might want to use about half of what you have prepared—roughly 1 cup. This layer should be visually appealing, so arrange the peaches neatly.
  5. Sprinkle 1/4 cup of granola over the peaches. This adds a delightful crunch. Make sure to distribute it evenly to ensure every bite has that satisfying texture. Avoid packing it down too tightly, as you want it to maintain its crunch.
  6. Repeat the layers: spoon in another 1/4 cup of yogurt, followed by another cup of peaches, and another sprinkle of granola. You should have at least two layers, but feel free to add more depending on your glass size.
  7. Finish off your parfait with a drizzle of honey on top for added sweetness and a touch of elegance. If you’re using sliced almonds or shredded coconut, sprinkle them on top now. It adds a lovely visual contrast and extra flavor.
  8. Serve immediately or refrigerate for up to 30 minutes before serving to allow the flavors to meld together. However, I recommend enjoying it fresh to maintain the granola’s crunch.
  • Prep Time: 15 mins
  • Cook Time: 0 mins
  • Category: Breakfast
  • Method: No-cook
  • Cuisine: American

Nutrition

  • Serving Size: 1 parfait
  • Calories: 250
  • Sugar: 20 g
  • Sodium: 50 mg
  • Fat: 5 g
  • Saturated Fat: 2 g
  • Unsaturated Fat: 3 g
  • Trans Fat: 0 g
  • Carbohydrates: 40 g
  • Fiber: 3 g
  • Protein: 10 g
  • Cholesterol: 10 mg

Keywords: Choose ripe peaches for the best flavor and texture. Use a clear glass for a beautiful presentation. For creaminess, consider whipping the yogurt before layering. Be mindful of the granola-to-yogurt ratio. Prepare yogurt and peaches ahead of time for gatherings, layering just before serving.

Did you make this recipe?

Share a photo and tag us — we can't wait to see what you've made!

Sun-Kissed Frozen Orange Cream Slush

As a child, summer days felt like they lasted forever. I remember the sticky heat wrapping around me as I played outside, my laughter mingling with the sounds of the neighborhood. But nothing could cool me down quite like the moment I’d spot my grandmother, laboring over her blender, whipping up her famous Frozen Orange Creamsicle Slush. That vibrant orange treat, with its frosty texture and sweet citrus aroma, was like a burst of sunshine in a cup. Just one sip, and I could feel the coolness wash over me, sparking pure joy.

This Frozen Orange Creamsicle Slush has a way of making you feel like a kid again. Its creamy, dreamy consistency is a delightful balance of bright orange and soft vanilla, inviting you to dive right in. The refreshing tang of orange dances on your tongue, while the smooth creaminess envelops you in a comforting embrace. It’s a nostalgic treat that’s perfect for hot summer afternoons or anytime you need a little pick-me-up.

What makes my version of this slush stand out is the addition of a hint of vanilla bean, which elevates the flavor and adds an extra layer of richness. Plus, it’s super easy to whip up with just a few simple ingredients that you probably already have on hand! So, if you’re ready to relive those sun-soaked memories, let me show you exactly how to make it.

Sun-Kissed Frozen Orange Cream Slush

Why You’ll Love This Recipe

  • Each slush is a perfect blend of creamy vanilla and zesty orange, creating a nostalgic flavor reminiscent of summer days.
  • This refreshing treat is ready in under 15 minutes, making it an ideal quick dessert for unexpected guests or hot afternoons.
  • With just 8 simple ingredients, it’s budget-friendly, ensuring you don’t have to break the bank to enjoy a delicious slush.
  • The slush has a perfectly smooth texture, thanks to the combination of ice and ice cream, providing a delightful contrast to the bright citrus flavors.
  • It’s highly customizable; you can easily adjust the sweetness and add fresh herbs for a unique twist that suits your taste.

Ingredients

  • 2 cups orange juice (freshly squeezed or store-bought)
  • 1 cup vanilla ice cream
  • 1 cup crushed ice
  • 1/2 cup milk (whole or 2%)
  • 1/4 cup granulated sugar (adjust based on sweetness preference)
  • 1 teaspoon vanilla extract
  • Zest of 1 orange (for added flavor)
  • Fresh orange slices and mint leaves (for garnish)

The star of this Frozen Orange Creamsicle Slush is the orange juice, which provides the vibrant, citrusy base. Freshly squeezed juice will yield the brightest flavor, but store-bought options can be just as convenient. If you’re opting for store-bought, choose 100% pure juice with no added sugars for the best results. Another essential ingredient is the vanilla ice cream; it adds creaminess and sweetness. You can substitute it with dairy-free ice cream if you’re looking for a vegan option. Whole or 2% milk complements the ice cream, creating a smooth blend. If you want a lower-calorie version, almond or oat milk can be good alternatives.

Lastly, the granulated sugar can be adjusted based on your sweetness preference. If you prefer a more natural sweetener, consider using honey or agave syrup. The orange zest enhances the flavor profile, providing an aromatic pop that brings the whole slush together. Don’t skip it! It adds an extra layer of brightness that makes this slush truly special.

Step-by-Step Instructions

  1. Start by preparing your ingredients. Gather 2 cups of orange juice, 1 cup of vanilla ice cream, and 1 cup of crushed ice. Make sure the ice is finely crushed, as larger chunks can make blending difficult.
  2. In a blender, combine the orange juice, vanilla ice cream, crushed ice, and 1/2 cup of milk. Add 1/4 cup of granulated sugar and 1 teaspoon of vanilla extract. If you like a sweeter slush, consider adding a bit more sugar at this stage.
  3. Add the zest of 1 orange to the blender. This step is crucial for enhancing the citrus flavor of your slush. Make sure not to include the bitter white pith—only the flavorful zest.
  4. Blend the mixture on medium-high speed for about 30-45 seconds. Stop once the ingredients are fully combined and the slush has a smooth, even consistency. If you notice large chunks of ice, blend for an additional 10-15 seconds. Avoid over-blending, as this can make the slush too liquidy.
  5. Once blended, taste the slush. If it needs more sweetness, add a little more sugar and blend for a few more seconds. If it’s too thick, you can add a splash of milk to reach your desired consistency.
  6. Pour the slush into glasses. This recipe typically serves 4, but you can easily double it for larger gatherings. Use a spoon to help guide the slush into the glasses if needed.
  7. Garnish each serving with fresh orange slices and mint leaves. The mint not only adds a pop of color but also a refreshing aroma that complements the citrus flavors beautifully.
  8. Serve immediately and enjoy! If you’ve made extra, you can refrigerate it for a short time, but it’s best enjoyed fresh.

Pro Tips for the Best Frozen Orange Creamsicle Slush

  • Don’t skip the orange zest! It’s a game-changer for flavor. Always zest before juicing to make it easier.
  • Use a high-powered blender for the best texture. A standard blender may struggle with ice, leading to uneven consistency. If you have a food processor, that can work too, but ensure the ice is finely crushed.
  • Adjust the ice-to-liquid ratio carefully. If your slush is too thick, it won’t blend well. Start with less ice and add more until you reach your preferred texture.
  • Be cautious with the sugar! Always start with the lower amount, as you can easily add more, but it’s hard to fix an overly sweet slush.
  • For a fun twist, consider adding a splash of coconut milk or a handful of fresh fruit like strawberries or pineapple. This not only enhances the flavor but also adds a beautiful color contrast.

Variations & Serving Ideas

There are countless ways to put a spin on your Frozen Orange Creamsicle Slush. Consider making a tropical version by adding in some pineapple juice or coconut milk for a delightful tropical twist. If you’re feeling adventurous, try incorporating a handful of frozen mango or peach slices for added sweetness. For a lighter version, swap out the vanilla ice cream for Greek yogurt for a creamy yet tangy alternative.

As for serving ideas, this refreshing slush pairs wonderfully with light summer dishes like grilled chicken skewers, fish tacos, or a simple salad topped with citrus vinaigrette. The bright, zesty flavors of the slush complement these dishes perfectly, making them an ideal pairing for a sunny day.

Storage, Make-Ahead & Reheating

This Frozen Orange Creamsicle Slush is best enjoyed fresh, but if you have leftovers, you can store them in an airtight container in the fridge for up to 2 days. Just keep in mind that the slush may lose some of its texture over time as the ice melts. It doesn’t freeze well, as the ice will turn into a solid block. If you must freeze it, blend again after thawing to restore the slushy consistency. This treat is best the day you make it, as the flavors meld together beautifully overnight, enhancing its deliciousness.

Frequently Asked Questions

Can I make Frozen Orange Creamsicle Slush ahead of time?

Yes — in fact, it tastes even better the next day as the flavors meld. However, it’s best to enjoy it fresh, as the texture can change if stored for too long. If you need to prepare it ahead, keep it in the fridge and re-blend before serving.

What kind of orange juice should I use?

For the best flavor, use freshly squeezed orange juice. However, if you’re short on time, opt for 100% pure store-bought juice without added sugars. This will ensure that your slush remains flavorful and refreshing.

Can I substitute the vanilla ice cream?

Absolutely! If you’re looking for a dairy-free option, coconut milk ice cream or a non-dairy vanilla ice cream can work wonderfully. They will still provide the creamy texture and sweetness you desire.

How can I adjust the sweetness of my slush?

You can easily adjust the sweetness by modifying the amount of sugar added. Start with 1/4 cup and taste the mixture before blending. If you prefer it sweeter, add more sugar gradually until it reaches your desired level.

What should I do if my slush is too thick?

If your slush is too thick, simply add a splash of milk or orange juice and blend again. This will help achieve a more drinkable consistency while maintaining the slushy texture. Adjust gradually to reach your preferred thickness.

Sun-Kissed Frozen Orange Cream Slush

Final Thoughts

The Frozen Orange Creamsicle Slush is a delightful blend of refreshing citrus and creamy goodness, making it a perfect treat for warm days or any time you crave a taste of nostalgia. The way the bright orange flavor dances with the creamy texture truly elevates this slush, transforming it into a satisfying escape from the everyday.

This is the kind of recipe I come back to again and again, especially when I’m looking to cool down or impress guests at a summer gathering. It’s simple to make and always brings smiles all around! I encourage you to try this recipe for yourself—don’t hesitate to share your results or even put your own spin on it. Happy slushing!

Print
clock clock iconcutlery cutlery iconflag flag iconfolder folder iconinstagram instagram iconpinterest pinterest iconfacebook facebook iconprint print iconsquares squares iconheart heart iconheart solid heart solid icon

Frozen Orange Creamsicle Slush


  • Author: Lily author
  • Total Time: 15 minutes
  • Yield: 4 servings 1x
Pin Recipe
Print Recipe

Description

This Frozen Orange Creamsicle Slush is a refreshing treat that combines creamy vanilla and zesty orange flavors. Perfect for hot summer days, it brings back nostalgic memories with every sip.


Ingredients

Scale
  • 2 cups orange juice (freshly squeezed or store-bought)
  • 1 cup vanilla ice cream
  • 1 cup crushed ice
  • 1/2 cup milk (whole or 2%)
  • 1/4 cup granulated sugar (adjust based on sweetness preference)
  • 1 teaspoon vanilla extract
  • Zest of 1 orange (for added flavor)
  • Fresh orange slices and mint leaves (for garnish)

Instructions

  1. Start by preparing your ingredients. Gather 2 cups of orange juice, 1 cup of vanilla ice cream, and 1 cup of crushed ice. Make sure the ice is finely crushed, as larger chunks can make blending difficult.
  2. In a blender, combine the orange juice, vanilla ice cream, crushed ice, and 1/2 cup of milk. Add 1/4 cup of granulated sugar and 1 teaspoon of vanilla extract. If you like a sweeter slush, consider adding a bit more sugar at this stage.
  3. Add the zest of 1 orange to the blender. This step is crucial for enhancing the citrus flavor of your slush. Make sure not to include the bitter white pith—only the flavorful zest.
  4. Blend the mixture on medium-high speed for about 30-45 seconds. Stop once the ingredients are fully combined and the slush has a smooth, even consistency. If you notice large chunks of ice, blend for an additional 10-15 seconds. Avoid over-blending, as this can make the slush too liquidy.
  5. Once blended, taste the slush. If it needs more sweetness, add a little more sugar and blend for a few more seconds. If it’s too thick, you can add a splash of milk to reach your desired consistency.
  6. Pour the slush into glasses. This recipe typically serves 4, but you can easily double it for larger gatherings. Use a spoon to help guide the slush into the glasses if needed.
  7. Garnish each serving with fresh orange slices and mint leaves. The mint not only adds a pop of color but also a refreshing aroma that complements the citrus flavors beautifully.
  8. Serve immediately and enjoy! If you’ve made extra, you can refrigerate it for a short time, but it's best enjoyed fresh.
  • Prep Time: 15 min
  • Cook Time: 0 min
  • Category: Dessert
  • Method: Blending
  • Cuisine: American

Nutrition

  • Serving Size: 1 serving
  • Calories: 200
  • Sugar: 30 g
  • Sodium: 50 mg
  • Fat: 5 g
  • Saturated Fat: 3 g
  • Unsaturated Fat: 2 g
  • Trans Fat: 0 g
  • Carbohydrates: 40 g
  • Fiber: 1 g
  • Protein: 2 g
  • Cholesterol: 20 mg

Keywords: Don't skip the orange zest! It's a game-changer for flavor. Always zest before juicing to make it easier.

Did you make this recipe?

Share a photo and tag us — we can't wait to see what you've made!

Zesty Lemon Poppy Seed Delight

One rainy afternoon, I found myself in my grandmother’s cozy kitchen, the kind that always smelled like warmth and love. She was whipping up her famous Lemon Poppy Seed Loaf, a recipe that had been passed down through generations. As the batter came together, the zesty aroma of fresh lemons filled the air, mingling perfectly with the nutty fragrance of poppy seeds. I can still picture her, apron-clad, as she expertly drizzled a vibrant citrus icing over the loaf, creating a glossy, sun-kissed finish that beckoned us to dive in. It was a moment that sparked my own passion for baking, and this recipe has become a cherished staple in my home ever since.

When you take a bite of this Lemon Poppy Seed Loaf, it’s like a burst of sunshine on your palate. The loaf is beautifully golden, with a tender crumb that melts in your mouth. Each slice is speckled with tiny poppy seeds, adding a delightful crunch that contrasts beautifully with the tangy sweetness of the lemon. And that citrus icing? It’s the finishing touch that elevates this loaf from ordinary to extraordinary, with its bright, zesty flavor dancing on your taste buds.

This recipe stands out because it embraces simplicity while delivering on flavor. I’ve added a hint of vanilla to the batter, enhancing the overall taste and making it even more indulgent. Trust me, once you make this Lemon Poppy Seed Loaf With Citrus Icing, it’ll become a go-to in your baking repertoire.

So, let me show you exactly how to make it!

Zesty Lemon Poppy Seed Delight

Why You’ll Love This Recipe

  • Moist and tender crumb that melts in your mouth, thanks to the perfect balance of butter and buttermilk.
  • Bright, zesty lemon flavor paired with crunchy poppy seeds, creating a delightful texture and taste experience.
  • Easy to whip up in just about an hour, perfect for last-minute gatherings or a cozy afternoon treat.
  • Budget-friendly with everyday ingredients, making it an accessible option for all home bakers.
  • The citrus icing adds a sweet tang that elevates the loaf, turning a simple recipe into a showstopper!

Ingredients

  • 1 ½ cups (190g) all-purpose flour
  • 1 teaspoon baking powder
  • ½ teaspoon baking soda
  • ½ teaspoon salt
  • 3 tablespoons poppy seeds
  • ½ cup (115g) unsalted butter, softened to room temperature
  • 1 cup (200g) granulated sugar
  • 2 large eggs
  • 1 teaspoon vanilla extract
  • 1 teaspoon lemon zest (from about 1 medium lemon)
  • ½ cup (120ml) buttermilk
  • 2 tablespoons fresh lemon juice

For the Citrus Icing:

  • 1 cup (120g) powdered sugar
  • 2 tablespoons fresh lemon juice
  • 1 tablespoon orange juice
  • 1 teaspoon lemon zest (for garnish, optional)

Let’s dive into the key ingredients that make this Lemon Poppy Seed Loaf so special. The all-purpose flour provides the structure and base for the loaf, while the baking powder and baking soda ensure it rises perfectly, giving the loaf a light texture. For a gluten-free variation, you could substitute the flour with a gluten-free all-purpose blend. Poppy seeds not only add a delightful crunch but also contribute to the unique flavor profile that pairs well with the citrus notes.

Unsalted butter is crucial for achieving the buttery richness that makes this loaf so moist. If you’re looking for a dairy-free option, coconut oil or a vegan butter can be used instead. The buttermilk is another essential component, providing acidity that activates the baking soda for a fluffy texture. If you don’t have buttermilk on hand, you can easily make a substitute by mixing ½ cup of milk with 1 tablespoon of vinegar or lemon juice and letting it sit for about 5 minutes.

Step-by-Step Instructions

  1. Preheat your oven to 350°F (175°C). Grease a 9×5-inch loaf pan or line it with parchment paper for easy removal later.
  2. In a medium mixing bowl, whisk together 1 ½ cups of all-purpose flour, 1 teaspoon of baking powder, ½ teaspoon of baking soda, ½ teaspoon of salt, and 3 tablespoons of poppy seeds. This helps to evenly distribute the baking agents and ensures a uniform rise.
  3. In a large mixing bowl, cream together ½ cup of softened unsalted butter and 1 cup of granulated sugar using an electric mixer on medium speed for about 3-4 minutes, until the mixture is light and fluffy. Make sure to scrape down the sides of the bowl occasionally.
  4. Add 2 large eggs, 1 teaspoon of vanilla extract, and 1 teaspoon of lemon zest to the creamed butter and sugar, mixing until fully combined. You want a smooth consistency, so ensure there are no lumps of butter.
  5. In a small bowl, combine ½ cup of buttermilk and 2 tablespoons of fresh lemon juice. Alternately add the dry ingredients and buttermilk mixture to the butter mixture, starting and ending with the dry ingredients. Mix just until combined; do not overmix, as this can lead to a dense loaf.
  6. Pour the batter into the prepared loaf pan. Smooth the top with a spatula, ensuring it’s even. Bake in the preheated oven for 50-60 minutes, or until a toothpick inserted in the center comes out clean. The edges should be lightly golden brown, and the center should feel just set.
  7. Once baked, remove the loaf from the oven and allow it to cool in the pan for about 10 minutes. Then, transfer it to a wire rack to cool completely. Resist the urge to slice too soon, as it will be crumbly if it’s still warm.
  8. While the loaf is cooling, prepare the citrus icing. In a medium bowl, whisk together 1 cup of powdered sugar, 2 tablespoons of fresh lemon juice, and 1 tablespoon of orange juice until smooth. If the icing is too thick, you can add a little more juice to reach your desired consistency.
  9. Once the loaf is completely cool, drizzle the citrus icing over the top. If you like, sprinkle with an additional teaspoon of lemon zest for an extra pop of flavor and color.

Pro Tips for the Best Lemon Poppy Seed Loaf With Citrus Icing

  • Be careful not to overmix your batter; this is a common mistake that can lead to a dense loaf. Mix just until the dry ingredients are incorporated for a light and fluffy texture.
  • Use room temperature ingredients, especially the butter and eggs. This helps to create a smoother batter and ensures even baking. Take your eggs out of the fridge about 30 minutes before you start.
  • For a more pronounced lemon flavor, consider adding a little lemon extract in addition to the zest and juice. Just a half teaspoon can elevate the citrus notes significantly.
  • When measuring your flour, spoon it into the measuring cup and level it off with a knife instead of scooping directly from the bag. This prevents packing and ensures you don’t end up with a dry loaf.
  • Invest in a good quality loaf pan; it makes a difference in heat distribution, which ensures even baking. If your pan is dark-coated, reduce the oven temperature by 25°F to prevent over-browning.

Variations & Serving Ideas

For a delightful twist, consider adding blueberries or raspberries to the batter for a fruity burst of flavor. You can also experiment with different citrus fruits—try lime or grapefruit zest and juice for a refreshing change. For a healthier option, substitute half of the all-purpose flour with whole wheat flour for added fiber without compromising too much on texture.

This Lemon Poppy Seed Loaf pairs beautifully with a light salad, such as a mixed greens salad with a vinaigrette, or a cup of tea for a cozy afternoon treat. It also complements a creamy cheese platter, as the acidity of the loaf balances rich cheeses perfectly. Lastly, a scoop of vanilla ice cream on the side creates a delightful contrast of temperatures and flavors!

Storage, Make-Ahead & Reheating

This Lemon Poppy Seed Loaf can be stored at room temperature for up to 3 days if wrapped tightly in plastic wrap. If you want to keep it longer, it freezes well for up to 3 months. To freeze, wrap the loaf tightly in plastic wrap and then in aluminum foil to prevent freezer burn.

When you’re ready to enjoy it again, simply thaw it in the fridge overnight. Reheat individual slices in the microwave for 15-20 seconds or in a toaster oven until warmed through. Interestingly, many people find that this loaf tastes even better the next day, as the flavors have time to meld!

Frequently Asked Questions

Can I make Lemon Poppy Seed Loaf With Citrus Icing ahead of time?

Yes — in fact, it tastes even better the next day! You can make the loaf a day in advance, allowing the flavors to develop. Just be sure to store it in an airtight container to maintain its moisture.

Can I substitute the poppy seeds?

Absolutely! If you don’t have poppy seeds on hand or prefer an alternative, you can use sesame seeds for a similar crunch or omit them entirely for a smooth loaf.

What can I use instead of buttermilk?

If you don’t have buttermilk, you can easily create a substitute by mixing ½ cup of milk (dairy or plant-based) with 1 tablespoon of vinegar or lemon juice. Let it sit for 5 minutes before using in the recipe.

How can I make this recipe gluten-free?

To make a gluten-free version of this Lemon Poppy Seed Loaf, substitute the all-purpose flour with a gluten-free all-purpose flour blend. Just ensure that the blend contains a binding agent like xanthan gum for the best results.

What is the best way to store leftover loaf?

Leftover Lemon Poppy Seed Loaf should be stored in an airtight container at room temperature for up to 3 days. For longer storage, wrap it tightly and freeze for up to 3 months. Thaw it before serving for the best texture.

Zesty Lemon Poppy Seed Delight

Final Thoughts

The Lemon Poppy Seed Loaf with Citrus Icing is truly a delightful treat that brings a burst of brightness to any occasion. The zesty lemon flavor combined with the subtle crunch of poppy seeds creates a satisfying balance, while the citrus icing adds a touch of sweetness that perfectly complements the loaf’s tanginess.

This is the kind of recipe I come back to again and again, especially when I want to brighten up a gloomy day or celebrate a small victory. The aroma that fills the kitchen as it bakes is absolutely heavenly! I encourage you to give this recipe a try; you might just find it becoming a beloved staple in your home. Don’t forget to share your results or even add your own unique twist—I can’t wait to see what you create!

Print
clock clock iconcutlery cutlery iconflag flag iconfolder folder iconinstagram instagram iconpinterest pinterest iconfacebook facebook iconprint print iconsquares squares iconheart heart iconheart solid heart solid icon

Lemon Poppy Seed Loaf


  • Author: Lily author
  • Total Time: 13 minute
  • Yield: 1 loaf 1x
Pin Recipe
Print Recipe

Description

This Lemon Poppy Seed Loaf is a delightful treat that combines zesty lemon flavor with crunchy poppy seeds. Topped with a citrus icing, it’s perfect for any occasion.


Ingredients

Scale
  • 1 ½ cups (190g) all-purpose flour
  • 1 teaspoon baking powder
  • ½ teaspoon baking soda
  • ½ teaspoon salt
  • 3 tablespoons poppy seeds
  • ½ cup (115g) unsalted butter, softened to room temperature
  • 1 cup (200g) granulated sugar
  • 2 large eggs
  • 1 teaspoon vanilla extract
  • 1 teaspoon lemon zest (from about 1 medium lemon)
  • ½ cup (120ml) buttermilk
  • 2 tablespoons fresh lemon juice
  • 1 cup (120g) powdered sugar
  • 2 tablespoons fresh lemon juice
  • 1 tablespoon orange juice
  • 1 teaspoon lemon zest (for garnish, optional)

Instructions

  1. Preheat your oven to 350°F (175°C). Grease a 9×5-inch loaf pan or line it with parchment paper for easy removal later.
  2. In a medium mixing bowl, whisk together 1 ½ cups of all-purpose flour, 1 teaspoon of baking powder, ½ teaspoon of baking soda, ½ teaspoon of salt, and 3 tablespoons of poppy seeds. This helps to evenly distribute the baking agents and ensures a uniform rise.
  3. In a large mixing bowl, cream together ½ cup of softened unsalted butter and 1 cup of granulated sugar using an electric mixer on medium speed for about 3-4 minutes, until the mixture is light and fluffy. Make sure to scrape down the sides of the bowl occasionally.
  4. Add 2 large eggs, 1 teaspoon of vanilla extract, and 1 teaspoon of lemon zest to the creamed butter and sugar, mixing until fully combined. You want a smooth consistency, so ensure there are no lumps of butter.
  5. In a small bowl, combine ½ cup of buttermilk and 2 tablespoons of fresh lemon juice. Alternately add the dry ingredients and buttermilk mixture to the butter mixture, starting and ending with the dry ingredients. Mix just until combined; do not overmix, as this can lead to a dense loaf.
  6. Pour the batter into the prepared loaf pan. Smooth the top with a spatula, ensuring it’s even. Bake in the preheated oven for 50-60 minutes, or until a toothpick inserted in the center comes out clean. The edges should be lightly golden brown, and the center should feel just set.
  7. Once baked, remove the loaf from the oven and allow it to cool in the pan for about 10 minutes. Then, transfer it to a wire rack to cool completely. Resist the urge to slice too soon, as it will be crumbly if it’s still warm.
  8. While the loaf is cooling, prepare the citrus icing. In a medium bowl, whisk together 1 cup of powdered sugar, 2 tablespoons of fresh lemon juice, and 1 tablespoon of orange juice until smooth. If the icing is too thick, you can add a little more juice to reach your desired consistency.
  9. Once the loaf is completely cool, drizzle the citrus icing over the top. If you like, sprinkle with an additional teaspoon of lemon zest for an extra pop of flavor and color.
  • Prep Time: 15 mins
  • Cook Time: 50-60 mins
  • Category: Dessert
  • Method: Baking
  • Cuisine: American

Nutrition

  • Serving Size: 1 slice
  • Calories: 200
  • Sugar: 15 g
  • Sodium: 150 mg
  • Fat: 8 g
  • Saturated Fat: 5 g
  • Unsaturated Fat: 3 g
  • Trans Fat: 0 g
  • Carbohydrates: 30 g
  • Fiber: 1 g
  • Protein: 3 g
  • Cholesterol: 40 mg

Keywords: Be careful not to overmix your batter; this is a common mistake that can lead to a dense loaf. Use room temperature ingredients for a smoother batter and even baking.

Did you make this recipe?

Share a photo and tag us — we can't wait to see what you've made!

  • Privacy Policy
  • Terms Of Service
  • Contact
  • About
  • GDPR

Copyright © 2025 Homesmad