• Skip to primary navigation
  • Skip to main content
  • Skip to primary sidebar
Homesmad

Homesmad

  • Home
  • Breakfast & Brunch
  • Appetizers & Snacks
  • Dinner
  • Dessert
  • About
  • Privacy Policy
  • Contact
Homesmad
  • Home
  • Breakfast & Brunch
  • Appetizers & Snacks
  • Dinner
  • Dessert
  • About
  • Privacy Policy
  • Contact

Easy Pesto Chicken Flatbread Recipe: Quick Dinner Idea!

September 27, 2025 by Lily author

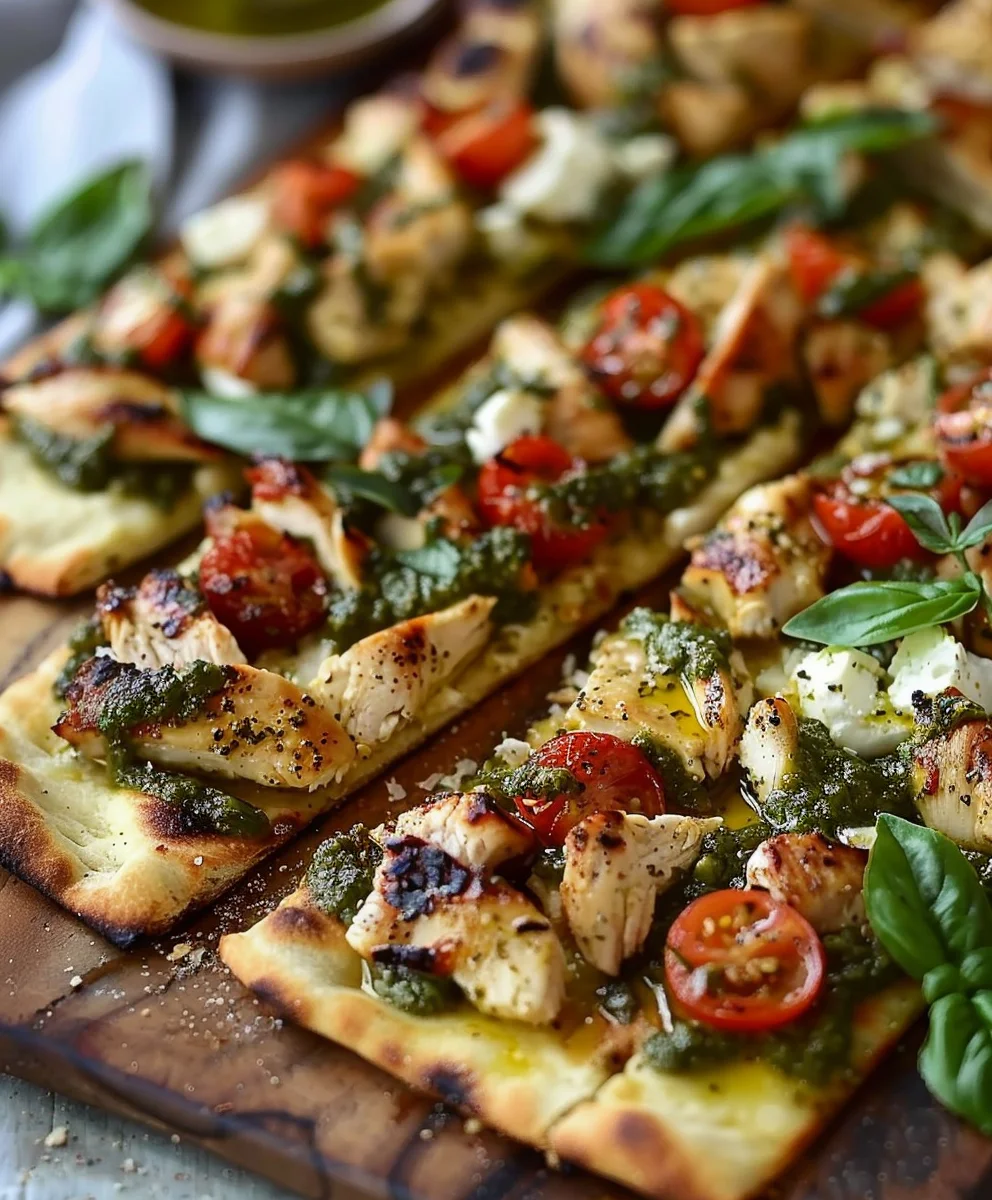
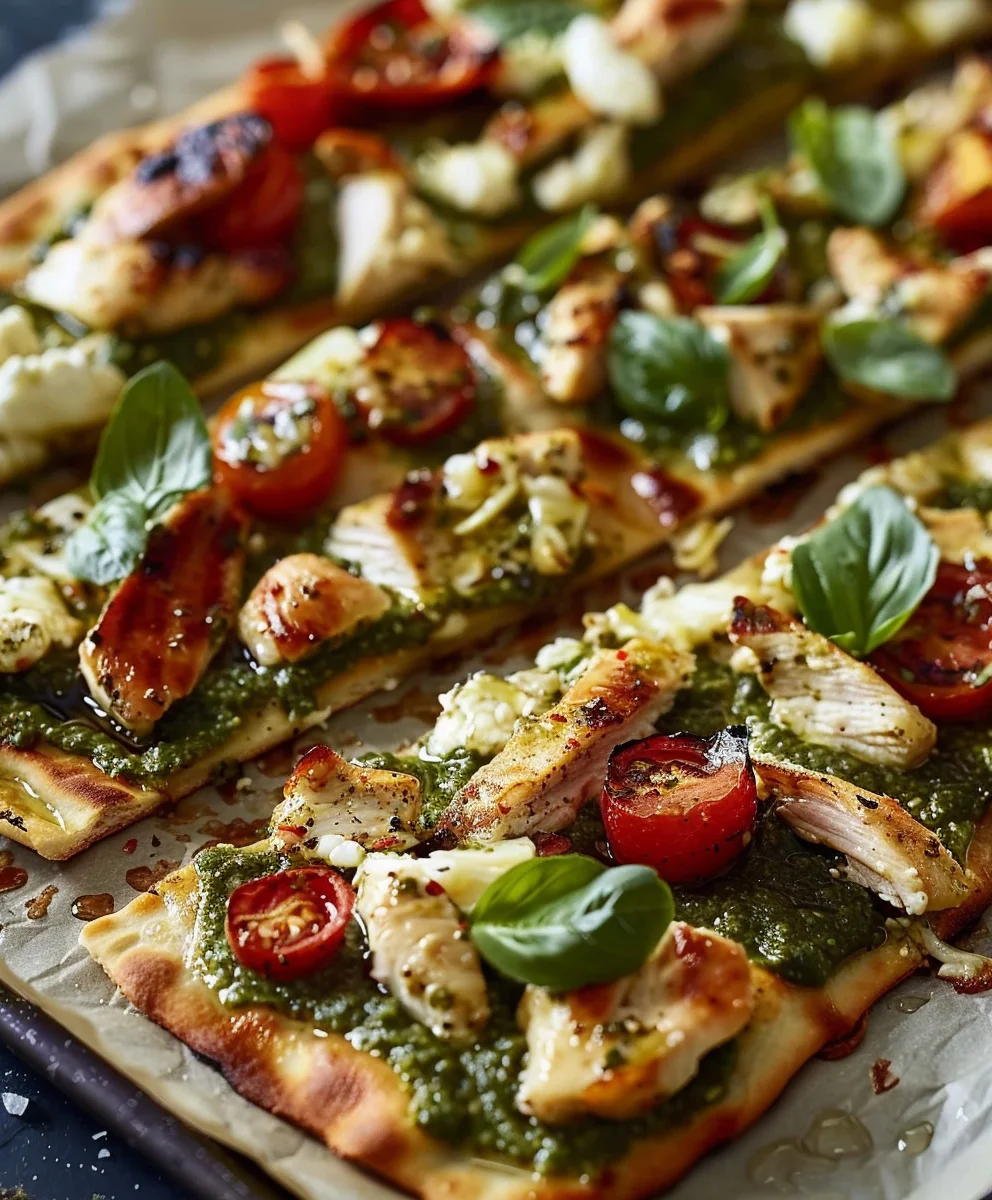
Pesto Chicken Flatbread is more than just a meal; it’s an invitation to a symphony of flavors that effortlessly blends vibrant Italian tradition with comforting convenience. Imagine sinking your teeth into a perfectly baked, slightly crisp flatbread, generously slathered with bright, aromatic basil pesto. This is then layered with tender, seasoned chicken pieces, and finally crowned with a blanket of melted, gooey mozzarella cheese. It’s a culinary experience that truly satisfies on multiple levels.

While the exact combination of this delightful dish might be a modern innovation, its components boast rich historical roots. Pesto, hailing from the Liguria region of Italy, is a testament to the power of fresh, simple ingredients like basil, pine nuts, garlic, and Parmesan, skillfully combined to create an explosion of flavor. Flatbreads themselves are ancient, found across countless cultures, serving as a versatile canvas for diverse toppings. Bringing these elements together results in a dish that feels both timeless and excitingly fresh.

I find that people absolutely adore this dish for its incredible balance. It offers the fresh, herbaceous zest of pesto, the satisfying protein of chicken, and the delightful crisp-chew of a perfectly baked flatbread. It’s remarkably convenient for a busy weeknight yet sophisticated enough to impress at a casual gathering. The ease of preparation combined with its undeniable gourmet appeal makes Pesto Chicken Flatbread an absolute favorite in my kitchen, and I’m confident it will become one in yours too.

Easy Pesto Chicken Flatbread Recipe: Quick Dinner Idea! this RECIPE

Ingredients:

  • For the Chicken:
    • 1.5 pounds boneless, skinless chicken breasts or thighs, cut into 1-inch pieces
    • 1 tablespoon olive oil
    • 1/2 teaspoon garlic powder
    • 1/2 teaspoon onion powder
    • 1/4 teaspoon dried oregano
    • Salt and freshly ground black pepper, to taste
  • For the Pesto Chicken Flatbread Base:
    • 4 individual flatbreads (such as naan bread, pre-made pizza crusts, or large pita bread)
    • 1/2 cup prepared basil pesto (store-bought or homemade, your preference!)
    • 1.5 cups shredded mozzarella cheese, divided
    • 1/2 cup grated Parmesan cheese, divided
  • For the Toppings:
    • 1 cup cherry tomatoes, halved
    • 1/4 cup thinly sliced red onion
    • 1/2 cup baby spinach leaves
    • 1/4 cup crumbled feta cheese (optional, but highly recommended!)
    • Red pepper flakes, for garnish (optional)
    • Fresh basil leaves, chopped, for garnish (optional)
    • A drizzle of extra virgin olive oil, for finishing (optional)

Preparing the Flavorful Chicken

  1. First things first, let’s get our chicken ready! Take your boneless, skinless chicken breasts or thighs and pat them thoroughly dry with paper towels. This crucial step helps achieve a beautiful sear and prevents the chicken from steaming. Once dry, place them on a clean cutting board and carefully cut them into uniform 1-inch pieces. Aim for consistency in size, as this ensures even cooking, meaning no undercooked bits and no dry, overcooked pieces.
    A consistent cut makes all the difference for this Pesto Chicken Flatbread.
  2. Now it’s time to infuse that chicken with some fantastic flavor. In a medium-sized bowl, combine your diced chicken with 1 tablespoon of olive oil. Drizzle it over the chicken and toss to coat each piece lightly. Next, sprinkle in the garlic powder, onion powder, dried oregano, and a generous pinch of salt and freshly ground black pepper. Give it another good toss, making sure all the spices are evenly distributed and clinging to every surface of the chicken. This seasoning blend will lay a delicious foundation for our Pesto Chicken Flatbread.
  3. Heat a large non-stick skillet or cast-iron pan over medium-high heat. You want it to be nice and hot before you add the chicken, as this is key for developing that golden-brown crust we’re looking for. Once the pan is sufficiently heated (you can test by flicking a drop of water into it – if it sizzles and evaporates immediately, you’re good to go!), add the seasoned chicken pieces in a single layer. Avoid overcrowding the pan; if necessary, cook the chicken in two batches. Overcrowding lowers the pan’s temperature and can lead to steamed, rather than seared, chicken.
  4. Cook the chicken for about 4-6 minutes, flipping occasionally, until it’s beautifully golden brown on all sides and cooked through. The internal temperature should reach 165°F (74°C). You’ll notice the aroma filling your kitchen, a wonderful preview of the deliciousness to come. Once cooked, remove the chicken from the pan and set it aside in a bowl. It’s okay if there are some caramelized bits stuck to the pan; those are flavor builders! We’ll add them to our Pesto Chicken Flatbread later.

Assembling Your Pesto Chicken Flatbread Masterpiece

  1. Preheat your oven to 400°F (200°C). If you’re using a pizza stone, place it in the oven during preheating to get it wonderfully hot. Otherwise, prepare a large baking sheet by lining it with parchment paper for easy cleanup and to prevent sticking. A properly preheated oven is crucial for achieving a crispy crust on your Pesto Chicken Flatbread.
  2. Lay out your individual flatbreads on your prepared baking sheet or directly onto the preheated pizza stone (if using). Each flatbread will serve as the canvas for your culinary creation. Take your 1/2 cup of prepared basil pesto and evenly spread about 2 tablespoons over each flatbread, covering the surface right up to the edges. Don’t be shy with the pesto; it’s the heart and soul of this Pesto Chicken Flatbread! The vibrant green and fragrant basil will immediately awaken your senses.
  3. Now for the cheesy goodness! Sprinkle approximately 1/4 cup of the shredded mozzarella cheese over the pesto on each flatbread. Follow that with about 1 tablespoon of the grated Parmesan cheese per flatbread. This initial layer of cheese will act as a delicious base, melting into the pesto and creating a wonderful foundation for our toppings.
  4. Next, evenly distribute the cooked chicken pieces over the cheese layer on each flatbread. Make sure every bite of your Pesto Chicken Flatbread will have a piece of that succulent, seasoned chicken.
  5. Time to add some color and freshness! Scatter the halved cherry tomatoes and thinly sliced red onion over the chicken and cheese. These vegetables will soften and sweeten slightly during baking, adding delightful bursts of flavor and texture. If you’re a fan of a little extra tang and creaminess, this is also the perfect moment to sprinkle on that crumbled feta cheese. Trust me, it’s a game-changer for this Pesto Chicken Flatbread.
  6. Finally, top each flatbread with the remaining shredded mozzarella cheese and grated Parmesan cheese. This top layer of cheese will melt into a golden, bubbly blanket, sealing in all the delicious toppings and creating that irresistible cheesy pull. Ensure an even distribution for maximum enjoyment.

Baking to Perfection

  1. Carefully transfer the baking sheet with your assembled Pesto Chicken Flatbreads into the preheated oven. If using a pizza stone, you can slide the flatbreads directly onto the hot stone. Bake for 10-15 minutes, or until the cheese is beautifully melted and bubbly, and the crusts are golden brown and crispy around the edges. Keep a close eye on them, as oven temperatures can vary, and flatbreads cook relatively quickly. You’ll know they’re ready when they look utterly irresistible.
    That perfect golden crust is what we’re aiming for!
  2. Once the Pesto Chicken Flatbreads are cooked to perfection, carefully remove the baking sheet from the oven. The kitchen will be filled with the most amazing aroma of basil, garlic, and melted cheese – a truly enticing experience.

Finishing Touches and Serving Suggestions

  1. Immediately after removing the flatbreads from the oven, while they are still piping hot, scatter the fresh baby spinach leaves over the top of each Pesto Chicken Flatbread. The residual heat from the flatbread will gently wilt the spinach, allowing it to maintain its vibrant color and fresh texture, rather than becoming overly cooked and soggy. This adds a lovely, healthy green touch and a slight bitterness that balances the richness of the pesto and cheese.
  2. For an extra layer of freshness and a beautiful aromatic finish, sprinkle each Pesto Chicken Flatbread with chopped fresh basil leaves, if desired. The aroma of fresh basil is simply intoxicating and truly elevates the dish. If you enjoy a little heat, a dusting of red pepper flakes adds a fantastic zing that complements the other flavors beautifully.
  3. Finally, if you want to add a touch of gourmet elegance and a slight fruity note, a very light drizzle of good quality extra virgin olive oil over the top of each finished Pesto Chicken Flatbread can make a significant difference. It adds a subtle sheen and enhances the overall mouthfeel.
  4. Allow the Pesto Chicken Flatbreads to cool for just a minute or two before slicing. This brief resting period helps the cheese set slightly, making for cleaner cuts and preventing all the toppings from sliding off when you pick up a slice. Use a pizza cutter or a sharp knife to cut each flatbread into desired wedges or squares.
  5. Serve your homemade Pesto Chicken Flatbreads immediately as a fantastic appetizer, a light lunch, or a delightful dinner. They pair wonderfully with a simple green salad dressed with a light vinaigrette, offering a refreshing contrast to the rich flavors of the flatbread. For a more substantial meal, a side of roasted vegetables or a cup of your favorite soup would also be excellent companions. This Pesto Chicken Flatbread is incredibly versatile and always a crowd-pleaser!
  6. Chef’s Tip for Leftovers: If by some miracle you have any Pesto Chicken Flatbread left, store it in an airtight container in the refrigerator for up to 2-3 days. To reheat, place slices on a baking sheet and warm in a preheated oven at 350°F (175°C) for about 5-7 minutes, or until heated through and crispy. Avoid the microwave if you want to maintain that lovely crispy crust! This dish reheats surprisingly well, making it perfect for meal prep or quick lunches throughout the week. You might even find the flavors deepen slightly overnight, making for an even more enjoyable second round.

Easy Pesto Chicken Flatbread Recipe: Quick Dinner Idea!

Conclusion:

Well, my friends, we’ve reached the end of our culinary journey, but I truly believe this is just the beginning of your love affair with one of the most delightfully simple yet profoundly satisfying dishes you’ll ever whip up. If there’s one recipe I could implore you to try this week, it would undoubtedly be this incredible Pesto Chicken Flatbread. It’s not just a meal; it’s an experience – a vibrant symphony of flavors that manages to be both comforting and exciting all at once. Imagine the tender, savory chicken, perfectly complemented by the bright, aromatic embrace of fresh pesto, all nestled atop a wonderfully crisp flatbread that gives way to a gooey, melted layer of cheese. It’s the kind of dish that makes you close your eyes and savor every single bite.

Why This Pesto Chicken Flatbread is a Game-Changer

What makes this recipe an absolute must-try isn’t just its phenomenal taste, but its sheer practicality. In today’s busy world, finding a meal that tastes like it took hours to prepare but actually comes together in minutes is like striking culinary gold. This flatbread offers exactly that. It’s perfect for a speedy weeknight dinner when you’re short on time but refuse to compromise on flavor. It’s equally fantastic as a sophisticated yet unfussy appetizer for entertaining, sliced into smaller, shareable pieces that will disappear in a flash. The vibrant colors alone are enough to brighten any table, and the combination of textures – from the chewy chicken to the creamy pesto and the crispy crust – is simply irresistible. It’s a recipe that delivers big on flavor with minimal fuss, making you feel like a gourmet chef without the usual effort.

Unleash Your Inner Chef: Serving Suggestions & Creative Variations

While this Pesto Chicken Flatbread is absolutely divine on its own, it also serves as a fantastic canvas for your own culinary creativity. For a complete meal, I love serving it alongside a simple, crisp green salad tossed with a light vinaigrette – perhaps a lemon-herb dressing to really bring out the pesto’s freshness. Roasted cherry tomatoes or some quickly sautéed zucchini make wonderful companions, adding another layer of sweetness and texture. But don’t stop there! This recipe is incredibly adaptable, inviting you to experiment and make it truly your own.

Topping & Cheese Twists:
  • Herbaceous Burst: A generous sprinkle of fresh basil leaves or a drizzle of balsamic glaze after baking can elevate the flavors even further.
  • Spice it Up: For those who love a little heat, a pinch of red pepper flakes sprinkled over the cheese before baking adds a fantastic kick.
  • Cheese, Please: Feel free to experiment with different cheeses! Crumbled feta or creamy goat cheese would add a tangy counterpoint, while provolone or fontina could offer a different kind of melt and flavor profile. A blend of mozzarella, provolone, and a touch of Parmesan is always a winner.
  • Extra Veggies: Thinly sliced red onion, sun-dried tomatoes (either packed in oil or dry-packed and rehydrated), or even some marinated artichoke hearts can be fantastic additions for extra flavor and texture.
Base & Protein Swaps:
  • Flatbread Alternatives: Don’t have the exact flatbread on hand? Naan bread works beautifully, as does a sturdy pita. You can even use pre-made pizza dough for a slightly thicker crust, or large tortillas for a super-speedy, thinner version.
  • Protein Power-Ups: Not a fan of chicken, or just looking for a change? Cooked shrimp or crumbled Italian sausage would be delicious. For a fantastic vegetarian option, simply load it up with roasted vegetables like bell peppers, zucchini, mushrooms, and omit the chicken.
  • Pesto Explorations: While classic basil pesto is unbeatable, consider trying a sun-dried tomato pesto for a richer, sweeter profile, or a kale pesto for an earthy twist. The possibilities are truly endless!

Your Turn: Try It, Love It, Share It!

Now, it’s your moment to shine in the kitchen! I genuinely hope you feel inspired to gather your ingredients and give this Pesto Chicken Flatbread a try very soon. I promise, the aromas that will fill your kitchen as it bakes are reason enough, but that first bite? Pure bliss. Don’t be shy about making it your own – cooking is all about creativity and personal taste. Once you’ve experienced the magic of this dish, I would absolutely love to hear from you. Please come back and share your experience in the comments below! Tell me what you loved, what variations you tried, who you shared it with, or any clever tips you discovered along the way. Your feedback and culinary adventures are what make this community so vibrant. Happy cooking, and bon appétit!


Easy Pesto Chicken Flatbread Recipe: Quick Dinner Idea!

Easy Pesto Chicken Flatbread Recipe: Quick Dinner Idea!

Pesto Chicken Flatbread is a delightful blend of vibrant Italian tradition and comforting convenience. It features a perfectly baked flatbread slathered with bright basil pesto, layered with tender, seasoned chicken pieces, and topped with melted mozzarella cheese. This dish offers a fresh, herbaceous zest, satisfying protein, and a delightful crisp-chew, making it perfect for busy weeknights or casual gatherings.

Prep Time
15 Minutes

Cook Time
20 Minutes

Total Time
35 Minutes

Servings
4 servings

Ingredients

  • 2 large boneless, skinless chicken breasts
  • 1 cup fresh basil pesto
  • 4 flatbreads
  • 1 cup shredded mozzarella cheese
  • 1/2 cup halved cherry tomatoes
  • 1/4 cup grated Parmesan cheese
  • 2 tablespoons olive oil
  • Salt, to taste
  • Pepper, to taste
  • Fresh basil leaves, for garnish (optional)

Instructions

  1. Step 1
    Cut chicken breasts into 1-inch pieces. Pat dry with paper towels.
  2. Step 2
    In a bowl, toss chicken with 1 tablespoon olive oil, salt, and pepper until evenly coated.
  3. Step 3
    Heat a large skillet over medium-high heat. Cook chicken for 4-6 minutes, flipping occasionally, until golden brown and cooked through (165°F/74°C). Set aside.
  4. Step 4
    Preheat oven to 400°F (200°C). Line a baking sheet with parchment paper.
  5. Step 5
    Lay flatbreads on the baking sheet. Spread 2 tablespoons of basil pesto evenly over each flatbread.
  6. Step 6
    Sprinkle a portion of the shredded mozzarella and grated Parmesan cheese over the pesto on each flatbread to create a base layer.
  7. Step 7
    Evenly distribute the cooked chicken pieces and halved cherry tomatoes over the cheese layer on each flatbread.
  8. Step 8
    Top each flatbread with the remaining shredded mozzarella cheese and grated Parmesan cheese.
  9. Step 9
    Bake for 10-15 minutes, or until the cheese is beautifully melted and bubbly, and the crusts are golden brown and crispy.
  10. Step 10
    Carefully remove the flatbreads from the oven.
  11. Step 11
    Garnish with chopped fresh basil leaves, if desired.
  12. Step 12
    Allow the flatbreads to cool for 1-2 minutes before slicing into wedges or squares. Serve immediately.
  13. Step 13
    Store any leftovers in an airtight container in the refrigerator for up to 2-3 days. Reheat in a preheated oven at 350°F (175°C) for about 5-7 minutes for best results.

Important Information

Nutrition Facts (Per Serving)

It is important to consider this information as approximate and not to use it as definitive health advice.

Allergy Information

Please check ingredients for potential allergens and consult a health professional if in doubt.

« Previous Post
Spooky Baked Halloween Chips: Fun & Easy Halloween Treat
Next Post »
Quick Caesar Chicken Bowl: Fresh, Flavorful, & Satisfying

If you enjoyed this…

Steak Tortellini: A Delicious and Easy Recipe

Creamy Smothered Chicken: A Delicious Recipe for Comfort Food Lovers

German Goulash: The Authentic Recipe You Need to Try

Primary Sidebar

Browse by Diet

BreakfastDinnerLunchDessertAppetizer

Sweet Peach Yogurt Parfait Delight

One of my fondest memories is from a lazy summer afternoon spent at my grandmother’s house. The sun filtered through the kitchen window, casting a warm glow over the table where she would create her culinary magic. It was during one of those blissful moments that I first tasted her Peach Yogurt Parfait with Honey and Granola. The sweet aroma of ripe peaches mingling with creamy yogurt and the crunch of granola was nothing short of heavenly. It felt like summer captured in a bowl, and I still remember the joy of diving in with a spoon, each layer revealing a new burst of flavor.

When I think about that parfait, I can almost hear the gentle hum of the bees outside, reminding me of the floral notes that honey brings to every bite. The vibrant yellows and soft oranges of the peaches contrast beautifully with the creamy white yogurt and the golden crunch of granola. It’s a dish that not only looks delightful but also tastes like a celebration of fresh, wholesome ingredients.

What makes my version of this Peach Yogurt Parfait special is the careful balance of flavors and textures. I use ripe, juicy peaches, drizzled with locally sourced honey, and a homemade granola that’s bursting with nuts and seeds for an extra crunch. It’s a simple dish, but every layer is crafted with love and attention.

Let me show you exactly how to make this delightful parfait, so you can bring a bit of that summer magic into your kitchen!

Sweet Peach Yogurt Parfait Delight

Why You’ll Love This Recipe

  • Delightfully creamy texture from the Greek yogurt, paired with the juicy sweetness of fresh peaches.
  • Ready in under 20 minutes, making it a quick and satisfying breakfast or snack option.
  • Budget-friendly, using common ingredients that you may already have in your pantry.
  • Customizable with your favorite granola and nuts, allowing you to tailor each parfait to your taste.
  • Perfectly balanced flavors with the bright acidity of lemon juice and the sweetness of honey enhancing the peaches.

Ingredients

  • For the Parfait:
  • 2 cups plain Greek yogurt (or vanilla yogurt for a sweeter option)
  • 2 large ripe peaches, diced (about 2 cups)
  • 1 tablespoon fresh lemon juice (to prevent browning of peaches)
  • 2 tablespoons honey (plus more for drizzling)
  • 1 teaspoon vanilla extract (optional for extra flavor)
  • For the Granola:
  • 1 cup granola (store-bought or homemade; see notes for a simple granola recipe)
  • 1/4 cup sliced almonds (optional for added crunch)
  • 1/4 cup shredded coconut (optional for added flavor)

Let’s dive into some key ingredients that make this Peach Yogurt Parfait so delightful! First, the Greek yogurt is not only creamy but also packed with protein, making it a satisfying option for breakfast or a snack. If you’re looking for a sweeter option, you can easily substitute it with vanilla yogurt, though it may alter the overall flavor balance. Next, the ripe peaches are the star of the show; their natural sweetness shines through, so I recommend choosing peaches that yield slightly to pressure, indicating they’re perfectly ripe. If peaches aren’t in season, feel free to use nectarines or even frozen peaches—just thaw them before use. Finally, honey adds a lovely floral sweetness that ties everything together. If you prefer, maple syrup can serve as a delicious substitute.

Step-by-Step Instructions

  1. Start by preparing the peaches. Wash them thoroughly, then slice and dice them into bite-sized pieces. In a medium bowl, toss the diced peaches with 1 tablespoon of fresh lemon juice to prevent browning. Set aside for about 5 minutes while the lemon juice works its magic.
  2. In a separate bowl, combine the Greek yogurt, 2 tablespoons of honey, and 1 teaspoon of vanilla extract if using. Stir the mixture until smooth and thoroughly blended. This should take about a minute. Avoid overmixing to maintain the creaminess of the yogurt.
  3. Now it’s time to layer your parfait. Grab a clear glass or bowl to showcase your beautiful creation. Start with a generous spoonful of the yogurt mixture at the bottom—about 1/4 cup will do. Use a spoon to spread it evenly.
  4. Add a layer of the diced peaches over the yogurt, ensuring they cover the yogurt completely. You might want to use about half of what you have prepared—roughly 1 cup. This layer should be visually appealing, so arrange the peaches neatly.
  5. Sprinkle 1/4 cup of granola over the peaches. This adds a delightful crunch. Make sure to distribute it evenly to ensure every bite has that satisfying texture. Avoid packing it down too tightly, as you want it to maintain its crunch.
  6. Repeat the layers: spoon in another 1/4 cup of yogurt, followed by another cup of peaches, and another sprinkle of granola. You should have at least two layers, but feel free to add more depending on your glass size.
  7. Finish off your parfait with a drizzle of honey on top for added sweetness and a touch of elegance. If you’re using sliced almonds or shredded coconut, sprinkle them on top now. It adds a lovely visual contrast and extra flavor.
  8. Serve immediately or refrigerate for up to 30 minutes before serving to allow the flavors to meld together. However, I recommend enjoying it fresh to maintain the granola’s crunch.

Pro Tips for the Best Peach Yogurt Parfait With Honey And Granola

  • Make sure to choose ripe peaches for the best flavor and texture. A common mistake is using unripe fruit, which can lead to a less enjoyable parfait. Look for peaches that are fragrant and slightly soft to the touch.
  • Use a clear glass to assemble your parfait; this not only makes for a beautiful presentation but also allows you to see the colorful layers, which adds to the enjoyment of eating it.
  • For an even creamier texture, consider whipping the Greek yogurt with a hand mixer for a couple of minutes before layering. This small adjustment makes a huge difference in mouthfeel.
  • Be mindful of the granola-to-yogurt ratio. Too much granola can overwhelm the parfait, while too little can make it feel too creamy. Aim for about 1/4 cup of granola per layer for the perfect balance.
  • If you’re making this for a gathering, consider preparing the yogurt and peaches ahead of time and layering them just before serving. This ensures the granola stays crunchy!

Variations & Serving Ideas

There are so many ways to get creative with your Peach Yogurt Parfait! For a tropical twist, swap out the peaches for mangoes or pineapples and top with coconut flakes. If you prefer a berry flavor, mix in some blueberries or strawberries with the peaches for added color and taste. For a nutty version, incorporate chopped walnuts or pecans instead of almonds.

As for serving ideas, this parfait pairs beautifully with a side of scrambled eggs for a hearty breakfast or fresh fruit salad for a light lunch. You might also enjoy it alongside whole grain toast with almond butter for an energizing snack. The contrast of flavors and textures will elevate your meal experience!

Storage, Make-Ahead & Reheating

The Peach Yogurt Parfait is best enjoyed fresh, but you can prepare some components ahead of time. Store the layered parfait in an airtight container in the refrigerator for up to 24 hours. However, be cautious; the granola may lose its crunch if stored too long. You can freeze the yogurt and peach mixture for up to 2 months; just remember to thaw it in the refrigerator overnight before serving.

If you plan to enjoy this dish the next day, it can taste even better as the flavors meld together. Just remember to add the granola right before serving to keep its delightful crunch!

Frequently Asked Questions

Can I make Peach Yogurt Parfait With Honey And Granola ahead of time?

Yes — in fact, it tastes even better the next day as the flavors meld. However, I recommend waiting to add the granola until just before serving to maintain its crunch.

What can I substitute for Greek yogurt?

If you prefer a lighter option, you can substitute Greek yogurt with regular yogurt or a dairy-free alternative like coconut yogurt. Just remember that this may alter the creaminess and flavor profile slightly.

Can I use frozen peaches for this parfait?

Absolutely! Just make sure to thaw the frozen peaches before using them. They will still add great flavor, though the texture may be slightly softer than fresh peaches.

How do I make the parfait vegan?

To make a vegan version, substitute the Greek yogurt with a plant-based yogurt alternative, and replace honey with maple syrup or agave nectar. This keeps the parfait sweet while adhering to a vegan diet.

What other fruits can I use in this recipe?

You can mix and match fruits based on your preference. Try using strawberries, blueberries, raspberries, or even bananas. Just make sure to adjust the lemon juice as needed to prevent browning.

Sweet Peach Yogurt Parfait Delight

Final Thoughts

The Peach Yogurt Parfait with Honey and Granola is a delightful blend of creamy yogurt, sweet peaches, and crunchy granola that creates a satisfying and nourishing treat. Each layer bursts with flavor, making it a perfect choice for breakfast or a light dessert.

This is the kind of recipe I come back to again and again, especially when I want something refreshing and wholesome to start my day. The harmony of sweet and tart flavors, combined with the delightful crunch, never fails to lift my spirits!

I encourage you to give this parfait a try and indulge in its comforting goodness. Feel free to share your results or even add your own twist—perhaps a sprinkle of cinnamon or a handful of nuts. Enjoy creating your perfect parfait!

Print
clock clock iconcutlery cutlery iconflag flag iconfolder folder iconinstagram instagram iconpinterest pinterest iconfacebook facebook iconprint print iconsquares squares iconheart heart iconheart solid heart solid icon

Peach Yogurt Parfait


  • Author: Lily author
  • Total Time: 15 minutes
  • Yield: 4 servings 1x
Pin Recipe
Print Recipe

Description

This Peach Yogurt Parfait combines creamy Greek yogurt, juicy peaches, and crunchy granola for a delightful treat. It’s a perfect breakfast or snack that captures the essence of summer in every bite.


Ingredients

Scale
  • For the Parfait:
  • 2 cups plain Greek yogurt (or vanilla yogurt for a sweeter option)
  • 2 large ripe peaches, diced (about 2 cups)
  • 1 tablespoon fresh lemon juice (to prevent browning of peaches)
  • 2 tablespoons honey (plus more for drizzling)
  • 1 teaspoon vanilla extract (optional for extra flavor)
  • For the Granola:
  • 1 cup granola (store-bought or homemade; see notes for a simple granola recipe)
  • 1/4 cup sliced almonds (optional for added crunch)
  • 1/4 cup shredded coconut (optional for added flavor)

Instructions

  1. Start by preparing the peaches. Wash them thoroughly, then slice and dice them into bite-sized pieces. In a medium bowl, toss the diced peaches with 1 tablespoon of fresh lemon juice to prevent browning. Set aside for about 5 minutes while the lemon juice works its magic.
  2. In a separate bowl, combine the Greek yogurt, 2 tablespoons of honey, and 1 teaspoon of vanilla extract if using. Stir the mixture until smooth and thoroughly blended. This should take about a minute. Avoid overmixing to maintain the creaminess of the yogurt.
  3. Now it’s time to layer your parfait. Grab a clear glass or bowl to showcase your beautiful creation. Start with a generous spoonful of the yogurt mixture at the bottom—about 1/4 cup will do. Use a spoon to spread it evenly.
  4. Add a layer of the diced peaches over the yogurt, ensuring they cover the yogurt completely. You might want to use about half of what you have prepared—roughly 1 cup. This layer should be visually appealing, so arrange the peaches neatly.
  5. Sprinkle 1/4 cup of granola over the peaches. This adds a delightful crunch. Make sure to distribute it evenly to ensure every bite has that satisfying texture. Avoid packing it down too tightly, as you want it to maintain its crunch.
  6. Repeat the layers: spoon in another 1/4 cup of yogurt, followed by another cup of peaches, and another sprinkle of granola. You should have at least two layers, but feel free to add more depending on your glass size.
  7. Finish off your parfait with a drizzle of honey on top for added sweetness and a touch of elegance. If you’re using sliced almonds or shredded coconut, sprinkle them on top now. It adds a lovely visual contrast and extra flavor.
  8. Serve immediately or refrigerate for up to 30 minutes before serving to allow the flavors to meld together. However, I recommend enjoying it fresh to maintain the granola’s crunch.
  • Prep Time: 15 mins
  • Cook Time: 0 mins
  • Category: Breakfast
  • Method: No-cook
  • Cuisine: American

Nutrition

  • Serving Size: 1 parfait
  • Calories: 250
  • Sugar: 20 g
  • Sodium: 50 mg
  • Fat: 5 g
  • Saturated Fat: 2 g
  • Unsaturated Fat: 3 g
  • Trans Fat: 0 g
  • Carbohydrates: 40 g
  • Fiber: 3 g
  • Protein: 10 g
  • Cholesterol: 10 mg

Keywords: Choose ripe peaches for the best flavor and texture. Use a clear glass for a beautiful presentation. For creaminess, consider whipping the yogurt before layering. Be mindful of the granola-to-yogurt ratio. Prepare yogurt and peaches ahead of time for gatherings, layering just before serving.

Did you make this recipe?

Share a photo and tag us — we can't wait to see what you've made!

Sun-Kissed Frozen Orange Cream Slush

As a child, summer days felt like they lasted forever. I remember the sticky heat wrapping around me as I played outside, my laughter mingling with the sounds of the neighborhood. But nothing could cool me down quite like the moment I’d spot my grandmother, laboring over her blender, whipping up her famous Frozen Orange Creamsicle Slush. That vibrant orange treat, with its frosty texture and sweet citrus aroma, was like a burst of sunshine in a cup. Just one sip, and I could feel the coolness wash over me, sparking pure joy.

This Frozen Orange Creamsicle Slush has a way of making you feel like a kid again. Its creamy, dreamy consistency is a delightful balance of bright orange and soft vanilla, inviting you to dive right in. The refreshing tang of orange dances on your tongue, while the smooth creaminess envelops you in a comforting embrace. It’s a nostalgic treat that’s perfect for hot summer afternoons or anytime you need a little pick-me-up.

What makes my version of this slush stand out is the addition of a hint of vanilla bean, which elevates the flavor and adds an extra layer of richness. Plus, it’s super easy to whip up with just a few simple ingredients that you probably already have on hand! So, if you’re ready to relive those sun-soaked memories, let me show you exactly how to make it.

Sun-Kissed Frozen Orange Cream Slush

Why You’ll Love This Recipe

  • Each slush is a perfect blend of creamy vanilla and zesty orange, creating a nostalgic flavor reminiscent of summer days.
  • This refreshing treat is ready in under 15 minutes, making it an ideal quick dessert for unexpected guests or hot afternoons.
  • With just 8 simple ingredients, it’s budget-friendly, ensuring you don’t have to break the bank to enjoy a delicious slush.
  • The slush has a perfectly smooth texture, thanks to the combination of ice and ice cream, providing a delightful contrast to the bright citrus flavors.
  • It’s highly customizable; you can easily adjust the sweetness and add fresh herbs for a unique twist that suits your taste.

Ingredients

  • 2 cups orange juice (freshly squeezed or store-bought)
  • 1 cup vanilla ice cream
  • 1 cup crushed ice
  • 1/2 cup milk (whole or 2%)
  • 1/4 cup granulated sugar (adjust based on sweetness preference)
  • 1 teaspoon vanilla extract
  • Zest of 1 orange (for added flavor)
  • Fresh orange slices and mint leaves (for garnish)

The star of this Frozen Orange Creamsicle Slush is the orange juice, which provides the vibrant, citrusy base. Freshly squeezed juice will yield the brightest flavor, but store-bought options can be just as convenient. If you’re opting for store-bought, choose 100% pure juice with no added sugars for the best results. Another essential ingredient is the vanilla ice cream; it adds creaminess and sweetness. You can substitute it with dairy-free ice cream if you’re looking for a vegan option. Whole or 2% milk complements the ice cream, creating a smooth blend. If you want a lower-calorie version, almond or oat milk can be good alternatives.

Lastly, the granulated sugar can be adjusted based on your sweetness preference. If you prefer a more natural sweetener, consider using honey or agave syrup. The orange zest enhances the flavor profile, providing an aromatic pop that brings the whole slush together. Don’t skip it! It adds an extra layer of brightness that makes this slush truly special.

Step-by-Step Instructions

  1. Start by preparing your ingredients. Gather 2 cups of orange juice, 1 cup of vanilla ice cream, and 1 cup of crushed ice. Make sure the ice is finely crushed, as larger chunks can make blending difficult.
  2. In a blender, combine the orange juice, vanilla ice cream, crushed ice, and 1/2 cup of milk. Add 1/4 cup of granulated sugar and 1 teaspoon of vanilla extract. If you like a sweeter slush, consider adding a bit more sugar at this stage.
  3. Add the zest of 1 orange to the blender. This step is crucial for enhancing the citrus flavor of your slush. Make sure not to include the bitter white pith—only the flavorful zest.
  4. Blend the mixture on medium-high speed for about 30-45 seconds. Stop once the ingredients are fully combined and the slush has a smooth, even consistency. If you notice large chunks of ice, blend for an additional 10-15 seconds. Avoid over-blending, as this can make the slush too liquidy.
  5. Once blended, taste the slush. If it needs more sweetness, add a little more sugar and blend for a few more seconds. If it’s too thick, you can add a splash of milk to reach your desired consistency.
  6. Pour the slush into glasses. This recipe typically serves 4, but you can easily double it for larger gatherings. Use a spoon to help guide the slush into the glasses if needed.
  7. Garnish each serving with fresh orange slices and mint leaves. The mint not only adds a pop of color but also a refreshing aroma that complements the citrus flavors beautifully.
  8. Serve immediately and enjoy! If you’ve made extra, you can refrigerate it for a short time, but it’s best enjoyed fresh.

Pro Tips for the Best Frozen Orange Creamsicle Slush

  • Don’t skip the orange zest! It’s a game-changer for flavor. Always zest before juicing to make it easier.
  • Use a high-powered blender for the best texture. A standard blender may struggle with ice, leading to uneven consistency. If you have a food processor, that can work too, but ensure the ice is finely crushed.
  • Adjust the ice-to-liquid ratio carefully. If your slush is too thick, it won’t blend well. Start with less ice and add more until you reach your preferred texture.
  • Be cautious with the sugar! Always start with the lower amount, as you can easily add more, but it’s hard to fix an overly sweet slush.
  • For a fun twist, consider adding a splash of coconut milk or a handful of fresh fruit like strawberries or pineapple. This not only enhances the flavor but also adds a beautiful color contrast.

Variations & Serving Ideas

There are countless ways to put a spin on your Frozen Orange Creamsicle Slush. Consider making a tropical version by adding in some pineapple juice or coconut milk for a delightful tropical twist. If you’re feeling adventurous, try incorporating a handful of frozen mango or peach slices for added sweetness. For a lighter version, swap out the vanilla ice cream for Greek yogurt for a creamy yet tangy alternative.

As for serving ideas, this refreshing slush pairs wonderfully with light summer dishes like grilled chicken skewers, fish tacos, or a simple salad topped with citrus vinaigrette. The bright, zesty flavors of the slush complement these dishes perfectly, making them an ideal pairing for a sunny day.

Storage, Make-Ahead & Reheating

This Frozen Orange Creamsicle Slush is best enjoyed fresh, but if you have leftovers, you can store them in an airtight container in the fridge for up to 2 days. Just keep in mind that the slush may lose some of its texture over time as the ice melts. It doesn’t freeze well, as the ice will turn into a solid block. If you must freeze it, blend again after thawing to restore the slushy consistency. This treat is best the day you make it, as the flavors meld together beautifully overnight, enhancing its deliciousness.

Frequently Asked Questions

Can I make Frozen Orange Creamsicle Slush ahead of time?

Yes — in fact, it tastes even better the next day as the flavors meld. However, it’s best to enjoy it fresh, as the texture can change if stored for too long. If you need to prepare it ahead, keep it in the fridge and re-blend before serving.

What kind of orange juice should I use?

For the best flavor, use freshly squeezed orange juice. However, if you’re short on time, opt for 100% pure store-bought juice without added sugars. This will ensure that your slush remains flavorful and refreshing.

Can I substitute the vanilla ice cream?

Absolutely! If you’re looking for a dairy-free option, coconut milk ice cream or a non-dairy vanilla ice cream can work wonderfully. They will still provide the creamy texture and sweetness you desire.

How can I adjust the sweetness of my slush?

You can easily adjust the sweetness by modifying the amount of sugar added. Start with 1/4 cup and taste the mixture before blending. If you prefer it sweeter, add more sugar gradually until it reaches your desired level.

What should I do if my slush is too thick?

If your slush is too thick, simply add a splash of milk or orange juice and blend again. This will help achieve a more drinkable consistency while maintaining the slushy texture. Adjust gradually to reach your preferred thickness.

Sun-Kissed Frozen Orange Cream Slush

Final Thoughts

The Frozen Orange Creamsicle Slush is a delightful blend of refreshing citrus and creamy goodness, making it a perfect treat for warm days or any time you crave a taste of nostalgia. The way the bright orange flavor dances with the creamy texture truly elevates this slush, transforming it into a satisfying escape from the everyday.

This is the kind of recipe I come back to again and again, especially when I’m looking to cool down or impress guests at a summer gathering. It’s simple to make and always brings smiles all around! I encourage you to try this recipe for yourself—don’t hesitate to share your results or even put your own spin on it. Happy slushing!

Print
clock clock iconcutlery cutlery iconflag flag iconfolder folder iconinstagram instagram iconpinterest pinterest iconfacebook facebook iconprint print iconsquares squares iconheart heart iconheart solid heart solid icon

Frozen Orange Creamsicle Slush


  • Author: Lily author
  • Total Time: 15 minutes
  • Yield: 4 servings 1x
Pin Recipe
Print Recipe

Description

This Frozen Orange Creamsicle Slush is a refreshing treat that combines creamy vanilla and zesty orange flavors. Perfect for hot summer days, it brings back nostalgic memories with every sip.


Ingredients

Scale
  • 2 cups orange juice (freshly squeezed or store-bought)
  • 1 cup vanilla ice cream
  • 1 cup crushed ice
  • 1/2 cup milk (whole or 2%)
  • 1/4 cup granulated sugar (adjust based on sweetness preference)
  • 1 teaspoon vanilla extract
  • Zest of 1 orange (for added flavor)
  • Fresh orange slices and mint leaves (for garnish)

Instructions

  1. Start by preparing your ingredients. Gather 2 cups of orange juice, 1 cup of vanilla ice cream, and 1 cup of crushed ice. Make sure the ice is finely crushed, as larger chunks can make blending difficult.
  2. In a blender, combine the orange juice, vanilla ice cream, crushed ice, and 1/2 cup of milk. Add 1/4 cup of granulated sugar and 1 teaspoon of vanilla extract. If you like a sweeter slush, consider adding a bit more sugar at this stage.
  3. Add the zest of 1 orange to the blender. This step is crucial for enhancing the citrus flavor of your slush. Make sure not to include the bitter white pith—only the flavorful zest.
  4. Blend the mixture on medium-high speed for about 30-45 seconds. Stop once the ingredients are fully combined and the slush has a smooth, even consistency. If you notice large chunks of ice, blend for an additional 10-15 seconds. Avoid over-blending, as this can make the slush too liquidy.
  5. Once blended, taste the slush. If it needs more sweetness, add a little more sugar and blend for a few more seconds. If it’s too thick, you can add a splash of milk to reach your desired consistency.
  6. Pour the slush into glasses. This recipe typically serves 4, but you can easily double it for larger gatherings. Use a spoon to help guide the slush into the glasses if needed.
  7. Garnish each serving with fresh orange slices and mint leaves. The mint not only adds a pop of color but also a refreshing aroma that complements the citrus flavors beautifully.
  8. Serve immediately and enjoy! If you’ve made extra, you can refrigerate it for a short time, but it's best enjoyed fresh.
  • Prep Time: 15 min
  • Cook Time: 0 min
  • Category: Dessert
  • Method: Blending
  • Cuisine: American

Nutrition

  • Serving Size: 1 serving
  • Calories: 200
  • Sugar: 30 g
  • Sodium: 50 mg
  • Fat: 5 g
  • Saturated Fat: 3 g
  • Unsaturated Fat: 2 g
  • Trans Fat: 0 g
  • Carbohydrates: 40 g
  • Fiber: 1 g
  • Protein: 2 g
  • Cholesterol: 20 mg

Keywords: Don't skip the orange zest! It's a game-changer for flavor. Always zest before juicing to make it easier.

Did you make this recipe?

Share a photo and tag us — we can't wait to see what you've made!

Zesty Lemon Poppy Seed Delight

One rainy afternoon, I found myself in my grandmother’s cozy kitchen, the kind that always smelled like warmth and love. She was whipping up her famous Lemon Poppy Seed Loaf, a recipe that had been passed down through generations. As the batter came together, the zesty aroma of fresh lemons filled the air, mingling perfectly with the nutty fragrance of poppy seeds. I can still picture her, apron-clad, as she expertly drizzled a vibrant citrus icing over the loaf, creating a glossy, sun-kissed finish that beckoned us to dive in. It was a moment that sparked my own passion for baking, and this recipe has become a cherished staple in my home ever since.

When you take a bite of this Lemon Poppy Seed Loaf, it’s like a burst of sunshine on your palate. The loaf is beautifully golden, with a tender crumb that melts in your mouth. Each slice is speckled with tiny poppy seeds, adding a delightful crunch that contrasts beautifully with the tangy sweetness of the lemon. And that citrus icing? It’s the finishing touch that elevates this loaf from ordinary to extraordinary, with its bright, zesty flavor dancing on your taste buds.

This recipe stands out because it embraces simplicity while delivering on flavor. I’ve added a hint of vanilla to the batter, enhancing the overall taste and making it even more indulgent. Trust me, once you make this Lemon Poppy Seed Loaf With Citrus Icing, it’ll become a go-to in your baking repertoire.

So, let me show you exactly how to make it!

Zesty Lemon Poppy Seed Delight

Why You’ll Love This Recipe

  • Moist and tender crumb that melts in your mouth, thanks to the perfect balance of butter and buttermilk.
  • Bright, zesty lemon flavor paired with crunchy poppy seeds, creating a delightful texture and taste experience.
  • Easy to whip up in just about an hour, perfect for last-minute gatherings or a cozy afternoon treat.
  • Budget-friendly with everyday ingredients, making it an accessible option for all home bakers.
  • The citrus icing adds a sweet tang that elevates the loaf, turning a simple recipe into a showstopper!

Ingredients

  • 1 ½ cups (190g) all-purpose flour
  • 1 teaspoon baking powder
  • ½ teaspoon baking soda
  • ½ teaspoon salt
  • 3 tablespoons poppy seeds
  • ½ cup (115g) unsalted butter, softened to room temperature
  • 1 cup (200g) granulated sugar
  • 2 large eggs
  • 1 teaspoon vanilla extract
  • 1 teaspoon lemon zest (from about 1 medium lemon)
  • ½ cup (120ml) buttermilk
  • 2 tablespoons fresh lemon juice

For the Citrus Icing:

  • 1 cup (120g) powdered sugar
  • 2 tablespoons fresh lemon juice
  • 1 tablespoon orange juice
  • 1 teaspoon lemon zest (for garnish, optional)

Let’s dive into the key ingredients that make this Lemon Poppy Seed Loaf so special. The all-purpose flour provides the structure and base for the loaf, while the baking powder and baking soda ensure it rises perfectly, giving the loaf a light texture. For a gluten-free variation, you could substitute the flour with a gluten-free all-purpose blend. Poppy seeds not only add a delightful crunch but also contribute to the unique flavor profile that pairs well with the citrus notes.

Unsalted butter is crucial for achieving the buttery richness that makes this loaf so moist. If you’re looking for a dairy-free option, coconut oil or a vegan butter can be used instead. The buttermilk is another essential component, providing acidity that activates the baking soda for a fluffy texture. If you don’t have buttermilk on hand, you can easily make a substitute by mixing ½ cup of milk with 1 tablespoon of vinegar or lemon juice and letting it sit for about 5 minutes.

Step-by-Step Instructions

  1. Preheat your oven to 350°F (175°C). Grease a 9×5-inch loaf pan or line it with parchment paper for easy removal later.
  2. In a medium mixing bowl, whisk together 1 ½ cups of all-purpose flour, 1 teaspoon of baking powder, ½ teaspoon of baking soda, ½ teaspoon of salt, and 3 tablespoons of poppy seeds. This helps to evenly distribute the baking agents and ensures a uniform rise.
  3. In a large mixing bowl, cream together ½ cup of softened unsalted butter and 1 cup of granulated sugar using an electric mixer on medium speed for about 3-4 minutes, until the mixture is light and fluffy. Make sure to scrape down the sides of the bowl occasionally.
  4. Add 2 large eggs, 1 teaspoon of vanilla extract, and 1 teaspoon of lemon zest to the creamed butter and sugar, mixing until fully combined. You want a smooth consistency, so ensure there are no lumps of butter.
  5. In a small bowl, combine ½ cup of buttermilk and 2 tablespoons of fresh lemon juice. Alternately add the dry ingredients and buttermilk mixture to the butter mixture, starting and ending with the dry ingredients. Mix just until combined; do not overmix, as this can lead to a dense loaf.
  6. Pour the batter into the prepared loaf pan. Smooth the top with a spatula, ensuring it’s even. Bake in the preheated oven for 50-60 minutes, or until a toothpick inserted in the center comes out clean. The edges should be lightly golden brown, and the center should feel just set.
  7. Once baked, remove the loaf from the oven and allow it to cool in the pan for about 10 minutes. Then, transfer it to a wire rack to cool completely. Resist the urge to slice too soon, as it will be crumbly if it’s still warm.
  8. While the loaf is cooling, prepare the citrus icing. In a medium bowl, whisk together 1 cup of powdered sugar, 2 tablespoons of fresh lemon juice, and 1 tablespoon of orange juice until smooth. If the icing is too thick, you can add a little more juice to reach your desired consistency.
  9. Once the loaf is completely cool, drizzle the citrus icing over the top. If you like, sprinkle with an additional teaspoon of lemon zest for an extra pop of flavor and color.

Pro Tips for the Best Lemon Poppy Seed Loaf With Citrus Icing

  • Be careful not to overmix your batter; this is a common mistake that can lead to a dense loaf. Mix just until the dry ingredients are incorporated for a light and fluffy texture.
  • Use room temperature ingredients, especially the butter and eggs. This helps to create a smoother batter and ensures even baking. Take your eggs out of the fridge about 30 minutes before you start.
  • For a more pronounced lemon flavor, consider adding a little lemon extract in addition to the zest and juice. Just a half teaspoon can elevate the citrus notes significantly.
  • When measuring your flour, spoon it into the measuring cup and level it off with a knife instead of scooping directly from the bag. This prevents packing and ensures you don’t end up with a dry loaf.
  • Invest in a good quality loaf pan; it makes a difference in heat distribution, which ensures even baking. If your pan is dark-coated, reduce the oven temperature by 25°F to prevent over-browning.

Variations & Serving Ideas

For a delightful twist, consider adding blueberries or raspberries to the batter for a fruity burst of flavor. You can also experiment with different citrus fruits—try lime or grapefruit zest and juice for a refreshing change. For a healthier option, substitute half of the all-purpose flour with whole wheat flour for added fiber without compromising too much on texture.

This Lemon Poppy Seed Loaf pairs beautifully with a light salad, such as a mixed greens salad with a vinaigrette, or a cup of tea for a cozy afternoon treat. It also complements a creamy cheese platter, as the acidity of the loaf balances rich cheeses perfectly. Lastly, a scoop of vanilla ice cream on the side creates a delightful contrast of temperatures and flavors!

Storage, Make-Ahead & Reheating

This Lemon Poppy Seed Loaf can be stored at room temperature for up to 3 days if wrapped tightly in plastic wrap. If you want to keep it longer, it freezes well for up to 3 months. To freeze, wrap the loaf tightly in plastic wrap and then in aluminum foil to prevent freezer burn.

When you’re ready to enjoy it again, simply thaw it in the fridge overnight. Reheat individual slices in the microwave for 15-20 seconds or in a toaster oven until warmed through. Interestingly, many people find that this loaf tastes even better the next day, as the flavors have time to meld!

Frequently Asked Questions

Can I make Lemon Poppy Seed Loaf With Citrus Icing ahead of time?

Yes — in fact, it tastes even better the next day! You can make the loaf a day in advance, allowing the flavors to develop. Just be sure to store it in an airtight container to maintain its moisture.

Can I substitute the poppy seeds?

Absolutely! If you don’t have poppy seeds on hand or prefer an alternative, you can use sesame seeds for a similar crunch or omit them entirely for a smooth loaf.

What can I use instead of buttermilk?

If you don’t have buttermilk, you can easily create a substitute by mixing ½ cup of milk (dairy or plant-based) with 1 tablespoon of vinegar or lemon juice. Let it sit for 5 minutes before using in the recipe.

How can I make this recipe gluten-free?

To make a gluten-free version of this Lemon Poppy Seed Loaf, substitute the all-purpose flour with a gluten-free all-purpose flour blend. Just ensure that the blend contains a binding agent like xanthan gum for the best results.

What is the best way to store leftover loaf?

Leftover Lemon Poppy Seed Loaf should be stored in an airtight container at room temperature for up to 3 days. For longer storage, wrap it tightly and freeze for up to 3 months. Thaw it before serving for the best texture.

Zesty Lemon Poppy Seed Delight

Final Thoughts

The Lemon Poppy Seed Loaf with Citrus Icing is truly a delightful treat that brings a burst of brightness to any occasion. The zesty lemon flavor combined with the subtle crunch of poppy seeds creates a satisfying balance, while the citrus icing adds a touch of sweetness that perfectly complements the loaf’s tanginess.

This is the kind of recipe I come back to again and again, especially when I want to brighten up a gloomy day or celebrate a small victory. The aroma that fills the kitchen as it bakes is absolutely heavenly! I encourage you to give this recipe a try; you might just find it becoming a beloved staple in your home. Don’t forget to share your results or even add your own unique twist—I can’t wait to see what you create!

Print
clock clock iconcutlery cutlery iconflag flag iconfolder folder iconinstagram instagram iconpinterest pinterest iconfacebook facebook iconprint print iconsquares squares iconheart heart iconheart solid heart solid icon

Lemon Poppy Seed Loaf


  • Author: Lily author
  • Total Time: 39 minute
  • Yield: 1 loaf 1x
Pin Recipe
Print Recipe

Description

This Lemon Poppy Seed Loaf is a delightful treat that combines zesty lemon flavor with crunchy poppy seeds. Topped with a citrus icing, it’s perfect for any occasion.


Ingredients

Scale
  • 1 ½ cups (190g) all-purpose flour
  • 1 teaspoon baking powder
  • ½ teaspoon baking soda
  • ½ teaspoon salt
  • 3 tablespoons poppy seeds
  • ½ cup (115g) unsalted butter, softened to room temperature
  • 1 cup (200g) granulated sugar
  • 2 large eggs
  • 1 teaspoon vanilla extract
  • 1 teaspoon lemon zest (from about 1 medium lemon)
  • ½ cup (120ml) buttermilk
  • 2 tablespoons fresh lemon juice
  • 1 cup (120g) powdered sugar
  • 2 tablespoons fresh lemon juice
  • 1 tablespoon orange juice
  • 1 teaspoon lemon zest (for garnish, optional)

Instructions

  1. Preheat your oven to 350°F (175°C). Grease a 9×5-inch loaf pan or line it with parchment paper for easy removal later.
  2. In a medium mixing bowl, whisk together 1 ½ cups of all-purpose flour, 1 teaspoon of baking powder, ½ teaspoon of baking soda, ½ teaspoon of salt, and 3 tablespoons of poppy seeds. This helps to evenly distribute the baking agents and ensures a uniform rise.
  3. In a large mixing bowl, cream together ½ cup of softened unsalted butter and 1 cup of granulated sugar using an electric mixer on medium speed for about 3-4 minutes, until the mixture is light and fluffy. Make sure to scrape down the sides of the bowl occasionally.
  4. Add 2 large eggs, 1 teaspoon of vanilla extract, and 1 teaspoon of lemon zest to the creamed butter and sugar, mixing until fully combined. You want a smooth consistency, so ensure there are no lumps of butter.
  5. In a small bowl, combine ½ cup of buttermilk and 2 tablespoons of fresh lemon juice. Alternately add the dry ingredients and buttermilk mixture to the butter mixture, starting and ending with the dry ingredients. Mix just until combined; do not overmix, as this can lead to a dense loaf.
  6. Pour the batter into the prepared loaf pan. Smooth the top with a spatula, ensuring it’s even. Bake in the preheated oven for 50-60 minutes, or until a toothpick inserted in the center comes out clean. The edges should be lightly golden brown, and the center should feel just set.
  7. Once baked, remove the loaf from the oven and allow it to cool in the pan for about 10 minutes. Then, transfer it to a wire rack to cool completely. Resist the urge to slice too soon, as it will be crumbly if it’s still warm.
  8. While the loaf is cooling, prepare the citrus icing. In a medium bowl, whisk together 1 cup of powdered sugar, 2 tablespoons of fresh lemon juice, and 1 tablespoon of orange juice until smooth. If the icing is too thick, you can add a little more juice to reach your desired consistency.
  9. Once the loaf is completely cool, drizzle the citrus icing over the top. If you like, sprinkle with an additional teaspoon of lemon zest for an extra pop of flavor and color.
  • Prep Time: 15 mins
  • Cook Time: 50-60 mins
  • Category: Dessert
  • Method: Baking
  • Cuisine: American

Nutrition

  • Serving Size: 1 slice
  • Calories: 200
  • Sugar: 15 g
  • Sodium: 150 mg
  • Fat: 8 g
  • Saturated Fat: 5 g
  • Unsaturated Fat: 3 g
  • Trans Fat: 0 g
  • Carbohydrates: 30 g
  • Fiber: 1 g
  • Protein: 3 g
  • Cholesterol: 40 mg

Keywords: Be careful not to overmix your batter; this is a common mistake that can lead to a dense loaf. Use room temperature ingredients for a smoother batter and even baking.

Did you make this recipe?

Share a photo and tag us — we can't wait to see what you've made!

  • Privacy Policy
  • Terms Of Service
  • Contact
  • About
  • GDPR

Copyright © 2025 Homesmad