• Skip to primary navigation
  • Skip to main content
  • Skip to primary sidebar
Homesmad

Homesmad

  • Home
  • Breakfast & Brunch
  • Appetizers & Snacks
  • Dinner
  • Dessert
  • About
  • Privacy Policy
  • Contact
Homesmad
  • Home
  • Breakfast & Brunch
  • Appetizers & Snacks
  • Dinner
  • Dessert
  • About
  • Privacy Policy
  • Contact

Cheesy Garlic Chicken Wraps: Easy & Flavorful Recipe!

September 28, 2025 by Lily author

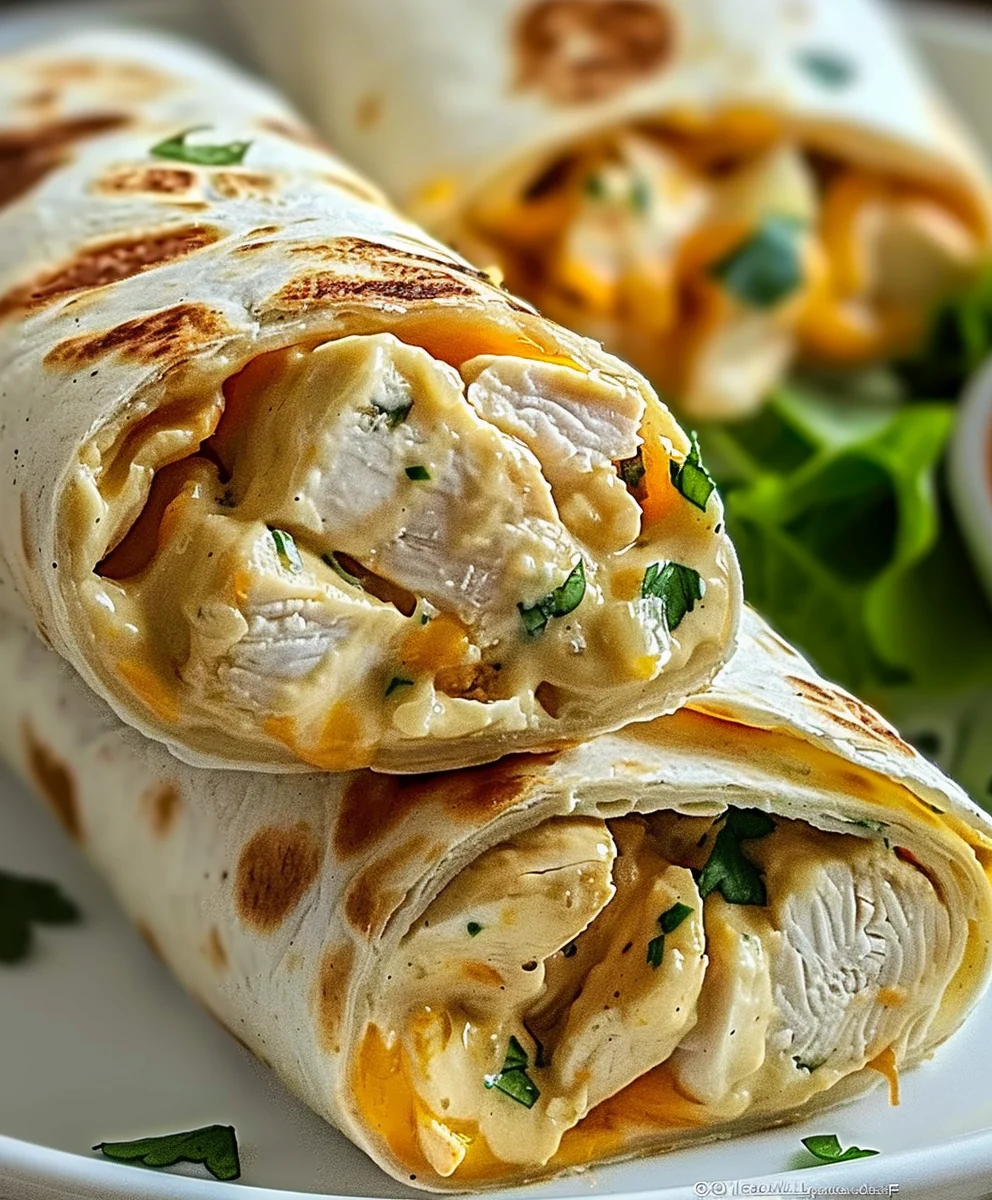
Cheesy Garlic Chicken Wraps? a title that truly promises an explosion of flavor and comfort in every single bite. Have you ever found yourself craving a meal that perfectly balances indulgent taste with incredible convenience? We certainly understand that feeling of wanting something truly satisfying after a long day, something that brings immense joy without demanding hours of effort in the kitchen.

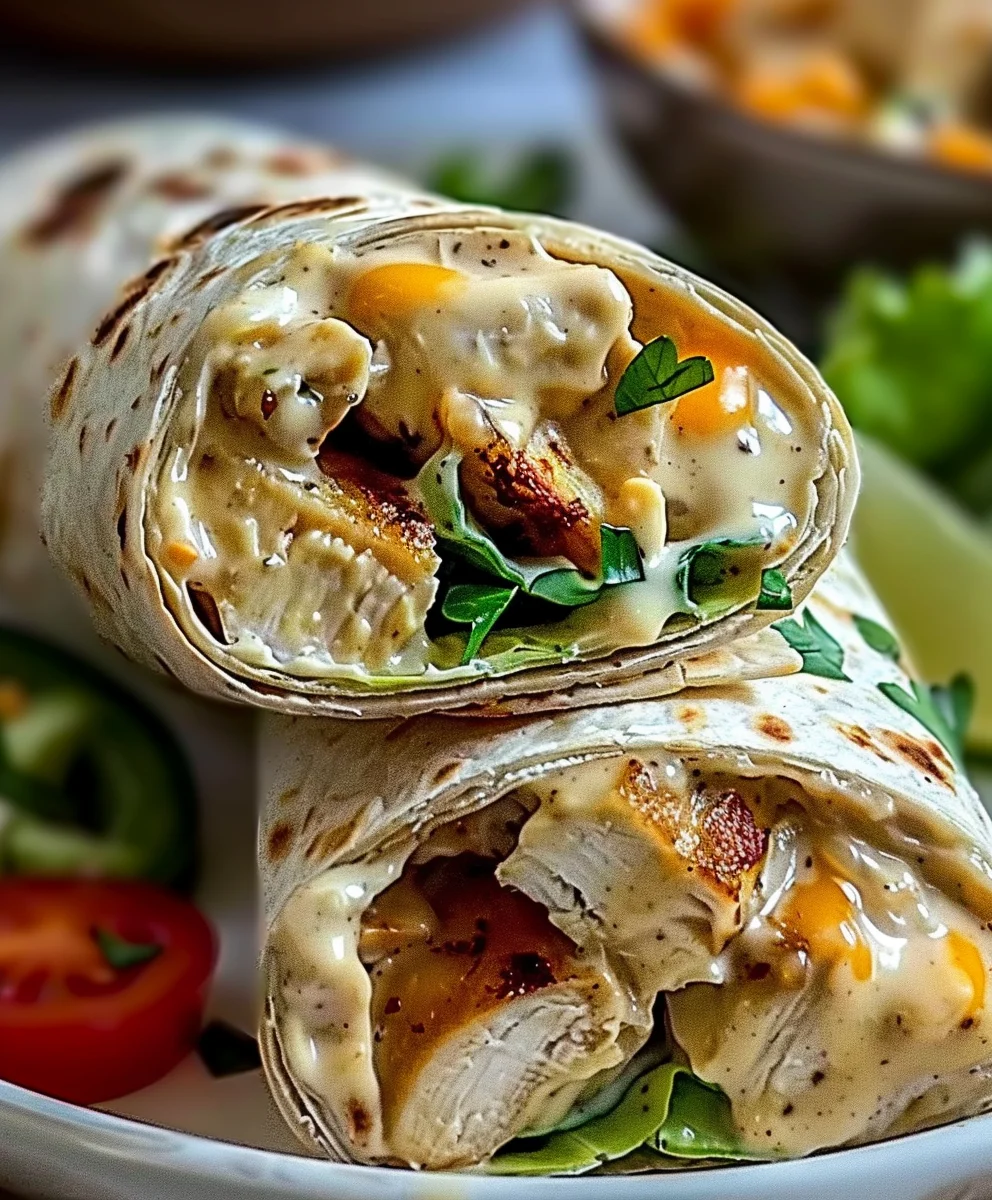
Imagine sinking your teeth into tender, perfectly seasoned chicken, enveloped in a warm, soft tortilla, generously coated with a rich, molten layer of garlic-infused cheese.

It’s a culinary dream brought to life! While the humble wrap has deep roots in various global culinary traditions, evolving from simple flatbreads to the versatile modern meal we know and love today, the combination of savory chicken, aromatic garlic, and gooey cheese is a timeless crowd-pleaser that effortlessly transcends borders. This particular rendition elevates a classic concept into something truly special and memorable. People adore this dish not just for its undeniable deliciousness – the savory depth of garlic, the creamy richness of melted cheese, and the succulent texture of chicken – but also for its remarkable versatility and ease of preparation. Whether you’re planning a quick weeknight dinner, a portable lunch, or a delightful snack, our guide to these cheesy garlic chicken wraps ensures a culinary experience you’ll want to revisit again and again. Get ready to discover your new go-to comfort food that perfectly ticks all the boxes!

Cheesy Garlic Chicken Wraps: Easy & Flavorful Recipe! this RECIPE

Ingredients:

  • For the Chicken:
    • 1.5 pounds boneless, skinless chicken breasts, about 3-4 medium-sized breasts. I like to choose ones of similar thickness for even cooking.
    • 2 tablespoons olive oil, plus extra for cooking.
    • 4 cloves garlic, minced very finely or grated. Fresh garlic is absolutely essential here for that vibrant flavor in our cheesy garlic chicken wraps!
    • 1 teaspoon smoked paprika. This adds a lovely depth and a hint of color.
    • ½ teaspoon dried oregano.
    • ¼ teaspoon black pepper, freshly ground if possible.
    • ½ teaspoon salt, or to taste.
  • For the Cheesy Garlic Sauce:
    • 2 tablespoons unsalted butter.
    • 2 tablespoons all-purpose flour.
    • 1 ½ cups whole milk, warmed slightly (this helps prevent lumps).
    • 4 cloves garlic, minced very finely. Yes, more garlic! It’s what makes these wraps truly special.
    • 4 ounces cream cheese, softened to room temperature.
    • 1 cup shredded mozzarella cheese.
    • ½ cup shredded cheddar cheese.
    • ¼ cup grated Parmesan cheese.
    • 2 tablespoons fresh parsley, chopped, for garnish and flavor.
    • ¼ teaspoon salt, or to taste.
    • ⅛ teaspoon black pepper, or to taste.
    • Pinch of red pepper flakes (optional, for a subtle kick).
  • For the Wraps & Fillings:
    • 8 large flour tortillas, approximately 10-inch diameter. Choose good quality, flexible tortillas that won’t tear when you roll them.
    • 2 cups shredded romaine lettuce, or mixed greens.
    • 1 large ripe tomato, diced or sliced thinly.
    • ½ red onion, thinly sliced (optional, but adds a nice crunch and bite).
    • Optional additions: Pickled jalapeños for a kick, or a few slices of avocado for creaminess.

Prepping the Chicken for our Cheesy Garlic Chicken Wraps

  1. Prepare the Chicken Breasts: First things first, let’s get our chicken ready. Place your boneless, skinless chicken breasts on a clean cutting board. Using a sharp knife, carefully slice each chicken breast horizontally into thinner cutlets, about ½-inch thick. Depending on the size of your breasts, you might get two or three cutlets from each. The goal here is uniform thickness, which ensures quick and even cooking, preventing dry spots and allowing the marinade to penetrate more effectively. If some pieces are significantly thicker, you can gently pound them between two pieces of plastic wrap with a meat mallet or the bottom of a heavy pan until they are about ½-inch thick. This tenderizes the meat beautifully.
  2. Create the Marinade: In a medium bowl, combine 2 tablespoons of olive oil, 4 cloves of finely minced garlic, 1 teaspoon of smoked paprika, ½ teaspoon of dried oregano, ¼ teaspoon of black pepper, and ½ teaspoon of salt. Give this a good stir until all the spices are well incorporated with the oil. The aroma of this simple marinade is already promising!
  3. Marinate the Chicken: Add the prepared chicken cutlets to the bowl with the marinade. Use your hands, or a spoon, to toss the chicken thoroughly, ensuring every piece is coated evenly with the fragrant mixture. Make sure each piece is glistening with the marinade. Cover the bowl with plastic wrap and refrigerate for at least 30 minutes. If you have more time, you can marinate it for up to 2 hours for even deeper flavor, but honestly, even 30 minutes makes a significant difference. Don’t marinate for too long if your marinade has acidic components (which this one doesn’t heavily), but generally, chicken is fine for a few hours.
  4. Cook the Marinated Chicken: When you’re ready to cook, remove the chicken from the refrigerator and let it sit at room temperature for about 10-15 minutes while you heat your pan. Heat 1 tablespoon of olive oil in a large skillet or frying pan over medium-high heat. You want the pan to be nice and hot to get a good sear on the chicken.
  5. Sear for Tenderness: Once the oil is shimmering, carefully place the chicken cutlets into the hot skillet in a single layer. Do not overcrowd the pan; if necessary, cook the chicken in two batches to ensure proper browning and even cooking. Overcrowding will steam the chicken instead of searing it, and we want beautiful golden-brown pieces for our cheesy garlic chicken wraps. Cook for 3-4 minutes per side, or until the chicken is golden brown and cooked through. The internal temperature should reach 165°F (74°C).
  6. Rest the Chicken: Once cooked, remove the chicken from the skillet and transfer it to a clean cutting board. Tent it loosely with aluminum foil and let it rest for 5-10 minutes. This resting period is crucial as it allows the juices to redistribute throughout the meat, resulting in incredibly tender and moist chicken for our wraps.
  7. Slice the Chicken: After resting, slice the chicken against the grain into thin strips or dice it into bite-sized pieces, whichever you prefer for your wraps. I personally love thin strips as they distribute nicely throughout the wrap. Set aside.

Crafting the Irresistible Cheesy Garlic Sauce

  1. Prepare the Roux: In a medium saucepan, melt 2 tablespoons of unsalted butter over medium heat. Once the butter is melted and begins to foam, add 2 tablespoons of all-purpose flour. Whisk continuously for about 1-2 minutes, creating a smooth paste known as a roux. This roux is our thickening agent and the foundation of our creamy sauce. You want to cook out the raw flour taste, but don’t let it brown too much.
  2. Infuse with Garlic: Add 4 cloves of finely minced garlic to the roux. Continue to cook and stir for another minute until the garlic becomes fragrant. Be careful not to burn the garlic, as this will make it bitter. The smell at this stage is absolutely heavenly and promises great things for our cheesy garlic chicken wraps.
  3. Gradually Add Milk: Slowly pour in 1 ½ cups of slightly warmed whole milk, whisking constantly to prevent any lumps from forming. Start with a small amount of milk to loosen the roux, then gradually add the rest. Keep whisking until the sauce is smooth and starts to thicken. This usually takes about 3-5 minutes. Persistence with the whisk is key here to achieve a silky-smooth sauce.
  4. Introduce the Cheeses: Reduce the heat to low. Add 4 ounces of softened cream cheese, 1 cup of shredded mozzarella, ½ cup of shredded cheddar, and ¼ cup of grated Parmesan cheese to the saucepan. Stir continuously until all the cheeses are completely melted and incorporated into a wonderfully smooth, rich, and creamy sauce. The cream cheese adds an incredible tang and luxurious texture, making it perfect for our cheesy garlic chicken wraps.
  5. Season the Sauce: Season the cheesy garlic sauce with ¼ teaspoon of salt, ⅛ teaspoon of black pepper, and a pinch of optional red pepper flakes. Taste and adjust the seasonings as needed. You want this sauce to be vibrant and flavorful, as it will be a dominant note in the wraps.
  6. Finish with Fresh Herbs: Stir in 2 tablespoons of freshly chopped parsley. This adds a burst of fresh flavor and a beautiful touch of green to the rich, creamy sauce. Keep the sauce warm over very low heat while you prepare the other fillings. If it thickens too much, you can stir in a splash of warm milk to reach your desired consistency.

Preparing the Fresh Fillings

  1. Wash and Dry Greens: Thoroughly wash 2 cups of romaine lettuce or mixed greens under cold running water. Pat them completely dry with a clean kitchen towel or use a salad spinner. Excess water will make your wraps soggy, so this step is important. Shred or chop the lettuce into bite-sized pieces.
  2. Dice the Tomato: Wash and dice or thinly slice 1 large ripe tomato. Ensure the pieces are not too large to make wrapping easier.
  3. Slice the Red Onion (Optional): If using, peel and thinly slice ½ red onion. You can separate the rings for a more delicate texture. If you find raw onion too strong, you can soak the slices in cold water for 10-15 minutes, then drain and pat dry – this mellows their flavor beautifully.
  4. Prepare Optional Additions: If you’re including pickled jalapeños, slice them thinly. If using avocado, slice or dice it just before assembly to prevent browning.

Assembling Your Delicious Cheesy Garlic Chicken Wraps

  1. Warm the Tortillas: This is a crucial step for flexible, tear-free wraps. You can warm the tortillas in several ways:
    • Microwave: Stack 2-3 tortillas, wrap them in a damp paper towel, and microwave for 20-30 seconds until warm and pliable.
    • Skillet: Heat a dry skillet over medium-high heat. Place one tortilla at a time in the hot skillet for about 15-20 seconds per side, until it puffs up slightly and is warm and flexible.
    • Oven: Wrap a stack of tortillas in aluminum foil and heat in a preheated oven at 350°F (175°C) for 10-15 minutes.

    Keep the warmed tortillas covered with a clean kitchen towel to retain their warmth and flexibility while you assemble.

  2. Lay out the Tortilla: Place a warm tortilla on a clean, flat surface.
  3. Spread the Cheesy Garlic Sauce: Spoon a generous amount (about 2-3 tablespoons) of the warm cheesy garlic sauce onto the center of the tortilla. Spread it evenly, leaving about a 1-inch border around the edges. This sauce is the star, so don’t be shy!
  4. Add the Chicken: Place a portion of the sliced, cooked cheesy garlic chicken on top of the sauce, closer to one edge of the tortilla. Aim for about ¼ to ⅓ cup of chicken per wrap.
  5. Layer the Veggies: Layer the fresh fillings over the chicken. Start with a handful of shredded lettuce, followed by some diced tomatoes and sliced red onion (if using). If you have other optional fillings like jalapeños or avocado, add them now.
  6. Fold the Wrap – The Burrito Method:
    1. Fold in the Sides: Take the two opposite sides of the tortilla (the left and right edges) and fold them inward, overlapping the fillings slightly. This creates a neat package and prevents the fillings from spilling out the sides.
    2. Fold from the Bottom: Take the edge of the tortilla closest to you, just below the fillings, and fold it tightly up and over the filling. Tuck it in securely.
    3. Roll It Up: While keeping the folded side snug against the fillings, begin to roll the tortilla away from you, pressing gently but firmly, until you reach the other side. You should have a tightly rolled, cylindrical wrap.

    Practice makes perfect! The key is to keep it tight so the cheesy garlic chicken wraps hold together well.

  7. Serve Immediately: You can slice the wraps in half diagonally for an appealing presentation, or serve them whole. These cheesy garlic chicken wraps are best enjoyed immediately while the chicken is warm and the sauce is delightfully gooey. I just know you’re going to love them! They make for a fantastic quick lunch or a satisfying dinner.

Cheesy Garlic Chicken Wraps: Easy & Flavorful Recipe!

Conclusion:

If there’s one thing I hope you take away from our time together, it’s the absolute joy and undeniable deliciousness packed into every single bite of this incredible recipe. We’ve explored the magic that happens when tender, seasoned chicken meets gooey, melted cheese, all enrobed in a golden, crispy wrap, infused with that unmistakable punch of garlic. This isn’t just another meal; it’s a culinary hug, a dish designed to comfort, satisfy, and genuinely impress, all without demanding hours of your precious time. I truly believe it strikes that perfect balance of being fantastically flavorful yet remarkably straightforward, making it an ideal choice for busy weeknights when you still crave something homemade and hearty. The simplicity of its preparation belies the depth of flavor you’ll achieve, making it a truly rewarding cooking experience for chefs of all skill levels. It’s the kind of dish that makes you feel like you’ve whipped up something gourmet, when in reality, it’s incredibly accessible.

The Irresistible Appeal of This Dish

What makes this particular recipe a must-try, in my humble opinion, is its universal appeal. It’s savory, comforting, and has that glorious “cheesy pull” factor that simply makes everyone smile. The garlic isn’t just an afterthought; it’s an integral player, adding a fragrant, warming depth that elevates the entire dish. Imagine biting into a perfectly golden, slightly crisp tortilla, giving way to succulent chicken pieces coated in a rich, velvety cheese sauce, brightened by aromatic garlic. It’s a symphony of textures and flavors that dance on your palate, leaving you thoroughly content and planning your next batch before the first one is even finished. It’s perfect for satisfying those deep cravings for something both wholesome and utterly indulgent, proving that quick meals don’t have to compromise on taste or quality.

Elevate Your Dining Experience with These Serving Suggestions!

One of the beautiful aspects of this recipe is its incredible versatility when it comes to serving. While fantastic on its own as a fulfilling main course, you can easily pair it with a crisp, refreshing green salad dressed with a light vinaigrette to balance the richness. For a more substantial meal, consider serving it alongside a bowl of creamy tomato soup or a side of seasoned roasted vegetables like asparagus or broccoli. If you’re hosting a casual get-together, cut the wraps into smaller, bite-sized pieces before serving; they make phenomenal appetizers or party snacks that are guaranteed to disappear quickly. They’re also brilliant for packed lunches, as they hold up wonderfully and taste just as good at room temperature. Don’t underestimate their potential as a quick, satisfying breakfast wrap if you’re looking for something savory to kickstart your day!

Unleash Your Inner Chef with These Creative Variations!

The core of this recipe is fantastic, but don’t be afraid to experiment and make it truly your own! For those who love a bit of heat, a pinch of red pepper flakes or a dash of hot sauce mixed into the chicken filling will give it a wonderful kick. If you’re looking to sneak in some extra vegetables, finely diced bell peppers, sautéed onions, or even a handful of fresh spinach can be folded into the chicken mixture before wrapping. You could swap out the cheddar for a different cheese like mozzarella for extra stretch, provolone for a sharper taste, or even a Monterey Jack blend for a creamy texture. Experiment with different herbs too; fresh parsley or chives stirred in at the end can add a lovely freshness. For a fun twist, try using different types of tortillas, such as whole wheat for a nuttier flavor or even spinach tortillas for a pop of color. If chicken isn’t your preference, cooked ground turkey, shredded pork, or even a plant-based protein crumble could work wonderfully, adapting the cooking time as needed. Imagine the possibilities! A spicy version with jalapeños and pepper jack cheese, or a Mediterranean twist with feta, olives, and oregano. The base is so robust, it invites creativity.

Indeed, it’s this very specific creation, the one we’ve been celebrating throughout this article, often uniquely identified by its full string

Recipe:cheesy Garlic Chicken Wraps?utm_source=pinzk

, that I’m so eager for you to experience. Trust me, once you experience the incredible synergy of flavors in what we’ve lovingly called `Recipe:cheesy Garlic Chicken Wraps?utm_source=pinzk`, you’ll understand why it’s destined to become a staple in your kitchen. This isn’t just about following instructions; it’s about embarking on a flavorful journey that culminates in a dish you’ll be proud to serve. I’ve poured my heart into sharing this with you, confident that it will bring as much joy to your table as it does to mine.

So, I truly encourage you, my dear reader, to set aside some time soon and give this recipe a try. You’ll be amazed at how quickly you can create something so incredibly satisfying and bursting with flavor. And when you do, please, please come back and share your experience! I absolutely adore hearing about your culinary adventures, your clever variations, and how this dish brought smiles to your family and friends. Your feedback and stories are what truly inspire me and fuel this wonderful cooking community we’re building. Happy cooking, and I can’t wait to hear all about your delicious success!


Cheesy Garlic Chicken Wraps

Cheesy Garlic Chicken Wraps

Tender, perfectly seasoned chicken, enveloped in a warm tortilla, generously coated with a rich, molten layer of garlic-infused cheese. This recipe offers a delightful balance of indulgent taste and incredible convenience, making it a perfect, satisfying meal for any occasion. A timeless crowd-pleaser that’s easy to prepare and truly special.

Prep Time
40 Minutes
Cook Time
40 Minutes
Total Time
20 Minutes
Servings
8 wraps

Ingredients

  • 1.5 lbs boneless, skinless chicken breasts (3-4 medium)
  • 2 tbsp olive oil
  • 4 cloves garlic, minced (for chicken marinade)
  • 1 tsp smoked paprika
  • ½ tsp dried oregano
  • ¼ tsp black pepper (for chicken)
  • ½ tsp salt (for chicken)
  • 2 tbsp unsalted butter
  • 2 tbsp all-purpose flour
  • 1 ½ cups whole milk, warmed
  • 4 cloves garlic, minced (for sauce)
  • 4 oz cream cheese, softened
  • 1 cup shredded mozzarella cheese
  • ½ cup shredded cheddar cheese
  • ¼ cup grated Parmesan cheese
  • 2 tbsp fresh parsley, chopped
  • ¼ tsp salt (for sauce)
  • ⅛ tsp black pepper (for sauce)
  • Pinch red pepper flakes (optional)
  • 8 large flour tortillas (10-inch diameter)
  • 2 cups shredded romaine lettuce or mixed greens
  • 1 large ripe tomato, diced or sliced
  • ½ red onion, thinly sliced (optional)
  • Pickled jalapeños (optional)
  • Avocado (optional)

Instructions

  1. Step 1
    Slice chicken breasts into ½-inch thick cutlets; pound for uniform thickness if needed. In a bowl, combine 2 tbsp olive oil, 4 minced garlic cloves, 1 tsp smoked paprika, ½ tsp dried oregano, ¼ tsp black pepper, and ½ tsp salt. Add chicken, toss to coat, and refrigerate for at least 30 minutes.
  2. Step 2
    Heat 1 tbsp olive oil in a skillet over medium-high heat. Sear chicken in a single layer for 3-4 minutes per side until golden brown and cooked through (internal temp 165°F/74°C). Cook in batches if necessary. Remove, tent with foil, and rest for 5-10 minutes. Slice chicken into thin strips or dice.
  3. Step 3
    Melt 2 tbsp unsalted butter in a saucepan over medium heat. Whisk in 2 tbsp all-purpose flour for 1-2 minutes to form a roux. Add 4 minced garlic cloves; cook 1 minute until fragrant. Gradually whisk in 1 ½ cups warmed whole milk until smooth and thickened (3-5 minutes). Reduce heat to low. Stir in 4 oz softened cream cheese, 1 cup mozzarella, ½ cup cheddar, and ¼ cup Parmesan until melted and smooth. Season with ¼ tsp salt, ⅛ tsp black pepper, and optional red pepper flakes. Stir in 2 tbsp chopped parsley. Keep warm.
  4. Step 4
    Wash and dry 2 cups romaine lettuce; shred/chop. Dice or thinly slice 1 large ripe tomato. Thinly slice ½ red onion (optional; soak in cold water for 10-15 mins to mellow flavor if desired). Prepare any optional additions like sliced pickled jalapeños or avocado.
  5. Step 5
    Warm 8 large flour tortillas (microwave, skillet, or oven) until pliable; keep covered. Place a warm tortilla on a flat surface. Spread 2-3 tbsp of warm cheesy garlic sauce, leaving a 1-inch border. Add ¼-⅓ cup sliced cooked chicken, then layer with shredded lettuce, diced tomato, sliced red onion, and any other optional fillings. Fold in the left and right sides of the tortilla. Then, fold the bottom edge up tightly over the fillings and roll away from you, pressing gently but firmly, to create a tight cylindrical wrap.
  6. Step 6
    Serve Cheesy Garlic Chicken Wraps immediately, whole or sliced diagonally. Enjoy!

Important Information

Nutrition Facts (Per Serving)

It is important to consider this information as approximate and not to use it as definitive health advice.

Allergy Information

Please check ingredients for potential allergens and consult a health professional if in doubt.

« Previous Post
Easy Butter Chicken Recipe: Ultimate Flavor, Quick Meal
Next Post »
Best Cheesy Chicken & Rice Casserole - Quick Family Meal

If you enjoyed this…

Ultimate Crock Pot Crack Potato Soup: You’ll Crave This!

Melt-in-Your-Mouth Red Grape Juice Braised Chuck Roast

Juicy Roasted French Garlic Chicken: A Family Favorite

Primary Sidebar

Browse by Diet

BreakfastDinnerLunchDessertAppetizer

Sweet Peach Yogurt Parfait Delight

One of my fondest memories is from a lazy summer afternoon spent at my grandmother’s house. The sun filtered through the kitchen window, casting a warm glow over the table where she would create her culinary magic. It was during one of those blissful moments that I first tasted her Peach Yogurt Parfait with Honey and Granola. The sweet aroma of ripe peaches mingling with creamy yogurt and the crunch of granola was nothing short of heavenly. It felt like summer captured in a bowl, and I still remember the joy of diving in with a spoon, each layer revealing a new burst of flavor.

When I think about that parfait, I can almost hear the gentle hum of the bees outside, reminding me of the floral notes that honey brings to every bite. The vibrant yellows and soft oranges of the peaches contrast beautifully with the creamy white yogurt and the golden crunch of granola. It’s a dish that not only looks delightful but also tastes like a celebration of fresh, wholesome ingredients.

What makes my version of this Peach Yogurt Parfait special is the careful balance of flavors and textures. I use ripe, juicy peaches, drizzled with locally sourced honey, and a homemade granola that’s bursting with nuts and seeds for an extra crunch. It’s a simple dish, but every layer is crafted with love and attention.

Let me show you exactly how to make this delightful parfait, so you can bring a bit of that summer magic into your kitchen!

Sweet Peach Yogurt Parfait Delight

Why You’ll Love This Recipe

  • Delightfully creamy texture from the Greek yogurt, paired with the juicy sweetness of fresh peaches.
  • Ready in under 20 minutes, making it a quick and satisfying breakfast or snack option.
  • Budget-friendly, using common ingredients that you may already have in your pantry.
  • Customizable with your favorite granola and nuts, allowing you to tailor each parfait to your taste.
  • Perfectly balanced flavors with the bright acidity of lemon juice and the sweetness of honey enhancing the peaches.

Ingredients

  • For the Parfait:
  • 2 cups plain Greek yogurt (or vanilla yogurt for a sweeter option)
  • 2 large ripe peaches, diced (about 2 cups)
  • 1 tablespoon fresh lemon juice (to prevent browning of peaches)
  • 2 tablespoons honey (plus more for drizzling)
  • 1 teaspoon vanilla extract (optional for extra flavor)
  • For the Granola:
  • 1 cup granola (store-bought or homemade; see notes for a simple granola recipe)
  • 1/4 cup sliced almonds (optional for added crunch)
  • 1/4 cup shredded coconut (optional for added flavor)

Let’s dive into some key ingredients that make this Peach Yogurt Parfait so delightful! First, the Greek yogurt is not only creamy but also packed with protein, making it a satisfying option for breakfast or a snack. If you’re looking for a sweeter option, you can easily substitute it with vanilla yogurt, though it may alter the overall flavor balance. Next, the ripe peaches are the star of the show; their natural sweetness shines through, so I recommend choosing peaches that yield slightly to pressure, indicating they’re perfectly ripe. If peaches aren’t in season, feel free to use nectarines or even frozen peaches—just thaw them before use. Finally, honey adds a lovely floral sweetness that ties everything together. If you prefer, maple syrup can serve as a delicious substitute.

Step-by-Step Instructions

  1. Start by preparing the peaches. Wash them thoroughly, then slice and dice them into bite-sized pieces. In a medium bowl, toss the diced peaches with 1 tablespoon of fresh lemon juice to prevent browning. Set aside for about 5 minutes while the lemon juice works its magic.
  2. In a separate bowl, combine the Greek yogurt, 2 tablespoons of honey, and 1 teaspoon of vanilla extract if using. Stir the mixture until smooth and thoroughly blended. This should take about a minute. Avoid overmixing to maintain the creaminess of the yogurt.
  3. Now it’s time to layer your parfait. Grab a clear glass or bowl to showcase your beautiful creation. Start with a generous spoonful of the yogurt mixture at the bottom—about 1/4 cup will do. Use a spoon to spread it evenly.
  4. Add a layer of the diced peaches over the yogurt, ensuring they cover the yogurt completely. You might want to use about half of what you have prepared—roughly 1 cup. This layer should be visually appealing, so arrange the peaches neatly.
  5. Sprinkle 1/4 cup of granola over the peaches. This adds a delightful crunch. Make sure to distribute it evenly to ensure every bite has that satisfying texture. Avoid packing it down too tightly, as you want it to maintain its crunch.
  6. Repeat the layers: spoon in another 1/4 cup of yogurt, followed by another cup of peaches, and another sprinkle of granola. You should have at least two layers, but feel free to add more depending on your glass size.
  7. Finish off your parfait with a drizzle of honey on top for added sweetness and a touch of elegance. If you’re using sliced almonds or shredded coconut, sprinkle them on top now. It adds a lovely visual contrast and extra flavor.
  8. Serve immediately or refrigerate for up to 30 minutes before serving to allow the flavors to meld together. However, I recommend enjoying it fresh to maintain the granola’s crunch.

Pro Tips for the Best Peach Yogurt Parfait With Honey And Granola

  • Make sure to choose ripe peaches for the best flavor and texture. A common mistake is using unripe fruit, which can lead to a less enjoyable parfait. Look for peaches that are fragrant and slightly soft to the touch.
  • Use a clear glass to assemble your parfait; this not only makes for a beautiful presentation but also allows you to see the colorful layers, which adds to the enjoyment of eating it.
  • For an even creamier texture, consider whipping the Greek yogurt with a hand mixer for a couple of minutes before layering. This small adjustment makes a huge difference in mouthfeel.
  • Be mindful of the granola-to-yogurt ratio. Too much granola can overwhelm the parfait, while too little can make it feel too creamy. Aim for about 1/4 cup of granola per layer for the perfect balance.
  • If you’re making this for a gathering, consider preparing the yogurt and peaches ahead of time and layering them just before serving. This ensures the granola stays crunchy!

Variations & Serving Ideas

There are so many ways to get creative with your Peach Yogurt Parfait! For a tropical twist, swap out the peaches for mangoes or pineapples and top with coconut flakes. If you prefer a berry flavor, mix in some blueberries or strawberries with the peaches for added color and taste. For a nutty version, incorporate chopped walnuts or pecans instead of almonds.

As for serving ideas, this parfait pairs beautifully with a side of scrambled eggs for a hearty breakfast or fresh fruit salad for a light lunch. You might also enjoy it alongside whole grain toast with almond butter for an energizing snack. The contrast of flavors and textures will elevate your meal experience!

Storage, Make-Ahead & Reheating

The Peach Yogurt Parfait is best enjoyed fresh, but you can prepare some components ahead of time. Store the layered parfait in an airtight container in the refrigerator for up to 24 hours. However, be cautious; the granola may lose its crunch if stored too long. You can freeze the yogurt and peach mixture for up to 2 months; just remember to thaw it in the refrigerator overnight before serving.

If you plan to enjoy this dish the next day, it can taste even better as the flavors meld together. Just remember to add the granola right before serving to keep its delightful crunch!

Frequently Asked Questions

Can I make Peach Yogurt Parfait With Honey And Granola ahead of time?

Yes — in fact, it tastes even better the next day as the flavors meld. However, I recommend waiting to add the granola until just before serving to maintain its crunch.

What can I substitute for Greek yogurt?

If you prefer a lighter option, you can substitute Greek yogurt with regular yogurt or a dairy-free alternative like coconut yogurt. Just remember that this may alter the creaminess and flavor profile slightly.

Can I use frozen peaches for this parfait?

Absolutely! Just make sure to thaw the frozen peaches before using them. They will still add great flavor, though the texture may be slightly softer than fresh peaches.

How do I make the parfait vegan?

To make a vegan version, substitute the Greek yogurt with a plant-based yogurt alternative, and replace honey with maple syrup or agave nectar. This keeps the parfait sweet while adhering to a vegan diet.

What other fruits can I use in this recipe?

You can mix and match fruits based on your preference. Try using strawberries, blueberries, raspberries, or even bananas. Just make sure to adjust the lemon juice as needed to prevent browning.

Sweet Peach Yogurt Parfait Delight

Final Thoughts

The Peach Yogurt Parfait with Honey and Granola is a delightful blend of creamy yogurt, sweet peaches, and crunchy granola that creates a satisfying and nourishing treat. Each layer bursts with flavor, making it a perfect choice for breakfast or a light dessert.

This is the kind of recipe I come back to again and again, especially when I want something refreshing and wholesome to start my day. The harmony of sweet and tart flavors, combined with the delightful crunch, never fails to lift my spirits!

I encourage you to give this parfait a try and indulge in its comforting goodness. Feel free to share your results or even add your own twist—perhaps a sprinkle of cinnamon or a handful of nuts. Enjoy creating your perfect parfait!

Print
clock clock iconcutlery cutlery iconflag flag iconfolder folder iconinstagram instagram iconpinterest pinterest iconfacebook facebook iconprint print iconsquares squares iconheart heart iconheart solid heart solid icon

Peach Yogurt Parfait


  • Author: Lily author
  • Total Time: 15 minutes
  • Yield: 4 servings 1x
Pin Recipe
Print Recipe

Description

This Peach Yogurt Parfait combines creamy Greek yogurt, juicy peaches, and crunchy granola for a delightful treat. It’s a perfect breakfast or snack that captures the essence of summer in every bite.


Ingredients

Scale
  • For the Parfait:
  • 2 cups plain Greek yogurt (or vanilla yogurt for a sweeter option)
  • 2 large ripe peaches, diced (about 2 cups)
  • 1 tablespoon fresh lemon juice (to prevent browning of peaches)
  • 2 tablespoons honey (plus more for drizzling)
  • 1 teaspoon vanilla extract (optional for extra flavor)
  • For the Granola:
  • 1 cup granola (store-bought or homemade; see notes for a simple granola recipe)
  • 1/4 cup sliced almonds (optional for added crunch)
  • 1/4 cup shredded coconut (optional for added flavor)

Instructions

  1. Start by preparing the peaches. Wash them thoroughly, then slice and dice them into bite-sized pieces. In a medium bowl, toss the diced peaches with 1 tablespoon of fresh lemon juice to prevent browning. Set aside for about 5 minutes while the lemon juice works its magic.
  2. In a separate bowl, combine the Greek yogurt, 2 tablespoons of honey, and 1 teaspoon of vanilla extract if using. Stir the mixture until smooth and thoroughly blended. This should take about a minute. Avoid overmixing to maintain the creaminess of the yogurt.
  3. Now it’s time to layer your parfait. Grab a clear glass or bowl to showcase your beautiful creation. Start with a generous spoonful of the yogurt mixture at the bottom—about 1/4 cup will do. Use a spoon to spread it evenly.
  4. Add a layer of the diced peaches over the yogurt, ensuring they cover the yogurt completely. You might want to use about half of what you have prepared—roughly 1 cup. This layer should be visually appealing, so arrange the peaches neatly.
  5. Sprinkle 1/4 cup of granola over the peaches. This adds a delightful crunch. Make sure to distribute it evenly to ensure every bite has that satisfying texture. Avoid packing it down too tightly, as you want it to maintain its crunch.
  6. Repeat the layers: spoon in another 1/4 cup of yogurt, followed by another cup of peaches, and another sprinkle of granola. You should have at least two layers, but feel free to add more depending on your glass size.
  7. Finish off your parfait with a drizzle of honey on top for added sweetness and a touch of elegance. If you’re using sliced almonds or shredded coconut, sprinkle them on top now. It adds a lovely visual contrast and extra flavor.
  8. Serve immediately or refrigerate for up to 30 minutes before serving to allow the flavors to meld together. However, I recommend enjoying it fresh to maintain the granola’s crunch.
  • Prep Time: 15 mins
  • Cook Time: 0 mins
  • Category: Breakfast
  • Method: No-cook
  • Cuisine: American

Nutrition

  • Serving Size: 1 parfait
  • Calories: 250
  • Sugar: 20 g
  • Sodium: 50 mg
  • Fat: 5 g
  • Saturated Fat: 2 g
  • Unsaturated Fat: 3 g
  • Trans Fat: 0 g
  • Carbohydrates: 40 g
  • Fiber: 3 g
  • Protein: 10 g
  • Cholesterol: 10 mg

Keywords: Choose ripe peaches for the best flavor and texture. Use a clear glass for a beautiful presentation. For creaminess, consider whipping the yogurt before layering. Be mindful of the granola-to-yogurt ratio. Prepare yogurt and peaches ahead of time for gatherings, layering just before serving.

Did you make this recipe?

Share a photo and tag us — we can't wait to see what you've made!

Sun-Kissed Frozen Orange Cream Slush

As a child, summer days felt like they lasted forever. I remember the sticky heat wrapping around me as I played outside, my laughter mingling with the sounds of the neighborhood. But nothing could cool me down quite like the moment I’d spot my grandmother, laboring over her blender, whipping up her famous Frozen Orange Creamsicle Slush. That vibrant orange treat, with its frosty texture and sweet citrus aroma, was like a burst of sunshine in a cup. Just one sip, and I could feel the coolness wash over me, sparking pure joy.

This Frozen Orange Creamsicle Slush has a way of making you feel like a kid again. Its creamy, dreamy consistency is a delightful balance of bright orange and soft vanilla, inviting you to dive right in. The refreshing tang of orange dances on your tongue, while the smooth creaminess envelops you in a comforting embrace. It’s a nostalgic treat that’s perfect for hot summer afternoons or anytime you need a little pick-me-up.

What makes my version of this slush stand out is the addition of a hint of vanilla bean, which elevates the flavor and adds an extra layer of richness. Plus, it’s super easy to whip up with just a few simple ingredients that you probably already have on hand! So, if you’re ready to relive those sun-soaked memories, let me show you exactly how to make it.

Sun-Kissed Frozen Orange Cream Slush

Why You’ll Love This Recipe

  • Each slush is a perfect blend of creamy vanilla and zesty orange, creating a nostalgic flavor reminiscent of summer days.
  • This refreshing treat is ready in under 15 minutes, making it an ideal quick dessert for unexpected guests or hot afternoons.
  • With just 8 simple ingredients, it’s budget-friendly, ensuring you don’t have to break the bank to enjoy a delicious slush.
  • The slush has a perfectly smooth texture, thanks to the combination of ice and ice cream, providing a delightful contrast to the bright citrus flavors.
  • It’s highly customizable; you can easily adjust the sweetness and add fresh herbs for a unique twist that suits your taste.

Ingredients

  • 2 cups orange juice (freshly squeezed or store-bought)
  • 1 cup vanilla ice cream
  • 1 cup crushed ice
  • 1/2 cup milk (whole or 2%)
  • 1/4 cup granulated sugar (adjust based on sweetness preference)
  • 1 teaspoon vanilla extract
  • Zest of 1 orange (for added flavor)
  • Fresh orange slices and mint leaves (for garnish)

The star of this Frozen Orange Creamsicle Slush is the orange juice, which provides the vibrant, citrusy base. Freshly squeezed juice will yield the brightest flavor, but store-bought options can be just as convenient. If you’re opting for store-bought, choose 100% pure juice with no added sugars for the best results. Another essential ingredient is the vanilla ice cream; it adds creaminess and sweetness. You can substitute it with dairy-free ice cream if you’re looking for a vegan option. Whole or 2% milk complements the ice cream, creating a smooth blend. If you want a lower-calorie version, almond or oat milk can be good alternatives.

Lastly, the granulated sugar can be adjusted based on your sweetness preference. If you prefer a more natural sweetener, consider using honey or agave syrup. The orange zest enhances the flavor profile, providing an aromatic pop that brings the whole slush together. Don’t skip it! It adds an extra layer of brightness that makes this slush truly special.

Step-by-Step Instructions

  1. Start by preparing your ingredients. Gather 2 cups of orange juice, 1 cup of vanilla ice cream, and 1 cup of crushed ice. Make sure the ice is finely crushed, as larger chunks can make blending difficult.
  2. In a blender, combine the orange juice, vanilla ice cream, crushed ice, and 1/2 cup of milk. Add 1/4 cup of granulated sugar and 1 teaspoon of vanilla extract. If you like a sweeter slush, consider adding a bit more sugar at this stage.
  3. Add the zest of 1 orange to the blender. This step is crucial for enhancing the citrus flavor of your slush. Make sure not to include the bitter white pith—only the flavorful zest.
  4. Blend the mixture on medium-high speed for about 30-45 seconds. Stop once the ingredients are fully combined and the slush has a smooth, even consistency. If you notice large chunks of ice, blend for an additional 10-15 seconds. Avoid over-blending, as this can make the slush too liquidy.
  5. Once blended, taste the slush. If it needs more sweetness, add a little more sugar and blend for a few more seconds. If it’s too thick, you can add a splash of milk to reach your desired consistency.
  6. Pour the slush into glasses. This recipe typically serves 4, but you can easily double it for larger gatherings. Use a spoon to help guide the slush into the glasses if needed.
  7. Garnish each serving with fresh orange slices and mint leaves. The mint not only adds a pop of color but also a refreshing aroma that complements the citrus flavors beautifully.
  8. Serve immediately and enjoy! If you’ve made extra, you can refrigerate it for a short time, but it’s best enjoyed fresh.

Pro Tips for the Best Frozen Orange Creamsicle Slush

  • Don’t skip the orange zest! It’s a game-changer for flavor. Always zest before juicing to make it easier.
  • Use a high-powered blender for the best texture. A standard blender may struggle with ice, leading to uneven consistency. If you have a food processor, that can work too, but ensure the ice is finely crushed.
  • Adjust the ice-to-liquid ratio carefully. If your slush is too thick, it won’t blend well. Start with less ice and add more until you reach your preferred texture.
  • Be cautious with the sugar! Always start with the lower amount, as you can easily add more, but it’s hard to fix an overly sweet slush.
  • For a fun twist, consider adding a splash of coconut milk or a handful of fresh fruit like strawberries or pineapple. This not only enhances the flavor but also adds a beautiful color contrast.

Variations & Serving Ideas

There are countless ways to put a spin on your Frozen Orange Creamsicle Slush. Consider making a tropical version by adding in some pineapple juice or coconut milk for a delightful tropical twist. If you’re feeling adventurous, try incorporating a handful of frozen mango or peach slices for added sweetness. For a lighter version, swap out the vanilla ice cream for Greek yogurt for a creamy yet tangy alternative.

As for serving ideas, this refreshing slush pairs wonderfully with light summer dishes like grilled chicken skewers, fish tacos, or a simple salad topped with citrus vinaigrette. The bright, zesty flavors of the slush complement these dishes perfectly, making them an ideal pairing for a sunny day.

Storage, Make-Ahead & Reheating

This Frozen Orange Creamsicle Slush is best enjoyed fresh, but if you have leftovers, you can store them in an airtight container in the fridge for up to 2 days. Just keep in mind that the slush may lose some of its texture over time as the ice melts. It doesn’t freeze well, as the ice will turn into a solid block. If you must freeze it, blend again after thawing to restore the slushy consistency. This treat is best the day you make it, as the flavors meld together beautifully overnight, enhancing its deliciousness.

Frequently Asked Questions

Can I make Frozen Orange Creamsicle Slush ahead of time?

Yes — in fact, it tastes even better the next day as the flavors meld. However, it’s best to enjoy it fresh, as the texture can change if stored for too long. If you need to prepare it ahead, keep it in the fridge and re-blend before serving.

What kind of orange juice should I use?

For the best flavor, use freshly squeezed orange juice. However, if you’re short on time, opt for 100% pure store-bought juice without added sugars. This will ensure that your slush remains flavorful and refreshing.

Can I substitute the vanilla ice cream?

Absolutely! If you’re looking for a dairy-free option, coconut milk ice cream or a non-dairy vanilla ice cream can work wonderfully. They will still provide the creamy texture and sweetness you desire.

How can I adjust the sweetness of my slush?

You can easily adjust the sweetness by modifying the amount of sugar added. Start with 1/4 cup and taste the mixture before blending. If you prefer it sweeter, add more sugar gradually until it reaches your desired level.

What should I do if my slush is too thick?

If your slush is too thick, simply add a splash of milk or orange juice and blend again. This will help achieve a more drinkable consistency while maintaining the slushy texture. Adjust gradually to reach your preferred thickness.

Sun-Kissed Frozen Orange Cream Slush

Final Thoughts

The Frozen Orange Creamsicle Slush is a delightful blend of refreshing citrus and creamy goodness, making it a perfect treat for warm days or any time you crave a taste of nostalgia. The way the bright orange flavor dances with the creamy texture truly elevates this slush, transforming it into a satisfying escape from the everyday.

This is the kind of recipe I come back to again and again, especially when I’m looking to cool down or impress guests at a summer gathering. It’s simple to make and always brings smiles all around! I encourage you to try this recipe for yourself—don’t hesitate to share your results or even put your own spin on it. Happy slushing!

Print
clock clock iconcutlery cutlery iconflag flag iconfolder folder iconinstagram instagram iconpinterest pinterest iconfacebook facebook iconprint print iconsquares squares iconheart heart iconheart solid heart solid icon

Frozen Orange Creamsicle Slush


  • Author: Lily author
  • Total Time: 15 minutes
  • Yield: 4 servings 1x
Pin Recipe
Print Recipe

Description

This Frozen Orange Creamsicle Slush is a refreshing treat that combines creamy vanilla and zesty orange flavors. Perfect for hot summer days, it brings back nostalgic memories with every sip.


Ingredients

Scale
  • 2 cups orange juice (freshly squeezed or store-bought)
  • 1 cup vanilla ice cream
  • 1 cup crushed ice
  • 1/2 cup milk (whole or 2%)
  • 1/4 cup granulated sugar (adjust based on sweetness preference)
  • 1 teaspoon vanilla extract
  • Zest of 1 orange (for added flavor)
  • Fresh orange slices and mint leaves (for garnish)

Instructions

  1. Start by preparing your ingredients. Gather 2 cups of orange juice, 1 cup of vanilla ice cream, and 1 cup of crushed ice. Make sure the ice is finely crushed, as larger chunks can make blending difficult.
  2. In a blender, combine the orange juice, vanilla ice cream, crushed ice, and 1/2 cup of milk. Add 1/4 cup of granulated sugar and 1 teaspoon of vanilla extract. If you like a sweeter slush, consider adding a bit more sugar at this stage.
  3. Add the zest of 1 orange to the blender. This step is crucial for enhancing the citrus flavor of your slush. Make sure not to include the bitter white pith—only the flavorful zest.
  4. Blend the mixture on medium-high speed for about 30-45 seconds. Stop once the ingredients are fully combined and the slush has a smooth, even consistency. If you notice large chunks of ice, blend for an additional 10-15 seconds. Avoid over-blending, as this can make the slush too liquidy.
  5. Once blended, taste the slush. If it needs more sweetness, add a little more sugar and blend for a few more seconds. If it’s too thick, you can add a splash of milk to reach your desired consistency.
  6. Pour the slush into glasses. This recipe typically serves 4, but you can easily double it for larger gatherings. Use a spoon to help guide the slush into the glasses if needed.
  7. Garnish each serving with fresh orange slices and mint leaves. The mint not only adds a pop of color but also a refreshing aroma that complements the citrus flavors beautifully.
  8. Serve immediately and enjoy! If you’ve made extra, you can refrigerate it for a short time, but it's best enjoyed fresh.
  • Prep Time: 15 min
  • Cook Time: 0 min
  • Category: Dessert
  • Method: Blending
  • Cuisine: American

Nutrition

  • Serving Size: 1 serving
  • Calories: 200
  • Sugar: 30 g
  • Sodium: 50 mg
  • Fat: 5 g
  • Saturated Fat: 3 g
  • Unsaturated Fat: 2 g
  • Trans Fat: 0 g
  • Carbohydrates: 40 g
  • Fiber: 1 g
  • Protein: 2 g
  • Cholesterol: 20 mg

Keywords: Don't skip the orange zest! It's a game-changer for flavor. Always zest before juicing to make it easier.

Did you make this recipe?

Share a photo and tag us — we can't wait to see what you've made!

Zesty Lemon Poppy Seed Delight

One rainy afternoon, I found myself in my grandmother’s cozy kitchen, the kind that always smelled like warmth and love. She was whipping up her famous Lemon Poppy Seed Loaf, a recipe that had been passed down through generations. As the batter came together, the zesty aroma of fresh lemons filled the air, mingling perfectly with the nutty fragrance of poppy seeds. I can still picture her, apron-clad, as she expertly drizzled a vibrant citrus icing over the loaf, creating a glossy, sun-kissed finish that beckoned us to dive in. It was a moment that sparked my own passion for baking, and this recipe has become a cherished staple in my home ever since.

When you take a bite of this Lemon Poppy Seed Loaf, it’s like a burst of sunshine on your palate. The loaf is beautifully golden, with a tender crumb that melts in your mouth. Each slice is speckled with tiny poppy seeds, adding a delightful crunch that contrasts beautifully with the tangy sweetness of the lemon. And that citrus icing? It’s the finishing touch that elevates this loaf from ordinary to extraordinary, with its bright, zesty flavor dancing on your taste buds.

This recipe stands out because it embraces simplicity while delivering on flavor. I’ve added a hint of vanilla to the batter, enhancing the overall taste and making it even more indulgent. Trust me, once you make this Lemon Poppy Seed Loaf With Citrus Icing, it’ll become a go-to in your baking repertoire.

So, let me show you exactly how to make it!

Zesty Lemon Poppy Seed Delight

Why You’ll Love This Recipe

  • Moist and tender crumb that melts in your mouth, thanks to the perfect balance of butter and buttermilk.
  • Bright, zesty lemon flavor paired with crunchy poppy seeds, creating a delightful texture and taste experience.
  • Easy to whip up in just about an hour, perfect for last-minute gatherings or a cozy afternoon treat.
  • Budget-friendly with everyday ingredients, making it an accessible option for all home bakers.
  • The citrus icing adds a sweet tang that elevates the loaf, turning a simple recipe into a showstopper!

Ingredients

  • 1 ½ cups (190g) all-purpose flour
  • 1 teaspoon baking powder
  • ½ teaspoon baking soda
  • ½ teaspoon salt
  • 3 tablespoons poppy seeds
  • ½ cup (115g) unsalted butter, softened to room temperature
  • 1 cup (200g) granulated sugar
  • 2 large eggs
  • 1 teaspoon vanilla extract
  • 1 teaspoon lemon zest (from about 1 medium lemon)
  • ½ cup (120ml) buttermilk
  • 2 tablespoons fresh lemon juice

For the Citrus Icing:

  • 1 cup (120g) powdered sugar
  • 2 tablespoons fresh lemon juice
  • 1 tablespoon orange juice
  • 1 teaspoon lemon zest (for garnish, optional)

Let’s dive into the key ingredients that make this Lemon Poppy Seed Loaf so special. The all-purpose flour provides the structure and base for the loaf, while the baking powder and baking soda ensure it rises perfectly, giving the loaf a light texture. For a gluten-free variation, you could substitute the flour with a gluten-free all-purpose blend. Poppy seeds not only add a delightful crunch but also contribute to the unique flavor profile that pairs well with the citrus notes.

Unsalted butter is crucial for achieving the buttery richness that makes this loaf so moist. If you’re looking for a dairy-free option, coconut oil or a vegan butter can be used instead. The buttermilk is another essential component, providing acidity that activates the baking soda for a fluffy texture. If you don’t have buttermilk on hand, you can easily make a substitute by mixing ½ cup of milk with 1 tablespoon of vinegar or lemon juice and letting it sit for about 5 minutes.

Step-by-Step Instructions

  1. Preheat your oven to 350°F (175°C). Grease a 9×5-inch loaf pan or line it with parchment paper for easy removal later.
  2. In a medium mixing bowl, whisk together 1 ½ cups of all-purpose flour, 1 teaspoon of baking powder, ½ teaspoon of baking soda, ½ teaspoon of salt, and 3 tablespoons of poppy seeds. This helps to evenly distribute the baking agents and ensures a uniform rise.
  3. In a large mixing bowl, cream together ½ cup of softened unsalted butter and 1 cup of granulated sugar using an electric mixer on medium speed for about 3-4 minutes, until the mixture is light and fluffy. Make sure to scrape down the sides of the bowl occasionally.
  4. Add 2 large eggs, 1 teaspoon of vanilla extract, and 1 teaspoon of lemon zest to the creamed butter and sugar, mixing until fully combined. You want a smooth consistency, so ensure there are no lumps of butter.
  5. In a small bowl, combine ½ cup of buttermilk and 2 tablespoons of fresh lemon juice. Alternately add the dry ingredients and buttermilk mixture to the butter mixture, starting and ending with the dry ingredients. Mix just until combined; do not overmix, as this can lead to a dense loaf.
  6. Pour the batter into the prepared loaf pan. Smooth the top with a spatula, ensuring it’s even. Bake in the preheated oven for 50-60 minutes, or until a toothpick inserted in the center comes out clean. The edges should be lightly golden brown, and the center should feel just set.
  7. Once baked, remove the loaf from the oven and allow it to cool in the pan for about 10 minutes. Then, transfer it to a wire rack to cool completely. Resist the urge to slice too soon, as it will be crumbly if it’s still warm.
  8. While the loaf is cooling, prepare the citrus icing. In a medium bowl, whisk together 1 cup of powdered sugar, 2 tablespoons of fresh lemon juice, and 1 tablespoon of orange juice until smooth. If the icing is too thick, you can add a little more juice to reach your desired consistency.
  9. Once the loaf is completely cool, drizzle the citrus icing over the top. If you like, sprinkle with an additional teaspoon of lemon zest for an extra pop of flavor and color.

Pro Tips for the Best Lemon Poppy Seed Loaf With Citrus Icing

  • Be careful not to overmix your batter; this is a common mistake that can lead to a dense loaf. Mix just until the dry ingredients are incorporated for a light and fluffy texture.
  • Use room temperature ingredients, especially the butter and eggs. This helps to create a smoother batter and ensures even baking. Take your eggs out of the fridge about 30 minutes before you start.
  • For a more pronounced lemon flavor, consider adding a little lemon extract in addition to the zest and juice. Just a half teaspoon can elevate the citrus notes significantly.
  • When measuring your flour, spoon it into the measuring cup and level it off with a knife instead of scooping directly from the bag. This prevents packing and ensures you don’t end up with a dry loaf.
  • Invest in a good quality loaf pan; it makes a difference in heat distribution, which ensures even baking. If your pan is dark-coated, reduce the oven temperature by 25°F to prevent over-browning.

Variations & Serving Ideas

For a delightful twist, consider adding blueberries or raspberries to the batter for a fruity burst of flavor. You can also experiment with different citrus fruits—try lime or grapefruit zest and juice for a refreshing change. For a healthier option, substitute half of the all-purpose flour with whole wheat flour for added fiber without compromising too much on texture.

This Lemon Poppy Seed Loaf pairs beautifully with a light salad, such as a mixed greens salad with a vinaigrette, or a cup of tea for a cozy afternoon treat. It also complements a creamy cheese platter, as the acidity of the loaf balances rich cheeses perfectly. Lastly, a scoop of vanilla ice cream on the side creates a delightful contrast of temperatures and flavors!

Storage, Make-Ahead & Reheating

This Lemon Poppy Seed Loaf can be stored at room temperature for up to 3 days if wrapped tightly in plastic wrap. If you want to keep it longer, it freezes well for up to 3 months. To freeze, wrap the loaf tightly in plastic wrap and then in aluminum foil to prevent freezer burn.

When you’re ready to enjoy it again, simply thaw it in the fridge overnight. Reheat individual slices in the microwave for 15-20 seconds or in a toaster oven until warmed through. Interestingly, many people find that this loaf tastes even better the next day, as the flavors have time to meld!

Frequently Asked Questions

Can I make Lemon Poppy Seed Loaf With Citrus Icing ahead of time?

Yes — in fact, it tastes even better the next day! You can make the loaf a day in advance, allowing the flavors to develop. Just be sure to store it in an airtight container to maintain its moisture.

Can I substitute the poppy seeds?

Absolutely! If you don’t have poppy seeds on hand or prefer an alternative, you can use sesame seeds for a similar crunch or omit them entirely for a smooth loaf.

What can I use instead of buttermilk?

If you don’t have buttermilk, you can easily create a substitute by mixing ½ cup of milk (dairy or plant-based) with 1 tablespoon of vinegar or lemon juice. Let it sit for 5 minutes before using in the recipe.

How can I make this recipe gluten-free?

To make a gluten-free version of this Lemon Poppy Seed Loaf, substitute the all-purpose flour with a gluten-free all-purpose flour blend. Just ensure that the blend contains a binding agent like xanthan gum for the best results.

What is the best way to store leftover loaf?

Leftover Lemon Poppy Seed Loaf should be stored in an airtight container at room temperature for up to 3 days. For longer storage, wrap it tightly and freeze for up to 3 months. Thaw it before serving for the best texture.

Zesty Lemon Poppy Seed Delight

Final Thoughts

The Lemon Poppy Seed Loaf with Citrus Icing is truly a delightful treat that brings a burst of brightness to any occasion. The zesty lemon flavor combined with the subtle crunch of poppy seeds creates a satisfying balance, while the citrus icing adds a touch of sweetness that perfectly complements the loaf’s tanginess.

This is the kind of recipe I come back to again and again, especially when I want to brighten up a gloomy day or celebrate a small victory. The aroma that fills the kitchen as it bakes is absolutely heavenly! I encourage you to give this recipe a try; you might just find it becoming a beloved staple in your home. Don’t forget to share your results or even add your own unique twist—I can’t wait to see what you create!

Print
clock clock iconcutlery cutlery iconflag flag iconfolder folder iconinstagram instagram iconpinterest pinterest iconfacebook facebook iconprint print iconsquares squares iconheart heart iconheart solid heart solid icon

Lemon Poppy Seed Loaf


  • Author: Lily author
  • Total Time: 11 minute
  • Yield: 1 loaf 1x
Pin Recipe
Print Recipe

Description

This Lemon Poppy Seed Loaf is a delightful treat that combines zesty lemon flavor with crunchy poppy seeds. Topped with a citrus icing, it’s perfect for any occasion.


Ingredients

Scale
  • 1 ½ cups (190g) all-purpose flour
  • 1 teaspoon baking powder
  • ½ teaspoon baking soda
  • ½ teaspoon salt
  • 3 tablespoons poppy seeds
  • ½ cup (115g) unsalted butter, softened to room temperature
  • 1 cup (200g) granulated sugar
  • 2 large eggs
  • 1 teaspoon vanilla extract
  • 1 teaspoon lemon zest (from about 1 medium lemon)
  • ½ cup (120ml) buttermilk
  • 2 tablespoons fresh lemon juice
  • 1 cup (120g) powdered sugar
  • 2 tablespoons fresh lemon juice
  • 1 tablespoon orange juice
  • 1 teaspoon lemon zest (for garnish, optional)

Instructions

  1. Preheat your oven to 350°F (175°C). Grease a 9×5-inch loaf pan or line it with parchment paper for easy removal later.
  2. In a medium mixing bowl, whisk together 1 ½ cups of all-purpose flour, 1 teaspoon of baking powder, ½ teaspoon of baking soda, ½ teaspoon of salt, and 3 tablespoons of poppy seeds. This helps to evenly distribute the baking agents and ensures a uniform rise.
  3. In a large mixing bowl, cream together ½ cup of softened unsalted butter and 1 cup of granulated sugar using an electric mixer on medium speed for about 3-4 minutes, until the mixture is light and fluffy. Make sure to scrape down the sides of the bowl occasionally.
  4. Add 2 large eggs, 1 teaspoon of vanilla extract, and 1 teaspoon of lemon zest to the creamed butter and sugar, mixing until fully combined. You want a smooth consistency, so ensure there are no lumps of butter.
  5. In a small bowl, combine ½ cup of buttermilk and 2 tablespoons of fresh lemon juice. Alternately add the dry ingredients and buttermilk mixture to the butter mixture, starting and ending with the dry ingredients. Mix just until combined; do not overmix, as this can lead to a dense loaf.
  6. Pour the batter into the prepared loaf pan. Smooth the top with a spatula, ensuring it’s even. Bake in the preheated oven for 50-60 minutes, or until a toothpick inserted in the center comes out clean. The edges should be lightly golden brown, and the center should feel just set.
  7. Once baked, remove the loaf from the oven and allow it to cool in the pan for about 10 minutes. Then, transfer it to a wire rack to cool completely. Resist the urge to slice too soon, as it will be crumbly if it’s still warm.
  8. While the loaf is cooling, prepare the citrus icing. In a medium bowl, whisk together 1 cup of powdered sugar, 2 tablespoons of fresh lemon juice, and 1 tablespoon of orange juice until smooth. If the icing is too thick, you can add a little more juice to reach your desired consistency.
  9. Once the loaf is completely cool, drizzle the citrus icing over the top. If you like, sprinkle with an additional teaspoon of lemon zest for an extra pop of flavor and color.
  • Prep Time: 15 mins
  • Cook Time: 50-60 mins
  • Category: Dessert
  • Method: Baking
  • Cuisine: American

Nutrition

  • Serving Size: 1 slice
  • Calories: 200
  • Sugar: 15 g
  • Sodium: 150 mg
  • Fat: 8 g
  • Saturated Fat: 5 g
  • Unsaturated Fat: 3 g
  • Trans Fat: 0 g
  • Carbohydrates: 30 g
  • Fiber: 1 g
  • Protein: 3 g
  • Cholesterol: 40 mg

Keywords: Be careful not to overmix your batter; this is a common mistake that can lead to a dense loaf. Use room temperature ingredients for a smoother batter and even baking.

Did you make this recipe?

Share a photo and tag us — we can't wait to see what you've made!

  • Privacy Policy
  • Terms Of Service
  • Contact
  • About
  • GDPR

Copyright © 2025 Homesmad