• Skip to primary navigation
  • Skip to main content
  • Skip to primary sidebar
Homesmad

Homesmad

  • Home
  • Breakfast & Brunch
  • Appetizers & Snacks
  • Dinner
  • Dessert
  • About
  • Privacy Policy
  • Contact
Homesmad
  • Home
  • Breakfast & Brunch
  • Appetizers & Snacks
  • Dinner
  • Dessert
  • About
  • Privacy Policy
  • Contact

Delicious Fall Harvest Pasta Salad Recipe – Perfect for Any Meal!

October 3, 2025 by Lily author

Fall Harvest Pasta Salad Recipe is more than just a dish; it’s an edible celebration of autumn’s bounty. Imagine a vibrant medley of seasonal ingredients, each bite bursting with the crispness of a cool fall morning and the comforting warmth of a cozy evening. I’ve always found a special joy in creating meals that reflect the changing seasons, and this recipe truly embodies that spirit. It’s a modern take on gathering the harvest, bringing together the earthy sweetness of roasted vegetables, the tangy pop of dried fruit, and the comforting chew of perfectly cooked pasta, all tossed in a delightful, aromatic dressing.

While the concept of pasta salad might seem contemporary, its heart lies in the age-old tradition of utilizing fresh, seasonal produce, a practice revered across cultures for centuries. This particular Fall Harvest Pasta Salad Recipe is cherished by so many for its incredible versatility and irresistible flavor profile. People adore its perfect balance of textures – from the tender pasta and roasted squash to the satisfying crunch of pecans and crisp apple – making it an ideal side dish for any gathering or a wonderfully satisfying main course. Its make-ahead convenience and ability to please diverse palates ensure it’s a staple for potlucks, weeknight dinners, and holiday tables alike. Get ready to fall in love with the ultimate autumn comfort food, served delightfully cool.

Delicious Fall Harvest Pasta Salad Recipe – Perfect for Any Meal! this RECIPE

Ingredients:

  • For the Fall Harvest Pasta Salad:
    • 1 pound (450g) short-cut pasta, such as fusilli, orecchiette, or farfalle
    • 1 medium butternut squash, about 2-3 pounds, peeled, seeded, and cut into ¾-inch cubes
    • 1 pound Brussels sprouts, trimmed and halved (or quartered if very large)
    • 1 small red onion, cut into ½-inch wedges
    • 1-2 crisp-sweet apples (like Honeycrisp or Fuji), cored and cut into ¾-inch cubes
    • ½ cup dried cranberries (or tart cherries)
    • ½ cup pecans, roughly chopped and toasted
    • 4 ounces (113g) fresh goat cheese, crumbled
    • ¼ cup fresh parsley, finely chopped
    • 1 tablespoon fresh sage, finely chopped
    • 1 teaspoon fresh thyme leaves, picked from stems
    • ¼ cup extra virgin olive oil (for roasting vegetables)
    • 1 teaspoon sea salt (for roasting vegetables)
    • ½ teaspoon freshly ground black pepper (for roasting vegetables)
  • For the Maple-Apple Cider Vinaigrette:
    • ½ cup extra virgin olive oil
    • ¼ cup apple cider vinegar
    • 2 tablespoons pure maple syrup (grade A or B for richer flavor)
    • 1 tablespoon Dijon mustard
    • 1 small clove garlic, minced (optional, but highly recommended for depth)
    • ½ teaspoon sea salt
    • ¼ teaspoon freshly ground black pepper

Roasting the Fall Harvest Vegetables

This is where the magic truly begins for our Fall Harvest Pasta Salad Recipe! Roasting brings out the incredible sweetness and depth of flavor in our autumn vegetables, transforming them into tender, caramelized gems that are simply irresistible. I always recommend using two baking sheets here to ensure everything roasts evenly and gets beautifully golden-brown, rather than steaming, which can happen if they are too crowded. As the vegetables roast, your kitchen will fill with the most inviting aroma — a sweet, earthy scent that truly signifies autumn and sets the stage for our delightful pasta salad.

  1. First things first, preheat your oven to a robust 400°F (200°C). This temperature is perfect for achieving that lovely crisp exterior and tender interior on our vegetables.
  2. Prepare the butternut squash: Tackling that butternut squash is our first step! Peeling a butternut squash can be a bit of a workout, but it’s worth it for the creamy texture it lends. I find a good quality vegetable peeler makes all the difference. Once peeled, carefully slice it in half lengthwise, then use a sturdy spoon to scoop out the seeds and stringy bits from the cavity. Now, cut the squash into uniform ¾-inch cubes. Uniformity is absolutely key here for even cooking, ensuring every piece is perfectly tender at the same time.
  3. Prepare the Brussels sprouts: For the Brussels sprouts, trim off the very end of the stem and remove any loose or discolored outer leaves. If they are on the smaller side, simply halve them. For larger sprouts, I like to quarter them so they cook through nicely and offer more surface area for that delicious caramelization.
  4. Prepare the red onion: Next, take your small red onion and cut it into ½-inch wedges. Red onion adds a wonderful sharp contrast that mellows and sweetens beautifully as it roasts, contributing a lovely savory undertone to the Fall Harvest Pasta Salad Recipe.
  5. Combine and season the vegetables: In a very large mixing bowl, combine the cubed butternut squash, the halved (or quartered) Brussels sprouts, and the red onion wedges. Drizzle them generously with ¼ cup of extra virgin olive oil. I love how the olive oil helps the seasonings adhere and promotes beautiful browning and crisp edges.
  6. Season the vegetables: Sprinkle the vegetables evenly with 1 teaspoon of sea salt and ½ teaspoon of freshly ground black pepper. Use your clean hands to toss everything together thoroughly, making sure every single piece — every cube of squash, every Brussels sprout half — is coated in oil and seasoning. You want every bite of this Fall Harvest Pasta Salad Recipe to be flavorful!
  7. Arrange on baking sheets: Divide the seasoned vegetables evenly between your two prepared baking sheets. The trick here is to spread them out in a single layer, giving each piece a little breathing room. If they’re too crowded, they’ll steam instead of roast, and we want that gorgeous caramelization and tender texture.
  8. Roast the vegetables: Transfer the baking sheets to your preheated oven. Roast for approximately 25-35 minutes, or until the vegetables are wonderfully tender, slightly caramelized, and beautifully golden brown at the edges. I usually give them a gentle stir or flip halfway through the roasting time to encourage even browning on all sides. Keep an eye on them; ovens can vary! Once they’re perfectly roasted and fragrant, remove them from the oven and set them aside to cool slightly while you prepare the other components of our delightful Fall Harvest Pasta Salad Recipe.

Cooking the Pasta

While our beautiful fall vegetables are roasting, or even after they’ve come out of the oven, we can turn our attention to the star of any pasta salad — the pasta itself! Achieving perfectly al dente pasta is absolutely crucial for a great pasta salad; nobody wants mushy or overly soft pasta that falls apart. For this Fall Harvest Pasta Salad Recipe, I like to choose a short, sturdy pasta shape that can really hold onto the dressing and all those wonderful roasted bits. Shapes like fusilli (those lovely spirals), orecchiette (little ears perfect for scooping up flavor), or farfalle (bow ties) work wonderfully because their nooks and crannies, or their substantial shape, capture the dressing and small vegetable pieces perfectly.

  1. Bring water to a rolling boil: Fill a very large pot with plenty of water — usually at least 6 quarts for 1 pound of pasta. This generous amount of water gives the pasta ample room to move and cook properly, preventing it from clumping. Place it over high heat and bring it to a vigorous, rolling boil.
  2. Season the water generously: Once the water is at a full boil, add a generous amount of salt to the water. I usually add about 1-2 tablespoons of kosher salt or sea salt. Salting the water adequately is the only chance you get to season the pasta itself from the inside out, adding a fundamental layer of flavor that will make a huge difference to your finished Fall Harvest Pasta Salad Recipe. Think of it as seasoning the foundation of our dish!
  3. Cook the pasta to al dente: Add the 1 pound of short-cut pasta to the boiling salted water. Stir immediately and frequently during the first few minutes to prevent the pasta from sticking together. Cook according to the package directions, but always keep a close eye on it and taste it a minute or two before the suggested cooking time.
  4. Achieve the perfect al dente texture: We’re aiming for “al dente” here — meaning it should be tender but still have a slight, pleasant bite to it when you chew. For pasta salad, I often cook it just to al dente, sometimes even 30 seconds to a minute less than what I would for a hot pasta dish, as it will firm up ever so slightly as it cools. This ensures your Fall Harvest Pasta Salad Recipe has great texture.
  5. Drain and rinse: Once the pasta is perfectly al dente, carefully drain it in a colander. For pasta salads, I generally recommend giving the pasta a quick rinse under cold water. This crucial step immediately stops the cooking process and removes any excess starch, which prevents the pasta from sticking together and helps keep the salad from becoming gummy. Shake the colander well to remove as much water as possible.
  6. Cool the pasta completely: Transfer the rinsed and thoroughly drained pasta to a large bowl and let it cool completely while you finish up the other components. You can spread it out on a baking sheet to speed up cooling if you’re in a hurry. Ensuring the pasta is cool helps prevent the other ingredients, especially the goat cheese, from getting too warm and melting when everything is combined.

Preparing the Maple-Apple Cider Vinaigrette

This vibrant Maple-Apple Cider Vinaigrette is the glorious glue that brings all the beautiful, diverse flavors of our Fall Harvest Pasta Salad Recipe together. It’s a harmonious blend of sweet, tangy, and boasts a lovely warmth that complements the roasted vegetables and creamy goat cheese perfectly. It’s incredibly simple to make, but the careful balance of flavors is key to making this pasta salad truly shine!

  1. Combine liquid ingredients: In a small bowl or, even better, a jar with a tight-fitting lid (my preferred method for easy emulsification!), combine ½ cup of extra virgin olive oil, ¼ cup of apple cider vinegar, and 2 tablespoons of pure maple syrup. The maple syrup adds that quintessential fall sweetness and a beautiful, rich depth that truly enhances the “harvest” aspect of our salad.
  2. Add savory elements: Stir in 1 tablespoon of Dijon mustard. Dijon mustard is a fantastic emulsifier; it helps the dressing stay together and adds a wonderful zesty, slightly sharp note that cuts through the richness. If you’re using it, now is the time to add your minced small clove of garlic. Garlic adds a lovely aromatic punch that brings an extra layer of complexity to the vinaigrette.
  3. Season the dressing: Season the dressing with ½ teaspoon of sea salt and ¼ teaspoon of freshly ground black pepper. Remember, you can always adjust seasonings later, so start here and taste as you go.
  4. Whisk or shake vigorously: Whisk all the ingredients together vigorously until the vinaigrette is well combined and beautifully emulsified. If you’re using a jar, simply put on the lid and shake it until everything is creamy and homogenous — it’s a great arm workout! You’ll notice the color become a bit lighter and creamier as the oil and vinegar fully combine. If you don’t have a jar, a whisk and a bowl work just as well, though you might need to whisk for a minute or two longer to achieve that lovely emulsified texture.
  5. Taste and adjust: Give the vinaigrette a taste. This is your chance to make it absolutely perfect for your palate! You might decide you want a little more maple syrup for sweetness, perhaps a touch more apple cider vinegar for an extra tang, or a pinch more salt or pepper to really make the flavors pop. Set the dressing aside while you move on to assembling your magnificent Fall Harvest Pasta Salad Recipe.

Assembling the Fall Harvest Pasta Salad

Now for the exciting part — bringing everything together into our spectacular Fall Harvest Pasta Salad Recipe! This is where all our hard work pays off, and the individual components transform into a harmonious, incredibly flavorful, and visually stunning dish. It’s important to make sure your roasted vegetables and pasta are cooled down before assembling to prevent the goat cheese from melting excessively and the entire salad from becoming soggy. We want distinct textures and vibrant colors!

  1. Cube the apple: While the pasta cools, prepare your apple. You want a crisp-sweet variety for this, like a Honeycrisp or Fuji, as it adds a wonderful fresh crunch and bright flavor that contrasts beautifully with the earthiness of the roasted vegetables. Core the apple and cut it into ¾-inch cubes, similar in size to your roasted squash. You can leave the skin on for extra color, nutrition, and texture! The apple adds a fantastic crisp texture and a burst of fresh, juicy sweetness to every bite.
  2. Toast the pecans: If you haven’t already, take a moment to gently toast your ½ cup of pecans. You can do this in a dry skillet over medium heat for 3-5 minutes, stirring frequently until they become fragrant and lightly golden. Alternatively, you can toast them in the oven alongside your vegetables for the last 5 minutes of roasting time. Watch them very carefully as nuts can burn quickly! Once toasted, let them cool completely and then roughly chop them. Toasting significantly enhances their nutty flavor and adds a fantastic crunch to the Fall Harvest Pasta Salad Recipe.
  3. Chop the fresh herbs: Gather your fresh parsley, sage, and thyme. Finely chop ¼ cup of fresh parsley, 1 tablespoon of fresh sage, and carefully pick the tiny leaves from 1 teaspoon of fresh thyme stems. Fresh herbs are essential here; they add a burst of vibrant freshness and an aromatic depth that truly elevates this Fall Harvest Pasta Salad Recipe, making it smell as good as it tastes.
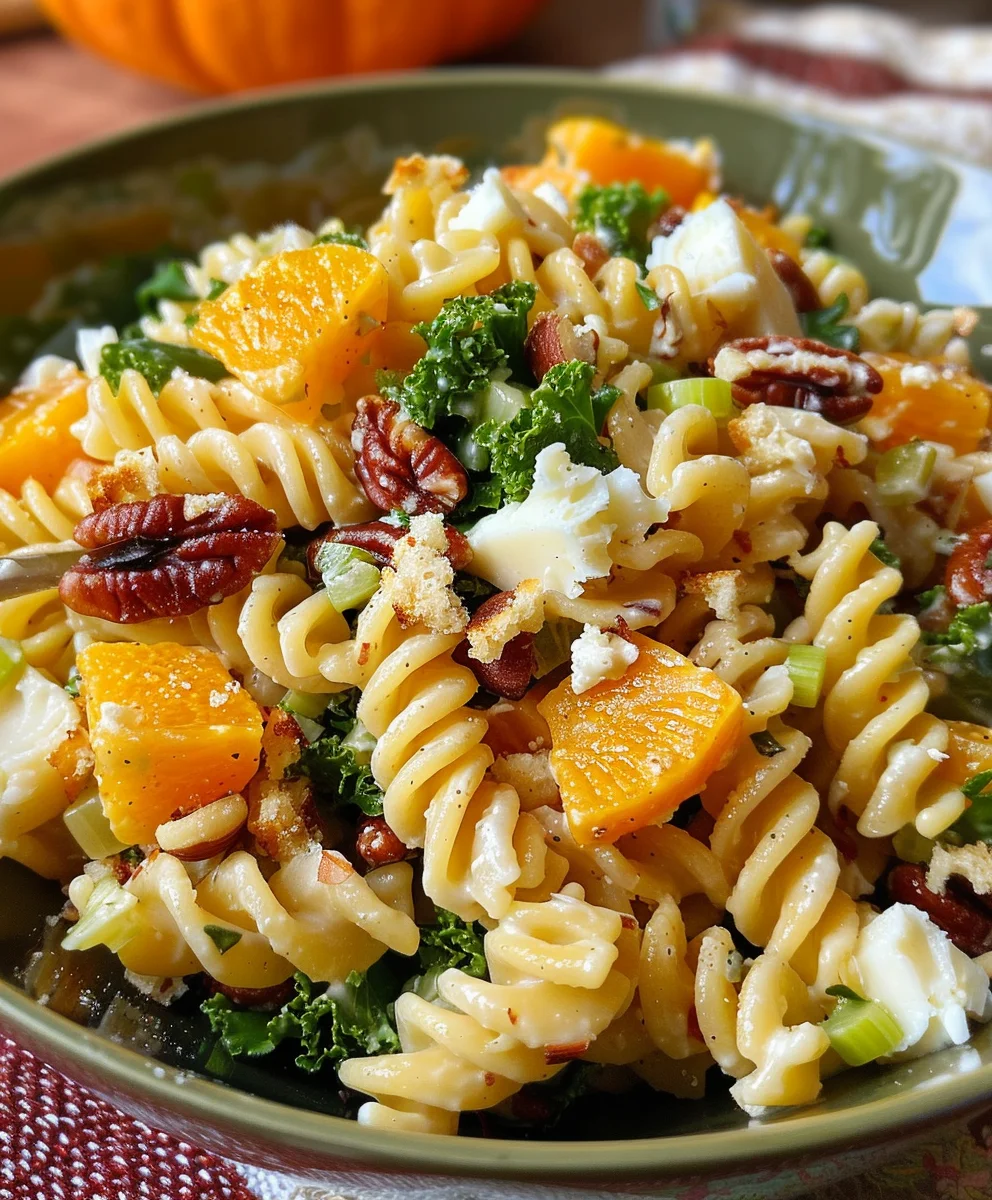
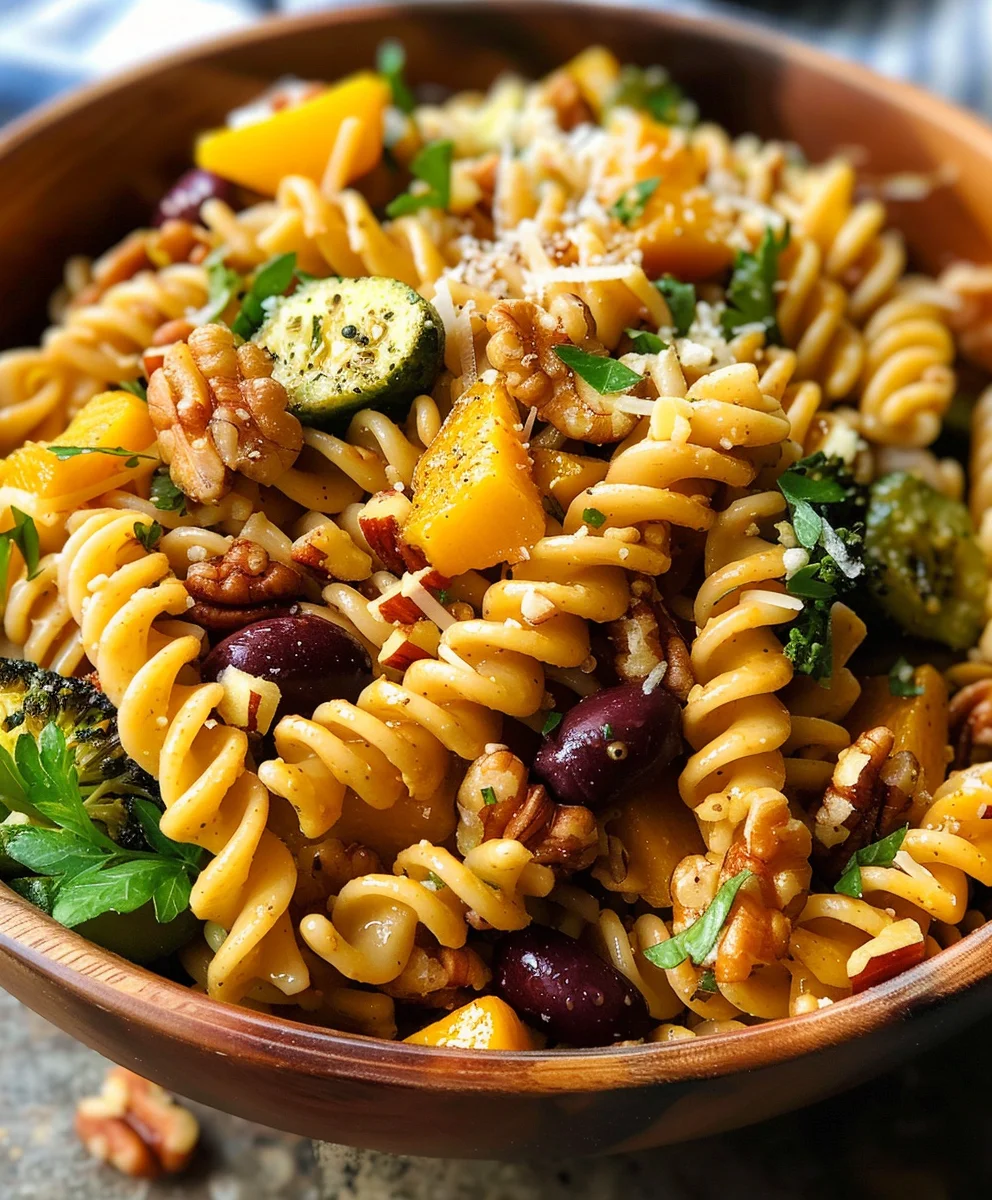
  4. Combine main ingredients: In a very large mixing bowl — one big enough to accommodate all these wonderful ingredients comfortably — combine the cooled cooked pasta, the cooled roasted butternut squash, Brussels sprouts, and red onion. Add the cubed fresh apple and ½ cup of dried cranberries. The dried cranberries offer a delightful chewy texture and a pop of tartness that brightens the whole dish. You could also use dried tart cherries if you prefer, for a slightly different, but equally delicious, berry note.
  5. Add herbs and nuts: Sprinkle in the chopped fresh parsley, sage, and thyme, along with the toasted and chopped pecans. These ingredients contribute not only flavor but also appealing visual interest and varying textures.
  6. Dress the salad: Now, pour the prepared Maple-Apple Cider Vinaigrette generously over the pasta and vegetable mixture.
  7. Toss gently to coat: Using two large spoons or tongs, gently toss everything together until all the ingredients are beautifully and evenly coated with the dressing. Take your time here to ensure even distribution of all those delicious flavors and textures. Every component should be singing!
  8. Add crumbled goat cheese: Finally, gently fold in the 4 ounces of crumbled fresh goat cheese. I adore goat cheese in this salad for its creamy texture and distinct tangy, slightly earthy flavor. It melts ever so slightly when mixed with the still-warm (but not hot!) roasted vegetables and pasta, creating a wonderful, almost saucy element that binds flavors. Its sharp flavor is a perfect counterpoint to the sweet squash and maple dressing, adding a layer of sophistication to our Fall Harvest Pasta Salad Recipe. If you prefer, crumbled feta cheese would also be a delicious substitute, offering a similar salty tang.

Chilling and Serving Your Fall Harvest Pasta Salad

This Fall Harvest Pasta Salad Recipe is truly one of those dishes that gets better with a little time, allowing all those incredible autumn flavors to meld and deepen. A short chill in the refrigerator is not just for cooling; it allows the pasta to fully absorb the dressing and the individual flavors to marry and develop into something truly harmonious and profound.

  1. Chill the salad: Once assembled, cover the bowl tightly with plastic wrap or transfer the salad to an airtight container. Refrigerate for at least 1-2 hours, or ideally longer, to allow the flavors to marry beautifully. I find that chilling for at least 4 hours, or even overnight, yields the most flavorful results, as it gives everything ample time to truly get to know each other. The longer it chills, the more pronounced and harmonious the “fall harvest” essence becomes.
  2. Final check and serve: Before serving, give the Fall Harvest Pasta Salad Recipe a good stir. Sometimes, the pasta might absorb a lot of the dressing during chilling, so you might want to add a tiny splash more olive oil or apple cider vinegar if it seems a little dry for your liking. Taste and adjust seasonings one last time — perhaps a pinch more salt or pepper, or even a touch more maple syrup if you like it on the sweeter side. This final adjustment ensures perfection.
  3. Presentation and Enjoyment: You can serve this delightful pasta salad chilled or at room temperature; both are wonderful. For a beautiful presentation, transfer it to a large, shallow serving bowl or platter and garnish with a few extra fresh herb sprigs, a sprinkle of extra goat cheese, or a few whole toasted pecans. This Fall Harvest Pasta Salad Recipe is not just a dish; it’s an experience, a celebration of autumn’s bounty. It’s substantial enough to be a light lunch on its own, a fantastic vegetarian main, or an incredibly popular side dish at any autumn gathering. It’s perfect for potlucks, holiday meals like Thanksgiving, or simply as a vibrant, make-ahead weeknight side that holds up beautifully in the refrigerator for several days. The vibrant colors — the deep orange of the squash, the rich green of the Brussels sprouts, the ruby red of the cranberries, and the creamy white of the goat cheese — make it an inviting and visually stunning dish that truly embodies the spirit and flavors of the fall season. Enjoy every delicious, wholesome, and satisfying bite of this truly exceptional Fall Harvest Pasta Salad Recipe!

Delicious Fall Harvest Pasta Salad Recipe – Perfect for Any Meal!

Conclusion:

Well, my friends, we’ve reached the sweet, savory, and utterly satisfying end of our journey through this incredible recipe. I sincerely hope that by now, you’re as excited as I am about getting into your kitchen to whip up this absolute gem. This isn’t just another pasta dish; it’s a vibrant, heartwarming, and deeply satisfying culinary experience that truly captures the essence of the season. From the moment you toss those perfectly roasted vegetables with the al dente pasta, you’ll feel the magic happening. The symphony of flavors, from the earthy sweetness of roasted squash and apples to the subtle tang of dried cranberries and the nutty crunch of pecans, creates a harmonious blend that is simply irresistible. Every bite is a delightful exploration of texture and taste, proving that comfort food doesn’t have to be heavy – it can be brilliantly fresh and invigorating. We’ve created something that is both incredibly nourishing and undeniably delicious, making it a stellar addition to any meal, any time.

What makes this particular dish a true standout is its incredible balance. It manages to be hearty enough to satisfy a hungry crowd, yet light enough to complement other dishes. The dressing, a carefully crafted blend that enhances rather than overwhelms, ties all the diverse components together, creating a unified flavor profile that will have everyone reaching for seconds. I find myself coming back to this recipe time and time again because it consistently delivers on taste, presentation, and pure enjoyment. It’s also surprisingly simple to prepare, making it a perfect choice for busy weeknights or for those times when you want to impress without spending hours slaving over a hot stove. Trust me, the minimal effort yields maximum reward here, and that’s a promise! This is a dish that truly embodies the spirit of autumn, bringing warmth and flavor to every plate.

Serving Suggestions & Creative Variations to Elevate Your Meal

Now that you’re practically salivating, let’s talk about how to make this dish an even more versatile star in your culinary repertoire. While fantastic on its own as a light lunch or a satisfying vegetarian main course, this pasta salad truly shines in a variety of settings. Imagine serving it as a stunning side dish at your next holiday gathering, bringing a burst of color and fresh flavor to the table. It pairs beautifully with roasted chicken, grilled salmon, or even a hearty lentil soup, offering a refreshing counterpoint to richer flavors. For a delightful packed lunch, it holds up incredibly well, meaning you can enjoy its goodness for days after preparing it, making your meal prep a breeze. It’s also an absolute crowd-pleaser for potlucks or picnics, traveling well and impressing all who try it.

But why stop there? Let’s get creative! If you’re looking to boost the protein content, consider adding some crumbled goat cheese or feta for a tangy kick, or perhaps some pan-seared halloumi for a salty, chewy texture. For meat-eaters, shredded rotisserie chicken or crispy bacon bits would integrate seamlessly, adding another layer of savory goodness. Plant-based enthusiasts could toss in some roasted chickpeas for extra crunch and protein, or even some crumbled firm tofu. Don’t be afraid to experiment with your greens too; a handful of baby spinach or arugula wilted in with the warm pasta would add a lovely peppery note. And for those who like a little heat, a pinch of red pepper flakes in the dressing can awaken the entire dish. Swap out the pecans for toasted walnuts or pepitas for a different nutty dimension. You could even drizzle with a balsamic glaze right before serving for an extra layer of sweetness and tang. The beauty of this recipe is its adaptability, allowing you to truly make it your own based on what you have on hand or what your taste buds are craving, ensuring it always feels fresh and exciting.

Don’t Just Dream About It – Make This Fall Harvest Pasta Salad Recipe Today!

So, what are you waiting for? This is your invitation, your gentle nudge, to dive into the delightful world of this Fall Harvest Pasta Salad Recipe. I promise you, it’s a game-changer. It’s the kind of recipe that makes you feel accomplished, nourished, and utterly content. Imagine the aromas filling your kitchen as you roast the vegetables, the vibrant colors coming together in the bowl, and most importantly, the incredible satisfaction of that first bite. It’s more than just food; it’s an experience, a memory waiting to be made around your own table, bringing smiles and warmth to everyone.

I genuinely encourage you to give this a try. Don’t let another day pass without experiencing the joy and deliciousness this dish brings. It’s perfect for cozy evenings, festive gatherings, or simply treating yourself to something truly special. And when you do, please, please, please come back and share your experience with me! I absolutely love hearing how your culinary adventures turn out. Did you add something special? Did your family rave about it? Snap a picture, leave a comment, or simply tell me what you thought. Your feedback not only brightens my day but also helps others discover the magic of this recipe. Let’s celebrate the bounty of the season together, one delicious forkful at a time. Happy cooking, everyone!


Fall Harvest Pasta Salad Recipe

Fall Harvest Pasta Salad Recipe

Fall Harvest Pasta Salad Recipe is more than just a dish; it’s an edible celebration of autumn’s bounty. Imagine a vibrant medley of seasonal ingredients, each bite bursting with the crispness of a cool fall morning and the comforting warmth of a cozy evening. It’s a modern take on gathering the harvest, bringing together the earthy sweetness of roasted vegetables, the tangy pop of dried fruit, and the comforting chew of perfectly cooked pasta, all tossed in a delightful, aromatic dressing. This particular Fall Harvest Pasta Salad Recipe is cherished by so many for its incredible versatility and irresistible flavor profile. People adore its perfect balance of textures, making it an ideal side dish for any gathering or a wonderfully satisfying main course. Its make-ahead convenience and ability to please diverse palates ensure it’s a staple for potlucks, weeknight dinners, and holiday tables alike. Get ready to fall in love with the ultimate autumn comfort food, served delightfully cool.

Prep Time
45 Minutes

Cook Time
40 Minutes

Total Time
25 Minutes

Servings
6 servings

Ingredients

  • 12 oz pasta
  • 1 cup butternut squash, diced
  • 1 cup Brussels sprouts, halved
  • 1 cup cranberries
  • 1/2 cup pecans, chopped
  • 1/2 cup feta cheese, crumbled
  • 1/4 cup olive oil
  • 2 tbsp balsamic vinegar
  • Salt to taste
  • Pepper to taste

Instructions

  1. Step 1
    Preheat oven to 400°F (200°C). In a large bowl, toss the diced butternut squash and halved Brussels sprouts with a drizzle of olive oil, salt, and pepper.
  2. Step 2
    Spread the seasoned vegetables in a single layer on a baking sheet. Roast for 25-35 minutes, stirring halfway, until tender and caramelized. Remove from oven and let cool completely.
  3. Step 3
    Cook 12 oz pasta in generously salted boiling water according to package directions until al dente. Drain, rinse immediately with cold water to stop cooking, and cool completely.
  4. Step 4
    In a small bowl, whisk together 1/4 cup olive oil, 2 tablespoons balsamic vinegar, salt, and pepper until well combined and emulsified.
  5. Step 5
    In a very large mixing bowl, combine the cooled cooked pasta, cooled roasted butternut squash and Brussels sprouts, 1 cup cranberries, and 1/2 cup chopped pecans.
  6. Step 6
    Pour the prepared dressing generously over the pasta and vegetable mixture. Toss gently until all ingredients are evenly coated. Gently fold in 1/2 cup crumbled feta cheese.
  7. Step 7
    Cover the salad and refrigerate for at least 1-2 hours, or ideally longer, to allow flavors to meld. Before serving, give it a good stir and adjust seasonings if needed. Serve chilled or at room temperature.

Important Information

Nutrition Facts (Per Serving)

It is important to consider this information as approximate and not to use it as definitive health advice.

Allergy Information

Please check ingredients for potential allergens and consult a health professional if in doubt.

« Previous Post
Butternut Squash Mac & Cheese: Creamy & Healthy Comfort
Next Post »
Rich & Creamy Black Velvet Cheesecake Cookies Recipe

If you enjoyed this…

Honey Goat Cheese Grilled Cheese: Sweet & Savory Delight

Cottage Cheese Bread

Cottage Cheese Bread – Soft, Moist & Protein-Packed!

Hearty Sausage Tortellini Soup: Quick & Easy Weeknight Meal

Primary Sidebar

Browse by Diet

BreakfastDinnerLunchDessertAppetizer

Sweet Peach Yogurt Parfait Delight

One of my fondest memories is from a lazy summer afternoon spent at my grandmother’s house. The sun filtered through the kitchen window, casting a warm glow over the table where she would create her culinary magic. It was during one of those blissful moments that I first tasted her Peach Yogurt Parfait with Honey and Granola. The sweet aroma of ripe peaches mingling with creamy yogurt and the crunch of granola was nothing short of heavenly. It felt like summer captured in a bowl, and I still remember the joy of diving in with a spoon, each layer revealing a new burst of flavor.

When I think about that parfait, I can almost hear the gentle hum of the bees outside, reminding me of the floral notes that honey brings to every bite. The vibrant yellows and soft oranges of the peaches contrast beautifully with the creamy white yogurt and the golden crunch of granola. It’s a dish that not only looks delightful but also tastes like a celebration of fresh, wholesome ingredients.

What makes my version of this Peach Yogurt Parfait special is the careful balance of flavors and textures. I use ripe, juicy peaches, drizzled with locally sourced honey, and a homemade granola that’s bursting with nuts and seeds for an extra crunch. It’s a simple dish, but every layer is crafted with love and attention.

Let me show you exactly how to make this delightful parfait, so you can bring a bit of that summer magic into your kitchen!

Sweet Peach Yogurt Parfait Delight

Why You’ll Love This Recipe

  • Delightfully creamy texture from the Greek yogurt, paired with the juicy sweetness of fresh peaches.
  • Ready in under 20 minutes, making it a quick and satisfying breakfast or snack option.
  • Budget-friendly, using common ingredients that you may already have in your pantry.
  • Customizable with your favorite granola and nuts, allowing you to tailor each parfait to your taste.
  • Perfectly balanced flavors with the bright acidity of lemon juice and the sweetness of honey enhancing the peaches.

Ingredients

  • For the Parfait:
  • 2 cups plain Greek yogurt (or vanilla yogurt for a sweeter option)
  • 2 large ripe peaches, diced (about 2 cups)
  • 1 tablespoon fresh lemon juice (to prevent browning of peaches)
  • 2 tablespoons honey (plus more for drizzling)
  • 1 teaspoon vanilla extract (optional for extra flavor)
  • For the Granola:
  • 1 cup granola (store-bought or homemade; see notes for a simple granola recipe)
  • 1/4 cup sliced almonds (optional for added crunch)
  • 1/4 cup shredded coconut (optional for added flavor)

Let’s dive into some key ingredients that make this Peach Yogurt Parfait so delightful! First, the Greek yogurt is not only creamy but also packed with protein, making it a satisfying option for breakfast or a snack. If you’re looking for a sweeter option, you can easily substitute it with vanilla yogurt, though it may alter the overall flavor balance. Next, the ripe peaches are the star of the show; their natural sweetness shines through, so I recommend choosing peaches that yield slightly to pressure, indicating they’re perfectly ripe. If peaches aren’t in season, feel free to use nectarines or even frozen peaches—just thaw them before use. Finally, honey adds a lovely floral sweetness that ties everything together. If you prefer, maple syrup can serve as a delicious substitute.

Step-by-Step Instructions

  1. Start by preparing the peaches. Wash them thoroughly, then slice and dice them into bite-sized pieces. In a medium bowl, toss the diced peaches with 1 tablespoon of fresh lemon juice to prevent browning. Set aside for about 5 minutes while the lemon juice works its magic.
  2. In a separate bowl, combine the Greek yogurt, 2 tablespoons of honey, and 1 teaspoon of vanilla extract if using. Stir the mixture until smooth and thoroughly blended. This should take about a minute. Avoid overmixing to maintain the creaminess of the yogurt.
  3. Now it’s time to layer your parfait. Grab a clear glass or bowl to showcase your beautiful creation. Start with a generous spoonful of the yogurt mixture at the bottom—about 1/4 cup will do. Use a spoon to spread it evenly.
  4. Add a layer of the diced peaches over the yogurt, ensuring they cover the yogurt completely. You might want to use about half of what you have prepared—roughly 1 cup. This layer should be visually appealing, so arrange the peaches neatly.
  5. Sprinkle 1/4 cup of granola over the peaches. This adds a delightful crunch. Make sure to distribute it evenly to ensure every bite has that satisfying texture. Avoid packing it down too tightly, as you want it to maintain its crunch.
  6. Repeat the layers: spoon in another 1/4 cup of yogurt, followed by another cup of peaches, and another sprinkle of granola. You should have at least two layers, but feel free to add more depending on your glass size.
  7. Finish off your parfait with a drizzle of honey on top for added sweetness and a touch of elegance. If you’re using sliced almonds or shredded coconut, sprinkle them on top now. It adds a lovely visual contrast and extra flavor.
  8. Serve immediately or refrigerate for up to 30 minutes before serving to allow the flavors to meld together. However, I recommend enjoying it fresh to maintain the granola’s crunch.

Pro Tips for the Best Peach Yogurt Parfait With Honey And Granola

  • Make sure to choose ripe peaches for the best flavor and texture. A common mistake is using unripe fruit, which can lead to a less enjoyable parfait. Look for peaches that are fragrant and slightly soft to the touch.
  • Use a clear glass to assemble your parfait; this not only makes for a beautiful presentation but also allows you to see the colorful layers, which adds to the enjoyment of eating it.
  • For an even creamier texture, consider whipping the Greek yogurt with a hand mixer for a couple of minutes before layering. This small adjustment makes a huge difference in mouthfeel.
  • Be mindful of the granola-to-yogurt ratio. Too much granola can overwhelm the parfait, while too little can make it feel too creamy. Aim for about 1/4 cup of granola per layer for the perfect balance.
  • If you’re making this for a gathering, consider preparing the yogurt and peaches ahead of time and layering them just before serving. This ensures the granola stays crunchy!

Variations & Serving Ideas

There are so many ways to get creative with your Peach Yogurt Parfait! For a tropical twist, swap out the peaches for mangoes or pineapples and top with coconut flakes. If you prefer a berry flavor, mix in some blueberries or strawberries with the peaches for added color and taste. For a nutty version, incorporate chopped walnuts or pecans instead of almonds.

As for serving ideas, this parfait pairs beautifully with a side of scrambled eggs for a hearty breakfast or fresh fruit salad for a light lunch. You might also enjoy it alongside whole grain toast with almond butter for an energizing snack. The contrast of flavors and textures will elevate your meal experience!

Storage, Make-Ahead & Reheating

The Peach Yogurt Parfait is best enjoyed fresh, but you can prepare some components ahead of time. Store the layered parfait in an airtight container in the refrigerator for up to 24 hours. However, be cautious; the granola may lose its crunch if stored too long. You can freeze the yogurt and peach mixture for up to 2 months; just remember to thaw it in the refrigerator overnight before serving.

If you plan to enjoy this dish the next day, it can taste even better as the flavors meld together. Just remember to add the granola right before serving to keep its delightful crunch!

Frequently Asked Questions

Can I make Peach Yogurt Parfait With Honey And Granola ahead of time?

Yes — in fact, it tastes even better the next day as the flavors meld. However, I recommend waiting to add the granola until just before serving to maintain its crunch.

What can I substitute for Greek yogurt?

If you prefer a lighter option, you can substitute Greek yogurt with regular yogurt or a dairy-free alternative like coconut yogurt. Just remember that this may alter the creaminess and flavor profile slightly.

Can I use frozen peaches for this parfait?

Absolutely! Just make sure to thaw the frozen peaches before using them. They will still add great flavor, though the texture may be slightly softer than fresh peaches.

How do I make the parfait vegan?

To make a vegan version, substitute the Greek yogurt with a plant-based yogurt alternative, and replace honey with maple syrup or agave nectar. This keeps the parfait sweet while adhering to a vegan diet.

What other fruits can I use in this recipe?

You can mix and match fruits based on your preference. Try using strawberries, blueberries, raspberries, or even bananas. Just make sure to adjust the lemon juice as needed to prevent browning.

Sweet Peach Yogurt Parfait Delight

Final Thoughts

The Peach Yogurt Parfait with Honey and Granola is a delightful blend of creamy yogurt, sweet peaches, and crunchy granola that creates a satisfying and nourishing treat. Each layer bursts with flavor, making it a perfect choice for breakfast or a light dessert.

This is the kind of recipe I come back to again and again, especially when I want something refreshing and wholesome to start my day. The harmony of sweet and tart flavors, combined with the delightful crunch, never fails to lift my spirits!

I encourage you to give this parfait a try and indulge in its comforting goodness. Feel free to share your results or even add your own twist—perhaps a sprinkle of cinnamon or a handful of nuts. Enjoy creating your perfect parfait!

Print
clock clock iconcutlery cutlery iconflag flag iconfolder folder iconinstagram instagram iconpinterest pinterest iconfacebook facebook iconprint print iconsquares squares iconheart heart iconheart solid heart solid icon

Peach Yogurt Parfait


  • Author: Lily author
  • Total Time: 15 minutes
  • Yield: 4 servings 1x
Pin Recipe
Print Recipe

Description

This Peach Yogurt Parfait combines creamy Greek yogurt, juicy peaches, and crunchy granola for a delightful treat. It’s a perfect breakfast or snack that captures the essence of summer in every bite.


Ingredients

Scale
  • For the Parfait:
  • 2 cups plain Greek yogurt (or vanilla yogurt for a sweeter option)
  • 2 large ripe peaches, diced (about 2 cups)
  • 1 tablespoon fresh lemon juice (to prevent browning of peaches)
  • 2 tablespoons honey (plus more for drizzling)
  • 1 teaspoon vanilla extract (optional for extra flavor)
  • For the Granola:
  • 1 cup granola (store-bought or homemade; see notes for a simple granola recipe)
  • 1/4 cup sliced almonds (optional for added crunch)
  • 1/4 cup shredded coconut (optional for added flavor)

Instructions

  1. Start by preparing the peaches. Wash them thoroughly, then slice and dice them into bite-sized pieces. In a medium bowl, toss the diced peaches with 1 tablespoon of fresh lemon juice to prevent browning. Set aside for about 5 minutes while the lemon juice works its magic.
  2. In a separate bowl, combine the Greek yogurt, 2 tablespoons of honey, and 1 teaspoon of vanilla extract if using. Stir the mixture until smooth and thoroughly blended. This should take about a minute. Avoid overmixing to maintain the creaminess of the yogurt.
  3. Now it’s time to layer your parfait. Grab a clear glass or bowl to showcase your beautiful creation. Start with a generous spoonful of the yogurt mixture at the bottom—about 1/4 cup will do. Use a spoon to spread it evenly.
  4. Add a layer of the diced peaches over the yogurt, ensuring they cover the yogurt completely. You might want to use about half of what you have prepared—roughly 1 cup. This layer should be visually appealing, so arrange the peaches neatly.
  5. Sprinkle 1/4 cup of granola over the peaches. This adds a delightful crunch. Make sure to distribute it evenly to ensure every bite has that satisfying texture. Avoid packing it down too tightly, as you want it to maintain its crunch.
  6. Repeat the layers: spoon in another 1/4 cup of yogurt, followed by another cup of peaches, and another sprinkle of granola. You should have at least two layers, but feel free to add more depending on your glass size.
  7. Finish off your parfait with a drizzle of honey on top for added sweetness and a touch of elegance. If you’re using sliced almonds or shredded coconut, sprinkle them on top now. It adds a lovely visual contrast and extra flavor.
  8. Serve immediately or refrigerate for up to 30 minutes before serving to allow the flavors to meld together. However, I recommend enjoying it fresh to maintain the granola’s crunch.
  • Prep Time: 15 mins
  • Cook Time: 0 mins
  • Category: Breakfast
  • Method: No-cook
  • Cuisine: American

Nutrition

  • Serving Size: 1 parfait
  • Calories: 250
  • Sugar: 20 g
  • Sodium: 50 mg
  • Fat: 5 g
  • Saturated Fat: 2 g
  • Unsaturated Fat: 3 g
  • Trans Fat: 0 g
  • Carbohydrates: 40 g
  • Fiber: 3 g
  • Protein: 10 g
  • Cholesterol: 10 mg

Keywords: Choose ripe peaches for the best flavor and texture. Use a clear glass for a beautiful presentation. For creaminess, consider whipping the yogurt before layering. Be mindful of the granola-to-yogurt ratio. Prepare yogurt and peaches ahead of time for gatherings, layering just before serving.

Did you make this recipe?

Share a photo and tag us — we can't wait to see what you've made!

Sun-Kissed Frozen Orange Cream Slush

As a child, summer days felt like they lasted forever. I remember the sticky heat wrapping around me as I played outside, my laughter mingling with the sounds of the neighborhood. But nothing could cool me down quite like the moment I’d spot my grandmother, laboring over her blender, whipping up her famous Frozen Orange Creamsicle Slush. That vibrant orange treat, with its frosty texture and sweet citrus aroma, was like a burst of sunshine in a cup. Just one sip, and I could feel the coolness wash over me, sparking pure joy.

This Frozen Orange Creamsicle Slush has a way of making you feel like a kid again. Its creamy, dreamy consistency is a delightful balance of bright orange and soft vanilla, inviting you to dive right in. The refreshing tang of orange dances on your tongue, while the smooth creaminess envelops you in a comforting embrace. It’s a nostalgic treat that’s perfect for hot summer afternoons or anytime you need a little pick-me-up.

What makes my version of this slush stand out is the addition of a hint of vanilla bean, which elevates the flavor and adds an extra layer of richness. Plus, it’s super easy to whip up with just a few simple ingredients that you probably already have on hand! So, if you’re ready to relive those sun-soaked memories, let me show you exactly how to make it.

Sun-Kissed Frozen Orange Cream Slush

Why You’ll Love This Recipe

  • Each slush is a perfect blend of creamy vanilla and zesty orange, creating a nostalgic flavor reminiscent of summer days.
  • This refreshing treat is ready in under 15 minutes, making it an ideal quick dessert for unexpected guests or hot afternoons.
  • With just 8 simple ingredients, it’s budget-friendly, ensuring you don’t have to break the bank to enjoy a delicious slush.
  • The slush has a perfectly smooth texture, thanks to the combination of ice and ice cream, providing a delightful contrast to the bright citrus flavors.
  • It’s highly customizable; you can easily adjust the sweetness and add fresh herbs for a unique twist that suits your taste.

Ingredients

  • 2 cups orange juice (freshly squeezed or store-bought)
  • 1 cup vanilla ice cream
  • 1 cup crushed ice
  • 1/2 cup milk (whole or 2%)
  • 1/4 cup granulated sugar (adjust based on sweetness preference)
  • 1 teaspoon vanilla extract
  • Zest of 1 orange (for added flavor)
  • Fresh orange slices and mint leaves (for garnish)

The star of this Frozen Orange Creamsicle Slush is the orange juice, which provides the vibrant, citrusy base. Freshly squeezed juice will yield the brightest flavor, but store-bought options can be just as convenient. If you’re opting for store-bought, choose 100% pure juice with no added sugars for the best results. Another essential ingredient is the vanilla ice cream; it adds creaminess and sweetness. You can substitute it with dairy-free ice cream if you’re looking for a vegan option. Whole or 2% milk complements the ice cream, creating a smooth blend. If you want a lower-calorie version, almond or oat milk can be good alternatives.

Lastly, the granulated sugar can be adjusted based on your sweetness preference. If you prefer a more natural sweetener, consider using honey or agave syrup. The orange zest enhances the flavor profile, providing an aromatic pop that brings the whole slush together. Don’t skip it! It adds an extra layer of brightness that makes this slush truly special.

Step-by-Step Instructions

  1. Start by preparing your ingredients. Gather 2 cups of orange juice, 1 cup of vanilla ice cream, and 1 cup of crushed ice. Make sure the ice is finely crushed, as larger chunks can make blending difficult.
  2. In a blender, combine the orange juice, vanilla ice cream, crushed ice, and 1/2 cup of milk. Add 1/4 cup of granulated sugar and 1 teaspoon of vanilla extract. If you like a sweeter slush, consider adding a bit more sugar at this stage.
  3. Add the zest of 1 orange to the blender. This step is crucial for enhancing the citrus flavor of your slush. Make sure not to include the bitter white pith—only the flavorful zest.
  4. Blend the mixture on medium-high speed for about 30-45 seconds. Stop once the ingredients are fully combined and the slush has a smooth, even consistency. If you notice large chunks of ice, blend for an additional 10-15 seconds. Avoid over-blending, as this can make the slush too liquidy.
  5. Once blended, taste the slush. If it needs more sweetness, add a little more sugar and blend for a few more seconds. If it’s too thick, you can add a splash of milk to reach your desired consistency.
  6. Pour the slush into glasses. This recipe typically serves 4, but you can easily double it for larger gatherings. Use a spoon to help guide the slush into the glasses if needed.
  7. Garnish each serving with fresh orange slices and mint leaves. The mint not only adds a pop of color but also a refreshing aroma that complements the citrus flavors beautifully.
  8. Serve immediately and enjoy! If you’ve made extra, you can refrigerate it for a short time, but it’s best enjoyed fresh.

Pro Tips for the Best Frozen Orange Creamsicle Slush

  • Don’t skip the orange zest! It’s a game-changer for flavor. Always zest before juicing to make it easier.
  • Use a high-powered blender for the best texture. A standard blender may struggle with ice, leading to uneven consistency. If you have a food processor, that can work too, but ensure the ice is finely crushed.
  • Adjust the ice-to-liquid ratio carefully. If your slush is too thick, it won’t blend well. Start with less ice and add more until you reach your preferred texture.
  • Be cautious with the sugar! Always start with the lower amount, as you can easily add more, but it’s hard to fix an overly sweet slush.
  • For a fun twist, consider adding a splash of coconut milk or a handful of fresh fruit like strawberries or pineapple. This not only enhances the flavor but also adds a beautiful color contrast.

Variations & Serving Ideas

There are countless ways to put a spin on your Frozen Orange Creamsicle Slush. Consider making a tropical version by adding in some pineapple juice or coconut milk for a delightful tropical twist. If you’re feeling adventurous, try incorporating a handful of frozen mango or peach slices for added sweetness. For a lighter version, swap out the vanilla ice cream for Greek yogurt for a creamy yet tangy alternative.

As for serving ideas, this refreshing slush pairs wonderfully with light summer dishes like grilled chicken skewers, fish tacos, or a simple salad topped with citrus vinaigrette. The bright, zesty flavors of the slush complement these dishes perfectly, making them an ideal pairing for a sunny day.

Storage, Make-Ahead & Reheating

This Frozen Orange Creamsicle Slush is best enjoyed fresh, but if you have leftovers, you can store them in an airtight container in the fridge for up to 2 days. Just keep in mind that the slush may lose some of its texture over time as the ice melts. It doesn’t freeze well, as the ice will turn into a solid block. If you must freeze it, blend again after thawing to restore the slushy consistency. This treat is best the day you make it, as the flavors meld together beautifully overnight, enhancing its deliciousness.

Frequently Asked Questions

Can I make Frozen Orange Creamsicle Slush ahead of time?

Yes — in fact, it tastes even better the next day as the flavors meld. However, it’s best to enjoy it fresh, as the texture can change if stored for too long. If you need to prepare it ahead, keep it in the fridge and re-blend before serving.

What kind of orange juice should I use?

For the best flavor, use freshly squeezed orange juice. However, if you’re short on time, opt for 100% pure store-bought juice without added sugars. This will ensure that your slush remains flavorful and refreshing.

Can I substitute the vanilla ice cream?

Absolutely! If you’re looking for a dairy-free option, coconut milk ice cream or a non-dairy vanilla ice cream can work wonderfully. They will still provide the creamy texture and sweetness you desire.

How can I adjust the sweetness of my slush?

You can easily adjust the sweetness by modifying the amount of sugar added. Start with 1/4 cup and taste the mixture before blending. If you prefer it sweeter, add more sugar gradually until it reaches your desired level.

What should I do if my slush is too thick?

If your slush is too thick, simply add a splash of milk or orange juice and blend again. This will help achieve a more drinkable consistency while maintaining the slushy texture. Adjust gradually to reach your preferred thickness.

Sun-Kissed Frozen Orange Cream Slush

Final Thoughts

The Frozen Orange Creamsicle Slush is a delightful blend of refreshing citrus and creamy goodness, making it a perfect treat for warm days or any time you crave a taste of nostalgia. The way the bright orange flavor dances with the creamy texture truly elevates this slush, transforming it into a satisfying escape from the everyday.

This is the kind of recipe I come back to again and again, especially when I’m looking to cool down or impress guests at a summer gathering. It’s simple to make and always brings smiles all around! I encourage you to try this recipe for yourself—don’t hesitate to share your results or even put your own spin on it. Happy slushing!

Print
clock clock iconcutlery cutlery iconflag flag iconfolder folder iconinstagram instagram iconpinterest pinterest iconfacebook facebook iconprint print iconsquares squares iconheart heart iconheart solid heart solid icon

Frozen Orange Creamsicle Slush


  • Author: Lily author
  • Total Time: 15 minutes
  • Yield: 4 servings 1x
Pin Recipe
Print Recipe

Description

This Frozen Orange Creamsicle Slush is a refreshing treat that combines creamy vanilla and zesty orange flavors. Perfect for hot summer days, it brings back nostalgic memories with every sip.


Ingredients

Scale
  • 2 cups orange juice (freshly squeezed or store-bought)
  • 1 cup vanilla ice cream
  • 1 cup crushed ice
  • 1/2 cup milk (whole or 2%)
  • 1/4 cup granulated sugar (adjust based on sweetness preference)
  • 1 teaspoon vanilla extract
  • Zest of 1 orange (for added flavor)
  • Fresh orange slices and mint leaves (for garnish)

Instructions

  1. Start by preparing your ingredients. Gather 2 cups of orange juice, 1 cup of vanilla ice cream, and 1 cup of crushed ice. Make sure the ice is finely crushed, as larger chunks can make blending difficult.
  2. In a blender, combine the orange juice, vanilla ice cream, crushed ice, and 1/2 cup of milk. Add 1/4 cup of granulated sugar and 1 teaspoon of vanilla extract. If you like a sweeter slush, consider adding a bit more sugar at this stage.
  3. Add the zest of 1 orange to the blender. This step is crucial for enhancing the citrus flavor of your slush. Make sure not to include the bitter white pith—only the flavorful zest.
  4. Blend the mixture on medium-high speed for about 30-45 seconds. Stop once the ingredients are fully combined and the slush has a smooth, even consistency. If you notice large chunks of ice, blend for an additional 10-15 seconds. Avoid over-blending, as this can make the slush too liquidy.
  5. Once blended, taste the slush. If it needs more sweetness, add a little more sugar and blend for a few more seconds. If it’s too thick, you can add a splash of milk to reach your desired consistency.
  6. Pour the slush into glasses. This recipe typically serves 4, but you can easily double it for larger gatherings. Use a spoon to help guide the slush into the glasses if needed.
  7. Garnish each serving with fresh orange slices and mint leaves. The mint not only adds a pop of color but also a refreshing aroma that complements the citrus flavors beautifully.
  8. Serve immediately and enjoy! If you’ve made extra, you can refrigerate it for a short time, but it's best enjoyed fresh.
  • Prep Time: 15 min
  • Cook Time: 0 min
  • Category: Dessert
  • Method: Blending
  • Cuisine: American

Nutrition

  • Serving Size: 1 serving
  • Calories: 200
  • Sugar: 30 g
  • Sodium: 50 mg
  • Fat: 5 g
  • Saturated Fat: 3 g
  • Unsaturated Fat: 2 g
  • Trans Fat: 0 g
  • Carbohydrates: 40 g
  • Fiber: 1 g
  • Protein: 2 g
  • Cholesterol: 20 mg

Keywords: Don't skip the orange zest! It's a game-changer for flavor. Always zest before juicing to make it easier.

Did you make this recipe?

Share a photo and tag us — we can't wait to see what you've made!

Zesty Lemon Poppy Seed Delight

One rainy afternoon, I found myself in my grandmother’s cozy kitchen, the kind that always smelled like warmth and love. She was whipping up her famous Lemon Poppy Seed Loaf, a recipe that had been passed down through generations. As the batter came together, the zesty aroma of fresh lemons filled the air, mingling perfectly with the nutty fragrance of poppy seeds. I can still picture her, apron-clad, as she expertly drizzled a vibrant citrus icing over the loaf, creating a glossy, sun-kissed finish that beckoned us to dive in. It was a moment that sparked my own passion for baking, and this recipe has become a cherished staple in my home ever since.

When you take a bite of this Lemon Poppy Seed Loaf, it’s like a burst of sunshine on your palate. The loaf is beautifully golden, with a tender crumb that melts in your mouth. Each slice is speckled with tiny poppy seeds, adding a delightful crunch that contrasts beautifully with the tangy sweetness of the lemon. And that citrus icing? It’s the finishing touch that elevates this loaf from ordinary to extraordinary, with its bright, zesty flavor dancing on your taste buds.

This recipe stands out because it embraces simplicity while delivering on flavor. I’ve added a hint of vanilla to the batter, enhancing the overall taste and making it even more indulgent. Trust me, once you make this Lemon Poppy Seed Loaf With Citrus Icing, it’ll become a go-to in your baking repertoire.

So, let me show you exactly how to make it!

Zesty Lemon Poppy Seed Delight

Why You’ll Love This Recipe

  • Moist and tender crumb that melts in your mouth, thanks to the perfect balance of butter and buttermilk.
  • Bright, zesty lemon flavor paired with crunchy poppy seeds, creating a delightful texture and taste experience.
  • Easy to whip up in just about an hour, perfect for last-minute gatherings or a cozy afternoon treat.
  • Budget-friendly with everyday ingredients, making it an accessible option for all home bakers.
  • The citrus icing adds a sweet tang that elevates the loaf, turning a simple recipe into a showstopper!

Ingredients

  • 1 ½ cups (190g) all-purpose flour
  • 1 teaspoon baking powder
  • ½ teaspoon baking soda
  • ½ teaspoon salt
  • 3 tablespoons poppy seeds
  • ½ cup (115g) unsalted butter, softened to room temperature
  • 1 cup (200g) granulated sugar
  • 2 large eggs
  • 1 teaspoon vanilla extract
  • 1 teaspoon lemon zest (from about 1 medium lemon)
  • ½ cup (120ml) buttermilk
  • 2 tablespoons fresh lemon juice

For the Citrus Icing:

  • 1 cup (120g) powdered sugar
  • 2 tablespoons fresh lemon juice
  • 1 tablespoon orange juice
  • 1 teaspoon lemon zest (for garnish, optional)

Let’s dive into the key ingredients that make this Lemon Poppy Seed Loaf so special. The all-purpose flour provides the structure and base for the loaf, while the baking powder and baking soda ensure it rises perfectly, giving the loaf a light texture. For a gluten-free variation, you could substitute the flour with a gluten-free all-purpose blend. Poppy seeds not only add a delightful crunch but also contribute to the unique flavor profile that pairs well with the citrus notes.

Unsalted butter is crucial for achieving the buttery richness that makes this loaf so moist. If you’re looking for a dairy-free option, coconut oil or a vegan butter can be used instead. The buttermilk is another essential component, providing acidity that activates the baking soda for a fluffy texture. If you don’t have buttermilk on hand, you can easily make a substitute by mixing ½ cup of milk with 1 tablespoon of vinegar or lemon juice and letting it sit for about 5 minutes.

Step-by-Step Instructions

  1. Preheat your oven to 350°F (175°C). Grease a 9×5-inch loaf pan or line it with parchment paper for easy removal later.
  2. In a medium mixing bowl, whisk together 1 ½ cups of all-purpose flour, 1 teaspoon of baking powder, ½ teaspoon of baking soda, ½ teaspoon of salt, and 3 tablespoons of poppy seeds. This helps to evenly distribute the baking agents and ensures a uniform rise.
  3. In a large mixing bowl, cream together ½ cup of softened unsalted butter and 1 cup of granulated sugar using an electric mixer on medium speed for about 3-4 minutes, until the mixture is light and fluffy. Make sure to scrape down the sides of the bowl occasionally.
  4. Add 2 large eggs, 1 teaspoon of vanilla extract, and 1 teaspoon of lemon zest to the creamed butter and sugar, mixing until fully combined. You want a smooth consistency, so ensure there are no lumps of butter.
  5. In a small bowl, combine ½ cup of buttermilk and 2 tablespoons of fresh lemon juice. Alternately add the dry ingredients and buttermilk mixture to the butter mixture, starting and ending with the dry ingredients. Mix just until combined; do not overmix, as this can lead to a dense loaf.
  6. Pour the batter into the prepared loaf pan. Smooth the top with a spatula, ensuring it’s even. Bake in the preheated oven for 50-60 minutes, or until a toothpick inserted in the center comes out clean. The edges should be lightly golden brown, and the center should feel just set.
  7. Once baked, remove the loaf from the oven and allow it to cool in the pan for about 10 minutes. Then, transfer it to a wire rack to cool completely. Resist the urge to slice too soon, as it will be crumbly if it’s still warm.
  8. While the loaf is cooling, prepare the citrus icing. In a medium bowl, whisk together 1 cup of powdered sugar, 2 tablespoons of fresh lemon juice, and 1 tablespoon of orange juice until smooth. If the icing is too thick, you can add a little more juice to reach your desired consistency.
  9. Once the loaf is completely cool, drizzle the citrus icing over the top. If you like, sprinkle with an additional teaspoon of lemon zest for an extra pop of flavor and color.

Pro Tips for the Best Lemon Poppy Seed Loaf With Citrus Icing

  • Be careful not to overmix your batter; this is a common mistake that can lead to a dense loaf. Mix just until the dry ingredients are incorporated for a light and fluffy texture.
  • Use room temperature ingredients, especially the butter and eggs. This helps to create a smoother batter and ensures even baking. Take your eggs out of the fridge about 30 minutes before you start.
  • For a more pronounced lemon flavor, consider adding a little lemon extract in addition to the zest and juice. Just a half teaspoon can elevate the citrus notes significantly.
  • When measuring your flour, spoon it into the measuring cup and level it off with a knife instead of scooping directly from the bag. This prevents packing and ensures you don’t end up with a dry loaf.
  • Invest in a good quality loaf pan; it makes a difference in heat distribution, which ensures even baking. If your pan is dark-coated, reduce the oven temperature by 25°F to prevent over-browning.

Variations & Serving Ideas

For a delightful twist, consider adding blueberries or raspberries to the batter for a fruity burst of flavor. You can also experiment with different citrus fruits—try lime or grapefruit zest and juice for a refreshing change. For a healthier option, substitute half of the all-purpose flour with whole wheat flour for added fiber without compromising too much on texture.

This Lemon Poppy Seed Loaf pairs beautifully with a light salad, such as a mixed greens salad with a vinaigrette, or a cup of tea for a cozy afternoon treat. It also complements a creamy cheese platter, as the acidity of the loaf balances rich cheeses perfectly. Lastly, a scoop of vanilla ice cream on the side creates a delightful contrast of temperatures and flavors!

Storage, Make-Ahead & Reheating

This Lemon Poppy Seed Loaf can be stored at room temperature for up to 3 days if wrapped tightly in plastic wrap. If you want to keep it longer, it freezes well for up to 3 months. To freeze, wrap the loaf tightly in plastic wrap and then in aluminum foil to prevent freezer burn.

When you’re ready to enjoy it again, simply thaw it in the fridge overnight. Reheat individual slices in the microwave for 15-20 seconds or in a toaster oven until warmed through. Interestingly, many people find that this loaf tastes even better the next day, as the flavors have time to meld!

Frequently Asked Questions

Can I make Lemon Poppy Seed Loaf With Citrus Icing ahead of time?

Yes — in fact, it tastes even better the next day! You can make the loaf a day in advance, allowing the flavors to develop. Just be sure to store it in an airtight container to maintain its moisture.

Can I substitute the poppy seeds?

Absolutely! If you don’t have poppy seeds on hand or prefer an alternative, you can use sesame seeds for a similar crunch or omit them entirely for a smooth loaf.

What can I use instead of buttermilk?

If you don’t have buttermilk, you can easily create a substitute by mixing ½ cup of milk (dairy or plant-based) with 1 tablespoon of vinegar or lemon juice. Let it sit for 5 minutes before using in the recipe.

How can I make this recipe gluten-free?

To make a gluten-free version of this Lemon Poppy Seed Loaf, substitute the all-purpose flour with a gluten-free all-purpose flour blend. Just ensure that the blend contains a binding agent like xanthan gum for the best results.

What is the best way to store leftover loaf?

Leftover Lemon Poppy Seed Loaf should be stored in an airtight container at room temperature for up to 3 days. For longer storage, wrap it tightly and freeze for up to 3 months. Thaw it before serving for the best texture.

Zesty Lemon Poppy Seed Delight

Final Thoughts

The Lemon Poppy Seed Loaf with Citrus Icing is truly a delightful treat that brings a burst of brightness to any occasion. The zesty lemon flavor combined with the subtle crunch of poppy seeds creates a satisfying balance, while the citrus icing adds a touch of sweetness that perfectly complements the loaf’s tanginess.

This is the kind of recipe I come back to again and again, especially when I want to brighten up a gloomy day or celebrate a small victory. The aroma that fills the kitchen as it bakes is absolutely heavenly! I encourage you to give this recipe a try; you might just find it becoming a beloved staple in your home. Don’t forget to share your results or even add your own unique twist—I can’t wait to see what you create!

Print
clock clock iconcutlery cutlery iconflag flag iconfolder folder iconinstagram instagram iconpinterest pinterest iconfacebook facebook iconprint print iconsquares squares iconheart heart iconheart solid heart solid icon

Lemon Poppy Seed Loaf


  • Author: Lily author
  • Total Time: 13 minute
  • Yield: 1 loaf 1x
Pin Recipe
Print Recipe

Description

This Lemon Poppy Seed Loaf is a delightful treat that combines zesty lemon flavor with crunchy poppy seeds. Topped with a citrus icing, it’s perfect for any occasion.


Ingredients

Scale
  • 1 ½ cups (190g) all-purpose flour
  • 1 teaspoon baking powder
  • ½ teaspoon baking soda
  • ½ teaspoon salt
  • 3 tablespoons poppy seeds
  • ½ cup (115g) unsalted butter, softened to room temperature
  • 1 cup (200g) granulated sugar
  • 2 large eggs
  • 1 teaspoon vanilla extract
  • 1 teaspoon lemon zest (from about 1 medium lemon)
  • ½ cup (120ml) buttermilk
  • 2 tablespoons fresh lemon juice
  • 1 cup (120g) powdered sugar
  • 2 tablespoons fresh lemon juice
  • 1 tablespoon orange juice
  • 1 teaspoon lemon zest (for garnish, optional)

Instructions

  1. Preheat your oven to 350°F (175°C). Grease a 9×5-inch loaf pan or line it with parchment paper for easy removal later.
  2. In a medium mixing bowl, whisk together 1 ½ cups of all-purpose flour, 1 teaspoon of baking powder, ½ teaspoon of baking soda, ½ teaspoon of salt, and 3 tablespoons of poppy seeds. This helps to evenly distribute the baking agents and ensures a uniform rise.
  3. In a large mixing bowl, cream together ½ cup of softened unsalted butter and 1 cup of granulated sugar using an electric mixer on medium speed for about 3-4 minutes, until the mixture is light and fluffy. Make sure to scrape down the sides of the bowl occasionally.
  4. Add 2 large eggs, 1 teaspoon of vanilla extract, and 1 teaspoon of lemon zest to the creamed butter and sugar, mixing until fully combined. You want a smooth consistency, so ensure there are no lumps of butter.
  5. In a small bowl, combine ½ cup of buttermilk and 2 tablespoons of fresh lemon juice. Alternately add the dry ingredients and buttermilk mixture to the butter mixture, starting and ending with the dry ingredients. Mix just until combined; do not overmix, as this can lead to a dense loaf.
  6. Pour the batter into the prepared loaf pan. Smooth the top with a spatula, ensuring it’s even. Bake in the preheated oven for 50-60 minutes, or until a toothpick inserted in the center comes out clean. The edges should be lightly golden brown, and the center should feel just set.
  7. Once baked, remove the loaf from the oven and allow it to cool in the pan for about 10 minutes. Then, transfer it to a wire rack to cool completely. Resist the urge to slice too soon, as it will be crumbly if it’s still warm.
  8. While the loaf is cooling, prepare the citrus icing. In a medium bowl, whisk together 1 cup of powdered sugar, 2 tablespoons of fresh lemon juice, and 1 tablespoon of orange juice until smooth. If the icing is too thick, you can add a little more juice to reach your desired consistency.
  9. Once the loaf is completely cool, drizzle the citrus icing over the top. If you like, sprinkle with an additional teaspoon of lemon zest for an extra pop of flavor and color.
  • Prep Time: 15 mins
  • Cook Time: 50-60 mins
  • Category: Dessert
  • Method: Baking
  • Cuisine: American

Nutrition

  • Serving Size: 1 slice
  • Calories: 200
  • Sugar: 15 g
  • Sodium: 150 mg
  • Fat: 8 g
  • Saturated Fat: 5 g
  • Unsaturated Fat: 3 g
  • Trans Fat: 0 g
  • Carbohydrates: 30 g
  • Fiber: 1 g
  • Protein: 3 g
  • Cholesterol: 40 mg

Keywords: Be careful not to overmix your batter; this is a common mistake that can lead to a dense loaf. Use room temperature ingredients for a smoother batter and even baking.

Did you make this recipe?

Share a photo and tag us — we can't wait to see what you've made!

  • Privacy Policy
  • Terms Of Service
  • Contact
  • About
  • GDPR

Copyright © 2025 Homesmad