• Skip to primary navigation
  • Skip to main content
  • Skip to primary sidebar
Homesmad

Homesmad

  • Home
  • Breakfast & Brunch
  • Appetizers & Snacks
  • Dinner
  • Dessert
  • About
  • Privacy Policy
  • Contact
Homesmad
  • Home
  • Breakfast & Brunch
  • Appetizers & Snacks
  • Dinner
  • Dessert
  • About
  • Privacy Policy
  • Contact

Vampires Kiss Mocktail: Spooky Non-Alcoholic Halloween Drink

October 5, 2025 by Lily author

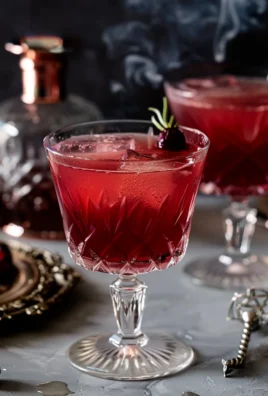
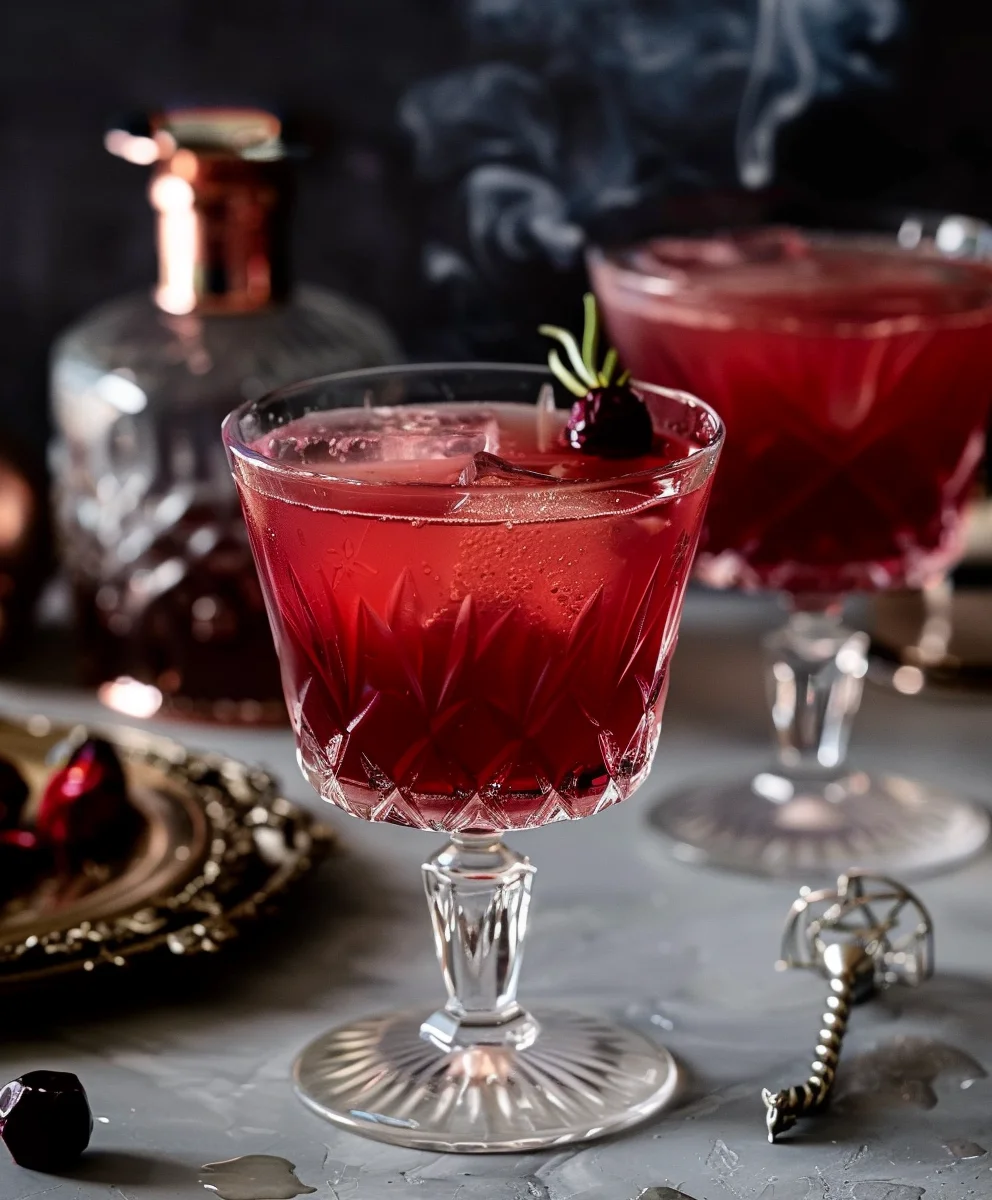
Vampires Kiss Cocktail – Prepare to be enchanted by a libation that is as visually striking as it is deliciously complex. Imagine a drink that perfectly captures an air of mystique and elegance, with its dramatic crimson hue and intriguing name. This isn’t just another beverage; it’s a statement, a centerpiece, and a true conversation starter, especially as the nights grow longer and the veil between worlds feels thinner. While the exact historical origins of the Vampires Kiss Cocktail are somewhat steeped in modern lore rather than ancient texts, its cultural significance blooms around themed celebrations, particularly Halloween and gothic-inspired soirées, where it becomes an emblem of dark romance and festive fun.

People absolutely adore this cocktail for a multitude of reasons. Firstly, its appearance is undeniably captivating; the rich red color, often contrasted with a darker rim or a smoky garnish, makes it an Instagram sensation and a feast for the eyes before it even touches the lips. But beyond the aesthetics, the taste is what truly wins hearts. It typically offers a delightful balance of sweet and tart, often with notes of vibrant cherry, cranberry, or a hint of raspberry, creating a sophisticated flavor profile that is both refreshing and indulgent. The Vampires Kiss Cocktail is also incredibly versatile, making it accessible for home bartenders to recreate with spectacular results, ensuring that every sip is an experience to savor.

Vampires Kiss Mocktail: Spooky Non-Alcoholic Halloween Drink this RECIPE

Ingredients:

  • For the Blood Orange Simple Syrup:
    • 1 cup (200g) granulated sugar, a classic choice for its fine texture and easy dissolution, ensuring a smooth syrup.
    • 1 cup (240ml) water, essential for creating the liquid base of our flavorful syrup.
    • Zest of 2 large blood oranges, vibrant and aromatic, this zest will infuse our syrup with a deep citrus note.
    • Juice of 2 large blood oranges (about ½ cup / 120ml), freshly squeezed for the most intense and authentic flavor, giving the syrup its characteristic ruby hue and sweet-tart profile.
  • For the Vampires Kiss Cocktail:
    • 2 oz (60ml) premium vodka, I prefer a smooth, neutral vodka that allows the other flavors to shine, acting as the perfect canvas for our cocktail.
    • 1 oz (30ml) Chambord raspberry liqueur, or another high-quality black raspberry liqueur, which contributes a luxurious sweetness, a deep berry flavor, and that iconic, dark red “blood” color to our “Vampires Kiss Cocktail”.
    • 1 oz (30ml) fresh blood orange juice, freshly squeezed is absolutely crucial here, as it provides a bright, slightly tart counterpoint to the sweetness of the liqueurs and marries beautifully with the syrup.
    • ½ oz (15ml) freshly made Blood Orange Simple Syrup (from above), to sweeten and enhance the blood orange essence, balancing the drink without making it cloying.
    • ½ oz (15ml) fresh lime juice, a splash of tartness to brighten all the rich flavors and add a necessary zing, lifting the entire cocktail.
    • Ice, for shaking and chilling, ensuring our “Vampires Kiss Cocktail” is perfectly frosty and diluted.
  • For the Garnish:
    • Fresh blood orange slice or wheel, for an elegant, citrusy visual accent.
    • A few fresh cranberries, threaded onto a cocktail pick, resembling glistening drops of “blood” and adding a festive touch.
    • A sprig of fresh rosemary, gently bruised, for a fragrant, aromatic flourish that adds an unexpected, sophisticated herbal note.
    • Optional: Edible red glitter or red sugar for rimming the glass, for an extra dramatic, sparkling effect that really screams “Vampires Kiss Cocktail”.

Phase 1: Crafting the Blood Orange Simple Syrup

  1. Combine Ingredients: In a small saucepan, I like to combine the granulated sugar and water. Place the saucepan over medium heat on your stovetop. We want to gently heat this mixture, not boil it vigorously.
  2. Dissolve the Sugar: Stir the sugar and water continuously with a spoon or whisk. My goal here is to completely dissolve the sugar until the liquid turns perfectly clear and no granules remain visible at the bottom. This usually takes about 3-5 minutes. It’s important not to rush this step, as any undissolved sugar can make your syrup grainy.
  3. Infuse with Zest: Once the sugar is fully dissolved, remove the saucepan from the heat. Now, carefully add the vibrant blood orange zest to the hot syrup. The heat will help release the essential oils from the zest, infusing the syrup with an incredible citrus aroma and flavor. I often let it steep for about 10-15 minutes, allowing ample time for the flavors to meld beautifully.
  4. Add Blood Orange Juice: After the steeping period, strain the syrup through a fine-mesh sieve into a clean, heatproof container. This removes all the zest, leaving you with a smooth, clear syrup. Now, stir in the freshly squeezed blood orange juice. The syrup will immediately take on a gorgeous ruby-red hue, which is just perfect for our “Vampires Kiss Cocktail”.
  5. Cool and Store: Allow the simple syrup to cool completely to room temperature. This might take an hour or so. Once cooled, transfer the syrup to an airtight bottle or jar. You can store this flavorful blood orange simple syrup in your refrigerator for up to two weeks, making it convenient to whip up a “Vampires Kiss Cocktail” whenever the mood strikes. Having this ready in advance really streamlines the cocktail-making process.

Phase 2: Preparing Your Glassware and Garnish for the “Vampires Kiss Cocktail”

  1. Chill Your Glassware: For any elegant cocktail, especially something as sophisticated as the “Vampires Kiss Cocktail,” serving it in a perfectly chilled glass is paramount. I always recommend placing your chosen coupe or martini glasses in the freezer for at least 15-20 minutes before you plan to mix your drinks. A frosty glass keeps your cocktail colder for longer and looks incredibly inviting.
  2. Prepare Optional Rim (if desired): If you’re feeling extra dramatic, now is the time to prepare an optional rim. On a shallow plate, spread out some fine red sanding sugar or edible red glitter. Take one of your chilled glasses, moisten the rim with a blood orange wedge or a damp cloth, and then gently dip the rim into the sugar or glitter, twisting slightly to ensure an even coating. This adds a spectacular visual element that screams “Vampires Kiss Cocktail”!
  3. Craft Your Garnishes:
    • Blood Orange Slice/Wheel: If using a slice, make a small cut from the center to the edge so it can sit elegantly on the rim of the glass. If using a wheel, it can float or be draped.
    • Cranberry Skewer: Thread 2-3 fresh cranberries onto a small cocktail pick. These look like precious, glistening ruby beads.
    • Rosemary Sprig: Take a small sprig of fresh rosemary. Before adding it, gently clap it between your palms or lightly bruise it. This releases its aromatic oils, which will add a lovely, subtle piney scent to complement the cocktail’s sweetness. The interplay of scent and taste is key to a truly memorable “Vampires Kiss Cocktail.”

Phase 3: Mixing Your “Vampires Kiss Cocktail”

  1. Gather Your Tools: Make sure you have a cocktail shaker, a jigger for precise measurements, a fine-mesh strainer, and plenty of fresh ice ready to go. Precision in measurement is crucial for a balanced “Vampires Kiss Cocktail.”
  2. Add Ingredients to Shaker: Into your cocktail shaker, I carefully measure and pour the following:
    • 2 oz (60ml) premium vodka
    • 1 oz (30ml) Chambord raspberry liqueur
    • 1 oz (30ml) freshly squeezed blood orange juice
    • ½ oz (15ml) freshly made Blood Orange Simple Syrup
    • ½ oz (15ml) freshly squeezed lime juice

    The order here isn’t strictly critical, but I usually start with the largest volume and work my way down.

  3. Fill with Ice: Now, fill the shaker about two-thirds full with fresh, good-quality ice cubes. Using fresh ice is important; old ice can be tainted with freezer odors and will dilute your drink too quickly.
  4. Seal and Shake Vigorously: Secure the lid tightly on your shaker. Then, with purpose and enthusiasm, shake the mixture vigorously for about 15-20 seconds. You’ll know it’s ready when the outside of the shaker becomes thoroughly frosted and noticeably cold to the touch. This vigorous shaking not only chills the cocktail but also properly aerates and combines all the ingredients, creating a beautifully smooth and integrated flavor profile for our “Vampires Kiss Cocktail.” Don’t be shy with your shaking – this is where the magic happens!
  5. Double Strain for Perfection: Remove the lid from the shaker. Take your pre-chilled coupe or martini glass. Place a fine-mesh strainer over the opening of the glass and pour the contents of the shaker through it. I always double strain my cocktails, especially those with fruit juices or zest, to remove any small ice shards, pulp, or residual zest. This ensures a silky-smooth texture, which is absolutely essential for an elegant cocktail like the “Vampires Kiss Cocktail.” You want a pristine, jewel-toned liquid flowing into your glass.

Phase 4: The Grand Presentation and Enjoyment of Your “Vampires Kiss Cocktail”

  1. Garnish with Flair: Now for the artistic touch! Carefully place your blood orange slice or wheel on the rim of the glass. Position the cranberry skewer beside it, letting it lean elegantly or rest subtly within the drink. Finally, gently place the bruised rosemary sprig in the cocktail. As you do this, you’ll notice the subtle, fresh aroma of the rosemary mingling with the sweet-tart fruit notes. The visual appeal and aromatic layers truly elevate the “Vampires Kiss Cocktail” experience.
  2. Serve Immediately: A perfectly crafted “Vampires Kiss Cocktail” is best enjoyed immediately after preparation, while it’s at its coldest and most vibrant. Hand it to your guest, or take a moment to admire your handiwork before taking that first delightful sip.
  3. Savor the Flavors: Take a deep breath to appreciate the complex aromas – the citrus, the berry, the hint of herbal rosemary. Then, take a slow sip. You should experience a beautiful balance of sweet, tart, and boozy, with the rich raspberry and bright blood orange dancing together, all smoothed out by the subtle warmth of the vodka. This truly is a “Vampires Kiss Cocktail” that leaves a lasting impression, a hauntingly delicious experience.

Phase 5: Tips for the Perfect “Vampires Kiss Cocktail” and Variations

Achieving the perfect “Vampires Kiss Cocktail” every time is less about strict rules and more about understanding a few key principles and having fun experimenting. Here are some of my favorite tips and variations to make your creation truly shine:

  1. Quality of Ingredients is King: This cannot be stressed enough. For a cocktail with such distinct fruit flavors, using freshly squeezed juices is non-negotiable. Bottled juices, while convenient, simply won’t deliver the vibrant, fresh taste that elevates the “Vampires Kiss Cocktail” from good to extraordinary. Similarly, invest in a premium vodka and a good quality raspberry liqueur. You’ll taste the difference.
  2. Mastering the Sweetness: Everyone has a different preference for sweetness. I’ve found that ½ ounce of my Blood Orange Simple Syrup provides a lovely balance, but if you prefer your “Vampires Kiss Cocktail” a little sweeter, you can always add another ¼ ounce. Conversely, if you like it tarter, a touch less syrup or an extra squeeze of lime juice will do the trick. Don’t be afraid to taste and adjust a tiny bit before the final pour.
  3. Ice, Ice Baby: The quality of your ice matters! Use fresh, clear ice cubes for shaking. Old ice from the back of the freezer can absorb off-flavors, and cloudy ice melts faster, over-diluting your precious “Vampires Kiss Cocktail.” Large, dense ice cubes are ideal for shaking as they chill effectively with minimal dilution.
  4. Chill Everything: Beyond just the glass, consider chilling your vodka and Chambord in the refrigerator prior to mixing. Starting with colder ingredients means less dilution during shaking, resulting in a more potent and flavorful “Vampires Kiss Cocktail.”
  5. Batching for a Crowd: Planning a party or a Halloween gathering? You can easily batch the liquid components of the “Vampires Kiss Cocktail” (vodka, Chambord, blood orange juice, simple syrup, lime juice) ahead of time. Mix them all together in a large pitcher or jar and keep it chilled in the refrigerator. When it’s time to serve, simply pour the desired amount into a shaker with ice, shake until well-chilled, strain into your prepared glasses, and garnish. This significantly reduces stress during entertaining and allows you to enjoy your guests!
  6. Spirit Variations: While vodka is classic for the “Vampires Kiss Cocktail,” don’t hesitate to experiment!
    • Gin: A floral, citrus-forward gin can add an intriguing botanical complexity.
    • White Rum: For a slightly sweeter, Caribbean-inspired twist.
    • Tequila Blanco: If you enjoy the earthy notes of agave, it can create a surprisingly delicious and unique “Vampires Kiss Cocktail.”
  7. Non-Alcoholic Version (The “Vampire’s Embrace”): For those who prefer a mocktail, you can easily adapt this recipe. Omit the vodka and Chambord. Increase the blood orange juice to 2 oz, the blood orange simple syrup to 1 oz, and the lime juice to ¾ oz. Top with sparkling cranberry juice, ginger ale, or even a non-alcoholic sparkling rosé for effervescence. The garnishes will still make it feel incredibly special and on-theme. It’s a fantastic way for everyone to enjoy the allure of the “Vampires Kiss Cocktail” concept.
  8. Seasonal Twists: While blood oranges are seasonal, you can adapt this concept. In summer, try using muddled raspberries and regular orange juice, or even a different berry liqueur. The core idea of a dark, alluring, fruit-forward cocktail remains.

I hope these tips empower you to create a truly spectacular “Vampires Kiss Cocktail” that impresses both you and your guests. Enjoy the process, and most importantly, savor every dramatic, delicious sip!

Vampires Kiss Mocktail: Spooky Non-Alcoholic Halloween Drink

Conclusion:

And there you have it, my friends! We’ve journeyed through the simple steps to create a truly captivating beverage that’s far more than just a drink; it’s an experience. If you’ve been looking for that one signature cocktail to impress your guests, to add a touch of drama to your next gathering, or simply to treat yourself to something delightfully different, then this recipe for the Vampires Kiss Cocktail is absolutely your answer. I truly believe it’s a must-try for so many reasons. Its striking appearance, with those deep, alluring crimson hues, immediately grabs attention, promising a sensory adventure before the first sip even touches your lips. But it’s not just a pretty face; the flavor profile is equally enchanting. It perfectly balances a mysterious sweetness with a subtle tang, creating a sophisticated taste that avoids being overly cloying or too sharp. It’s undeniably smooth, wonderfully refreshing, and surprisingly easy to prepare, making it a fantastic choice whether you’re a seasoned home bartender or just beginning your mixology journey. I promise you, once you taste the elegant complexity and feel the festive spirit it brings, you’ll understand why it quickly became one of my personal favorites.

Elevate Your Experience with These Serving Suggestions:

To truly unleash the full potential of your Vampires Kiss, presentation is key. I highly recommend chilling your martini or coupe glasses beforehand; a frosty glass not only looks elegant but keeps your cocktail perfectly cool. For an extra touch of theatrical flair, a rim of black sanding sugar or a deep red glitter dust adds a dramatic, gothic elegance that perfectly complements the drink’s name. You could also garnish with a single, dark cherry impaled on a cocktail pick, or even a few blood orange slices for a vibrant contrast. For those hosting a themed party, perhaps a Halloween bash or a spooky movie night, consider dropping a small piece of food-grade dry ice into a larger punch bowl version (exercising extreme caution, of course) for a truly eerie, bubbling, smoky effect that will absolutely mesmerize your guests. Imagine the gasps of delight as you serve up this visually stunning concoction!

Unleash Your Inner Mixologist: Creative Variations to Explore:

While the classic Vampires Kiss is pure perfection, don’t hesitate to get creative and make it your own! For a slightly sweeter profile, a splash of raspberry liqueur instead of cherry can introduce a brighter berry note. If you prefer a richer, deeper flavor, consider infusing your vodka with some vanilla bean for a few days prior, or even experimenting with a dark rum instead of vodka for a Caribbean-inspired twist. For a non-alcoholic, equally enchanting version that everyone can enjoy, simply substitute the vodka and champagne with sparkling cranberry juice and a good quality non-alcoholic sparkling cider or grape juice. The color will still be magnificent, and the flavor will be a delightful, fruity mocktail. You can even batch this recipe ahead of time for larger parties – simply mix the vodka and cranberry juice in a pitcher, chill, and then top individual servings with chilled champagne or sparkling wine just before serving. This makes entertaining a breeze and ensures every guest gets a freshly bubbly drink. Pair it with dark chocolate desserts, a rich charcuterie board, or even savory mini quiches for a balanced evening.

Your Turn! Dive into the Darkness and Share Your Creation!

Now that I’ve shared all my secrets and suggestions, it’s truly your moment to shine. I genuinely encourage you to grab your shaker, gather your ingredients, and embark on this delightful journey to create your very own Vampires Kiss Cocktail. Trust me, the satisfaction of crafting such a beautiful and delicious drink is immensely rewarding. Don’t just stop at making it – I’d absolutely love to see your interpretations! Please, once you’ve whipped up your masterpiece, share your photos, your serving suggestions, or any clever variations you come up with. Tag me, leave a comment below, or share your experience on your favorite social media platforms. I’m always thrilled to see how you infuse your personal touch into these recipes. Let’s create a community of cocktail enthusiasts who appreciate the finer, and perhaps a little darker, things in life. Cheers to your next unforgettable drink, and I can’t wait to hear all about your magical Vampires Kiss experience!


Vampires Kiss Mocktail

Vampires Kiss Mocktail

Indulge in the mystique of the Vampires Kiss Mocktail, a visually striking and deliciously complex non-alcoholic drink perfect for Halloween and gothic-inspired soirées. This captivating beverage offers a delightful balance of sweet and tart, with vibrant pomegranate and a hint of cherry, beautifully complemented by a non-alcoholic bourbon alternative, creating a sophisticated and refreshing experience.

Prep Time
10 Minutes

Cook Time
0 Minutes

Total Time
10 Minutes

Servings
1 serving

Ingredients

  • 3 oz (90ml) 100% pomegranate juice
  • 2 oz (60ml) Lyre’s American Malt (non-alcoholic bourbon alternative)
  • ½ oz (15ml) fresh lime juice
  • 1 bar spoon (½ tsp) Luxardo cherry syrup
  • 1 oz (30ml) chilled Cola
  • 1 oz (30ml) chilled club soda
  • 1 sprig rosemary (for garnish)

Instructions

  1. Step 1
    Chill your chosen coupe or martini glass for at least 15 minutes. Optionally, moisten the rim with a lime wedge and dip into red sanding sugar or edible red glitter for a dramatic effect.
  2. Step 2
    In a cocktail shaker, combine pomegranate juice, Lyre’s American Malt, fresh lime juice, and Luxardo cherry syrup.
  3. Step 3
    Fill the shaker two-thirds full with fresh ice cubes. Secure the lid tightly and shake vigorously for 15-20 seconds, until the outside of the shaker is thoroughly frosted.
  4. Step 4
    Strain the chilled mixture into your prepared glass. Top the drink with 1 oz (30ml) chilled Cola and 1 oz (30ml) chilled club soda.
  5. Step 5
    Garnish with a fresh rosemary sprig (gently bruised to release aroma). Serve immediately and savor your Vampires Kiss Mocktail.

Important Information

Nutrition Facts (Per Serving)

It is important to consider this information as approximate and not to use it as definitive health advice.

Allergy Information

Please check ingredients for potential allergens and consult a health professional if in doubt.

« Previous Post
Best Caramel Apple Cheesecake Dip for Fall & Holiday Parties!
Next Post »
Easy Spooky Chocolate Covered Halloween Dipped Oreos

If you enjoyed this…

Crunchy Zucchini Chips: The Ultimate Healthy Snack Recipe

Hocus Pocus Punch – Spooky Non-Alcoholic Halloween Drink

Vampires Kiss Mocktail: Spooky Non-Alcoholic Halloween Drink

Primary Sidebar

Browse by Diet

BreakfastDinnerLunchDessertAppetizer

Sweet Peach Yogurt Parfait Delight

One of my fondest memories is from a lazy summer afternoon spent at my grandmother’s house. The sun filtered through the kitchen window, casting a warm glow over the table where she would create her culinary magic. It was during one of those blissful moments that I first tasted her Peach Yogurt Parfait with Honey and Granola. The sweet aroma of ripe peaches mingling with creamy yogurt and the crunch of granola was nothing short of heavenly. It felt like summer captured in a bowl, and I still remember the joy of diving in with a spoon, each layer revealing a new burst of flavor.

When I think about that parfait, I can almost hear the gentle hum of the bees outside, reminding me of the floral notes that honey brings to every bite. The vibrant yellows and soft oranges of the peaches contrast beautifully with the creamy white yogurt and the golden crunch of granola. It’s a dish that not only looks delightful but also tastes like a celebration of fresh, wholesome ingredients.

What makes my version of this Peach Yogurt Parfait special is the careful balance of flavors and textures. I use ripe, juicy peaches, drizzled with locally sourced honey, and a homemade granola that’s bursting with nuts and seeds for an extra crunch. It’s a simple dish, but every layer is crafted with love and attention.

Let me show you exactly how to make this delightful parfait, so you can bring a bit of that summer magic into your kitchen!

Sweet Peach Yogurt Parfait Delight

Why You’ll Love This Recipe

  • Delightfully creamy texture from the Greek yogurt, paired with the juicy sweetness of fresh peaches.
  • Ready in under 20 minutes, making it a quick and satisfying breakfast or snack option.
  • Budget-friendly, using common ingredients that you may already have in your pantry.
  • Customizable with your favorite granola and nuts, allowing you to tailor each parfait to your taste.
  • Perfectly balanced flavors with the bright acidity of lemon juice and the sweetness of honey enhancing the peaches.

Ingredients

  • For the Parfait:
  • 2 cups plain Greek yogurt (or vanilla yogurt for a sweeter option)
  • 2 large ripe peaches, diced (about 2 cups)
  • 1 tablespoon fresh lemon juice (to prevent browning of peaches)
  • 2 tablespoons honey (plus more for drizzling)
  • 1 teaspoon vanilla extract (optional for extra flavor)
  • For the Granola:
  • 1 cup granola (store-bought or homemade; see notes for a simple granola recipe)
  • 1/4 cup sliced almonds (optional for added crunch)
  • 1/4 cup shredded coconut (optional for added flavor)

Let’s dive into some key ingredients that make this Peach Yogurt Parfait so delightful! First, the Greek yogurt is not only creamy but also packed with protein, making it a satisfying option for breakfast or a snack. If you’re looking for a sweeter option, you can easily substitute it with vanilla yogurt, though it may alter the overall flavor balance. Next, the ripe peaches are the star of the show; their natural sweetness shines through, so I recommend choosing peaches that yield slightly to pressure, indicating they’re perfectly ripe. If peaches aren’t in season, feel free to use nectarines or even frozen peaches—just thaw them before use. Finally, honey adds a lovely floral sweetness that ties everything together. If you prefer, maple syrup can serve as a delicious substitute.

Step-by-Step Instructions

  1. Start by preparing the peaches. Wash them thoroughly, then slice and dice them into bite-sized pieces. In a medium bowl, toss the diced peaches with 1 tablespoon of fresh lemon juice to prevent browning. Set aside for about 5 minutes while the lemon juice works its magic.
  2. In a separate bowl, combine the Greek yogurt, 2 tablespoons of honey, and 1 teaspoon of vanilla extract if using. Stir the mixture until smooth and thoroughly blended. This should take about a minute. Avoid overmixing to maintain the creaminess of the yogurt.
  3. Now it’s time to layer your parfait. Grab a clear glass or bowl to showcase your beautiful creation. Start with a generous spoonful of the yogurt mixture at the bottom—about 1/4 cup will do. Use a spoon to spread it evenly.
  4. Add a layer of the diced peaches over the yogurt, ensuring they cover the yogurt completely. You might want to use about half of what you have prepared—roughly 1 cup. This layer should be visually appealing, so arrange the peaches neatly.
  5. Sprinkle 1/4 cup of granola over the peaches. This adds a delightful crunch. Make sure to distribute it evenly to ensure every bite has that satisfying texture. Avoid packing it down too tightly, as you want it to maintain its crunch.
  6. Repeat the layers: spoon in another 1/4 cup of yogurt, followed by another cup of peaches, and another sprinkle of granola. You should have at least two layers, but feel free to add more depending on your glass size.
  7. Finish off your parfait with a drizzle of honey on top for added sweetness and a touch of elegance. If you’re using sliced almonds or shredded coconut, sprinkle them on top now. It adds a lovely visual contrast and extra flavor.
  8. Serve immediately or refrigerate for up to 30 minutes before serving to allow the flavors to meld together. However, I recommend enjoying it fresh to maintain the granola’s crunch.

Pro Tips for the Best Peach Yogurt Parfait With Honey And Granola

  • Make sure to choose ripe peaches for the best flavor and texture. A common mistake is using unripe fruit, which can lead to a less enjoyable parfait. Look for peaches that are fragrant and slightly soft to the touch.
  • Use a clear glass to assemble your parfait; this not only makes for a beautiful presentation but also allows you to see the colorful layers, which adds to the enjoyment of eating it.
  • For an even creamier texture, consider whipping the Greek yogurt with a hand mixer for a couple of minutes before layering. This small adjustment makes a huge difference in mouthfeel.
  • Be mindful of the granola-to-yogurt ratio. Too much granola can overwhelm the parfait, while too little can make it feel too creamy. Aim for about 1/4 cup of granola per layer for the perfect balance.
  • If you’re making this for a gathering, consider preparing the yogurt and peaches ahead of time and layering them just before serving. This ensures the granola stays crunchy!

Variations & Serving Ideas

There are so many ways to get creative with your Peach Yogurt Parfait! For a tropical twist, swap out the peaches for mangoes or pineapples and top with coconut flakes. If you prefer a berry flavor, mix in some blueberries or strawberries with the peaches for added color and taste. For a nutty version, incorporate chopped walnuts or pecans instead of almonds.

As for serving ideas, this parfait pairs beautifully with a side of scrambled eggs for a hearty breakfast or fresh fruit salad for a light lunch. You might also enjoy it alongside whole grain toast with almond butter for an energizing snack. The contrast of flavors and textures will elevate your meal experience!

Storage, Make-Ahead & Reheating

The Peach Yogurt Parfait is best enjoyed fresh, but you can prepare some components ahead of time. Store the layered parfait in an airtight container in the refrigerator for up to 24 hours. However, be cautious; the granola may lose its crunch if stored too long. You can freeze the yogurt and peach mixture for up to 2 months; just remember to thaw it in the refrigerator overnight before serving.

If you plan to enjoy this dish the next day, it can taste even better as the flavors meld together. Just remember to add the granola right before serving to keep its delightful crunch!

Frequently Asked Questions

Can I make Peach Yogurt Parfait With Honey And Granola ahead of time?

Yes — in fact, it tastes even better the next day as the flavors meld. However, I recommend waiting to add the granola until just before serving to maintain its crunch.

What can I substitute for Greek yogurt?

If you prefer a lighter option, you can substitute Greek yogurt with regular yogurt or a dairy-free alternative like coconut yogurt. Just remember that this may alter the creaminess and flavor profile slightly.

Can I use frozen peaches for this parfait?

Absolutely! Just make sure to thaw the frozen peaches before using them. They will still add great flavor, though the texture may be slightly softer than fresh peaches.

How do I make the parfait vegan?

To make a vegan version, substitute the Greek yogurt with a plant-based yogurt alternative, and replace honey with maple syrup or agave nectar. This keeps the parfait sweet while adhering to a vegan diet.

What other fruits can I use in this recipe?

You can mix and match fruits based on your preference. Try using strawberries, blueberries, raspberries, or even bananas. Just make sure to adjust the lemon juice as needed to prevent browning.

Sweet Peach Yogurt Parfait Delight

Final Thoughts

The Peach Yogurt Parfait with Honey and Granola is a delightful blend of creamy yogurt, sweet peaches, and crunchy granola that creates a satisfying and nourishing treat. Each layer bursts with flavor, making it a perfect choice for breakfast or a light dessert.

This is the kind of recipe I come back to again and again, especially when I want something refreshing and wholesome to start my day. The harmony of sweet and tart flavors, combined with the delightful crunch, never fails to lift my spirits!

I encourage you to give this parfait a try and indulge in its comforting goodness. Feel free to share your results or even add your own twist—perhaps a sprinkle of cinnamon or a handful of nuts. Enjoy creating your perfect parfait!

Print
clock clock iconcutlery cutlery iconflag flag iconfolder folder iconinstagram instagram iconpinterest pinterest iconfacebook facebook iconprint print iconsquares squares iconheart heart iconheart solid heart solid icon

Peach Yogurt Parfait


  • Author: Lily author
  • Total Time: 15 minutes
  • Yield: 4 servings 1x
Pin Recipe
Print Recipe

Description

This Peach Yogurt Parfait combines creamy Greek yogurt, juicy peaches, and crunchy granola for a delightful treat. It’s a perfect breakfast or snack that captures the essence of summer in every bite.


Ingredients

Scale
  • For the Parfait:
  • 2 cups plain Greek yogurt (or vanilla yogurt for a sweeter option)
  • 2 large ripe peaches, diced (about 2 cups)
  • 1 tablespoon fresh lemon juice (to prevent browning of peaches)
  • 2 tablespoons honey (plus more for drizzling)
  • 1 teaspoon vanilla extract (optional for extra flavor)
  • For the Granola:
  • 1 cup granola (store-bought or homemade; see notes for a simple granola recipe)
  • 1/4 cup sliced almonds (optional for added crunch)
  • 1/4 cup shredded coconut (optional for added flavor)

Instructions

  1. Start by preparing the peaches. Wash them thoroughly, then slice and dice them into bite-sized pieces. In a medium bowl, toss the diced peaches with 1 tablespoon of fresh lemon juice to prevent browning. Set aside for about 5 minutes while the lemon juice works its magic.
  2. In a separate bowl, combine the Greek yogurt, 2 tablespoons of honey, and 1 teaspoon of vanilla extract if using. Stir the mixture until smooth and thoroughly blended. This should take about a minute. Avoid overmixing to maintain the creaminess of the yogurt.
  3. Now it’s time to layer your parfait. Grab a clear glass or bowl to showcase your beautiful creation. Start with a generous spoonful of the yogurt mixture at the bottom—about 1/4 cup will do. Use a spoon to spread it evenly.
  4. Add a layer of the diced peaches over the yogurt, ensuring they cover the yogurt completely. You might want to use about half of what you have prepared—roughly 1 cup. This layer should be visually appealing, so arrange the peaches neatly.
  5. Sprinkle 1/4 cup of granola over the peaches. This adds a delightful crunch. Make sure to distribute it evenly to ensure every bite has that satisfying texture. Avoid packing it down too tightly, as you want it to maintain its crunch.
  6. Repeat the layers: spoon in another 1/4 cup of yogurt, followed by another cup of peaches, and another sprinkle of granola. You should have at least two layers, but feel free to add more depending on your glass size.
  7. Finish off your parfait with a drizzle of honey on top for added sweetness and a touch of elegance. If you’re using sliced almonds or shredded coconut, sprinkle them on top now. It adds a lovely visual contrast and extra flavor.
  8. Serve immediately or refrigerate for up to 30 minutes before serving to allow the flavors to meld together. However, I recommend enjoying it fresh to maintain the granola’s crunch.
  • Prep Time: 15 mins
  • Cook Time: 0 mins
  • Category: Breakfast
  • Method: No-cook
  • Cuisine: American

Nutrition

  • Serving Size: 1 parfait
  • Calories: 250
  • Sugar: 20 g
  • Sodium: 50 mg
  • Fat: 5 g
  • Saturated Fat: 2 g
  • Unsaturated Fat: 3 g
  • Trans Fat: 0 g
  • Carbohydrates: 40 g
  • Fiber: 3 g
  • Protein: 10 g
  • Cholesterol: 10 mg

Keywords: Choose ripe peaches for the best flavor and texture. Use a clear glass for a beautiful presentation. For creaminess, consider whipping the yogurt before layering. Be mindful of the granola-to-yogurt ratio. Prepare yogurt and peaches ahead of time for gatherings, layering just before serving.

Did you make this recipe?

Share a photo and tag us — we can't wait to see what you've made!

Sun-Kissed Frozen Orange Cream Slush

As a child, summer days felt like they lasted forever. I remember the sticky heat wrapping around me as I played outside, my laughter mingling with the sounds of the neighborhood. But nothing could cool me down quite like the moment I’d spot my grandmother, laboring over her blender, whipping up her famous Frozen Orange Creamsicle Slush. That vibrant orange treat, with its frosty texture and sweet citrus aroma, was like a burst of sunshine in a cup. Just one sip, and I could feel the coolness wash over me, sparking pure joy.

This Frozen Orange Creamsicle Slush has a way of making you feel like a kid again. Its creamy, dreamy consistency is a delightful balance of bright orange and soft vanilla, inviting you to dive right in. The refreshing tang of orange dances on your tongue, while the smooth creaminess envelops you in a comforting embrace. It’s a nostalgic treat that’s perfect for hot summer afternoons or anytime you need a little pick-me-up.

What makes my version of this slush stand out is the addition of a hint of vanilla bean, which elevates the flavor and adds an extra layer of richness. Plus, it’s super easy to whip up with just a few simple ingredients that you probably already have on hand! So, if you’re ready to relive those sun-soaked memories, let me show you exactly how to make it.

Sun-Kissed Frozen Orange Cream Slush

Why You’ll Love This Recipe

  • Each slush is a perfect blend of creamy vanilla and zesty orange, creating a nostalgic flavor reminiscent of summer days.
  • This refreshing treat is ready in under 15 minutes, making it an ideal quick dessert for unexpected guests or hot afternoons.
  • With just 8 simple ingredients, it’s budget-friendly, ensuring you don’t have to break the bank to enjoy a delicious slush.
  • The slush has a perfectly smooth texture, thanks to the combination of ice and ice cream, providing a delightful contrast to the bright citrus flavors.
  • It’s highly customizable; you can easily adjust the sweetness and add fresh herbs for a unique twist that suits your taste.

Ingredients

  • 2 cups orange juice (freshly squeezed or store-bought)
  • 1 cup vanilla ice cream
  • 1 cup crushed ice
  • 1/2 cup milk (whole or 2%)
  • 1/4 cup granulated sugar (adjust based on sweetness preference)
  • 1 teaspoon vanilla extract
  • Zest of 1 orange (for added flavor)
  • Fresh orange slices and mint leaves (for garnish)

The star of this Frozen Orange Creamsicle Slush is the orange juice, which provides the vibrant, citrusy base. Freshly squeezed juice will yield the brightest flavor, but store-bought options can be just as convenient. If you’re opting for store-bought, choose 100% pure juice with no added sugars for the best results. Another essential ingredient is the vanilla ice cream; it adds creaminess and sweetness. You can substitute it with dairy-free ice cream if you’re looking for a vegan option. Whole or 2% milk complements the ice cream, creating a smooth blend. If you want a lower-calorie version, almond or oat milk can be good alternatives.

Lastly, the granulated sugar can be adjusted based on your sweetness preference. If you prefer a more natural sweetener, consider using honey or agave syrup. The orange zest enhances the flavor profile, providing an aromatic pop that brings the whole slush together. Don’t skip it! It adds an extra layer of brightness that makes this slush truly special.

Step-by-Step Instructions

  1. Start by preparing your ingredients. Gather 2 cups of orange juice, 1 cup of vanilla ice cream, and 1 cup of crushed ice. Make sure the ice is finely crushed, as larger chunks can make blending difficult.
  2. In a blender, combine the orange juice, vanilla ice cream, crushed ice, and 1/2 cup of milk. Add 1/4 cup of granulated sugar and 1 teaspoon of vanilla extract. If you like a sweeter slush, consider adding a bit more sugar at this stage.
  3. Add the zest of 1 orange to the blender. This step is crucial for enhancing the citrus flavor of your slush. Make sure not to include the bitter white pith—only the flavorful zest.
  4. Blend the mixture on medium-high speed for about 30-45 seconds. Stop once the ingredients are fully combined and the slush has a smooth, even consistency. If you notice large chunks of ice, blend for an additional 10-15 seconds. Avoid over-blending, as this can make the slush too liquidy.
  5. Once blended, taste the slush. If it needs more sweetness, add a little more sugar and blend for a few more seconds. If it’s too thick, you can add a splash of milk to reach your desired consistency.
  6. Pour the slush into glasses. This recipe typically serves 4, but you can easily double it for larger gatherings. Use a spoon to help guide the slush into the glasses if needed.
  7. Garnish each serving with fresh orange slices and mint leaves. The mint not only adds a pop of color but also a refreshing aroma that complements the citrus flavors beautifully.
  8. Serve immediately and enjoy! If you’ve made extra, you can refrigerate it for a short time, but it’s best enjoyed fresh.

Pro Tips for the Best Frozen Orange Creamsicle Slush

  • Don’t skip the orange zest! It’s a game-changer for flavor. Always zest before juicing to make it easier.
  • Use a high-powered blender for the best texture. A standard blender may struggle with ice, leading to uneven consistency. If you have a food processor, that can work too, but ensure the ice is finely crushed.
  • Adjust the ice-to-liquid ratio carefully. If your slush is too thick, it won’t blend well. Start with less ice and add more until you reach your preferred texture.
  • Be cautious with the sugar! Always start with the lower amount, as you can easily add more, but it’s hard to fix an overly sweet slush.
  • For a fun twist, consider adding a splash of coconut milk or a handful of fresh fruit like strawberries or pineapple. This not only enhances the flavor but also adds a beautiful color contrast.

Variations & Serving Ideas

There are countless ways to put a spin on your Frozen Orange Creamsicle Slush. Consider making a tropical version by adding in some pineapple juice or coconut milk for a delightful tropical twist. If you’re feeling adventurous, try incorporating a handful of frozen mango or peach slices for added sweetness. For a lighter version, swap out the vanilla ice cream for Greek yogurt for a creamy yet tangy alternative.

As for serving ideas, this refreshing slush pairs wonderfully with light summer dishes like grilled chicken skewers, fish tacos, or a simple salad topped with citrus vinaigrette. The bright, zesty flavors of the slush complement these dishes perfectly, making them an ideal pairing for a sunny day.

Storage, Make-Ahead & Reheating

This Frozen Orange Creamsicle Slush is best enjoyed fresh, but if you have leftovers, you can store them in an airtight container in the fridge for up to 2 days. Just keep in mind that the slush may lose some of its texture over time as the ice melts. It doesn’t freeze well, as the ice will turn into a solid block. If you must freeze it, blend again after thawing to restore the slushy consistency. This treat is best the day you make it, as the flavors meld together beautifully overnight, enhancing its deliciousness.

Frequently Asked Questions

Can I make Frozen Orange Creamsicle Slush ahead of time?

Yes — in fact, it tastes even better the next day as the flavors meld. However, it’s best to enjoy it fresh, as the texture can change if stored for too long. If you need to prepare it ahead, keep it in the fridge and re-blend before serving.

What kind of orange juice should I use?

For the best flavor, use freshly squeezed orange juice. However, if you’re short on time, opt for 100% pure store-bought juice without added sugars. This will ensure that your slush remains flavorful and refreshing.

Can I substitute the vanilla ice cream?

Absolutely! If you’re looking for a dairy-free option, coconut milk ice cream or a non-dairy vanilla ice cream can work wonderfully. They will still provide the creamy texture and sweetness you desire.

How can I adjust the sweetness of my slush?

You can easily adjust the sweetness by modifying the amount of sugar added. Start with 1/4 cup and taste the mixture before blending. If you prefer it sweeter, add more sugar gradually until it reaches your desired level.

What should I do if my slush is too thick?

If your slush is too thick, simply add a splash of milk or orange juice and blend again. This will help achieve a more drinkable consistency while maintaining the slushy texture. Adjust gradually to reach your preferred thickness.

Sun-Kissed Frozen Orange Cream Slush

Final Thoughts

The Frozen Orange Creamsicle Slush is a delightful blend of refreshing citrus and creamy goodness, making it a perfect treat for warm days or any time you crave a taste of nostalgia. The way the bright orange flavor dances with the creamy texture truly elevates this slush, transforming it into a satisfying escape from the everyday.

This is the kind of recipe I come back to again and again, especially when I’m looking to cool down or impress guests at a summer gathering. It’s simple to make and always brings smiles all around! I encourage you to try this recipe for yourself—don’t hesitate to share your results or even put your own spin on it. Happy slushing!

Print
clock clock iconcutlery cutlery iconflag flag iconfolder folder iconinstagram instagram iconpinterest pinterest iconfacebook facebook iconprint print iconsquares squares iconheart heart iconheart solid heart solid icon

Frozen Orange Creamsicle Slush


  • Author: Lily author
  • Total Time: 15 minutes
  • Yield: 4 servings 1x
Pin Recipe
Print Recipe

Description

This Frozen Orange Creamsicle Slush is a refreshing treat that combines creamy vanilla and zesty orange flavors. Perfect for hot summer days, it brings back nostalgic memories with every sip.


Ingredients

Scale
  • 2 cups orange juice (freshly squeezed or store-bought)
  • 1 cup vanilla ice cream
  • 1 cup crushed ice
  • 1/2 cup milk (whole or 2%)
  • 1/4 cup granulated sugar (adjust based on sweetness preference)
  • 1 teaspoon vanilla extract
  • Zest of 1 orange (for added flavor)
  • Fresh orange slices and mint leaves (for garnish)

Instructions

  1. Start by preparing your ingredients. Gather 2 cups of orange juice, 1 cup of vanilla ice cream, and 1 cup of crushed ice. Make sure the ice is finely crushed, as larger chunks can make blending difficult.
  2. In a blender, combine the orange juice, vanilla ice cream, crushed ice, and 1/2 cup of milk. Add 1/4 cup of granulated sugar and 1 teaspoon of vanilla extract. If you like a sweeter slush, consider adding a bit more sugar at this stage.
  3. Add the zest of 1 orange to the blender. This step is crucial for enhancing the citrus flavor of your slush. Make sure not to include the bitter white pith—only the flavorful zest.
  4. Blend the mixture on medium-high speed for about 30-45 seconds. Stop once the ingredients are fully combined and the slush has a smooth, even consistency. If you notice large chunks of ice, blend for an additional 10-15 seconds. Avoid over-blending, as this can make the slush too liquidy.
  5. Once blended, taste the slush. If it needs more sweetness, add a little more sugar and blend for a few more seconds. If it’s too thick, you can add a splash of milk to reach your desired consistency.
  6. Pour the slush into glasses. This recipe typically serves 4, but you can easily double it for larger gatherings. Use a spoon to help guide the slush into the glasses if needed.
  7. Garnish each serving with fresh orange slices and mint leaves. The mint not only adds a pop of color but also a refreshing aroma that complements the citrus flavors beautifully.
  8. Serve immediately and enjoy! If you’ve made extra, you can refrigerate it for a short time, but it's best enjoyed fresh.
  • Prep Time: 15 min
  • Cook Time: 0 min
  • Category: Dessert
  • Method: Blending
  • Cuisine: American

Nutrition

  • Serving Size: 1 serving
  • Calories: 200
  • Sugar: 30 g
  • Sodium: 50 mg
  • Fat: 5 g
  • Saturated Fat: 3 g
  • Unsaturated Fat: 2 g
  • Trans Fat: 0 g
  • Carbohydrates: 40 g
  • Fiber: 1 g
  • Protein: 2 g
  • Cholesterol: 20 mg

Keywords: Don't skip the orange zest! It's a game-changer for flavor. Always zest before juicing to make it easier.

Did you make this recipe?

Share a photo and tag us — we can't wait to see what you've made!

Zesty Lemon Poppy Seed Delight

One rainy afternoon, I found myself in my grandmother’s cozy kitchen, the kind that always smelled like warmth and love. She was whipping up her famous Lemon Poppy Seed Loaf, a recipe that had been passed down through generations. As the batter came together, the zesty aroma of fresh lemons filled the air, mingling perfectly with the nutty fragrance of poppy seeds. I can still picture her, apron-clad, as she expertly drizzled a vibrant citrus icing over the loaf, creating a glossy, sun-kissed finish that beckoned us to dive in. It was a moment that sparked my own passion for baking, and this recipe has become a cherished staple in my home ever since.

When you take a bite of this Lemon Poppy Seed Loaf, it’s like a burst of sunshine on your palate. The loaf is beautifully golden, with a tender crumb that melts in your mouth. Each slice is speckled with tiny poppy seeds, adding a delightful crunch that contrasts beautifully with the tangy sweetness of the lemon. And that citrus icing? It’s the finishing touch that elevates this loaf from ordinary to extraordinary, with its bright, zesty flavor dancing on your taste buds.

This recipe stands out because it embraces simplicity while delivering on flavor. I’ve added a hint of vanilla to the batter, enhancing the overall taste and making it even more indulgent. Trust me, once you make this Lemon Poppy Seed Loaf With Citrus Icing, it’ll become a go-to in your baking repertoire.

So, let me show you exactly how to make it!

Zesty Lemon Poppy Seed Delight

Why You’ll Love This Recipe

  • Moist and tender crumb that melts in your mouth, thanks to the perfect balance of butter and buttermilk.
  • Bright, zesty lemon flavor paired with crunchy poppy seeds, creating a delightful texture and taste experience.
  • Easy to whip up in just about an hour, perfect for last-minute gatherings or a cozy afternoon treat.
  • Budget-friendly with everyday ingredients, making it an accessible option for all home bakers.
  • The citrus icing adds a sweet tang that elevates the loaf, turning a simple recipe into a showstopper!

Ingredients

  • 1 ½ cups (190g) all-purpose flour
  • 1 teaspoon baking powder
  • ½ teaspoon baking soda
  • ½ teaspoon salt
  • 3 tablespoons poppy seeds
  • ½ cup (115g) unsalted butter, softened to room temperature
  • 1 cup (200g) granulated sugar
  • 2 large eggs
  • 1 teaspoon vanilla extract
  • 1 teaspoon lemon zest (from about 1 medium lemon)
  • ½ cup (120ml) buttermilk
  • 2 tablespoons fresh lemon juice

For the Citrus Icing:

  • 1 cup (120g) powdered sugar
  • 2 tablespoons fresh lemon juice
  • 1 tablespoon orange juice
  • 1 teaspoon lemon zest (for garnish, optional)

Let’s dive into the key ingredients that make this Lemon Poppy Seed Loaf so special. The all-purpose flour provides the structure and base for the loaf, while the baking powder and baking soda ensure it rises perfectly, giving the loaf a light texture. For a gluten-free variation, you could substitute the flour with a gluten-free all-purpose blend. Poppy seeds not only add a delightful crunch but also contribute to the unique flavor profile that pairs well with the citrus notes.

Unsalted butter is crucial for achieving the buttery richness that makes this loaf so moist. If you’re looking for a dairy-free option, coconut oil or a vegan butter can be used instead. The buttermilk is another essential component, providing acidity that activates the baking soda for a fluffy texture. If you don’t have buttermilk on hand, you can easily make a substitute by mixing ½ cup of milk with 1 tablespoon of vinegar or lemon juice and letting it sit for about 5 minutes.

Step-by-Step Instructions

  1. Preheat your oven to 350°F (175°C). Grease a 9×5-inch loaf pan or line it with parchment paper for easy removal later.
  2. In a medium mixing bowl, whisk together 1 ½ cups of all-purpose flour, 1 teaspoon of baking powder, ½ teaspoon of baking soda, ½ teaspoon of salt, and 3 tablespoons of poppy seeds. This helps to evenly distribute the baking agents and ensures a uniform rise.
  3. In a large mixing bowl, cream together ½ cup of softened unsalted butter and 1 cup of granulated sugar using an electric mixer on medium speed for about 3-4 minutes, until the mixture is light and fluffy. Make sure to scrape down the sides of the bowl occasionally.
  4. Add 2 large eggs, 1 teaspoon of vanilla extract, and 1 teaspoon of lemon zest to the creamed butter and sugar, mixing until fully combined. You want a smooth consistency, so ensure there are no lumps of butter.
  5. In a small bowl, combine ½ cup of buttermilk and 2 tablespoons of fresh lemon juice. Alternately add the dry ingredients and buttermilk mixture to the butter mixture, starting and ending with the dry ingredients. Mix just until combined; do not overmix, as this can lead to a dense loaf.
  6. Pour the batter into the prepared loaf pan. Smooth the top with a spatula, ensuring it’s even. Bake in the preheated oven for 50-60 minutes, or until a toothpick inserted in the center comes out clean. The edges should be lightly golden brown, and the center should feel just set.
  7. Once baked, remove the loaf from the oven and allow it to cool in the pan for about 10 minutes. Then, transfer it to a wire rack to cool completely. Resist the urge to slice too soon, as it will be crumbly if it’s still warm.
  8. While the loaf is cooling, prepare the citrus icing. In a medium bowl, whisk together 1 cup of powdered sugar, 2 tablespoons of fresh lemon juice, and 1 tablespoon of orange juice until smooth. If the icing is too thick, you can add a little more juice to reach your desired consistency.
  9. Once the loaf is completely cool, drizzle the citrus icing over the top. If you like, sprinkle with an additional teaspoon of lemon zest for an extra pop of flavor and color.

Pro Tips for the Best Lemon Poppy Seed Loaf With Citrus Icing

  • Be careful not to overmix your batter; this is a common mistake that can lead to a dense loaf. Mix just until the dry ingredients are incorporated for a light and fluffy texture.
  • Use room temperature ingredients, especially the butter and eggs. This helps to create a smoother batter and ensures even baking. Take your eggs out of the fridge about 30 minutes before you start.
  • For a more pronounced lemon flavor, consider adding a little lemon extract in addition to the zest and juice. Just a half teaspoon can elevate the citrus notes significantly.
  • When measuring your flour, spoon it into the measuring cup and level it off with a knife instead of scooping directly from the bag. This prevents packing and ensures you don’t end up with a dry loaf.
  • Invest in a good quality loaf pan; it makes a difference in heat distribution, which ensures even baking. If your pan is dark-coated, reduce the oven temperature by 25°F to prevent over-browning.

Variations & Serving Ideas

For a delightful twist, consider adding blueberries or raspberries to the batter for a fruity burst of flavor. You can also experiment with different citrus fruits—try lime or grapefruit zest and juice for a refreshing change. For a healthier option, substitute half of the all-purpose flour with whole wheat flour for added fiber without compromising too much on texture.

This Lemon Poppy Seed Loaf pairs beautifully with a light salad, such as a mixed greens salad with a vinaigrette, or a cup of tea for a cozy afternoon treat. It also complements a creamy cheese platter, as the acidity of the loaf balances rich cheeses perfectly. Lastly, a scoop of vanilla ice cream on the side creates a delightful contrast of temperatures and flavors!

Storage, Make-Ahead & Reheating

This Lemon Poppy Seed Loaf can be stored at room temperature for up to 3 days if wrapped tightly in plastic wrap. If you want to keep it longer, it freezes well for up to 3 months. To freeze, wrap the loaf tightly in plastic wrap and then in aluminum foil to prevent freezer burn.

When you’re ready to enjoy it again, simply thaw it in the fridge overnight. Reheat individual slices in the microwave for 15-20 seconds or in a toaster oven until warmed through. Interestingly, many people find that this loaf tastes even better the next day, as the flavors have time to meld!

Frequently Asked Questions

Can I make Lemon Poppy Seed Loaf With Citrus Icing ahead of time?

Yes — in fact, it tastes even better the next day! You can make the loaf a day in advance, allowing the flavors to develop. Just be sure to store it in an airtight container to maintain its moisture.

Can I substitute the poppy seeds?

Absolutely! If you don’t have poppy seeds on hand or prefer an alternative, you can use sesame seeds for a similar crunch or omit them entirely for a smooth loaf.

What can I use instead of buttermilk?

If you don’t have buttermilk, you can easily create a substitute by mixing ½ cup of milk (dairy or plant-based) with 1 tablespoon of vinegar or lemon juice. Let it sit for 5 minutes before using in the recipe.

How can I make this recipe gluten-free?

To make a gluten-free version of this Lemon Poppy Seed Loaf, substitute the all-purpose flour with a gluten-free all-purpose flour blend. Just ensure that the blend contains a binding agent like xanthan gum for the best results.

What is the best way to store leftover loaf?

Leftover Lemon Poppy Seed Loaf should be stored in an airtight container at room temperature for up to 3 days. For longer storage, wrap it tightly and freeze for up to 3 months. Thaw it before serving for the best texture.

Zesty Lemon Poppy Seed Delight

Final Thoughts

The Lemon Poppy Seed Loaf with Citrus Icing is truly a delightful treat that brings a burst of brightness to any occasion. The zesty lemon flavor combined with the subtle crunch of poppy seeds creates a satisfying balance, while the citrus icing adds a touch of sweetness that perfectly complements the loaf’s tanginess.

This is the kind of recipe I come back to again and again, especially when I want to brighten up a gloomy day or celebrate a small victory. The aroma that fills the kitchen as it bakes is absolutely heavenly! I encourage you to give this recipe a try; you might just find it becoming a beloved staple in your home. Don’t forget to share your results or even add your own unique twist—I can’t wait to see what you create!

Print
clock clock iconcutlery cutlery iconflag flag iconfolder folder iconinstagram instagram iconpinterest pinterest iconfacebook facebook iconprint print iconsquares squares iconheart heart iconheart solid heart solid icon

Lemon Poppy Seed Loaf


  • Author: Lily author
  • Total Time: 13 minute
  • Yield: 1 loaf 1x
Pin Recipe
Print Recipe

Description

This Lemon Poppy Seed Loaf is a delightful treat that combines zesty lemon flavor with crunchy poppy seeds. Topped with a citrus icing, it’s perfect for any occasion.


Ingredients

Scale
  • 1 ½ cups (190g) all-purpose flour
  • 1 teaspoon baking powder
  • ½ teaspoon baking soda
  • ½ teaspoon salt
  • 3 tablespoons poppy seeds
  • ½ cup (115g) unsalted butter, softened to room temperature
  • 1 cup (200g) granulated sugar
  • 2 large eggs
  • 1 teaspoon vanilla extract
  • 1 teaspoon lemon zest (from about 1 medium lemon)
  • ½ cup (120ml) buttermilk
  • 2 tablespoons fresh lemon juice
  • 1 cup (120g) powdered sugar
  • 2 tablespoons fresh lemon juice
  • 1 tablespoon orange juice
  • 1 teaspoon lemon zest (for garnish, optional)

Instructions

  1. Preheat your oven to 350°F (175°C). Grease a 9×5-inch loaf pan or line it with parchment paper for easy removal later.
  2. In a medium mixing bowl, whisk together 1 ½ cups of all-purpose flour, 1 teaspoon of baking powder, ½ teaspoon of baking soda, ½ teaspoon of salt, and 3 tablespoons of poppy seeds. This helps to evenly distribute the baking agents and ensures a uniform rise.
  3. In a large mixing bowl, cream together ½ cup of softened unsalted butter and 1 cup of granulated sugar using an electric mixer on medium speed for about 3-4 minutes, until the mixture is light and fluffy. Make sure to scrape down the sides of the bowl occasionally.
  4. Add 2 large eggs, 1 teaspoon of vanilla extract, and 1 teaspoon of lemon zest to the creamed butter and sugar, mixing until fully combined. You want a smooth consistency, so ensure there are no lumps of butter.
  5. In a small bowl, combine ½ cup of buttermilk and 2 tablespoons of fresh lemon juice. Alternately add the dry ingredients and buttermilk mixture to the butter mixture, starting and ending with the dry ingredients. Mix just until combined; do not overmix, as this can lead to a dense loaf.
  6. Pour the batter into the prepared loaf pan. Smooth the top with a spatula, ensuring it’s even. Bake in the preheated oven for 50-60 minutes, or until a toothpick inserted in the center comes out clean. The edges should be lightly golden brown, and the center should feel just set.
  7. Once baked, remove the loaf from the oven and allow it to cool in the pan for about 10 minutes. Then, transfer it to a wire rack to cool completely. Resist the urge to slice too soon, as it will be crumbly if it’s still warm.
  8. While the loaf is cooling, prepare the citrus icing. In a medium bowl, whisk together 1 cup of powdered sugar, 2 tablespoons of fresh lemon juice, and 1 tablespoon of orange juice until smooth. If the icing is too thick, you can add a little more juice to reach your desired consistency.
  9. Once the loaf is completely cool, drizzle the citrus icing over the top. If you like, sprinkle with an additional teaspoon of lemon zest for an extra pop of flavor and color.
  • Prep Time: 15 mins
  • Cook Time: 50-60 mins
  • Category: Dessert
  • Method: Baking
  • Cuisine: American

Nutrition

  • Serving Size: 1 slice
  • Calories: 200
  • Sugar: 15 g
  • Sodium: 150 mg
  • Fat: 8 g
  • Saturated Fat: 5 g
  • Unsaturated Fat: 3 g
  • Trans Fat: 0 g
  • Carbohydrates: 30 g
  • Fiber: 1 g
  • Protein: 3 g
  • Cholesterol: 40 mg

Keywords: Be careful not to overmix your batter; this is a common mistake that can lead to a dense loaf. Use room temperature ingredients for a smoother batter and even baking.

Did you make this recipe?

Share a photo and tag us — we can't wait to see what you've made!

  • Privacy Policy
  • Terms Of Service
  • Contact
  • About
  • GDPR

Copyright © 2025 Homesmad