• Skip to primary navigation
  • Skip to main content
  • Skip to primary sidebar
Homesmad

Homesmad

  • Home
  • Breakfast & Brunch
  • Appetizers & Snacks
  • Dinner
  • Dessert
  • About
  • Privacy Policy
  • Contact
Homesmad
  • Home
  • Breakfast & Brunch
  • Appetizers & Snacks
  • Dinner
  • Dessert
  • About
  • Privacy Policy
  • Contact

Irresistible Apple Pie Bombs: Your New Favorite Baked Treat

October 5, 2025 by Lily author

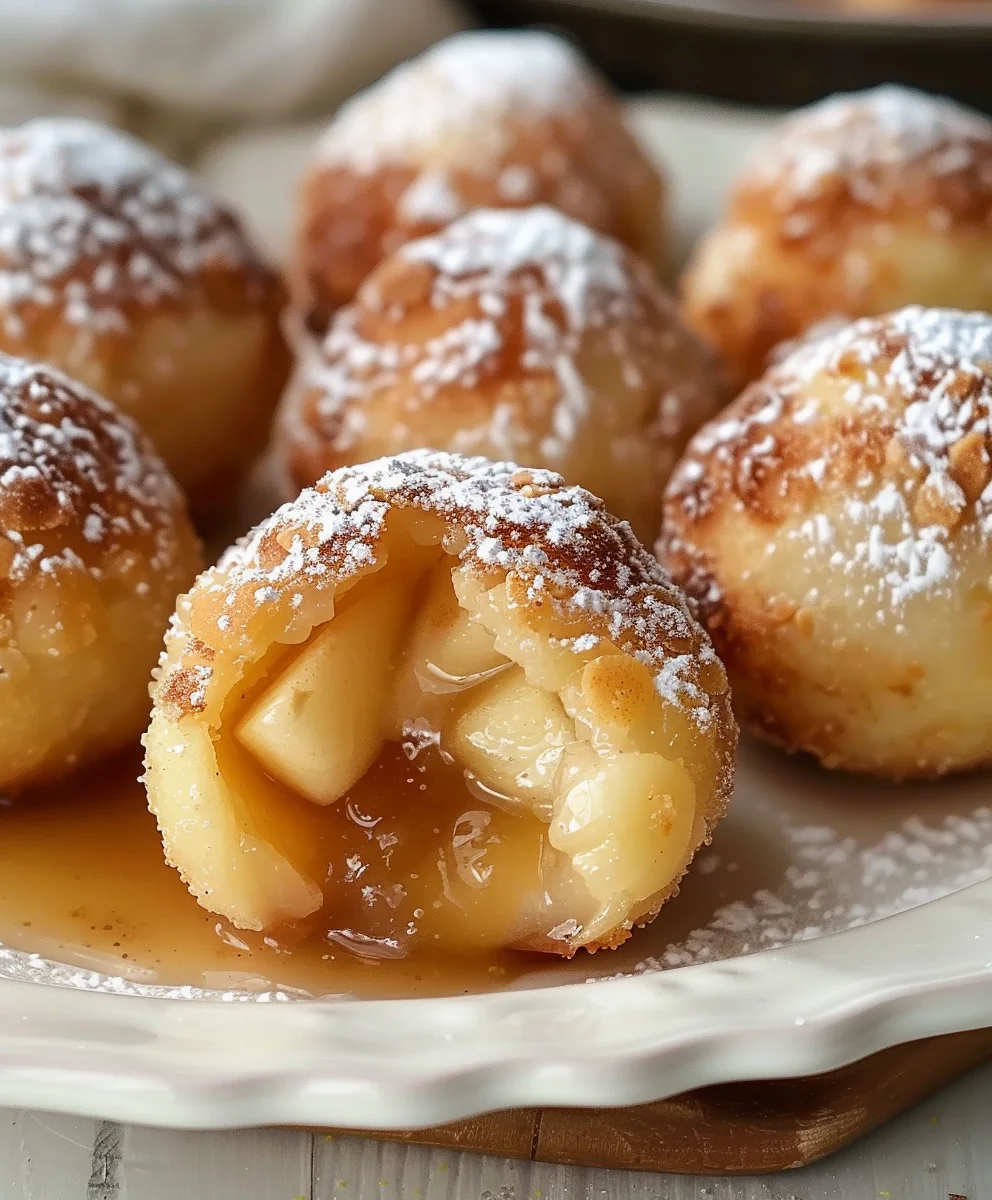
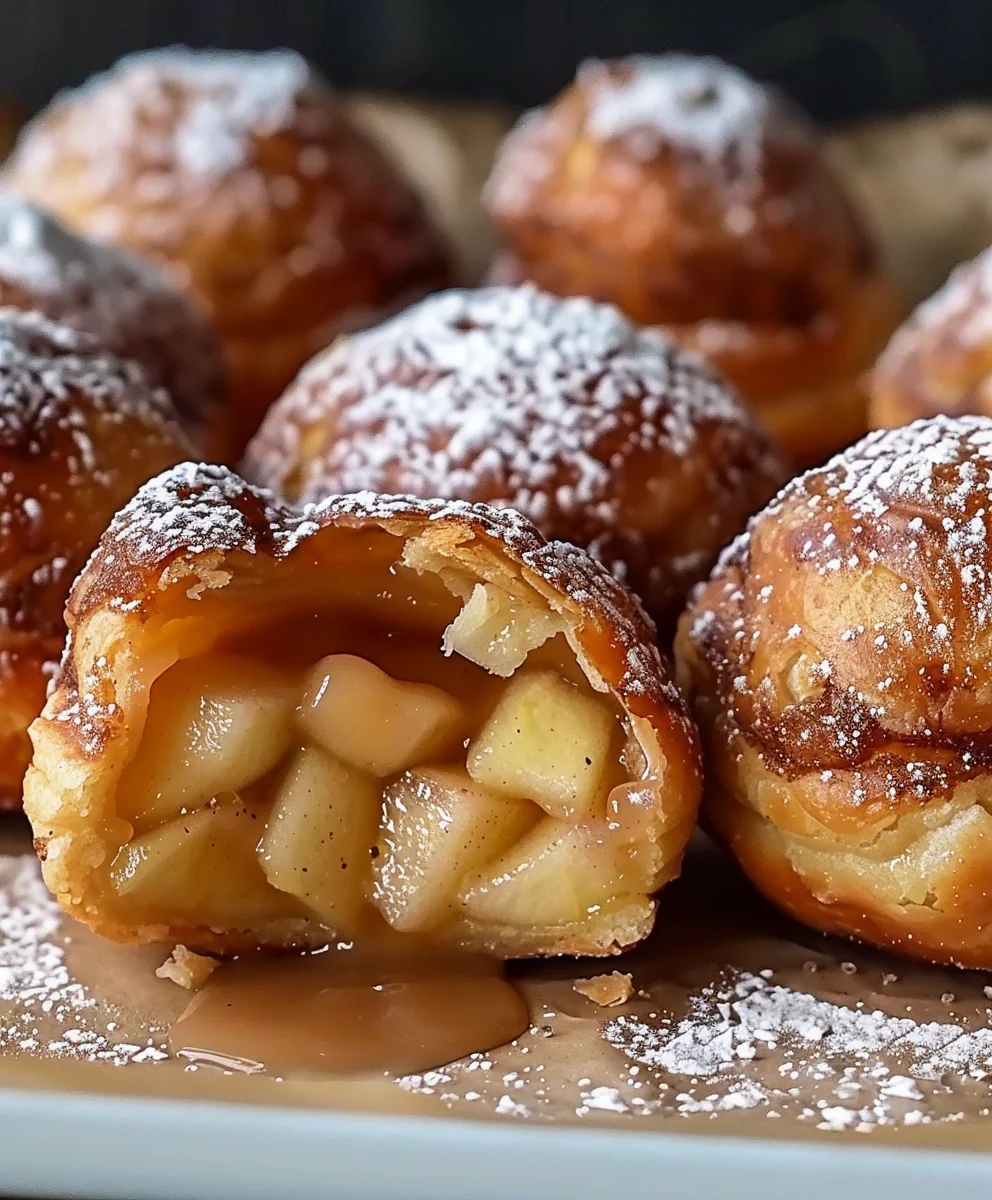
Apple Pie Bombs are truly a revelation for anyone who adores the classic dessert but craves a modern, convenient twist. These delightful, individual servings encapsulate all the comforting flavors of a traditional apple pie in a wonderfully portable package. While the concept of apple pie itself carries a rich American heritage, symbolizing warmth and home, these ‘bombs’ represent an innovative evolution, offering a less daunting baking experience without compromising on that beloved taste. I find myself constantly recommending these because of their irresistible combination of tender, spiced apple filling enveloped in a golden, flaky crust, often with a decadent glaze. They are perfectly sized for a quick dessert, a delightful breakfast treat, or an impressive addition to any potluck.

Experience the Joy of Each Bite

Imagine biting into a warm, gooey center bursting with sweet apple and cinnamon, encased in a perfectly crisp exterior. That’s the magic these Apple Pie Bombs deliver. Preparing these is surprisingly straightforward, making them an accessible baking project for enthusiasts of all skill levels. We are thrilled for you to embark on this culinary journey with us, creating treats that are sure to become a cherished favorite in your home and impress anyone lucky enough to try them.

Irresistible Apple Pie Bombs: Your New Favorite Baked Treat this RECIPE

Ingredients:

  • For the Apple Pie Bombs:
    • 2 cans (8 oz each) refrigerated crescent roll dough (such as Pillsbury Crescent Rolls)
    • 3 medium-sized baking apples (about 1.5 lbs), I highly recommend Granny Smith or Honeycrisp for their texture and tartness
    • ½ cup packed light brown sugar
    • 1 teaspoon ground cinnamon
    • ¼ teaspoon ground nutmeg (optional, but adds a lovely warmth!)
    • 2 tablespoons unsalted butter
    • 1 tablespoon fresh lemon juice
    • 1 teaspoon pure vanilla extract
    • Pinch of salt
    • Additional melted butter for brushing (about 2-3 tablespoons)
    • Additional cinnamon sugar for topping (about 2 tablespoons sugar mixed with ½ teaspoon cinnamon)
  • For the Vanilla Glaze (Optional, but highly recommended for that extra touch!):
    • 1 cup powdered sugar (confectioners’ sugar)
    • 2 tablespoons milk (whole milk or half-and-half works best for richness)
    • ½ teaspoon pure vanilla extract
    • Pinch of salt

Prepare the Apple Filling:

  1. Prepare the Apples: First things first, let’s get those beautiful apples ready. Grab your three medium-sized baking apples. I usually go for Granny Smith because their tartness beautifully balances the sweetness of the other ingredients, and they hold their shape wonderfully during cooking. Honeycrisp are also a fantastic option if you prefer a slightly sweeter and crispier apple. Carefully peel each apple, then core them. Once peeled and cored, I like to finely dice them into small, uniform pieces. Think about quarter-inch cubes – no larger than that. Uniformity is key here, as it ensures they cook evenly and fit snugly into our “bombs” without creating awkward bulges. Uneven pieces can lead to some being too mushy and others still too firm, and we want perfection in every bite!
  2. Sauté the Apples: Now, let’s bring some warmth to our kitchen. In a medium-sized skillet or a non-stick frying pan, melt 2 tablespoons of unsalted butter over medium heat. Once the butter is glistening and fully melted, add your finely diced apples to the pan. Sauté the apples for about 3 to 5 minutes, stirring occasionally. We’re not looking to fully cook them at this stage; rather, we want to soften them slightly and begin to release their natural sugars and aromas. You’ll notice them becoming a bit more translucent around the edges.
  3. Flavor the Filling: It’s time to infuse these apples with those classic apple pie flavors! Reduce the heat to medium-low. To the apples, add ½ cup of packed light brown sugar, 1 teaspoon of ground cinnamon, and if you’re using it, ¼ teaspoon of ground nutmeg. Don’t forget that crucial pinch of salt – it genuinely enhances all the sweet flavors. Finally, pour in 1 tablespoon of fresh lemon juice. The lemon juice is your secret weapon here; it not only brightens the flavor profile, cutting through the sweetness, but also prevents the apples from browning excessively, keeping their lovely light color. Stir everything together until the apples are thoroughly coated in the fragrant spice and sugar mixture.
  4. Simmer to Perfection: Continue to simmer the apple mixture over medium-low heat for another 5 to 7 minutes. Stir frequently to prevent sticking and ensure even cooking. The goal here is to allow the apples to become tender but still retain a slight bite – we don’t want apple mush! The sugar will melt and combine with the apple juices, creating a wonderfully thick, syrupy sauce that will be absolutely divine inside our bombs. Once the apples are tender and the sauce has thickened, remove the skillet from the heat. Stir in 1 teaspoon of pure vanilla extract – this adds another layer of aromatic warmth that truly elevates the filling. Let the apple filling cool completely before you move on to the next step. Cooling is essential; hot filling will melt your crescent dough, making assembly a messy and frustrating endeavor. I often transfer it to a separate bowl and pop it in the fridge for 15-20 minutes to speed up this process.

Assemble the Apple Pie Bombs:

  1. Preheat and Prep: Before you even think about unwrapping that dough, preheat your oven to 375°F (190°C). This ensures your oven is perfectly heated and ready to go the moment your bombs are assembled, which is crucial for even baking. Line a large baking sheet with parchment paper. This simple step is a game-changer – it prevents sticking, makes cleanup a breeze, and ensures the bottoms of your bombs get perfectly golden brown. Also, take a moment to melt about 2-3 tablespoons of unsalted butter in a small bowl for brushing later, and in another small bowl, mix together your additional cinnamon sugar for topping (2 tablespoons sugar with ½ teaspoon cinnamon). Having everything ready makes the assembly process smooth and enjoyable.
  2. Unroll the Dough: Now for the fun part! Carefully unroll one can of refrigerated crescent roll dough onto a clean, dry surface, such as a large cutting board or your countertop. If you’re using dough that comes in a single sheet (not pre-perforated triangles), use a pizza cutter or a sharp knife to cut it into 8 equal triangles. If you’re using the standard pre-perforated kind, simply separate the dough along the perforations into 8 individual triangles. Repeat this process with the second can of dough, so you should have 16 triangles in total. Try to keep the dough as cold as possible; warm dough is much harder to work with and more prone to tearing.
  3. Fill the Triangles: This is where our “bombs” truly come to life. Take one crescent dough triangle. Using a small spoon, place approximately 1 to 1.5 tablespoons of your cooled apple filling onto the wider end of the dough triangle. Don’t overfill, no matter how tempting it is! Overfilling can make sealing difficult and may cause the bombs to burst open during baking, leading to a sticky, sugary mess on your baking sheet. We’re aiming for that perfect balance of dough and filling in every bite.
  4. Roll and Seal: Once the filling is in place, gently fold the wider end of the dough over the filling. Now, carefully roll the dough towards the narrower, pointed end of the triangle, just as you would roll a regular crescent roll. Once rolled, this is the most critical step for success: sealing! Take your fingers and pinch the seams of the dough together, especially at the sides and where the dough overlaps. You want to completely enclose the apple filling, forming a neat, compact “bomb.” Make sure there are no visible gaps or holes where the filling could escape. If your dough tears slightly, gently pinch it back together. A small tear isn’t the end of the world, but try to avoid large ones to keep the filling secure and moist inside.
  5. Arrange on Baking Sheet: As you finish assembling each apple pie bomb, place it seam-side down on your prepared parchment-lined baking sheet. Make sure to leave a little space between each bomb, about an inch or so, to allow for even baking and proper air circulation. Continue this process until all 16 dough triangles are filled, rolled, and sealed, forming neat little apple pie bombs on your baking sheet. Take a moment to admire your handiwork – they should look like plump, ready-to-burst packages of deliciousness!

Baking the Apple Pie Bombs:

  1. Brush and Sprinkle: Before they go into the oven, let’s give them that irresistible golden crust and extra flavor. Take your small bowl of melted unsalted butter and, using a pastry brush, lightly brush the tops and sides of each apple pie bomb with the melted butter. This not only helps them brown beautifully but also acts as a “glue” for our next step. Immediately after brushing with butter, sprinkle a generous amount of your cinnamon sugar mixture evenly over the tops of all the bombs. Don’t be shy here; that cinnamon sugar topping creates a delightful crunch and an explosion of classic apple pie flavor with every bite. The butter ensures the cinnamon sugar adheres perfectly, creating a beautiful caramelized crust as they bake.
  2. Bake to Golden Perfection: Carefully transfer the baking sheet with your beautifully prepared apple pie bombs into your preheated 375°F (190°C) oven. Bake for approximately 12 to 15 minutes. Baking time can vary slightly depending on your oven, so I always recommend keeping a close eye on them, especially during the last few minutes. You’ll know they’re done when the crescent roll dough is puffed up, golden brown, and absolutely irresistible looking. The cinnamon sugar on top should be caramelized and glistening. The intoxicating aroma that will fill your kitchen during this stage is simply heavenly and a sure sign that something delicious is happening!
  3. Cool Slightly: Once baked to perfection, carefully remove the baking sheet from the oven. Resist the urge to dive in immediately! While they look and smell amazing, the filling inside will be incredibly hot, and the dough needs a few minutes to set. Allow the apple pie bombs to cool on the baking sheet for about 5 to 10 minutes. This brief cooling period helps the filling to settle and firm up slightly, preventing it from being scalding hot and overly runny when you take that first glorious bite. After this initial cooling, you can transfer them to a wire rack to cool completely if you plan on adding the glaze, or simply serve them warm straight from the baking sheet.

Prepare the Glaze (Optional but Recommended!):

  1. Whisk the Glaze Ingredients: If you’ve decided to elevate your Apple Pie Bombs with a glorious vanilla glaze – and I wholeheartedly encourage you to do so! – let’s get that prepared while the bombs are cooling. In a medium-sized bowl, combine 1 cup of powdered sugar (also known as confectioners’ sugar), 2 tablespoons of milk (I find whole milk or half-and-half gives the richest, creamiest consistency), ½ teaspoon of pure vanilla extract, and that tiny but mighty pinch of salt.
  2. Achieve Perfect Consistency: Using a whisk, thoroughly combine all the ingredients. Start whisking gently at first to incorporate the powdered sugar without creating a dust cloud, then pick up the pace. Continue whisking until the mixture is completely smooth and free of any lumps. You’re aiming for a consistency that is thick enough to coat the back of a spoon but still thin enough to drizzle beautifully. If your glaze seems too thick, add a tiny splash more milk (about ¼ teaspoon at a time) and whisk again until it reaches your desired consistency. If it’s too thin, sift in another tablespoon or two of powdered sugar until it thickens up. Consistency is key for a perfect drizzle!
  3. Drizzle and Serve: Once your apple pie bombs have cooled for at least 10-15 minutes (they should still be warm, but not piping hot, otherwise the glaze will simply melt and run off), it’s time for the final flourish! You can either drizzle the glaze generously over all the bombs directly on the cooling rack, or you can individually dip the tops of each bomb into the glaze for a more uniform coating. My personal preference is to grab a spoon and drizzle it artfully over each one, creating lovely cascades of vanilla sweetness. Let the glaze set for a few minutes before serving. The delicate sweetness and creamy texture of the glaze perfectly complement the spiced apple filling and the flaky, buttery crust.

Serving Suggestions & Storage:

  1. Enjoy Them Warm: These Apple Pie Bombs are truly at their absolute best when served warm, ideally with the glaze still slightly soft. The warmth enhances all the comforting flavors, making each bite a truly blissful experience.
  2. Elevate the Experience: To take these from simply delicious to utterly decadent, consider serving them alongside a scoop of high-quality vanilla bean ice cream. The cold, creamy ice cream melting into the warm apple bomb creates an incredible contrast of temperatures and textures that is simply divine. A dollop of homemade whipped cream or a drizzle of caramel sauce would also be fantastic additions for an extra layer of indulgence. Imagine serving these at a family gathering or a cozy dessert night – they are always a crowd-pleaser!
  3. Storage: If by some miracle you happen to have any leftovers, these Apple Pie Bombs can be stored in an airtight container at room temperature for up to 2 days. If your kitchen is particularly warm or humid, or if they have the glaze, I recommend storing them in the refrigerator, where they’ll keep well for up to 3-4 days.
  4. Reheating: To reheat, simply pop them into a microwave for 15-20 seconds for a quick warm-up, or place them in a preheated oven at 300°F (150°C) for about 5-7 minutes until they are warmed through and the crust is crisp again. Reheating in the oven is my preferred method as it helps to restore the texture of the crust much better than the microwave, preventing any sogginess. Enjoy these delightful treats at any time – for breakfast with coffee, as a satisfying snack, or as a comforting dessert! They are a testament to the joy of homemade baking.

Irresistible Apple Pie Bombs: Your New Favorite Baked Treat

Conclusion:

So, there you have it – my absolute favorite recipe for these delightful, individual treats. If you’ve been searching for a dessert that marries convenience with an explosion of flavor, look no further. What makes these Apple Pie Bombs truly exceptional is their ingenious simplicity coupled with an undeniably nostalgic taste. Each bite delivers that comforting warmth of spiced apples, perfectly tender and bursting with their natural sweetness, encased in a golden, slightly crisp, and utterly delicious pastry shell. It’s the quintessential apple pie experience, but reimagined into a portable, pop-in-your-mouth format that’s simply irresistible. I promise you, once you try them, you’ll understand why they’ve become such a beloved staple in my kitchen. They’re less fuss than a traditional pie, yet they deliver all the satisfaction and heartwarming goodness. The flaky texture of the pastry contrasting with the soft, warm apple filling is a symphony for your taste buds, making them an instant crowd-pleaser for any occasion, from casual family desserts to impressive potluck contributions. They truly embody the spirit of homemade comfort with a playful twist, and that’s precisely why I encourage everyone to give them a go. The aroma alone as they bake is enough to make anyone’s mouth water, filling your home with the sweet, spicy scent of autumn – a perfect treat any time of year.

Now, let’s talk about taking your Apple Pie Bombs experience to the next level. While they are absolutely divine on their own, fresh from the oven, there are so many wonderful ways to enjoy them. For the ultimate indulgence, I highly recommend serving them à la mode with a generous scoop of vanilla bean ice cream. The cold, creamy ice cream melting into the warm pastry and apple filling is a match made in dessert heaven, creating an incredible play of temperatures and textures that will send your taste buds into a frenzy. A dollop of freshly whipped cream, perhaps infused with a hint of vanilla or cinnamon, also works wonders, adding a light, airy richness. If you’re looking for a simple yet elegant finish, a dusting of powdered sugar or a sprinkle of cinnamon sugar over the warm bombs is always a classic. Or, for those who love a bit more sweetness and shine, a quick glaze made from powdered sugar and a splash of milk or apple cider takes them to another level of delectable beauty. A drizzle of warm caramel sauce, either store-bought or homemade, also elevates the flavor profile, adding a buttery, sweet note that complements the apples beautifully. Imagine these little gems alongside your morning coffee or as a special afternoon treat with a cup of spiced tea – pure bliss!

Exploring Delicious Variations:

Don’t be afraid to get creative and make this recipe truly your own! While apple is classic, the possibilities for fruit fillings are endless. Why not try a batch with juicy tart cherries for a different kind of sweet-tart explosion, or perhaps ripe peaches for a taste of summer? Mixed berries, either fresh or frozen, would also be magnificent, offering a vibrant burst of color and flavor. You could even experiment with different spices – a pinch of nutmeg, allspice, or even a touch of ground ginger can add another layer of complexity to the apple filling. For those who love a bit of crunch, consider adding finely chopped toasted pecans or walnuts to the apple mixture before wrapping them up. Or, if you’re feeling ambitious, a sprinkle of streusel topping over the unbaked bombs will create an even more satisfying texture contrast. The beauty of this recipe lies in its adaptability, allowing you to tailor it to your personal preferences and whatever seasonal fruits you have on hand. Don’t be shy; experiment and discover your new favorite iteration! You might even find that using a different type of dough, like a tender biscuit dough for a chewier texture, creates a whole new delightful experience. The core concept of a warm, fruity filling encased in a golden, baked shell is so versatile, inviting endless culinary adventures.

So, what are you waiting for? I genuinely hope you feel inspired to roll up your sleeves and give these fantastic Apple Pie Bombs a try in your own kitchen very soon. They truly are a delightful experience to bake and an even more delightful experience to eat. I promise, the smiles you’ll see on the faces of your family and friends when they bite into these warm, comforting treats will be all the reward you need. And when you do, please, please come back and share your experience with me! I absolutely adore hearing about your culinary adventures. Did you try a unique variation? Did your kids help you make them? What was your favorite part? Your feedback, your photos, and your stories are what make this community so vibrant and exciting. So, grab your ingredients, preheat your oven, and prepare to create some truly unforgettable moments with these incredible Apple Pie Bombs. Happy baking, everyone!


Apple Pie Bombs

Apple Pie Bombs

These delightful individual Apple Pie Bombs encapsulate all the comforting flavors of a traditional apple pie in a wonderfully portable package. A tender, spiced apple filling is enveloped in a golden, flaky biscuit crust, coated with cinnamon sugar, and baked to perfection. They’re ideal for a quick dessert, breakfast treat, or potluck addition.

Prep Time
25 Minutes

Cook Time
15 Minutes

Total Time
40 Minutes

Servings
8 servings

Ingredients

  • 2 medium apples, peeled, cored, and diced
  • 2 tablespoons unsalted butter (for filling)
  • 1/3 cup granulated sugar (for filling)
  • 1 teaspoon ground cinnamon (for filling)
  • 1 tablespoon cornstarch
  • 2 tablespoons water
  • 1 can refrigerated biscuit dough (8 biscuits)
  • 1/2 cup unsalted butter, melted (for coating)
  • 1 cup granulated sugar (for coating)
  • 1 tablespoon ground cinnamon (for coating)

Instructions

  1. Step 1
    Dice apples into small, uniform pieces. In a medium skillet, melt 2 tablespoons butter over medium heat. Add diced apples and sauté for 3-5 minutes until slightly softened. Reduce heat to medium-low, add 1/3 cup granulated sugar and 1 teaspoon cinnamon. In a small bowl, whisk 1 tablespoon cornstarch with 2 tablespoons water, then stir into the apples. Simmer for 5-7 minutes, stirring, until apples are tender and sauce thickens. Remove from heat and let cool completely.
  2. Step 2
    Preheat oven to 375°F (190°C). Line a baking sheet with parchment paper. In a small bowl, combine 1 cup granulated sugar and 1 tablespoon cinnamon for topping. Melt 1/2 cup unsalted butter in another small bowl for dipping.
  3. Step 3
    Separate the biscuit dough into 8 individual biscuits. Flatten each biscuit slightly. Place about 1 to 1.5 tablespoons of the cooled apple filling onto the center of each flattened biscuit. Bring the edges of the dough together over the filling and pinch firmly to seal, forming a ball or pouch. Ensure no gaps where filling can escape.
  4. Step 4
    Dip each assembled apple pie bomb into the melted butter, ensuring it’s fully coated. Then, roll it in the cinnamon sugar mixture until generously coated. Place seam-side down on the prepared baking sheet, leaving space between each. Bake for 12-15 minutes, or until puffed and golden brown.
  5. Step 5
    Remove from oven and let cool on the baking sheet for 5-10 minutes. Serve warm. Optionally, drizzle with a simple vanilla glaze (not included in ingredients but suggested in source article). Store leftovers in an airtight container at room temperature for up to 2 days, or refrigerate for 3-4 days.

Important Information

Nutrition Facts (Per Serving)

It is important to consider this information as approximate and not to use it as definitive health advice.

Allergy Information

Please check ingredients for potential allergens and consult a health professional if in doubt.

« Previous Post
Candy Acorns Recipe: Easy & Fun No-Bake Treat!
Next Post »
Pumpkin Chocolate Muffins: Your New Favorite Fall Bake

If you enjoyed this…

Irresistible Cinnamon Brown Butter Cookies: Your New Favorite

Soft Apple & Carrot Dog Chew Bites Recipe – Healthy Treats!

Mini Cotton Candy Cheesecake Puff Balls: Sweet Delight Recipe

Primary Sidebar

Browse by Diet

BreakfastDinnerLunchDessertAppetizer

Sweet Peach Yogurt Parfait Delight

One of my fondest memories is from a lazy summer afternoon spent at my grandmother’s house. The sun filtered through the kitchen window, casting a warm glow over the table where she would create her culinary magic. It was during one of those blissful moments that I first tasted her Peach Yogurt Parfait with Honey and Granola. The sweet aroma of ripe peaches mingling with creamy yogurt and the crunch of granola was nothing short of heavenly. It felt like summer captured in a bowl, and I still remember the joy of diving in with a spoon, each layer revealing a new burst of flavor.

When I think about that parfait, I can almost hear the gentle hum of the bees outside, reminding me of the floral notes that honey brings to every bite. The vibrant yellows and soft oranges of the peaches contrast beautifully with the creamy white yogurt and the golden crunch of granola. It’s a dish that not only looks delightful but also tastes like a celebration of fresh, wholesome ingredients.

What makes my version of this Peach Yogurt Parfait special is the careful balance of flavors and textures. I use ripe, juicy peaches, drizzled with locally sourced honey, and a homemade granola that’s bursting with nuts and seeds for an extra crunch. It’s a simple dish, but every layer is crafted with love and attention.

Let me show you exactly how to make this delightful parfait, so you can bring a bit of that summer magic into your kitchen!

Sweet Peach Yogurt Parfait Delight

Why You’ll Love This Recipe

  • Delightfully creamy texture from the Greek yogurt, paired with the juicy sweetness of fresh peaches.
  • Ready in under 20 minutes, making it a quick and satisfying breakfast or snack option.
  • Budget-friendly, using common ingredients that you may already have in your pantry.
  • Customizable with your favorite granola and nuts, allowing you to tailor each parfait to your taste.
  • Perfectly balanced flavors with the bright acidity of lemon juice and the sweetness of honey enhancing the peaches.

Ingredients

  • For the Parfait:
  • 2 cups plain Greek yogurt (or vanilla yogurt for a sweeter option)
  • 2 large ripe peaches, diced (about 2 cups)
  • 1 tablespoon fresh lemon juice (to prevent browning of peaches)
  • 2 tablespoons honey (plus more for drizzling)
  • 1 teaspoon vanilla extract (optional for extra flavor)
  • For the Granola:
  • 1 cup granola (store-bought or homemade; see notes for a simple granola recipe)
  • 1/4 cup sliced almonds (optional for added crunch)
  • 1/4 cup shredded coconut (optional for added flavor)

Let’s dive into some key ingredients that make this Peach Yogurt Parfait so delightful! First, the Greek yogurt is not only creamy but also packed with protein, making it a satisfying option for breakfast or a snack. If you’re looking for a sweeter option, you can easily substitute it with vanilla yogurt, though it may alter the overall flavor balance. Next, the ripe peaches are the star of the show; their natural sweetness shines through, so I recommend choosing peaches that yield slightly to pressure, indicating they’re perfectly ripe. If peaches aren’t in season, feel free to use nectarines or even frozen peaches—just thaw them before use. Finally, honey adds a lovely floral sweetness that ties everything together. If you prefer, maple syrup can serve as a delicious substitute.

Step-by-Step Instructions

  1. Start by preparing the peaches. Wash them thoroughly, then slice and dice them into bite-sized pieces. In a medium bowl, toss the diced peaches with 1 tablespoon of fresh lemon juice to prevent browning. Set aside for about 5 minutes while the lemon juice works its magic.
  2. In a separate bowl, combine the Greek yogurt, 2 tablespoons of honey, and 1 teaspoon of vanilla extract if using. Stir the mixture until smooth and thoroughly blended. This should take about a minute. Avoid overmixing to maintain the creaminess of the yogurt.
  3. Now it’s time to layer your parfait. Grab a clear glass or bowl to showcase your beautiful creation. Start with a generous spoonful of the yogurt mixture at the bottom—about 1/4 cup will do. Use a spoon to spread it evenly.
  4. Add a layer of the diced peaches over the yogurt, ensuring they cover the yogurt completely. You might want to use about half of what you have prepared—roughly 1 cup. This layer should be visually appealing, so arrange the peaches neatly.
  5. Sprinkle 1/4 cup of granola over the peaches. This adds a delightful crunch. Make sure to distribute it evenly to ensure every bite has that satisfying texture. Avoid packing it down too tightly, as you want it to maintain its crunch.
  6. Repeat the layers: spoon in another 1/4 cup of yogurt, followed by another cup of peaches, and another sprinkle of granola. You should have at least two layers, but feel free to add more depending on your glass size.
  7. Finish off your parfait with a drizzle of honey on top for added sweetness and a touch of elegance. If you’re using sliced almonds or shredded coconut, sprinkle them on top now. It adds a lovely visual contrast and extra flavor.
  8. Serve immediately or refrigerate for up to 30 minutes before serving to allow the flavors to meld together. However, I recommend enjoying it fresh to maintain the granola’s crunch.

Pro Tips for the Best Peach Yogurt Parfait With Honey And Granola

  • Make sure to choose ripe peaches for the best flavor and texture. A common mistake is using unripe fruit, which can lead to a less enjoyable parfait. Look for peaches that are fragrant and slightly soft to the touch.
  • Use a clear glass to assemble your parfait; this not only makes for a beautiful presentation but also allows you to see the colorful layers, which adds to the enjoyment of eating it.
  • For an even creamier texture, consider whipping the Greek yogurt with a hand mixer for a couple of minutes before layering. This small adjustment makes a huge difference in mouthfeel.
  • Be mindful of the granola-to-yogurt ratio. Too much granola can overwhelm the parfait, while too little can make it feel too creamy. Aim for about 1/4 cup of granola per layer for the perfect balance.
  • If you’re making this for a gathering, consider preparing the yogurt and peaches ahead of time and layering them just before serving. This ensures the granola stays crunchy!

Variations & Serving Ideas

There are so many ways to get creative with your Peach Yogurt Parfait! For a tropical twist, swap out the peaches for mangoes or pineapples and top with coconut flakes. If you prefer a berry flavor, mix in some blueberries or strawberries with the peaches for added color and taste. For a nutty version, incorporate chopped walnuts or pecans instead of almonds.

As for serving ideas, this parfait pairs beautifully with a side of scrambled eggs for a hearty breakfast or fresh fruit salad for a light lunch. You might also enjoy it alongside whole grain toast with almond butter for an energizing snack. The contrast of flavors and textures will elevate your meal experience!

Storage, Make-Ahead & Reheating

The Peach Yogurt Parfait is best enjoyed fresh, but you can prepare some components ahead of time. Store the layered parfait in an airtight container in the refrigerator for up to 24 hours. However, be cautious; the granola may lose its crunch if stored too long. You can freeze the yogurt and peach mixture for up to 2 months; just remember to thaw it in the refrigerator overnight before serving.

If you plan to enjoy this dish the next day, it can taste even better as the flavors meld together. Just remember to add the granola right before serving to keep its delightful crunch!

Frequently Asked Questions

Can I make Peach Yogurt Parfait With Honey And Granola ahead of time?

Yes — in fact, it tastes even better the next day as the flavors meld. However, I recommend waiting to add the granola until just before serving to maintain its crunch.

What can I substitute for Greek yogurt?

If you prefer a lighter option, you can substitute Greek yogurt with regular yogurt or a dairy-free alternative like coconut yogurt. Just remember that this may alter the creaminess and flavor profile slightly.

Can I use frozen peaches for this parfait?

Absolutely! Just make sure to thaw the frozen peaches before using them. They will still add great flavor, though the texture may be slightly softer than fresh peaches.

How do I make the parfait vegan?

To make a vegan version, substitute the Greek yogurt with a plant-based yogurt alternative, and replace honey with maple syrup or agave nectar. This keeps the parfait sweet while adhering to a vegan diet.

What other fruits can I use in this recipe?

You can mix and match fruits based on your preference. Try using strawberries, blueberries, raspberries, or even bananas. Just make sure to adjust the lemon juice as needed to prevent browning.

Sweet Peach Yogurt Parfait Delight

Final Thoughts

The Peach Yogurt Parfait with Honey and Granola is a delightful blend of creamy yogurt, sweet peaches, and crunchy granola that creates a satisfying and nourishing treat. Each layer bursts with flavor, making it a perfect choice for breakfast or a light dessert.

This is the kind of recipe I come back to again and again, especially when I want something refreshing and wholesome to start my day. The harmony of sweet and tart flavors, combined with the delightful crunch, never fails to lift my spirits!

I encourage you to give this parfait a try and indulge in its comforting goodness. Feel free to share your results or even add your own twist—perhaps a sprinkle of cinnamon or a handful of nuts. Enjoy creating your perfect parfait!

Print
clock clock iconcutlery cutlery iconflag flag iconfolder folder iconinstagram instagram iconpinterest pinterest iconfacebook facebook iconprint print iconsquares squares iconheart heart iconheart solid heart solid icon

Peach Yogurt Parfait


  • Author: Lily author
  • Total Time: 15 minutes
  • Yield: 4 servings 1x
Pin Recipe
Print Recipe

Description

This Peach Yogurt Parfait combines creamy Greek yogurt, juicy peaches, and crunchy granola for a delightful treat. It’s a perfect breakfast or snack that captures the essence of summer in every bite.


Ingredients

Scale
  • For the Parfait:
  • 2 cups plain Greek yogurt (or vanilla yogurt for a sweeter option)
  • 2 large ripe peaches, diced (about 2 cups)
  • 1 tablespoon fresh lemon juice (to prevent browning of peaches)
  • 2 tablespoons honey (plus more for drizzling)
  • 1 teaspoon vanilla extract (optional for extra flavor)
  • For the Granola:
  • 1 cup granola (store-bought or homemade; see notes for a simple granola recipe)
  • 1/4 cup sliced almonds (optional for added crunch)
  • 1/4 cup shredded coconut (optional for added flavor)

Instructions

  1. Start by preparing the peaches. Wash them thoroughly, then slice and dice them into bite-sized pieces. In a medium bowl, toss the diced peaches with 1 tablespoon of fresh lemon juice to prevent browning. Set aside for about 5 minutes while the lemon juice works its magic.
  2. In a separate bowl, combine the Greek yogurt, 2 tablespoons of honey, and 1 teaspoon of vanilla extract if using. Stir the mixture until smooth and thoroughly blended. This should take about a minute. Avoid overmixing to maintain the creaminess of the yogurt.
  3. Now it’s time to layer your parfait. Grab a clear glass or bowl to showcase your beautiful creation. Start with a generous spoonful of the yogurt mixture at the bottom—about 1/4 cup will do. Use a spoon to spread it evenly.
  4. Add a layer of the diced peaches over the yogurt, ensuring they cover the yogurt completely. You might want to use about half of what you have prepared—roughly 1 cup. This layer should be visually appealing, so arrange the peaches neatly.
  5. Sprinkle 1/4 cup of granola over the peaches. This adds a delightful crunch. Make sure to distribute it evenly to ensure every bite has that satisfying texture. Avoid packing it down too tightly, as you want it to maintain its crunch.
  6. Repeat the layers: spoon in another 1/4 cup of yogurt, followed by another cup of peaches, and another sprinkle of granola. You should have at least two layers, but feel free to add more depending on your glass size.
  7. Finish off your parfait with a drizzle of honey on top for added sweetness and a touch of elegance. If you’re using sliced almonds or shredded coconut, sprinkle them on top now. It adds a lovely visual contrast and extra flavor.
  8. Serve immediately or refrigerate for up to 30 minutes before serving to allow the flavors to meld together. However, I recommend enjoying it fresh to maintain the granola’s crunch.
  • Prep Time: 15 mins
  • Cook Time: 0 mins
  • Category: Breakfast
  • Method: No-cook
  • Cuisine: American

Nutrition

  • Serving Size: 1 parfait
  • Calories: 250
  • Sugar: 20 g
  • Sodium: 50 mg
  • Fat: 5 g
  • Saturated Fat: 2 g
  • Unsaturated Fat: 3 g
  • Trans Fat: 0 g
  • Carbohydrates: 40 g
  • Fiber: 3 g
  • Protein: 10 g
  • Cholesterol: 10 mg

Keywords: Choose ripe peaches for the best flavor and texture. Use a clear glass for a beautiful presentation. For creaminess, consider whipping the yogurt before layering. Be mindful of the granola-to-yogurt ratio. Prepare yogurt and peaches ahead of time for gatherings, layering just before serving.

Did you make this recipe?

Share a photo and tag us — we can't wait to see what you've made!

Sun-Kissed Frozen Orange Cream Slush

As a child, summer days felt like they lasted forever. I remember the sticky heat wrapping around me as I played outside, my laughter mingling with the sounds of the neighborhood. But nothing could cool me down quite like the moment I’d spot my grandmother, laboring over her blender, whipping up her famous Frozen Orange Creamsicle Slush. That vibrant orange treat, with its frosty texture and sweet citrus aroma, was like a burst of sunshine in a cup. Just one sip, and I could feel the coolness wash over me, sparking pure joy.

This Frozen Orange Creamsicle Slush has a way of making you feel like a kid again. Its creamy, dreamy consistency is a delightful balance of bright orange and soft vanilla, inviting you to dive right in. The refreshing tang of orange dances on your tongue, while the smooth creaminess envelops you in a comforting embrace. It’s a nostalgic treat that’s perfect for hot summer afternoons or anytime you need a little pick-me-up.

What makes my version of this slush stand out is the addition of a hint of vanilla bean, which elevates the flavor and adds an extra layer of richness. Plus, it’s super easy to whip up with just a few simple ingredients that you probably already have on hand! So, if you’re ready to relive those sun-soaked memories, let me show you exactly how to make it.

Sun-Kissed Frozen Orange Cream Slush

Why You’ll Love This Recipe

  • Each slush is a perfect blend of creamy vanilla and zesty orange, creating a nostalgic flavor reminiscent of summer days.
  • This refreshing treat is ready in under 15 minutes, making it an ideal quick dessert for unexpected guests or hot afternoons.
  • With just 8 simple ingredients, it’s budget-friendly, ensuring you don’t have to break the bank to enjoy a delicious slush.
  • The slush has a perfectly smooth texture, thanks to the combination of ice and ice cream, providing a delightful contrast to the bright citrus flavors.
  • It’s highly customizable; you can easily adjust the sweetness and add fresh herbs for a unique twist that suits your taste.

Ingredients

  • 2 cups orange juice (freshly squeezed or store-bought)
  • 1 cup vanilla ice cream
  • 1 cup crushed ice
  • 1/2 cup milk (whole or 2%)
  • 1/4 cup granulated sugar (adjust based on sweetness preference)
  • 1 teaspoon vanilla extract
  • Zest of 1 orange (for added flavor)
  • Fresh orange slices and mint leaves (for garnish)

The star of this Frozen Orange Creamsicle Slush is the orange juice, which provides the vibrant, citrusy base. Freshly squeezed juice will yield the brightest flavor, but store-bought options can be just as convenient. If you’re opting for store-bought, choose 100% pure juice with no added sugars for the best results. Another essential ingredient is the vanilla ice cream; it adds creaminess and sweetness. You can substitute it with dairy-free ice cream if you’re looking for a vegan option. Whole or 2% milk complements the ice cream, creating a smooth blend. If you want a lower-calorie version, almond or oat milk can be good alternatives.

Lastly, the granulated sugar can be adjusted based on your sweetness preference. If you prefer a more natural sweetener, consider using honey or agave syrup. The orange zest enhances the flavor profile, providing an aromatic pop that brings the whole slush together. Don’t skip it! It adds an extra layer of brightness that makes this slush truly special.

Step-by-Step Instructions

  1. Start by preparing your ingredients. Gather 2 cups of orange juice, 1 cup of vanilla ice cream, and 1 cup of crushed ice. Make sure the ice is finely crushed, as larger chunks can make blending difficult.
  2. In a blender, combine the orange juice, vanilla ice cream, crushed ice, and 1/2 cup of milk. Add 1/4 cup of granulated sugar and 1 teaspoon of vanilla extract. If you like a sweeter slush, consider adding a bit more sugar at this stage.
  3. Add the zest of 1 orange to the blender. This step is crucial for enhancing the citrus flavor of your slush. Make sure not to include the bitter white pith—only the flavorful zest.
  4. Blend the mixture on medium-high speed for about 30-45 seconds. Stop once the ingredients are fully combined and the slush has a smooth, even consistency. If you notice large chunks of ice, blend for an additional 10-15 seconds. Avoid over-blending, as this can make the slush too liquidy.
  5. Once blended, taste the slush. If it needs more sweetness, add a little more sugar and blend for a few more seconds. If it’s too thick, you can add a splash of milk to reach your desired consistency.
  6. Pour the slush into glasses. This recipe typically serves 4, but you can easily double it for larger gatherings. Use a spoon to help guide the slush into the glasses if needed.
  7. Garnish each serving with fresh orange slices and mint leaves. The mint not only adds a pop of color but also a refreshing aroma that complements the citrus flavors beautifully.
  8. Serve immediately and enjoy! If you’ve made extra, you can refrigerate it for a short time, but it’s best enjoyed fresh.

Pro Tips for the Best Frozen Orange Creamsicle Slush

  • Don’t skip the orange zest! It’s a game-changer for flavor. Always zest before juicing to make it easier.
  • Use a high-powered blender for the best texture. A standard blender may struggle with ice, leading to uneven consistency. If you have a food processor, that can work too, but ensure the ice is finely crushed.
  • Adjust the ice-to-liquid ratio carefully. If your slush is too thick, it won’t blend well. Start with less ice and add more until you reach your preferred texture.
  • Be cautious with the sugar! Always start with the lower amount, as you can easily add more, but it’s hard to fix an overly sweet slush.
  • For a fun twist, consider adding a splash of coconut milk or a handful of fresh fruit like strawberries or pineapple. This not only enhances the flavor but also adds a beautiful color contrast.

Variations & Serving Ideas

There are countless ways to put a spin on your Frozen Orange Creamsicle Slush. Consider making a tropical version by adding in some pineapple juice or coconut milk for a delightful tropical twist. If you’re feeling adventurous, try incorporating a handful of frozen mango or peach slices for added sweetness. For a lighter version, swap out the vanilla ice cream for Greek yogurt for a creamy yet tangy alternative.

As for serving ideas, this refreshing slush pairs wonderfully with light summer dishes like grilled chicken skewers, fish tacos, or a simple salad topped with citrus vinaigrette. The bright, zesty flavors of the slush complement these dishes perfectly, making them an ideal pairing for a sunny day.

Storage, Make-Ahead & Reheating

This Frozen Orange Creamsicle Slush is best enjoyed fresh, but if you have leftovers, you can store them in an airtight container in the fridge for up to 2 days. Just keep in mind that the slush may lose some of its texture over time as the ice melts. It doesn’t freeze well, as the ice will turn into a solid block. If you must freeze it, blend again after thawing to restore the slushy consistency. This treat is best the day you make it, as the flavors meld together beautifully overnight, enhancing its deliciousness.

Frequently Asked Questions

Can I make Frozen Orange Creamsicle Slush ahead of time?

Yes — in fact, it tastes even better the next day as the flavors meld. However, it’s best to enjoy it fresh, as the texture can change if stored for too long. If you need to prepare it ahead, keep it in the fridge and re-blend before serving.

What kind of orange juice should I use?

For the best flavor, use freshly squeezed orange juice. However, if you’re short on time, opt for 100% pure store-bought juice without added sugars. This will ensure that your slush remains flavorful and refreshing.

Can I substitute the vanilla ice cream?

Absolutely! If you’re looking for a dairy-free option, coconut milk ice cream or a non-dairy vanilla ice cream can work wonderfully. They will still provide the creamy texture and sweetness you desire.

How can I adjust the sweetness of my slush?

You can easily adjust the sweetness by modifying the amount of sugar added. Start with 1/4 cup and taste the mixture before blending. If you prefer it sweeter, add more sugar gradually until it reaches your desired level.

What should I do if my slush is too thick?

If your slush is too thick, simply add a splash of milk or orange juice and blend again. This will help achieve a more drinkable consistency while maintaining the slushy texture. Adjust gradually to reach your preferred thickness.

Sun-Kissed Frozen Orange Cream Slush

Final Thoughts

The Frozen Orange Creamsicle Slush is a delightful blend of refreshing citrus and creamy goodness, making it a perfect treat for warm days or any time you crave a taste of nostalgia. The way the bright orange flavor dances with the creamy texture truly elevates this slush, transforming it into a satisfying escape from the everyday.

This is the kind of recipe I come back to again and again, especially when I’m looking to cool down or impress guests at a summer gathering. It’s simple to make and always brings smiles all around! I encourage you to try this recipe for yourself—don’t hesitate to share your results or even put your own spin on it. Happy slushing!

Print
clock clock iconcutlery cutlery iconflag flag iconfolder folder iconinstagram instagram iconpinterest pinterest iconfacebook facebook iconprint print iconsquares squares iconheart heart iconheart solid heart solid icon

Frozen Orange Creamsicle Slush


  • Author: Lily author
  • Total Time: 15 minutes
  • Yield: 4 servings 1x
Pin Recipe
Print Recipe

Description

This Frozen Orange Creamsicle Slush is a refreshing treat that combines creamy vanilla and zesty orange flavors. Perfect for hot summer days, it brings back nostalgic memories with every sip.


Ingredients

Scale
  • 2 cups orange juice (freshly squeezed or store-bought)
  • 1 cup vanilla ice cream
  • 1 cup crushed ice
  • 1/2 cup milk (whole or 2%)
  • 1/4 cup granulated sugar (adjust based on sweetness preference)
  • 1 teaspoon vanilla extract
  • Zest of 1 orange (for added flavor)
  • Fresh orange slices and mint leaves (for garnish)

Instructions

  1. Start by preparing your ingredients. Gather 2 cups of orange juice, 1 cup of vanilla ice cream, and 1 cup of crushed ice. Make sure the ice is finely crushed, as larger chunks can make blending difficult.
  2. In a blender, combine the orange juice, vanilla ice cream, crushed ice, and 1/2 cup of milk. Add 1/4 cup of granulated sugar and 1 teaspoon of vanilla extract. If you like a sweeter slush, consider adding a bit more sugar at this stage.
  3. Add the zest of 1 orange to the blender. This step is crucial for enhancing the citrus flavor of your slush. Make sure not to include the bitter white pith—only the flavorful zest.
  4. Blend the mixture on medium-high speed for about 30-45 seconds. Stop once the ingredients are fully combined and the slush has a smooth, even consistency. If you notice large chunks of ice, blend for an additional 10-15 seconds. Avoid over-blending, as this can make the slush too liquidy.
  5. Once blended, taste the slush. If it needs more sweetness, add a little more sugar and blend for a few more seconds. If it’s too thick, you can add a splash of milk to reach your desired consistency.
  6. Pour the slush into glasses. This recipe typically serves 4, but you can easily double it for larger gatherings. Use a spoon to help guide the slush into the glasses if needed.
  7. Garnish each serving with fresh orange slices and mint leaves. The mint not only adds a pop of color but also a refreshing aroma that complements the citrus flavors beautifully.
  8. Serve immediately and enjoy! If you’ve made extra, you can refrigerate it for a short time, but it's best enjoyed fresh.
  • Prep Time: 15 min
  • Cook Time: 0 min
  • Category: Dessert
  • Method: Blending
  • Cuisine: American

Nutrition

  • Serving Size: 1 serving
  • Calories: 200
  • Sugar: 30 g
  • Sodium: 50 mg
  • Fat: 5 g
  • Saturated Fat: 3 g
  • Unsaturated Fat: 2 g
  • Trans Fat: 0 g
  • Carbohydrates: 40 g
  • Fiber: 1 g
  • Protein: 2 g
  • Cholesterol: 20 mg

Keywords: Don't skip the orange zest! It's a game-changer for flavor. Always zest before juicing to make it easier.

Did you make this recipe?

Share a photo and tag us — we can't wait to see what you've made!

Zesty Lemon Poppy Seed Delight

One rainy afternoon, I found myself in my grandmother’s cozy kitchen, the kind that always smelled like warmth and love. She was whipping up her famous Lemon Poppy Seed Loaf, a recipe that had been passed down through generations. As the batter came together, the zesty aroma of fresh lemons filled the air, mingling perfectly with the nutty fragrance of poppy seeds. I can still picture her, apron-clad, as she expertly drizzled a vibrant citrus icing over the loaf, creating a glossy, sun-kissed finish that beckoned us to dive in. It was a moment that sparked my own passion for baking, and this recipe has become a cherished staple in my home ever since.

When you take a bite of this Lemon Poppy Seed Loaf, it’s like a burst of sunshine on your palate. The loaf is beautifully golden, with a tender crumb that melts in your mouth. Each slice is speckled with tiny poppy seeds, adding a delightful crunch that contrasts beautifully with the tangy sweetness of the lemon. And that citrus icing? It’s the finishing touch that elevates this loaf from ordinary to extraordinary, with its bright, zesty flavor dancing on your taste buds.

This recipe stands out because it embraces simplicity while delivering on flavor. I’ve added a hint of vanilla to the batter, enhancing the overall taste and making it even more indulgent. Trust me, once you make this Lemon Poppy Seed Loaf With Citrus Icing, it’ll become a go-to in your baking repertoire.

So, let me show you exactly how to make it!

Zesty Lemon Poppy Seed Delight

Why You’ll Love This Recipe

  • Moist and tender crumb that melts in your mouth, thanks to the perfect balance of butter and buttermilk.
  • Bright, zesty lemon flavor paired with crunchy poppy seeds, creating a delightful texture and taste experience.
  • Easy to whip up in just about an hour, perfect for last-minute gatherings or a cozy afternoon treat.
  • Budget-friendly with everyday ingredients, making it an accessible option for all home bakers.
  • The citrus icing adds a sweet tang that elevates the loaf, turning a simple recipe into a showstopper!

Ingredients

  • 1 ½ cups (190g) all-purpose flour
  • 1 teaspoon baking powder
  • ½ teaspoon baking soda
  • ½ teaspoon salt
  • 3 tablespoons poppy seeds
  • ½ cup (115g) unsalted butter, softened to room temperature
  • 1 cup (200g) granulated sugar
  • 2 large eggs
  • 1 teaspoon vanilla extract
  • 1 teaspoon lemon zest (from about 1 medium lemon)
  • ½ cup (120ml) buttermilk
  • 2 tablespoons fresh lemon juice

For the Citrus Icing:

  • 1 cup (120g) powdered sugar
  • 2 tablespoons fresh lemon juice
  • 1 tablespoon orange juice
  • 1 teaspoon lemon zest (for garnish, optional)

Let’s dive into the key ingredients that make this Lemon Poppy Seed Loaf so special. The all-purpose flour provides the structure and base for the loaf, while the baking powder and baking soda ensure it rises perfectly, giving the loaf a light texture. For a gluten-free variation, you could substitute the flour with a gluten-free all-purpose blend. Poppy seeds not only add a delightful crunch but also contribute to the unique flavor profile that pairs well with the citrus notes.

Unsalted butter is crucial for achieving the buttery richness that makes this loaf so moist. If you’re looking for a dairy-free option, coconut oil or a vegan butter can be used instead. The buttermilk is another essential component, providing acidity that activates the baking soda for a fluffy texture. If you don’t have buttermilk on hand, you can easily make a substitute by mixing ½ cup of milk with 1 tablespoon of vinegar or lemon juice and letting it sit for about 5 minutes.

Step-by-Step Instructions

  1. Preheat your oven to 350°F (175°C). Grease a 9×5-inch loaf pan or line it with parchment paper for easy removal later.
  2. In a medium mixing bowl, whisk together 1 ½ cups of all-purpose flour, 1 teaspoon of baking powder, ½ teaspoon of baking soda, ½ teaspoon of salt, and 3 tablespoons of poppy seeds. This helps to evenly distribute the baking agents and ensures a uniform rise.
  3. In a large mixing bowl, cream together ½ cup of softened unsalted butter and 1 cup of granulated sugar using an electric mixer on medium speed for about 3-4 minutes, until the mixture is light and fluffy. Make sure to scrape down the sides of the bowl occasionally.
  4. Add 2 large eggs, 1 teaspoon of vanilla extract, and 1 teaspoon of lemon zest to the creamed butter and sugar, mixing until fully combined. You want a smooth consistency, so ensure there are no lumps of butter.
  5. In a small bowl, combine ½ cup of buttermilk and 2 tablespoons of fresh lemon juice. Alternately add the dry ingredients and buttermilk mixture to the butter mixture, starting and ending with the dry ingredients. Mix just until combined; do not overmix, as this can lead to a dense loaf.
  6. Pour the batter into the prepared loaf pan. Smooth the top with a spatula, ensuring it’s even. Bake in the preheated oven for 50-60 minutes, or until a toothpick inserted in the center comes out clean. The edges should be lightly golden brown, and the center should feel just set.
  7. Once baked, remove the loaf from the oven and allow it to cool in the pan for about 10 minutes. Then, transfer it to a wire rack to cool completely. Resist the urge to slice too soon, as it will be crumbly if it’s still warm.
  8. While the loaf is cooling, prepare the citrus icing. In a medium bowl, whisk together 1 cup of powdered sugar, 2 tablespoons of fresh lemon juice, and 1 tablespoon of orange juice until smooth. If the icing is too thick, you can add a little more juice to reach your desired consistency.
  9. Once the loaf is completely cool, drizzle the citrus icing over the top. If you like, sprinkle with an additional teaspoon of lemon zest for an extra pop of flavor and color.

Pro Tips for the Best Lemon Poppy Seed Loaf With Citrus Icing

  • Be careful not to overmix your batter; this is a common mistake that can lead to a dense loaf. Mix just until the dry ingredients are incorporated for a light and fluffy texture.
  • Use room temperature ingredients, especially the butter and eggs. This helps to create a smoother batter and ensures even baking. Take your eggs out of the fridge about 30 minutes before you start.
  • For a more pronounced lemon flavor, consider adding a little lemon extract in addition to the zest and juice. Just a half teaspoon can elevate the citrus notes significantly.
  • When measuring your flour, spoon it into the measuring cup and level it off with a knife instead of scooping directly from the bag. This prevents packing and ensures you don’t end up with a dry loaf.
  • Invest in a good quality loaf pan; it makes a difference in heat distribution, which ensures even baking. If your pan is dark-coated, reduce the oven temperature by 25°F to prevent over-browning.

Variations & Serving Ideas

For a delightful twist, consider adding blueberries or raspberries to the batter for a fruity burst of flavor. You can also experiment with different citrus fruits—try lime or grapefruit zest and juice for a refreshing change. For a healthier option, substitute half of the all-purpose flour with whole wheat flour for added fiber without compromising too much on texture.

This Lemon Poppy Seed Loaf pairs beautifully with a light salad, such as a mixed greens salad with a vinaigrette, or a cup of tea for a cozy afternoon treat. It also complements a creamy cheese platter, as the acidity of the loaf balances rich cheeses perfectly. Lastly, a scoop of vanilla ice cream on the side creates a delightful contrast of temperatures and flavors!

Storage, Make-Ahead & Reheating

This Lemon Poppy Seed Loaf can be stored at room temperature for up to 3 days if wrapped tightly in plastic wrap. If you want to keep it longer, it freezes well for up to 3 months. To freeze, wrap the loaf tightly in plastic wrap and then in aluminum foil to prevent freezer burn.

When you’re ready to enjoy it again, simply thaw it in the fridge overnight. Reheat individual slices in the microwave for 15-20 seconds or in a toaster oven until warmed through. Interestingly, many people find that this loaf tastes even better the next day, as the flavors have time to meld!

Frequently Asked Questions

Can I make Lemon Poppy Seed Loaf With Citrus Icing ahead of time?

Yes — in fact, it tastes even better the next day! You can make the loaf a day in advance, allowing the flavors to develop. Just be sure to store it in an airtight container to maintain its moisture.

Can I substitute the poppy seeds?

Absolutely! If you don’t have poppy seeds on hand or prefer an alternative, you can use sesame seeds for a similar crunch or omit them entirely for a smooth loaf.

What can I use instead of buttermilk?

If you don’t have buttermilk, you can easily create a substitute by mixing ½ cup of milk (dairy or plant-based) with 1 tablespoon of vinegar or lemon juice. Let it sit for 5 minutes before using in the recipe.

How can I make this recipe gluten-free?

To make a gluten-free version of this Lemon Poppy Seed Loaf, substitute the all-purpose flour with a gluten-free all-purpose flour blend. Just ensure that the blend contains a binding agent like xanthan gum for the best results.

What is the best way to store leftover loaf?

Leftover Lemon Poppy Seed Loaf should be stored in an airtight container at room temperature for up to 3 days. For longer storage, wrap it tightly and freeze for up to 3 months. Thaw it before serving for the best texture.

Zesty Lemon Poppy Seed Delight

Final Thoughts

The Lemon Poppy Seed Loaf with Citrus Icing is truly a delightful treat that brings a burst of brightness to any occasion. The zesty lemon flavor combined with the subtle crunch of poppy seeds creates a satisfying balance, while the citrus icing adds a touch of sweetness that perfectly complements the loaf’s tanginess.

This is the kind of recipe I come back to again and again, especially when I want to brighten up a gloomy day or celebrate a small victory. The aroma that fills the kitchen as it bakes is absolutely heavenly! I encourage you to give this recipe a try; you might just find it becoming a beloved staple in your home. Don’t forget to share your results or even add your own unique twist—I can’t wait to see what you create!

Print
clock clock iconcutlery cutlery iconflag flag iconfolder folder iconinstagram instagram iconpinterest pinterest iconfacebook facebook iconprint print iconsquares squares iconheart heart iconheart solid heart solid icon

Lemon Poppy Seed Loaf


  • Author: Lily author
  • Total Time: 25 minute
  • Yield: 1 loaf 1x
Pin Recipe
Print Recipe

Description

This Lemon Poppy Seed Loaf is a delightful treat that combines zesty lemon flavor with crunchy poppy seeds. Topped with a citrus icing, it’s perfect for any occasion.


Ingredients

Scale
  • 1 ½ cups (190g) all-purpose flour
  • 1 teaspoon baking powder
  • ½ teaspoon baking soda
  • ½ teaspoon salt
  • 3 tablespoons poppy seeds
  • ½ cup (115g) unsalted butter, softened to room temperature
  • 1 cup (200g) granulated sugar
  • 2 large eggs
  • 1 teaspoon vanilla extract
  • 1 teaspoon lemon zest (from about 1 medium lemon)
  • ½ cup (120ml) buttermilk
  • 2 tablespoons fresh lemon juice
  • 1 cup (120g) powdered sugar
  • 2 tablespoons fresh lemon juice
  • 1 tablespoon orange juice
  • 1 teaspoon lemon zest (for garnish, optional)

Instructions

  1. Preheat your oven to 350°F (175°C). Grease a 9×5-inch loaf pan or line it with parchment paper for easy removal later.
  2. In a medium mixing bowl, whisk together 1 ½ cups of all-purpose flour, 1 teaspoon of baking powder, ½ teaspoon of baking soda, ½ teaspoon of salt, and 3 tablespoons of poppy seeds. This helps to evenly distribute the baking agents and ensures a uniform rise.
  3. In a large mixing bowl, cream together ½ cup of softened unsalted butter and 1 cup of granulated sugar using an electric mixer on medium speed for about 3-4 minutes, until the mixture is light and fluffy. Make sure to scrape down the sides of the bowl occasionally.
  4. Add 2 large eggs, 1 teaspoon of vanilla extract, and 1 teaspoon of lemon zest to the creamed butter and sugar, mixing until fully combined. You want a smooth consistency, so ensure there are no lumps of butter.
  5. In a small bowl, combine ½ cup of buttermilk and 2 tablespoons of fresh lemon juice. Alternately add the dry ingredients and buttermilk mixture to the butter mixture, starting and ending with the dry ingredients. Mix just until combined; do not overmix, as this can lead to a dense loaf.
  6. Pour the batter into the prepared loaf pan. Smooth the top with a spatula, ensuring it’s even. Bake in the preheated oven for 50-60 minutes, or until a toothpick inserted in the center comes out clean. The edges should be lightly golden brown, and the center should feel just set.
  7. Once baked, remove the loaf from the oven and allow it to cool in the pan for about 10 minutes. Then, transfer it to a wire rack to cool completely. Resist the urge to slice too soon, as it will be crumbly if it’s still warm.
  8. While the loaf is cooling, prepare the citrus icing. In a medium bowl, whisk together 1 cup of powdered sugar, 2 tablespoons of fresh lemon juice, and 1 tablespoon of orange juice until smooth. If the icing is too thick, you can add a little more juice to reach your desired consistency.
  9. Once the loaf is completely cool, drizzle the citrus icing over the top. If you like, sprinkle with an additional teaspoon of lemon zest for an extra pop of flavor and color.
  • Prep Time: 15 mins
  • Cook Time: 50-60 mins
  • Category: Dessert
  • Method: Baking
  • Cuisine: American

Nutrition

  • Serving Size: 1 slice
  • Calories: 200
  • Sugar: 15 g
  • Sodium: 150 mg
  • Fat: 8 g
  • Saturated Fat: 5 g
  • Unsaturated Fat: 3 g
  • Trans Fat: 0 g
  • Carbohydrates: 30 g
  • Fiber: 1 g
  • Protein: 3 g
  • Cholesterol: 40 mg

Keywords: Be careful not to overmix your batter; this is a common mistake that can lead to a dense loaf. Use room temperature ingredients for a smoother batter and even baking.

Did you make this recipe?

Share a photo and tag us — we can't wait to see what you've made!

  • Privacy Policy
  • Terms Of Service
  • Contact
  • About
  • GDPR

Copyright © 2025 Homesmad