• Skip to primary navigation
  • Skip to main content
  • Skip to primary sidebar
Homesmad

Homesmad

  • Home
  • Breakfast & Brunch
  • Appetizers & Snacks
  • Dinner
  • Dessert
  • About
  • Privacy Policy
  • Contact
Homesmad
  • Home
  • Breakfast & Brunch
  • Appetizers & Snacks
  • Dinner
  • Dessert
  • About
  • Privacy Policy
  • Contact

Festive Cinnamon Apple Cranberry Mimosa Mocktail Recipe

October 9, 2025 by Lily author

Cinnamon Apple Cranberry Mimosa – just hearing those words evokes images of crisp autumn mornings, festive holiday brunches, and joyful gatherings. I’ve always been captivated by the simple elegance of a classic mimosa, but there’s something truly magical about infusing it with seasonal flavors that elevate it from a mere drink to a memorable experience. This isn’t just another cocktail; it’s a celebration in a glass, perfectly balancing the sweetness of apple, the tartness of cranberry, and the warm, inviting spice of cinnamon. It’s the ultimate way to greet guests and set a wonderfully convivial tone for any occasion.

While the traditional mimosa has graced brunch tables for decades, becoming synonymous with leisurely weekend mornings and special occasions, I believe it truly shines when given a seasonal twist. This particular blend offers a delightful departure, inviting you to savor the essence of fall and winter in every effervescent sip. People adore this drink not only for its stunning ruby-red hue and festive bubbles but also for its incredibly approachable yet sophisticated flavor profile. It’s remarkably easy to prepare, making it the ideal choice for hosts who want to impress without spending hours behind the bar. Imagine the delight on your guests’ faces as they take their first sip of this vibrant Cinnamon Apple Cranberry Mimosa, a true testament to simple ingredients coming together to create something extraordinary. It’s refreshing, comforting, and utterly irresistible – the perfect accompaniment to any festive spread.

Festive Cinnamon Apple Cranberry Mimosa Mocktail Recipe this RECIPE

Ingredients:

  • For the Spiced Apple Cranberry Base:
    • 3 cups (approx. 720ml) unfiltered apple cider or high-quality apple juice. I really love the natural sweetness and slightly cloudy appearance that unfiltered cider brings to our mimosa.
    • 1 cup (approx. 240ml) 100% cranberry juice, unsweetened. The tartness here is crucial to balance the sweetness from the apple and sparkling wine. Make sure it’s not a cranberry cocktail, as those often have added sugars that can throw off the balance of our perfect Cinnamon Apple Cranberry Mimosa.
    • 2-3 cinnamon sticks (about 3 inches long each). These are going to infuse that quintessential cozy cinnamon flavor into our base.
    • 1 teaspoon whole cloves. Just a little hint of spice to complement the cinnamon.
    • 2-3 star anise pods (optional, but highly recommended for an extra layer of aromatic complexity). I find these add a lovely, subtle licorice note that really elevates the whole experience.
    • 1/4 cup (approx. 50g) granulated sugar, or to taste. This is optional and can be adjusted depending on the sweetness of your apple cider and personal preference. I usually add a little to enhance the fruit flavors as they simmer.
  • For the Mimosa Assembly:
    • 1-2 bottles (750ml each) chilled Brut Champagne, Prosecco, or your favorite dry sparkling wine. Choosing a dry sparkling wine is important because our base is already quite flavorful and sweet. A Brut or Extra Dry will provide the perfect effervescent balance without overwhelming the delicate spiced notes of our Cinnamon Apple Cranberry Mimosa.
    • 1 large orange, for fresh juice (optional, for an extra citrus kick) and garnishing.
  • For the Garnish & Rim (Optional but highly encouraged for a festive touch!):
    • 1/4 cup granulated sugar.
    • 1-2 teaspoons ground cinnamon.
    • Fresh cranberries, about 1/4 cup. These add a beautiful pop of color and a fresh, tart bite.
    • 1-2 small apples (such as Honeycrisp or Gala), thinly sliced. These look absolutely stunning floating in the glass.
    • Small sprigs of fresh rosemary or mint (optional, for an aromatic garnish).

Preparing the Spiced Apple Cranberry Base:

This is where all the magic begins, and trust me, your kitchen is going to smell absolutely heavenly! Preparing this base ahead of time is a fantastic idea, as it allows the flavors to truly meld and deepen. It also makes assembling your mimosas a breeze when your guests arrive, allowing you more time to socialize and less time fussing.

  1. Combine Liquids and Spices: In a medium saucepan, combine the unfiltered apple cider (or juice), the 100% unsweetened cranberry juice, the cinnamon sticks, whole cloves, and if you’re using them, the star anise pods. If you’ve decided to add a touch of extra sweetness, now is the time to stir in the granulated sugar. I always give it a little taste test at this stage to gauge the natural sweetness of the cider and adjust the sugar from there. Remember, we’re aiming for a balanced flavor, not overly sweet, since it will be paired with dry sparkling wine.
  2. Gentle Simmering to Infuse Flavors: Place the saucepan over medium-low heat. We want to bring the mixture to a gentle simmer, but we absolutely do not want a rolling boil. A gentle simmer is key to coaxing out all those wonderful aromatic oils from the spices without cooking away too much of the liquid or making the flavors bitter. Once you see small bubbles forming around the edges and a faint wispy steam, reduce the heat to the lowest setting possible.
  3. Infusion and Cooling: Let the spiced apple cranberry mixture simmer very gently for about 15-20 minutes. This slow infusion process is where the real depth of flavor for your Cinnamon Apple Cranberry Mimosa is built. You’ll notice the aroma filling your kitchen, a beautiful blend of sweet apples, tart cranberries, and warm spices. After 15-20 minutes, remove the saucepan from the heat. Now, here’s an important step: let the spices steep in the liquid as it cools down completely to room temperature. This extended steeping time allows the flavors to intensify significantly. I often cover the pot during this cooling period to trap all those lovely aromas.
  4. Strain and Chill: Once the spiced base has cooled completely, use a fine-mesh sieve to strain out all the cinnamon sticks, cloves, and star anise. You want a beautifully clear, smooth liquid. Discard the spent spices. Transfer the strained apple cranberry base to an airtight container or pitcher and refrigerate it for at least 2-3 hours, or even better, overnight. Serving a cold mimosa is paramount, and a well-chilled base contributes significantly to the overall enjoyment. Making this base a day or two in advance not only saves you time on the day of your event but also allows the flavors to truly deepen and harmonize.

Prepping Your Glasses and Garnish:

Presentation is half the fun of a festive drink like our Cinnamon Apple Cranberry Mimosa! A beautifully garnished glass makes each sip feel extra special and really elevates the entire experience for your guests. Don’t skip these steps; they add so much to the visual appeal and even a subtle aromatic note.

  1. Prepare the Cinnamon Sugar Rim (Optional, but highly recommended!): On a small, shallow plate, combine the granulated sugar and ground cinnamon. Stir them together until well mixed. The ratio of sugar to cinnamon can be adjusted to your preference; I usually go for about 4 parts sugar to 1 part cinnamon for a lovely balance. Take a wedge of orange or a lemon, and moisten the rim of each Champagne flute or coupé glass. Alternatively, you can dip the rim briefly into a very shallow dish of water or the leftover cranberry juice. Immediately, invert the glass and gently dip the moistened rim into the cinnamon sugar mixture, twisting slightly to ensure an even coating. Set the glasses aside, upright, to let the rim dry a little. This adds a delightful scent and a subtle sweet-spicy crunch with every sip.
  2. Prepare the Garnishes:

    • Apple Slices: Wash and thinly slice your small apples. To prevent them from browning, you can briefly dip the slices in a mixture of water and a squeeze of lemon juice. While this step is optional, it does keep them looking fresh and crisp, especially if you’re prepping ahead of time. These thin slices look elegant when placed directly into the mimosa.
    • Fresh Cranberries: Wash your fresh cranberries. You can simply float a few in each glass, or if you’re feeling extra fancy, you can thread a few onto a small cocktail skewer. They provide a wonderful burst of color and a contrasting tartness that complements the drink beautifully.
    • Orange Zest/Twists (Optional): If you’re using the fresh orange for juice, you can also create some beautiful orange twists or strips of zest. These add an extra layer of citrus aroma and visual elegance to your Cinnamon Apple Cranberry Mimosa.
    • Rosemary/Mint Sprigs (Optional): For an unexpected aromatic touch, a tiny sprig of fresh rosemary or mint can be gently tucked into the glass. Rosemary, in particular, offers a wonderful holiday scent that pairs surprisingly well with the apple and cranberry notes.

Assembling Your Cinnamon Apple Cranberry Mimosa:

Now for the grand finale – bringing all these wonderful components together to create your dazzling Cinnamon Apple Cranberry Mimosa! The key here is gentle handling, especially when it comes to the sparkling wine, to preserve those lovely bubbles. Think of it as a delicate dance of flavors and effervescence.

  1. Pour the Spiced Base: Take your beautifully prepped Champagne flutes or coupé glasses. Pour approximately 2-3 ounces (about 1/4 to 1/3 of the glass, depending on the size of your flutes) of the chilled spiced apple cranberry base into each glass. I like to start with less and add more if needed, as this allows for personal customization of the sweetness and intensity. You can always adjust the ratio once you see how it blends with the sparkling wine. Ensuring your base is well-chilled is crucial for a truly refreshing mimosa; a warm base will cause your sparkling wine to lose its bubbles much faster.
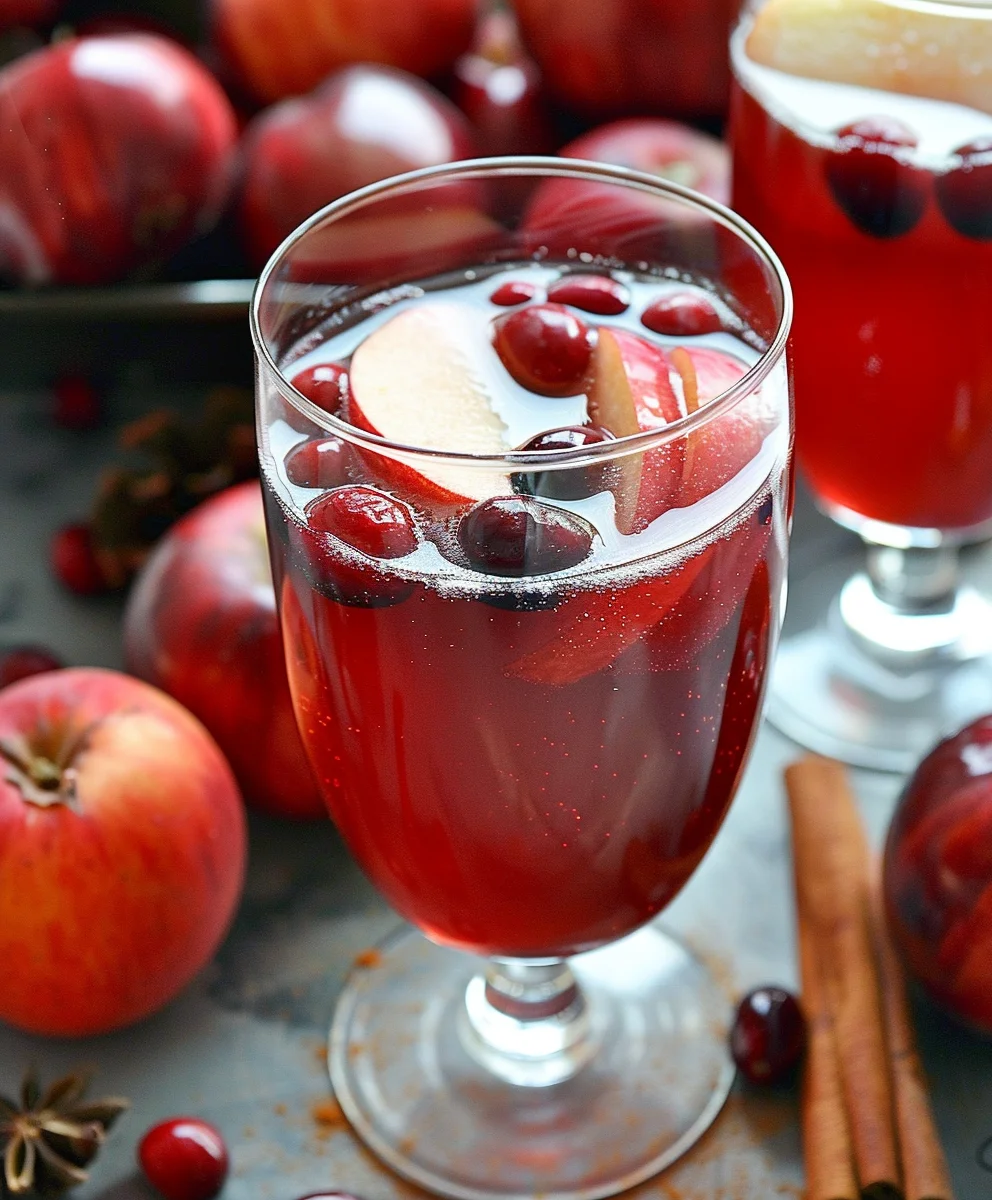
  2. Add the Sparkling Wine: Slowly top off each glass with the chilled Brut Champagne, Prosecco, or sparkling wine. Tilt the glass slightly and pour the sparkling wine gently down the side. This technique helps to minimize the foam and preserve the effervescence, ensuring your mimosa stays delightfully bubbly for longer. Fill the glass almost to the rim, leaving a little space for the garnishes. The contrast of the deep red base with the pale golden sparkling wine is absolutely beautiful and immediately signals a festive drink.
  3. Garnish and Serve Immediately: Now for the artistic touch! Carefully add your chosen garnishes to each mimosa. I love to float 2-3 fresh cranberries and a thin apple slice or two in each glass. If you’ve prepared orange twists or rosemary sprigs, add them now. The fresh cranberries will often sink and then slowly rise with the bubbles, creating a mesmerizing effect. The apple slices elegantly float, adding to the visual appeal. Serve your Cinnamon Apple Cranberry Mimosas immediately to ensure they are enjoyed at their peak of fizz and chill.

Serving Suggestions and Variations:

Your Cinnamon Apple Cranberry Mimosa is a fantastic drink on its own, but there are always ways to adapt it to different tastes or occasions. This section is all about getting creative and making the mimosa truly your own, or perfectly suited for your specific gathering.

  1. Ideal Occasions: This mimosa is not just a drink; it’s an experience! It’s absolutely perfect for holiday brunches – think Thanksgiving morning, Christmas Day, or New Year’s Day. Its warm, inviting flavors and festive colors make it a showstopper. It’s also wonderful for autumn gatherings, cozy fall afternoons, or any celebratory moment where you want to add a touch of seasonal elegance and warmth. I’ve found it’s a huge hit at bridal showers and baby showers too, especially when there’s a fall or winter theme.
  2. Non-Alcoholic Version (Sparkling Cider Mimosa): For guests who prefer to skip the alcohol, or for a family-friendly option, you can easily transform this recipe! Simply replace the Champagne or sparkling wine with chilled sparkling apple cider or sparkling white grape juice. The spiced apple cranberry base remains the same, providing all that wonderful flavor. You still get the beautiful fizziness and presentation, making it an inclusive and delicious option for everyone to enjoy. It’s equally festive and just as delicious, maintaining the essence of the Cinnamon Apple Cranberry Mimosa.
  3. Spice Variations: While cinnamon, clove, and star anise are classic, don’t hesitate to experiment!

    • Ginger: A few thin slices of fresh ginger added to the simmering base can introduce a lovely, subtle zing.
    • Cardamom: A few green cardamom pods (lightly crushed to release their aroma) can add a complex, almost floral note that pairs beautifully with apples.
    • Nutmeg: A tiny pinch of freshly grated nutmeg can also be added to the simmering base or even dusted lightly over the finished drink for an extra layer of warmth.

    Remember to start with small quantities when experimenting with new spices, as their flavors can be quite potent.

  4. Adjusting Sweetness: Everyone has a different palate when it comes to sweetness. If you find your mimosa is too tart, you can add a tiny splash of simple syrup (equal parts sugar and water, heated until dissolved, then cooled) to your individual glass of the spiced base before adding the sparkling wine. If it’s too sweet, ensure you’re using unsweetened cranberry juice and a very dry sparkling wine, and consider reducing the sugar in the spiced base next time. The beauty of this recipe is its adaptability.
  5. Batch Preparation for a Crowd: If you’re hosting a large gathering, you can prepare a large batch of the spiced apple cranberry base in advance. Keep it chilled in pitchers. Set up a mimosa bar with your chilled sparkling wine, the spiced base, and all the gorgeous garnishes in separate bowls. Let your guests mix their own Cinnamon Apple Cranberry Mimosa to their preferred ratio. This is a fun and interactive way to serve, and it takes the pressure off you as the host!
  6. Consider the Glassware: While traditional Champagne flutes are elegant and help preserve bubbles, coupé glasses offer a vintage, festive look and allow more room for floating garnishes. If you don’t have either, a wine glass or even a clear tumbler can work in a pinch – the key is the delicious drink inside!

I genuinely hope you enjoy crafting and sipping this delightful Cinnamon Apple Cranberry Mimosa as much as I do. It truly is a celebration in a glass!

Festive Cinnamon Apple Cranberry Mimosa Mocktail Recipe

Conclusion:

As we wrap up our journey through this delightful concoction, I truly hope you’re feeling as inspired as I am to whip up a batch of these glorious mimosas. This isn’t just another drink; it’s a celebration in a glass, a perfect harmony of flavors that simply sings with the essence of autumn and festive cheer. I’ve poured my heart into perfecting this recipe, and I genuinely believe it stands out from the crowd. Its unique blend of sweet apple, tart cranberry, and warm cinnamon notes creates an invigorating and comforting experience all at once, making it an undeniable must-try for any occasion, big or small. You’ll find that its vibrant color and enticing aroma alone are enough to captivate your guests, but the first sip? That’s where the real magic happens, leaving a lasting impression that will have everyone asking for the recipe.

What I adore most about this particular mimosa is its versatility and the way it effortlessly elevates any gathering. Forget the mundane; this is a sophisticated sip that still feels incredibly approachable. The crispness of the apple juice provides a refreshing base, beautifully complemented by the subtle tang of cranberry, all rounded out by that comforting hint of cinnamon spice. It’s a masterful balance, not too sweet, not too tart, just perfectly balanced for a truly exquisite taste. Whether you’re planning a cozy brunch with loved ones, hosting a holiday get-together, or simply treating yourself to a luxurious morning moment, this recipe is your ticket to an unforgettable beverage experience. Trust me when I say, once you taste this, you’ll understand why it’s become such a beloved staple in my own home.

Now, let’s talk about presentation and those little touches that transform a drink into an event. For serving, I highly recommend using elegant champagne flutes or coupe glasses to showcase its beautiful ruby hue. To elevate the visual appeal and enhance the aromatic experience, consider chilling your glasses beforehand. A simple yet stunning garnish can make all the difference: try a thin slice of apple fanned out on the rim, a few fresh cranberries dropped into the glass, or even a cinnamon stick for an extra flourish and delightful scent. For a touch of rustic charm, you could even rim your glasses with a mixture of sugar and ground cinnamon – just moisten the rim with a wedge of lemon or a little apple juice first. These small details not only make the drink more appealing but also build anticipation for that first wonderful sip.

Thinking about food pairings? This mimosa is incredibly versatile. It pairs wonderfully with classic brunch fare like fluffy pancakes, waffles, or French toast, as its crispness cuts through the sweetness. For something savory, consider serving it alongside a hearty quiche, breakfast burritos, or even a cheese and charcuterie board; the tartness of the cranberry and apple provides a lovely counterpoint to richer flavors. During the holidays, imagine serving this with a festive cranberry orange scone or a spiced pumpkin bread – absolutely divine!

And for those who love to experiment, here are a few exciting variations to inspire your culinary creativity. If you’re looking for a non-alcoholic option that’s just as festive, simply substitute the sparkling wine with sparkling apple cider, ginger ale, or even a non-alcoholic sparkling grape juice. The flavors will still shine beautifully! For a slightly different alcoholic twist, consider adding a splash of apple brandy or a spiced rum to the mix before topping with sparkling wine for an extra layer of warmth and complexity. You could also experiment with a hint of orange liqueur for a classic mimosa feel, or even infuse your apple juice with a star anise or a few cloves during the chilling process for an even deeper spice profile. Don’t be afraid to make this recipe your own; it’s robust enough to handle a little playful adaptation.

My dearest readers, I wholeheartedly encourage you to carve out some time this week to try this exceptional Cinnamon Apple Cranberry Mimosa. It’s more than just a recipe; it’s an invitation to savor the moment, to celebrate the simple joys, and to create lasting memories with those you cherish. I promise you, the aroma filling your kitchen and the delightful taste on your palate will be well worth the small effort. Once you’ve experienced the magic, I would absolutely love to hear about it! Please, share your creations, your serving ideas, and any delightful tweaks you might have come up with. Tag me, leave a comment, or simply tell a friend. Your experiences inspire me, and I cherish the community we build around our shared love for delicious food and drink. Happy mixing, and may your glass always be filled with joy!


Cinnamon Apple Cranberry Mimosa Mocktail

Cinnamon Apple Cranberry Mimosa Mocktail

A vibrant and festive non-alcoholic drink, blending sweet apple and tart cranberry with warm cinnamon spice. Perfect for any celebration, offering a delightful and refreshing experience.

Prep Time
10 Minutes

Cook Time
0 Minutes

Total Time
10 Minutes

Servings
1 serving

Ingredients

  • 1/2 cup cranberry juice
  • 1/4 cup apple cider
  • 1/2 cup sparkling cider (non-alcoholic)
  • Sprinkle of cinnamon
  • 2 apple slices
  • Handful of cranberries
  • 1 cinnamon stick

Instructions

  1. Step 1
    In a serving glass, gently combine 1/2 cup cranberry juice and 1/4 cup apple cider.
  2. Step 2
    Slowly top the juice mixture with 1/2 cup chilled sparkling cider, pouring gently to maintain effervescence.
  3. Step 3
    Garnish the mocktail with a sprinkle of cinnamon, 2 thin apple slices, a handful of fresh cranberries, and a cinnamon stick. Serve immediately for optimal enjoyment.

Important Information

Nutrition Facts (Per Serving)

It is important to consider this information as approximate and not to use it as definitive health advice.

Allergy Information

Please check ingredients for potential allergens and consult a health professional if in doubt.

« Previous Post
One-Pan Garlic Chicken Gnocchi Skillet | Quick & Delicious
Next Post »
Best Key Lime Pound Cake Recipe – Tangy Citrus Delight

If you enjoyed this…

Strawberry Oatmeal Bars: Easy Recipe & Baking Tips

Christmas Sprinkle Buttermilk Bread: A Festive Treat!

Whole Wheat Old Fashioned Pancakes Recipe – Healthy Breakfast

Primary Sidebar

Browse by Diet

BreakfastDinnerLunchDessertAppetizer

Sweet Peach Yogurt Parfait Delight

One of my fondest memories is from a lazy summer afternoon spent at my grandmother’s house. The sun filtered through the kitchen window, casting a warm glow over the table where she would create her culinary magic. It was during one of those blissful moments that I first tasted her Peach Yogurt Parfait with Honey and Granola. The sweet aroma of ripe peaches mingling with creamy yogurt and the crunch of granola was nothing short of heavenly. It felt like summer captured in a bowl, and I still remember the joy of diving in with a spoon, each layer revealing a new burst of flavor.

When I think about that parfait, I can almost hear the gentle hum of the bees outside, reminding me of the floral notes that honey brings to every bite. The vibrant yellows and soft oranges of the peaches contrast beautifully with the creamy white yogurt and the golden crunch of granola. It’s a dish that not only looks delightful but also tastes like a celebration of fresh, wholesome ingredients.

What makes my version of this Peach Yogurt Parfait special is the careful balance of flavors and textures. I use ripe, juicy peaches, drizzled with locally sourced honey, and a homemade granola that’s bursting with nuts and seeds for an extra crunch. It’s a simple dish, but every layer is crafted with love and attention.

Let me show you exactly how to make this delightful parfait, so you can bring a bit of that summer magic into your kitchen!

Sweet Peach Yogurt Parfait Delight

Why You’ll Love This Recipe

  • Delightfully creamy texture from the Greek yogurt, paired with the juicy sweetness of fresh peaches.
  • Ready in under 20 minutes, making it a quick and satisfying breakfast or snack option.
  • Budget-friendly, using common ingredients that you may already have in your pantry.
  • Customizable with your favorite granola and nuts, allowing you to tailor each parfait to your taste.
  • Perfectly balanced flavors with the bright acidity of lemon juice and the sweetness of honey enhancing the peaches.

Ingredients

  • For the Parfait:
  • 2 cups plain Greek yogurt (or vanilla yogurt for a sweeter option)
  • 2 large ripe peaches, diced (about 2 cups)
  • 1 tablespoon fresh lemon juice (to prevent browning of peaches)
  • 2 tablespoons honey (plus more for drizzling)
  • 1 teaspoon vanilla extract (optional for extra flavor)
  • For the Granola:
  • 1 cup granola (store-bought or homemade; see notes for a simple granola recipe)
  • 1/4 cup sliced almonds (optional for added crunch)
  • 1/4 cup shredded coconut (optional for added flavor)

Let’s dive into some key ingredients that make this Peach Yogurt Parfait so delightful! First, the Greek yogurt is not only creamy but also packed with protein, making it a satisfying option for breakfast or a snack. If you’re looking for a sweeter option, you can easily substitute it with vanilla yogurt, though it may alter the overall flavor balance. Next, the ripe peaches are the star of the show; their natural sweetness shines through, so I recommend choosing peaches that yield slightly to pressure, indicating they’re perfectly ripe. If peaches aren’t in season, feel free to use nectarines or even frozen peaches—just thaw them before use. Finally, honey adds a lovely floral sweetness that ties everything together. If you prefer, maple syrup can serve as a delicious substitute.

Step-by-Step Instructions

  1. Start by preparing the peaches. Wash them thoroughly, then slice and dice them into bite-sized pieces. In a medium bowl, toss the diced peaches with 1 tablespoon of fresh lemon juice to prevent browning. Set aside for about 5 minutes while the lemon juice works its magic.
  2. In a separate bowl, combine the Greek yogurt, 2 tablespoons of honey, and 1 teaspoon of vanilla extract if using. Stir the mixture until smooth and thoroughly blended. This should take about a minute. Avoid overmixing to maintain the creaminess of the yogurt.
  3. Now it’s time to layer your parfait. Grab a clear glass or bowl to showcase your beautiful creation. Start with a generous spoonful of the yogurt mixture at the bottom—about 1/4 cup will do. Use a spoon to spread it evenly.
  4. Add a layer of the diced peaches over the yogurt, ensuring they cover the yogurt completely. You might want to use about half of what you have prepared—roughly 1 cup. This layer should be visually appealing, so arrange the peaches neatly.
  5. Sprinkle 1/4 cup of granola over the peaches. This adds a delightful crunch. Make sure to distribute it evenly to ensure every bite has that satisfying texture. Avoid packing it down too tightly, as you want it to maintain its crunch.
  6. Repeat the layers: spoon in another 1/4 cup of yogurt, followed by another cup of peaches, and another sprinkle of granola. You should have at least two layers, but feel free to add more depending on your glass size.
  7. Finish off your parfait with a drizzle of honey on top for added sweetness and a touch of elegance. If you’re using sliced almonds or shredded coconut, sprinkle them on top now. It adds a lovely visual contrast and extra flavor.
  8. Serve immediately or refrigerate for up to 30 minutes before serving to allow the flavors to meld together. However, I recommend enjoying it fresh to maintain the granola’s crunch.

Pro Tips for the Best Peach Yogurt Parfait With Honey And Granola

  • Make sure to choose ripe peaches for the best flavor and texture. A common mistake is using unripe fruit, which can lead to a less enjoyable parfait. Look for peaches that are fragrant and slightly soft to the touch.
  • Use a clear glass to assemble your parfait; this not only makes for a beautiful presentation but also allows you to see the colorful layers, which adds to the enjoyment of eating it.
  • For an even creamier texture, consider whipping the Greek yogurt with a hand mixer for a couple of minutes before layering. This small adjustment makes a huge difference in mouthfeel.
  • Be mindful of the granola-to-yogurt ratio. Too much granola can overwhelm the parfait, while too little can make it feel too creamy. Aim for about 1/4 cup of granola per layer for the perfect balance.
  • If you’re making this for a gathering, consider preparing the yogurt and peaches ahead of time and layering them just before serving. This ensures the granola stays crunchy!

Variations & Serving Ideas

There are so many ways to get creative with your Peach Yogurt Parfait! For a tropical twist, swap out the peaches for mangoes or pineapples and top with coconut flakes. If you prefer a berry flavor, mix in some blueberries or strawberries with the peaches for added color and taste. For a nutty version, incorporate chopped walnuts or pecans instead of almonds.

As for serving ideas, this parfait pairs beautifully with a side of scrambled eggs for a hearty breakfast or fresh fruit salad for a light lunch. You might also enjoy it alongside whole grain toast with almond butter for an energizing snack. The contrast of flavors and textures will elevate your meal experience!

Storage, Make-Ahead & Reheating

The Peach Yogurt Parfait is best enjoyed fresh, but you can prepare some components ahead of time. Store the layered parfait in an airtight container in the refrigerator for up to 24 hours. However, be cautious; the granola may lose its crunch if stored too long. You can freeze the yogurt and peach mixture for up to 2 months; just remember to thaw it in the refrigerator overnight before serving.

If you plan to enjoy this dish the next day, it can taste even better as the flavors meld together. Just remember to add the granola right before serving to keep its delightful crunch!

Frequently Asked Questions

Can I make Peach Yogurt Parfait With Honey And Granola ahead of time?

Yes — in fact, it tastes even better the next day as the flavors meld. However, I recommend waiting to add the granola until just before serving to maintain its crunch.

What can I substitute for Greek yogurt?

If you prefer a lighter option, you can substitute Greek yogurt with regular yogurt or a dairy-free alternative like coconut yogurt. Just remember that this may alter the creaminess and flavor profile slightly.

Can I use frozen peaches for this parfait?

Absolutely! Just make sure to thaw the frozen peaches before using them. They will still add great flavor, though the texture may be slightly softer than fresh peaches.

How do I make the parfait vegan?

To make a vegan version, substitute the Greek yogurt with a plant-based yogurt alternative, and replace honey with maple syrup or agave nectar. This keeps the parfait sweet while adhering to a vegan diet.

What other fruits can I use in this recipe?

You can mix and match fruits based on your preference. Try using strawberries, blueberries, raspberries, or even bananas. Just make sure to adjust the lemon juice as needed to prevent browning.

Sweet Peach Yogurt Parfait Delight

Final Thoughts

The Peach Yogurt Parfait with Honey and Granola is a delightful blend of creamy yogurt, sweet peaches, and crunchy granola that creates a satisfying and nourishing treat. Each layer bursts with flavor, making it a perfect choice for breakfast or a light dessert.

This is the kind of recipe I come back to again and again, especially when I want something refreshing and wholesome to start my day. The harmony of sweet and tart flavors, combined with the delightful crunch, never fails to lift my spirits!

I encourage you to give this parfait a try and indulge in its comforting goodness. Feel free to share your results or even add your own twist—perhaps a sprinkle of cinnamon or a handful of nuts. Enjoy creating your perfect parfait!

Print
clock clock iconcutlery cutlery iconflag flag iconfolder folder iconinstagram instagram iconpinterest pinterest iconfacebook facebook iconprint print iconsquares squares iconheart heart iconheart solid heart solid icon

Peach Yogurt Parfait


  • Author: Lily author
  • Total Time: 15 minutes
  • Yield: 4 servings 1x
Pin Recipe
Print Recipe

Description

This Peach Yogurt Parfait combines creamy Greek yogurt, juicy peaches, and crunchy granola for a delightful treat. It’s a perfect breakfast or snack that captures the essence of summer in every bite.


Ingredients

Scale
  • For the Parfait:
  • 2 cups plain Greek yogurt (or vanilla yogurt for a sweeter option)
  • 2 large ripe peaches, diced (about 2 cups)
  • 1 tablespoon fresh lemon juice (to prevent browning of peaches)
  • 2 tablespoons honey (plus more for drizzling)
  • 1 teaspoon vanilla extract (optional for extra flavor)
  • For the Granola:
  • 1 cup granola (store-bought or homemade; see notes for a simple granola recipe)
  • 1/4 cup sliced almonds (optional for added crunch)
  • 1/4 cup shredded coconut (optional for added flavor)

Instructions

  1. Start by preparing the peaches. Wash them thoroughly, then slice and dice them into bite-sized pieces. In a medium bowl, toss the diced peaches with 1 tablespoon of fresh lemon juice to prevent browning. Set aside for about 5 minutes while the lemon juice works its magic.
  2. In a separate bowl, combine the Greek yogurt, 2 tablespoons of honey, and 1 teaspoon of vanilla extract if using. Stir the mixture until smooth and thoroughly blended. This should take about a minute. Avoid overmixing to maintain the creaminess of the yogurt.
  3. Now it’s time to layer your parfait. Grab a clear glass or bowl to showcase your beautiful creation. Start with a generous spoonful of the yogurt mixture at the bottom—about 1/4 cup will do. Use a spoon to spread it evenly.
  4. Add a layer of the diced peaches over the yogurt, ensuring they cover the yogurt completely. You might want to use about half of what you have prepared—roughly 1 cup. This layer should be visually appealing, so arrange the peaches neatly.
  5. Sprinkle 1/4 cup of granola over the peaches. This adds a delightful crunch. Make sure to distribute it evenly to ensure every bite has that satisfying texture. Avoid packing it down too tightly, as you want it to maintain its crunch.
  6. Repeat the layers: spoon in another 1/4 cup of yogurt, followed by another cup of peaches, and another sprinkle of granola. You should have at least two layers, but feel free to add more depending on your glass size.
  7. Finish off your parfait with a drizzle of honey on top for added sweetness and a touch of elegance. If you’re using sliced almonds or shredded coconut, sprinkle them on top now. It adds a lovely visual contrast and extra flavor.
  8. Serve immediately or refrigerate for up to 30 minutes before serving to allow the flavors to meld together. However, I recommend enjoying it fresh to maintain the granola’s crunch.
  • Prep Time: 15 mins
  • Cook Time: 0 mins
  • Category: Breakfast
  • Method: No-cook
  • Cuisine: American

Nutrition

  • Serving Size: 1 parfait
  • Calories: 250
  • Sugar: 20 g
  • Sodium: 50 mg
  • Fat: 5 g
  • Saturated Fat: 2 g
  • Unsaturated Fat: 3 g
  • Trans Fat: 0 g
  • Carbohydrates: 40 g
  • Fiber: 3 g
  • Protein: 10 g
  • Cholesterol: 10 mg

Keywords: Choose ripe peaches for the best flavor and texture. Use a clear glass for a beautiful presentation. For creaminess, consider whipping the yogurt before layering. Be mindful of the granola-to-yogurt ratio. Prepare yogurt and peaches ahead of time for gatherings, layering just before serving.

Did you make this recipe?

Share a photo and tag us — we can't wait to see what you've made!

Sun-Kissed Frozen Orange Cream Slush

As a child, summer days felt like they lasted forever. I remember the sticky heat wrapping around me as I played outside, my laughter mingling with the sounds of the neighborhood. But nothing could cool me down quite like the moment I’d spot my grandmother, laboring over her blender, whipping up her famous Frozen Orange Creamsicle Slush. That vibrant orange treat, with its frosty texture and sweet citrus aroma, was like a burst of sunshine in a cup. Just one sip, and I could feel the coolness wash over me, sparking pure joy.

This Frozen Orange Creamsicle Slush has a way of making you feel like a kid again. Its creamy, dreamy consistency is a delightful balance of bright orange and soft vanilla, inviting you to dive right in. The refreshing tang of orange dances on your tongue, while the smooth creaminess envelops you in a comforting embrace. It’s a nostalgic treat that’s perfect for hot summer afternoons or anytime you need a little pick-me-up.

What makes my version of this slush stand out is the addition of a hint of vanilla bean, which elevates the flavor and adds an extra layer of richness. Plus, it’s super easy to whip up with just a few simple ingredients that you probably already have on hand! So, if you’re ready to relive those sun-soaked memories, let me show you exactly how to make it.

Sun-Kissed Frozen Orange Cream Slush

Why You’ll Love This Recipe

  • Each slush is a perfect blend of creamy vanilla and zesty orange, creating a nostalgic flavor reminiscent of summer days.
  • This refreshing treat is ready in under 15 minutes, making it an ideal quick dessert for unexpected guests or hot afternoons.
  • With just 8 simple ingredients, it’s budget-friendly, ensuring you don’t have to break the bank to enjoy a delicious slush.
  • The slush has a perfectly smooth texture, thanks to the combination of ice and ice cream, providing a delightful contrast to the bright citrus flavors.
  • It’s highly customizable; you can easily adjust the sweetness and add fresh herbs for a unique twist that suits your taste.

Ingredients

  • 2 cups orange juice (freshly squeezed or store-bought)
  • 1 cup vanilla ice cream
  • 1 cup crushed ice
  • 1/2 cup milk (whole or 2%)
  • 1/4 cup granulated sugar (adjust based on sweetness preference)
  • 1 teaspoon vanilla extract
  • Zest of 1 orange (for added flavor)
  • Fresh orange slices and mint leaves (for garnish)

The star of this Frozen Orange Creamsicle Slush is the orange juice, which provides the vibrant, citrusy base. Freshly squeezed juice will yield the brightest flavor, but store-bought options can be just as convenient. If you’re opting for store-bought, choose 100% pure juice with no added sugars for the best results. Another essential ingredient is the vanilla ice cream; it adds creaminess and sweetness. You can substitute it with dairy-free ice cream if you’re looking for a vegan option. Whole or 2% milk complements the ice cream, creating a smooth blend. If you want a lower-calorie version, almond or oat milk can be good alternatives.

Lastly, the granulated sugar can be adjusted based on your sweetness preference. If you prefer a more natural sweetener, consider using honey or agave syrup. The orange zest enhances the flavor profile, providing an aromatic pop that brings the whole slush together. Don’t skip it! It adds an extra layer of brightness that makes this slush truly special.

Step-by-Step Instructions

  1. Start by preparing your ingredients. Gather 2 cups of orange juice, 1 cup of vanilla ice cream, and 1 cup of crushed ice. Make sure the ice is finely crushed, as larger chunks can make blending difficult.
  2. In a blender, combine the orange juice, vanilla ice cream, crushed ice, and 1/2 cup of milk. Add 1/4 cup of granulated sugar and 1 teaspoon of vanilla extract. If you like a sweeter slush, consider adding a bit more sugar at this stage.
  3. Add the zest of 1 orange to the blender. This step is crucial for enhancing the citrus flavor of your slush. Make sure not to include the bitter white pith—only the flavorful zest.
  4. Blend the mixture on medium-high speed for about 30-45 seconds. Stop once the ingredients are fully combined and the slush has a smooth, even consistency. If you notice large chunks of ice, blend for an additional 10-15 seconds. Avoid over-blending, as this can make the slush too liquidy.
  5. Once blended, taste the slush. If it needs more sweetness, add a little more sugar and blend for a few more seconds. If it’s too thick, you can add a splash of milk to reach your desired consistency.
  6. Pour the slush into glasses. This recipe typically serves 4, but you can easily double it for larger gatherings. Use a spoon to help guide the slush into the glasses if needed.
  7. Garnish each serving with fresh orange slices and mint leaves. The mint not only adds a pop of color but also a refreshing aroma that complements the citrus flavors beautifully.
  8. Serve immediately and enjoy! If you’ve made extra, you can refrigerate it for a short time, but it’s best enjoyed fresh.

Pro Tips for the Best Frozen Orange Creamsicle Slush

  • Don’t skip the orange zest! It’s a game-changer for flavor. Always zest before juicing to make it easier.
  • Use a high-powered blender for the best texture. A standard blender may struggle with ice, leading to uneven consistency. If you have a food processor, that can work too, but ensure the ice is finely crushed.
  • Adjust the ice-to-liquid ratio carefully. If your slush is too thick, it won’t blend well. Start with less ice and add more until you reach your preferred texture.
  • Be cautious with the sugar! Always start with the lower amount, as you can easily add more, but it’s hard to fix an overly sweet slush.
  • For a fun twist, consider adding a splash of coconut milk or a handful of fresh fruit like strawberries or pineapple. This not only enhances the flavor but also adds a beautiful color contrast.

Variations & Serving Ideas

There are countless ways to put a spin on your Frozen Orange Creamsicle Slush. Consider making a tropical version by adding in some pineapple juice or coconut milk for a delightful tropical twist. If you’re feeling adventurous, try incorporating a handful of frozen mango or peach slices for added sweetness. For a lighter version, swap out the vanilla ice cream for Greek yogurt for a creamy yet tangy alternative.

As for serving ideas, this refreshing slush pairs wonderfully with light summer dishes like grilled chicken skewers, fish tacos, or a simple salad topped with citrus vinaigrette. The bright, zesty flavors of the slush complement these dishes perfectly, making them an ideal pairing for a sunny day.

Storage, Make-Ahead & Reheating

This Frozen Orange Creamsicle Slush is best enjoyed fresh, but if you have leftovers, you can store them in an airtight container in the fridge for up to 2 days. Just keep in mind that the slush may lose some of its texture over time as the ice melts. It doesn’t freeze well, as the ice will turn into a solid block. If you must freeze it, blend again after thawing to restore the slushy consistency. This treat is best the day you make it, as the flavors meld together beautifully overnight, enhancing its deliciousness.

Frequently Asked Questions

Can I make Frozen Orange Creamsicle Slush ahead of time?

Yes — in fact, it tastes even better the next day as the flavors meld. However, it’s best to enjoy it fresh, as the texture can change if stored for too long. If you need to prepare it ahead, keep it in the fridge and re-blend before serving.

What kind of orange juice should I use?

For the best flavor, use freshly squeezed orange juice. However, if you’re short on time, opt for 100% pure store-bought juice without added sugars. This will ensure that your slush remains flavorful and refreshing.

Can I substitute the vanilla ice cream?

Absolutely! If you’re looking for a dairy-free option, coconut milk ice cream or a non-dairy vanilla ice cream can work wonderfully. They will still provide the creamy texture and sweetness you desire.

How can I adjust the sweetness of my slush?

You can easily adjust the sweetness by modifying the amount of sugar added. Start with 1/4 cup and taste the mixture before blending. If you prefer it sweeter, add more sugar gradually until it reaches your desired level.

What should I do if my slush is too thick?

If your slush is too thick, simply add a splash of milk or orange juice and blend again. This will help achieve a more drinkable consistency while maintaining the slushy texture. Adjust gradually to reach your preferred thickness.

Sun-Kissed Frozen Orange Cream Slush

Final Thoughts

The Frozen Orange Creamsicle Slush is a delightful blend of refreshing citrus and creamy goodness, making it a perfect treat for warm days or any time you crave a taste of nostalgia. The way the bright orange flavor dances with the creamy texture truly elevates this slush, transforming it into a satisfying escape from the everyday.

This is the kind of recipe I come back to again and again, especially when I’m looking to cool down or impress guests at a summer gathering. It’s simple to make and always brings smiles all around! I encourage you to try this recipe for yourself—don’t hesitate to share your results or even put your own spin on it. Happy slushing!

Print
clock clock iconcutlery cutlery iconflag flag iconfolder folder iconinstagram instagram iconpinterest pinterest iconfacebook facebook iconprint print iconsquares squares iconheart heart iconheart solid heart solid icon

Frozen Orange Creamsicle Slush


  • Author: Lily author
  • Total Time: 15 minutes
  • Yield: 4 servings 1x
Pin Recipe
Print Recipe

Description

This Frozen Orange Creamsicle Slush is a refreshing treat that combines creamy vanilla and zesty orange flavors. Perfect for hot summer days, it brings back nostalgic memories with every sip.


Ingredients

Scale
  • 2 cups orange juice (freshly squeezed or store-bought)
  • 1 cup vanilla ice cream
  • 1 cup crushed ice
  • 1/2 cup milk (whole or 2%)
  • 1/4 cup granulated sugar (adjust based on sweetness preference)
  • 1 teaspoon vanilla extract
  • Zest of 1 orange (for added flavor)
  • Fresh orange slices and mint leaves (for garnish)

Instructions

  1. Start by preparing your ingredients. Gather 2 cups of orange juice, 1 cup of vanilla ice cream, and 1 cup of crushed ice. Make sure the ice is finely crushed, as larger chunks can make blending difficult.
  2. In a blender, combine the orange juice, vanilla ice cream, crushed ice, and 1/2 cup of milk. Add 1/4 cup of granulated sugar and 1 teaspoon of vanilla extract. If you like a sweeter slush, consider adding a bit more sugar at this stage.
  3. Add the zest of 1 orange to the blender. This step is crucial for enhancing the citrus flavor of your slush. Make sure not to include the bitter white pith—only the flavorful zest.
  4. Blend the mixture on medium-high speed for about 30-45 seconds. Stop once the ingredients are fully combined and the slush has a smooth, even consistency. If you notice large chunks of ice, blend for an additional 10-15 seconds. Avoid over-blending, as this can make the slush too liquidy.
  5. Once blended, taste the slush. If it needs more sweetness, add a little more sugar and blend for a few more seconds. If it’s too thick, you can add a splash of milk to reach your desired consistency.
  6. Pour the slush into glasses. This recipe typically serves 4, but you can easily double it for larger gatherings. Use a spoon to help guide the slush into the glasses if needed.
  7. Garnish each serving with fresh orange slices and mint leaves. The mint not only adds a pop of color but also a refreshing aroma that complements the citrus flavors beautifully.
  8. Serve immediately and enjoy! If you’ve made extra, you can refrigerate it for a short time, but it's best enjoyed fresh.
  • Prep Time: 15 min
  • Cook Time: 0 min
  • Category: Dessert
  • Method: Blending
  • Cuisine: American

Nutrition

  • Serving Size: 1 serving
  • Calories: 200
  • Sugar: 30 g
  • Sodium: 50 mg
  • Fat: 5 g
  • Saturated Fat: 3 g
  • Unsaturated Fat: 2 g
  • Trans Fat: 0 g
  • Carbohydrates: 40 g
  • Fiber: 1 g
  • Protein: 2 g
  • Cholesterol: 20 mg

Keywords: Don't skip the orange zest! It's a game-changer for flavor. Always zest before juicing to make it easier.

Did you make this recipe?

Share a photo and tag us — we can't wait to see what you've made!

Zesty Lemon Poppy Seed Delight

One rainy afternoon, I found myself in my grandmother’s cozy kitchen, the kind that always smelled like warmth and love. She was whipping up her famous Lemon Poppy Seed Loaf, a recipe that had been passed down through generations. As the batter came together, the zesty aroma of fresh lemons filled the air, mingling perfectly with the nutty fragrance of poppy seeds. I can still picture her, apron-clad, as she expertly drizzled a vibrant citrus icing over the loaf, creating a glossy, sun-kissed finish that beckoned us to dive in. It was a moment that sparked my own passion for baking, and this recipe has become a cherished staple in my home ever since.

When you take a bite of this Lemon Poppy Seed Loaf, it’s like a burst of sunshine on your palate. The loaf is beautifully golden, with a tender crumb that melts in your mouth. Each slice is speckled with tiny poppy seeds, adding a delightful crunch that contrasts beautifully with the tangy sweetness of the lemon. And that citrus icing? It’s the finishing touch that elevates this loaf from ordinary to extraordinary, with its bright, zesty flavor dancing on your taste buds.

This recipe stands out because it embraces simplicity while delivering on flavor. I’ve added a hint of vanilla to the batter, enhancing the overall taste and making it even more indulgent. Trust me, once you make this Lemon Poppy Seed Loaf With Citrus Icing, it’ll become a go-to in your baking repertoire.

So, let me show you exactly how to make it!

Zesty Lemon Poppy Seed Delight

Why You’ll Love This Recipe

  • Moist and tender crumb that melts in your mouth, thanks to the perfect balance of butter and buttermilk.
  • Bright, zesty lemon flavor paired with crunchy poppy seeds, creating a delightful texture and taste experience.
  • Easy to whip up in just about an hour, perfect for last-minute gatherings or a cozy afternoon treat.
  • Budget-friendly with everyday ingredients, making it an accessible option for all home bakers.
  • The citrus icing adds a sweet tang that elevates the loaf, turning a simple recipe into a showstopper!

Ingredients

  • 1 ½ cups (190g) all-purpose flour
  • 1 teaspoon baking powder
  • ½ teaspoon baking soda
  • ½ teaspoon salt
  • 3 tablespoons poppy seeds
  • ½ cup (115g) unsalted butter, softened to room temperature
  • 1 cup (200g) granulated sugar
  • 2 large eggs
  • 1 teaspoon vanilla extract
  • 1 teaspoon lemon zest (from about 1 medium lemon)
  • ½ cup (120ml) buttermilk
  • 2 tablespoons fresh lemon juice

For the Citrus Icing:

  • 1 cup (120g) powdered sugar
  • 2 tablespoons fresh lemon juice
  • 1 tablespoon orange juice
  • 1 teaspoon lemon zest (for garnish, optional)

Let’s dive into the key ingredients that make this Lemon Poppy Seed Loaf so special. The all-purpose flour provides the structure and base for the loaf, while the baking powder and baking soda ensure it rises perfectly, giving the loaf a light texture. For a gluten-free variation, you could substitute the flour with a gluten-free all-purpose blend. Poppy seeds not only add a delightful crunch but also contribute to the unique flavor profile that pairs well with the citrus notes.

Unsalted butter is crucial for achieving the buttery richness that makes this loaf so moist. If you’re looking for a dairy-free option, coconut oil or a vegan butter can be used instead. The buttermilk is another essential component, providing acidity that activates the baking soda for a fluffy texture. If you don’t have buttermilk on hand, you can easily make a substitute by mixing ½ cup of milk with 1 tablespoon of vinegar or lemon juice and letting it sit for about 5 minutes.

Step-by-Step Instructions

  1. Preheat your oven to 350°F (175°C). Grease a 9×5-inch loaf pan or line it with parchment paper for easy removal later.
  2. In a medium mixing bowl, whisk together 1 ½ cups of all-purpose flour, 1 teaspoon of baking powder, ½ teaspoon of baking soda, ½ teaspoon of salt, and 3 tablespoons of poppy seeds. This helps to evenly distribute the baking agents and ensures a uniform rise.
  3. In a large mixing bowl, cream together ½ cup of softened unsalted butter and 1 cup of granulated sugar using an electric mixer on medium speed for about 3-4 minutes, until the mixture is light and fluffy. Make sure to scrape down the sides of the bowl occasionally.
  4. Add 2 large eggs, 1 teaspoon of vanilla extract, and 1 teaspoon of lemon zest to the creamed butter and sugar, mixing until fully combined. You want a smooth consistency, so ensure there are no lumps of butter.
  5. In a small bowl, combine ½ cup of buttermilk and 2 tablespoons of fresh lemon juice. Alternately add the dry ingredients and buttermilk mixture to the butter mixture, starting and ending with the dry ingredients. Mix just until combined; do not overmix, as this can lead to a dense loaf.
  6. Pour the batter into the prepared loaf pan. Smooth the top with a spatula, ensuring it’s even. Bake in the preheated oven for 50-60 minutes, or until a toothpick inserted in the center comes out clean. The edges should be lightly golden brown, and the center should feel just set.
  7. Once baked, remove the loaf from the oven and allow it to cool in the pan for about 10 minutes. Then, transfer it to a wire rack to cool completely. Resist the urge to slice too soon, as it will be crumbly if it’s still warm.
  8. While the loaf is cooling, prepare the citrus icing. In a medium bowl, whisk together 1 cup of powdered sugar, 2 tablespoons of fresh lemon juice, and 1 tablespoon of orange juice until smooth. If the icing is too thick, you can add a little more juice to reach your desired consistency.
  9. Once the loaf is completely cool, drizzle the citrus icing over the top. If you like, sprinkle with an additional teaspoon of lemon zest for an extra pop of flavor and color.

Pro Tips for the Best Lemon Poppy Seed Loaf With Citrus Icing

  • Be careful not to overmix your batter; this is a common mistake that can lead to a dense loaf. Mix just until the dry ingredients are incorporated for a light and fluffy texture.
  • Use room temperature ingredients, especially the butter and eggs. This helps to create a smoother batter and ensures even baking. Take your eggs out of the fridge about 30 minutes before you start.
  • For a more pronounced lemon flavor, consider adding a little lemon extract in addition to the zest and juice. Just a half teaspoon can elevate the citrus notes significantly.
  • When measuring your flour, spoon it into the measuring cup and level it off with a knife instead of scooping directly from the bag. This prevents packing and ensures you don’t end up with a dry loaf.
  • Invest in a good quality loaf pan; it makes a difference in heat distribution, which ensures even baking. If your pan is dark-coated, reduce the oven temperature by 25°F to prevent over-browning.

Variations & Serving Ideas

For a delightful twist, consider adding blueberries or raspberries to the batter for a fruity burst of flavor. You can also experiment with different citrus fruits—try lime or grapefruit zest and juice for a refreshing change. For a healthier option, substitute half of the all-purpose flour with whole wheat flour for added fiber without compromising too much on texture.

This Lemon Poppy Seed Loaf pairs beautifully with a light salad, such as a mixed greens salad with a vinaigrette, or a cup of tea for a cozy afternoon treat. It also complements a creamy cheese platter, as the acidity of the loaf balances rich cheeses perfectly. Lastly, a scoop of vanilla ice cream on the side creates a delightful contrast of temperatures and flavors!

Storage, Make-Ahead & Reheating

This Lemon Poppy Seed Loaf can be stored at room temperature for up to 3 days if wrapped tightly in plastic wrap. If you want to keep it longer, it freezes well for up to 3 months. To freeze, wrap the loaf tightly in plastic wrap and then in aluminum foil to prevent freezer burn.

When you’re ready to enjoy it again, simply thaw it in the fridge overnight. Reheat individual slices in the microwave for 15-20 seconds or in a toaster oven until warmed through. Interestingly, many people find that this loaf tastes even better the next day, as the flavors have time to meld!

Frequently Asked Questions

Can I make Lemon Poppy Seed Loaf With Citrus Icing ahead of time?

Yes — in fact, it tastes even better the next day! You can make the loaf a day in advance, allowing the flavors to develop. Just be sure to store it in an airtight container to maintain its moisture.

Can I substitute the poppy seeds?

Absolutely! If you don’t have poppy seeds on hand or prefer an alternative, you can use sesame seeds for a similar crunch or omit them entirely for a smooth loaf.

What can I use instead of buttermilk?

If you don’t have buttermilk, you can easily create a substitute by mixing ½ cup of milk (dairy or plant-based) with 1 tablespoon of vinegar or lemon juice. Let it sit for 5 minutes before using in the recipe.

How can I make this recipe gluten-free?

To make a gluten-free version of this Lemon Poppy Seed Loaf, substitute the all-purpose flour with a gluten-free all-purpose flour blend. Just ensure that the blend contains a binding agent like xanthan gum for the best results.

What is the best way to store leftover loaf?

Leftover Lemon Poppy Seed Loaf should be stored in an airtight container at room temperature for up to 3 days. For longer storage, wrap it tightly and freeze for up to 3 months. Thaw it before serving for the best texture.

Zesty Lemon Poppy Seed Delight

Final Thoughts

The Lemon Poppy Seed Loaf with Citrus Icing is truly a delightful treat that brings a burst of brightness to any occasion. The zesty lemon flavor combined with the subtle crunch of poppy seeds creates a satisfying balance, while the citrus icing adds a touch of sweetness that perfectly complements the loaf’s tanginess.

This is the kind of recipe I come back to again and again, especially when I want to brighten up a gloomy day or celebrate a small victory. The aroma that fills the kitchen as it bakes is absolutely heavenly! I encourage you to give this recipe a try; you might just find it becoming a beloved staple in your home. Don’t forget to share your results or even add your own unique twist—I can’t wait to see what you create!

Print
clock clock iconcutlery cutlery iconflag flag iconfolder folder iconinstagram instagram iconpinterest pinterest iconfacebook facebook iconprint print iconsquares squares iconheart heart iconheart solid heart solid icon

Lemon Poppy Seed Loaf


  • Author: Lily author
  • Total Time: 49 minute
  • Yield: 1 loaf 1x
Pin Recipe
Print Recipe

Description

This Lemon Poppy Seed Loaf is a delightful treat that combines zesty lemon flavor with crunchy poppy seeds. Topped with a citrus icing, it’s perfect for any occasion.


Ingredients

Scale
  • 1 ½ cups (190g) all-purpose flour
  • 1 teaspoon baking powder
  • ½ teaspoon baking soda
  • ½ teaspoon salt
  • 3 tablespoons poppy seeds
  • ½ cup (115g) unsalted butter, softened to room temperature
  • 1 cup (200g) granulated sugar
  • 2 large eggs
  • 1 teaspoon vanilla extract
  • 1 teaspoon lemon zest (from about 1 medium lemon)
  • ½ cup (120ml) buttermilk
  • 2 tablespoons fresh lemon juice
  • 1 cup (120g) powdered sugar
  • 2 tablespoons fresh lemon juice
  • 1 tablespoon orange juice
  • 1 teaspoon lemon zest (for garnish, optional)

Instructions

  1. Preheat your oven to 350°F (175°C). Grease a 9×5-inch loaf pan or line it with parchment paper for easy removal later.
  2. In a medium mixing bowl, whisk together 1 ½ cups of all-purpose flour, 1 teaspoon of baking powder, ½ teaspoon of baking soda, ½ teaspoon of salt, and 3 tablespoons of poppy seeds. This helps to evenly distribute the baking agents and ensures a uniform rise.
  3. In a large mixing bowl, cream together ½ cup of softened unsalted butter and 1 cup of granulated sugar using an electric mixer on medium speed for about 3-4 minutes, until the mixture is light and fluffy. Make sure to scrape down the sides of the bowl occasionally.
  4. Add 2 large eggs, 1 teaspoon of vanilla extract, and 1 teaspoon of lemon zest to the creamed butter and sugar, mixing until fully combined. You want a smooth consistency, so ensure there are no lumps of butter.
  5. In a small bowl, combine ½ cup of buttermilk and 2 tablespoons of fresh lemon juice. Alternately add the dry ingredients and buttermilk mixture to the butter mixture, starting and ending with the dry ingredients. Mix just until combined; do not overmix, as this can lead to a dense loaf.
  6. Pour the batter into the prepared loaf pan. Smooth the top with a spatula, ensuring it’s even. Bake in the preheated oven for 50-60 minutes, or until a toothpick inserted in the center comes out clean. The edges should be lightly golden brown, and the center should feel just set.
  7. Once baked, remove the loaf from the oven and allow it to cool in the pan for about 10 minutes. Then, transfer it to a wire rack to cool completely. Resist the urge to slice too soon, as it will be crumbly if it’s still warm.
  8. While the loaf is cooling, prepare the citrus icing. In a medium bowl, whisk together 1 cup of powdered sugar, 2 tablespoons of fresh lemon juice, and 1 tablespoon of orange juice until smooth. If the icing is too thick, you can add a little more juice to reach your desired consistency.
  9. Once the loaf is completely cool, drizzle the citrus icing over the top. If you like, sprinkle with an additional teaspoon of lemon zest for an extra pop of flavor and color.
  • Prep Time: 15 mins
  • Cook Time: 50-60 mins
  • Category: Dessert
  • Method: Baking
  • Cuisine: American

Nutrition

  • Serving Size: 1 slice
  • Calories: 200
  • Sugar: 15 g
  • Sodium: 150 mg
  • Fat: 8 g
  • Saturated Fat: 5 g
  • Unsaturated Fat: 3 g
  • Trans Fat: 0 g
  • Carbohydrates: 30 g
  • Fiber: 1 g
  • Protein: 3 g
  • Cholesterol: 40 mg

Keywords: Be careful not to overmix your batter; this is a common mistake that can lead to a dense loaf. Use room temperature ingredients for a smoother batter and even baking.

Did you make this recipe?

Share a photo and tag us — we can't wait to see what you've made!

  • Privacy Policy
  • Terms Of Service
  • Contact
  • About
  • GDPR

Copyright © 2025 Homesmad