• Skip to primary navigation
  • Skip to main content
  • Skip to primary sidebar
Homesmad

Homesmad

  • Home
  • Breakfast & Brunch
  • Appetizers & Snacks
  • Dinner
  • Dessert
  • About
  • Privacy Policy
  • Contact
Homesmad
  • Home
  • Breakfast & Brunch
  • Appetizers & Snacks
  • Dinner
  • Dessert
  • About
  • Privacy Policy
  • Contact

Delicious Korean BBQ Steak Rice Bowls with Spicy Cream Sauce

October 17, 2025 by Lily author

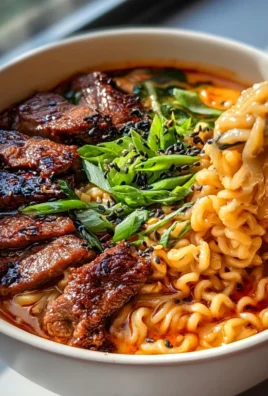
Korean Bbq Steak Rice Bowls With Spicy Cream Sauce are more than just a meal; they are a culinary journey, transforming your kitchen into a vibrant Korean eatery. Imagine succulent, perfectly marinated steak, grilled to tender perfection, served atop fluffy rice and crowned with a sauce so irresistibly creamy and spicy, it will awaken every single one of your taste buds. I am absolutely thrilled to share this recipe with you!

Korean BBQ, known as Gogi-gui, has captivated palates worldwide with its rich marinades and interactive dining experience. This particular iteration brings that beloved experience right to your home in a convenient and endlessly satisfying bowl. People adore this dish for its incredible depth of flavor – the savory, slightly sweet bulgogi-style beef, the comforting texture of the rice, and the undeniable kick from our unique creamy spicy sauce. It’s a harmonious blend of textures and tastes, offering a perfect balance that leaves you feeling both nourished and thoroughly indulged. Get ready to elevate your weeknight dinners with these fantastic Korean Bbq Steak Rice Bowls With Spicy Cream Sauce.

Delicious Korean BBQ Steak Rice Bowls with Spicy Cream Sauce this RECIPE

Ingredients:

  • For the Korean BBQ Steak:
    • 1.5-2 pounds flank steak or skirt steak, about 1-inch thick, trimmed of excess fat. I find these cuts absorb the marinade beautifully and cook quickly, perfect for a weeknight treat.
    • 1/2 cup low-sodium soy sauce. This forms the savory base of our marinade.
    • 1/4 cup mirin (sweet rice wine). It adds a lovely subtle sweetness and helps tenderize the meat.
    • 2 tablespoons toasted sesame oil. Essential for that distinct nutty, aromatic Korean flavor profile.
    • 2 tablespoons light brown sugar, packed. This balances the savory notes and aids in caramelization during cooking.
    • 2 tablespoons Gochujang (Korean chili paste). This is where the magic happens, offering a fermented, spicy, and slightly sweet kick. Adjust to your preference if you’re sensitive to heat, but don’t skip it entirely!
    • 1 tablespoon fresh ginger, grated. I love using a microplane for this to get a fine, aromatic paste.
    • 4 large cloves garlic, minced. Fresh garlic makes all the difference here, providing a pungent, delightful aroma.
    • 1/2 medium Asian pear, peeled and grated (about 1/4 cup). This might seem unusual, but the enzymes in Asian pear are fantastic natural tenderizers for meat and add a subtle sweetness.
    • 1 tablespoon rice vinegar. A touch of acidity brightens the whole marinade.
    • 1 teaspoon black pepper, freshly ground.
    • 1-2 tablespoons neutral oil for cooking the steak (like canola, grapeseed, or vegetable oil). We need a high smoke point oil for that beautiful sear.
  • For the Spicy Cream Sauce:
    • 1/2 cup good quality mayonnaise. I prefer a full-fat variety for the creamiest texture.
    • 2 tablespoons Gochujang (Korean chili paste). Yes, more of this wonderful stuff! It’s the star of the sauce too.
    • 1 tablespoon Sriracha (or more, to taste, if you love extra heat!). This adds a different layer of chili warmth.
    • 1 tablespoon fresh lime juice. A squeeze of citrus cuts through the richness and brightens the flavors immensely.
    • 1 teaspoon toasted sesame oil. Reinforces the nutty notes in the sauce.
    • 1 teaspoon honey or maple syrup. Just a touch to balance the spice and acidity.
    • 1/2 teaspoon garlic powder. For a smooth garlic flavor without raw garlic chunks.
    • A pinch of salt to taste.
  • For the Rice Bowls (Base & Toppings):
    • 2 cups uncooked short-grain white rice (like sushi rice or Calrose). This type of rice is perfectly sticky and holds up well in a bowl.
    • 4 cups water (or according to package directions for your rice).
    • 1 large English cucumber, thinly sliced or cut into matchsticks. Adds a refreshing crunch.
    • 2 medium carrots, julienned or grated. For color and a sweet, earthy bite.
    • 4-6 radishes, thinly sliced. Provides a beautiful pop of color and a peppery crunch.
    • 1 cup kimchi, chopped (optional, but highly recommended!). Fermented cabbage adds incredible depth and tang.
    • 4 large green onions (scallions), thinly sliced for garnish. Freshness and a mild oniony bite.
    • 2 tablespoons toasted sesame seeds for garnish. For a final flourish and nutty aroma.
    • Optional: A fried egg per bowl, with a runny yolk, for an extra luxurious touch.

Preparing the Korean BBQ Steak Marinade

  1. First things first, let’s get that incredible marinade together. In a large bowl or a sturdy zip-top bag, combine the soy sauce, mirin, toasted sesame oil, light brown sugar, Gochujang, grated fresh ginger, minced garlic, grated Asian pear, rice vinegar, and black pepper. Whisk everything together really well until the sugar is dissolved and all the ingredients are fully incorporated. You’re looking for a smooth, fragrant concoction. This marinade is the heart and soul of our “Korean Bbq Steak Rice Bowls With Spicy Cream Sauce,” so don’t rush this step!
  2. Now, let’s prepare our steak. If your flank or skirt steak is thicker than about 1 inch, you can carefully butterfly it horizontally or gently pound it to an even thickness. This ensures even cooking and better marinade absorption. Slice the steak against the grain into 1/2-inch thick strips. Slicing against the grain is super important for tender results!
  3. Add the sliced steak to the bowl or bag with the marinade. Make sure every piece of steak is thoroughly coated. If you’re using a zip-top bag, squeeze out any excess air before sealing. Place it in the refrigerator to marinate. I recommend marinating for at least 30 minutes, but for the best flavor and tenderness, aim for 2-4 hours. You can even marinate it overnight if you’re prepping ahead; just don’t go beyond 12 hours, as the acids in the marinade can start to break down the meat too much.

Crafting the Spicy Cream Sauce

  1. While our steak is soaking up all that goodness, let’s whip up the star sauce – our spicy cream sauce! In a medium bowl, combine the mayonnaise, Gochujang, Sriracha, fresh lime juice, toasted sesame oil, honey (or maple syrup), and garlic powder.
  2. Whisk all these ingredients together until the sauce is completely smooth and creamy. Give it a taste. This is your chance to adjust the flavors! Do you want it spicier? Add more Sriracha or Gochujang. A little sweeter? A touch more honey. More tangy? A tiny squeeze more lime. Trust your taste buds here; personal preference is key for the perfect sauce.
  3. Once you’re happy with the flavor, cover the bowl and place it in the refrigerator to chill while we finish preparing the rest of the meal. Chilling allows the flavors to meld beautifully and ensures a refreshing contrast to the warm steak and rice.

Preparing the Fluffy Rice

  1. It’s time for the foundation of our bowls: the rice. Measure out 2 cups of short-grain white rice. Transfer it to a fine-mesh sieve and rinse it under cold running water, agitating the rice with your fingers, until the water runs mostly clear. This removes excess starch, preventing gummy rice and yielding a wonderfully fluffy texture.
  2. For stovetop cooking: Combine the rinsed rice and 4 cups of water (or as directed by your rice package, as ratios can vary slightly) in a medium saucepan with a tight-fitting lid. Bring it to a boil over medium-high heat. Once boiling, reduce the heat to the lowest setting, cover tightly, and simmer for 15-20 minutes, or until all the water is absorbed.
  3. For rice cooker: Follow your rice cooker’s instructions for 2 cups of short-grain rice. Most rice cookers will have a specific water line for this type of rice.
  4. Once cooked, remove the rice from the heat (or turn off the rice cooker) and let it rest, still covered, for 10 minutes. This resting period is crucial! It allows the steam to redistribute, resulting in perfectly plump, separated grains. After resting, fluff the rice gently with a fork.

Prepping the Fresh Toppings

  1. While the rice is cooking and resting, let’s get our vibrant toppings ready. Thinly slice the English cucumber. I like to cut some into rounds and some into matchsticks for visual appeal and different textures.
  2. Julienne or grate the carrots. A mandoline can make quick work of julienning if you have one, or simply use a good sharp knife.
  3. Thinly slice the radishes. Again, a mandoline is great for uniformity here, or a steady hand with a knife.
  4. If using kimchi, give it a rough chop into bite-sized pieces.
  5. Thinly slice the green onions (scallions) for garnish. You can slice them straight or on a bias for a fancier look. Set aside the toasted sesame seeds for the final sprinkle.

Cooking the Korean BBQ Steak

  1. When you’re ready to cook, take the marinated steak out of the refrigerator and let it sit at room temperature for about 15-20 minutes. This helps the meat cook more evenly.
  2. Heat a large heavy-bottomed skillet or a cast-iron pan over medium-high heat. Add 1-2 tablespoons of neutral oil. You want the pan to be nice and hot – almost smoking – to get a good sear.
  3. Carefully add the marinated steak strips to the hot pan in a single layer. Do not overcrowd the pan! This is vital for achieving a beautiful sear and preventing the steak from steaming instead of browning. You’ll likely need to cook the steak in two or three batches.
  4. Cook the steak for 2-3 minutes per side, or until it’s nicely caramelized and cooked to your desired doneness. Since these are thin strips, they cook very quickly. I love a medium-rare to medium for flank or skirt steak to keep it tender.
  5. Once each batch is cooked, transfer the steak to a clean plate and loosely tent it with foil. Allow the steak to rest for at least 5 minutes before serving. Resting the meat allows the juices to redistribute, ensuring every bite is succulent and flavorful.

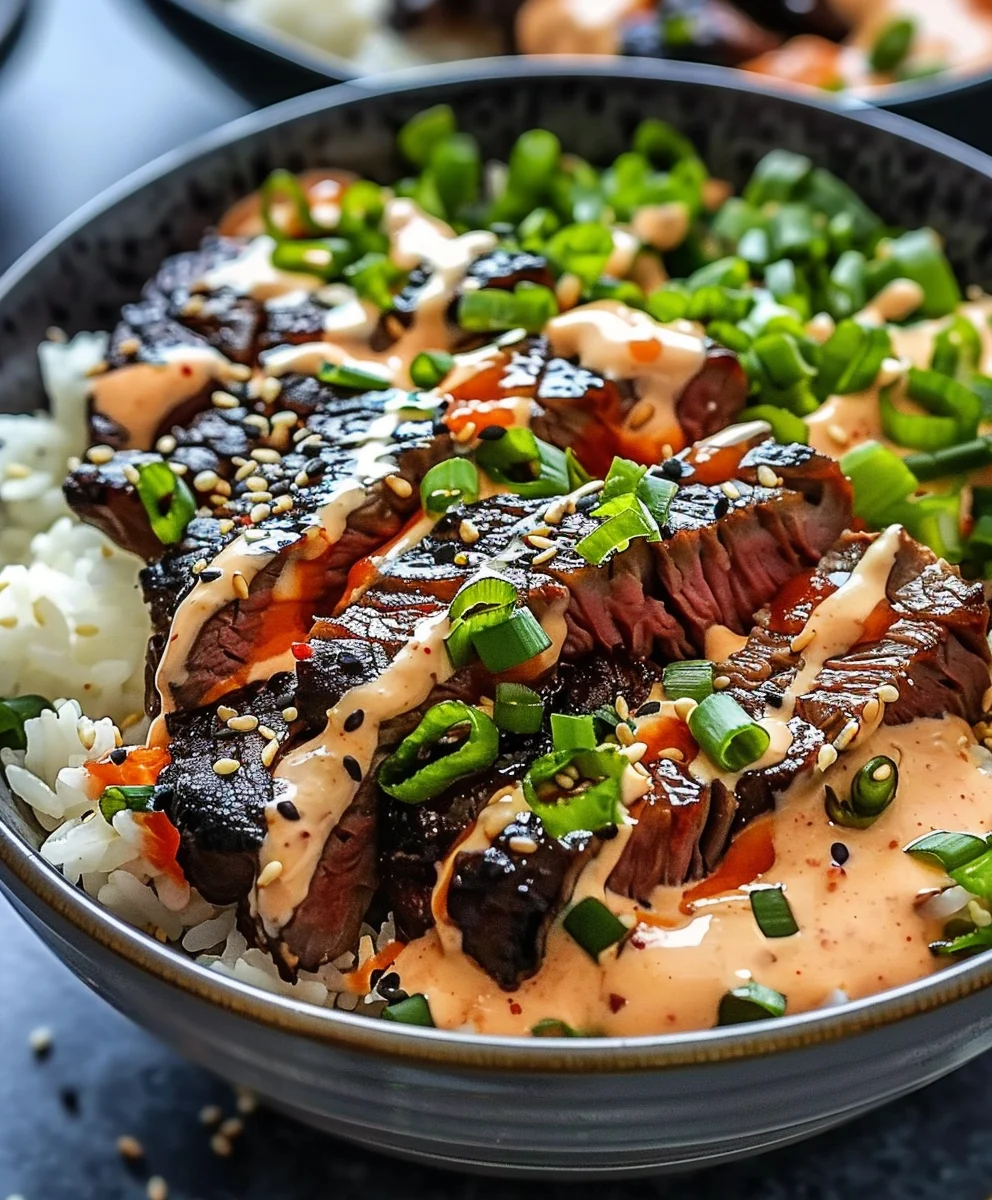
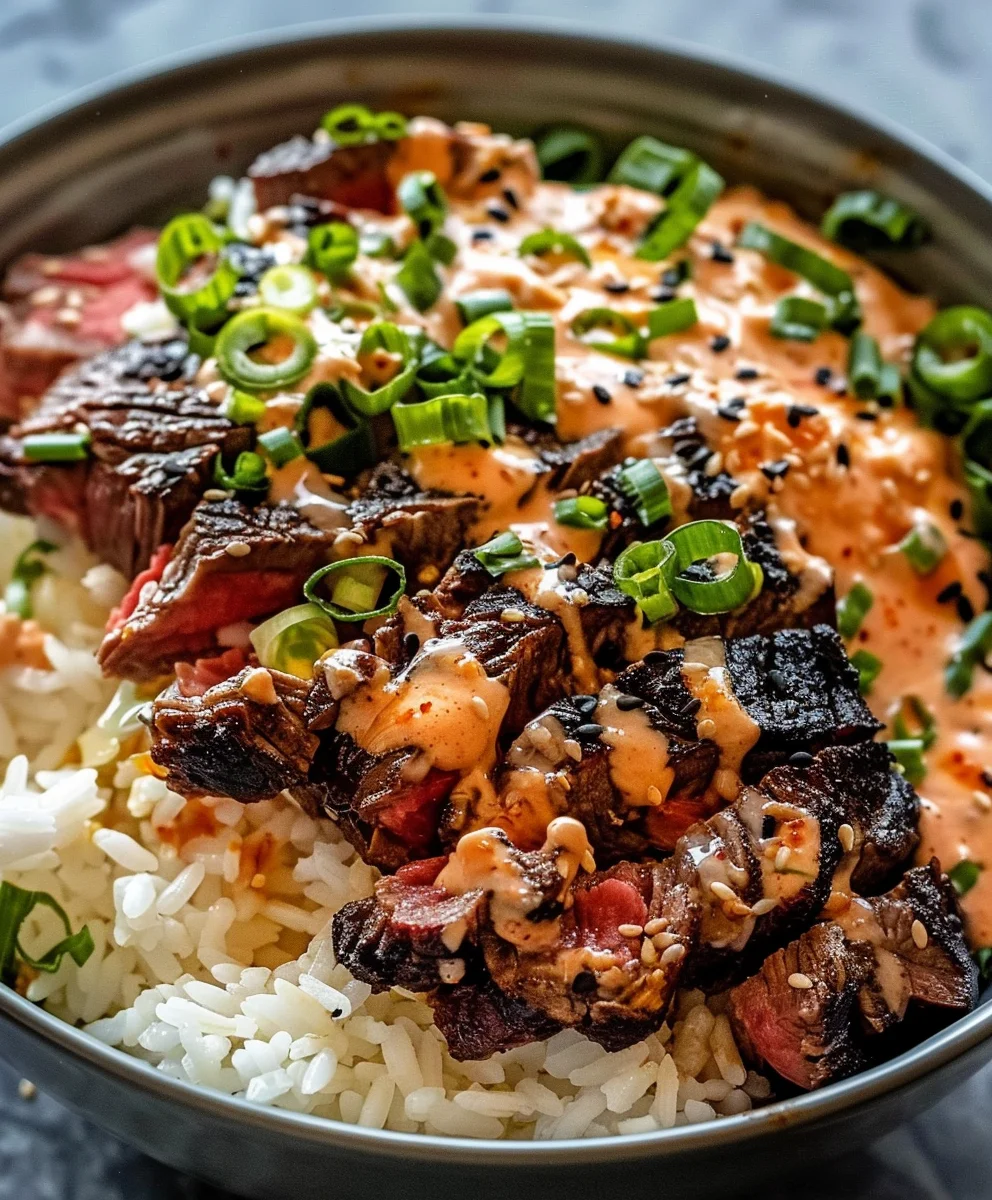
Assembling Your Korean BBQ Steak Rice Bowls With Spicy Cream Sauce

  1. Now for the grand finale – assembling your magnificent “Korean Bbq Steak Rice Bowls With Spicy Cream Sauce”! Grab your favorite serving bowls.
  2. Start by scooping a generous portion of the warm, fluffy rice into the bottom of each bowl. This is the comforting canvas for our flavors.
  3. Next, arrange a hearty serving of the perfectly cooked Korean BBQ steak over one side of the rice.
  4. Artfully arrange your prepared fresh toppings around the steak and rice. Place a vibrant cluster of cucumber, a pile of julienned carrots, a scattering of radishes, and if using, a scoop of tangy kimchi. We are building layers of texture and color here!
  5. Take your chilled spicy cream sauce and generously drizzle it over the steak and toppings. Don’t be shy – this sauce ties everything together beautifully. You can also serve extra sauce on the side for those who like to drench their bowls (like me!).
  6. Finally, garnish each bowl with a sprinkle of freshly sliced green onions and a generous dusting of toasted sesame seeds. If you’re adding a fried egg, now’s the time to gently place it atop the steak or rice, letting that rich yolk cascade over everything as you break it.
  7. Serve immediately and prepare for a burst of flavors! These Korean Bbq Steak Rice Bowls With Spicy Cream Sauce are a symphony of savory, sweet, spicy, and fresh, making for an incredibly satisfying and wholesome meal. Get ready to dig in and enjoy every delicious bite!

Delicious Korean BBQ Steak Rice Bowls with Spicy Cream Sauce

Conclusion:

Well, my friends, we’ve reached the exciting culmination of our culinary journey, and I genuinely hope you’re feeling as inspired and hungry as I am right now! What we’ve crafted here isn’t just another meal; it’s a vibrant, exhilarating experience that truly awakens the senses. I cannot stress enough why this particular recipe is an absolute game-changer, a must-try for anyone who appreciates bold flavors and satisfying textures. It perfectly balances the savory, slightly sweet char of beautifully cooked steak with the zesty, creamy, and undeniably spicy kick of its signature sauce. Add to that the freshness of crisp vegetables and the comforting base of fluffy rice, and you have a symphony of tastes that dances on your palate. It’s truly a dish that feels gourmet yet is surprisingly approachable for the home cook, making it an ideal choice for both a quick weeknight dinner or an impressive spread for entertaining guests. The initial thought of combining so many distinct elements might seem complex, but I promise you, each step is designed for maximum flavor impact with minimum fuss, leaving you with a dish that tastes like it took hours of intricate preparation.

Beyond its incredible taste, what makes this recipe stand out is its fantastic versatility. While it’s utterly delicious as presented, there are so many ways you can make it your own. For serving suggestions, think about adding a sprinkle of toasted sesame seeds or a generous handful of fresh cilantro right before serving to elevate the aromatics. A fried egg, with its runny yolk, makes for an unbelievably decadent topping, mixing beautifully with the spicy cream sauce to create an even richer, more luscious coating for your rice and steak. If you’re looking to amp up the greens, a side of blanched or stir-fried broccolini or spinach would be a wonderful complement. You could also serve this alongside some tangy kimchi for an extra fermented kick that beautifully cuts through the richness of the steak and sauce, enhancing the overall Korean-inspired experience.

Now, for variations, this recipe is incredibly forgiving and open to your creative touch. Don’t feel limited to steak; feel free to experiment with thinly sliced chicken breast or thighs, tender pork tenderloin, or even a robust plant-based protein like pan-fried tofu or tempeh, marinating them in a similar fashion to ensure they soak up all those fantastic flavors. You can easily adjust the heat level of the spicy cream sauce to your preference – add more gochujang or a pinch of gochugaru (Korean chili flakes) for an extra fiery punch, or dial it back with less sriracha and more mayonnaise for a milder, creamier version. Experiment with different vegetables too! Instead of the suggested carrots and cucumbers, consider adding some crunchy bell peppers, thinly sliced radishes, or even some edamame for a pop of color and texture. For those who prefer a different grain, this dish would be equally delightful served over brown rice, quinoa, or even nestled into fresh lettuce cups for a lighter, wrap-style meal. The beauty of this dish truly lies in its adaptability and how it invites you to play with flavors and ingredients.

Why You Absolutely Must Try This Recipe

What we’ve created here is more than just a meal; it’s an invitation to a genuinely delightful culinary experience. The Korean Bbq Steak Rice Bowls With Spicy Cream Sauce represents a perfect harmony of flavors – the smoky, savory depth of the steak, the vibrant, creamy heat of the sauce, and the refreshing crunch of fresh vegetables. It’s a dish that manages to be both excitingly exotic and incredibly comforting at the same time. Every bite is an explosion of texture and taste, guaranteed to leave you feeling utterly satisfied and craving more. This isn’t just about feeding your body; it’s about nourishing your soul with fantastic food and creating wonderful memories around your kitchen table. I genuinely believe that once you try this recipe, it will quickly become a cherished favorite in your cooking repertoire, a dish you’ll return to again and again because of its undeniable deliciousness and the sheer joy it brings.

Share Your Culinary Adventure!

So, please, don’t just read about it – go into your kitchen, gather your ingredients, and give this incredible recipe a try! I’m genuinely excited for you to experience the magic of these flavors firsthand. Once you’ve made your own batch, I would absolutely love to hear about your experience. Did you stick to the recipe, or did you put your own spin on it? What were your favorite parts? Did you try any of the serving suggestions or variations? Share your thoughts, your successes, and even your “aha!” moments. Tag me on social media or leave a comment below with your pictures and stories. There’s nothing I love more than seeing how you bring these recipes to life in your own homes. Happy cooking, and I can’t wait to hear all about your delicious adventure!


Delicious Korean BBQ Steak Rice Bowls with Spicy Cream Sauce

Delicious Korean BBQ Steak Rice Bowls with Spicy Cream Sauce

Transform your kitchen into a vibrant Korean eatery with these delicious Korean BBQ Steak Rice Bowls. Featuring succulent, perfectly marinated beef, cooked to tender perfection, served atop fluffy rice and crowned with a spicy sauce that will awaken your taste buds.

Prep Time
15 Minutes
Cook Time
10 Minutes
Total Time
55 Minutes
Servings
2 servings

Ingredients

  • 1 lb beef steak (flank, skirt, or New York strip), cut into 1-inch cubes
  • 1 tbsp soy sauce
  • 1 tbsp gochujang (Korean chili paste)
  • 1 tbsp honey
  • 1 tsp sesame oil
  • 1 tsp garlic powder
  • ½ tsp onion powder
  • ¼ tsp salt
  • ⅛ tsp black pepper
  • 1 cup cooked rice (white, brown, or jasmine)

Instructions

  1. Step 1
    In a medium bowl, combine 1 tbsp soy sauce, 1 tbsp gochujang, 1 tbsp honey, 1 tsp sesame oil, 1 tsp garlic powder, ½ tsp onion powder, ¼ tsp salt, and ⅛ tsp black pepper. Add the 1 lb beef steak cubes, ensuring all pieces are thoroughly coated. Marinate in the refrigerator for at least 30 minutes (for best flavor, marinate up to 4 hours).
  2. Step 2
    Heat a large skillet over medium-high heat. Add the marinated beef cubes to the hot pan. Cook for 5-7 minutes, stirring occasionally, until the beef is browned and cooked through to your desired doneness. Cook in batches if necessary to avoid overcrowding the pan.
  3. Step 3
    Scoop the 1 cup cooked rice into two serving bowls. Top generously with the hot Korean BBQ steak. Drizzle any remaining pan juices and sauce over the steak and rice. Serve immediately for a delicious meal.

Important Information

Nutrition Facts (Per Serving)

It is important to consider this information as approximate and not to use it as definitive health advice.

Allergy Information

Please check ingredients for potential allergens and consult a health professional if in doubt.

« Previous Post
Delightful Pumpkin Fluff: Easy, Creamy, No-Bake Treat!
Next Post »
Cowboy Butter Steak Sliders: Easy & Flavorful Beef Bites!

If you enjoyed this…

Best Rotisserie Chicken Mushroom Soup for Quick Meals

Spicy Korean Ramen with Grilled Beef & Creamy Sauce

Chicken Rice Bowl

Chicken Rice Bowl – A Flavorful, Easy, and Satisfying Meal!

Primary Sidebar

Browse by Diet

BreakfastDinnerLunchDessertAppetizer

Sweet Peach Yogurt Parfait Delight

One of my fondest memories is from a lazy summer afternoon spent at my grandmother’s house. The sun filtered through the kitchen window, casting a warm glow over the table where she would create her culinary magic. It was during one of those blissful moments that I first tasted her Peach Yogurt Parfait with Honey and Granola. The sweet aroma of ripe peaches mingling with creamy yogurt and the crunch of granola was nothing short of heavenly. It felt like summer captured in a bowl, and I still remember the joy of diving in with a spoon, each layer revealing a new burst of flavor.

When I think about that parfait, I can almost hear the gentle hum of the bees outside, reminding me of the floral notes that honey brings to every bite. The vibrant yellows and soft oranges of the peaches contrast beautifully with the creamy white yogurt and the golden crunch of granola. It’s a dish that not only looks delightful but also tastes like a celebration of fresh, wholesome ingredients.

What makes my version of this Peach Yogurt Parfait special is the careful balance of flavors and textures. I use ripe, juicy peaches, drizzled with locally sourced honey, and a homemade granola that’s bursting with nuts and seeds for an extra crunch. It’s a simple dish, but every layer is crafted with love and attention.

Let me show you exactly how to make this delightful parfait, so you can bring a bit of that summer magic into your kitchen!

Sweet Peach Yogurt Parfait Delight

Why You’ll Love This Recipe

  • Delightfully creamy texture from the Greek yogurt, paired with the juicy sweetness of fresh peaches.
  • Ready in under 20 minutes, making it a quick and satisfying breakfast or snack option.
  • Budget-friendly, using common ingredients that you may already have in your pantry.
  • Customizable with your favorite granola and nuts, allowing you to tailor each parfait to your taste.
  • Perfectly balanced flavors with the bright acidity of lemon juice and the sweetness of honey enhancing the peaches.

Ingredients

  • For the Parfait:
  • 2 cups plain Greek yogurt (or vanilla yogurt for a sweeter option)
  • 2 large ripe peaches, diced (about 2 cups)
  • 1 tablespoon fresh lemon juice (to prevent browning of peaches)
  • 2 tablespoons honey (plus more for drizzling)
  • 1 teaspoon vanilla extract (optional for extra flavor)
  • For the Granola:
  • 1 cup granola (store-bought or homemade; see notes for a simple granola recipe)
  • 1/4 cup sliced almonds (optional for added crunch)
  • 1/4 cup shredded coconut (optional for added flavor)

Let’s dive into some key ingredients that make this Peach Yogurt Parfait so delightful! First, the Greek yogurt is not only creamy but also packed with protein, making it a satisfying option for breakfast or a snack. If you’re looking for a sweeter option, you can easily substitute it with vanilla yogurt, though it may alter the overall flavor balance. Next, the ripe peaches are the star of the show; their natural sweetness shines through, so I recommend choosing peaches that yield slightly to pressure, indicating they’re perfectly ripe. If peaches aren’t in season, feel free to use nectarines or even frozen peaches—just thaw them before use. Finally, honey adds a lovely floral sweetness that ties everything together. If you prefer, maple syrup can serve as a delicious substitute.

Step-by-Step Instructions

  1. Start by preparing the peaches. Wash them thoroughly, then slice and dice them into bite-sized pieces. In a medium bowl, toss the diced peaches with 1 tablespoon of fresh lemon juice to prevent browning. Set aside for about 5 minutes while the lemon juice works its magic.
  2. In a separate bowl, combine the Greek yogurt, 2 tablespoons of honey, and 1 teaspoon of vanilla extract if using. Stir the mixture until smooth and thoroughly blended. This should take about a minute. Avoid overmixing to maintain the creaminess of the yogurt.
  3. Now it’s time to layer your parfait. Grab a clear glass or bowl to showcase your beautiful creation. Start with a generous spoonful of the yogurt mixture at the bottom—about 1/4 cup will do. Use a spoon to spread it evenly.
  4. Add a layer of the diced peaches over the yogurt, ensuring they cover the yogurt completely. You might want to use about half of what you have prepared—roughly 1 cup. This layer should be visually appealing, so arrange the peaches neatly.
  5. Sprinkle 1/4 cup of granola over the peaches. This adds a delightful crunch. Make sure to distribute it evenly to ensure every bite has that satisfying texture. Avoid packing it down too tightly, as you want it to maintain its crunch.
  6. Repeat the layers: spoon in another 1/4 cup of yogurt, followed by another cup of peaches, and another sprinkle of granola. You should have at least two layers, but feel free to add more depending on your glass size.
  7. Finish off your parfait with a drizzle of honey on top for added sweetness and a touch of elegance. If you’re using sliced almonds or shredded coconut, sprinkle them on top now. It adds a lovely visual contrast and extra flavor.
  8. Serve immediately or refrigerate for up to 30 minutes before serving to allow the flavors to meld together. However, I recommend enjoying it fresh to maintain the granola’s crunch.

Pro Tips for the Best Peach Yogurt Parfait With Honey And Granola

  • Make sure to choose ripe peaches for the best flavor and texture. A common mistake is using unripe fruit, which can lead to a less enjoyable parfait. Look for peaches that are fragrant and slightly soft to the touch.
  • Use a clear glass to assemble your parfait; this not only makes for a beautiful presentation but also allows you to see the colorful layers, which adds to the enjoyment of eating it.
  • For an even creamier texture, consider whipping the Greek yogurt with a hand mixer for a couple of minutes before layering. This small adjustment makes a huge difference in mouthfeel.
  • Be mindful of the granola-to-yogurt ratio. Too much granola can overwhelm the parfait, while too little can make it feel too creamy. Aim for about 1/4 cup of granola per layer for the perfect balance.
  • If you’re making this for a gathering, consider preparing the yogurt and peaches ahead of time and layering them just before serving. This ensures the granola stays crunchy!

Variations & Serving Ideas

There are so many ways to get creative with your Peach Yogurt Parfait! For a tropical twist, swap out the peaches for mangoes or pineapples and top with coconut flakes. If you prefer a berry flavor, mix in some blueberries or strawberries with the peaches for added color and taste. For a nutty version, incorporate chopped walnuts or pecans instead of almonds.

As for serving ideas, this parfait pairs beautifully with a side of scrambled eggs for a hearty breakfast or fresh fruit salad for a light lunch. You might also enjoy it alongside whole grain toast with almond butter for an energizing snack. The contrast of flavors and textures will elevate your meal experience!

Storage, Make-Ahead & Reheating

The Peach Yogurt Parfait is best enjoyed fresh, but you can prepare some components ahead of time. Store the layered parfait in an airtight container in the refrigerator for up to 24 hours. However, be cautious; the granola may lose its crunch if stored too long. You can freeze the yogurt and peach mixture for up to 2 months; just remember to thaw it in the refrigerator overnight before serving.

If you plan to enjoy this dish the next day, it can taste even better as the flavors meld together. Just remember to add the granola right before serving to keep its delightful crunch!

Frequently Asked Questions

Can I make Peach Yogurt Parfait With Honey And Granola ahead of time?

Yes — in fact, it tastes even better the next day as the flavors meld. However, I recommend waiting to add the granola until just before serving to maintain its crunch.

What can I substitute for Greek yogurt?

If you prefer a lighter option, you can substitute Greek yogurt with regular yogurt or a dairy-free alternative like coconut yogurt. Just remember that this may alter the creaminess and flavor profile slightly.

Can I use frozen peaches for this parfait?

Absolutely! Just make sure to thaw the frozen peaches before using them. They will still add great flavor, though the texture may be slightly softer than fresh peaches.

How do I make the parfait vegan?

To make a vegan version, substitute the Greek yogurt with a plant-based yogurt alternative, and replace honey with maple syrup or agave nectar. This keeps the parfait sweet while adhering to a vegan diet.

What other fruits can I use in this recipe?

You can mix and match fruits based on your preference. Try using strawberries, blueberries, raspberries, or even bananas. Just make sure to adjust the lemon juice as needed to prevent browning.

Sweet Peach Yogurt Parfait Delight

Final Thoughts

The Peach Yogurt Parfait with Honey and Granola is a delightful blend of creamy yogurt, sweet peaches, and crunchy granola that creates a satisfying and nourishing treat. Each layer bursts with flavor, making it a perfect choice for breakfast or a light dessert.

This is the kind of recipe I come back to again and again, especially when I want something refreshing and wholesome to start my day. The harmony of sweet and tart flavors, combined with the delightful crunch, never fails to lift my spirits!

I encourage you to give this parfait a try and indulge in its comforting goodness. Feel free to share your results or even add your own twist—perhaps a sprinkle of cinnamon or a handful of nuts. Enjoy creating your perfect parfait!

Print
clock clock iconcutlery cutlery iconflag flag iconfolder folder iconinstagram instagram iconpinterest pinterest iconfacebook facebook iconprint print iconsquares squares iconheart heart iconheart solid heart solid icon

Peach Yogurt Parfait


  • Author: Lily author
  • Total Time: 15 minutes
  • Yield: 4 servings 1x
Pin Recipe
Print Recipe

Description

This Peach Yogurt Parfait combines creamy Greek yogurt, juicy peaches, and crunchy granola for a delightful treat. It’s a perfect breakfast or snack that captures the essence of summer in every bite.


Ingredients

Scale
  • For the Parfait:
  • 2 cups plain Greek yogurt (or vanilla yogurt for a sweeter option)
  • 2 large ripe peaches, diced (about 2 cups)
  • 1 tablespoon fresh lemon juice (to prevent browning of peaches)
  • 2 tablespoons honey (plus more for drizzling)
  • 1 teaspoon vanilla extract (optional for extra flavor)
  • For the Granola:
  • 1 cup granola (store-bought or homemade; see notes for a simple granola recipe)
  • 1/4 cup sliced almonds (optional for added crunch)
  • 1/4 cup shredded coconut (optional for added flavor)

Instructions

  1. Start by preparing the peaches. Wash them thoroughly, then slice and dice them into bite-sized pieces. In a medium bowl, toss the diced peaches with 1 tablespoon of fresh lemon juice to prevent browning. Set aside for about 5 minutes while the lemon juice works its magic.
  2. In a separate bowl, combine the Greek yogurt, 2 tablespoons of honey, and 1 teaspoon of vanilla extract if using. Stir the mixture until smooth and thoroughly blended. This should take about a minute. Avoid overmixing to maintain the creaminess of the yogurt.
  3. Now it’s time to layer your parfait. Grab a clear glass or bowl to showcase your beautiful creation. Start with a generous spoonful of the yogurt mixture at the bottom—about 1/4 cup will do. Use a spoon to spread it evenly.
  4. Add a layer of the diced peaches over the yogurt, ensuring they cover the yogurt completely. You might want to use about half of what you have prepared—roughly 1 cup. This layer should be visually appealing, so arrange the peaches neatly.
  5. Sprinkle 1/4 cup of granola over the peaches. This adds a delightful crunch. Make sure to distribute it evenly to ensure every bite has that satisfying texture. Avoid packing it down too tightly, as you want it to maintain its crunch.
  6. Repeat the layers: spoon in another 1/4 cup of yogurt, followed by another cup of peaches, and another sprinkle of granola. You should have at least two layers, but feel free to add more depending on your glass size.
  7. Finish off your parfait with a drizzle of honey on top for added sweetness and a touch of elegance. If you’re using sliced almonds or shredded coconut, sprinkle them on top now. It adds a lovely visual contrast and extra flavor.
  8. Serve immediately or refrigerate for up to 30 minutes before serving to allow the flavors to meld together. However, I recommend enjoying it fresh to maintain the granola’s crunch.
  • Prep Time: 15 mins
  • Cook Time: 0 mins
  • Category: Breakfast
  • Method: No-cook
  • Cuisine: American

Nutrition

  • Serving Size: 1 parfait
  • Calories: 250
  • Sugar: 20 g
  • Sodium: 50 mg
  • Fat: 5 g
  • Saturated Fat: 2 g
  • Unsaturated Fat: 3 g
  • Trans Fat: 0 g
  • Carbohydrates: 40 g
  • Fiber: 3 g
  • Protein: 10 g
  • Cholesterol: 10 mg

Keywords: Choose ripe peaches for the best flavor and texture. Use a clear glass for a beautiful presentation. For creaminess, consider whipping the yogurt before layering. Be mindful of the granola-to-yogurt ratio. Prepare yogurt and peaches ahead of time for gatherings, layering just before serving.

Did you make this recipe?

Share a photo and tag us — we can't wait to see what you've made!

Sun-Kissed Frozen Orange Cream Slush

As a child, summer days felt like they lasted forever. I remember the sticky heat wrapping around me as I played outside, my laughter mingling with the sounds of the neighborhood. But nothing could cool me down quite like the moment I’d spot my grandmother, laboring over her blender, whipping up her famous Frozen Orange Creamsicle Slush. That vibrant orange treat, with its frosty texture and sweet citrus aroma, was like a burst of sunshine in a cup. Just one sip, and I could feel the coolness wash over me, sparking pure joy.

This Frozen Orange Creamsicle Slush has a way of making you feel like a kid again. Its creamy, dreamy consistency is a delightful balance of bright orange and soft vanilla, inviting you to dive right in. The refreshing tang of orange dances on your tongue, while the smooth creaminess envelops you in a comforting embrace. It’s a nostalgic treat that’s perfect for hot summer afternoons or anytime you need a little pick-me-up.

What makes my version of this slush stand out is the addition of a hint of vanilla bean, which elevates the flavor and adds an extra layer of richness. Plus, it’s super easy to whip up with just a few simple ingredients that you probably already have on hand! So, if you’re ready to relive those sun-soaked memories, let me show you exactly how to make it.

Sun-Kissed Frozen Orange Cream Slush

Why You’ll Love This Recipe

  • Each slush is a perfect blend of creamy vanilla and zesty orange, creating a nostalgic flavor reminiscent of summer days.
  • This refreshing treat is ready in under 15 minutes, making it an ideal quick dessert for unexpected guests or hot afternoons.
  • With just 8 simple ingredients, it’s budget-friendly, ensuring you don’t have to break the bank to enjoy a delicious slush.
  • The slush has a perfectly smooth texture, thanks to the combination of ice and ice cream, providing a delightful contrast to the bright citrus flavors.
  • It’s highly customizable; you can easily adjust the sweetness and add fresh herbs for a unique twist that suits your taste.

Ingredients

  • 2 cups orange juice (freshly squeezed or store-bought)
  • 1 cup vanilla ice cream
  • 1 cup crushed ice
  • 1/2 cup milk (whole or 2%)
  • 1/4 cup granulated sugar (adjust based on sweetness preference)
  • 1 teaspoon vanilla extract
  • Zest of 1 orange (for added flavor)
  • Fresh orange slices and mint leaves (for garnish)

The star of this Frozen Orange Creamsicle Slush is the orange juice, which provides the vibrant, citrusy base. Freshly squeezed juice will yield the brightest flavor, but store-bought options can be just as convenient. If you’re opting for store-bought, choose 100% pure juice with no added sugars for the best results. Another essential ingredient is the vanilla ice cream; it adds creaminess and sweetness. You can substitute it with dairy-free ice cream if you’re looking for a vegan option. Whole or 2% milk complements the ice cream, creating a smooth blend. If you want a lower-calorie version, almond or oat milk can be good alternatives.

Lastly, the granulated sugar can be adjusted based on your sweetness preference. If you prefer a more natural sweetener, consider using honey or agave syrup. The orange zest enhances the flavor profile, providing an aromatic pop that brings the whole slush together. Don’t skip it! It adds an extra layer of brightness that makes this slush truly special.

Step-by-Step Instructions

  1. Start by preparing your ingredients. Gather 2 cups of orange juice, 1 cup of vanilla ice cream, and 1 cup of crushed ice. Make sure the ice is finely crushed, as larger chunks can make blending difficult.
  2. In a blender, combine the orange juice, vanilla ice cream, crushed ice, and 1/2 cup of milk. Add 1/4 cup of granulated sugar and 1 teaspoon of vanilla extract. If you like a sweeter slush, consider adding a bit more sugar at this stage.
  3. Add the zest of 1 orange to the blender. This step is crucial for enhancing the citrus flavor of your slush. Make sure not to include the bitter white pith—only the flavorful zest.
  4. Blend the mixture on medium-high speed for about 30-45 seconds. Stop once the ingredients are fully combined and the slush has a smooth, even consistency. If you notice large chunks of ice, blend for an additional 10-15 seconds. Avoid over-blending, as this can make the slush too liquidy.
  5. Once blended, taste the slush. If it needs more sweetness, add a little more sugar and blend for a few more seconds. If it’s too thick, you can add a splash of milk to reach your desired consistency.
  6. Pour the slush into glasses. This recipe typically serves 4, but you can easily double it for larger gatherings. Use a spoon to help guide the slush into the glasses if needed.
  7. Garnish each serving with fresh orange slices and mint leaves. The mint not only adds a pop of color but also a refreshing aroma that complements the citrus flavors beautifully.
  8. Serve immediately and enjoy! If you’ve made extra, you can refrigerate it for a short time, but it’s best enjoyed fresh.

Pro Tips for the Best Frozen Orange Creamsicle Slush

  • Don’t skip the orange zest! It’s a game-changer for flavor. Always zest before juicing to make it easier.
  • Use a high-powered blender for the best texture. A standard blender may struggle with ice, leading to uneven consistency. If you have a food processor, that can work too, but ensure the ice is finely crushed.
  • Adjust the ice-to-liquid ratio carefully. If your slush is too thick, it won’t blend well. Start with less ice and add more until you reach your preferred texture.
  • Be cautious with the sugar! Always start with the lower amount, as you can easily add more, but it’s hard to fix an overly sweet slush.
  • For a fun twist, consider adding a splash of coconut milk or a handful of fresh fruit like strawberries or pineapple. This not only enhances the flavor but also adds a beautiful color contrast.

Variations & Serving Ideas

There are countless ways to put a spin on your Frozen Orange Creamsicle Slush. Consider making a tropical version by adding in some pineapple juice or coconut milk for a delightful tropical twist. If you’re feeling adventurous, try incorporating a handful of frozen mango or peach slices for added sweetness. For a lighter version, swap out the vanilla ice cream for Greek yogurt for a creamy yet tangy alternative.

As for serving ideas, this refreshing slush pairs wonderfully with light summer dishes like grilled chicken skewers, fish tacos, or a simple salad topped with citrus vinaigrette. The bright, zesty flavors of the slush complement these dishes perfectly, making them an ideal pairing for a sunny day.

Storage, Make-Ahead & Reheating

This Frozen Orange Creamsicle Slush is best enjoyed fresh, but if you have leftovers, you can store them in an airtight container in the fridge for up to 2 days. Just keep in mind that the slush may lose some of its texture over time as the ice melts. It doesn’t freeze well, as the ice will turn into a solid block. If you must freeze it, blend again after thawing to restore the slushy consistency. This treat is best the day you make it, as the flavors meld together beautifully overnight, enhancing its deliciousness.

Frequently Asked Questions

Can I make Frozen Orange Creamsicle Slush ahead of time?

Yes — in fact, it tastes even better the next day as the flavors meld. However, it’s best to enjoy it fresh, as the texture can change if stored for too long. If you need to prepare it ahead, keep it in the fridge and re-blend before serving.

What kind of orange juice should I use?

For the best flavor, use freshly squeezed orange juice. However, if you’re short on time, opt for 100% pure store-bought juice without added sugars. This will ensure that your slush remains flavorful and refreshing.

Can I substitute the vanilla ice cream?

Absolutely! If you’re looking for a dairy-free option, coconut milk ice cream or a non-dairy vanilla ice cream can work wonderfully. They will still provide the creamy texture and sweetness you desire.

How can I adjust the sweetness of my slush?

You can easily adjust the sweetness by modifying the amount of sugar added. Start with 1/4 cup and taste the mixture before blending. If you prefer it sweeter, add more sugar gradually until it reaches your desired level.

What should I do if my slush is too thick?

If your slush is too thick, simply add a splash of milk or orange juice and blend again. This will help achieve a more drinkable consistency while maintaining the slushy texture. Adjust gradually to reach your preferred thickness.

Sun-Kissed Frozen Orange Cream Slush

Final Thoughts

The Frozen Orange Creamsicle Slush is a delightful blend of refreshing citrus and creamy goodness, making it a perfect treat for warm days or any time you crave a taste of nostalgia. The way the bright orange flavor dances with the creamy texture truly elevates this slush, transforming it into a satisfying escape from the everyday.

This is the kind of recipe I come back to again and again, especially when I’m looking to cool down or impress guests at a summer gathering. It’s simple to make and always brings smiles all around! I encourage you to try this recipe for yourself—don’t hesitate to share your results or even put your own spin on it. Happy slushing!

Print
clock clock iconcutlery cutlery iconflag flag iconfolder folder iconinstagram instagram iconpinterest pinterest iconfacebook facebook iconprint print iconsquares squares iconheart heart iconheart solid heart solid icon

Frozen Orange Creamsicle Slush


  • Author: Lily author
  • Total Time: 15 minutes
  • Yield: 4 servings 1x
Pin Recipe
Print Recipe

Description

This Frozen Orange Creamsicle Slush is a refreshing treat that combines creamy vanilla and zesty orange flavors. Perfect for hot summer days, it brings back nostalgic memories with every sip.


Ingredients

Scale
  • 2 cups orange juice (freshly squeezed or store-bought)
  • 1 cup vanilla ice cream
  • 1 cup crushed ice
  • 1/2 cup milk (whole or 2%)
  • 1/4 cup granulated sugar (adjust based on sweetness preference)
  • 1 teaspoon vanilla extract
  • Zest of 1 orange (for added flavor)
  • Fresh orange slices and mint leaves (for garnish)

Instructions

  1. Start by preparing your ingredients. Gather 2 cups of orange juice, 1 cup of vanilla ice cream, and 1 cup of crushed ice. Make sure the ice is finely crushed, as larger chunks can make blending difficult.
  2. In a blender, combine the orange juice, vanilla ice cream, crushed ice, and 1/2 cup of milk. Add 1/4 cup of granulated sugar and 1 teaspoon of vanilla extract. If you like a sweeter slush, consider adding a bit more sugar at this stage.
  3. Add the zest of 1 orange to the blender. This step is crucial for enhancing the citrus flavor of your slush. Make sure not to include the bitter white pith—only the flavorful zest.
  4. Blend the mixture on medium-high speed for about 30-45 seconds. Stop once the ingredients are fully combined and the slush has a smooth, even consistency. If you notice large chunks of ice, blend for an additional 10-15 seconds. Avoid over-blending, as this can make the slush too liquidy.
  5. Once blended, taste the slush. If it needs more sweetness, add a little more sugar and blend for a few more seconds. If it’s too thick, you can add a splash of milk to reach your desired consistency.
  6. Pour the slush into glasses. This recipe typically serves 4, but you can easily double it for larger gatherings. Use a spoon to help guide the slush into the glasses if needed.
  7. Garnish each serving with fresh orange slices and mint leaves. The mint not only adds a pop of color but also a refreshing aroma that complements the citrus flavors beautifully.
  8. Serve immediately and enjoy! If you’ve made extra, you can refrigerate it for a short time, but it's best enjoyed fresh.
  • Prep Time: 15 min
  • Cook Time: 0 min
  • Category: Dessert
  • Method: Blending
  • Cuisine: American

Nutrition

  • Serving Size: 1 serving
  • Calories: 200
  • Sugar: 30 g
  • Sodium: 50 mg
  • Fat: 5 g
  • Saturated Fat: 3 g
  • Unsaturated Fat: 2 g
  • Trans Fat: 0 g
  • Carbohydrates: 40 g
  • Fiber: 1 g
  • Protein: 2 g
  • Cholesterol: 20 mg

Keywords: Don't skip the orange zest! It's a game-changer for flavor. Always zest before juicing to make it easier.

Did you make this recipe?

Share a photo and tag us — we can't wait to see what you've made!

Zesty Lemon Poppy Seed Delight

One rainy afternoon, I found myself in my grandmother’s cozy kitchen, the kind that always smelled like warmth and love. She was whipping up her famous Lemon Poppy Seed Loaf, a recipe that had been passed down through generations. As the batter came together, the zesty aroma of fresh lemons filled the air, mingling perfectly with the nutty fragrance of poppy seeds. I can still picture her, apron-clad, as she expertly drizzled a vibrant citrus icing over the loaf, creating a glossy, sun-kissed finish that beckoned us to dive in. It was a moment that sparked my own passion for baking, and this recipe has become a cherished staple in my home ever since.

When you take a bite of this Lemon Poppy Seed Loaf, it’s like a burst of sunshine on your palate. The loaf is beautifully golden, with a tender crumb that melts in your mouth. Each slice is speckled with tiny poppy seeds, adding a delightful crunch that contrasts beautifully with the tangy sweetness of the lemon. And that citrus icing? It’s the finishing touch that elevates this loaf from ordinary to extraordinary, with its bright, zesty flavor dancing on your taste buds.

This recipe stands out because it embraces simplicity while delivering on flavor. I’ve added a hint of vanilla to the batter, enhancing the overall taste and making it even more indulgent. Trust me, once you make this Lemon Poppy Seed Loaf With Citrus Icing, it’ll become a go-to in your baking repertoire.

So, let me show you exactly how to make it!

Zesty Lemon Poppy Seed Delight

Why You’ll Love This Recipe

  • Moist and tender crumb that melts in your mouth, thanks to the perfect balance of butter and buttermilk.
  • Bright, zesty lemon flavor paired with crunchy poppy seeds, creating a delightful texture and taste experience.
  • Easy to whip up in just about an hour, perfect for last-minute gatherings or a cozy afternoon treat.
  • Budget-friendly with everyday ingredients, making it an accessible option for all home bakers.
  • The citrus icing adds a sweet tang that elevates the loaf, turning a simple recipe into a showstopper!

Ingredients

  • 1 ½ cups (190g) all-purpose flour
  • 1 teaspoon baking powder
  • ½ teaspoon baking soda
  • ½ teaspoon salt
  • 3 tablespoons poppy seeds
  • ½ cup (115g) unsalted butter, softened to room temperature
  • 1 cup (200g) granulated sugar
  • 2 large eggs
  • 1 teaspoon vanilla extract
  • 1 teaspoon lemon zest (from about 1 medium lemon)
  • ½ cup (120ml) buttermilk
  • 2 tablespoons fresh lemon juice

For the Citrus Icing:

  • 1 cup (120g) powdered sugar
  • 2 tablespoons fresh lemon juice
  • 1 tablespoon orange juice
  • 1 teaspoon lemon zest (for garnish, optional)

Let’s dive into the key ingredients that make this Lemon Poppy Seed Loaf so special. The all-purpose flour provides the structure and base for the loaf, while the baking powder and baking soda ensure it rises perfectly, giving the loaf a light texture. For a gluten-free variation, you could substitute the flour with a gluten-free all-purpose blend. Poppy seeds not only add a delightful crunch but also contribute to the unique flavor profile that pairs well with the citrus notes.

Unsalted butter is crucial for achieving the buttery richness that makes this loaf so moist. If you’re looking for a dairy-free option, coconut oil or a vegan butter can be used instead. The buttermilk is another essential component, providing acidity that activates the baking soda for a fluffy texture. If you don’t have buttermilk on hand, you can easily make a substitute by mixing ½ cup of milk with 1 tablespoon of vinegar or lemon juice and letting it sit for about 5 minutes.

Step-by-Step Instructions

  1. Preheat your oven to 350°F (175°C). Grease a 9×5-inch loaf pan or line it with parchment paper for easy removal later.
  2. In a medium mixing bowl, whisk together 1 ½ cups of all-purpose flour, 1 teaspoon of baking powder, ½ teaspoon of baking soda, ½ teaspoon of salt, and 3 tablespoons of poppy seeds. This helps to evenly distribute the baking agents and ensures a uniform rise.
  3. In a large mixing bowl, cream together ½ cup of softened unsalted butter and 1 cup of granulated sugar using an electric mixer on medium speed for about 3-4 minutes, until the mixture is light and fluffy. Make sure to scrape down the sides of the bowl occasionally.
  4. Add 2 large eggs, 1 teaspoon of vanilla extract, and 1 teaspoon of lemon zest to the creamed butter and sugar, mixing until fully combined. You want a smooth consistency, so ensure there are no lumps of butter.
  5. In a small bowl, combine ½ cup of buttermilk and 2 tablespoons of fresh lemon juice. Alternately add the dry ingredients and buttermilk mixture to the butter mixture, starting and ending with the dry ingredients. Mix just until combined; do not overmix, as this can lead to a dense loaf.
  6. Pour the batter into the prepared loaf pan. Smooth the top with a spatula, ensuring it’s even. Bake in the preheated oven for 50-60 minutes, or until a toothpick inserted in the center comes out clean. The edges should be lightly golden brown, and the center should feel just set.
  7. Once baked, remove the loaf from the oven and allow it to cool in the pan for about 10 minutes. Then, transfer it to a wire rack to cool completely. Resist the urge to slice too soon, as it will be crumbly if it’s still warm.
  8. While the loaf is cooling, prepare the citrus icing. In a medium bowl, whisk together 1 cup of powdered sugar, 2 tablespoons of fresh lemon juice, and 1 tablespoon of orange juice until smooth. If the icing is too thick, you can add a little more juice to reach your desired consistency.
  9. Once the loaf is completely cool, drizzle the citrus icing over the top. If you like, sprinkle with an additional teaspoon of lemon zest for an extra pop of flavor and color.

Pro Tips for the Best Lemon Poppy Seed Loaf With Citrus Icing

  • Be careful not to overmix your batter; this is a common mistake that can lead to a dense loaf. Mix just until the dry ingredients are incorporated for a light and fluffy texture.
  • Use room temperature ingredients, especially the butter and eggs. This helps to create a smoother batter and ensures even baking. Take your eggs out of the fridge about 30 minutes before you start.
  • For a more pronounced lemon flavor, consider adding a little lemon extract in addition to the zest and juice. Just a half teaspoon can elevate the citrus notes significantly.
  • When measuring your flour, spoon it into the measuring cup and level it off with a knife instead of scooping directly from the bag. This prevents packing and ensures you don’t end up with a dry loaf.
  • Invest in a good quality loaf pan; it makes a difference in heat distribution, which ensures even baking. If your pan is dark-coated, reduce the oven temperature by 25°F to prevent over-browning.

Variations & Serving Ideas

For a delightful twist, consider adding blueberries or raspberries to the batter for a fruity burst of flavor. You can also experiment with different citrus fruits—try lime or grapefruit zest and juice for a refreshing change. For a healthier option, substitute half of the all-purpose flour with whole wheat flour for added fiber without compromising too much on texture.

This Lemon Poppy Seed Loaf pairs beautifully with a light salad, such as a mixed greens salad with a vinaigrette, or a cup of tea for a cozy afternoon treat. It also complements a creamy cheese platter, as the acidity of the loaf balances rich cheeses perfectly. Lastly, a scoop of vanilla ice cream on the side creates a delightful contrast of temperatures and flavors!

Storage, Make-Ahead & Reheating

This Lemon Poppy Seed Loaf can be stored at room temperature for up to 3 days if wrapped tightly in plastic wrap. If you want to keep it longer, it freezes well for up to 3 months. To freeze, wrap the loaf tightly in plastic wrap and then in aluminum foil to prevent freezer burn.

When you’re ready to enjoy it again, simply thaw it in the fridge overnight. Reheat individual slices in the microwave for 15-20 seconds or in a toaster oven until warmed through. Interestingly, many people find that this loaf tastes even better the next day, as the flavors have time to meld!

Frequently Asked Questions

Can I make Lemon Poppy Seed Loaf With Citrus Icing ahead of time?

Yes — in fact, it tastes even better the next day! You can make the loaf a day in advance, allowing the flavors to develop. Just be sure to store it in an airtight container to maintain its moisture.

Can I substitute the poppy seeds?

Absolutely! If you don’t have poppy seeds on hand or prefer an alternative, you can use sesame seeds for a similar crunch or omit them entirely for a smooth loaf.

What can I use instead of buttermilk?

If you don’t have buttermilk, you can easily create a substitute by mixing ½ cup of milk (dairy or plant-based) with 1 tablespoon of vinegar or lemon juice. Let it sit for 5 minutes before using in the recipe.

How can I make this recipe gluten-free?

To make a gluten-free version of this Lemon Poppy Seed Loaf, substitute the all-purpose flour with a gluten-free all-purpose flour blend. Just ensure that the blend contains a binding agent like xanthan gum for the best results.

What is the best way to store leftover loaf?

Leftover Lemon Poppy Seed Loaf should be stored in an airtight container at room temperature for up to 3 days. For longer storage, wrap it tightly and freeze for up to 3 months. Thaw it before serving for the best texture.

Zesty Lemon Poppy Seed Delight

Final Thoughts

The Lemon Poppy Seed Loaf with Citrus Icing is truly a delightful treat that brings a burst of brightness to any occasion. The zesty lemon flavor combined with the subtle crunch of poppy seeds creates a satisfying balance, while the citrus icing adds a touch of sweetness that perfectly complements the loaf’s tanginess.

This is the kind of recipe I come back to again and again, especially when I want to brighten up a gloomy day or celebrate a small victory. The aroma that fills the kitchen as it bakes is absolutely heavenly! I encourage you to give this recipe a try; you might just find it becoming a beloved staple in your home. Don’t forget to share your results or even add your own unique twist—I can’t wait to see what you create!

Print
clock clock iconcutlery cutlery iconflag flag iconfolder folder iconinstagram instagram iconpinterest pinterest iconfacebook facebook iconprint print iconsquares squares iconheart heart iconheart solid heart solid icon

Lemon Poppy Seed Loaf


  • Author: Lily author
  • Total Time: 13 minute
  • Yield: 1 loaf 1x
Pin Recipe
Print Recipe

Description

This Lemon Poppy Seed Loaf is a delightful treat that combines zesty lemon flavor with crunchy poppy seeds. Topped with a citrus icing, it’s perfect for any occasion.


Ingredients

Scale
  • 1 ½ cups (190g) all-purpose flour
  • 1 teaspoon baking powder
  • ½ teaspoon baking soda
  • ½ teaspoon salt
  • 3 tablespoons poppy seeds
  • ½ cup (115g) unsalted butter, softened to room temperature
  • 1 cup (200g) granulated sugar
  • 2 large eggs
  • 1 teaspoon vanilla extract
  • 1 teaspoon lemon zest (from about 1 medium lemon)
  • ½ cup (120ml) buttermilk
  • 2 tablespoons fresh lemon juice
  • 1 cup (120g) powdered sugar
  • 2 tablespoons fresh lemon juice
  • 1 tablespoon orange juice
  • 1 teaspoon lemon zest (for garnish, optional)

Instructions

  1. Preheat your oven to 350°F (175°C). Grease a 9×5-inch loaf pan or line it with parchment paper for easy removal later.
  2. In a medium mixing bowl, whisk together 1 ½ cups of all-purpose flour, 1 teaspoon of baking powder, ½ teaspoon of baking soda, ½ teaspoon of salt, and 3 tablespoons of poppy seeds. This helps to evenly distribute the baking agents and ensures a uniform rise.
  3. In a large mixing bowl, cream together ½ cup of softened unsalted butter and 1 cup of granulated sugar using an electric mixer on medium speed for about 3-4 minutes, until the mixture is light and fluffy. Make sure to scrape down the sides of the bowl occasionally.
  4. Add 2 large eggs, 1 teaspoon of vanilla extract, and 1 teaspoon of lemon zest to the creamed butter and sugar, mixing until fully combined. You want a smooth consistency, so ensure there are no lumps of butter.
  5. In a small bowl, combine ½ cup of buttermilk and 2 tablespoons of fresh lemon juice. Alternately add the dry ingredients and buttermilk mixture to the butter mixture, starting and ending with the dry ingredients. Mix just until combined; do not overmix, as this can lead to a dense loaf.
  6. Pour the batter into the prepared loaf pan. Smooth the top with a spatula, ensuring it’s even. Bake in the preheated oven for 50-60 minutes, or until a toothpick inserted in the center comes out clean. The edges should be lightly golden brown, and the center should feel just set.
  7. Once baked, remove the loaf from the oven and allow it to cool in the pan for about 10 minutes. Then, transfer it to a wire rack to cool completely. Resist the urge to slice too soon, as it will be crumbly if it’s still warm.
  8. While the loaf is cooling, prepare the citrus icing. In a medium bowl, whisk together 1 cup of powdered sugar, 2 tablespoons of fresh lemon juice, and 1 tablespoon of orange juice until smooth. If the icing is too thick, you can add a little more juice to reach your desired consistency.
  9. Once the loaf is completely cool, drizzle the citrus icing over the top. If you like, sprinkle with an additional teaspoon of lemon zest for an extra pop of flavor and color.
  • Prep Time: 15 mins
  • Cook Time: 50-60 mins
  • Category: Dessert
  • Method: Baking
  • Cuisine: American

Nutrition

  • Serving Size: 1 slice
  • Calories: 200
  • Sugar: 15 g
  • Sodium: 150 mg
  • Fat: 8 g
  • Saturated Fat: 5 g
  • Unsaturated Fat: 3 g
  • Trans Fat: 0 g
  • Carbohydrates: 30 g
  • Fiber: 1 g
  • Protein: 3 g
  • Cholesterol: 40 mg

Keywords: Be careful not to overmix your batter; this is a common mistake that can lead to a dense loaf. Use room temperature ingredients for a smoother batter and even baking.

Did you make this recipe?

Share a photo and tag us — we can't wait to see what you've made!

  • Privacy Policy
  • Terms Of Service
  • Contact
  • About
  • GDPR

Copyright © 2025 Homesmad