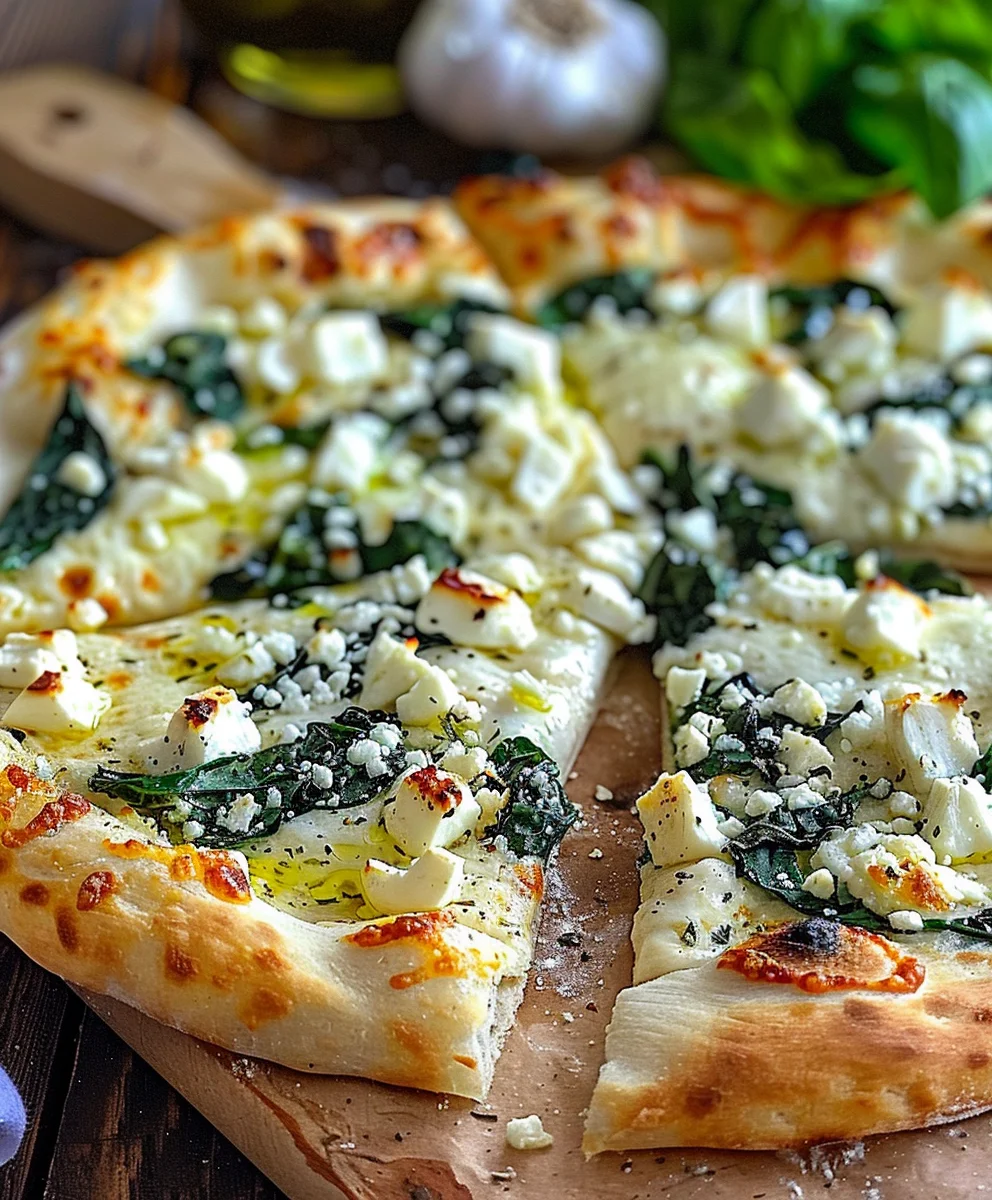
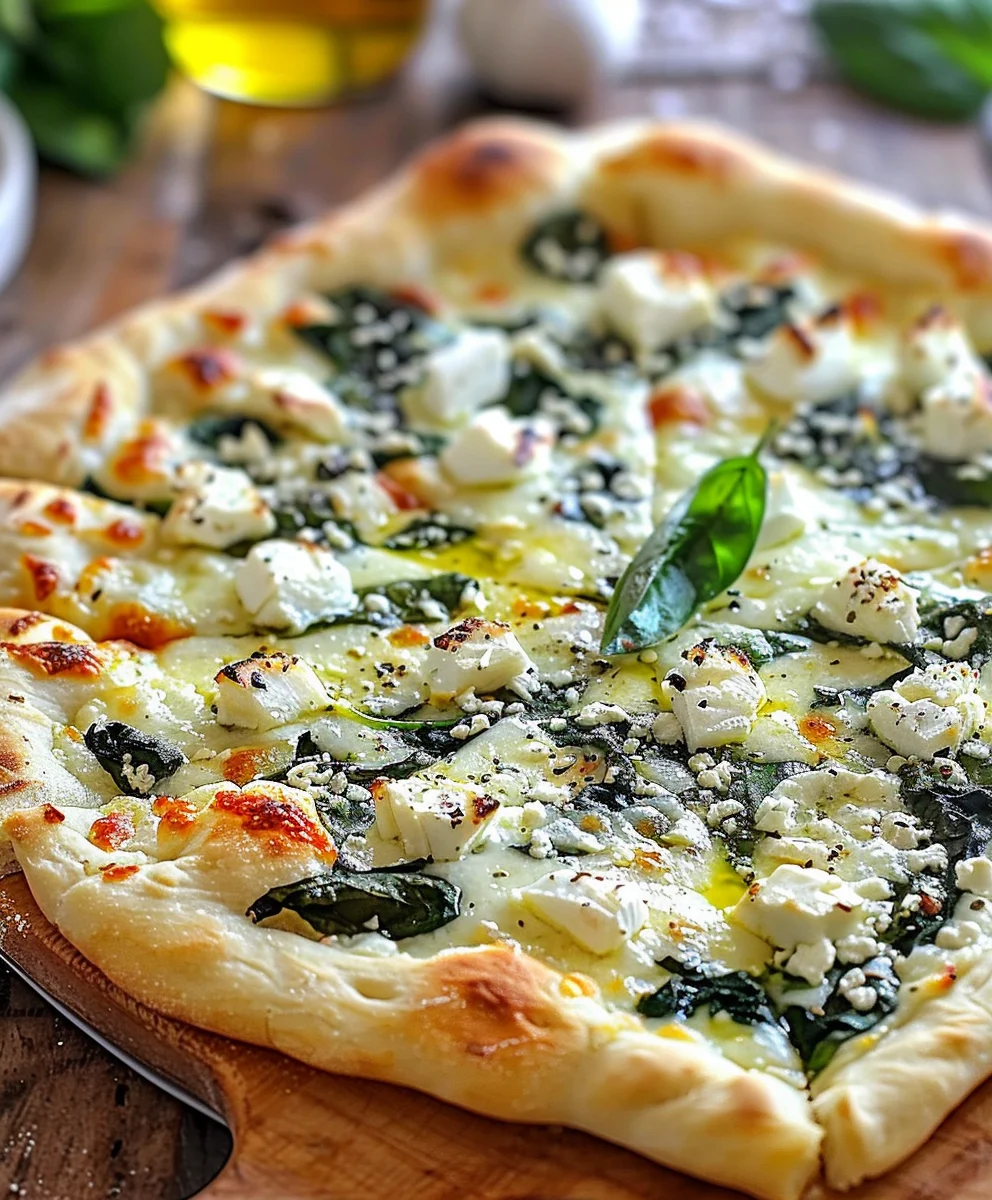
Greek Roasted Garlic Spinach White Pizza A Flavorful Delight is more than just a meal; it’s an exquisite culinary journey that promises to awaken your senses and transport your taste buds straight to the sun-drenched shores of the Mediterranean. Imagine a perfectly golden, crispy crust generously adorned with a creamy, dreamy blend of cheeses, tender wilted spinach, and, the true showstopper, deeply caramelized and aromatic roasted garlic. This isn’t your ordinary pizza night; it’s an elevated experience, brimming with vibrant, savory notes that feel both comforting and sophisticated.
While the beloved white pizza concept has roots in Italian-American traditions, our rendition infuses it with a distinct Greek character, paying homage to the timeless harmony of fresh spinach and the deeply satisfying sweetness of roasted garlic—ingredients that have been cornerstones of Mediterranean cuisine for centuries. People absolutely adore this dish not only for its undeniably rich and savory taste but also for its delightful textural contrasts and how it offers a refreshingly light yet incredibly satisfying alternative to traditional tomato-based pizzas. Every bite of this Greek Roasted Garlic Spinach White Pizza A Flavorful Delight delivers a symphony of creamy, garlicky, and herbaceous notes, promising a truly unforgettable meal that feels both wholesome and luxurious. It’s the perfect centerpiece for a lively gathering or a cherished weeknight indulgence, proving that simple, quality ingredients can indeed create something extraordinary.

Ingredients:
-
For the Pizza Dough:
- 1 pound (approximately 450-500g) good quality pizza dough, either homemade or store-bought. I usually opt for a fresh, high-hydration dough from my local bakery, as it gives the best crust.
-
For the Roasted Garlic:
- 2 large heads of garlic
- 2 tablespoons olive oil, plus more for drizzling
- A pinch of sea salt and freshly ground black pepper
-
For the Creamy White Garlic Sauce:
- 3 tablespoons unsalted butter
- 3 tablespoons all-purpose flour
- 1 ½ cups whole milk (or a mix of whole milk and half-and-half for extra richness)
- ½ cup freshly grated Parmesan cheese (the real stuff makes a difference!)
- ¼ teaspoon freshly grated nutmeg (enhances cream sauces beautifully)
- Salt and freshly ground white pepper to taste
- The roasted garlic cloves from 1 of the roasted garlic heads (reserve the other for topping)
-
For the Delicious Toppings:
- 5-6 ounces fresh baby spinach
- 1 tablespoon olive oil (for wilting spinach)
- 1 ½ cups shredded low-moisture mozzarella cheese, divided (about 6 ounces)
- ½ cup crumbled feta cheese (sheep’s milk feta is my favorite for its tangy bite)
- ¼ cup Kalamata olives, pitted and sliced in half
- ¼ small red onion, very thinly sliced (optional, but adds a lovely sharpness)
- Optional: A few sun-dried tomatoes, thinly sliced (packed in oil, drained)
-
For Finishing:
- Fresh dill or oregano, chopped (for garnish, just before serving)
- A final drizzle of extra virgin olive oil
Prepping Our Foundation: Roasting the Garlic and Preparing the Dough
-
Begin by Roasting the Garlic: This step is foundational for our “Greek Roasted Garlic Spinach White Pizza A Flavorful Delight” as it transforms raw, pungent garlic into sweet, mellow, spreadable cloves. Preheat your oven to 400°F (200°C). Take your two heads of garlic and carefully slice off about a quarter inch from the top of each head, exposing the individual cloves. Place them on a piece of aluminum foil or in a small oven-safe dish. Drizzle each head generously with about 1 tablespoon of olive oil, ensuring it seeps down into the cloves. Sprinkle with a pinch of sea salt and freshly ground black pepper. Wrap the garlic tightly in the foil or cover the dish. Roast for 35-45 minutes, or until the cloves are wonderfully soft and lightly golden brown. You’ll know they’re ready when your kitchen starts smelling absolutely divine! Once roasted, remove from the oven and allow them to cool slightly. Once cool enough to handle, gently squeeze the softened garlic cloves out of their skins. You should have a creamy, spreadable paste. Set aside.
Tip for Perfectly Roasted Garlic:
Don’t rush the roasting process; slow and low heat is key to caramelizing the garlic’s natural sugars, which is essential for that sweet, nutty flavor we’re aiming for.
- Prepare Your Pizza Dough: If you’re using store-bought dough that was refrigerated, it’s crucial to let it come to room temperature. This can take anywhere from 1 to 2 hours, depending on the ambient temperature of your kitchen. Remove the dough from its packaging and place it in a lightly oiled bowl, turning once to coat. Cover the bowl loosely with plastic wrap or a clean kitchen towel and let it rest. A well-rested, room-temperature dough is much easier to work with; it will stretch beautifully without tearing and will result in a much better crust texture. If your dough is cold, it will fight you, snapping back and resisting your efforts to shape it, leading to a tough or uneven crust. Take this time to appreciate the subtle aroma of yeast developing.
Crafting the Velvety White Garlic Sauce
- Start the Bechamel Base: While your dough is resting, we’ll create the luscious white garlic sauce that truly defines our “Greek Roasted Garlic Spinach White Pizza A Flavorful Delight.” In a medium saucepan, melt 3 tablespoons of unsalted butter over medium heat. Once the butter is fully melted and begins to foam slightly, add 3 tablespoons of all-purpose flour. Whisk continuously for about 1-2 minutes, creating a smooth paste known as a roux. This step cooks out the raw flour taste and forms the thickening agent for our sauce. The roux should be a pale, golden color, not brown.
- Gradually Incorporate the Milk: Slowly pour in 1 ½ cups of whole milk, a little at a time, whisking constantly to prevent lumps. Start with about a quarter of the milk, whisk until smooth, then add more. This gradual addition ensures a super smooth, velvety sauce. Continue whisking as the sauce gently heats and thickens. This usually takes about 5-7 minutes. You’ll notice it start to coat the back of a spoon. Don’t rush this process; patience here will reward you with a perfectly creamy consistency.
- Season and Add Cheese: Once the sauce has thickened to your desired consistency – a medium-thick cream sauce is ideal for pizza – remove it from the heat. Stir in ½ cup of freshly grated Parmesan cheese. Using freshly grated Parmesan is paramount here; pre-shredded varieties often contain anti-caking agents that can make your sauce gritty. Stir until the cheese is completely melted and incorporated. Season with ¼ teaspoon of freshly grated nutmeg, which adds a subtle warmth and complexity to white sauces, and adjust salt and freshly ground white pepper to your liking. White pepper is often preferred in white sauces as it doesn’t leave visible black flecks.
- Infuse with Roasted Garlic: Now for the magic! Take the roasted garlic cloves from one of the heads you prepared earlier. Mash them with a fork until they form a smooth paste. Stir this roasted garlic paste directly into your warm white sauce. The sweet, mellow garlic will deeply flavor the sauce, creating an aromatic base that is simply irresistible. Taste and adjust seasonings one last time. This is the heart of your “Greek Roasted Garlic Spinach White Pizza A Flavorful Delight.” Set the sauce aside to cool slightly.
Preparing Our Fresh & Flavorful Toppings
- Wilt the Spinach: In a large skillet, heat 1 tablespoon of olive oil over medium heat. Add the fresh baby spinach in batches if necessary, cooking just until it wilts down, about 2-3 minutes. This step is important because raw spinach releases a lot of water when cooked, which can make your pizza soggy. Wilting it first removes excess moisture and concentrates its flavor. Once wilted, immediately transfer the spinach to a colander and press out any remaining liquid using the back of a spoon or your hands. Roughly chop the wilted spinach.
-
Prepare Other Toppings: Crumble the feta cheese. Pit and slice your Kalamata olives. Thinly slice your red onion. If using sun-dried tomatoes, drain them well and slice them thinly. Set all your beautiful toppings aside, ready for assembly. This organized approach, often referred to as “mise en place,” ensures a smooth and enjoyable pizza-making experience.
Why Mise en Place is a Game-Changer:
Having all your ingredients prepped and ready before assembly makes the entire process more efficient and less stressful, allowing you to focus on the artistry of building your “Greek Roasted Garlic Spinach White Pizza A Flavorful Delight.”
Assembling the “Greek Roasted Garlic Spinach White Pizza A Flavorful Delight”
- Preheat Your Oven and Pizza Stone/Steel: This is a critical step for achieving a truly crispy crust, reminiscent of pizzeria quality. Position an oven rack in the middle or upper-middle position. If you’re using a pizza stone or steel, place it on the rack and preheat your oven to its highest setting, usually between 475°F and 550°F (245°C-290°C). Allow the stone or steel to preheat for at least 30-60 minutes after the oven reaches temperature. This extreme heat is essential for a quick, even bake and a beautifully browned crust. If you don’t have a stone or steel, you can use a large, heavy baking sheet, but preheat it too.
- Shape the Dough: Lightly flour a clean work surface or your pizza peel. Carefully transfer your room-temperature pizza dough to the floured surface. Gently begin to stretch and shape the dough into a roughly 12-14 inch circle, or whatever shape best fits your baking surface. You can use your hands, a rolling pin, or even gravity by holding the dough up and letting it stretch. Aim for an even thickness, leaving a slightly thicker edge for the crust. Once shaped, carefully transfer the dough to a piece of parchment paper on your pizza peel (or directly onto a lightly floured peel if you’re confident in your transfer skills).
- Apply the White Garlic Sauce: Spoon a generous amount of your creamy white garlic sauce onto the center of the stretched dough. Using the back of the spoon, spread the sauce evenly over the dough, leaving about a 1-inch border for the crust. Don’t overload it, as too much sauce can make the pizza soggy. We want just enough to provide that rich, garlicky base. This sauce is truly what makes this “Greek Roasted Garlic Spinach White Pizza A Flavorful Delight” unique.
- Layer on the Toppings: First, sprinkle about half of the shredded mozzarella cheese directly over the sauce. This layer acts as a barrier, preventing other toppings from making the crust wet. Next, evenly distribute the wilted spinach over the mozzarella. Follow with the crumbled feta cheese, the sliced Kalamata olives, and the thinly sliced red onion. If you’re using sun-dried tomatoes, scatter them now. Finally, take the remaining roasted garlic cloves from the second head you reserved earlier. You can either gently mash them and dot them over the pizza, or leave them whole for bursts of concentrated garlic flavor.
- Finish with More Mozzarella: Sprinkle the remaining half of the shredded mozzarella cheese over all the toppings. This top layer of mozzarella will melt beautifully, holding all the ingredients together and creating that classic golden-brown, bubbly top crust.
Baking Our Masterpiece to Golden Perfection
- Launch the Pizza into the Oven: Carefully slide the pizza (either on its parchment paper or directly from the peel) onto the preheated pizza stone or baking sheet in the oven. Close the oven door quickly to retain heat.
- Bake to Golden Perfection: Bake for 10-15 minutes, or until the crust is golden brown and puffy, and the cheese is bubbly and lightly charred in spots. The exact baking time will depend on your oven’s temperature and your preferred level of crispiness. Keep an eye on it, especially towards the end. If you notice one side browning faster, carefully rotate the pizza halfway through baking. The high heat ensures a quick bake, which is key to a crisp crust and perfectly melted, yet not overcooked, toppings. This is the moment when your “Greek Roasted Garlic Spinach White Pizza A Flavorful Delight” truly comes alive.
The Grand Finale: Finishing Touches and Serving
- Rest and Garnish: Once the pizza is beautifully baked, carefully remove it from the oven using your pizza peel or a sturdy spatula. Transfer it to a cutting board. Resist the urge to slice into it immediately! Allow the pizza to rest for 3-5 minutes. This resting period allows the cheese to set slightly, making for cleaner slices and preventing all the toppings from sliding off. While it rests, generously sprinkle the fresh chopped dill or oregano over the hot pizza. The residual heat will release their aromatic oils, adding a burst of freshness.
- A Final Drizzle and Serve: For an extra layer of flavor and a beautiful sheen, drizzle a little bit of good quality extra virgin olive oil over the finished pizza just before slicing. This elevates the overall taste and aroma.
- Slice and Enjoy: Use a sharp pizza cutter to slice your magnificent “Greek Roasted Garlic Spinach White Pizza A Flavorful Delight” into wedges. Serve immediately and watch your friends and family delight in every single bite. The combination of sweet roasted garlic, creamy white sauce, tangy feta, earthy spinach, and briny olives on a perfectly crisp crust is truly a culinary experience that will leave everyone wanting more. This pizza is not just a meal; it’s an invitation to savor the rich, vibrant flavors of the Mediterranean, brought together in a comforting and utterly delicious package. Enjoy the fruits of your labor!
Conclusion:
And there you have it, my friends! We’ve journeyed through the simple steps to create what I genuinely believe will become a staple in your kitchen and a topic of delighted conversation around your dining table. This isn’t just another pizza; it’s a testament to how a few high-quality, thoughtfully combined ingredients can elevate a familiar dish into something truly extraordinary. The moment that golden crust emerges from your oven, fragrant with roasted garlic and rich with creamy cheeses, you’ll understand exactly what I mean. The initial aroma alone is enough to make your mouth water, promising a taste experience that is both comforting and incredibly sophisticated. It’s the kind of dish that truly satisfies, wrapping you in a warm, savory embrace with every single bite.
I can confidently say that the Greek Roasted Garlic Spinach White Pizza A Flavorful Delight is an absolute must-try for anyone who appreciates the finer things in life, especially when those things are surprisingly easy to achieve. Imagine the subtle sweetness of slow-roasted garlic mingling with the earthy notes of fresh spinach, all bound together by a luscious blend of mozzarella and creamy ricotta, kissed with a hint of tangy feta. It’s a symphony of textures and tastes: a crisp, chewy crust, gooey melted cheese, and tender, flavorful greens. This pizza offers a refreshing departure from your standard tomato-based pies, providing a lighter yet incredibly rich flavor profile that is utterly irresistible. It’s perfect for a cozy night in, an elegant dinner party, or even a casual gathering with friends – it truly shines in any setting, always leaving a lasting impression of culinary excellence and thoughtful preparation.
Serving Suggestions to Elevate Your Experience
While this magnificent white pizza is certainly capable of standing proudly on its own as a complete meal, I love to offer a few ideas to round out your culinary adventure. For a balanced meal, pair a generous slice with a crisp, vibrant green salad dressed simply with lemon vinaigrette – the acidity provides a beautiful counterpoint to the richness of the pizza. A light, chilled cucumber and dill soup would also make a refreshing starter, especially on a warmer evening. Alternatively, consider serving it alongside a plate of marinated Kalamata olives and a sprinkle of fresh dill for a truly authentic Greek mezze experience. And don’t forget the beverage! A dry white wine, such as a Sauvignon Blanc or a crisp Pinot Grigio, would beautifully complement the garlicky, cheesy goodness, enhancing every nuanced flavor without overpowering it. Even a good quality sparkling water with a twist of lemon can be a delightful accompaniment.
Unleash Your Inner Chef: Exciting Variations!
One of the aspects I adore most about this recipe is its incredible versatility. Consider this recipe a wonderful canvas for your own culinary creativity! Want to add more Mediterranean flair? Try sprinkling some sun-dried tomatoes, chopped artichoke hearts, or even a handful of briny Kalamata olives over the cheese before baking. For a richer, meatier option, crumbled cooked lamb sausage or finely diced, pre-cooked chicken breast would be absolutely divine. If you’re a fan of spicy notes, a generous pinch of red pepper flakes will add a welcome kick. Cheese lovers might experiment with adding a touch of crumbled goat cheese for extra tang, or some smoked provolone for depth. For those with dietary considerations, this recipe adapts beautifully to gluten-free pizza crusts, and if you’re looking to make it entirely plant-based, simply swap the dairy cheeses for your favorite vegan mozzarella and ricotta alternatives, perhaps even adding some nutritional yeast for that extra umami flavor. Don’t be afraid to experiment with fresh herbs like oregano or fresh basil for an added aromatic dimension. The possibilities are truly endless, allowing you to tailor this sensational pizza exactly to your personal taste and available ingredients.
So, what are you waiting for? I wholeheartedly encourage you to roll up your sleeves, gather your ingredients, and dive into the delightful process of making this incredible Greek Roasted Garlic Spinach White Pizza. Trust me, the effort (which is minimal!) is incredibly rewarding, yielding a dish that tastes like it came straight from a gourmet trattoria. Once you’ve pulled that magnificent creation from your oven, taken that glorious first bite, and experienced the sheer satisfaction of creating something so utterly delicious, I would absolutely love to hear about it! Please, share your photos, your triumphs, your clever variations, and your honest feedback in the comments below. Let’s build a community of enthusiastic home chefs who aren’t afraid to explore new flavors and share their culinary adventures. Happy baking, my friends, and enjoy every single savory moment!
Greek Roasted Garlic Spinach White Pizza: Flavorful Delight
Greek Roasted Garlic Spinach White Pizza A Flavorful Delight is more than just a meal; it’s an exquisite culinary journey that promises to awaken your senses and transport your taste buds straight to the sun-drenched shores of the Mediterranean. Imagine a perfectly golden, crispy crust generously adorned with a creamy, dreamy blend of cheeses, tender wilted spinach, and, the true showstopper, deeply caramelized and aromatic roasted garlic. This isn’t your ordinary pizza night; it’s an elevated experience, brimming with vibrant, savory notes that feel both comforting and sophisticated.
Ingredients
-
1 lb (450-500g) pizza dough
-
2 large heads garlic
-
2 tbsp olive oil
-
Pinch of sea salt
-
Pinch of black pepper
-
3 tbsp unsalted butter
-
3 tbsp all-purpose flour
-
1½ cups whole milk
-
½ cup freshly grated Parmesan cheese
-
¼ tsp freshly grated nutmeg
-
Salt to taste
-
Freshly ground white pepper to taste
-
Roasted garlic cloves (from 1 head)
-
5-6 oz fresh baby spinach
-
1 tbsp olive oil (for wilting spinach)
-
1½ cups shredded low-moisture mozzarella cheese (divided)
-
½ cup crumbled feta cheese
-
¼ cup Kalamata olives (pitted and sliced)
-
¼ small red onion (thinly sliced, optional)
-
A few sun-dried tomatoes (thinly sliced, optional)
-
Fresh dill or oregano (chopped, for garnish)
-
Extra virgin olive oil (for drizzling)
Instructions
-
Step 1
Preheat oven to 400°F (200°C). Slice tops off 2 garlic heads, drizzle with olive oil, salt, and pepper. Wrap in foil and roast for 35-45 minutes until soft. Squeeze out cloves; reserve cloves from 1 head for the sauce, and the remaining for topping. -
Step 2
Allow pizza dough to come to room temperature (1-2 hours) in a lightly oiled, covered bowl. -
Step 3
In a saucepan, melt 3 tbsp unsalted butter. Whisk in 3 tbsp all-purpose flour for 1-2 minutes to form a roux. Gradually whisk in 1½ cups whole milk until smooth and thickened (5-7 minutes). Remove from heat, stir in ½ cup Parmesan, ¼ tsp nutmeg, salt, and white pepper. Mash and stir in the roasted garlic cloves from one head into the sauce. -
Step 4
Heat 1 tbsp olive oil in a large skillet, wilt 5-6 oz baby spinach (2-3 minutes), drain excess liquid, and chop. Prepare remaining toppings: crumble feta cheese, slice Kalamata olives, thinly slice red onion (if using), and thinly slice drained sun-dried tomatoes (if using). -
Step 5
Place a pizza stone or heavy baking sheet on the middle rack. Preheat oven to its highest setting (475°F-550°F / 245°C-290°C) for at least 30-60 minutes. -
Step 6
On a lightly floured surface or pizza peel, stretch dough into a 12-14 inch circle, leaving a thicker crust. Transfer to parchment on the peel. Spread the white garlic sauce, leaving a 1-inch border. Layer half of the mozzarella, then spinach, feta, olives, and red onion. Dot with the reserved roasted garlic cloves. Top with the remaining mozzarella. -
Step 7
Carefully slide the pizza onto the preheated stone or baking sheet. Bake for 10-15 minutes, or until the crust is golden brown and the cheese is bubbly and lightly charred. -
Step 8
Remove from oven and transfer to a cutting board. Let rest for 3-5 minutes. Garnish with fresh chopped dill or oregano and a drizzle of extra virgin olive oil. Slice and serve immediately.
Important Information
Nutrition Facts (Per Serving)
It is important to consider this information as approximate and not to use it as definitive health advice.
Allergy Information
Please check ingredients for potential allergens and consult a health professional if in doubt.