• Skip to primary navigation
  • Skip to main content
  • Skip to primary sidebar
Homesmad

Homesmad

  • Home
  • Breakfast & Brunch
  • Appetizers & Snacks
  • Dinner
  • Dessert
  • About
  • Privacy Policy
  • Contact
Homesmad
  • Home
  • Breakfast & Brunch
  • Appetizers & Snacks
  • Dinner
  • Dessert
  • About
  • Privacy Policy
  • Contact

Maple Donut Bars: Soft, Chewy, & Irresistibly Delicious!

October 30, 2025 by Lily author

Soft Baked Maple Donut Bars are about to become your new favorite treat, I promise. Imagine the cozy, comforting aroma of maple filling your kitchen, without the fuss and mess of deep-frying traditional donuts. I’m absolutely thrilled to share a recipe that encapsulates everything wonderful about a classic donut but in a delightfully convenient bar form. While deep-fried donuts have a rich history spanning cultures and centuries, this baked rendition offers a modern twist, delivering all the beloved flavors and textures with a lighter touch. It’s a testament to how beloved breakfast pastries can evolve to fit our busy lives while still delivering on taste.

Why You’ll Adore These Soft Baked Maple Donut Bars

People adore this dish for its incredibly soft, cake-like texture, the warmth of real maple syrup infused throughout, and the sheer joy of a no-fry dessert that’s perfect for sharing. These Soft Baked Maple Donut Bars offer the quintessential donut experience – that tender crumb and sweet glaze – in an easy-to-serve format, ideal for brunches, parties, or simply a cozy afternoon indulgence. I truly believe you’ll fall in love with how effortless and utterly delicious they are.

Maple Donut Bars: Soft, Chewy, & Irresistibly Delicious! this RECIPE

Ingredients:

For the Soft Baked Maple Donut Bars:

  • 1 ½ cups (340g) unsalted butter, very soft, at room temperature. This is crucial for a light and airy texture.
  • 1 ½ cups (300g) granulated sugar. For that perfect sweetness that balances the maple.
  • 4 large eggs, at room temperature. Again, room temperature helps them incorporate smoothly into the batter without curdling.
  • 1 tablespoon pure vanilla extract. I love to use a good quality extract here to really boost the flavor profile of our Soft Baked Maple Donut Bars.
  • 1 cup (240ml) buttermilk, at room temperature. If you don’t have buttermilk, you can make your own by adding 1 tablespoon of lemon juice or white vinegar to regular milk and letting it sit for 5-10 minutes until it slightly curdles.
  • 3 ½ cups (420g) all-purpose flour, sifted. Sifting helps prevent lumps and ensures a delicate crumb.
  • 1 ½ teaspoons baking powder. This gives our bars their beautiful lift.
  • ½ teaspoon baking soda. Works with the acidity of the buttermilk for an extra tender texture.
  • 1 teaspoon salt. A must-have for balancing all the sweet flavors.
  • 1 teaspoon ground cinnamon. Just a touch to enhance the “donut” flavor.
  • ½ teaspoon ground nutmeg. Freshly grated is always best, if you have it, for a truly aromatic experience.

For the Maple Glaze:

  • 4 cups (480g) powdered sugar (confectioners’ sugar), sifted. Sifting is important to avoid a lumpy glaze.
  • ½ cup (120ml) pure maple syrup, preferably Grade A Dark, Robust Taste (formerly Grade B). This type of syrup has a richer, more pronounced maple flavor that really shines in the glaze.
  • ¼ cup (60ml) whole milk, or more as needed. You want a pourable but not too thin consistency.
  • 1 teaspoon pure vanilla extract. Enhances the overall flavor.
  • Pinch of salt. To cut through the sweetness and highlight the maple.

Equipment You’ll Need:

  • 9×13 inch baking pan. A standard size is perfect for these Soft Baked Maple Donut Bars.
  • Parchment paper. Essential for easy removal and cleanup.
  • Non-stick cooking spray or butter and flour for preparing the pan.
  • Large mixing bowls (at least two).
  • Electric mixer (stand mixer with paddle attachment or a hand mixer). This will make creaming the butter and sugar much easier and more effective.
  • Whisk. For combining dry ingredients.
  • Rubber spatula. For scraping down bowls and folding batter.
  • Measuring cups and spoons. Accurate measurements are key in baking!
  • Sifter or fine-mesh sieve. For your flour and powdered sugar.
  • Wire cooling rack. Absolutely necessary for proper cooling and glazing.
  • Small saucepan or microwave-safe bowl (optional, for warming maple syrup).

Preparing Your Soft Baked Maple Donut Bars:

Phase 1: Preparing the Pan and Dry Ingredients

  1. Preheat Your Oven and Prepare the Pan:

    First things first, let’s get our oven ready. Preheat your oven to 350°F (175°C). While the oven warms up, prepare your 9×13 inch baking pan. I like to line mine with parchment paper, leaving an overhang on the longer sides. This creates “handles” that will make lifting the baked Soft Baked Maple Donut Bars out of the pan incredibly easy after they’ve cooled. Once lined, lightly spray the parchment paper and any exposed pan edges with non-stick cooking spray, or grease with butter and dust with flour. This step guarantees your delicious bars won’t stick!

  2. Whisk Together the Dry Ingredients:

    In a large mixing bowl, take your sifted all-purpose flour. Add the baking powder, baking soda, salt, ground cinnamon, and ground nutmeg. Give these a good whisk together until they are thoroughly combined. It’s important that these leavening agents and spices are evenly distributed, so every bite of your Soft Baked Maple Donut Bars has that perfect rise and spiced flavor. Set this bowl aside for a moment.

Phase 2: Combining Wet and Dry Ingredients for the Donut Bars

  1. Cream the Butter and Sugar:

    In another large mixing bowl, preferably the bowl of your stand mixer fitted with the paddle attachment, or with a hand mixer, add your very soft, room temperature unsalted butter and granulated sugar. Beat them together on medium-high speed for about 3 to 5 minutes. You’re looking for a mixture that is light in color, fluffy, and significantly increased in volume. This creaming process incorporates air into the butter and sugar, which is fundamental for creating the tender, cake-like texture of our Soft Baked Maple Donut Bars. Don’t skimp on this step! Scrape down the sides of the bowl occasionally to ensure everything is evenly mixed.

  2. Incorporate the Eggs and Vanilla:

    Once your butter and sugar are beautifully light and fluffy, it’s time to add the eggs. Add them one at a time, beating well after each addition. Make sure each egg is fully incorporated into the mixture before adding the next. This prevents the mixture from curdling and ensures a smooth batter. After the last egg is mixed in, stir in the pure vanilla extract. The batter might look a little curdled at this point, but don’t worry, it will come together beautifully when the dry ingredients are added.

  3. Alternate Adding Dry Ingredients and Buttermilk:

    Now, it’s time to bring everything together. With your mixer on low speed, gradually add the dry ingredients to the wet ingredients, alternating with the buttermilk. I usually start and end with the dry ingredients. So, add about one-third of the dry mixture, mix until just combined, then add half of the buttermilk, mix until just combined, then another third of the dry mixture, the remaining buttermilk, and finally, the last third of the dry mixture.
    Be very careful not to overmix the batter at this stage. Overmixing develops the gluten in the flour, which can lead to tough Soft Baked Maple Donut Bars instead of the soft, tender ones we’re aiming for. Mix only until no streaks of flour remain. A few small lumps are perfectly fine.

  4. Transfer Batter to the Prepared Pan:

    Using your rubber spatula, gently scrape the batter into your prepared 9×13 inch baking pan. Spread it out evenly to the edges of the pan. You want a consistent thickness across the entire surface so that your Soft Baked Maple Donut Bars bake uniformly. Give the pan a gentle tap or two on the counter to release any large air bubbles.

Phase 3: Baking the Donut Bars

  1. Bake Until Golden and Done:

    Place the baking pan in your preheated oven. Bake for approximately 28-35 minutes. Baking times can vary depending on your oven, so it’s always a good idea to start checking a little early. The Soft Baked Maple Donut Bars are done when the edges are lightly golden brown, and a wooden skewer or toothpick inserted into the center comes out clean or with a few moist crumbs attached.
    Do not overbake! This is key to keeping them incredibly soft and moist.

  2. Cooling is Essential:

    Once baked, carefully remove the pan from the oven. Let the Soft Baked Maple Donut Bars cool in the pan on a wire rack for about 15-20 minutes. This initial cooling period allows the bars to set up properly. After this time, use the parchment paper overhangs to gently lift the entire slab of donut bars out of the pan and transfer them directly onto the wire rack to cool completely.
    Allowing them to cool completely before glazing is non-negotiable. Glazing warm bars will result in a runny, absorbed glaze rather than a beautiful, set coating. This is the perfect time to start preparing your maple glaze!

Phase 4: Crafting the Silky Maple Glaze

  1. Gather Your Glaze Ingredients:

    While your Soft Baked Maple Donut Bars are cooling, let’s make that luscious maple glaze. In a medium-sized mixing bowl, add your sifted powdered sugar. Sifting is truly important here to ensure a perfectly smooth glaze without any pesky lumps.

  2. Combine and Whisk:

    To the powdered sugar, add the pure maple syrup, whole milk, pure vanilla extract, and a tiny pinch of salt. Start whisking these ingredients together. I prefer to do this by hand with a whisk, but you can use an electric mixer on low speed if you prefer.

  3. Achieve the Perfect Consistency:

    Whisk until the glaze is completely smooth and free of lumps. You’re looking for a thick, pourable consistency, similar to pancake syrup but a bit more substantial. If it’s too thick, add a tiny bit more milk, about a teaspoon at a time, until you reach the desired consistency. If it’s too thin, you can whisk in a tablespoon or two more of sifted powdered sugar.
    The consistency is paramount for a beautiful glaze that coats the Soft Baked Maple Donut Bars perfectly. It should be able to slowly drip off the whisk, not run like water.

  4. Optional: Warm the Glaze Slightly:

    For an even silkier, more pourable glaze that sets with a beautiful sheen, you can very gently warm the maple syrup before mixing it in, or warm the completed glaze in a small saucepan over low heat, stirring constantly, until just warm (not hot!). Alternatively, a quick 10-15 seconds in the microwave can also do the trick. This step is completely optional but can elevate the glaze texture.

Phase 5: Glazing and Finishing Your Soft Baked Maple Donut Bars

  1. Prepare for Glazing:

    Ensure your Soft Baked Maple Donut Bars are completely cool. Place the wire rack with the cooled bars over a sheet of parchment paper or aluminum foil. This will catch any drips from the glaze and make cleanup a breeze.

  2. Glaze the Donut Bars:

    Pour the prepared maple glaze evenly over the top of the cooled donut bars. Use an offset spatula or the back of a spoon to gently spread the glaze, ensuring it covers the entire surface. Let some of it drip down the sides for that rustic, “homemade donut” look. Work relatively quickly, as the glaze will start to set.

  3. Allow the Glaze to Set:

    Let the glazed Soft Baked Maple Donut Bars sit undisturbed on the wire rack for at least 30 minutes, or until the glaze has fully set. You’ll know it’s ready when it’s no longer sticky to the touch and has formed a slightly firm, shiny crust. This setting time is crucial for preventing a messy situation when you go to cut and serve them.

  4. Slice and Serve:

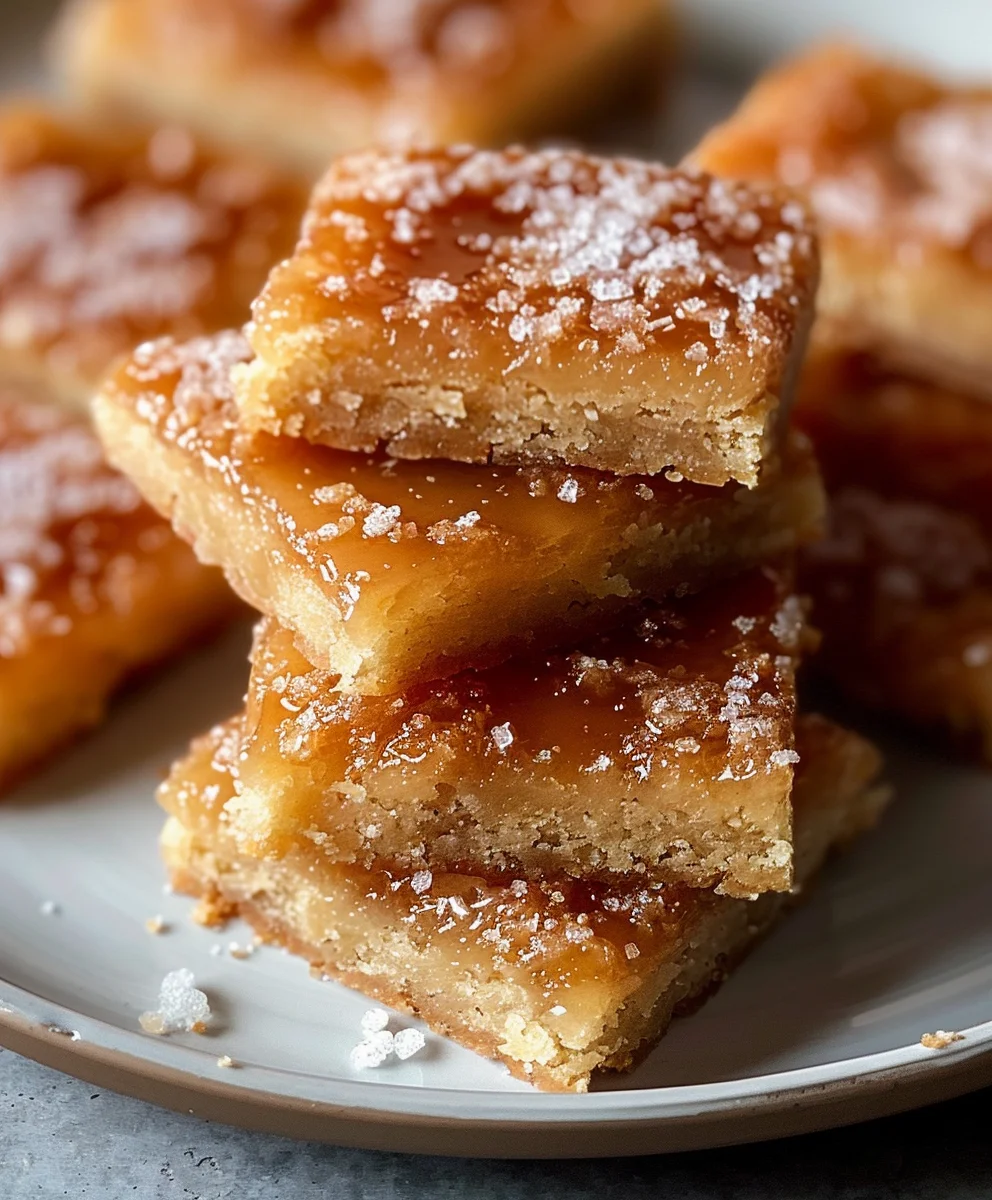
    Once the glaze is set, carefully transfer the entire slab back onto a cutting board. Using a sharp knife, cut the Soft Baked Maple Donut Bars into your desired size and shape. You can cut them into traditional bar shapes, squares, or even smaller bite-sized pieces for a party. I find cutting them into about 12-16 bars works well.
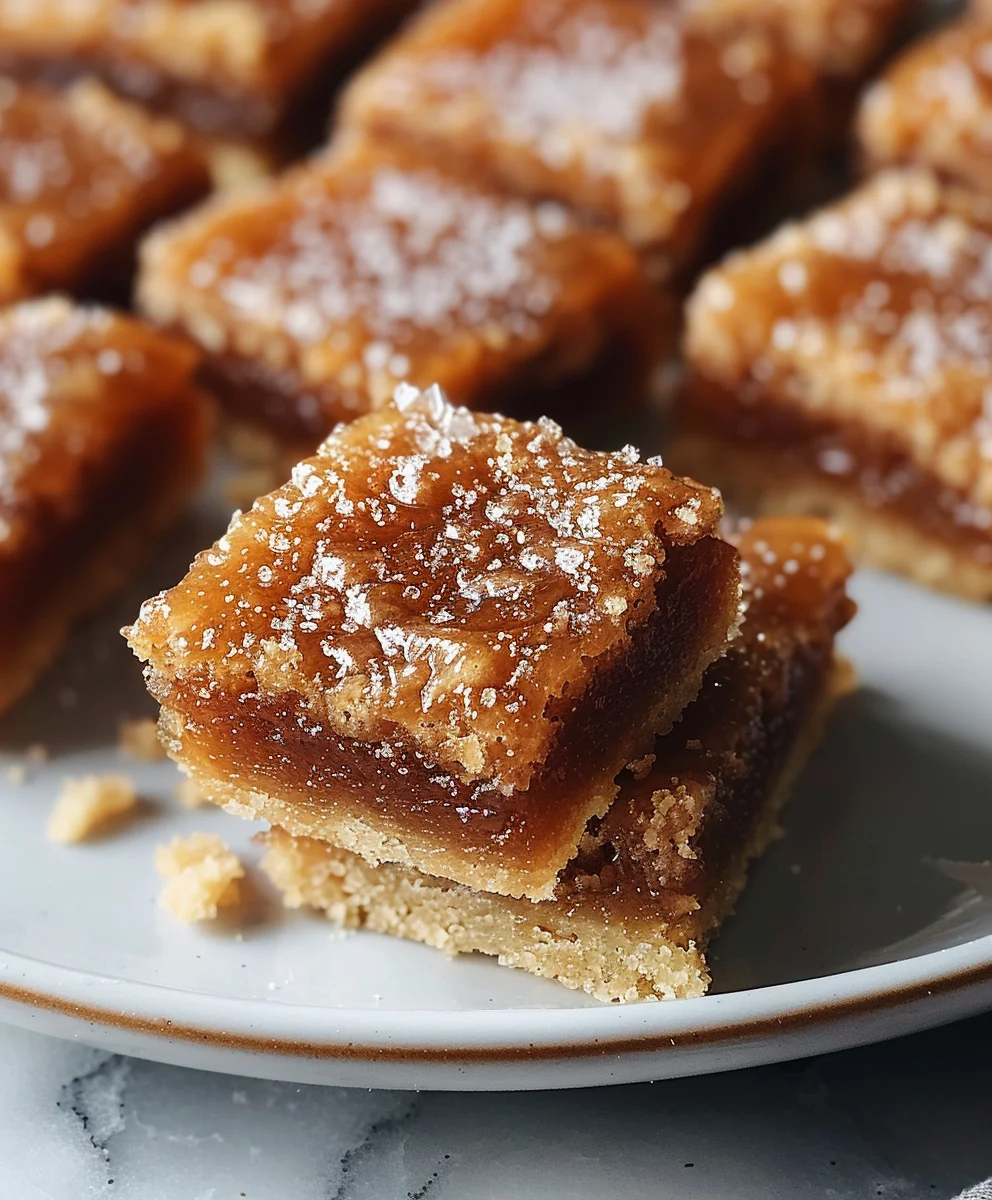
    Serve these delightful Soft Baked Maple Donut Bars immediately and enjoy the incredibly soft, moist crumb contrasted with the sweet, rich maple glaze! These are truly a treat that embodies comfort and deliciousness in every single bite.

  5. Storing Leftovers:

    If by some miracle you have any leftovers, these Soft Baked Maple Donut Bars can be stored in an airtight container at room temperature for up to 3 days. They also freeze beautifully for longer storage, just make sure they are well-wrapped to prevent freezer burn. To thaw, simply let them sit at room temperature for a few hours. They are just as delicious on day two, sometimes even better as the flavors meld!

Maple Donut Bars: Soft, Chewy, & Irresistibly Delicious!

Conclusion:

And there you have it, my friends! We’ve reached the sweet finale of our baking journey, and I genuinely hope you’re as excited as I am about what we’ve discovered. This isn’t just another recipe; it’s an invitation to experience pure, unadulterated comfort and joy, baked right into every single bite. These Soft Baked Maple Donut Bars are truly a game-changer – they capture all the warm, inviting essence of your favorite maple donut, but with the delightful convenience and irresistible chewiness of a bar. Imagine the golden-brown edges, the tender, airy crumb, and that luscious, sweet maple glaze melting on your tongue. It’s a moment of blissful indulgence that feels both sophisticated and wonderfully nostalgic. I’ve poured my heart into perfecting this recipe, ensuring that each step is clear, simple, and leads to an absolutely spectacular result that will impress everyone who tries it.

What makes these bars an absolute must-try? It’s the unique combination of flavors and textures that really sets them apart. They offer that delightful ‘fried’ taste and aroma without any of the actual deep-frying, which means less mess, less fuss, and a much lighter feel. The maple flavor isn’t just a whisper; it sings, bright and clear, perfectly balanced by the subtle richness of the bar itself. They’re incredibly satisfying without being overly heavy, making them suitable for so many occasions. Trust me when I say, the aroma alone as these bake will fill your home with such an enchanting, cozy scent, you’ll be counting down the minutes until they’re ready to devour. It’s a truly sensory experience from start to finish, culminating in a taste that is nothing short of heavenly.

Now, let’s talk about how to enjoy these beauties, because versatility is another one of their strong suits. While they are absolutely divine on their own, still warm from the oven, there are so many ways to elevate the experience. For a truly decadent breakfast or brunch treat, serve them alongside a piping hot mug of coffee or a tall glass of cold milk. The warmth of the coffee beautifully complements the maple, creating a breakfast pairing that feels incredibly special. For an afternoon pick-me-up, a single bar with a cup of herbal tea is pure bliss. And for dessert? Oh, the possibilities! A scoop of good quality vanilla bean ice cream melting over a slightly warm Soft Baked Maple Donut Bar is an experience not to be missed. The contrast of the cool, creamy ice cream with the warm, tender bar and sweet glaze is simply divine. You could even sprinkle a pinch of flaky sea salt over the glaze just before it sets for a sophisticated sweet-and-salty kick.

Feeling a little adventurous? These bars are incredibly adaptable, making them perfect for your creative culinary experiments. Consider adding a handful of finely chopped pecans or walnuts to the batter for a delightful nutty crunch and an extra layer of flavor. A pinch of ground cinnamon or nutmeg mixed into the dry ingredients can add an even deeper, warmer spice note, especially comforting during the cooler months. For a different twist on the glaze, you could add a tiny drop of bourbon extract for a grown-up touch, or even a hint of almond extract for a subtle, floral undertone. If you’re a chocolate lover, a drizzle of melted dark chocolate over the maple glaze once it’s set would be an irresistible addition. Don’t be afraid to make this recipe truly your own – that’s the joy of home baking!

So, please, don’t just admire these photos; take the plunge and whip up a batch of these glorious bars yourself. I promise you, it’s an incredibly rewarding experience. There’s something deeply satisfying about creating such a delightful treat from scratch, and I truly believe that once you try them, these Soft Baked Maple Donut Bars will become a cherished staple in your baking repertoire. I am absolutely brimming with anticipation to hear about your baking adventures. Did you add a special twist? What was your favorite way to serve them? Did they bring smiles to everyone’s faces? Please, please share your thoughts, your photos, and your experiences in the comments section below. Your feedback truly brightens my day and helps this wonderful community grow. Happy baking, my friends, and may your kitchens always be filled with the sweet, comforting scent of homemade deliciousness!


Soft Baked Maple Donut Bars

Soft Baked Maple Donut Bars

Imagine the cozy, comforting aroma of maple filling your kitchen with these soft-baked donut bars. This no-fry dessert delivers all the beloved donut flavors and textures in a delightfully convenient bar form, perfect for sharing.

Prep Time
20 Minutes

Cook Time
30 Minutes

Total Time
30 Minutes

Servings
12 to 16 bars

Ingredients

  • 11/4 cups all-purpose flour
  • 1/2 cup granulated sugar
  • 1/4 cup brown sugar, packed
  • 1/2 teaspoon baking soda
  • 1/4 teaspoon baking powder
  • 1/4 teaspoon salt
  • 1/2 teaspoon ground cinnamon
  • 1/4 cup unsalted butter, melted
  • 1/4 cup pure maple syrup (for batter)
  • 1/4 cup milk
  • 1 large egg
  • 1 teaspoon vanilla extract (for batter)
  • For the Maple Glaze:
  • 4 cups powdered sugar, sifted
  • 1/2 cup pure maple syrup (for glaze), preferably Grade A Dark, Robust Taste
  • 1/4 cup whole milk, or more as needed
  • 1 teaspoon pure vanilla extract (for glaze)
  • Pinch of salt (for glaze)

Instructions

  1. Step 1
    Preheat oven to 350°F (175°C). Line a 9×13 inch baking pan with parchment paper, leaving an overhang, then lightly grease. In a large bowl, whisk together the 11/4 cups all-purpose flour, 1/2 teaspoon baking soda, 1/4 teaspoon baking powder, 1/4 teaspoon salt, 1/2 teaspoon ground cinnamon.
  2. Step 2
    In a separate bowl, whisk together the 1/4 cup unsalted melted butter, 1/2 cup granulated sugar, 1/4 cup packed brown sugar, 1/4 cup pure maple syrup, 1/4 cup milk, 1 large egg, and 1 teaspoon vanilla extract until smooth.
  3. Step 3
    Gradually add the wet ingredient mixture to the dry ingredients, mixing on low speed until just combined and no streaks of flour remain. Be careful not to overmix.
  4. Step 4
    Pour batter into the prepared pan and spread evenly. Bake for 28-35 minutes, or until edges are golden brown and a toothpick inserted into the center comes out clean. Let cool in the pan for 15-20 minutes, then lift onto a wire rack to cool completely.
  5. Step 5
    While bars cool, whisk together 4 cups sifted powdered sugar, 1/2 cup pure maple syrup, 1/4 cup whole milk, 1 teaspoon pure vanilla extract, and a pinch of salt until completely smooth and a thick, pourable consistency is achieved. Add more milk or powdered sugar if needed to adjust consistency.
  6. Step 6
    Once bars are completely cool, place the wire rack over parchment paper to catch drips. Pour the maple glaze evenly over the bars, spreading to cover. Let the glaze set for at least 30 minutes, then slice into desired bar shapes and serve. Store leftovers in an airtight container at room temperature for up to 3 days.

Important Information

Nutrition Facts (Per Serving)

It is important to consider this information as approximate and not to use it as definitive health advice.

Allergy Information

Please check ingredients for potential allergens and consult a health professional if in doubt.

« Previous Post
Salted Caramel Pretzel Bark: Sweet & Salty Perfection!
Next Post »
Best Caramel Coffee Buttercream Cake Ever! Easy Recipe

If you enjoyed this…

Cannoli Bites Dessert: A Delicious Twist on a Classic Treat

Irresistible Red Velvet Brownies: A Must-Try Dessert

Juicy Cinnamon Roll Apple Cake Recipe for a Cozy Treat

Primary Sidebar

Browse by Diet

BreakfastDinnerLunchDessertAppetizer

Sweet Peach Yogurt Parfait Delight

One of my fondest memories is from a lazy summer afternoon spent at my grandmother’s house. The sun filtered through the kitchen window, casting a warm glow over the table where she would create her culinary magic. It was during one of those blissful moments that I first tasted her Peach Yogurt Parfait with Honey and Granola. The sweet aroma of ripe peaches mingling with creamy yogurt and the crunch of granola was nothing short of heavenly. It felt like summer captured in a bowl, and I still remember the joy of diving in with a spoon, each layer revealing a new burst of flavor.

When I think about that parfait, I can almost hear the gentle hum of the bees outside, reminding me of the floral notes that honey brings to every bite. The vibrant yellows and soft oranges of the peaches contrast beautifully with the creamy white yogurt and the golden crunch of granola. It’s a dish that not only looks delightful but also tastes like a celebration of fresh, wholesome ingredients.

What makes my version of this Peach Yogurt Parfait special is the careful balance of flavors and textures. I use ripe, juicy peaches, drizzled with locally sourced honey, and a homemade granola that’s bursting with nuts and seeds for an extra crunch. It’s a simple dish, but every layer is crafted with love and attention.

Let me show you exactly how to make this delightful parfait, so you can bring a bit of that summer magic into your kitchen!

Sweet Peach Yogurt Parfait Delight

Why You’ll Love This Recipe

  • Delightfully creamy texture from the Greek yogurt, paired with the juicy sweetness of fresh peaches.
  • Ready in under 20 minutes, making it a quick and satisfying breakfast or snack option.
  • Budget-friendly, using common ingredients that you may already have in your pantry.
  • Customizable with your favorite granola and nuts, allowing you to tailor each parfait to your taste.
  • Perfectly balanced flavors with the bright acidity of lemon juice and the sweetness of honey enhancing the peaches.

Ingredients

  • For the Parfait:
  • 2 cups plain Greek yogurt (or vanilla yogurt for a sweeter option)
  • 2 large ripe peaches, diced (about 2 cups)
  • 1 tablespoon fresh lemon juice (to prevent browning of peaches)
  • 2 tablespoons honey (plus more for drizzling)
  • 1 teaspoon vanilla extract (optional for extra flavor)
  • For the Granola:
  • 1 cup granola (store-bought or homemade; see notes for a simple granola recipe)
  • 1/4 cup sliced almonds (optional for added crunch)
  • 1/4 cup shredded coconut (optional for added flavor)

Let’s dive into some key ingredients that make this Peach Yogurt Parfait so delightful! First, the Greek yogurt is not only creamy but also packed with protein, making it a satisfying option for breakfast or a snack. If you’re looking for a sweeter option, you can easily substitute it with vanilla yogurt, though it may alter the overall flavor balance. Next, the ripe peaches are the star of the show; their natural sweetness shines through, so I recommend choosing peaches that yield slightly to pressure, indicating they’re perfectly ripe. If peaches aren’t in season, feel free to use nectarines or even frozen peaches—just thaw them before use. Finally, honey adds a lovely floral sweetness that ties everything together. If you prefer, maple syrup can serve as a delicious substitute.

Step-by-Step Instructions

  1. Start by preparing the peaches. Wash them thoroughly, then slice and dice them into bite-sized pieces. In a medium bowl, toss the diced peaches with 1 tablespoon of fresh lemon juice to prevent browning. Set aside for about 5 minutes while the lemon juice works its magic.
  2. In a separate bowl, combine the Greek yogurt, 2 tablespoons of honey, and 1 teaspoon of vanilla extract if using. Stir the mixture until smooth and thoroughly blended. This should take about a minute. Avoid overmixing to maintain the creaminess of the yogurt.
  3. Now it’s time to layer your parfait. Grab a clear glass or bowl to showcase your beautiful creation. Start with a generous spoonful of the yogurt mixture at the bottom—about 1/4 cup will do. Use a spoon to spread it evenly.
  4. Add a layer of the diced peaches over the yogurt, ensuring they cover the yogurt completely. You might want to use about half of what you have prepared—roughly 1 cup. This layer should be visually appealing, so arrange the peaches neatly.
  5. Sprinkle 1/4 cup of granola over the peaches. This adds a delightful crunch. Make sure to distribute it evenly to ensure every bite has that satisfying texture. Avoid packing it down too tightly, as you want it to maintain its crunch.
  6. Repeat the layers: spoon in another 1/4 cup of yogurt, followed by another cup of peaches, and another sprinkle of granola. You should have at least two layers, but feel free to add more depending on your glass size.
  7. Finish off your parfait with a drizzle of honey on top for added sweetness and a touch of elegance. If you’re using sliced almonds or shredded coconut, sprinkle them on top now. It adds a lovely visual contrast and extra flavor.
  8. Serve immediately or refrigerate for up to 30 minutes before serving to allow the flavors to meld together. However, I recommend enjoying it fresh to maintain the granola’s crunch.

Pro Tips for the Best Peach Yogurt Parfait With Honey And Granola

  • Make sure to choose ripe peaches for the best flavor and texture. A common mistake is using unripe fruit, which can lead to a less enjoyable parfait. Look for peaches that are fragrant and slightly soft to the touch.
  • Use a clear glass to assemble your parfait; this not only makes for a beautiful presentation but also allows you to see the colorful layers, which adds to the enjoyment of eating it.
  • For an even creamier texture, consider whipping the Greek yogurt with a hand mixer for a couple of minutes before layering. This small adjustment makes a huge difference in mouthfeel.
  • Be mindful of the granola-to-yogurt ratio. Too much granola can overwhelm the parfait, while too little can make it feel too creamy. Aim for about 1/4 cup of granola per layer for the perfect balance.
  • If you’re making this for a gathering, consider preparing the yogurt and peaches ahead of time and layering them just before serving. This ensures the granola stays crunchy!

Variations & Serving Ideas

There are so many ways to get creative with your Peach Yogurt Parfait! For a tropical twist, swap out the peaches for mangoes or pineapples and top with coconut flakes. If you prefer a berry flavor, mix in some blueberries or strawberries with the peaches for added color and taste. For a nutty version, incorporate chopped walnuts or pecans instead of almonds.

As for serving ideas, this parfait pairs beautifully with a side of scrambled eggs for a hearty breakfast or fresh fruit salad for a light lunch. You might also enjoy it alongside whole grain toast with almond butter for an energizing snack. The contrast of flavors and textures will elevate your meal experience!

Storage, Make-Ahead & Reheating

The Peach Yogurt Parfait is best enjoyed fresh, but you can prepare some components ahead of time. Store the layered parfait in an airtight container in the refrigerator for up to 24 hours. However, be cautious; the granola may lose its crunch if stored too long. You can freeze the yogurt and peach mixture for up to 2 months; just remember to thaw it in the refrigerator overnight before serving.

If you plan to enjoy this dish the next day, it can taste even better as the flavors meld together. Just remember to add the granola right before serving to keep its delightful crunch!

Frequently Asked Questions

Can I make Peach Yogurt Parfait With Honey And Granola ahead of time?

Yes — in fact, it tastes even better the next day as the flavors meld. However, I recommend waiting to add the granola until just before serving to maintain its crunch.

What can I substitute for Greek yogurt?

If you prefer a lighter option, you can substitute Greek yogurt with regular yogurt or a dairy-free alternative like coconut yogurt. Just remember that this may alter the creaminess and flavor profile slightly.

Can I use frozen peaches for this parfait?

Absolutely! Just make sure to thaw the frozen peaches before using them. They will still add great flavor, though the texture may be slightly softer than fresh peaches.

How do I make the parfait vegan?

To make a vegan version, substitute the Greek yogurt with a plant-based yogurt alternative, and replace honey with maple syrup or agave nectar. This keeps the parfait sweet while adhering to a vegan diet.

What other fruits can I use in this recipe?

You can mix and match fruits based on your preference. Try using strawberries, blueberries, raspberries, or even bananas. Just make sure to adjust the lemon juice as needed to prevent browning.

Sweet Peach Yogurt Parfait Delight

Final Thoughts

The Peach Yogurt Parfait with Honey and Granola is a delightful blend of creamy yogurt, sweet peaches, and crunchy granola that creates a satisfying and nourishing treat. Each layer bursts with flavor, making it a perfect choice for breakfast or a light dessert.

This is the kind of recipe I come back to again and again, especially when I want something refreshing and wholesome to start my day. The harmony of sweet and tart flavors, combined with the delightful crunch, never fails to lift my spirits!

I encourage you to give this parfait a try and indulge in its comforting goodness. Feel free to share your results or even add your own twist—perhaps a sprinkle of cinnamon or a handful of nuts. Enjoy creating your perfect parfait!

Print
clock clock iconcutlery cutlery iconflag flag iconfolder folder iconinstagram instagram iconpinterest pinterest iconfacebook facebook iconprint print iconsquares squares iconheart heart iconheart solid heart solid icon

Peach Yogurt Parfait


  • Author: Lily author
  • Total Time: 15 minutes
  • Yield: 4 servings 1x
Pin Recipe
Print Recipe

Description

This Peach Yogurt Parfait combines creamy Greek yogurt, juicy peaches, and crunchy granola for a delightful treat. It’s a perfect breakfast or snack that captures the essence of summer in every bite.


Ingredients

Scale
  • For the Parfait:
  • 2 cups plain Greek yogurt (or vanilla yogurt for a sweeter option)
  • 2 large ripe peaches, diced (about 2 cups)
  • 1 tablespoon fresh lemon juice (to prevent browning of peaches)
  • 2 tablespoons honey (plus more for drizzling)
  • 1 teaspoon vanilla extract (optional for extra flavor)
  • For the Granola:
  • 1 cup granola (store-bought or homemade; see notes for a simple granola recipe)
  • 1/4 cup sliced almonds (optional for added crunch)
  • 1/4 cup shredded coconut (optional for added flavor)

Instructions

  1. Start by preparing the peaches. Wash them thoroughly, then slice and dice them into bite-sized pieces. In a medium bowl, toss the diced peaches with 1 tablespoon of fresh lemon juice to prevent browning. Set aside for about 5 minutes while the lemon juice works its magic.
  2. In a separate bowl, combine the Greek yogurt, 2 tablespoons of honey, and 1 teaspoon of vanilla extract if using. Stir the mixture until smooth and thoroughly blended. This should take about a minute. Avoid overmixing to maintain the creaminess of the yogurt.
  3. Now it’s time to layer your parfait. Grab a clear glass or bowl to showcase your beautiful creation. Start with a generous spoonful of the yogurt mixture at the bottom—about 1/4 cup will do. Use a spoon to spread it evenly.
  4. Add a layer of the diced peaches over the yogurt, ensuring they cover the yogurt completely. You might want to use about half of what you have prepared—roughly 1 cup. This layer should be visually appealing, so arrange the peaches neatly.
  5. Sprinkle 1/4 cup of granola over the peaches. This adds a delightful crunch. Make sure to distribute it evenly to ensure every bite has that satisfying texture. Avoid packing it down too tightly, as you want it to maintain its crunch.
  6. Repeat the layers: spoon in another 1/4 cup of yogurt, followed by another cup of peaches, and another sprinkle of granola. You should have at least two layers, but feel free to add more depending on your glass size.
  7. Finish off your parfait with a drizzle of honey on top for added sweetness and a touch of elegance. If you’re using sliced almonds or shredded coconut, sprinkle them on top now. It adds a lovely visual contrast and extra flavor.
  8. Serve immediately or refrigerate for up to 30 minutes before serving to allow the flavors to meld together. However, I recommend enjoying it fresh to maintain the granola’s crunch.
  • Prep Time: 15 mins
  • Cook Time: 0 mins
  • Category: Breakfast
  • Method: No-cook
  • Cuisine: American

Nutrition

  • Serving Size: 1 parfait
  • Calories: 250
  • Sugar: 20 g
  • Sodium: 50 mg
  • Fat: 5 g
  • Saturated Fat: 2 g
  • Unsaturated Fat: 3 g
  • Trans Fat: 0 g
  • Carbohydrates: 40 g
  • Fiber: 3 g
  • Protein: 10 g
  • Cholesterol: 10 mg

Keywords: Choose ripe peaches for the best flavor and texture. Use a clear glass for a beautiful presentation. For creaminess, consider whipping the yogurt before layering. Be mindful of the granola-to-yogurt ratio. Prepare yogurt and peaches ahead of time for gatherings, layering just before serving.

Did you make this recipe?

Share a photo and tag us — we can't wait to see what you've made!

Sun-Kissed Frozen Orange Cream Slush

As a child, summer days felt like they lasted forever. I remember the sticky heat wrapping around me as I played outside, my laughter mingling with the sounds of the neighborhood. But nothing could cool me down quite like the moment I’d spot my grandmother, laboring over her blender, whipping up her famous Frozen Orange Creamsicle Slush. That vibrant orange treat, with its frosty texture and sweet citrus aroma, was like a burst of sunshine in a cup. Just one sip, and I could feel the coolness wash over me, sparking pure joy.

This Frozen Orange Creamsicle Slush has a way of making you feel like a kid again. Its creamy, dreamy consistency is a delightful balance of bright orange and soft vanilla, inviting you to dive right in. The refreshing tang of orange dances on your tongue, while the smooth creaminess envelops you in a comforting embrace. It’s a nostalgic treat that’s perfect for hot summer afternoons or anytime you need a little pick-me-up.

What makes my version of this slush stand out is the addition of a hint of vanilla bean, which elevates the flavor and adds an extra layer of richness. Plus, it’s super easy to whip up with just a few simple ingredients that you probably already have on hand! So, if you’re ready to relive those sun-soaked memories, let me show you exactly how to make it.

Sun-Kissed Frozen Orange Cream Slush

Why You’ll Love This Recipe

  • Each slush is a perfect blend of creamy vanilla and zesty orange, creating a nostalgic flavor reminiscent of summer days.
  • This refreshing treat is ready in under 15 minutes, making it an ideal quick dessert for unexpected guests or hot afternoons.
  • With just 8 simple ingredients, it’s budget-friendly, ensuring you don’t have to break the bank to enjoy a delicious slush.
  • The slush has a perfectly smooth texture, thanks to the combination of ice and ice cream, providing a delightful contrast to the bright citrus flavors.
  • It’s highly customizable; you can easily adjust the sweetness and add fresh herbs for a unique twist that suits your taste.

Ingredients

  • 2 cups orange juice (freshly squeezed or store-bought)
  • 1 cup vanilla ice cream
  • 1 cup crushed ice
  • 1/2 cup milk (whole or 2%)
  • 1/4 cup granulated sugar (adjust based on sweetness preference)
  • 1 teaspoon vanilla extract
  • Zest of 1 orange (for added flavor)
  • Fresh orange slices and mint leaves (for garnish)

The star of this Frozen Orange Creamsicle Slush is the orange juice, which provides the vibrant, citrusy base. Freshly squeezed juice will yield the brightest flavor, but store-bought options can be just as convenient. If you’re opting for store-bought, choose 100% pure juice with no added sugars for the best results. Another essential ingredient is the vanilla ice cream; it adds creaminess and sweetness. You can substitute it with dairy-free ice cream if you’re looking for a vegan option. Whole or 2% milk complements the ice cream, creating a smooth blend. If you want a lower-calorie version, almond or oat milk can be good alternatives.

Lastly, the granulated sugar can be adjusted based on your sweetness preference. If you prefer a more natural sweetener, consider using honey or agave syrup. The orange zest enhances the flavor profile, providing an aromatic pop that brings the whole slush together. Don’t skip it! It adds an extra layer of brightness that makes this slush truly special.

Step-by-Step Instructions

  1. Start by preparing your ingredients. Gather 2 cups of orange juice, 1 cup of vanilla ice cream, and 1 cup of crushed ice. Make sure the ice is finely crushed, as larger chunks can make blending difficult.
  2. In a blender, combine the orange juice, vanilla ice cream, crushed ice, and 1/2 cup of milk. Add 1/4 cup of granulated sugar and 1 teaspoon of vanilla extract. If you like a sweeter slush, consider adding a bit more sugar at this stage.
  3. Add the zest of 1 orange to the blender. This step is crucial for enhancing the citrus flavor of your slush. Make sure not to include the bitter white pith—only the flavorful zest.
  4. Blend the mixture on medium-high speed for about 30-45 seconds. Stop once the ingredients are fully combined and the slush has a smooth, even consistency. If you notice large chunks of ice, blend for an additional 10-15 seconds. Avoid over-blending, as this can make the slush too liquidy.
  5. Once blended, taste the slush. If it needs more sweetness, add a little more sugar and blend for a few more seconds. If it’s too thick, you can add a splash of milk to reach your desired consistency.
  6. Pour the slush into glasses. This recipe typically serves 4, but you can easily double it for larger gatherings. Use a spoon to help guide the slush into the glasses if needed.
  7. Garnish each serving with fresh orange slices and mint leaves. The mint not only adds a pop of color but also a refreshing aroma that complements the citrus flavors beautifully.
  8. Serve immediately and enjoy! If you’ve made extra, you can refrigerate it for a short time, but it’s best enjoyed fresh.

Pro Tips for the Best Frozen Orange Creamsicle Slush

  • Don’t skip the orange zest! It’s a game-changer for flavor. Always zest before juicing to make it easier.
  • Use a high-powered blender for the best texture. A standard blender may struggle with ice, leading to uneven consistency. If you have a food processor, that can work too, but ensure the ice is finely crushed.
  • Adjust the ice-to-liquid ratio carefully. If your slush is too thick, it won’t blend well. Start with less ice and add more until you reach your preferred texture.
  • Be cautious with the sugar! Always start with the lower amount, as you can easily add more, but it’s hard to fix an overly sweet slush.
  • For a fun twist, consider adding a splash of coconut milk or a handful of fresh fruit like strawberries or pineapple. This not only enhances the flavor but also adds a beautiful color contrast.

Variations & Serving Ideas

There are countless ways to put a spin on your Frozen Orange Creamsicle Slush. Consider making a tropical version by adding in some pineapple juice or coconut milk for a delightful tropical twist. If you’re feeling adventurous, try incorporating a handful of frozen mango or peach slices for added sweetness. For a lighter version, swap out the vanilla ice cream for Greek yogurt for a creamy yet tangy alternative.

As for serving ideas, this refreshing slush pairs wonderfully with light summer dishes like grilled chicken skewers, fish tacos, or a simple salad topped with citrus vinaigrette. The bright, zesty flavors of the slush complement these dishes perfectly, making them an ideal pairing for a sunny day.

Storage, Make-Ahead & Reheating

This Frozen Orange Creamsicle Slush is best enjoyed fresh, but if you have leftovers, you can store them in an airtight container in the fridge for up to 2 days. Just keep in mind that the slush may lose some of its texture over time as the ice melts. It doesn’t freeze well, as the ice will turn into a solid block. If you must freeze it, blend again after thawing to restore the slushy consistency. This treat is best the day you make it, as the flavors meld together beautifully overnight, enhancing its deliciousness.

Frequently Asked Questions

Can I make Frozen Orange Creamsicle Slush ahead of time?

Yes — in fact, it tastes even better the next day as the flavors meld. However, it’s best to enjoy it fresh, as the texture can change if stored for too long. If you need to prepare it ahead, keep it in the fridge and re-blend before serving.

What kind of orange juice should I use?

For the best flavor, use freshly squeezed orange juice. However, if you’re short on time, opt for 100% pure store-bought juice without added sugars. This will ensure that your slush remains flavorful and refreshing.

Can I substitute the vanilla ice cream?

Absolutely! If you’re looking for a dairy-free option, coconut milk ice cream or a non-dairy vanilla ice cream can work wonderfully. They will still provide the creamy texture and sweetness you desire.

How can I adjust the sweetness of my slush?

You can easily adjust the sweetness by modifying the amount of sugar added. Start with 1/4 cup and taste the mixture before blending. If you prefer it sweeter, add more sugar gradually until it reaches your desired level.

What should I do if my slush is too thick?

If your slush is too thick, simply add a splash of milk or orange juice and blend again. This will help achieve a more drinkable consistency while maintaining the slushy texture. Adjust gradually to reach your preferred thickness.

Sun-Kissed Frozen Orange Cream Slush

Final Thoughts

The Frozen Orange Creamsicle Slush is a delightful blend of refreshing citrus and creamy goodness, making it a perfect treat for warm days or any time you crave a taste of nostalgia. The way the bright orange flavor dances with the creamy texture truly elevates this slush, transforming it into a satisfying escape from the everyday.

This is the kind of recipe I come back to again and again, especially when I’m looking to cool down or impress guests at a summer gathering. It’s simple to make and always brings smiles all around! I encourage you to try this recipe for yourself—don’t hesitate to share your results or even put your own spin on it. Happy slushing!

Print
clock clock iconcutlery cutlery iconflag flag iconfolder folder iconinstagram instagram iconpinterest pinterest iconfacebook facebook iconprint print iconsquares squares iconheart heart iconheart solid heart solid icon

Frozen Orange Creamsicle Slush


  • Author: Lily author
  • Total Time: 15 minutes
  • Yield: 4 servings 1x
Pin Recipe
Print Recipe

Description

This Frozen Orange Creamsicle Slush is a refreshing treat that combines creamy vanilla and zesty orange flavors. Perfect for hot summer days, it brings back nostalgic memories with every sip.


Ingredients

Scale
  • 2 cups orange juice (freshly squeezed or store-bought)
  • 1 cup vanilla ice cream
  • 1 cup crushed ice
  • 1/2 cup milk (whole or 2%)
  • 1/4 cup granulated sugar (adjust based on sweetness preference)
  • 1 teaspoon vanilla extract
  • Zest of 1 orange (for added flavor)
  • Fresh orange slices and mint leaves (for garnish)

Instructions

  1. Start by preparing your ingredients. Gather 2 cups of orange juice, 1 cup of vanilla ice cream, and 1 cup of crushed ice. Make sure the ice is finely crushed, as larger chunks can make blending difficult.
  2. In a blender, combine the orange juice, vanilla ice cream, crushed ice, and 1/2 cup of milk. Add 1/4 cup of granulated sugar and 1 teaspoon of vanilla extract. If you like a sweeter slush, consider adding a bit more sugar at this stage.
  3. Add the zest of 1 orange to the blender. This step is crucial for enhancing the citrus flavor of your slush. Make sure not to include the bitter white pith—only the flavorful zest.
  4. Blend the mixture on medium-high speed for about 30-45 seconds. Stop once the ingredients are fully combined and the slush has a smooth, even consistency. If you notice large chunks of ice, blend for an additional 10-15 seconds. Avoid over-blending, as this can make the slush too liquidy.
  5. Once blended, taste the slush. If it needs more sweetness, add a little more sugar and blend for a few more seconds. If it’s too thick, you can add a splash of milk to reach your desired consistency.
  6. Pour the slush into glasses. This recipe typically serves 4, but you can easily double it for larger gatherings. Use a spoon to help guide the slush into the glasses if needed.
  7. Garnish each serving with fresh orange slices and mint leaves. The mint not only adds a pop of color but also a refreshing aroma that complements the citrus flavors beautifully.
  8. Serve immediately and enjoy! If you’ve made extra, you can refrigerate it for a short time, but it's best enjoyed fresh.
  • Prep Time: 15 min
  • Cook Time: 0 min
  • Category: Dessert
  • Method: Blending
  • Cuisine: American

Nutrition

  • Serving Size: 1 serving
  • Calories: 200
  • Sugar: 30 g
  • Sodium: 50 mg
  • Fat: 5 g
  • Saturated Fat: 3 g
  • Unsaturated Fat: 2 g
  • Trans Fat: 0 g
  • Carbohydrates: 40 g
  • Fiber: 1 g
  • Protein: 2 g
  • Cholesterol: 20 mg

Keywords: Don't skip the orange zest! It's a game-changer for flavor. Always zest before juicing to make it easier.

Did you make this recipe?

Share a photo and tag us — we can't wait to see what you've made!

Zesty Lemon Poppy Seed Delight

One rainy afternoon, I found myself in my grandmother’s cozy kitchen, the kind that always smelled like warmth and love. She was whipping up her famous Lemon Poppy Seed Loaf, a recipe that had been passed down through generations. As the batter came together, the zesty aroma of fresh lemons filled the air, mingling perfectly with the nutty fragrance of poppy seeds. I can still picture her, apron-clad, as she expertly drizzled a vibrant citrus icing over the loaf, creating a glossy, sun-kissed finish that beckoned us to dive in. It was a moment that sparked my own passion for baking, and this recipe has become a cherished staple in my home ever since.

When you take a bite of this Lemon Poppy Seed Loaf, it’s like a burst of sunshine on your palate. The loaf is beautifully golden, with a tender crumb that melts in your mouth. Each slice is speckled with tiny poppy seeds, adding a delightful crunch that contrasts beautifully with the tangy sweetness of the lemon. And that citrus icing? It’s the finishing touch that elevates this loaf from ordinary to extraordinary, with its bright, zesty flavor dancing on your taste buds.

This recipe stands out because it embraces simplicity while delivering on flavor. I’ve added a hint of vanilla to the batter, enhancing the overall taste and making it even more indulgent. Trust me, once you make this Lemon Poppy Seed Loaf With Citrus Icing, it’ll become a go-to in your baking repertoire.

So, let me show you exactly how to make it!

Zesty Lemon Poppy Seed Delight

Why You’ll Love This Recipe

  • Moist and tender crumb that melts in your mouth, thanks to the perfect balance of butter and buttermilk.
  • Bright, zesty lemon flavor paired with crunchy poppy seeds, creating a delightful texture and taste experience.
  • Easy to whip up in just about an hour, perfect for last-minute gatherings or a cozy afternoon treat.
  • Budget-friendly with everyday ingredients, making it an accessible option for all home bakers.
  • The citrus icing adds a sweet tang that elevates the loaf, turning a simple recipe into a showstopper!

Ingredients

  • 1 ½ cups (190g) all-purpose flour
  • 1 teaspoon baking powder
  • ½ teaspoon baking soda
  • ½ teaspoon salt
  • 3 tablespoons poppy seeds
  • ½ cup (115g) unsalted butter, softened to room temperature
  • 1 cup (200g) granulated sugar
  • 2 large eggs
  • 1 teaspoon vanilla extract
  • 1 teaspoon lemon zest (from about 1 medium lemon)
  • ½ cup (120ml) buttermilk
  • 2 tablespoons fresh lemon juice

For the Citrus Icing:

  • 1 cup (120g) powdered sugar
  • 2 tablespoons fresh lemon juice
  • 1 tablespoon orange juice
  • 1 teaspoon lemon zest (for garnish, optional)

Let’s dive into the key ingredients that make this Lemon Poppy Seed Loaf so special. The all-purpose flour provides the structure and base for the loaf, while the baking powder and baking soda ensure it rises perfectly, giving the loaf a light texture. For a gluten-free variation, you could substitute the flour with a gluten-free all-purpose blend. Poppy seeds not only add a delightful crunch but also contribute to the unique flavor profile that pairs well with the citrus notes.

Unsalted butter is crucial for achieving the buttery richness that makes this loaf so moist. If you’re looking for a dairy-free option, coconut oil or a vegan butter can be used instead. The buttermilk is another essential component, providing acidity that activates the baking soda for a fluffy texture. If you don’t have buttermilk on hand, you can easily make a substitute by mixing ½ cup of milk with 1 tablespoon of vinegar or lemon juice and letting it sit for about 5 minutes.

Step-by-Step Instructions

  1. Preheat your oven to 350°F (175°C). Grease a 9×5-inch loaf pan or line it with parchment paper for easy removal later.
  2. In a medium mixing bowl, whisk together 1 ½ cups of all-purpose flour, 1 teaspoon of baking powder, ½ teaspoon of baking soda, ½ teaspoon of salt, and 3 tablespoons of poppy seeds. This helps to evenly distribute the baking agents and ensures a uniform rise.
  3. In a large mixing bowl, cream together ½ cup of softened unsalted butter and 1 cup of granulated sugar using an electric mixer on medium speed for about 3-4 minutes, until the mixture is light and fluffy. Make sure to scrape down the sides of the bowl occasionally.
  4. Add 2 large eggs, 1 teaspoon of vanilla extract, and 1 teaspoon of lemon zest to the creamed butter and sugar, mixing until fully combined. You want a smooth consistency, so ensure there are no lumps of butter.
  5. In a small bowl, combine ½ cup of buttermilk and 2 tablespoons of fresh lemon juice. Alternately add the dry ingredients and buttermilk mixture to the butter mixture, starting and ending with the dry ingredients. Mix just until combined; do not overmix, as this can lead to a dense loaf.
  6. Pour the batter into the prepared loaf pan. Smooth the top with a spatula, ensuring it’s even. Bake in the preheated oven for 50-60 minutes, or until a toothpick inserted in the center comes out clean. The edges should be lightly golden brown, and the center should feel just set.
  7. Once baked, remove the loaf from the oven and allow it to cool in the pan for about 10 minutes. Then, transfer it to a wire rack to cool completely. Resist the urge to slice too soon, as it will be crumbly if it’s still warm.
  8. While the loaf is cooling, prepare the citrus icing. In a medium bowl, whisk together 1 cup of powdered sugar, 2 tablespoons of fresh lemon juice, and 1 tablespoon of orange juice until smooth. If the icing is too thick, you can add a little more juice to reach your desired consistency.
  9. Once the loaf is completely cool, drizzle the citrus icing over the top. If you like, sprinkle with an additional teaspoon of lemon zest for an extra pop of flavor and color.

Pro Tips for the Best Lemon Poppy Seed Loaf With Citrus Icing

  • Be careful not to overmix your batter; this is a common mistake that can lead to a dense loaf. Mix just until the dry ingredients are incorporated for a light and fluffy texture.
  • Use room temperature ingredients, especially the butter and eggs. This helps to create a smoother batter and ensures even baking. Take your eggs out of the fridge about 30 minutes before you start.
  • For a more pronounced lemon flavor, consider adding a little lemon extract in addition to the zest and juice. Just a half teaspoon can elevate the citrus notes significantly.
  • When measuring your flour, spoon it into the measuring cup and level it off with a knife instead of scooping directly from the bag. This prevents packing and ensures you don’t end up with a dry loaf.
  • Invest in a good quality loaf pan; it makes a difference in heat distribution, which ensures even baking. If your pan is dark-coated, reduce the oven temperature by 25°F to prevent over-browning.

Variations & Serving Ideas

For a delightful twist, consider adding blueberries or raspberries to the batter for a fruity burst of flavor. You can also experiment with different citrus fruits—try lime or grapefruit zest and juice for a refreshing change. For a healthier option, substitute half of the all-purpose flour with whole wheat flour for added fiber without compromising too much on texture.

This Lemon Poppy Seed Loaf pairs beautifully with a light salad, such as a mixed greens salad with a vinaigrette, or a cup of tea for a cozy afternoon treat. It also complements a creamy cheese platter, as the acidity of the loaf balances rich cheeses perfectly. Lastly, a scoop of vanilla ice cream on the side creates a delightful contrast of temperatures and flavors!

Storage, Make-Ahead & Reheating

This Lemon Poppy Seed Loaf can be stored at room temperature for up to 3 days if wrapped tightly in plastic wrap. If you want to keep it longer, it freezes well for up to 3 months. To freeze, wrap the loaf tightly in plastic wrap and then in aluminum foil to prevent freezer burn.

When you’re ready to enjoy it again, simply thaw it in the fridge overnight. Reheat individual slices in the microwave for 15-20 seconds or in a toaster oven until warmed through. Interestingly, many people find that this loaf tastes even better the next day, as the flavors have time to meld!

Frequently Asked Questions

Can I make Lemon Poppy Seed Loaf With Citrus Icing ahead of time?

Yes — in fact, it tastes even better the next day! You can make the loaf a day in advance, allowing the flavors to develop. Just be sure to store it in an airtight container to maintain its moisture.

Can I substitute the poppy seeds?

Absolutely! If you don’t have poppy seeds on hand or prefer an alternative, you can use sesame seeds for a similar crunch or omit them entirely for a smooth loaf.

What can I use instead of buttermilk?

If you don’t have buttermilk, you can easily create a substitute by mixing ½ cup of milk (dairy or plant-based) with 1 tablespoon of vinegar or lemon juice. Let it sit for 5 minutes before using in the recipe.

How can I make this recipe gluten-free?

To make a gluten-free version of this Lemon Poppy Seed Loaf, substitute the all-purpose flour with a gluten-free all-purpose flour blend. Just ensure that the blend contains a binding agent like xanthan gum for the best results.

What is the best way to store leftover loaf?

Leftover Lemon Poppy Seed Loaf should be stored in an airtight container at room temperature for up to 3 days. For longer storage, wrap it tightly and freeze for up to 3 months. Thaw it before serving for the best texture.

Zesty Lemon Poppy Seed Delight

Final Thoughts

The Lemon Poppy Seed Loaf with Citrus Icing is truly a delightful treat that brings a burst of brightness to any occasion. The zesty lemon flavor combined with the subtle crunch of poppy seeds creates a satisfying balance, while the citrus icing adds a touch of sweetness that perfectly complements the loaf’s tanginess.

This is the kind of recipe I come back to again and again, especially when I want to brighten up a gloomy day or celebrate a small victory. The aroma that fills the kitchen as it bakes is absolutely heavenly! I encourage you to give this recipe a try; you might just find it becoming a beloved staple in your home. Don’t forget to share your results or even add your own unique twist—I can’t wait to see what you create!

Print
clock clock iconcutlery cutlery iconflag flag iconfolder folder iconinstagram instagram iconpinterest pinterest iconfacebook facebook iconprint print iconsquares squares iconheart heart iconheart solid heart solid icon

Lemon Poppy Seed Loaf


  • Author: Lily author
  • Total Time: 26 minute
  • Yield: 1 loaf 1x
Pin Recipe
Print Recipe

Description

This Lemon Poppy Seed Loaf is a delightful treat that combines zesty lemon flavor with crunchy poppy seeds. Topped with a citrus icing, it’s perfect for any occasion.


Ingredients

Scale
  • 1 ½ cups (190g) all-purpose flour
  • 1 teaspoon baking powder
  • ½ teaspoon baking soda
  • ½ teaspoon salt
  • 3 tablespoons poppy seeds
  • ½ cup (115g) unsalted butter, softened to room temperature
  • 1 cup (200g) granulated sugar
  • 2 large eggs
  • 1 teaspoon vanilla extract
  • 1 teaspoon lemon zest (from about 1 medium lemon)
  • ½ cup (120ml) buttermilk
  • 2 tablespoons fresh lemon juice
  • 1 cup (120g) powdered sugar
  • 2 tablespoons fresh lemon juice
  • 1 tablespoon orange juice
  • 1 teaspoon lemon zest (for garnish, optional)

Instructions

  1. Preheat your oven to 350°F (175°C). Grease a 9×5-inch loaf pan or line it with parchment paper for easy removal later.
  2. In a medium mixing bowl, whisk together 1 ½ cups of all-purpose flour, 1 teaspoon of baking powder, ½ teaspoon of baking soda, ½ teaspoon of salt, and 3 tablespoons of poppy seeds. This helps to evenly distribute the baking agents and ensures a uniform rise.
  3. In a large mixing bowl, cream together ½ cup of softened unsalted butter and 1 cup of granulated sugar using an electric mixer on medium speed for about 3-4 minutes, until the mixture is light and fluffy. Make sure to scrape down the sides of the bowl occasionally.
  4. Add 2 large eggs, 1 teaspoon of vanilla extract, and 1 teaspoon of lemon zest to the creamed butter and sugar, mixing until fully combined. You want a smooth consistency, so ensure there are no lumps of butter.
  5. In a small bowl, combine ½ cup of buttermilk and 2 tablespoons of fresh lemon juice. Alternately add the dry ingredients and buttermilk mixture to the butter mixture, starting and ending with the dry ingredients. Mix just until combined; do not overmix, as this can lead to a dense loaf.
  6. Pour the batter into the prepared loaf pan. Smooth the top with a spatula, ensuring it’s even. Bake in the preheated oven for 50-60 minutes, or until a toothpick inserted in the center comes out clean. The edges should be lightly golden brown, and the center should feel just set.
  7. Once baked, remove the loaf from the oven and allow it to cool in the pan for about 10 minutes. Then, transfer it to a wire rack to cool completely. Resist the urge to slice too soon, as it will be crumbly if it’s still warm.
  8. While the loaf is cooling, prepare the citrus icing. In a medium bowl, whisk together 1 cup of powdered sugar, 2 tablespoons of fresh lemon juice, and 1 tablespoon of orange juice until smooth. If the icing is too thick, you can add a little more juice to reach your desired consistency.
  9. Once the loaf is completely cool, drizzle the citrus icing over the top. If you like, sprinkle with an additional teaspoon of lemon zest for an extra pop of flavor and color.
  • Prep Time: 15 mins
  • Cook Time: 50-60 mins
  • Category: Dessert
  • Method: Baking
  • Cuisine: American

Nutrition

  • Serving Size: 1 slice
  • Calories: 200
  • Sugar: 15 g
  • Sodium: 150 mg
  • Fat: 8 g
  • Saturated Fat: 5 g
  • Unsaturated Fat: 3 g
  • Trans Fat: 0 g
  • Carbohydrates: 30 g
  • Fiber: 1 g
  • Protein: 3 g
  • Cholesterol: 40 mg

Keywords: Be careful not to overmix your batter; this is a common mistake that can lead to a dense loaf. Use room temperature ingredients for a smoother batter and even baking.

Did you make this recipe?

Share a photo and tag us — we can't wait to see what you've made!

  • Privacy Policy
  • Terms Of Service
  • Contact
  • About
  • GDPR

Copyright © 2025 Homesmad