Broccoli And Mushroom Stir Fry An Incredible Ultimate Recipe awaits you, promising a culinary journey that’s both wonderfully simple and incredibly satisfying. Have you ever wished for a meal that ticks all the boxes – vibrant, nutritious, bursting with flavor, and on the table in minutes? Well, your wish is about to come true! Stir-frying, an ancient Chinese cooking technique, has evolved over centuries, celebrated for its ability to transform humble ingredients into a symphony of textures and tastes with lightning speed. It’s a method that values freshness and efficiency, perfectly aligning with our modern desire for delicious, wholesome food without the fuss.
I find that people absolutely adore a good stir-fry because it delivers a delightful crunch from perfectly cooked vegetables, complemented by the tender, earthy notes of mushrooms, all coated in a savory, umami-rich sauce. It’s the kind of dish that truly brightens your palate and leaves you feeling energized, not weighed down. Furthermore, the versatility of this cooking style means you can adapt it to your preferences, making it a perennial favorite for busy weeknights or a healthy lunch option. This particular Broccoli And Mushroom Stir Fry An Incredible Ultimate Recipe takes these beloved elements and elevates them, ensuring every bite is a delightful experience. Get ready to discover your new go-to meal!

Ingredients:
-
For the Vibrant Vegetables:
- 2 large heads of fresh broccoli, yielding about 4-5 cups of florets once trimmed. I love using fresh broccoli for its incredible texture and nutritional benefits in this stir fry!
- 1 pound (approximately 450g) of mixed mushrooms – a combination of cremini, shiitake, and oyster mushrooms works wonderfully for diverse textures and deeper flavor. Slice them to about 1/4-inch thickness.
- 1 medium red bell pepper, thinly sliced into strips. This adds a beautiful pop of color and a delightful sweetness to our ultimate stir-fry.
- 1 medium yellow onion, thinly sliced or cut into wedges. It provides a foundational sweetness and aromatic base.
- 1 cup snow peas or sugar snap peas (optional, but highly recommended for an extra crunch and sweetness).
-
For the Aromatic Foundation:
- 5-6 cloves garlic, freshly minced. You can never have too much garlic in a stir-fry, in my opinion!
- 2-inch piece of fresh ginger, peeled and finely minced or grated. The spicy, fresh kick of ginger is essential for that authentic stir-fry flavor.
-
For the Irresistible Stir-Fry Sauce:
- 1/2 cup low-sodium soy sauce. This forms the savory backbone of our sauce.
- 1/4 cup oyster sauce. If you’re vegetarian, a mushroom-based “vegetarian oyster sauce” is an excellent substitute and works beautifully. This adds an unparalleled umami depth.
- 2 tablespoons rice vinegar. It provides a crucial tanginess that balances the richness of the other ingredients.
- 2 tablespoons light brown sugar (or maple syrup for a refined sugar-free option). A touch of sweetness really rounds out the flavor profile.
- 1 tablespoon cornstarch. This is our secret weapon for thickening the sauce, ensuring it coats every piece of the Broccoli And Mushroom Stir Fry An Incredible Ultimate Recipe beautifully.
- 1/2 teaspoon white pepper. It offers a subtle heat and a distinct aroma different from black pepper, common in Asian cuisine.
- 1/4 cup water or low-sodium vegetable broth. This helps to thin the sauce to the right consistency and bloom the cornstarch.
- 1 teaspoon toasted sesame oil. Add this at the very end of mixing the sauce for its fragrant, nutty aroma.
-
For Cooking:
- 3-4 tablespoons high-heat cooking oil, such as canola, grapeseed, or peanut oil. These oils can withstand the high temperatures required for stir-frying without smoking.
-
For Garnish (Optional, but highly encouraged):
- 2 green onions, thinly sliced diagonally. They add freshness and a mild oniony bite.
- 1 tablespoon toasted sesame seeds. A sprinkle adds texture and a lovely nutty flavor.
- A dash of chili flakes or a drizzle of chili oil for those who love a bit of heat.
Preparing Your Wonderful Ingredients: The Foundation of Flavor
-
Getting the Broccoli Ready: First, let’s tackle our star vegetable. Begin by washing the broccoli heads thoroughly. Using a sharp knife, carefully trim the florets from the tough stalks. Aim for bite-sized pieces, roughly 1 to 1.5 inches in diameter. I like to also peel the thicker parts of the stalk and slice them into coins; they’re surprisingly tender and delicious when cooked right, minimizing waste!
For truly vibrant and tender-crisp broccoli, I always recommend a quick blanching step. Bring a medium pot of salted water to a rolling boil. Add the broccoli florets and cook for just 1-2 minutes until they turn a brilliant green and are slightly tender but still have a good bite. Immediately drain them and plunge them into an ice bath (a bowl of ice water) to stop the cooking process and preserve that beautiful color. Once cooled, drain them thoroughly and set aside. This small step makes a huge difference in the final texture of our Broccoli And Mushroom Stir Fry An Incredible Ultimate Recipe.
- Mushroom Mastery: Next, let’s prepare the mushrooms. Avoid washing mushrooms under running water, as they absorb too much moisture and won’t brown as well. Instead, gently wipe them clean with a damp paper towel to remove any dirt. Trim off the very ends of the woody stems from shiitake or oyster mushrooms. Slice all your mushrooms to an even 1/4-inch thickness. Uniform slicing ensures even cooking, which is key for getting that perfect golden sear.
- Prepping Other Vegetables: Take your red bell pepper and slice it thinly into strips, about 2 inches long. For the yellow onion, you can either slice it thinly or cut it into small wedges, depending on your preference. If you’re using snow peas or sugar snap peas, trim any tough ends. Organization is paramount in stir-frying; have all your vegetables prepped and ready to go before you even think about turning on the heat. This is often called “mise en place” and it will make your cooking experience so much smoother.
- Aromatic Powerhouse: Peel and finely mince your garlic cloves. The finer the mince, the more flavor it releases. For the ginger, peel it using the edge of a spoon (it’s surprisingly effective!) and then finely mince or grate it. Again, aim for a very fine texture so it melds seamlessly into the dish without any large fibrous bits. Keep these aromatics separate from your other vegetables, as they will be added at a specific point in the cooking process.
Crafting the Ultimate Stir-Fry Sauce: The Heart of the Dish
- Combining the Sauce Elements: Now, let’s create the magical sauce that will bring all these incredible flavors together. In a medium bowl or a large measuring cup, combine the low-sodium soy sauce, oyster sauce (or vegetarian oyster sauce), rice vinegar, and light brown sugar. Whisk these ingredients together until the sugar is completely dissolved.
- The Cornstarch Slurry: In a small separate bowl, whisk the cornstarch with the 1/4 cup of water or vegetable broth until no lumps remain. This is your cornstarch slurry, and it’s what will thicken our sauce to a luxurious, glossy consistency. Add this slurry to the main sauce mixture and whisk everything thoroughly.
- Finishing Touches for the Sauce: Finally, add the white pepper and the toasted sesame oil to the sauce mixture. Give it one last good whisk to ensure everything is fully incorporated. Set this incredibly flavorful sauce aside. Having your sauce ready before you start cooking is crucial; stir-frying moves very quickly, and you won’t have time to mix it mid-cook. This meticulously crafted sauce is what makes the “Broccoli And Mushroom Stir Fry An Incredible Ultimate Recipe” truly stand out!
The Searing and Stir-Frying Process: Unleashing the Wok’s Potential
- Heating the Wok or Pan: Place your wok or a large, heavy-bottomed skillet over high heat. This is perhaps the most important step for achieving that authentic stir-fry texture. Allow the pan to get scorching hot – you should see wisps of smoke beginning to rise. Once hot, add 2 tablespoons of your high-heat cooking oil. Swirl to coat the bottom and sides of the pan.
- Searing the Mushrooms: This is a technique I swear by for amazing flavor. Add the sliced mushrooms to the very hot oil in a single layer if possible, or in batches if your pan isn’t large enough. Do not stir them immediately! Let them sear undisturbed for 2-3 minutes until they develop a deep golden-brown crust. This caramelization creates an intense umami flavor. Then, stir and cook for another 3-5 minutes until all sides are nicely browned and much of their moisture has evaporated. Remove the mushrooms from the pan and set them aside with the blanched broccoli. We’re building layers of flavor here!
- Stir-Frying the Aromatics and Onions: Add another tablespoon of oil to the hot pan if needed. Add the sliced yellow onion and stir-fry for 2-3 minutes until it starts to soften and become translucent. Next, add the minced garlic and ginger. Stir-fry constantly for about 30 seconds to 1 minute until fragrant. Be careful not to burn the garlic, as burnt garlic can turn bitter very quickly.
- Adding the Bell Pepper and Peas: Toss in the sliced red bell pepper and, if using, the snow peas or sugar snap peas. Stir-fry for 2-3 minutes. We want these vegetables to be tender-crisp, not mushy. They should retain some of their vibrant color and a pleasant crunch. This incredible ultimate recipe relies on perfectly cooked vegetables.
- Reintroducing the Stars: Now, it’s time to bring back our blanched broccoli and perfectly seared mushrooms. Add them to the pan with the other vegetables. Toss everything together for 1-2 minutes to heat them through and combine the flavors.
Bringing It All Together and Serving: The Grand Finale
- The Sauce Revelation: Give your prepared stir-fry sauce one final quick whisk to ensure the cornstarch hasn’t settled at the bottom. Pour the entire sauce mixture evenly over the vegetables in the pan. Immediately stir and toss vigorously to coat all the vegetables.
- Thickening the Sauce: Continue to stir-fry for another 1-2 minutes. You’ll notice the sauce rapidly begin to thicken and become glossy, clinging beautifully to every piece of broccoli and mushroom. This is where the magic happens, transforming our ingredients into the most incredible ultimate recipe. Once the sauce has reached your desired consistency, and everything is piping hot, turn off the heat.
- The Finishing Touch: Transfer your glorious Broccoli And Mushroom Stir Fry An Incredible Ultimate Recipe immediately to a large serving platter or individual bowls.
- Garnish and Serve: Garnish generously with the thinly sliced green onions and toasted sesame seeds. If you enjoy a bit of heat, a drizzle of chili oil or a sprinkle of chili flakes would be a fantastic addition. Serve this magnificent stir-fry hot, perhaps alongside fluffy steamed jasmine rice, brown rice, or even some simple stir-fried noodles to complete your meal. This dish is not just a meal; it’s an experience, packed with incredible textures and a symphony of flavors that will leave you craving more! Enjoy every single bite of this ultimate recipe!
Conclusion:
And there you have it! We’ve journeyed through the simple yet profound magic of what I truly believe is a weeknight game-changer, a dish that consistently delivers on flavor, nutrition, and sheer satisfaction. If you’re looking for a meal that’s both incredibly easy to prepare and remarkably delicious, then this recipe, without a doubt, deserves a prime spot in your cooking repertoire. It’s the perfect solution for those busy evenings when you crave something wholesome and homemade but are short on time. The vibrant, crisp-tender broccoli paired with the earthy, savory mushrooms, all coated in that irresistible umami-rich sauce, creates a symphony of textures and tastes that will leave you feeling completely content.
I find myself turning to this dish again and again because it’s not just a meal; it’s an experience that brightens the dinner table and brings a smile to everyone’s face. It’s truly a testament to how fantastic simple, fresh ingredients can be when combined thoughtfully. Every bite offers that perfect balance of crunch from the broccoli, the hearty chew of the mushrooms, and the nuanced sweetness and savoriness of the sauce. It’s a dish that manages to be both light and incredibly fulfilling, proving that healthy eating doesn’t have to sacrifice an ounce of flavor. This isn’t just any stir-fry; it’s truly the Broccoli And Mushroom Stir Fry An Incredible Ultimate Recipe, designed to be a standout star in your kitchen.
Now, let’s talk about how to make this culinary creation even more spectacular, or how to adapt it to your preferences. The beauty of a stir-fry lies in its incredible versatility. While fantastic on its own, I highly recommend serving this delightful stir-fry over a bed of fluffy jasmine rice to soak up every last drop of that amazing sauce. Brown rice or quinoa are also excellent choices for a healthier, heartier meal. For those looking for a low-carb alternative, cauliflower rice works wonderfully, providing a similar texture without the extra carbohydrates. You could even toss it with some pre-cooked noodles, like udon or ramen, for a complete noodle bowl experience!
Don’t be afraid to experiment and make this recipe truly your own. If you’re looking to add some protein, thinly sliced chicken breast or shrimp can be stir-fried right alongside the vegetables, or pan-fried tofu (firm or extra-firm, pressed well) makes a fantastic vegetarian addition. Just be sure to cook the protein almost through before adding your vegetables. Want to boost the veggie content even further? Julienne carrots, sliced bell peppers of any color, snap peas, or even some baby corn would be welcome additions, just remember to add them based on their cooking time – tougher vegetables first. For an extra kick, a dash of sriracha or a pinch of red pepper flakes in the sauce can elevate the heat. A squeeze of fresh lime juice at the end can also add a wonderful brightness, cutting through the richness beautifully. And for a truly aromatic finish, a sprinkle of toasted sesame seeds or chopped fresh cilantro and green onions always elevates the presentation and flavor.
Now it’s your turn to unleash your inner chef!
I genuinely encourage you to grab your wok or large skillet and give this sensational stir-fry a try this week. You’ll be amazed at how quickly it comes together and how incredibly satisfying it is. It’s a recipe that I’m incredibly proud of, and I’m confident that once you taste it, it will become a regular fixture in your meal rotation. Cooking should be an enjoyable, fulfilling experience, and I promise you, this recipe embodies just that. It’s simple enough for beginners but flavorful enough to impress even the most seasoned cooks.
Don’t keep this deliciousness to yourself!
I would absolutely love to hear about your experience. Did you add a unique twist? What did you serve it with? Please share your thoughts, photos, and any creative variations you come up with in the comments below. Your feedback and culinary adventures inspire me, and I can’t wait to see how you make this incredible recipe shine in your kitchen. Happy cooking, my friends!
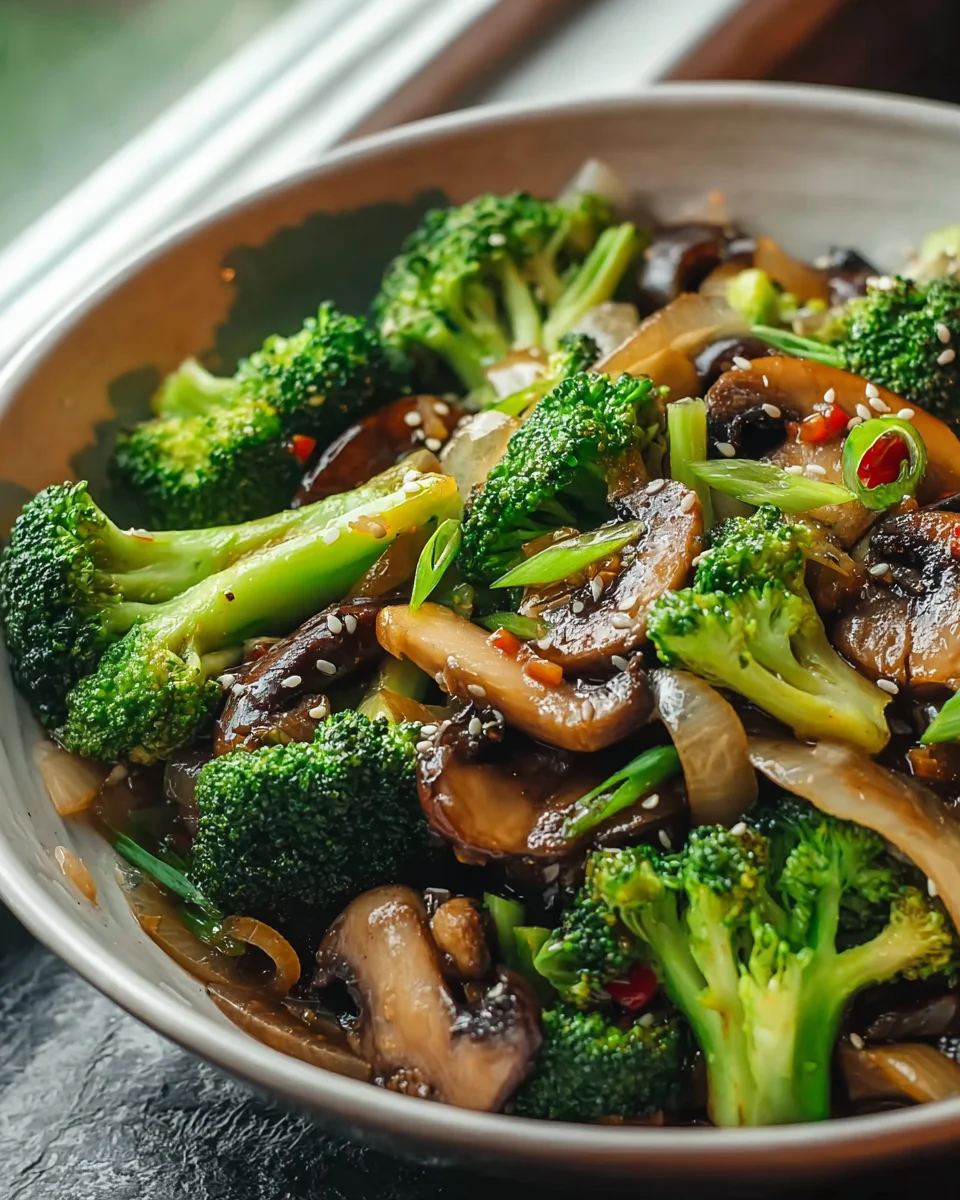
Amazing Broccoli & Mushroom Stir Fry Ultimate Recipe
Broccoli And Mushroom Stir Fry An Incredible Ultimate Recipe offers a vibrant, nutritious, and flavorful meal ready in minutes. This ancient Chinese cooking technique transforms humble ingredients into a symphony of textures and tastes, celebrated for its freshness and efficiency. Enjoy delightful crunch from perfectly cooked vegetables, tender, earthy mushrooms, all coated in a savory, umami-rich sauce. This versatile dish brightens your palate, leaving you energized, making it a go-to for busy weeknights or a healthy lunch.
Ingredients
Instructions
Important Information
Nutrition Facts (Per Serving)
It is important to consider this information as approximate and not to use it as definitive health advice.
Allergy Information
Please check ingredients for potential allergens and consult a health professional if in doubt.