• Skip to primary navigation
  • Skip to main content
  • Skip to primary sidebar
Homesmad

Homesmad

  • Home
  • Breakfast & Brunch
  • Appetizers & Snacks
  • Dinner
  • Dessert
  • About
  • Privacy Policy
  • Contact
Homesmad
  • Home
  • Breakfast & Brunch
  • Appetizers & Snacks
  • Dinner
  • Dessert
  • About
  • Privacy Policy
  • Contact

Hearty Sausage Tortellini Soup: Quick & Easy Weeknight Meal

October 2, 2025 by Lily author

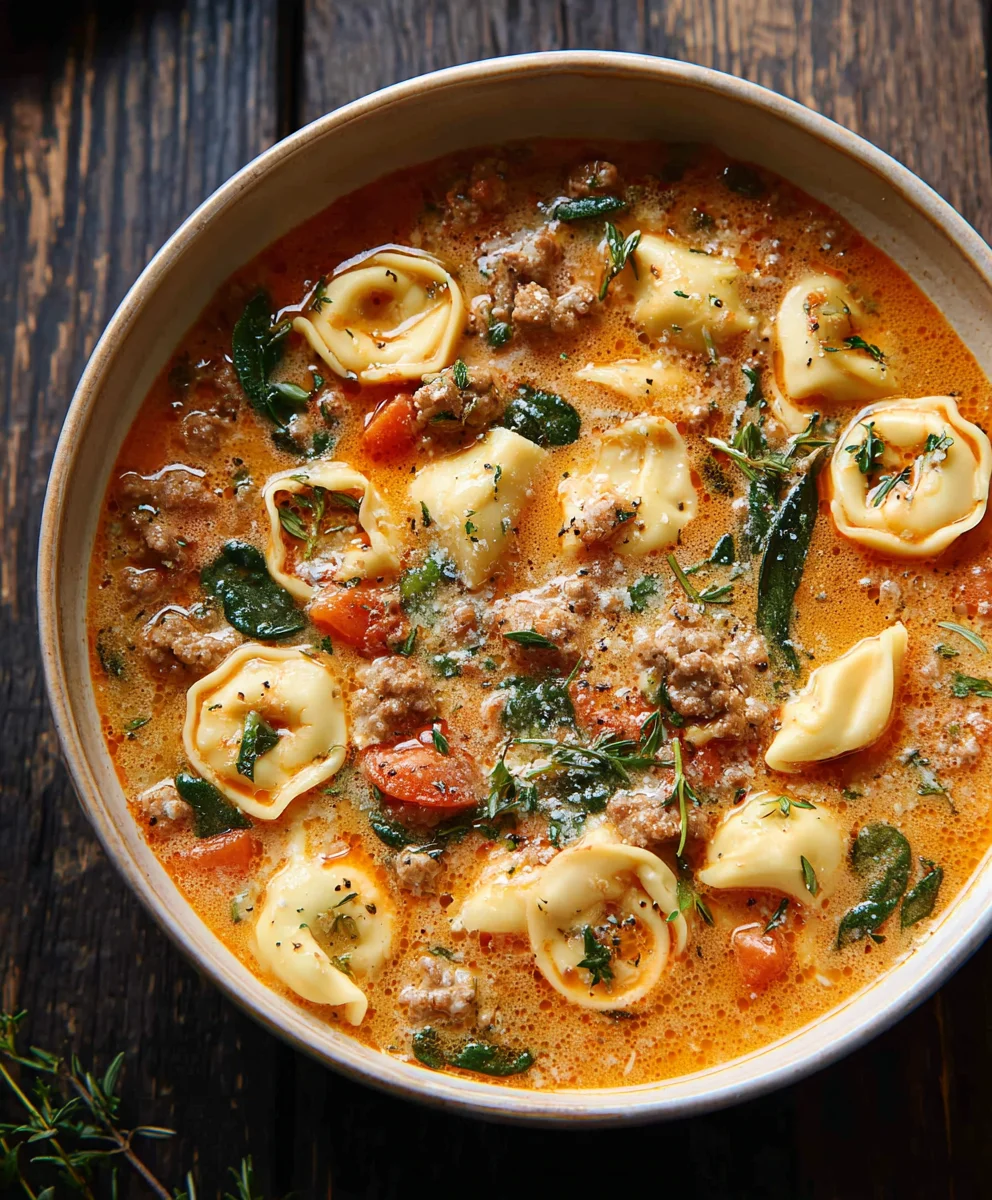
Sausage Tortellini Soup is more than just a meal; it’s an instant invitation to warmth and comfort, a delightful experience that transforms an ordinary evening into something truly special. Imagine the savory aroma filling your kitchen as tender tortellini, rich Italian sausage, and vibrant vegetables simmer together in a creamy, flavorful broth. This culinary masterpiece effortlessly marries the rustic charm of Italian-inspired ingredients with the ease required for modern life, creating a dish that feels both gourmet and incredibly approachable.

While tortellini hails from the heart of Italy, bringing centuries of culinary heritage and a touch of artisanal craftsmanship, the concept of a hearty, nourishing soup brimming with robust flavors has become a beloved staple across many cultures. This particular combination has gained immense popularity for a reason: it offers an incredible balance of textures and tastes. People universally adore this Sausage Tortellini Soup for its comforting creaminess, the satisfying chew of the pasta, the hearty kick from the seasoned sausage, and the nourishing touch of fresh greens. It’s incredibly adaptable, surprisingly simple to prepare, and guarantees to be a family favorite, perfect for cozy nights in or a comforting meal shared with friends. I am genuinely thrilled to guide you through creating this incredibly satisfying and heartwarming dish.

Hearty Sausage Tortellini Soup: Quick & Easy Weeknight Meal this RECIPE

Ingredients:

  • 2 tablespoons olive oil
  • 1 pound Italian sausage, mild or hot (casings removed if using links)
  • 1 large yellow onion, diced
  • 4 cloves garlic, minced
  • 6 cups chicken broth (low sodium recommended for better control over saltiness)
  • 1 (14.5 ounce) can diced tomatoes, undrained
  • 1 (6 ounce) can tomato paste
  • 1 teaspoon dried basil
  • 1 teaspoon dried oregano
  • ½ teaspoon red pepper flakes (optional, adjust to your preferred level of heat)
  • 1 teaspoon salt (or to taste)
  • ½ teaspoon black pepper (or to taste)
  • 1 (19 ounce) package refrigerated cheese tortellini (or frozen, see notes in instructions for cooking time adjustment)
  • 5 ounces fresh baby spinach
  • ½ cup heavy cream
  • Freshly grated Parmesan cheese, for serving

Prepping Our Ingredients for Maximum Flavor

Before we even think about turning on the stove, let’s get all of our ingredients ready. This step, often called “mise en place” by professional chefs, is crucial for a smooth cooking experience and helps prevent any last-minute scrambling. Trust me, it makes all the difference when you’re moving quickly through the steps!

  1. Dice the Onion with Precision:

    First, take your large yellow onion. Carefully cut it in half from root to stem, peel off the outer layers, and then place each half cut-side down on your cutting board. Make several horizontal slices, not quite cutting all the way through the root end. Then, make vertical slices before dicing across those cuts. Our goal is a uniform dice, which ensures the onion cooks evenly and releases its sweet aromatic flavors consistently into our soup base. If your onion pieces are too large, they might not soften properly by the time the rest of the soup is ready. Too small, and they could disappear into the broth.

  2. Mince the Garlic for Aromatic Depth:

    Next up, our garlic. Peel the 4 cloves and give them a good smash with the side of your knife. This helps release their natural oils and makes them easier to mince. Chop them finely. We want small, potent pieces of garlic to infuse our soup with that essential savory aroma without overwhelming the other flavors. Remember, a fine mince means maximum surface area for flavor release, which is exactly what we want in our rich Sausage Tortellini Soup.

  3. Prepare Your Sausage:

    If you’re using Italian sausage links, gently remove the casings. You can usually do this by making a shallow slit down the length of each link and peeling the casing away. If you’re using bulk sausage, simply set it aside, ready to be broken apart in the pot. Having it ready ensures we can add it to the hot pan without delay once we begin cooking.

  4. Measure and Organize All Remaining Ingredients:

    Measure out your olive oil, chicken broth, tomato paste, dried basil, dried oregano, red pepper flakes, salt, and black pepper. Open your can of diced tomatoes and have it ready. Get your tortellini and spinach out of the fridge. Having everything pre-measured and within arm’s reach means you won’t be scrambling for ingredients while something is cooking on the stove, which can be critical when working with ingredients like garlic that can burn quickly. This organized approach helps us to layer flavors effectively and efficiently.

Building the Flavor Foundation: Sautéing and Browning

This is where the magic begins, where we start to build the incredibly deep and savory base for our Sausage Tortellini Soup. Taking your time here will pay dividends in the final taste.

  1. Brown the Italian Sausage:

    Place a large Dutch oven or a heavy-bottomed pot over medium-high heat. Add the 2 tablespoons of olive oil. Once the oil shimmers, add your Italian sausage. Using a wooden spoon or a potato masher, break the sausage apart into small, bite-sized pieces as it cooks. Stir occasionally, allowing the sausage to brown nicely on all sides. This browning process, known as the Maillard reaction, creates hundreds of new flavor compounds, giving the sausage a rich, complex taste that will become the backbone of our soup. Continue to cook until the sausage is no longer pink and has developed a beautiful golden-brown crust. This usually takes about 6-8 minutes. Once fully cooked and beautifully browned, use a slotted spoon to transfer the sausage to a plate lined with paper towels, leaving any rendered fat behind in the pot. We want to keep that flavorful fat for the next step!

  2. Sauté the Onions to Sweet Perfection:

    Reduce the heat to medium. Add your diced onion to the pot, utilizing the delicious rendered sausage fat. If there isn’t enough fat (sometimes leaner sausages don’t release much), you can add another tablespoon of olive oil. Sauté the onions, stirring frequently, until they become soft, translucent, and slightly caramelized around the edges. This process typically takes about 5-7 minutes. Allowing the onions to cook down slowly brings out their natural sweetness, which will balance the richness of the sausage and the acidity of the tomatoes. Do not rush this step; properly cooked onions are a cornerstone of flavor in so many dishes.

  3. Infuse with Garlic:

    Now, add your minced garlic to the softened onions. Stir constantly for about 60 seconds, or until the garlic becomes fragrant. It’s important to cook it just until aromatic; be extremely careful not to burn the garlic, as burnt garlic turns bitter and can ruin the entire flavor profile of your soup. We’re looking for a lovely, pungent aroma, not a dark color. This brief sauté awakens the garlic’s powerful flavor, integrating it seamlessly into our evolving soup base.

  4. Bloom the Tomato Paste:

    Add the 6-ounce can of tomato paste to the pot with the onions and garlic. Stir it in thoroughly, allowing the tomato paste to cook for about 2-3 minutes, stirring constantly. You might notice it darken slightly and become a deeper, richer red. This process, often called “blooming” or “caramelizing” the tomato paste, deepens its flavor, removing any raw or metallic notes and concentrating its natural sweetness and umami. It’s a small step that makes a huge difference in the overall depth of your Sausage Tortellini Soup.

Simmering to Perfection: The Heart of Our Soup

With our flavor base established, it’s time to bring everything together into a cohesive, comforting soup. This phase allows all the ingredients to meld and harmonize, creating that quintessential warm, savory experience.

  1. Combine and Deglaze:

    Pour in the 6 cups of chicken broth, along with the undrained can of diced tomatoes. Using your wooden spoon, gently scrape the bottom of the pot to loosen any browned bits (known as “fond”). These browned bits are packed with incredible flavor from the sausage, onions, and garlic, and dissolving them into the broth is like unlocking a hidden layer of deliciousness for our Sausage Tortellini Soup. This process is called deglazing, and it’s a chef’s secret for maximizing flavor.

  2. Introduce the Herbs and Seasonings:

    Stir in the dried basil, dried oregano, red pepper flakes (if using), 1 teaspoon of salt, and ½ teaspoon of black pepper. Give everything a good stir to ensure the herbs are evenly distributed throughout the liquid. These classic Italian seasonings are perfectly chosen to complement the Italian sausage and tomato base, creating that familiar, comforting aroma we all love.

  3. Return the Sausage and Simmer:

    Now, add your browned Italian sausage back into the pot. Bring the soup to a gentle simmer over medium heat. Once simmering, reduce the heat to low, cover the pot, and let it gently simmer for at least 15-20 minutes. This simmering time is crucial. It allows all the flavors to deepen and meld together beautifully, softening the onions even further and creating a truly harmonious and rich broth. You’ll notice the aromas filling your kitchen, promising the deliciousness to come.

  4. Taste and Adjust Seasoning:

    After the simmering time, remove the lid and give your soup a taste. This is your chance to adjust the seasonings to your personal preference. Does it need a little more salt? A pinch more pepper? Maybe another dash of red pepper flakes for an extra kick? Remember, you can always add more, but you can’t take it away. Trust your palate; it’s the best guide!

The Creamy Finish: Adding Tortellini and Spinach

We’re in the home stretch now! These final additions bring texture, color, and a luxurious creaminess that elevates our soup to truly comforting status.

  1. Cook the Tortellini to Al Dente Perfection:

    Increase the heat slightly to bring the soup back to a gentle simmer. Add the 19-ounce package of refrigerated cheese tortellini directly into the simmering soup. Stir gently to ensure the tortellini are fully submerged and don’t stick together. Cook according to package directions, which is typically 3-5 minutes for refrigerated tortellini, or until they are al dente (tender yet still firm to the bite). If you are using frozen tortellini, it will likely take a few minutes longer, so follow the package instructions closely. It’s important not to overcook the tortellini, as they can become mushy. We want them to hold their shape and offer a satisfying chew in every spoonful of our Sausage Tortellini Soup.

  2. Wilt in the Fresh Spinach:

    Once the tortellini is almost done, add the 5 ounces of fresh baby spinach to the pot. Gently stir the spinach into the hot soup. The residual heat from the soup will cause the spinach to wilt quickly, usually within 1-2 minutes. You’ll watch it transform from a vibrant pile into tender, deep green leaves. We add the spinach at this stage to prevent it from overcooking and becoming mushy or losing its bright color. It adds a wonderful freshness, a pop of color, and essential nutrients to our hearty soup.

  3. Stir in the Heavy Cream for Richness:

    Finally, remove the pot from the heat. Stir in the ½ cup of heavy cream. Gently fold it into the soup until it’s fully incorporated and the broth takes on a beautiful, creamy, and slightly opaque appearance. Adding the cream at the very end and off the heat helps to prevent any chance of it curdling, especially since our soup has an acidic tomato base. This step adds a luxurious richness and a silky mouthfeel, transforming our already delicious soup into a truly decadent and comforting experience. Let the soup rest for just a minute or two, allowing the flavors to settle.

Serving Up Our Delicious Sausage Tortellini Soup

The moment has arrived! Your kitchen should be filled with an incredible aroma, and your delicious Sausage Tortellini Soup is ready to be enjoyed.

  1. Ladle and Garnish:

    Carefully ladle generous portions of the hot, creamy soup into individual bowls. Ensure each serving gets a good mix of sausage, tortellini, and spinach. For the ultimate finishing touch, generously sprinkle each bowl with freshly grated Parmesan cheese. The salty, nutty flavor of the Parmesan perfectly complements the rich and savory notes of the soup, adding another layer of irresistible flavor.

  2. Enjoy and Pair:

    Serve immediately, perhaps with a side of warm, crusty bread or garlic bread for dipping. There’s nothing quite like dipping a piece of crusty bread into this rich, creamy broth. This soup is wonderfully filling and comforting, making it a perfect meal for a chilly evening or a cozy family dinner. The combination of savory sausage, tender tortellini, fresh spinach, and a creamy tomato broth is simply irresistible.

    Leftovers and Reheating Tips:

    Any leftover Sausage Tortellini Soup can be stored in an airtight container in the refrigerator for up to 3-4 days. When reheating, gently warm the soup on the stovetop over low heat, stirring occasionally. You might find that the tortellini soaks up some of the broth overnight, making the soup thicker. If it’s too thick for your liking, simply add a splash of extra chicken broth or even a little water to reach your desired consistency. Avoid boiling the soup vigorously when reheating, especially if you added cream, to maintain its smooth texture.

    Variations to Explore:

    Feel free to customize your soup! You can swap baby spinach for chopped kale, adding it a few minutes earlier to allow it to soften. For extra heartiness, a can of drained and rinsed cannellini beans or great northern beans could be stirred in with the tortellini. Experiment with different types of tortellini fillings, like mushroom or even a spicier sausage, to change up the flavor profile. The possibilities are endless for making this comforting soup your own!

Hearty Sausage Tortellini Soup: Quick & Easy Weeknight Meal

Conclusion:

What truly sets this particular recipe apart and makes it an absolute must-try is its unparalleled ability to deliver deep, comforting flavors with surprising ease, transforming simple components into something truly extraordinary. I’ve found that this isn’t just another meal; it’s an experience, a delightful escape into a bowl of pure culinary happiness that consistently brings a smile to everyone’s face. The rich, savory notes from the expertly seasoned sausage, perfectly complemented by the tender, cheese-filled tortellini, all suspended in a beautifully robust and deeply flavorful broth, create a symphony for your taste buds that is both hearty and incredibly satisfying. It’s the kind of dish that warms you from the inside out, making it an ideal choice for a chilly evening or whenever you find yourself craving something profoundly comforting and truly delicious.

I’ve meticulously crafted this recipe to ensure that even on the busiest weeknights, this amazing creation comes together with minimal fuss, proving that gourmet appeal can effortlessly blend with homemade convenience. The balance of textures – the slight chew of the tortellini, the satisfying crumble of the sausage, and the tender vegetables – makes every spoonful interesting and inviting, a culinary adventure in itself. This isn’t just a simple soup; it’s a testament to how thoughtfully combined ingredients can elevate a dish from good to utterly unforgettable. The secret lies in the layering of flavors, which I’ve designed to achieve maximum impact with minimum effort on your part, ensuring that every time you prepare this, it tastes like it came straight from a gourmet kitchen. This particular Sausage Tortellini Soup stands out for its unique ability to be both incredibly rich and remarkably easy to prepare, making it a staple you’ll find yourself craving time and again. It truly embodies the perfect marriage of comfort food and achievable weeknight excellence, providing a hearty, wholesome meal that feels incredibly special.

While this Sausage Tortellini Soup is undeniably perfect as is, part of the joy of cooking, for me, is the endless possibility of making a recipe truly your own! For serving, I always wholeheartedly recommend a crusty loaf of artisanal bread – perhaps a rustic sourdough or a warm baguette – which is absolutely perfect for soaking up every last drop of that incredible, flavorful broth. A generous sprinkle of freshly grated Parmesan or Pecorino Romano cheese just before serving adds another layer of salty, umami goodness and a lovely visual appeal, and for those who enjoy a bit of a kick, a dash of red pepper flakes can introduce a wonderful warmth. If you’re looking to boost the vegetable content or simply stretch the soup a bit further, consider adding a handful of fresh spinach or tender kale during the last few minutes of cooking; it wilts beautifully into the hot broth and adds a healthy green element without overpowering the existing flavors. For those who yearn for an even creamier texture, a splash of heavy cream or a dollop of mascarpone stirred in right at the end can elevate the richness beautifully, transforming it into an even more decadent experience. You could also experiment with different types of sausage – a spicy Italian sausage for a bolder, more assertive flavor profile, or even a chicken or turkey sausage for a lighter, yet still satisfying, take. Feeling adventurous? Try swapping the tortellini for other pasta shapes like orecchiette or cavatappi, or for a heartier, more stew-like consistency, add some cannellini beans. The possibilities are truly endless, allowing you to adapt this wonderful recipe to suit any preference, dietary need, or what you simply have on hand in your pantry. A crisp side salad with a tangy vinaigrette also provides a refreshing contrast to the hearty warmth of the soup, balancing the meal perfectly.

So, now that you have all the tips, tricks, and tempting variations, I genuinely hope you feel incredibly inspired and excited to bring this magnificent Sausage Tortellini Soup to life in your very own kitchen. There’s something profoundly rewarding and uniquely satisfying about creating a meal that not only tastes absolutely amazing but also brings immense warmth, comfort, and joy to your table and to those you share it with. Please, don’t be shy – dive in, experience the magic, and savor every single spoonful. Once you’ve had the chance to whip up this comforting bowl of deliciousness, I would absolutely love, love, love to hear all about your experience! Please, feel free to share your thoughts, your clever adaptations, your personal serving suggestions, or even just a wonderful photo of your culinary masterpiece. Connecting with fellow food enthusiasts and seeing your creative spins and successes with my recipes is one of the most fulfilling and cherished parts of sharing what I love to do. Your feedback, your stories, and your unique approaches are incredibly invaluable to me, helping to build a truly wonderful and supportive community of home cooks. So go ahead, gather your ingredients, turn on your stove, and prepare to be utterly amazed by the incredible flavors you’re about to create. I promise you, your taste buds will send you their heartfelt thanks!


Hearty Beef Tortellini Soup: Quick & Easy Weeknight Meal

Hearty Beef Tortellini Soup: Quick & Easy Weeknight Meal

A comforting and easy weeknight meal featuring tender tortellini, savory Italian beef sausage, and vibrant vegetables simmered in a creamy, flavorful broth.

Prep Time
15 Minutes

Cook Time
40 Minutes

Total Time
55 Minutes

Servings
6 servings

Ingredients

  • 12 oz spicy Italian beef sausage
  • 1 tablespoon olive oil
  • 1 tablespoon Italian seasoning
  • 1 teaspoon paprika
  • 1 large sweet potato, peeled, cubed
  • 5 cloves garlic, minced
  • 1/4 teaspoon red pepper flakes
  • 1 tablespoon tomato paste
  • 6 cups water
  • 8 oz refrigerated three-cheese tortellini
  • 4 oz fresh spinach
  • 1/2 cup heavy cream
  • 4 tablespoons fresh thyme

Instructions

  1. Step 1
    Peel and cube the sweet potato. Mince the garlic. Prepare the beef sausage (remove casings if using links). Measure out all other ingredients.
  2. Step 2
    In a large Dutch oven or pot, heat 1 tablespoon olive oil over medium-high heat. Add the beef sausage, breaking it apart with a spoon. Cook for 6-8 minutes until browned. Transfer cooked sausage to a plate, leaving any rendered fat in the pot.
  3. Step 3
    Add the cubed sweet potato to the pot. Sauté for 5-7 minutes until slightly softened. Stir in the minced garlic and red pepper flakes; cook for 1 minute until fragrant.
  4. Step 4
    Add 1 tablespoon tomato paste, 1 tablespoon Italian seasoning, and 1 teaspoon paprika to the pot. Cook for 2-3 minutes, stirring constantly, to deepen their flavors.
  5. Step 5
    Pour in 6 cups water, scraping the bottom of the pot to deglaze and loosen any browned bits. Return the browned beef sausage to the pot. Bring to a gentle simmer, then reduce heat to low, cover, and let it simmer for 15-20 minutes to meld the flavors. Taste and adjust seasoning as needed.
  6. Step 6
    Increase heat slightly to bring the soup back to a simmer. Add the 8 oz refrigerated three-cheese tortellini and cook according to package directions (typically 3-5 minutes). Stir in 4 oz fresh spinach until wilted (1-2 minutes).
  7. Step 7
    Remove the pot from heat. Stir in 1/2 cup heavy cream and 4 tablespoons fresh thyme until fully incorporated and the soup is creamy.
  8. Step 8
    Ladle generous portions of the hot soup into individual bowls. Garnish with freshly grated Parmesan cheese and serve immediately, perhaps with crusty bread for dipping.

Important Information

Nutrition Facts (Per Serving)

It is important to consider this information as approximate and not to use it as definitive health advice.

Allergy Information

Please check ingredients for potential allergens and consult a health professional if in doubt.

« Previous Post
Marry Me Pumpkin Chicken Pasta: Creamy & Delicious!
Next Post »
Crispy Air Fryer Apple Fritters You'll Crave!

If you enjoyed this…

Savory Turkey Spinach Mushroom Delight

Best Fiery Chicken Ramen w/ Creamy Garlic Sauce Recipe

Easy Honey Garlic Chicken w/ Creamy High Protein Mac Cheese

Primary Sidebar

Browse by Diet

BreakfastDinnerLunchDessertAppetizer

Sweet Peach Yogurt Parfait Delight

One of my fondest memories is from a lazy summer afternoon spent at my grandmother’s house. The sun filtered through the kitchen window, casting a warm glow over the table where she would create her culinary magic. It was during one of those blissful moments that I first tasted her Peach Yogurt Parfait with Honey and Granola. The sweet aroma of ripe peaches mingling with creamy yogurt and the crunch of granola was nothing short of heavenly. It felt like summer captured in a bowl, and I still remember the joy of diving in with a spoon, each layer revealing a new burst of flavor.

When I think about that parfait, I can almost hear the gentle hum of the bees outside, reminding me of the floral notes that honey brings to every bite. The vibrant yellows and soft oranges of the peaches contrast beautifully with the creamy white yogurt and the golden crunch of granola. It’s a dish that not only looks delightful but also tastes like a celebration of fresh, wholesome ingredients.

What makes my version of this Peach Yogurt Parfait special is the careful balance of flavors and textures. I use ripe, juicy peaches, drizzled with locally sourced honey, and a homemade granola that’s bursting with nuts and seeds for an extra crunch. It’s a simple dish, but every layer is crafted with love and attention.

Let me show you exactly how to make this delightful parfait, so you can bring a bit of that summer magic into your kitchen!

Sweet Peach Yogurt Parfait Delight

Why You’ll Love This Recipe

  • Delightfully creamy texture from the Greek yogurt, paired with the juicy sweetness of fresh peaches.
  • Ready in under 20 minutes, making it a quick and satisfying breakfast or snack option.
  • Budget-friendly, using common ingredients that you may already have in your pantry.
  • Customizable with your favorite granola and nuts, allowing you to tailor each parfait to your taste.
  • Perfectly balanced flavors with the bright acidity of lemon juice and the sweetness of honey enhancing the peaches.

Ingredients

  • For the Parfait:
  • 2 cups plain Greek yogurt (or vanilla yogurt for a sweeter option)
  • 2 large ripe peaches, diced (about 2 cups)
  • 1 tablespoon fresh lemon juice (to prevent browning of peaches)
  • 2 tablespoons honey (plus more for drizzling)
  • 1 teaspoon vanilla extract (optional for extra flavor)
  • For the Granola:
  • 1 cup granola (store-bought or homemade; see notes for a simple granola recipe)
  • 1/4 cup sliced almonds (optional for added crunch)
  • 1/4 cup shredded coconut (optional for added flavor)

Let’s dive into some key ingredients that make this Peach Yogurt Parfait so delightful! First, the Greek yogurt is not only creamy but also packed with protein, making it a satisfying option for breakfast or a snack. If you’re looking for a sweeter option, you can easily substitute it with vanilla yogurt, though it may alter the overall flavor balance. Next, the ripe peaches are the star of the show; their natural sweetness shines through, so I recommend choosing peaches that yield slightly to pressure, indicating they’re perfectly ripe. If peaches aren’t in season, feel free to use nectarines or even frozen peaches—just thaw them before use. Finally, honey adds a lovely floral sweetness that ties everything together. If you prefer, maple syrup can serve as a delicious substitute.

Step-by-Step Instructions

  1. Start by preparing the peaches. Wash them thoroughly, then slice and dice them into bite-sized pieces. In a medium bowl, toss the diced peaches with 1 tablespoon of fresh lemon juice to prevent browning. Set aside for about 5 minutes while the lemon juice works its magic.
  2. In a separate bowl, combine the Greek yogurt, 2 tablespoons of honey, and 1 teaspoon of vanilla extract if using. Stir the mixture until smooth and thoroughly blended. This should take about a minute. Avoid overmixing to maintain the creaminess of the yogurt.
  3. Now it’s time to layer your parfait. Grab a clear glass or bowl to showcase your beautiful creation. Start with a generous spoonful of the yogurt mixture at the bottom—about 1/4 cup will do. Use a spoon to spread it evenly.
  4. Add a layer of the diced peaches over the yogurt, ensuring they cover the yogurt completely. You might want to use about half of what you have prepared—roughly 1 cup. This layer should be visually appealing, so arrange the peaches neatly.
  5. Sprinkle 1/4 cup of granola over the peaches. This adds a delightful crunch. Make sure to distribute it evenly to ensure every bite has that satisfying texture. Avoid packing it down too tightly, as you want it to maintain its crunch.
  6. Repeat the layers: spoon in another 1/4 cup of yogurt, followed by another cup of peaches, and another sprinkle of granola. You should have at least two layers, but feel free to add more depending on your glass size.
  7. Finish off your parfait with a drizzle of honey on top for added sweetness and a touch of elegance. If you’re using sliced almonds or shredded coconut, sprinkle them on top now. It adds a lovely visual contrast and extra flavor.
  8. Serve immediately or refrigerate for up to 30 minutes before serving to allow the flavors to meld together. However, I recommend enjoying it fresh to maintain the granola’s crunch.

Pro Tips for the Best Peach Yogurt Parfait With Honey And Granola

  • Make sure to choose ripe peaches for the best flavor and texture. A common mistake is using unripe fruit, which can lead to a less enjoyable parfait. Look for peaches that are fragrant and slightly soft to the touch.
  • Use a clear glass to assemble your parfait; this not only makes for a beautiful presentation but also allows you to see the colorful layers, which adds to the enjoyment of eating it.
  • For an even creamier texture, consider whipping the Greek yogurt with a hand mixer for a couple of minutes before layering. This small adjustment makes a huge difference in mouthfeel.
  • Be mindful of the granola-to-yogurt ratio. Too much granola can overwhelm the parfait, while too little can make it feel too creamy. Aim for about 1/4 cup of granola per layer for the perfect balance.
  • If you’re making this for a gathering, consider preparing the yogurt and peaches ahead of time and layering them just before serving. This ensures the granola stays crunchy!

Variations & Serving Ideas

There are so many ways to get creative with your Peach Yogurt Parfait! For a tropical twist, swap out the peaches for mangoes or pineapples and top with coconut flakes. If you prefer a berry flavor, mix in some blueberries or strawberries with the peaches for added color and taste. For a nutty version, incorporate chopped walnuts or pecans instead of almonds.

As for serving ideas, this parfait pairs beautifully with a side of scrambled eggs for a hearty breakfast or fresh fruit salad for a light lunch. You might also enjoy it alongside whole grain toast with almond butter for an energizing snack. The contrast of flavors and textures will elevate your meal experience!

Storage, Make-Ahead & Reheating

The Peach Yogurt Parfait is best enjoyed fresh, but you can prepare some components ahead of time. Store the layered parfait in an airtight container in the refrigerator for up to 24 hours. However, be cautious; the granola may lose its crunch if stored too long. You can freeze the yogurt and peach mixture for up to 2 months; just remember to thaw it in the refrigerator overnight before serving.

If you plan to enjoy this dish the next day, it can taste even better as the flavors meld together. Just remember to add the granola right before serving to keep its delightful crunch!

Frequently Asked Questions

Can I make Peach Yogurt Parfait With Honey And Granola ahead of time?

Yes — in fact, it tastes even better the next day as the flavors meld. However, I recommend waiting to add the granola until just before serving to maintain its crunch.

What can I substitute for Greek yogurt?

If you prefer a lighter option, you can substitute Greek yogurt with regular yogurt or a dairy-free alternative like coconut yogurt. Just remember that this may alter the creaminess and flavor profile slightly.

Can I use frozen peaches for this parfait?

Absolutely! Just make sure to thaw the frozen peaches before using them. They will still add great flavor, though the texture may be slightly softer than fresh peaches.

How do I make the parfait vegan?

To make a vegan version, substitute the Greek yogurt with a plant-based yogurt alternative, and replace honey with maple syrup or agave nectar. This keeps the parfait sweet while adhering to a vegan diet.

What other fruits can I use in this recipe?

You can mix and match fruits based on your preference. Try using strawberries, blueberries, raspberries, or even bananas. Just make sure to adjust the lemon juice as needed to prevent browning.

Sweet Peach Yogurt Parfait Delight

Final Thoughts

The Peach Yogurt Parfait with Honey and Granola is a delightful blend of creamy yogurt, sweet peaches, and crunchy granola that creates a satisfying and nourishing treat. Each layer bursts with flavor, making it a perfect choice for breakfast or a light dessert.

This is the kind of recipe I come back to again and again, especially when I want something refreshing and wholesome to start my day. The harmony of sweet and tart flavors, combined with the delightful crunch, never fails to lift my spirits!

I encourage you to give this parfait a try and indulge in its comforting goodness. Feel free to share your results or even add your own twist—perhaps a sprinkle of cinnamon or a handful of nuts. Enjoy creating your perfect parfait!

Print
clock clock iconcutlery cutlery iconflag flag iconfolder folder iconinstagram instagram iconpinterest pinterest iconfacebook facebook iconprint print iconsquares squares iconheart heart iconheart solid heart solid icon

Peach Yogurt Parfait


  • Author: Lily author
  • Total Time: 15 minutes
  • Yield: 4 servings 1x
Pin Recipe
Print Recipe

Description

This Peach Yogurt Parfait combines creamy Greek yogurt, juicy peaches, and crunchy granola for a delightful treat. It’s a perfect breakfast or snack that captures the essence of summer in every bite.


Ingredients

Scale
  • For the Parfait:
  • 2 cups plain Greek yogurt (or vanilla yogurt for a sweeter option)
  • 2 large ripe peaches, diced (about 2 cups)
  • 1 tablespoon fresh lemon juice (to prevent browning of peaches)
  • 2 tablespoons honey (plus more for drizzling)
  • 1 teaspoon vanilla extract (optional for extra flavor)
  • For the Granola:
  • 1 cup granola (store-bought or homemade; see notes for a simple granola recipe)
  • 1/4 cup sliced almonds (optional for added crunch)
  • 1/4 cup shredded coconut (optional for added flavor)

Instructions

  1. Start by preparing the peaches. Wash them thoroughly, then slice and dice them into bite-sized pieces. In a medium bowl, toss the diced peaches with 1 tablespoon of fresh lemon juice to prevent browning. Set aside for about 5 minutes while the lemon juice works its magic.
  2. In a separate bowl, combine the Greek yogurt, 2 tablespoons of honey, and 1 teaspoon of vanilla extract if using. Stir the mixture until smooth and thoroughly blended. This should take about a minute. Avoid overmixing to maintain the creaminess of the yogurt.
  3. Now it’s time to layer your parfait. Grab a clear glass or bowl to showcase your beautiful creation. Start with a generous spoonful of the yogurt mixture at the bottom—about 1/4 cup will do. Use a spoon to spread it evenly.
  4. Add a layer of the diced peaches over the yogurt, ensuring they cover the yogurt completely. You might want to use about half of what you have prepared—roughly 1 cup. This layer should be visually appealing, so arrange the peaches neatly.
  5. Sprinkle 1/4 cup of granola over the peaches. This adds a delightful crunch. Make sure to distribute it evenly to ensure every bite has that satisfying texture. Avoid packing it down too tightly, as you want it to maintain its crunch.
  6. Repeat the layers: spoon in another 1/4 cup of yogurt, followed by another cup of peaches, and another sprinkle of granola. You should have at least two layers, but feel free to add more depending on your glass size.
  7. Finish off your parfait with a drizzle of honey on top for added sweetness and a touch of elegance. If you’re using sliced almonds or shredded coconut, sprinkle them on top now. It adds a lovely visual contrast and extra flavor.
  8. Serve immediately or refrigerate for up to 30 minutes before serving to allow the flavors to meld together. However, I recommend enjoying it fresh to maintain the granola’s crunch.
  • Prep Time: 15 mins
  • Cook Time: 0 mins
  • Category: Breakfast
  • Method: No-cook
  • Cuisine: American

Nutrition

  • Serving Size: 1 parfait
  • Calories: 250
  • Sugar: 20 g
  • Sodium: 50 mg
  • Fat: 5 g
  • Saturated Fat: 2 g
  • Unsaturated Fat: 3 g
  • Trans Fat: 0 g
  • Carbohydrates: 40 g
  • Fiber: 3 g
  • Protein: 10 g
  • Cholesterol: 10 mg

Keywords: Choose ripe peaches for the best flavor and texture. Use a clear glass for a beautiful presentation. For creaminess, consider whipping the yogurt before layering. Be mindful of the granola-to-yogurt ratio. Prepare yogurt and peaches ahead of time for gatherings, layering just before serving.

Did you make this recipe?

Share a photo and tag us — we can't wait to see what you've made!

Sun-Kissed Frozen Orange Cream Slush

As a child, summer days felt like they lasted forever. I remember the sticky heat wrapping around me as I played outside, my laughter mingling with the sounds of the neighborhood. But nothing could cool me down quite like the moment I’d spot my grandmother, laboring over her blender, whipping up her famous Frozen Orange Creamsicle Slush. That vibrant orange treat, with its frosty texture and sweet citrus aroma, was like a burst of sunshine in a cup. Just one sip, and I could feel the coolness wash over me, sparking pure joy.

This Frozen Orange Creamsicle Slush has a way of making you feel like a kid again. Its creamy, dreamy consistency is a delightful balance of bright orange and soft vanilla, inviting you to dive right in. The refreshing tang of orange dances on your tongue, while the smooth creaminess envelops you in a comforting embrace. It’s a nostalgic treat that’s perfect for hot summer afternoons or anytime you need a little pick-me-up.

What makes my version of this slush stand out is the addition of a hint of vanilla bean, which elevates the flavor and adds an extra layer of richness. Plus, it’s super easy to whip up with just a few simple ingredients that you probably already have on hand! So, if you’re ready to relive those sun-soaked memories, let me show you exactly how to make it.

Sun-Kissed Frozen Orange Cream Slush

Why You’ll Love This Recipe

  • Each slush is a perfect blend of creamy vanilla and zesty orange, creating a nostalgic flavor reminiscent of summer days.
  • This refreshing treat is ready in under 15 minutes, making it an ideal quick dessert for unexpected guests or hot afternoons.
  • With just 8 simple ingredients, it’s budget-friendly, ensuring you don’t have to break the bank to enjoy a delicious slush.
  • The slush has a perfectly smooth texture, thanks to the combination of ice and ice cream, providing a delightful contrast to the bright citrus flavors.
  • It’s highly customizable; you can easily adjust the sweetness and add fresh herbs for a unique twist that suits your taste.

Ingredients

  • 2 cups orange juice (freshly squeezed or store-bought)
  • 1 cup vanilla ice cream
  • 1 cup crushed ice
  • 1/2 cup milk (whole or 2%)
  • 1/4 cup granulated sugar (adjust based on sweetness preference)
  • 1 teaspoon vanilla extract
  • Zest of 1 orange (for added flavor)
  • Fresh orange slices and mint leaves (for garnish)

The star of this Frozen Orange Creamsicle Slush is the orange juice, which provides the vibrant, citrusy base. Freshly squeezed juice will yield the brightest flavor, but store-bought options can be just as convenient. If you’re opting for store-bought, choose 100% pure juice with no added sugars for the best results. Another essential ingredient is the vanilla ice cream; it adds creaminess and sweetness. You can substitute it with dairy-free ice cream if you’re looking for a vegan option. Whole or 2% milk complements the ice cream, creating a smooth blend. If you want a lower-calorie version, almond or oat milk can be good alternatives.

Lastly, the granulated sugar can be adjusted based on your sweetness preference. If you prefer a more natural sweetener, consider using honey or agave syrup. The orange zest enhances the flavor profile, providing an aromatic pop that brings the whole slush together. Don’t skip it! It adds an extra layer of brightness that makes this slush truly special.

Step-by-Step Instructions

  1. Start by preparing your ingredients. Gather 2 cups of orange juice, 1 cup of vanilla ice cream, and 1 cup of crushed ice. Make sure the ice is finely crushed, as larger chunks can make blending difficult.
  2. In a blender, combine the orange juice, vanilla ice cream, crushed ice, and 1/2 cup of milk. Add 1/4 cup of granulated sugar and 1 teaspoon of vanilla extract. If you like a sweeter slush, consider adding a bit more sugar at this stage.
  3. Add the zest of 1 orange to the blender. This step is crucial for enhancing the citrus flavor of your slush. Make sure not to include the bitter white pith—only the flavorful zest.
  4. Blend the mixture on medium-high speed for about 30-45 seconds. Stop once the ingredients are fully combined and the slush has a smooth, even consistency. If you notice large chunks of ice, blend for an additional 10-15 seconds. Avoid over-blending, as this can make the slush too liquidy.
  5. Once blended, taste the slush. If it needs more sweetness, add a little more sugar and blend for a few more seconds. If it’s too thick, you can add a splash of milk to reach your desired consistency.
  6. Pour the slush into glasses. This recipe typically serves 4, but you can easily double it for larger gatherings. Use a spoon to help guide the slush into the glasses if needed.
  7. Garnish each serving with fresh orange slices and mint leaves. The mint not only adds a pop of color but also a refreshing aroma that complements the citrus flavors beautifully.
  8. Serve immediately and enjoy! If you’ve made extra, you can refrigerate it for a short time, but it’s best enjoyed fresh.

Pro Tips for the Best Frozen Orange Creamsicle Slush

  • Don’t skip the orange zest! It’s a game-changer for flavor. Always zest before juicing to make it easier.
  • Use a high-powered blender for the best texture. A standard blender may struggle with ice, leading to uneven consistency. If you have a food processor, that can work too, but ensure the ice is finely crushed.
  • Adjust the ice-to-liquid ratio carefully. If your slush is too thick, it won’t blend well. Start with less ice and add more until you reach your preferred texture.
  • Be cautious with the sugar! Always start with the lower amount, as you can easily add more, but it’s hard to fix an overly sweet slush.
  • For a fun twist, consider adding a splash of coconut milk or a handful of fresh fruit like strawberries or pineapple. This not only enhances the flavor but also adds a beautiful color contrast.

Variations & Serving Ideas

There are countless ways to put a spin on your Frozen Orange Creamsicle Slush. Consider making a tropical version by adding in some pineapple juice or coconut milk for a delightful tropical twist. If you’re feeling adventurous, try incorporating a handful of frozen mango or peach slices for added sweetness. For a lighter version, swap out the vanilla ice cream for Greek yogurt for a creamy yet tangy alternative.

As for serving ideas, this refreshing slush pairs wonderfully with light summer dishes like grilled chicken skewers, fish tacos, or a simple salad topped with citrus vinaigrette. The bright, zesty flavors of the slush complement these dishes perfectly, making them an ideal pairing for a sunny day.

Storage, Make-Ahead & Reheating

This Frozen Orange Creamsicle Slush is best enjoyed fresh, but if you have leftovers, you can store them in an airtight container in the fridge for up to 2 days. Just keep in mind that the slush may lose some of its texture over time as the ice melts. It doesn’t freeze well, as the ice will turn into a solid block. If you must freeze it, blend again after thawing to restore the slushy consistency. This treat is best the day you make it, as the flavors meld together beautifully overnight, enhancing its deliciousness.

Frequently Asked Questions

Can I make Frozen Orange Creamsicle Slush ahead of time?

Yes — in fact, it tastes even better the next day as the flavors meld. However, it’s best to enjoy it fresh, as the texture can change if stored for too long. If you need to prepare it ahead, keep it in the fridge and re-blend before serving.

What kind of orange juice should I use?

For the best flavor, use freshly squeezed orange juice. However, if you’re short on time, opt for 100% pure store-bought juice without added sugars. This will ensure that your slush remains flavorful and refreshing.

Can I substitute the vanilla ice cream?

Absolutely! If you’re looking for a dairy-free option, coconut milk ice cream or a non-dairy vanilla ice cream can work wonderfully. They will still provide the creamy texture and sweetness you desire.

How can I adjust the sweetness of my slush?

You can easily adjust the sweetness by modifying the amount of sugar added. Start with 1/4 cup and taste the mixture before blending. If you prefer it sweeter, add more sugar gradually until it reaches your desired level.

What should I do if my slush is too thick?

If your slush is too thick, simply add a splash of milk or orange juice and blend again. This will help achieve a more drinkable consistency while maintaining the slushy texture. Adjust gradually to reach your preferred thickness.

Sun-Kissed Frozen Orange Cream Slush

Final Thoughts

The Frozen Orange Creamsicle Slush is a delightful blend of refreshing citrus and creamy goodness, making it a perfect treat for warm days or any time you crave a taste of nostalgia. The way the bright orange flavor dances with the creamy texture truly elevates this slush, transforming it into a satisfying escape from the everyday.

This is the kind of recipe I come back to again and again, especially when I’m looking to cool down or impress guests at a summer gathering. It’s simple to make and always brings smiles all around! I encourage you to try this recipe for yourself—don’t hesitate to share your results or even put your own spin on it. Happy slushing!

Print
clock clock iconcutlery cutlery iconflag flag iconfolder folder iconinstagram instagram iconpinterest pinterest iconfacebook facebook iconprint print iconsquares squares iconheart heart iconheart solid heart solid icon

Frozen Orange Creamsicle Slush


  • Author: Lily author
  • Total Time: 15 minutes
  • Yield: 4 servings 1x
Pin Recipe
Print Recipe

Description

This Frozen Orange Creamsicle Slush is a refreshing treat that combines creamy vanilla and zesty orange flavors. Perfect for hot summer days, it brings back nostalgic memories with every sip.


Ingredients

Scale
  • 2 cups orange juice (freshly squeezed or store-bought)
  • 1 cup vanilla ice cream
  • 1 cup crushed ice
  • 1/2 cup milk (whole or 2%)
  • 1/4 cup granulated sugar (adjust based on sweetness preference)
  • 1 teaspoon vanilla extract
  • Zest of 1 orange (for added flavor)
  • Fresh orange slices and mint leaves (for garnish)

Instructions

  1. Start by preparing your ingredients. Gather 2 cups of orange juice, 1 cup of vanilla ice cream, and 1 cup of crushed ice. Make sure the ice is finely crushed, as larger chunks can make blending difficult.
  2. In a blender, combine the orange juice, vanilla ice cream, crushed ice, and 1/2 cup of milk. Add 1/4 cup of granulated sugar and 1 teaspoon of vanilla extract. If you like a sweeter slush, consider adding a bit more sugar at this stage.
  3. Add the zest of 1 orange to the blender. This step is crucial for enhancing the citrus flavor of your slush. Make sure not to include the bitter white pith—only the flavorful zest.
  4. Blend the mixture on medium-high speed for about 30-45 seconds. Stop once the ingredients are fully combined and the slush has a smooth, even consistency. If you notice large chunks of ice, blend for an additional 10-15 seconds. Avoid over-blending, as this can make the slush too liquidy.
  5. Once blended, taste the slush. If it needs more sweetness, add a little more sugar and blend for a few more seconds. If it’s too thick, you can add a splash of milk to reach your desired consistency.
  6. Pour the slush into glasses. This recipe typically serves 4, but you can easily double it for larger gatherings. Use a spoon to help guide the slush into the glasses if needed.
  7. Garnish each serving with fresh orange slices and mint leaves. The mint not only adds a pop of color but also a refreshing aroma that complements the citrus flavors beautifully.
  8. Serve immediately and enjoy! If you’ve made extra, you can refrigerate it for a short time, but it's best enjoyed fresh.
  • Prep Time: 15 min
  • Cook Time: 0 min
  • Category: Dessert
  • Method: Blending
  • Cuisine: American

Nutrition

  • Serving Size: 1 serving
  • Calories: 200
  • Sugar: 30 g
  • Sodium: 50 mg
  • Fat: 5 g
  • Saturated Fat: 3 g
  • Unsaturated Fat: 2 g
  • Trans Fat: 0 g
  • Carbohydrates: 40 g
  • Fiber: 1 g
  • Protein: 2 g
  • Cholesterol: 20 mg

Keywords: Don't skip the orange zest! It's a game-changer for flavor. Always zest before juicing to make it easier.

Did you make this recipe?

Share a photo and tag us — we can't wait to see what you've made!

Zesty Lemon Poppy Seed Delight

One rainy afternoon, I found myself in my grandmother’s cozy kitchen, the kind that always smelled like warmth and love. She was whipping up her famous Lemon Poppy Seed Loaf, a recipe that had been passed down through generations. As the batter came together, the zesty aroma of fresh lemons filled the air, mingling perfectly with the nutty fragrance of poppy seeds. I can still picture her, apron-clad, as she expertly drizzled a vibrant citrus icing over the loaf, creating a glossy, sun-kissed finish that beckoned us to dive in. It was a moment that sparked my own passion for baking, and this recipe has become a cherished staple in my home ever since.

When you take a bite of this Lemon Poppy Seed Loaf, it’s like a burst of sunshine on your palate. The loaf is beautifully golden, with a tender crumb that melts in your mouth. Each slice is speckled with tiny poppy seeds, adding a delightful crunch that contrasts beautifully with the tangy sweetness of the lemon. And that citrus icing? It’s the finishing touch that elevates this loaf from ordinary to extraordinary, with its bright, zesty flavor dancing on your taste buds.

This recipe stands out because it embraces simplicity while delivering on flavor. I’ve added a hint of vanilla to the batter, enhancing the overall taste and making it even more indulgent. Trust me, once you make this Lemon Poppy Seed Loaf With Citrus Icing, it’ll become a go-to in your baking repertoire.

So, let me show you exactly how to make it!

Zesty Lemon Poppy Seed Delight

Why You’ll Love This Recipe

  • Moist and tender crumb that melts in your mouth, thanks to the perfect balance of butter and buttermilk.
  • Bright, zesty lemon flavor paired with crunchy poppy seeds, creating a delightful texture and taste experience.
  • Easy to whip up in just about an hour, perfect for last-minute gatherings or a cozy afternoon treat.
  • Budget-friendly with everyday ingredients, making it an accessible option for all home bakers.
  • The citrus icing adds a sweet tang that elevates the loaf, turning a simple recipe into a showstopper!

Ingredients

  • 1 ½ cups (190g) all-purpose flour
  • 1 teaspoon baking powder
  • ½ teaspoon baking soda
  • ½ teaspoon salt
  • 3 tablespoons poppy seeds
  • ½ cup (115g) unsalted butter, softened to room temperature
  • 1 cup (200g) granulated sugar
  • 2 large eggs
  • 1 teaspoon vanilla extract
  • 1 teaspoon lemon zest (from about 1 medium lemon)
  • ½ cup (120ml) buttermilk
  • 2 tablespoons fresh lemon juice

For the Citrus Icing:

  • 1 cup (120g) powdered sugar
  • 2 tablespoons fresh lemon juice
  • 1 tablespoon orange juice
  • 1 teaspoon lemon zest (for garnish, optional)

Let’s dive into the key ingredients that make this Lemon Poppy Seed Loaf so special. The all-purpose flour provides the structure and base for the loaf, while the baking powder and baking soda ensure it rises perfectly, giving the loaf a light texture. For a gluten-free variation, you could substitute the flour with a gluten-free all-purpose blend. Poppy seeds not only add a delightful crunch but also contribute to the unique flavor profile that pairs well with the citrus notes.

Unsalted butter is crucial for achieving the buttery richness that makes this loaf so moist. If you’re looking for a dairy-free option, coconut oil or a vegan butter can be used instead. The buttermilk is another essential component, providing acidity that activates the baking soda for a fluffy texture. If you don’t have buttermilk on hand, you can easily make a substitute by mixing ½ cup of milk with 1 tablespoon of vinegar or lemon juice and letting it sit for about 5 minutes.

Step-by-Step Instructions

  1. Preheat your oven to 350°F (175°C). Grease a 9×5-inch loaf pan or line it with parchment paper for easy removal later.
  2. In a medium mixing bowl, whisk together 1 ½ cups of all-purpose flour, 1 teaspoon of baking powder, ½ teaspoon of baking soda, ½ teaspoon of salt, and 3 tablespoons of poppy seeds. This helps to evenly distribute the baking agents and ensures a uniform rise.
  3. In a large mixing bowl, cream together ½ cup of softened unsalted butter and 1 cup of granulated sugar using an electric mixer on medium speed for about 3-4 minutes, until the mixture is light and fluffy. Make sure to scrape down the sides of the bowl occasionally.
  4. Add 2 large eggs, 1 teaspoon of vanilla extract, and 1 teaspoon of lemon zest to the creamed butter and sugar, mixing until fully combined. You want a smooth consistency, so ensure there are no lumps of butter.
  5. In a small bowl, combine ½ cup of buttermilk and 2 tablespoons of fresh lemon juice. Alternately add the dry ingredients and buttermilk mixture to the butter mixture, starting and ending with the dry ingredients. Mix just until combined; do not overmix, as this can lead to a dense loaf.
  6. Pour the batter into the prepared loaf pan. Smooth the top with a spatula, ensuring it’s even. Bake in the preheated oven for 50-60 minutes, or until a toothpick inserted in the center comes out clean. The edges should be lightly golden brown, and the center should feel just set.
  7. Once baked, remove the loaf from the oven and allow it to cool in the pan for about 10 minutes. Then, transfer it to a wire rack to cool completely. Resist the urge to slice too soon, as it will be crumbly if it’s still warm.
  8. While the loaf is cooling, prepare the citrus icing. In a medium bowl, whisk together 1 cup of powdered sugar, 2 tablespoons of fresh lemon juice, and 1 tablespoon of orange juice until smooth. If the icing is too thick, you can add a little more juice to reach your desired consistency.
  9. Once the loaf is completely cool, drizzle the citrus icing over the top. If you like, sprinkle with an additional teaspoon of lemon zest for an extra pop of flavor and color.

Pro Tips for the Best Lemon Poppy Seed Loaf With Citrus Icing

  • Be careful not to overmix your batter; this is a common mistake that can lead to a dense loaf. Mix just until the dry ingredients are incorporated for a light and fluffy texture.
  • Use room temperature ingredients, especially the butter and eggs. This helps to create a smoother batter and ensures even baking. Take your eggs out of the fridge about 30 minutes before you start.
  • For a more pronounced lemon flavor, consider adding a little lemon extract in addition to the zest and juice. Just a half teaspoon can elevate the citrus notes significantly.
  • When measuring your flour, spoon it into the measuring cup and level it off with a knife instead of scooping directly from the bag. This prevents packing and ensures you don’t end up with a dry loaf.
  • Invest in a good quality loaf pan; it makes a difference in heat distribution, which ensures even baking. If your pan is dark-coated, reduce the oven temperature by 25°F to prevent over-browning.

Variations & Serving Ideas

For a delightful twist, consider adding blueberries or raspberries to the batter for a fruity burst of flavor. You can also experiment with different citrus fruits—try lime or grapefruit zest and juice for a refreshing change. For a healthier option, substitute half of the all-purpose flour with whole wheat flour for added fiber without compromising too much on texture.

This Lemon Poppy Seed Loaf pairs beautifully with a light salad, such as a mixed greens salad with a vinaigrette, or a cup of tea for a cozy afternoon treat. It also complements a creamy cheese platter, as the acidity of the loaf balances rich cheeses perfectly. Lastly, a scoop of vanilla ice cream on the side creates a delightful contrast of temperatures and flavors!

Storage, Make-Ahead & Reheating

This Lemon Poppy Seed Loaf can be stored at room temperature for up to 3 days if wrapped tightly in plastic wrap. If you want to keep it longer, it freezes well for up to 3 months. To freeze, wrap the loaf tightly in plastic wrap and then in aluminum foil to prevent freezer burn.

When you’re ready to enjoy it again, simply thaw it in the fridge overnight. Reheat individual slices in the microwave for 15-20 seconds or in a toaster oven until warmed through. Interestingly, many people find that this loaf tastes even better the next day, as the flavors have time to meld!

Frequently Asked Questions

Can I make Lemon Poppy Seed Loaf With Citrus Icing ahead of time?

Yes — in fact, it tastes even better the next day! You can make the loaf a day in advance, allowing the flavors to develop. Just be sure to store it in an airtight container to maintain its moisture.

Can I substitute the poppy seeds?

Absolutely! If you don’t have poppy seeds on hand or prefer an alternative, you can use sesame seeds for a similar crunch or omit them entirely for a smooth loaf.

What can I use instead of buttermilk?

If you don’t have buttermilk, you can easily create a substitute by mixing ½ cup of milk (dairy or plant-based) with 1 tablespoon of vinegar or lemon juice. Let it sit for 5 minutes before using in the recipe.

How can I make this recipe gluten-free?

To make a gluten-free version of this Lemon Poppy Seed Loaf, substitute the all-purpose flour with a gluten-free all-purpose flour blend. Just ensure that the blend contains a binding agent like xanthan gum for the best results.

What is the best way to store leftover loaf?

Leftover Lemon Poppy Seed Loaf should be stored in an airtight container at room temperature for up to 3 days. For longer storage, wrap it tightly and freeze for up to 3 months. Thaw it before serving for the best texture.

Zesty Lemon Poppy Seed Delight

Final Thoughts

The Lemon Poppy Seed Loaf with Citrus Icing is truly a delightful treat that brings a burst of brightness to any occasion. The zesty lemon flavor combined with the subtle crunch of poppy seeds creates a satisfying balance, while the citrus icing adds a touch of sweetness that perfectly complements the loaf’s tanginess.

This is the kind of recipe I come back to again and again, especially when I want to brighten up a gloomy day or celebrate a small victory. The aroma that fills the kitchen as it bakes is absolutely heavenly! I encourage you to give this recipe a try; you might just find it becoming a beloved staple in your home. Don’t forget to share your results or even add your own unique twist—I can’t wait to see what you create!

Print
clock clock iconcutlery cutlery iconflag flag iconfolder folder iconinstagram instagram iconpinterest pinterest iconfacebook facebook iconprint print iconsquares squares iconheart heart iconheart solid heart solid icon

Lemon Poppy Seed Loaf


  • Author: Lily author
  • Total Time: 5 minute
  • Yield: 1 loaf 1x
Pin Recipe
Print Recipe

Description

This Lemon Poppy Seed Loaf is a delightful treat that combines zesty lemon flavor with crunchy poppy seeds. Topped with a citrus icing, it’s perfect for any occasion.


Ingredients

Scale
  • 1 ½ cups (190g) all-purpose flour
  • 1 teaspoon baking powder
  • ½ teaspoon baking soda
  • ½ teaspoon salt
  • 3 tablespoons poppy seeds
  • ½ cup (115g) unsalted butter, softened to room temperature
  • 1 cup (200g) granulated sugar
  • 2 large eggs
  • 1 teaspoon vanilla extract
  • 1 teaspoon lemon zest (from about 1 medium lemon)
  • ½ cup (120ml) buttermilk
  • 2 tablespoons fresh lemon juice
  • 1 cup (120g) powdered sugar
  • 2 tablespoons fresh lemon juice
  • 1 tablespoon orange juice
  • 1 teaspoon lemon zest (for garnish, optional)

Instructions

  1. Preheat your oven to 350°F (175°C). Grease a 9×5-inch loaf pan or line it with parchment paper for easy removal later.
  2. In a medium mixing bowl, whisk together 1 ½ cups of all-purpose flour, 1 teaspoon of baking powder, ½ teaspoon of baking soda, ½ teaspoon of salt, and 3 tablespoons of poppy seeds. This helps to evenly distribute the baking agents and ensures a uniform rise.
  3. In a large mixing bowl, cream together ½ cup of softened unsalted butter and 1 cup of granulated sugar using an electric mixer on medium speed for about 3-4 minutes, until the mixture is light and fluffy. Make sure to scrape down the sides of the bowl occasionally.
  4. Add 2 large eggs, 1 teaspoon of vanilla extract, and 1 teaspoon of lemon zest to the creamed butter and sugar, mixing until fully combined. You want a smooth consistency, so ensure there are no lumps of butter.
  5. In a small bowl, combine ½ cup of buttermilk and 2 tablespoons of fresh lemon juice. Alternately add the dry ingredients and buttermilk mixture to the butter mixture, starting and ending with the dry ingredients. Mix just until combined; do not overmix, as this can lead to a dense loaf.
  6. Pour the batter into the prepared loaf pan. Smooth the top with a spatula, ensuring it’s even. Bake in the preheated oven for 50-60 minutes, or until a toothpick inserted in the center comes out clean. The edges should be lightly golden brown, and the center should feel just set.
  7. Once baked, remove the loaf from the oven and allow it to cool in the pan for about 10 minutes. Then, transfer it to a wire rack to cool completely. Resist the urge to slice too soon, as it will be crumbly if it’s still warm.
  8. While the loaf is cooling, prepare the citrus icing. In a medium bowl, whisk together 1 cup of powdered sugar, 2 tablespoons of fresh lemon juice, and 1 tablespoon of orange juice until smooth. If the icing is too thick, you can add a little more juice to reach your desired consistency.
  9. Once the loaf is completely cool, drizzle the citrus icing over the top. If you like, sprinkle with an additional teaspoon of lemon zest for an extra pop of flavor and color.
  • Prep Time: 15 mins
  • Cook Time: 50-60 mins
  • Category: Dessert
  • Method: Baking
  • Cuisine: American

Nutrition

  • Serving Size: 1 slice
  • Calories: 200
  • Sugar: 15 g
  • Sodium: 150 mg
  • Fat: 8 g
  • Saturated Fat: 5 g
  • Unsaturated Fat: 3 g
  • Trans Fat: 0 g
  • Carbohydrates: 30 g
  • Fiber: 1 g
  • Protein: 3 g
  • Cholesterol: 40 mg

Keywords: Be careful not to overmix your batter; this is a common mistake that can lead to a dense loaf. Use room temperature ingredients for a smoother batter and even baking.

Did you make this recipe?

Share a photo and tag us — we can't wait to see what you've made!

  • Privacy Policy
  • Terms Of Service
  • Contact
  • About
  • GDPR

Copyright © 2025 Homesmad