• Skip to primary navigation
  • Skip to main content
  • Skip to primary sidebar
Homesmad

Homesmad

  • Home
  • Breakfast & Brunch
  • Appetizers & Snacks
  • Dinner
  • Dessert
  • About
  • Privacy Policy
  • Contact
Homesmad
  • Home
  • Breakfast & Brunch
  • Appetizers & Snacks
  • Dinner
  • Dessert
  • About
  • Privacy Policy
  • Contact

Crispy Air Fryer Apple Fritters You’ll Crave!

October 2, 2025 by Lily author

Crispy air fryer apple fritters you’ll crave! Have you ever longed for that perfect combination of tender, spiced apple nestled within a gloriously golden, crunchy exterior, but without the hassle and oil of traditional deep-frying? If so, you’re in for an absolute treat. I’m incredibly excited to share a recipe that reimagines this beloved classic, delivering all the nostalgic comfort and irresistible flavor you adore, now made effortlessly convenient in your air fryer.

Apple fritters have a rich history, gracing breakfast tables, dessert menus, and fairgrounds for generations. Historically, these delightful morsels were often deep-fried, a culinary art that, while delicious, isn’t always practical for a quick weeknight treat or a less indulgent snack. My goal with this recipe was to capture that quintessential fritter experience – the warmth of cinnamon, the natural sweetness of apples, and that satisfying crunch – using modern appliance magic. People absolutely adore this dish not just for its comforting taste and aromatic spices, but for the incredible textural contrast: a soft, pillowy interior bursting with fruit, encased in an undeniably crispy shell. It’s truly a sensory delight.

Whether you’re looking for a delightful breakfast pastry, a unique brunch offering, or a simple yet impressive dessert, these delectable crispy air fryer apple fritters you’ll crave are surprisingly simple to prepare. Get ready to transform humble apples into an extraordinary indulgence that’s sure to become a cherished favorite in your kitchen.

Crispy Air Fryer Apple Fritters You'll Crave! this RECIPE

Ingredients:

  • For the Apple Fritters:
    • 2 medium-sized apples (I love a mix of Fuji and Granny Smith for balance, or Honeycrisp for sweetness and texture), peeled, cored, and finely diced (about 1/4 to 1/2 inch cubes)
    • 1 ½ cups all-purpose flour
    • ½ cup granulated sugar
    • 2 teaspoons baking powder
    • ½ teaspoon ground cinnamon
    • ¼ teaspoon ground nutmeg
    • ¼ teaspoon salt
    • ¾ cup milk (whole milk works wonders for richness)
    • 1 large egg, lightly beaten
    • 2 tablespoons unsalted butter, melted and slightly cooled
    • 1 teaspoon pure vanilla extract
    • Cooking spray or a light brushing of oil for the air fryer basket
  • For the Simple Vanilla Glaze:
    • 1 cup powdered sugar (confectioners’ sugar)
    • 2-3 tablespoons milk (start with 2 and add more if needed for desired consistency)
    • ½ teaspoon pure vanilla extract

Preparing the Apples for Your Crispy Air Fryer Apple Fritters

  1. Choose and Prepare Your Apples: First, let’s talk apples! I find that using a combination of a sweeter, crisper apple like Fuji or Honeycrisp with a slightly tart one like Granny Smith creates the most harmonious flavor profile for these crispy air fryer apple fritters you’ll crave! The tartness of the Granny Smith cuts through the sweetness of the batter and glaze, preventing the fritters from being overly rich. Begin by thoroughly washing your chosen apples under cool running water.
  2. Peeling and Coring: Next, you’ll need to peel them. A good swivel peeler makes this task quick and effortless. Once peeled, carefully core each apple. If you have an apple corer, it’s a breeze; otherwise, you can simply cut the apple into quarters and then slice away the core and seeds.
  3. Dicing with Precision: Now comes the dicing. This is a crucial step for achieving the perfect texture in your fritters. We’re aiming for small, uniform pieces, ideally about 1/4 to 1/2 inch cubes. The uniformity is key because it ensures that all the apple pieces cook evenly within the fritter. If some pieces are too large, they might remain a bit too firm, while overly small pieces could turn mushy. The goal is to have tender, slightly soft apple bits that still offer a pleasant bite, contributing beautifully to the overall texture of these delectable treats. As you dice, place the pieces in a medium-sized bowl. If you’re not going to mix the batter immediately, or if you’re preparing a large batch, you might want to toss the diced apples with a squeeze of lemon juice (about a teaspoon) to prevent them from browning. This step is purely aesthetic but helps keep your fritters looking vibrant and fresh.

Crafting the Irresistible Fritter Batter

  1. Combine Dry Ingredients: In a large mixing bowl, whisk together the all-purpose flour, granulated sugar, baking powder, ground cinnamon, ground nutmeg, and salt. It’s important to whisk these dry ingredients thoroughly to ensure that the baking powder and spices are evenly distributed. This prevents pockets of unmixed ingredients and helps the fritters rise uniformly, giving them that lovely fluffy texture we’re aiming for. This foundational step is essential for consistently delicious crispy air fryer apple fritters you’ll crave!
  2. Prepare Wet Ingredients: In a separate medium-sized bowl, lightly beat the large egg. Then, add the milk, melted butter (make sure it’s cooled slightly so it doesn’t scramble the egg!), and pure vanilla extract. Whisk these wet ingredients together until they are well combined. The vanilla extract is a non-negotiable here; it truly enhances the overall aroma and flavor profile of the fritters, bringing a comforting warmth to every bite.
  3. Gently Marry Wet and Dry: Now, pour the wet ingredient mixture into the bowl with the dry ingredients. Using a wooden spoon or a spatula, gently mix until just combined. The key here is to avoid overmixing! Overmixing develops the gluten in the flour too much, which can lead to tough, chewy fritters instead of the light and airy ones we desire. A few lumps in the batter are perfectly fine, even desirable; they often result in a more tender crumb. Stop mixing as soon as you no longer see streaks of dry flour.
  4. Fold in the Diced Apples: Finally, add your finely diced apples to the batter. Gently fold them in until they are evenly distributed throughout the mixture. You want every fritter to have a generous helping of those sweet, tender apple pieces. This gentle folding motion ensures that the apples are coated without further developing the gluten in the batter. Take your time with this step; it’s the last opportunity to ensure uniform distribution before cooking.

Air Frying Your Way to Crispy Perfection

  1. Preheat Your Air Fryer: Before you even think about putting batter in the basket, it’s crucial to preheat your air fryer. Set it to 350°F (175°C) and let it run for at least 5 minutes. Preheating ensures that the air fryer is at the optimal temperature when the fritters go in, which helps them cook evenly and develop that coveted crispy exterior from the start. A properly preheated air fryer is a secret weapon for achieving truly crispy air fryer apple fritters you’ll crave!
  2. Prepare the Air Fryer Basket: While your air fryer is preheating, lightly spray the air fryer basket with cooking spray or brush it with a thin layer of oil. This prevents the fritters from sticking and helps to promote even browning. You can also use parchment paper air fryer liners if you prefer, but ensure they are perforated to allow for proper airflow.
  3. Portioning the Fritters: Using a spoon or a small ice cream scoop (about 1.5 to 2 tablespoons per fritter), carefully drop dollops of the apple fritter batter into the preheated and prepared air fryer basket. Do not overcrowd the basket. It’s absolutely essential to leave plenty of space between each fritter to allow the hot air to circulate freely. If the basket is too full, the fritters will steam instead of air fry, resulting in a soggy texture rather than the crispy exterior we’re aiming for. You’ll likely need to cook these in batches, depending on the size of your air fryer.
  4. Initial Air Frying: Air fry the fritters at 350°F (175°C) for 6-8 minutes on the first side. During this time, the fritters will begin to puff up and cook through. You’ll notice the edges starting to turn a beautiful golden brown. The exact timing can vary slightly depending on your air fryer model and the size of your fritters, so keep an eye on them.
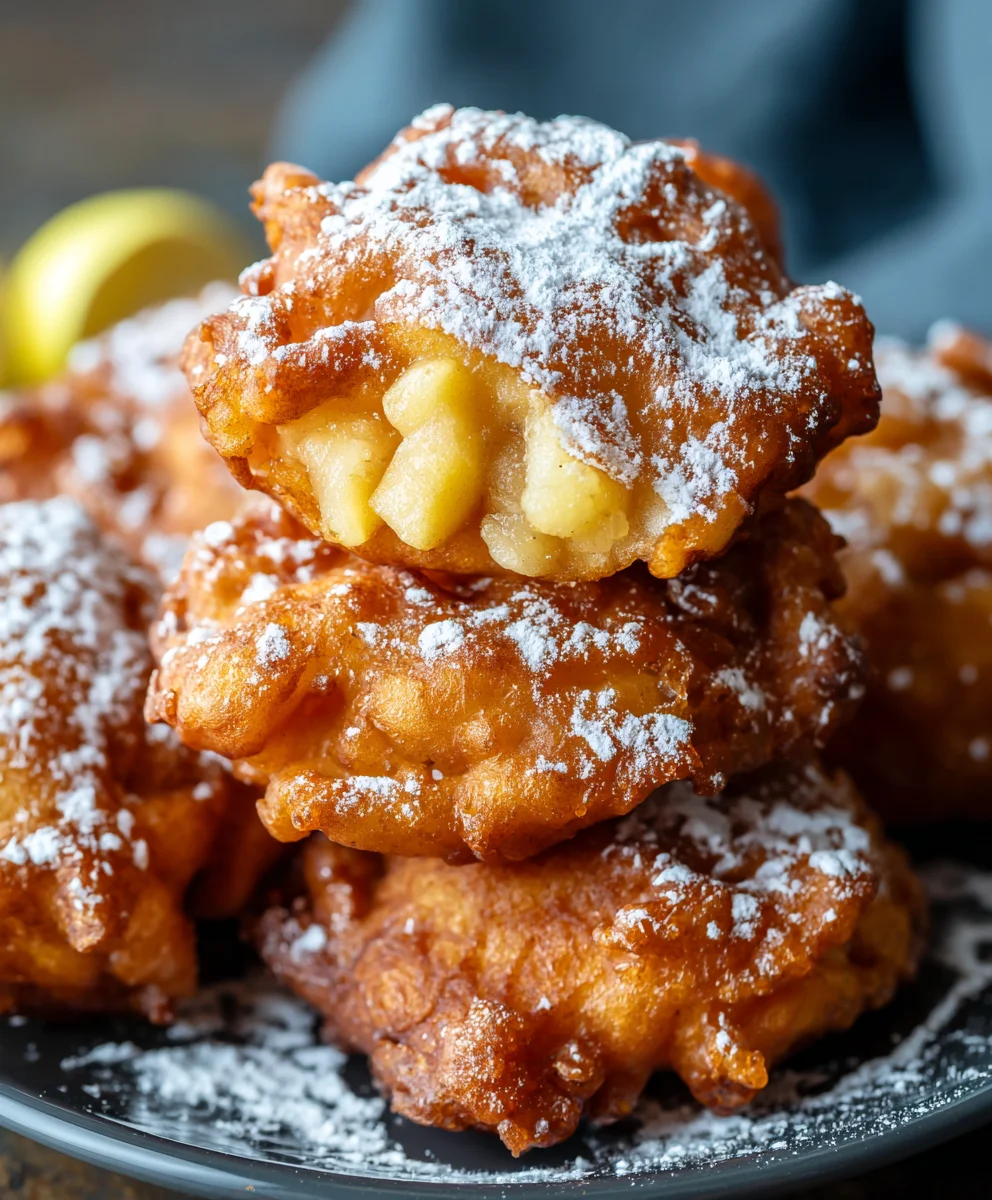
  5. Flip and Finish: After the initial cooking time, carefully flip each fritter using tongs or a spatula. This step is vital for ensuring even cooking and crispness on both sides. Continue to air fry for another 5-7 minutes, or until the fritters are deeply golden brown, cooked through, and delightfully crispy on the outside. To test for doneness, you can insert a toothpick into the center of a larger fritter; it should come out clean, indicating that the batter is fully cooked. The smell filling your kitchen at this point will be absolutely heavenly, a clear sign that these are indeed the crispy air fryer apple fritters you’ll crave!
  6. Remove and Repeat: Once a batch is done, carefully remove the cooked fritters from the air fryer basket and place them on a wire rack set over a baking sheet. This allows air to circulate around them, helping to maintain their crispness while they cool slightly. Repeat the air frying process with the remaining batter, making sure to re-spray the basket if necessary between batches.

Whipping Up the Luscious Vanilla Glaze

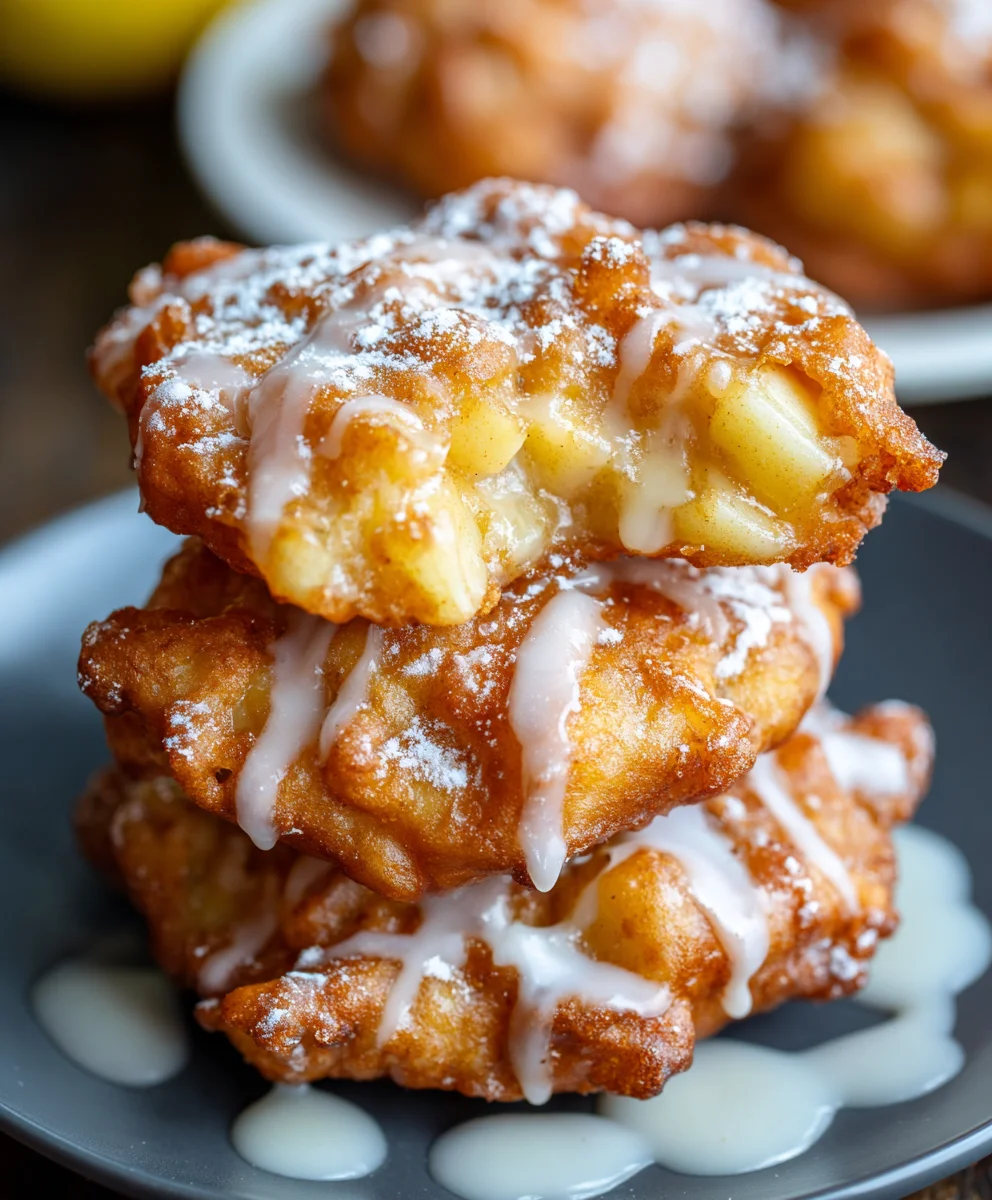
  1. Combine Glaze Ingredients: While your fritters are cooling slightly (they should still be warm), it’s the perfect time to prepare the simple yet decadent vanilla glaze. In a small mixing bowl, combine the powdered sugar, 2 tablespoons of milk, and ½ teaspoon of pure vanilla extract.
  2. Whisk to Perfection: Using a small whisk or a fork, vigorously whisk the ingredients together until they are completely smooth and free of any lumps. The consistency you’re looking for is a thick, pourable glaze that will coat the back of a spoon. If the glaze is too thick, add the remaining tablespoon of milk (or even a few drops more) a little at a time, whisking well after each addition, until you reach your desired consistency. If it turns out too thin, you can always whisk in a little more powdered sugar. This glaze adds a wonderful touch of sweetness and a beautiful sheen to your crispy air fryer apple fritters you’ll crave!

The Grand Finale: Glazing and Serving

  1. Glaze While Warm: Once all your apple fritters are cooked and resting on the wire rack, it’s time for the glorious glazing! I highly recommend glazing the fritters while they are still warm, but not piping hot. The warmth helps the glaze to melt slightly and adhere beautifully to the fritter, creating a thin, even coating that sets to a delicate crispness. You can either dip each fritter halfway into the bowl of glaze or, my preferred method for a more controlled application, drizzle the glaze generously over the warm fritters using a spoon. Let any excess glaze drip off and back into the baking sheet below the wire rack.
  2. Allow Glaze to Set: Let the glazed fritters sit on the wire rack for a few minutes, typically 5-10 minutes, to allow the glaze to set. As the glaze cools, it will harden slightly, creating a wonderfully sweet and slightly crunchy exterior that contrasts beautifully with the soft, apple-filled interior. This brief waiting period is crucial for the perfect finish.
  3. Serve and Enjoy: These crispy air fryer apple fritters you’ll crave! are best enjoyed fresh, warm, and within a few hours of making them, when their crispness is at its peak. The aroma alone will have everyone eager to dive in! They make a fantastic breakfast treat, a delightful dessert, or a comforting snack any time of day. While they are amazing on their own, a cup of hot coffee or tea makes for an exquisite pairing.
  4. Storage Tips: If you happen to have any leftovers (a rare occurrence in my experience!), store them in an airtight container at room temperature for up to 2 days. To re-crisp them, you can pop them back into the air fryer at 300°F (150°C) for 2-3 minutes, just until warmed through and the exterior has regained some of its crunch. However, the true magic of these fritters lies in their freshly made crispiness and warmth. Enjoy every single bite of these homemade delights!

Crispy Air Fryer Apple Fritters You'll Crave!

Conclusion:

And there you have it, my friends! We’ve reached the delicious culmination of our culinary journey together. I truly hope you’ve enjoyed exploring the magic behind these incredible air fryer apple fritters. What makes this recipe an absolute must-try, in my humble opinion, is its unparalleled ability to deliver that coveted golden-brown crispness without the greasy guilt often associated with traditional deep-frying. It’s a game-changer, plain and simple. Imagine biting into a fluffy, tender interior bursting with warm, spiced apple chunks, all encased in a beautifully crunchy exterior that sings with every bite. That, my friends, is the promise of this recipe, and it delivers on it spectacularly. It’s not just a dessert; it’s an experience, a delightful treat that perfectly balances health-consciousness with pure, unadulterated indulgence. Whether you’re looking for a quick breakfast boost, a delightful afternoon snack, or a show-stopping dessert to impress your loved ones, these fritters fit the bill with effortless grace. They prove that you don’t need a vat of oil to achieve bakery-quality results right in your own kitchen.

But the journey doesn’t end there; it’s just the beginning of your own creative culinary adventure! While the basic recipe for these crispy air fryer apple fritters is phenomenal on its own, I always encourage a little experimentation. When it comes to serving, the possibilities are as endless as your imagination. For a classic touch, a dusting of powdered sugar is always welcome, creating a lovely delicate sweetness that complements the spiced apples beautifully. If you’re feeling a bit more ambitious, a simple glaze made from powdered sugar and a splash of milk or apple cider takes them to an entirely new level of decadence. You could even add a hint of vanilla extract or cinnamon to your glaze for an extra aromatic kick. For those who love a bit of contrast, a scoop of vanilla bean ice cream melting over a warm fritter is pure bliss, creating a delightful hot-and-cold sensation that’s simply irresistible. A dollop of whipped cream, perhaps infused with a little maple syrup, also makes for an elegant accompaniment.

Beyond the classic, think about what else you love with apples. A drizzle of warm caramel sauce? Absolutely! A sprinkle of chopped toasted pecans or walnuts for added texture and nutty flavor? A fantastic idea! For a slightly more adult twist, consider serving them alongside a strong cup of coffee or a warming mug of spiced apple cider, especially on a chilly morning. They also make a fantastic addition to a brunch spread, pairing wonderfully with savory dishes to provide that perfect sweet counterpoint. Don’t be afraid to think outside the box; I’ve even heard of people enjoying them with a light fruit compote or a dollop of Greek yogurt for a healthier, tangier option.

And let’s talk about variations within the recipe itself. While Granny Smith apples offer that perfect tartness to cut through the sweetness, feel free to experiment with other apple varieties. Honeycrisp, Fuji, or even Gala apples can bring a different sweetness and texture profile to your fritters. Just adjust the overall sugar content slightly if using sweeter apples. Want to boost the spice factor? A pinch of nutmeg, allspice, or even a tiny touch of ground cloves can deepen the flavor profile. For an extra layer of richness, consider adding a tablespoon of melted butter to your batter before air frying, though it’s certainly not necessary for that delightful crisp. Some readers have even told me they’ve added a handful of golden raisins or dried cranberries to the apple mixture for a delightful chewiness and bursts of fruity flavor. If you’re catering to dietary needs, this recipe is incredibly adaptable. Swapping out regular flour for a gluten-free all-purpose blend and using a dairy-free milk substitute often works seamlessly, ensuring everyone can enjoy these heavenly treats. The beauty of this recipe lies in its forgiving nature and its invitation to personalize it to your heart’s content.

So, what are you waiting for? I sincerely hope you feel inspired and excited to try this recipe for yourself. It’s an incredibly rewarding experience, not just for the taste buds but for the soul. There’s something truly special about creating something so delicious from scratch, especially when it’s this easy and yields such impressive results. Please, I urge you to whip up a batch of these crispy air fryer apple fritters this week! I promise, you won’t regret it. Once you’ve savored every bite, I would absolutely love to hear about your experience. Did you add a special ingredient? Discover a new favorite serving suggestion? Or perhaps you just want to share the joy of your perfectly golden fritters? Head over to the comments section below, or better yet, share a picture of your magnificent creations on social media! Tag me and let me know how it went. Your feedback, your stories, and your beautiful food photos truly make my day and inspire other home cooks in our community. When you share your amazing creations, you’ll be contributing to a community that truly appreciates delicious, easy-to-make treats, and perhaps even help others discover this gem. We’ve even set up a special identifier for tracking the incredible engagement this particular recipe generates, something like this unique string that helps us see its reach: ?utm_source=pinterest&utm_medium=pin&utm_campaign=organic&utm_term=crispy%20air%20fryer%20apple%20fritters%20you’ll%20crave!&utm_content=pin C682d72e B1fa 96fc 87106fa9f634. It’s a testament to how much we want to see your success! So, go forth, make some fritters, and let the good times roll!


Crispy Air Fryer Apple Fritters You'll Crave!

Crispy Air Fryer Apple Fritters You’ll Crave!

Longing for tender, spiced apple nestled within a gloriously golden, crunchy exterior, without the hassle and oil of deep-frying? This recipe reimagines classic apple fritters, delivering all the nostalgic comfort and irresistible flavor effortlessly in your air fryer. Enjoy this sensory delight, perfect for breakfast, brunch, or dessert.

Prep Time
20 Minutes

Cook Time
30 Minutes

Total Time
50 Minutes

Servings
12-16 fritters

Ingredients

  • 2 medium apples, peeled, cored, and diced
  • 1 cup (120g) all-purpose flour
  • 1/4 cup (50g) granulated sugar
  • 1 teaspoon baking powder
  • 1 teaspoon ground cinnamon
  • 1/4 teaspoon ground nutmeg
  • 2 large eggs
  • 1/2 cup (120ml) milk
  • 1 teaspoon vanilla extract
  • Powdered sugar for dusting

Instructions

  1. Step 1
    Wash, peel, core, and dice 2 medium apples into 1/4 to 1/2 inch cubes. Place in a bowl.
  2. Step 2
    In a large mixing bowl, whisk together 1 cup all-purpose flour, 1/4 cup granulated sugar, 1 teaspoon baking powder, 1 teaspoon ground cinnamon, and 1/4 teaspoon ground nutmeg.
  3. Step 3
    In a separate medium-sized bowl, whisk together 2 large eggs, 1/2 cup milk, and 1 teaspoon vanilla extract.
  4. Step 4
    Pour the wet ingredient mixture into the dry ingredients. Mix gently with a spoon or spatula until just combined; avoid overmixing.
  5. Step 5
    Gently fold the diced apples into the batter until evenly distributed.
  6. Step 6
    Preheat your air fryer to 350°F (175°C) for at least 5 minutes. Lightly spray the air fryer basket with cooking spray or brush with oil.
  7. Step 7
    Drop 1.5 to 2 tablespoon portions of batter into the preheated basket, ensuring space between each fritter. Air fry at 350°F (175°C) for 6-8 minutes.
  8. Step 8
    Carefully flip each fritter. Continue to air fry for another 5-7 minutes, or until deeply golden brown and cooked through. (A toothpick inserted into the center should come out clean).
  9. Step 9
    Remove cooked fritters to a wire rack set over a baking sheet. Repeat the air frying process with the remaining batter, re-spraying the basket if needed.
  10. Step 10
    Lightly dust the warm fritters with powdered sugar. Serve immediately for best crispness.
  11. Step 11
    Store any leftover fritters in an airtight container at room temperature for up to 2 days. To re-crisp, air fry at 300°F (150°C) for 2-3 minutes.

Important Information

Nutrition Facts (Per Serving)

It is important to consider this information as approximate and not to use it as definitive health advice.

Allergy Information

Please check ingredients for potential allergens and consult a health professional if in doubt.

« Previous Post
Hearty Sausage Tortellini Soup: Quick & Easy Weeknight Meal
Next Post »
Garlic Butter Steak Bites & Potatoes: Tender & Crispy!

If you enjoyed this…

Blueberry Cream Cheese Bread: A Deliciously Moist Recipe to Try Today

Crispy Air Fryer Apple Fritters You’ll Crave!

Delicious Amish Cinnamon Bread Recipe to Savor Today!

Primary Sidebar

Browse by Diet

BreakfastDinnerLunchDessertAppetizer

Sweet Peach Yogurt Parfait Delight

One of my fondest memories is from a lazy summer afternoon spent at my grandmother’s house. The sun filtered through the kitchen window, casting a warm glow over the table where she would create her culinary magic. It was during one of those blissful moments that I first tasted her Peach Yogurt Parfait with Honey and Granola. The sweet aroma of ripe peaches mingling with creamy yogurt and the crunch of granola was nothing short of heavenly. It felt like summer captured in a bowl, and I still remember the joy of diving in with a spoon, each layer revealing a new burst of flavor.

When I think about that parfait, I can almost hear the gentle hum of the bees outside, reminding me of the floral notes that honey brings to every bite. The vibrant yellows and soft oranges of the peaches contrast beautifully with the creamy white yogurt and the golden crunch of granola. It’s a dish that not only looks delightful but also tastes like a celebration of fresh, wholesome ingredients.

What makes my version of this Peach Yogurt Parfait special is the careful balance of flavors and textures. I use ripe, juicy peaches, drizzled with locally sourced honey, and a homemade granola that’s bursting with nuts and seeds for an extra crunch. It’s a simple dish, but every layer is crafted with love and attention.

Let me show you exactly how to make this delightful parfait, so you can bring a bit of that summer magic into your kitchen!

Sweet Peach Yogurt Parfait Delight

Why You’ll Love This Recipe

  • Delightfully creamy texture from the Greek yogurt, paired with the juicy sweetness of fresh peaches.
  • Ready in under 20 minutes, making it a quick and satisfying breakfast or snack option.
  • Budget-friendly, using common ingredients that you may already have in your pantry.
  • Customizable with your favorite granola and nuts, allowing you to tailor each parfait to your taste.
  • Perfectly balanced flavors with the bright acidity of lemon juice and the sweetness of honey enhancing the peaches.

Ingredients

  • For the Parfait:
  • 2 cups plain Greek yogurt (or vanilla yogurt for a sweeter option)
  • 2 large ripe peaches, diced (about 2 cups)
  • 1 tablespoon fresh lemon juice (to prevent browning of peaches)
  • 2 tablespoons honey (plus more for drizzling)
  • 1 teaspoon vanilla extract (optional for extra flavor)
  • For the Granola:
  • 1 cup granola (store-bought or homemade; see notes for a simple granola recipe)
  • 1/4 cup sliced almonds (optional for added crunch)
  • 1/4 cup shredded coconut (optional for added flavor)

Let’s dive into some key ingredients that make this Peach Yogurt Parfait so delightful! First, the Greek yogurt is not only creamy but also packed with protein, making it a satisfying option for breakfast or a snack. If you’re looking for a sweeter option, you can easily substitute it with vanilla yogurt, though it may alter the overall flavor balance. Next, the ripe peaches are the star of the show; their natural sweetness shines through, so I recommend choosing peaches that yield slightly to pressure, indicating they’re perfectly ripe. If peaches aren’t in season, feel free to use nectarines or even frozen peaches—just thaw them before use. Finally, honey adds a lovely floral sweetness that ties everything together. If you prefer, maple syrup can serve as a delicious substitute.

Step-by-Step Instructions

  1. Start by preparing the peaches. Wash them thoroughly, then slice and dice them into bite-sized pieces. In a medium bowl, toss the diced peaches with 1 tablespoon of fresh lemon juice to prevent browning. Set aside for about 5 minutes while the lemon juice works its magic.
  2. In a separate bowl, combine the Greek yogurt, 2 tablespoons of honey, and 1 teaspoon of vanilla extract if using. Stir the mixture until smooth and thoroughly blended. This should take about a minute. Avoid overmixing to maintain the creaminess of the yogurt.
  3. Now it’s time to layer your parfait. Grab a clear glass or bowl to showcase your beautiful creation. Start with a generous spoonful of the yogurt mixture at the bottom—about 1/4 cup will do. Use a spoon to spread it evenly.
  4. Add a layer of the diced peaches over the yogurt, ensuring they cover the yogurt completely. You might want to use about half of what you have prepared—roughly 1 cup. This layer should be visually appealing, so arrange the peaches neatly.
  5. Sprinkle 1/4 cup of granola over the peaches. This adds a delightful crunch. Make sure to distribute it evenly to ensure every bite has that satisfying texture. Avoid packing it down too tightly, as you want it to maintain its crunch.
  6. Repeat the layers: spoon in another 1/4 cup of yogurt, followed by another cup of peaches, and another sprinkle of granola. You should have at least two layers, but feel free to add more depending on your glass size.
  7. Finish off your parfait with a drizzle of honey on top for added sweetness and a touch of elegance. If you’re using sliced almonds or shredded coconut, sprinkle them on top now. It adds a lovely visual contrast and extra flavor.
  8. Serve immediately or refrigerate for up to 30 minutes before serving to allow the flavors to meld together. However, I recommend enjoying it fresh to maintain the granola’s crunch.

Pro Tips for the Best Peach Yogurt Parfait With Honey And Granola

  • Make sure to choose ripe peaches for the best flavor and texture. A common mistake is using unripe fruit, which can lead to a less enjoyable parfait. Look for peaches that are fragrant and slightly soft to the touch.
  • Use a clear glass to assemble your parfait; this not only makes for a beautiful presentation but also allows you to see the colorful layers, which adds to the enjoyment of eating it.
  • For an even creamier texture, consider whipping the Greek yogurt with a hand mixer for a couple of minutes before layering. This small adjustment makes a huge difference in mouthfeel.
  • Be mindful of the granola-to-yogurt ratio. Too much granola can overwhelm the parfait, while too little can make it feel too creamy. Aim for about 1/4 cup of granola per layer for the perfect balance.
  • If you’re making this for a gathering, consider preparing the yogurt and peaches ahead of time and layering them just before serving. This ensures the granola stays crunchy!

Variations & Serving Ideas

There are so many ways to get creative with your Peach Yogurt Parfait! For a tropical twist, swap out the peaches for mangoes or pineapples and top with coconut flakes. If you prefer a berry flavor, mix in some blueberries or strawberries with the peaches for added color and taste. For a nutty version, incorporate chopped walnuts or pecans instead of almonds.

As for serving ideas, this parfait pairs beautifully with a side of scrambled eggs for a hearty breakfast or fresh fruit salad for a light lunch. You might also enjoy it alongside whole grain toast with almond butter for an energizing snack. The contrast of flavors and textures will elevate your meal experience!

Storage, Make-Ahead & Reheating

The Peach Yogurt Parfait is best enjoyed fresh, but you can prepare some components ahead of time. Store the layered parfait in an airtight container in the refrigerator for up to 24 hours. However, be cautious; the granola may lose its crunch if stored too long. You can freeze the yogurt and peach mixture for up to 2 months; just remember to thaw it in the refrigerator overnight before serving.

If you plan to enjoy this dish the next day, it can taste even better as the flavors meld together. Just remember to add the granola right before serving to keep its delightful crunch!

Frequently Asked Questions

Can I make Peach Yogurt Parfait With Honey And Granola ahead of time?

Yes — in fact, it tastes even better the next day as the flavors meld. However, I recommend waiting to add the granola until just before serving to maintain its crunch.

What can I substitute for Greek yogurt?

If you prefer a lighter option, you can substitute Greek yogurt with regular yogurt or a dairy-free alternative like coconut yogurt. Just remember that this may alter the creaminess and flavor profile slightly.

Can I use frozen peaches for this parfait?

Absolutely! Just make sure to thaw the frozen peaches before using them. They will still add great flavor, though the texture may be slightly softer than fresh peaches.

How do I make the parfait vegan?

To make a vegan version, substitute the Greek yogurt with a plant-based yogurt alternative, and replace honey with maple syrup or agave nectar. This keeps the parfait sweet while adhering to a vegan diet.

What other fruits can I use in this recipe?

You can mix and match fruits based on your preference. Try using strawberries, blueberries, raspberries, or even bananas. Just make sure to adjust the lemon juice as needed to prevent browning.

Sweet Peach Yogurt Parfait Delight

Final Thoughts

The Peach Yogurt Parfait with Honey and Granola is a delightful blend of creamy yogurt, sweet peaches, and crunchy granola that creates a satisfying and nourishing treat. Each layer bursts with flavor, making it a perfect choice for breakfast or a light dessert.

This is the kind of recipe I come back to again and again, especially when I want something refreshing and wholesome to start my day. The harmony of sweet and tart flavors, combined with the delightful crunch, never fails to lift my spirits!

I encourage you to give this parfait a try and indulge in its comforting goodness. Feel free to share your results or even add your own twist—perhaps a sprinkle of cinnamon or a handful of nuts. Enjoy creating your perfect parfait!

Print
clock clock iconcutlery cutlery iconflag flag iconfolder folder iconinstagram instagram iconpinterest pinterest iconfacebook facebook iconprint print iconsquares squares iconheart heart iconheart solid heart solid icon

Peach Yogurt Parfait


  • Author: Lily author
  • Total Time: 15 minutes
  • Yield: 4 servings 1x
Pin Recipe
Print Recipe

Description

This Peach Yogurt Parfait combines creamy Greek yogurt, juicy peaches, and crunchy granola for a delightful treat. It’s a perfect breakfast or snack that captures the essence of summer in every bite.


Ingredients

Scale
  • For the Parfait:
  • 2 cups plain Greek yogurt (or vanilla yogurt for a sweeter option)
  • 2 large ripe peaches, diced (about 2 cups)
  • 1 tablespoon fresh lemon juice (to prevent browning of peaches)
  • 2 tablespoons honey (plus more for drizzling)
  • 1 teaspoon vanilla extract (optional for extra flavor)
  • For the Granola:
  • 1 cup granola (store-bought or homemade; see notes for a simple granola recipe)
  • 1/4 cup sliced almonds (optional for added crunch)
  • 1/4 cup shredded coconut (optional for added flavor)

Instructions

  1. Start by preparing the peaches. Wash them thoroughly, then slice and dice them into bite-sized pieces. In a medium bowl, toss the diced peaches with 1 tablespoon of fresh lemon juice to prevent browning. Set aside for about 5 minutes while the lemon juice works its magic.
  2. In a separate bowl, combine the Greek yogurt, 2 tablespoons of honey, and 1 teaspoon of vanilla extract if using. Stir the mixture until smooth and thoroughly blended. This should take about a minute. Avoid overmixing to maintain the creaminess of the yogurt.
  3. Now it’s time to layer your parfait. Grab a clear glass or bowl to showcase your beautiful creation. Start with a generous spoonful of the yogurt mixture at the bottom—about 1/4 cup will do. Use a spoon to spread it evenly.
  4. Add a layer of the diced peaches over the yogurt, ensuring they cover the yogurt completely. You might want to use about half of what you have prepared—roughly 1 cup. This layer should be visually appealing, so arrange the peaches neatly.
  5. Sprinkle 1/4 cup of granola over the peaches. This adds a delightful crunch. Make sure to distribute it evenly to ensure every bite has that satisfying texture. Avoid packing it down too tightly, as you want it to maintain its crunch.
  6. Repeat the layers: spoon in another 1/4 cup of yogurt, followed by another cup of peaches, and another sprinkle of granola. You should have at least two layers, but feel free to add more depending on your glass size.
  7. Finish off your parfait with a drizzle of honey on top for added sweetness and a touch of elegance. If you’re using sliced almonds or shredded coconut, sprinkle them on top now. It adds a lovely visual contrast and extra flavor.
  8. Serve immediately or refrigerate for up to 30 minutes before serving to allow the flavors to meld together. However, I recommend enjoying it fresh to maintain the granola’s crunch.
  • Prep Time: 15 mins
  • Cook Time: 0 mins
  • Category: Breakfast
  • Method: No-cook
  • Cuisine: American

Nutrition

  • Serving Size: 1 parfait
  • Calories: 250
  • Sugar: 20 g
  • Sodium: 50 mg
  • Fat: 5 g
  • Saturated Fat: 2 g
  • Unsaturated Fat: 3 g
  • Trans Fat: 0 g
  • Carbohydrates: 40 g
  • Fiber: 3 g
  • Protein: 10 g
  • Cholesterol: 10 mg

Keywords: Choose ripe peaches for the best flavor and texture. Use a clear glass for a beautiful presentation. For creaminess, consider whipping the yogurt before layering. Be mindful of the granola-to-yogurt ratio. Prepare yogurt and peaches ahead of time for gatherings, layering just before serving.

Did you make this recipe?

Share a photo and tag us — we can't wait to see what you've made!

Sun-Kissed Frozen Orange Cream Slush

As a child, summer days felt like they lasted forever. I remember the sticky heat wrapping around me as I played outside, my laughter mingling with the sounds of the neighborhood. But nothing could cool me down quite like the moment I’d spot my grandmother, laboring over her blender, whipping up her famous Frozen Orange Creamsicle Slush. That vibrant orange treat, with its frosty texture and sweet citrus aroma, was like a burst of sunshine in a cup. Just one sip, and I could feel the coolness wash over me, sparking pure joy.

This Frozen Orange Creamsicle Slush has a way of making you feel like a kid again. Its creamy, dreamy consistency is a delightful balance of bright orange and soft vanilla, inviting you to dive right in. The refreshing tang of orange dances on your tongue, while the smooth creaminess envelops you in a comforting embrace. It’s a nostalgic treat that’s perfect for hot summer afternoons or anytime you need a little pick-me-up.

What makes my version of this slush stand out is the addition of a hint of vanilla bean, which elevates the flavor and adds an extra layer of richness. Plus, it’s super easy to whip up with just a few simple ingredients that you probably already have on hand! So, if you’re ready to relive those sun-soaked memories, let me show you exactly how to make it.

Sun-Kissed Frozen Orange Cream Slush

Why You’ll Love This Recipe

  • Each slush is a perfect blend of creamy vanilla and zesty orange, creating a nostalgic flavor reminiscent of summer days.
  • This refreshing treat is ready in under 15 minutes, making it an ideal quick dessert for unexpected guests or hot afternoons.
  • With just 8 simple ingredients, it’s budget-friendly, ensuring you don’t have to break the bank to enjoy a delicious slush.
  • The slush has a perfectly smooth texture, thanks to the combination of ice and ice cream, providing a delightful contrast to the bright citrus flavors.
  • It’s highly customizable; you can easily adjust the sweetness and add fresh herbs for a unique twist that suits your taste.

Ingredients

  • 2 cups orange juice (freshly squeezed or store-bought)
  • 1 cup vanilla ice cream
  • 1 cup crushed ice
  • 1/2 cup milk (whole or 2%)
  • 1/4 cup granulated sugar (adjust based on sweetness preference)
  • 1 teaspoon vanilla extract
  • Zest of 1 orange (for added flavor)
  • Fresh orange slices and mint leaves (for garnish)

The star of this Frozen Orange Creamsicle Slush is the orange juice, which provides the vibrant, citrusy base. Freshly squeezed juice will yield the brightest flavor, but store-bought options can be just as convenient. If you’re opting for store-bought, choose 100% pure juice with no added sugars for the best results. Another essential ingredient is the vanilla ice cream; it adds creaminess and sweetness. You can substitute it with dairy-free ice cream if you’re looking for a vegan option. Whole or 2% milk complements the ice cream, creating a smooth blend. If you want a lower-calorie version, almond or oat milk can be good alternatives.

Lastly, the granulated sugar can be adjusted based on your sweetness preference. If you prefer a more natural sweetener, consider using honey or agave syrup. The orange zest enhances the flavor profile, providing an aromatic pop that brings the whole slush together. Don’t skip it! It adds an extra layer of brightness that makes this slush truly special.

Step-by-Step Instructions

  1. Start by preparing your ingredients. Gather 2 cups of orange juice, 1 cup of vanilla ice cream, and 1 cup of crushed ice. Make sure the ice is finely crushed, as larger chunks can make blending difficult.
  2. In a blender, combine the orange juice, vanilla ice cream, crushed ice, and 1/2 cup of milk. Add 1/4 cup of granulated sugar and 1 teaspoon of vanilla extract. If you like a sweeter slush, consider adding a bit more sugar at this stage.
  3. Add the zest of 1 orange to the blender. This step is crucial for enhancing the citrus flavor of your slush. Make sure not to include the bitter white pith—only the flavorful zest.
  4. Blend the mixture on medium-high speed for about 30-45 seconds. Stop once the ingredients are fully combined and the slush has a smooth, even consistency. If you notice large chunks of ice, blend for an additional 10-15 seconds. Avoid over-blending, as this can make the slush too liquidy.
  5. Once blended, taste the slush. If it needs more sweetness, add a little more sugar and blend for a few more seconds. If it’s too thick, you can add a splash of milk to reach your desired consistency.
  6. Pour the slush into glasses. This recipe typically serves 4, but you can easily double it for larger gatherings. Use a spoon to help guide the slush into the glasses if needed.
  7. Garnish each serving with fresh orange slices and mint leaves. The mint not only adds a pop of color but also a refreshing aroma that complements the citrus flavors beautifully.
  8. Serve immediately and enjoy! If you’ve made extra, you can refrigerate it for a short time, but it’s best enjoyed fresh.

Pro Tips for the Best Frozen Orange Creamsicle Slush

  • Don’t skip the orange zest! It’s a game-changer for flavor. Always zest before juicing to make it easier.
  • Use a high-powered blender for the best texture. A standard blender may struggle with ice, leading to uneven consistency. If you have a food processor, that can work too, but ensure the ice is finely crushed.
  • Adjust the ice-to-liquid ratio carefully. If your slush is too thick, it won’t blend well. Start with less ice and add more until you reach your preferred texture.
  • Be cautious with the sugar! Always start with the lower amount, as you can easily add more, but it’s hard to fix an overly sweet slush.
  • For a fun twist, consider adding a splash of coconut milk or a handful of fresh fruit like strawberries or pineapple. This not only enhances the flavor but also adds a beautiful color contrast.

Variations & Serving Ideas

There are countless ways to put a spin on your Frozen Orange Creamsicle Slush. Consider making a tropical version by adding in some pineapple juice or coconut milk for a delightful tropical twist. If you’re feeling adventurous, try incorporating a handful of frozen mango or peach slices for added sweetness. For a lighter version, swap out the vanilla ice cream for Greek yogurt for a creamy yet tangy alternative.

As for serving ideas, this refreshing slush pairs wonderfully with light summer dishes like grilled chicken skewers, fish tacos, or a simple salad topped with citrus vinaigrette. The bright, zesty flavors of the slush complement these dishes perfectly, making them an ideal pairing for a sunny day.

Storage, Make-Ahead & Reheating

This Frozen Orange Creamsicle Slush is best enjoyed fresh, but if you have leftovers, you can store them in an airtight container in the fridge for up to 2 days. Just keep in mind that the slush may lose some of its texture over time as the ice melts. It doesn’t freeze well, as the ice will turn into a solid block. If you must freeze it, blend again after thawing to restore the slushy consistency. This treat is best the day you make it, as the flavors meld together beautifully overnight, enhancing its deliciousness.

Frequently Asked Questions

Can I make Frozen Orange Creamsicle Slush ahead of time?

Yes — in fact, it tastes even better the next day as the flavors meld. However, it’s best to enjoy it fresh, as the texture can change if stored for too long. If you need to prepare it ahead, keep it in the fridge and re-blend before serving.

What kind of orange juice should I use?

For the best flavor, use freshly squeezed orange juice. However, if you’re short on time, opt for 100% pure store-bought juice without added sugars. This will ensure that your slush remains flavorful and refreshing.

Can I substitute the vanilla ice cream?

Absolutely! If you’re looking for a dairy-free option, coconut milk ice cream or a non-dairy vanilla ice cream can work wonderfully. They will still provide the creamy texture and sweetness you desire.

How can I adjust the sweetness of my slush?

You can easily adjust the sweetness by modifying the amount of sugar added. Start with 1/4 cup and taste the mixture before blending. If you prefer it sweeter, add more sugar gradually until it reaches your desired level.

What should I do if my slush is too thick?

If your slush is too thick, simply add a splash of milk or orange juice and blend again. This will help achieve a more drinkable consistency while maintaining the slushy texture. Adjust gradually to reach your preferred thickness.

Sun-Kissed Frozen Orange Cream Slush

Final Thoughts

The Frozen Orange Creamsicle Slush is a delightful blend of refreshing citrus and creamy goodness, making it a perfect treat for warm days or any time you crave a taste of nostalgia. The way the bright orange flavor dances with the creamy texture truly elevates this slush, transforming it into a satisfying escape from the everyday.

This is the kind of recipe I come back to again and again, especially when I’m looking to cool down or impress guests at a summer gathering. It’s simple to make and always brings smiles all around! I encourage you to try this recipe for yourself—don’t hesitate to share your results or even put your own spin on it. Happy slushing!

Print
clock clock iconcutlery cutlery iconflag flag iconfolder folder iconinstagram instagram iconpinterest pinterest iconfacebook facebook iconprint print iconsquares squares iconheart heart iconheart solid heart solid icon

Frozen Orange Creamsicle Slush


  • Author: Lily author
  • Total Time: 15 minutes
  • Yield: 4 servings 1x
Pin Recipe
Print Recipe

Description

This Frozen Orange Creamsicle Slush is a refreshing treat that combines creamy vanilla and zesty orange flavors. Perfect for hot summer days, it brings back nostalgic memories with every sip.


Ingredients

Scale
  • 2 cups orange juice (freshly squeezed or store-bought)
  • 1 cup vanilla ice cream
  • 1 cup crushed ice
  • 1/2 cup milk (whole or 2%)
  • 1/4 cup granulated sugar (adjust based on sweetness preference)
  • 1 teaspoon vanilla extract
  • Zest of 1 orange (for added flavor)
  • Fresh orange slices and mint leaves (for garnish)

Instructions

  1. Start by preparing your ingredients. Gather 2 cups of orange juice, 1 cup of vanilla ice cream, and 1 cup of crushed ice. Make sure the ice is finely crushed, as larger chunks can make blending difficult.
  2. In a blender, combine the orange juice, vanilla ice cream, crushed ice, and 1/2 cup of milk. Add 1/4 cup of granulated sugar and 1 teaspoon of vanilla extract. If you like a sweeter slush, consider adding a bit more sugar at this stage.
  3. Add the zest of 1 orange to the blender. This step is crucial for enhancing the citrus flavor of your slush. Make sure not to include the bitter white pith—only the flavorful zest.
  4. Blend the mixture on medium-high speed for about 30-45 seconds. Stop once the ingredients are fully combined and the slush has a smooth, even consistency. If you notice large chunks of ice, blend for an additional 10-15 seconds. Avoid over-blending, as this can make the slush too liquidy.
  5. Once blended, taste the slush. If it needs more sweetness, add a little more sugar and blend for a few more seconds. If it’s too thick, you can add a splash of milk to reach your desired consistency.
  6. Pour the slush into glasses. This recipe typically serves 4, but you can easily double it for larger gatherings. Use a spoon to help guide the slush into the glasses if needed.
  7. Garnish each serving with fresh orange slices and mint leaves. The mint not only adds a pop of color but also a refreshing aroma that complements the citrus flavors beautifully.
  8. Serve immediately and enjoy! If you’ve made extra, you can refrigerate it for a short time, but it's best enjoyed fresh.
  • Prep Time: 15 min
  • Cook Time: 0 min
  • Category: Dessert
  • Method: Blending
  • Cuisine: American

Nutrition

  • Serving Size: 1 serving
  • Calories: 200
  • Sugar: 30 g
  • Sodium: 50 mg
  • Fat: 5 g
  • Saturated Fat: 3 g
  • Unsaturated Fat: 2 g
  • Trans Fat: 0 g
  • Carbohydrates: 40 g
  • Fiber: 1 g
  • Protein: 2 g
  • Cholesterol: 20 mg

Keywords: Don't skip the orange zest! It's a game-changer for flavor. Always zest before juicing to make it easier.

Did you make this recipe?

Share a photo and tag us — we can't wait to see what you've made!

Zesty Lemon Poppy Seed Delight

One rainy afternoon, I found myself in my grandmother’s cozy kitchen, the kind that always smelled like warmth and love. She was whipping up her famous Lemon Poppy Seed Loaf, a recipe that had been passed down through generations. As the batter came together, the zesty aroma of fresh lemons filled the air, mingling perfectly with the nutty fragrance of poppy seeds. I can still picture her, apron-clad, as she expertly drizzled a vibrant citrus icing over the loaf, creating a glossy, sun-kissed finish that beckoned us to dive in. It was a moment that sparked my own passion for baking, and this recipe has become a cherished staple in my home ever since.

When you take a bite of this Lemon Poppy Seed Loaf, it’s like a burst of sunshine on your palate. The loaf is beautifully golden, with a tender crumb that melts in your mouth. Each slice is speckled with tiny poppy seeds, adding a delightful crunch that contrasts beautifully with the tangy sweetness of the lemon. And that citrus icing? It’s the finishing touch that elevates this loaf from ordinary to extraordinary, with its bright, zesty flavor dancing on your taste buds.

This recipe stands out because it embraces simplicity while delivering on flavor. I’ve added a hint of vanilla to the batter, enhancing the overall taste and making it even more indulgent. Trust me, once you make this Lemon Poppy Seed Loaf With Citrus Icing, it’ll become a go-to in your baking repertoire.

So, let me show you exactly how to make it!

Zesty Lemon Poppy Seed Delight

Why You’ll Love This Recipe

  • Moist and tender crumb that melts in your mouth, thanks to the perfect balance of butter and buttermilk.
  • Bright, zesty lemon flavor paired with crunchy poppy seeds, creating a delightful texture and taste experience.
  • Easy to whip up in just about an hour, perfect for last-minute gatherings or a cozy afternoon treat.
  • Budget-friendly with everyday ingredients, making it an accessible option for all home bakers.
  • The citrus icing adds a sweet tang that elevates the loaf, turning a simple recipe into a showstopper!

Ingredients

  • 1 ½ cups (190g) all-purpose flour
  • 1 teaspoon baking powder
  • ½ teaspoon baking soda
  • ½ teaspoon salt
  • 3 tablespoons poppy seeds
  • ½ cup (115g) unsalted butter, softened to room temperature
  • 1 cup (200g) granulated sugar
  • 2 large eggs
  • 1 teaspoon vanilla extract
  • 1 teaspoon lemon zest (from about 1 medium lemon)
  • ½ cup (120ml) buttermilk
  • 2 tablespoons fresh lemon juice

For the Citrus Icing:

  • 1 cup (120g) powdered sugar
  • 2 tablespoons fresh lemon juice
  • 1 tablespoon orange juice
  • 1 teaspoon lemon zest (for garnish, optional)

Let’s dive into the key ingredients that make this Lemon Poppy Seed Loaf so special. The all-purpose flour provides the structure and base for the loaf, while the baking powder and baking soda ensure it rises perfectly, giving the loaf a light texture. For a gluten-free variation, you could substitute the flour with a gluten-free all-purpose blend. Poppy seeds not only add a delightful crunch but also contribute to the unique flavor profile that pairs well with the citrus notes.

Unsalted butter is crucial for achieving the buttery richness that makes this loaf so moist. If you’re looking for a dairy-free option, coconut oil or a vegan butter can be used instead. The buttermilk is another essential component, providing acidity that activates the baking soda for a fluffy texture. If you don’t have buttermilk on hand, you can easily make a substitute by mixing ½ cup of milk with 1 tablespoon of vinegar or lemon juice and letting it sit for about 5 minutes.

Step-by-Step Instructions

  1. Preheat your oven to 350°F (175°C). Grease a 9×5-inch loaf pan or line it with parchment paper for easy removal later.
  2. In a medium mixing bowl, whisk together 1 ½ cups of all-purpose flour, 1 teaspoon of baking powder, ½ teaspoon of baking soda, ½ teaspoon of salt, and 3 tablespoons of poppy seeds. This helps to evenly distribute the baking agents and ensures a uniform rise.
  3. In a large mixing bowl, cream together ½ cup of softened unsalted butter and 1 cup of granulated sugar using an electric mixer on medium speed for about 3-4 minutes, until the mixture is light and fluffy. Make sure to scrape down the sides of the bowl occasionally.
  4. Add 2 large eggs, 1 teaspoon of vanilla extract, and 1 teaspoon of lemon zest to the creamed butter and sugar, mixing until fully combined. You want a smooth consistency, so ensure there are no lumps of butter.
  5. In a small bowl, combine ½ cup of buttermilk and 2 tablespoons of fresh lemon juice. Alternately add the dry ingredients and buttermilk mixture to the butter mixture, starting and ending with the dry ingredients. Mix just until combined; do not overmix, as this can lead to a dense loaf.
  6. Pour the batter into the prepared loaf pan. Smooth the top with a spatula, ensuring it’s even. Bake in the preheated oven for 50-60 minutes, or until a toothpick inserted in the center comes out clean. The edges should be lightly golden brown, and the center should feel just set.
  7. Once baked, remove the loaf from the oven and allow it to cool in the pan for about 10 minutes. Then, transfer it to a wire rack to cool completely. Resist the urge to slice too soon, as it will be crumbly if it’s still warm.
  8. While the loaf is cooling, prepare the citrus icing. In a medium bowl, whisk together 1 cup of powdered sugar, 2 tablespoons of fresh lemon juice, and 1 tablespoon of orange juice until smooth. If the icing is too thick, you can add a little more juice to reach your desired consistency.
  9. Once the loaf is completely cool, drizzle the citrus icing over the top. If you like, sprinkle with an additional teaspoon of lemon zest for an extra pop of flavor and color.

Pro Tips for the Best Lemon Poppy Seed Loaf With Citrus Icing

  • Be careful not to overmix your batter; this is a common mistake that can lead to a dense loaf. Mix just until the dry ingredients are incorporated for a light and fluffy texture.
  • Use room temperature ingredients, especially the butter and eggs. This helps to create a smoother batter and ensures even baking. Take your eggs out of the fridge about 30 minutes before you start.
  • For a more pronounced lemon flavor, consider adding a little lemon extract in addition to the zest and juice. Just a half teaspoon can elevate the citrus notes significantly.
  • When measuring your flour, spoon it into the measuring cup and level it off with a knife instead of scooping directly from the bag. This prevents packing and ensures you don’t end up with a dry loaf.
  • Invest in a good quality loaf pan; it makes a difference in heat distribution, which ensures even baking. If your pan is dark-coated, reduce the oven temperature by 25°F to prevent over-browning.

Variations & Serving Ideas

For a delightful twist, consider adding blueberries or raspberries to the batter for a fruity burst of flavor. You can also experiment with different citrus fruits—try lime or grapefruit zest and juice for a refreshing change. For a healthier option, substitute half of the all-purpose flour with whole wheat flour for added fiber without compromising too much on texture.

This Lemon Poppy Seed Loaf pairs beautifully with a light salad, such as a mixed greens salad with a vinaigrette, or a cup of tea for a cozy afternoon treat. It also complements a creamy cheese platter, as the acidity of the loaf balances rich cheeses perfectly. Lastly, a scoop of vanilla ice cream on the side creates a delightful contrast of temperatures and flavors!

Storage, Make-Ahead & Reheating

This Lemon Poppy Seed Loaf can be stored at room temperature for up to 3 days if wrapped tightly in plastic wrap. If you want to keep it longer, it freezes well for up to 3 months. To freeze, wrap the loaf tightly in plastic wrap and then in aluminum foil to prevent freezer burn.

When you’re ready to enjoy it again, simply thaw it in the fridge overnight. Reheat individual slices in the microwave for 15-20 seconds or in a toaster oven until warmed through. Interestingly, many people find that this loaf tastes even better the next day, as the flavors have time to meld!

Frequently Asked Questions

Can I make Lemon Poppy Seed Loaf With Citrus Icing ahead of time?

Yes — in fact, it tastes even better the next day! You can make the loaf a day in advance, allowing the flavors to develop. Just be sure to store it in an airtight container to maintain its moisture.

Can I substitute the poppy seeds?

Absolutely! If you don’t have poppy seeds on hand or prefer an alternative, you can use sesame seeds for a similar crunch or omit them entirely for a smooth loaf.

What can I use instead of buttermilk?

If you don’t have buttermilk, you can easily create a substitute by mixing ½ cup of milk (dairy or plant-based) with 1 tablespoon of vinegar or lemon juice. Let it sit for 5 minutes before using in the recipe.

How can I make this recipe gluten-free?

To make a gluten-free version of this Lemon Poppy Seed Loaf, substitute the all-purpose flour with a gluten-free all-purpose flour blend. Just ensure that the blend contains a binding agent like xanthan gum for the best results.

What is the best way to store leftover loaf?

Leftover Lemon Poppy Seed Loaf should be stored in an airtight container at room temperature for up to 3 days. For longer storage, wrap it tightly and freeze for up to 3 months. Thaw it before serving for the best texture.

Zesty Lemon Poppy Seed Delight

Final Thoughts

The Lemon Poppy Seed Loaf with Citrus Icing is truly a delightful treat that brings a burst of brightness to any occasion. The zesty lemon flavor combined with the subtle crunch of poppy seeds creates a satisfying balance, while the citrus icing adds a touch of sweetness that perfectly complements the loaf’s tanginess.

This is the kind of recipe I come back to again and again, especially when I want to brighten up a gloomy day or celebrate a small victory. The aroma that fills the kitchen as it bakes is absolutely heavenly! I encourage you to give this recipe a try; you might just find it becoming a beloved staple in your home. Don’t forget to share your results or even add your own unique twist—I can’t wait to see what you create!

Print
clock clock iconcutlery cutlery iconflag flag iconfolder folder iconinstagram instagram iconpinterest pinterest iconfacebook facebook iconprint print iconsquares squares iconheart heart iconheart solid heart solid icon

Lemon Poppy Seed Loaf


  • Author: Lily author
  • Total Time: 17 minute
  • Yield: 1 loaf 1x
Pin Recipe
Print Recipe

Description

This Lemon Poppy Seed Loaf is a delightful treat that combines zesty lemon flavor with crunchy poppy seeds. Topped with a citrus icing, it’s perfect for any occasion.


Ingredients

Scale
  • 1 ½ cups (190g) all-purpose flour
  • 1 teaspoon baking powder
  • ½ teaspoon baking soda
  • ½ teaspoon salt
  • 3 tablespoons poppy seeds
  • ½ cup (115g) unsalted butter, softened to room temperature
  • 1 cup (200g) granulated sugar
  • 2 large eggs
  • 1 teaspoon vanilla extract
  • 1 teaspoon lemon zest (from about 1 medium lemon)
  • ½ cup (120ml) buttermilk
  • 2 tablespoons fresh lemon juice
  • 1 cup (120g) powdered sugar
  • 2 tablespoons fresh lemon juice
  • 1 tablespoon orange juice
  • 1 teaspoon lemon zest (for garnish, optional)

Instructions

  1. Preheat your oven to 350°F (175°C). Grease a 9×5-inch loaf pan or line it with parchment paper for easy removal later.
  2. In a medium mixing bowl, whisk together 1 ½ cups of all-purpose flour, 1 teaspoon of baking powder, ½ teaspoon of baking soda, ½ teaspoon of salt, and 3 tablespoons of poppy seeds. This helps to evenly distribute the baking agents and ensures a uniform rise.
  3. In a large mixing bowl, cream together ½ cup of softened unsalted butter and 1 cup of granulated sugar using an electric mixer on medium speed for about 3-4 minutes, until the mixture is light and fluffy. Make sure to scrape down the sides of the bowl occasionally.
  4. Add 2 large eggs, 1 teaspoon of vanilla extract, and 1 teaspoon of lemon zest to the creamed butter and sugar, mixing until fully combined. You want a smooth consistency, so ensure there are no lumps of butter.
  5. In a small bowl, combine ½ cup of buttermilk and 2 tablespoons of fresh lemon juice. Alternately add the dry ingredients and buttermilk mixture to the butter mixture, starting and ending with the dry ingredients. Mix just until combined; do not overmix, as this can lead to a dense loaf.
  6. Pour the batter into the prepared loaf pan. Smooth the top with a spatula, ensuring it’s even. Bake in the preheated oven for 50-60 minutes, or until a toothpick inserted in the center comes out clean. The edges should be lightly golden brown, and the center should feel just set.
  7. Once baked, remove the loaf from the oven and allow it to cool in the pan for about 10 minutes. Then, transfer it to a wire rack to cool completely. Resist the urge to slice too soon, as it will be crumbly if it’s still warm.
  8. While the loaf is cooling, prepare the citrus icing. In a medium bowl, whisk together 1 cup of powdered sugar, 2 tablespoons of fresh lemon juice, and 1 tablespoon of orange juice until smooth. If the icing is too thick, you can add a little more juice to reach your desired consistency.
  9. Once the loaf is completely cool, drizzle the citrus icing over the top. If you like, sprinkle with an additional teaspoon of lemon zest for an extra pop of flavor and color.
  • Prep Time: 15 mins
  • Cook Time: 50-60 mins
  • Category: Dessert
  • Method: Baking
  • Cuisine: American

Nutrition

  • Serving Size: 1 slice
  • Calories: 200
  • Sugar: 15 g
  • Sodium: 150 mg
  • Fat: 8 g
  • Saturated Fat: 5 g
  • Unsaturated Fat: 3 g
  • Trans Fat: 0 g
  • Carbohydrates: 30 g
  • Fiber: 1 g
  • Protein: 3 g
  • Cholesterol: 40 mg

Keywords: Be careful not to overmix your batter; this is a common mistake that can lead to a dense loaf. Use room temperature ingredients for a smoother batter and even baking.

Did you make this recipe?

Share a photo and tag us — we can't wait to see what you've made!

  • Privacy Policy
  • Terms Of Service
  • Contact
  • About
  • GDPR

Copyright © 2025 Homesmad