Garlic Butter Steak Bites And Potatoes Tender And Crispy Recipe is more than just a meal; it’s a culinary experience that promises to delight your senses and simplify your cooking routine. I’ve always believed that some of the most satisfying dishes are those that combine simple, high-quality ingredients into something truly extraordinary, and this recipe absolutely embodies that philosophy. While there isn’t one single origin story for the classic combination of steak and potatoes – a pairing celebrated across countless cultures for its hearty appeal and universal deliciousness – this particular rendition elevates it to new heights.
People adore this dish because it masterfully delivers on multiple fronts: the steak bites, marinated and seared to a perfect tender juiciness, are infused with rich, aromatic garlic butter, while the accompanying potatoes achieve that coveted crispy exterior and fluffy interior. It’s the ultimate comfort food, remarkably easy to prepare, and guarantees a burst of flavor in every forkful. Whether you’re planning a quick weeknight dinner or looking to impress guests without spending hours in the kitchen, this Garlic Butter Steak Bites And Potatoes Tender And Crispy Recipe offers convenience without compromising on gourmet taste. Get ready to discover your new favorite way to enjoy steak and potatoes!
Ingredients:
- For the Steak:
- 2 pounds (about 900g) boneless sirloin steak, ribeye, or New York strip, cut into 1-inch cubes
- 1 tablespoon olive oil or avocado oil, plus extra for cooking
- 1 teaspoon sea salt, or to taste
- ½ teaspoon freshly ground black pepper, or to taste
- ½ teaspoon garlic powder
- ¼ teaspoon onion powder
- For the Potatoes:
- 2 pounds (about 900g) small Yukon Gold or red potatoes, scrubbed clean and cut into 1-inch pieces (halved or quartered depending on size)
- 2 tablespoons olive oil
- 1 teaspoon sea salt
- ½ teaspoon freshly ground black pepper
- ½ teaspoon paprika (smoked paprika for a deeper flavor, if you like!)
- ¼ teaspoon cayenne pepper (optional, for a little kick)
- 2 sprigs fresh rosemary, roughly chopped (optional, but highly recommended for aroma)
- For the Garlic Butter Sauce:
- 6 tablespoons unsalted butter
- 6-8 cloves garlic, minced (I love my garlic, so I usually go for 8!)
- 2 sprigs fresh thyme, leaves stripped (about 1 teaspoon)
- 1 tablespoon fresh parsley, finely chopped, plus extra for garnish
Preparing the Potatoes for Tender Perfection
- Preheat Your Oven and Prepare Baking Sheet: First things first, let’s get our oven ready. Preheat your oven to a good, hot 400°F (200°C). While it’s heating, grab a large, sturdy baking sheet. For easy cleanup and to prevent sticking, I always recommend lining it with parchment paper or aluminum foil. This little step makes such a difference when you’re done cooking!
- Wash and Cut the Potatoes: Now, for our lovely potatoes. Take your 2 pounds of small Yukon Gold or red potatoes and give them a good scrub under cold running water. We’re leaving the skins on because that’s where a lot of the nutrients and delicious rustic texture are! Once clean, pat them dry with a clean kitchen towel. Then, carefully cut them into uniform 1-inch pieces. The key here is uniformity – this ensures they all cook at the same rate, resulting in perfectly tender potatoes throughout the dish. If they’re too big, they won’t cook in time; too small, and they might burn.
- Season the Potatoes: Transfer your cut potatoes to a large mixing bowl. Drizzle them generously with 2 tablespoons of olive oil. Now, let’s get those flavors in! Sprinkle over 1 teaspoon of sea salt, ½ teaspoon of freshly ground black pepper, ½ teaspoon of paprika (I love using smoked paprika here for an extra layer of savory depth), and if you’re feeling a little adventurous and want a subtle warmth, a ¼ teaspoon of cayenne pepper. Don’t forget those aromatic fresh rosemary sprigs, roughly chopped – they add such a wonderful, earthy fragrance.
- Toss and Spread: Using your hands or a large spoon, toss everything together really well, making sure every single potato piece is evenly coated with the oil and seasonings. We want all that flavor to stick! Once coated, spread the potatoes out in a single layer on your prepared baking sheet. It’s crucial not to overcrowd the pan; if the potatoes are too close together, they’ll steam instead of roast, and we’re aiming for crispy, golden edges, not soggy ones. If you have too many, use two baking sheets.
- Roast Until Tender and Crispy: Pop the baking sheet into your preheated oven. Roast for 25-30 minutes, or until the potatoes are beautifully tender on the inside and gloriously crispy and golden brown on the outside. About halfway through, give them a good stir to ensure even cooking and browning on all sides. You’re looking for that perfect balance of softness and a satisfying crisp bite. This initial roasting step is vital for achieving the “tender and crispy” texture advertised in our “Garlic Butter Steak Bites And Potatoes Tender And Crispy Recipe”! Remove them from the oven and set aside while we work on the star of our show.
Preparing the Perfect Steak Bites
- Prepare Your Steak: Take your 2 pounds of boneless sirloin, ribeye, or New York strip steak. I always recommend letting it sit out at room temperature for about 15-20 minutes before cooking. This helps it cook more evenly. Now, use paper towels to thoroughly pat the steak dry on all sides. This step is incredibly important! A dry surface is the secret to getting a fantastic, deep sear on your steak bites. Any moisture will cause the meat to steam rather than brown, preventing that delicious crust from forming.
- Cut and Season the Steak: Once patted dry, cut the steak into uniform 1-inch cubes. Again, consistency in size is key for even cooking. Place the steak bites in a clean mixing bowl. Drizzle with 1 tablespoon of olive oil, and then season generously with 1 teaspoon of sea salt, ½ teaspoon of freshly ground black pepper, ½ teaspoon of garlic powder, and ¼ teaspoon of onion powder. Toss everything together really well with your hands, ensuring every piece of steak is coated with the seasonings.
Crafting the Aromatic Garlic Butter Sauce
- Melt the Butter: In a small saucepan or a microwave-safe bowl, melt 6 tablespoons of unsalted butter over low heat or in the microwave. We’re aiming for fully melted, but not browned just yet.
- Infuse with Garlic and Herbs: Add your 6-8 cloves of minced garlic to the melted butter. Stir in the leaves from 2 sprigs of fresh thyme. Let this mixture gently simmer for 1-2 minutes over very low heat on the stovetop, just enough for the garlic to become fragrant and the thyme to release its essential oils. Be careful not to burn the garlic – we want it golden and aromatic, not bitter. The smell filling your kitchen right now will be absolutely heavenly!
- Add Fresh Parsley: Remove the garlic butter from the heat and stir in 1 tablespoon of finely chopped fresh parsley. This adds a lovely fresh, herbaceous note that brightens up the rich butter and garlic. Set this glorious sauce aside for now.
The Searing and Combining Process: Bringing It All Together
- Heat Your Pan for Searing: Grab a large, heavy-bottomed skillet – cast iron works exceptionally well here, but any good quality stainless steel pan will do. Place it over medium-high heat. Add just a touch more olive oil (about 1-2 teaspoons) and let it get smoking hot. You want to see wisps of smoke just starting to come off the oil; this indicates the pan is hot enough to get that beautiful sear.
- Sear the Steak Bites in Batches: Now, carefully add about half of your seasoned steak bites to the hot pan in a single layer. Do not overcrowd the pan! This is another critical step. If you add too many steak bites at once, the temperature of the pan will drop, and the steak will steam instead of sear, resulting in grey, tough meat rather than a beautiful brown crust. Let them sear undisturbed for 1-2 minutes per side, turning them to get a nice brown crust on all sides. We’re aiming for a medium-rare to medium doneness for maximum tenderness and juiciness. They will continue to cook slightly when combined with the potatoes and sauce.
- Remove and Repeat: Once the first batch of steak bites has a lovely crust and is cooked to your desired doneness, remove them from the pan and place them in a clean bowl or plate. Repeat the searing process with the remaining steak bites, adding a tiny bit more oil if needed.
- Combine Steak and Potatoes: Once all the steak bites are seared, return the first batch of steak bites to the skillet. Now, add your roasted potatoes that have been patiently waiting. Give everything a gentle stir to combine.
- Pour in the Garlic Butter Sauce: This is where the magic happens! Take your previously prepared, aromatic garlic butter sauce and pour it generously over the steak bites and potatoes in the skillet.
-
Toss and Coat: Using tongs or a large spoon, gently toss the steak bites and potatoes in the garlic butter sauce, ensuring every single piece is wonderfully coated. Let it cook together for another 1-2 minutes over medium heat, allowing all those incredible flavors to meld and deepen. The warmth will help the garlic butter really penetrate the steak and potatoes, enhancing the overall savory profile of our “Garlic Butter Steak Bites And Potatoes Tender And Crispy Recipe.”
Quick Tip for Flavor Infusion:
If you have any extra fresh rosemary or thyme sprigs, you can toss them into the pan during this final combining step. The residual heat will help release their oils, adding another layer of aromatic goodness to your dish.
Finishing Touches and Serving Your Masterpiece
- Final Garnish and Rest: Remove the skillet from the heat. Sprinkle generously with extra fresh chopped parsley for a pop of color and an additional fresh herbaceous note. While these are ‘bites’, letting the steak rest for just a minute or two in the pan (off the heat) allows the juices to redistribute, ensuring every bite is as tender and juicy as possible.
- Serve Immediately: These Garlic Butter Steak Bites and Potatoes are best served hot, right out of the skillet! I love to serve them directly from the pan, family-style, allowing everyone to dig in. They make a fantastic complete meal all on their own, but if you’re looking for something extra, a simple green salad with a light vinaigrette or some steamed green beans would be a wonderful accompaniment. Enjoy the fruits of your labor – a truly satisfying, flavorful, and incredibly easy meal! This “Garlic Butter Steak Bites And Potatoes Tender And Crispy Recipe” is sure to become a new favorite in your kitchen!
Conclusion:
If you’ve been searching for that ultimate weeknight meal or a dazzling dish to impress guests with minimal fuss, then your culinary quest truly ends here. I genuinely believe that this particular recipe stands out as a true game-changer in your kitchen repertoire. It’s not just about cooking; it’s about creating an experience that delights all the senses, from the intoxicating aroma that fills your home to the incredibly satisfying textures and flavors that dance on your palate. What makes this dish an absolute must-try is its remarkable ability to deliver gourmet-level taste with an ease that often feels too good to be true. Imagine perfectly seared steak pieces, each one a juicy, flavorful morsel, infused with a rich, aromatic garlic butter. Now, picture those alongside beautifully roasted potatoes, each edge caramelized to a golden crisp, yet the interior remaining wonderfully fluffy. This isn’t just a fantasy; it’s the promise of the Garlic Butter Steak Bites And Potatoes Tender And Crispy Recipe you’ve just explored. It’s the kind of meal that consistently receives rave reviews, effortlessly becoming a firm family favorite.
The magic of this recipe lies in its simplicity and the masterful combination of ingredients that elevate humble steak and potatoes into something truly extraordinary. It’s quick enough for those busy evenings when time is a luxury, yet elegant enough to grace your dinner table for a special occasion. The convenience of a single pan or sheet pan cooking means minimal cleanup, a bonus that I know we all appreciate after a delicious meal. But beyond convenience, it’s the sheer deliciousness that will keep you coming back for more. The garlic butter isn’t just a flavoring; it’s the golden thread that weaves through every element, coating the steak in a savory sheen and basting the potatoes to perfection, ensuring every bite is consistently flavorful. The texture contrast is key: the undeniable tenderness of the steak bites juxtaposed with the glorious crispiness of the potatoes is what makes this dish so utterly addictive.
Now, while this dish is perfect as is, it’s also wonderfully versatile, inviting you to put your own spin on it. For serving suggestions, consider pairing these delectable steak bites and potatoes with a vibrant, fresh green salad tossed in a light vinaigrette to add a refreshing counterpoint to the richness. A simple side of steamed asparagus or broccoli, perhaps drizzled with a little extra garlic butter, would also complement the meal beautifully, adding extra color and nutrients. If you’re looking to elevate it further, a dollop of creamy horseradish sauce or a bright chimichurri on the side offers an exciting flavor boost. For variations, don’t hesitate to experiment with different herbs; a sprig of fresh rosemary or thyme added during the roasting process can introduce a lovely aromatic depth. You could also toss in some cherry tomatoes or bell pepper slices with the potatoes during the last 10-15 minutes of cooking for added color and a hint of sweetness. A sprinkle of freshly grated Parmesan cheese over the finished dish adds a delightful salty, umami kick that many find irresistible. The beauty of this recipe is its adaptability, allowing you to tailor it to your personal preferences or what you happen to have on hand in your kitchen.
So, I truly hope that you feel inspired and excited to roll up your sleeves and give this incredible recipe a try. Don’t just take my word for it – experience the joy of preparing and savoring these amazing garlic butter steak bites and potatoes for yourself. I am confident that once you taste the succulent steak and the perfectly crispy potatoes, you’ll understand exactly why I’m so passionate about it. It’s an incredibly satisfying meal that truly delivers on its promise of flavor and ease. And when you do make it, please, please share your experience with me and with our wonderful community! I love hearing about your culinary adventures. Did you add any unique twists? What did your family think? Did you find any new favorite serving suggestions? Your insights and photos are always a huge source of inspiration for me and for others who are looking for their next delicious meal. Happy cooking, and I eagerly await hearing about your deliciously tender and crispy results!
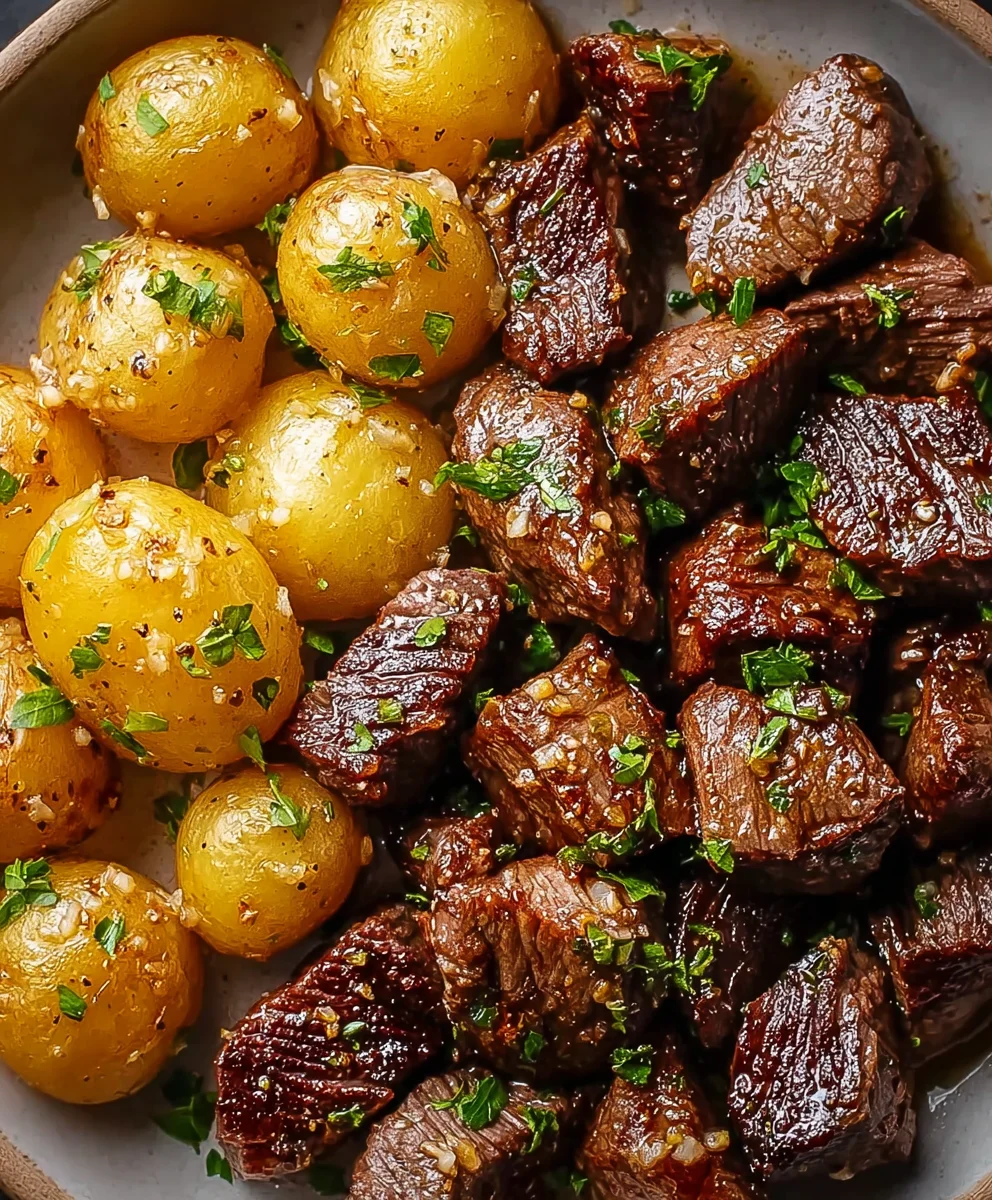
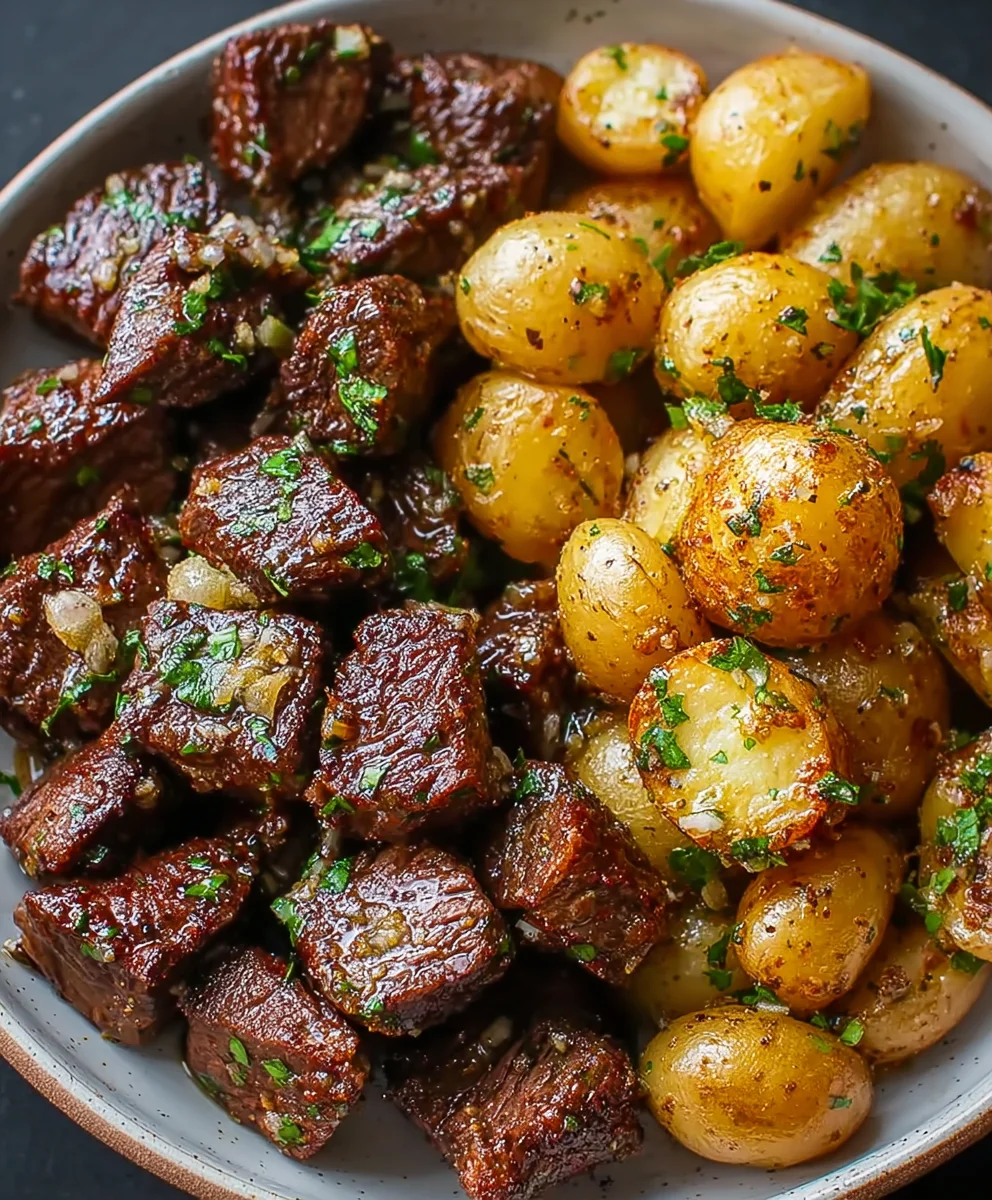
Garlic Butter Steak Bites & Potatoes
A delightful culinary experience, this recipe features tender, juicy steak bites infused with rich garlic butter, paired with perfectly crispy and fluffy roasted potatoes. It’s a remarkably easy and satisfying comfort food that promises a burst of flavor in every forkful.
Ingredients
-
2 pounds boneless sirloin steak (or ribeye, New York strip), cut into 1-inch cubes
-
1 tablespoon olive oil or avocado oil
-
1 teaspoon sea salt
-
½ teaspoon freshly ground black pepper
-
½ teaspoon garlic powder
-
¼ teaspoon onion powder
-
2 pounds small Yukon Gold or red potatoes, scrubbed and cut into 1-inch pieces
-
2 tablespoons olive oil
-
1 teaspoon sea salt
-
½ teaspoon freshly ground black pepper
-
½ teaspoon paprika
-
¼ teaspoon cayenne pepper
-
2 sprigs fresh rosemary, roughly chopped
-
6 tablespoons unsalted butter
-
6-8 cloves garlic, minced
-
2 sprigs fresh thyme, leaves stripped
-
1 tablespoon fresh parsley, finely chopped, plus extra for garnish
Instructions
-
Step 1
Preheat oven to 400°F (200°C) and line a large baking sheet. Wash, pat dry, and cut 2 lbs small Yukon Gold or red potatoes into uniform 1-inch pieces. In a large bowl, toss potatoes with 2 tbsp olive oil, 1 tsp sea salt, ½ tsp black pepper, ½ tsp paprika, ¼ tsp cayenne pepper (optional), and 2 chopped rosemary sprigs (optional). Spread in a single layer on the prepared baking sheet. -
Step 2
Roast potatoes for 25-30 minutes, or until tender and crispy, stirring halfway through for even cooking. Remove from oven and set aside. -
Step 3
Let 2 lbs boneless sirloin (or ribeye, New York strip) steak sit at room temperature for 15-20 minutes, then thoroughly pat dry. Cut steak into uniform 1-inch cubes. In a clean bowl, toss steak with 1 tbsp olive oil, 1 tsp sea salt, ½ tsp black pepper, ½ tsp garlic powder, and ¼ tsp onion powder. -
Step 4
Melt 6 tbsp unsalted butter in a small saucepan over low heat. Add 6-8 minced garlic cloves and leaves from 2 sprigs fresh thyme; gently simmer for 1-2 minutes until fragrant, being careful not to burn the garlic. Remove from heat and stir in 1 tbsp finely chopped fresh parsley. Set aside. -
Step 5
Heat a large, heavy-bottomed skillet (cast iron recommended) over medium-high heat with 1-2 tsp olive oil until smoking hot. Sear steak bites in batches (do not overcrowd), for 1-2 minutes per side, until a beautiful brown crust forms and cooked to your desired doneness. Remove seared steak to a clean bowl. -
Step 6
Return all seared steak to the skillet. Add the roasted potatoes. Pour the prepared garlic butter sauce generously over the steak and potatoes. Toss gently for 1-2 minutes over medium heat, ensuring every piece is coated and flavors meld. Remove from heat. -
Step 7
Sprinkle generously with extra fresh chopped parsley. Let the steak and potatoes rest in the pan (off heat) for 1-2 minutes to allow juices to redistribute. Serve immediately, directly from the skillet.
Important Information
Nutrition Facts (Per Serving)
It is important to consider this information as approximate and not to use it as definitive health advice.
Allergy Information
Please check ingredients for potential allergens and consult a health professional if in doubt.