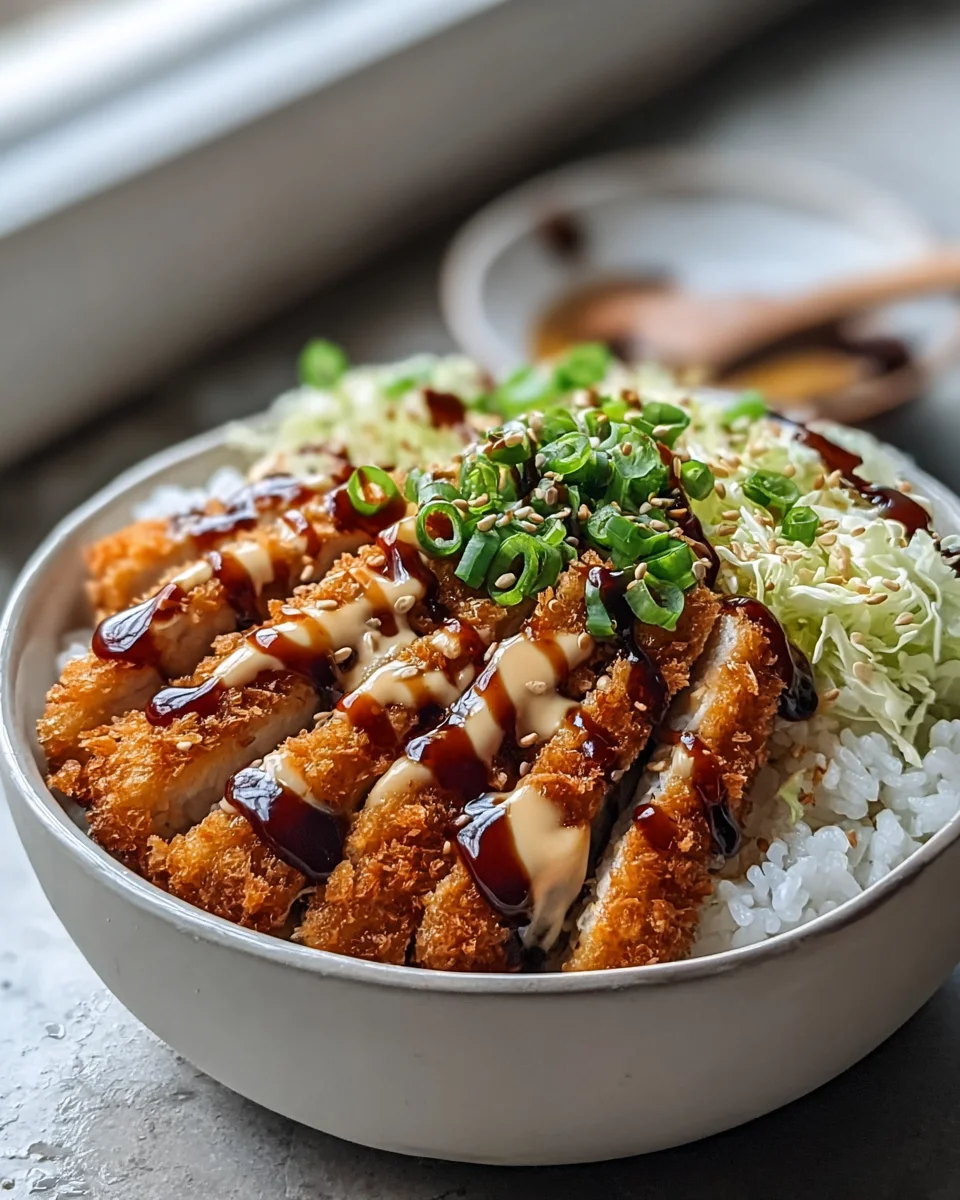
Japanese Katsu Bowls With Tonkatsu Sauce is more than just a meal; it’s an experience waiting to delight your taste buds and become a new favorite in your culinary repertoire. Imagine the satisfying crunch of perfectly fried panko-crusted pork, nestled atop a bed of fluffy, steamed rice, all generously drizzled with a rich, tangy, and subtly sweet Tonkatsu sauce that ties every element together. It’s a dish that promises comfort, excitement, and a burst of exquisite flavor in every single bite.
This iconic dish, known simply as Tonkatsu in Japan, boasts a fascinating journey from its European-inspired origins in the late 19th and early 20th centuries to becoming a beloved staple of Japanese cuisine. Adapting foreign culinary techniques with local ingredients and sensibilities, it quickly evolved into the unique, unforgettable delight we savor today. People absolutely adore this dish for its incredible textural contrast – the crispy exterior giving way to tender, juicy pork – and the undeniable umami punch from the signature sauce.
Why You’ll Love Making Japanese Katsu Bowls At Home
Beyond its incredible taste and texture, making your own Japanese Katsu Bowls With Tonkatsu Sauce at home is surprisingly straightforward and incredibly rewarding. It offers a wonderful blend of convenience for a weeknight dinner and impressive flair for entertaining guests. You’ll not only enjoy a restaurant-quality meal, but also the satisfaction of creating this culinary masterpiece from scratch, perfectly tailored to your preferences.

Ingredients:
Creating these delightful Japanese Katsu Bowls with homemade Tonkatsu Sauce is a culinary journey I absolutely adore sharing. It involves a few components, but each one is crucial for that authentic, satisfying flavor profile. I’ve broken down the ingredients for clarity, so you can gather everything you need with ease.
-
For the Pork Katsu:
- 4 boneless pork loin cutlets (about ½ inch thick, roughly 6-8 ounces each). I always look for nice, even thickness here, or be prepared to pound them yourself for consistency.
- ½ teaspoon salt, or to taste. Fine sea salt works wonderfully.
- ¼ teaspoon black pepper, freshly ground is always best.
- ½ cup all-purpose flour. This is your first dredge for that perfect crispy coating.
- 2 large eggs, lightly beaten. These act as the binder for your breadcrumbs.
- 2 cups panko breadcrumbs. Panko is non-negotiable for that signature light and airy crispness of Japanese katsu; don’t substitute regular breadcrumbs if you can help it!
- 4-6 cups vegetable oil (or other high-smoke point oil like canola or grapeseed oil) for deep frying. The amount can vary depending on the size of your pot.
-
For the Homemade Tonkatsu Sauce:
- ½ cup ketchup. The base of our tangy sauce.
- 2 tablespoons Worcestershire sauce. Adds a layer of umami and complexity.
- 1 tablespoon soy sauce. For depth and savory notes.
- 1 tablespoon mirin (Japanese sweet rice wine). Adds a subtle sweetness and glaze. If you don’t have it, a tiny pinch of sugar can be a very rough substitute, but mirin is highly recommended.
- 1 teaspoon Dijon mustard. For a touch of sharpness and emulsification.
- 1 teaspoon grated fresh ginger. This adds a beautiful aromatic warmth.
- ½ teaspoon grated fresh garlic. Another aromatic powerhouse that elevates the sauce.
- 1 tablespoon brown sugar, packed. Balances the tanginess with a lovely caramel note.
- ¼ cup water. To adjust consistency.
-
For Assembling Your Katsu Bowls:
- 4 cups cooked Japanese short-grain rice. Fluffy and slightly sticky, it’s the perfect canvas.
- 2 cups shredded green cabbage. Provides a fresh, crisp counterpoint to the fried pork.
- Optional garnishes: thinly sliced scallions, toasted sesame seeds, a squeeze of fresh lemon.
Preparing the Homemade Tonkatsu Sauce
Making your own Tonkatsu sauce is surprisingly simple and yields a flavor that far surpasses store-bought versions. It’s got that perfect balance of tangy, sweet, savory, and a hint of spice. I always recommend making this first, as it allows the flavors to meld beautifully while you prepare the pork.
-
Gather and Combine Ingredients: In a small saucepan or a microwave-safe bowl, combine the ketchup, Worcestershire sauce, soy sauce, mirin, Dijon mustard, grated fresh ginger, grated fresh garlic, brown sugar, and water. I love to give the fresh ginger and garlic a fine grate directly into the bowl; it really releases their aromatic oils, making the sauce incredibly fragrant.
-
Whisk Until Smooth: Whisk all the ingredients together thoroughly until the brown sugar has dissolved and the mixture is smooth. You want to make sure there are no lumps, especially from the brown sugar.
-
Gentle Simmer (Stovetop Method): If you’re using a saucepan, place it over medium-low heat. Bring the mixture to a very gentle simmer, stirring occasionally. You’re not looking for a rolling boil here, just enough heat to warm through and allow those flavors to fully integrate. Let it simmer for about 5-7 minutes. You’ll notice it slightly thickens as it cooks, transforming into that glossy, rich sauce we crave.
-
Microwave Method (Quicker Alternative): Alternatively, if you’re in a hurry, you can heat the sauce in the microwave. Place the bowl in the microwave and heat on high for 1-2 minutes, stopping halfway to stir. Be careful, as it can get very hot quickly. Continue heating until it’s warmed through and slightly thickened. I still prefer the stovetop method for a deeper flavor development, but the microwave works in a pinch!
-
Taste and Adjust: Once heated, give the sauce a taste. This is your chance to make it perfect for your palate! Do you want it a little sweeter? Add a tiny bit more brown sugar. A touch tangier? A splash more Worcestershire. A pinch more salt or pepper might also be in order. Remember, you are the chef!
-
Cool and Store: Remove the sauce from the heat and let it cool slightly. As it cools, it will thicken a bit more. You can use it immediately, or transfer it to an airtight container and store it in the refrigerator for up to a week. I often make a double batch because it’s so delicious on so many things!
Preparing the Pork Katsu
The heart of our Katsu Bowl is, of course, the crispy pork katsu itself. Achieving that perfect golden-brown, crunchy exterior with a juicy, tender interior is all about proper preparation and technique. Don’t skip any steps here; they all contribute to the ultimate katsu experience.
-
Prepare the Pork Cutlets: Lay each pork loin cutlet on a cutting board. If your cutlets are thicker than ½ inch or uneven, cover them with plastic wrap and use a meat mallet (or the flat side of a heavy pan) to pound them evenly to about ½ inch thickness. This tenderizes the meat and ensures even cooking. I find that pounding also creates more surface area for the breading, which means more crispiness!
-
Season the Pork: Once pounded, generously season both sides of each pork cutlet with salt and freshly ground black pepper. Don’t be shy here; proper seasoning at this stage is crucial for flavor throughout the finished dish. Gently press the seasoning into the meat.
-
Set Up Your Breading Station: This is a key step for efficiency and a clean workspace. Prepare three separate shallow dishes or plates:
- Dish 1: The ½ cup all-purpose flour.
- Dish 2: The 2 lightly beaten large eggs. I like to add a tiny splash of water (about 1 teaspoon) to the eggs and whisk them vigorously; it makes for a slightly thinner wash that coats more evenly.
- Dish 3: The 2 cups of panko breadcrumbs. Spread them out evenly so you have plenty of room to coat.
Make sure your station is set up in a logical order: flour, then egg, then panko. This streamlined approach prevents cross-contamination and makes the breading process much smoother.
-
The Three-Step Breading Process: This is where the magic happens for that incredible katsu crust. Take one seasoned pork cutlet and follow these steps meticulously:
- Flour: Dredge the pork cutlet entirely in the flour, making sure it’s completely coated. Gently shake off any excess flour. The flour creates a dry surface for the egg to adhere to, which in turn helps the panko stick.
- Egg: Dip the floured cutlet into the beaten eggs, ensuring all surfaces are covered. Lift the cutlet and let any excess egg drip off. You want a thin, even layer of egg, not a thick, gloopy one.
- Panko: Transfer the egg-coated cutlet to the panko breadcrumbs. Press the panko firmly onto both sides of the pork, ensuring it’s completely covered. Really get those breadcrumbs to adhere! I like to gently pat the panko into the meat to ensure it forms a thick, even crust. This firm pressing is critical for preventing the panko from falling off during frying. Repeat this process for all four pork cutlets.
Pro Tip: After breading, I like to place the cutlets on a wire rack set over a baking sheet and let them rest in the refrigerator for at least 15-20 minutes, or even up to an hour. This helps the breading adhere even more firmly, resulting in a crispier, more intact crust when fried. It’s a small step that makes a big difference!
Frying the Pork Katsu
Frying the katsu is arguably the most exciting part, as you watch those humble breaded cutlets transform into golden, crispy perfection. It requires a bit of attention to temperature, but don’t worry, I’ll walk you through it to ensure a perfectly cooked and incredibly crunchy katsu.
-
Heat the Oil: In a large, heavy-bottomed pot or a deep skillet (I prefer a cast-iron Dutch oven for even heat distribution), pour in your vegetable oil to a depth of about 2-3 inches. You need enough oil for the katsu to be mostly, if not fully, submerged. Place the pot over medium-high heat. Attach a deep-fry thermometer to the side of the pot. We are aiming for a consistent oil temperature of 325°F to 350°F (160°C to 175°C).
Why temperature matters:
If the oil is too cool, the katsu will absorb too much oil and become greasy. If it’s too hot, the breading will burn before the pork is cooked through. Patience here is key to getting it just right.
-
Test the Oil (If You Don’t Have a Thermometer): If you don’t have a thermometer, you can test the oil by dropping a small pinch of panko into it. If it immediately sizzles vigorously and turns golden brown within 10-15 seconds, your oil is ready. If it browns too quickly, lower the heat slightly; if it just sits there or browns slowly, increase the heat.
-
Fry the Katsu: Carefully slide one or two breaded pork cutlets into the hot oil, ensuring not to overcrowd the pot. Overcrowding will drastically drop the oil temperature and lead to soggy katsu. Fry each side for approximately 3-5 minutes, or until the katsu is beautifully golden brown and crispy. The exact time will depend on the thickness of your pork and the consistency of your oil temperature.
I love listening to the gentle sizzle as the katsu cooks; it’s a symphony of deliciousness in the making. Use tongs to carefully flip the katsu halfway through to ensure even browning. Keep an eye on the color – a rich, deep golden hue is what we’re aiming for. Internally, the pork should reach 145°F (63°C) for doneness.
-
Drain and Rest: Once the katsu is perfectly golden and cooked through, carefully remove it from the oil using tongs and transfer it to a wire rack set over a baking sheet lined with paper towels. The wire rack allows air to circulate around the katsu, preventing the bottom from getting soggy. Let the katsu rest for a few minutes while you fry the remaining cutlets. This resting period allows the juices in the pork to redistribute, ensuring a tender and moist interior.
Maintain Oil Temperature: Between batches, always check your oil temperature and adjust the heat as needed. It’s normal for the temperature to drop a bit when you add the cold katsu, so you might need to increase the heat briefly before the next batch.
Assembling Your Japanese Katsu Bowls
Now comes the moment of truth – assembling these beautiful, comforting Japanese Katsu Bowls! This is where all your hard work comes together into a harmonious and incredibly satisfying meal. The contrast of warm rice, crisp cabbage, juicy katsu, and the rich Tonkatsu sauce is simply divine.
-
Prepare Your Rice and Cabbage: While the katsu is resting, make sure your Japanese short-grain rice is hot and ready. Fluff it gently with a rice paddle. Also, ensure your shredded green cabbage is crisp and ready to go. A quick rinse and spin in a salad spinner is usually sufficient to get it perfectly fresh.
-
Slice the Katsu: Once rested, transfer each pork katsu cutlet to a clean cutting board. Using a sharp knife, slice each katsu into ½-inch-thick strips. I like to slice against the grain for maximum tenderness. You’ll hear that satisfying crunch as your knife goes through the crispy breading – it’s one of my favorite sounds in the kitchen!
Presentation Tip:
For a traditional presentation, try to keep the slices together in their original cutlet shape so you can fan them out artfully over the rice.
-
Assemble Each Bowl: Take a deep serving bowl for each person. First, spoon a generous amount of hot, fluffy Japanese rice into the bottom of the bowl. This forms the essential foundation of your katsu bowl.
-
Add the Cabbage: Next, arrange a mound of fresh, shredded green cabbage alongside or on top of the rice. The crisp, clean taste and texture of the cabbage provide a wonderful contrast to the rich fried pork. It’s like a built-in palate cleanser!
-
Arrange the Katsu: Carefully place the sliced katsu on top of the rice, fanning it out nicely or arranging it in an appealing pattern. The golden-brown katsu should be the star of the show here.
-
Drizzle with Tonkatsu Sauce: This is the grand finale! Generously drizzle your delicious homemade Tonkatsu sauce over the katsu. Don’t be shy; the sauce is what ties everything together. I usually like to put a small bowl of extra sauce on the table for those who want to add more as they eat.
-
Garnish (Optional, but Recommended!): For an extra touch of freshness and visual appeal, sprinkle some thinly sliced scallions and/or toasted sesame seeds over the top. A tiny squeeze of fresh lemon juice right before serving can also brighten up the flavors beautifully. Serve immediately and enjoy the fruits of your labor!
Conclusion:
The journey we’ve taken through this recipe culminates in one of the most satisfying and deeply flavorful meals you can possibly create in your own kitchen. I truly believe that once you experience the magic of making these bowls, you’ll understand exactly why they’re not just a meal, but an event. There’s something profoundly comforting and incredibly delicious about biting into that perfectly crispy, golden-brown panko-crusted pork cutlet, followed by the rich, tangy, and slightly sweet embrace of homemade tonkatsu sauce. This isn’t just about frying pork; it’s about crafting a symphony of textures and tastes that dance on your palate.
The contrast is key here: the delightful crunch of the katsu, the tender succulence of the pork inside, the fluffy steamed rice providing a neutral canvas, and the crisp, refreshing shredded cabbage cutting through the richness. And let’s not forget the star condiment, our homemade tonkatsu sauce, which elevates every single bite from good to absolutely phenomenal. It’s a dish that manages to be both hearty and surprisingly balanced. I promise you, the aroma alone as the katsu fries will have your mouth watering, and the first forkful will confirm that every step, every ingredient, was worth it. This is more than just dinner; it’s an experience that transports you straight to the bustling streets of Tokyo, all from the comfort of your home. Making homemade Japanese Katsu Bowls With Tonkatsu Sauce is an incredibly rewarding culinary adventure that delivers unparalleled taste and satisfaction. It’s a dish that impresses, comforts, and leaves everyone at the table utterly delighted.
Now that we’ve talked about why this recipe is a true gem, let’s explore how you can make it truly your own or serve it up for maximum enjoyment. While the classic pairing of fluffy white rice and a generous mound of thinly shredded cabbage is absolutely perfect, don’t hesitate to get creative.
Classic Pairings & Enhancements:
For a complete, authentic Japanese meal, I love serving my katsu bowls alongside a simple bowl of miso soup and a small dish of pickled ginger (gari). The ginger provides a wonderful palate cleanser, and the miso soup adds a lovely warmth and depth. A sprinkle of toasted sesame seeds over the katsu and rice adds an extra layer of nutty aroma and visual appeal. You could also include a side of edamame for a fresh, vibrant green touch.
Creative Protein Variations:
While pork loin is the traditional choice, this recipe is incredibly versatile.
Chicken Katsu: If you’re not a fan of pork, chicken breast or thigh makes for an equally delicious katsu. Just pound it thin and follow the same breading and frying process. Chicken katsu is a hugely popular alternative and just as satisfying.
Fish Katsu: For a lighter, seafood-inspired twist, try firm white fish like cod or tilapia. It fries up beautifully and offers a different texture profile.
Vegetarian Katsu: Don’t feel left out! Thick slices of eggplant, portobello mushrooms, or even firm tofu can be breaded and fried to create a fantastic vegetarian katsu that’s just as crispy and flavorful, especially when paired with our amazing tonkatsu sauce.
Elevating Your Bowl:
Consider adding other elements directly into your bowl. A perfectly soft-boiled egg, sliced in half, adds a rich, creamy yolk and extra protein. Sliced avocado can introduce a buttery texture and healthy fats. A dash of Japanese mayonnaise or a drizzle of sriracha if you like a bit of heat can also be fantastic additions to your already stellar bowl. For something truly next level, turn it into katsudon by simmering the katsu with egg and dashi broth before serving it over rice – a true Japanese comfort food classic! Or perhaps explore katsu curry, by serving it with a rich, savory Japanese curry sauce instead of tonkatsu sauce. The possibilities are truly endless once you master the basic katsu technique.
So there you have it – my passionate plea for you to dive headfirst into creating these incredible Japanese Katsu Bowls. I know it might seem like a project, but I promise you, the effort is minimal compared to the immense satisfaction you’ll gain from a homemade meal that rivals any restaurant offering. This recipe is a fantastic way to impress your friends and family, treat yourself to something truly special, or simply expand your culinary horizons.
I genuinely can’t wait for you to experience that first bite – the crunch, the tender meat, the burst of flavor from the sauce. It’s a moment of pure culinary bliss that I want every one of you to enjoy. Don’t be shy; embrace the process, have fun with it, and make these bowls your own.
Once you’ve whipped up your batch of perfect katsu, I would absolutely love to hear about your experience! Did you stick to the classic? Did you try a fun variation? What was your favorite part? Please share your thoughts, your photos, and any brilliant tips you discovered along the way. Your kitchen adventure is just beginning, and I’m so excited for you to discover the joy and deliciousness that comes with mastering the art of the perfect katsu. Happy cooking, my friends!
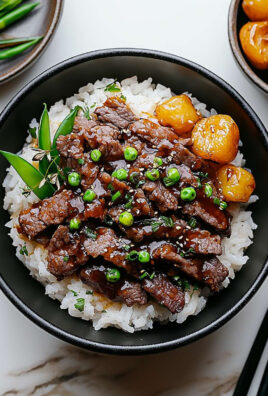
Japanese Beef Katsu Bowls with Tonkatsu Sauce
Japanese Beef Katsu Bowls with Tonkatsu Sauce is an experience waiting to delight your taste buds. Featuring crispy panko-crusted beef atop fluffy rice, drizzled with a rich, tangy, and subtly sweet Tonkatsu sauce, it’s a dish that promises comfort and exquisite flavor.
Ingredients
Instructions
Important Information
Nutrition Facts (Per Serving)
It is important to consider this information as approximate and not to use it as definitive health advice.
Allergy Information
Please check ingredients for potential allergens and consult a health professional if in doubt.