Coffee Butter Cookies are an absolute revelation for anyone who cherishes the rich aroma of a morning brew paired with the comforting sweetness of a classic baked treat. Imagine biting into a cookie that delivers that perfect balance – a crisp exterior giving way to a melt-in-your-mouth interior, all infused with the deep, aromatic notes of coffee. It’s a truly irresistible combination that elevates the humble cookie to something extraordinary, making it an instant favorite for cookie enthusiasts and coffee lovers alike.
The marriage of coffee and baked goods has a storied past, deeply rooted in European coffeehouse traditions where delectable pastries were essential companions to a robust cup of joe. While the exact origin of infusing coffee directly into a butter cookie recipe might be debated, the concept perfectly marries two beloved elements.
Why We Can’t Get Enough of These Coffee Butter Cookies
People adore these delightful treats not just for their unique flavor profile – the earthy bitterness of coffee perfectly cutting through the creamy sweetness of butter – but also for their incredible versatility. They offer a sophisticated twist on a familiar favorite, making them ideal for everything from an elegant afternoon tea to a cozy evening indulgence. My personal love for these Coffee Butter Cookies stems from their ability to transport me with every bite; they’re nostalgic yet fresh, comforting yet exciting, and always a welcome addition to any gathering.

Ingredients:
Creating these delightful Coffee Butter Cookies is a journey of simple pleasures, and it all starts with gathering your ingredients. Quality matters here, especially for the butter and coffee, as they are the stars of the show! Make sure your butter and egg yolks are at room temperature – this is a small detail that makes a big difference in the final texture of your cookies.
- 2 ½ sticks (300g) Unsalted Butter, softened to room temperature. I always opt for unsalted so I can control the salt content myself. Room temperature butter is crucial for a smooth, creamy dough.
- 1 cup (200g) Granulated Sugar. This provides the primary sweetness and contributes to that delightful crisp edge.
- ½ cup (100g) Light Brown Sugar, packed. The molasses in brown sugar adds a lovely depth of flavor and helps keep our cookies a bit chewier in the center.
- 2 Large Egg Yolks, at room temperature. We’re using just the yolks for extra richness and tenderness, without the extra moisture from the whites.
- 2 teaspoons Pure Vanilla Extract. A good quality vanilla extract really elevates the flavor profile.
- 3 tablespoons Instant Espresso Powder or very strong instant coffee granules. This is where our prominent coffee flavor comes from.
- 2 teaspoons Hot Water. Just enough to dissolve the espresso powder into a concentrated coffee liquid.
- 3 cups (360g) All-Purpose Flour. Properly measured, preferably spooned into the measuring cup and leveled off, not scooped directly from the bag.
- 1 teaspoon Baking Powder. For a little lift and tenderness.
- ½ teaspoon Fine Sea Salt. Balances the sweetness and enhances all the other flavors.
- Optional for Glaze/Drizzle:
- 1 cup (120g) Powdered Sugar, sifted.
- 1 teaspoon Instant Espresso Powder, dissolved in 1 teaspoon hot water (or strong brewed coffee).
- 2-3 tablespoons Milk or Cream (start with less and add until desired consistency).
Preparing the Coffee Butter Cookie Dough
- Getting Started with Butter and Sugars: In the bowl of your stand mixer fitted with the paddle attachment, or with a large mixing bowl and a hand mixer, combine your softened unsalted butter, granulated sugar, and light brown sugar. I always start on low speed to prevent a sugar cloud, then increase to medium-high. You want to beat this mixture until it’s wonderfully light, fluffy, and pale in color. This process, known as creaming, incorporates air into the butter and sugar, which is essential for a tender cookie. It usually takes a good 3-5 minutes. Make sure to scrape down the sides of the bowl with a rubber spatula frequently to ensure everything is thoroughly combined. Don’t rush this step! It’s the foundation of a fantastic butter cookie.
- Incorporating the Richness and Flavor: Next, add your two large egg yolks, one at a time, mixing well after each addition until fully incorporated. The yolks contribute significantly to the cookie’s rich flavor and delicate texture. Then, pour in the pure vanilla extract. Mix again until everything is smooth and well blended.
- The Coffee Kick: In a small, separate bowl, combine the instant espresso powder with the hot water. Stir it briskly until the espresso powder is completely dissolved, creating a concentrated coffee liquid. This is where the magic happens for our “Coffee Butter Cookies”! Pour this dissolved espresso mixture into your butter-sugar-egg mixture. Mix on low speed until just combined. You’ll notice the dough taking on a beautiful caramel-brown hue.
- Whisking Dry Ingredients: In another medium bowl, whisk together your all-purpose flour, baking powder, and fine sea salt. Whisking ensures these ingredients are evenly distributed, which is important for consistent cookie texture and leavening.
- Bringing it All Together – The Gentle Touch: With your mixer on the lowest speed, gradually add the dry ingredients to the wet ingredients, about one-third at a time. Mix only until just combined, being careful not to overmix. Overmixing the flour will develop the gluten too much, resulting in tough, dry cookies instead of the tender, crumbly texture we’re aiming for. As soon as you no longer see streaks of dry flour, stop the mixer. I often like to give it one final, gentle mix by hand with my rubber spatula, scraping the bottom and sides of the bowl to ensure no dry pockets remain. The dough should be soft, pliable, and slightly sticky.
Chilling the Dough for Perfect Coffee Butter Cookies
-
The Crucial Chill: Gently gather the dough into a cohesive ball. Place it on a piece of plastic wrap, flatten it into a disk about 1-inch thick, and wrap it tightly. Transfer the wrapped dough to the refrigerator and chill for at least 1 hour, or up to 24 hours. Chilling the dough is an absolutely vital step for several reasons:
- It solidifies the butter, which prevents the cookies from spreading too much in the oven, helping them maintain their shape.
- It allows the flavors to meld and deepen, making for a more robust coffee flavor.
- It makes the dough much easier to handle when it comes time to roll and shape your cookies.
I personally find that chilling for at least 2-3 hours yields the best results, allowing the dough to firm up beautifully.
Shaping and Baking Your Coffee Butter Cookies
- Prepping for Success: Once your dough is nicely chilled, preheat your oven to 350°F (175°C). Line two baking sheets with parchment paper or silicone baking mats. This prevents sticking and ensures even baking.
- Portioning and Shaping: Remove the chilled dough from the refrigerator. If it’s been chilling for a long time and is very firm, let it sit at room temperature for 5-10 minutes to soften just enough to be workable. Using a small cookie scoop (about 1.5 tablespoons) or by hand, roll the dough into uniform balls, roughly 1 inch in diameter. Consistency in size is important for even baking. Place the dough balls about 2 inches apart on your prepared baking sheets.
- The Classic Butter Cookie Look (Optional): For that traditional butter cookie appearance, gently flatten each ball slightly with the bottom of a glass or the tines of a fork in a crosshatch pattern. You can also lightly press them down with your thumb for a thumbprint cookie style, which could later be filled with chocolate or more coffee glaze. If you prefer a more rustic look, you can leave them as simple round balls. Sometimes, I like to roll the dough balls in a little granulated sugar before flattening them, which adds a lovely sparkling crust and extra sweetness.
- Baking to Perfection: Place one baking sheet at a time into your preheated oven. Bake for 10-12 minutes, or until the edges are lightly golden brown and the centers are just set. The exact baking time can vary depending on your oven and the size of your cookies, so keep a close eye on them. The cookies should still look a little pale in the center, not dark brown. Overbaking will make them dry and crumbly rather than tender. If you’re baking multiple sheets, rotate them halfway through for even browning.
- Cooling Down: Once baked, remove the cookies from the oven. Let them cool on the baking sheet for about 5 minutes before carefully transferring them to a wire rack to cool completely. This initial cooling on the hot baking sheet helps them set up and prevents them from breaking when you move them. Allowing them to cool completely before glazing or storing is essential.
Optional: Crafting a Coffee Glaze for Your Butter Cookies
While these Coffee Butter Cookies are absolutely delicious on their own, a simple coffee glaze can add an extra layer of flavor and a beautiful finishing touch. It’s truly a delightful enhancement!
- Preparing the Glaze Base: In a small bowl, combine the sifted powdered sugar with the dissolved instant espresso powder (or strong brewed coffee). Sifting the powdered sugar beforehand is key to avoiding lumps in your glaze, giving you a wonderfully smooth consistency.
- Achieving the Perfect Consistency: Gradually add the milk or cream, one tablespoon at a time, whisking continuously until you reach your desired consistency. For a thin drizzle, you’ll need a bit more liquid. For a thicker, more opaque glaze that you can dip the cookies into, you’ll need less. I usually aim for a consistency that coats the back of a spoon and drips off slowly – not too runny, not too thick. Taste it to make sure the coffee flavor is prominent but balanced with the sweetness. You can always add a tiny pinch more espresso powder if you want a stronger coffee punch.
- Glazing Your Masterpiece: Once your cookies are completely cool, you can either drizzle the glaze over them using a spoon or fork, or dip the tops of the cookies directly into the glaze. If you choose to drizzle, place the cooled cookies on a wire rack set over a piece of parchment paper or foil to catch any drips. This makes cleanup so much easier! Allow the glaze to set for at least 30 minutes, or until hardened, before stacking or storing.
Storing Your Delicious Coffee Butter Cookies
- Ensuring Freshness: Once completely cooled (and glazed, if applicable, with the glaze fully set), store your Coffee Butter Cookies in an airtight container at room temperature. They will stay fresh and tender for up to 5-7 days. I find that storing them with a piece of parchment paper between layers helps prevent them from sticking together, especially if they are glazed.
- Freezing for Later: These cookies also freeze beautifully! Place them in a single layer on a baking sheet and freeze until solid. Once frozen, transfer them to a freezer-safe bag or container, separating layers with parchment paper. They can be frozen for up to 2-3 months. When you’re ready to enjoy them, simply thaw them at room temperature. You’ll be so glad you have a stash of these delightful treats ready to go!
Well, friends, we’ve reached the sweet finale, and I truly hope you’re as excited about this recipe as I am. This isn’t just another cookie; it’s a revelation. Imagine biting into something that’s crisp at the edges, wonderfully tender in the center, and bursting with that perfect harmony of rich, creamy butter and invigorating coffee. It’s sophisticated, yet utterly comforting, making it an absolute game-changer for your baking repertoire. I promise you, once you taste these incredible Coffee Butter Cookies, you’ll understand why I can’t stop raving about them.
They strike that elusive balance between familiar warmth and intriguing novelty, setting them apart from your standard cookie fare. The aroma alone as they bake is enough to draw everyone into the kitchen, a promise of the deliciousness to come. They’re surprisingly simple to make, requiring no fancy techniques or obscure ingredients, yet they deliver a gourmet experience that feels wonderfully indulgent. Whether you’re a seasoned baker looking for a fresh, exciting challenge or a newcomer eager to impress, this recipe offers a foolproof path to pastry perfection. It’s the kind of treat that doesn’t just satisfy a craving; it creates a moment, a memory, a reason to smile. I genuinely believe these cookies will become a cherished staple in your home, eagerly requested by family and friends alike. Their unique flavor profile truly makes them unforgettable and a definite must-try.
Elevate Your Dessert Game
Now, about enjoying these beauties! While they are absolutely divine on their own, perhaps with a quiet cup of your favorite brew – be it a strong espresso, a creamy latte, or even a classic black coffee – their versatility is truly astounding. I love to serve them alongside a scoop of vanilla bean ice cream, allowing the slight warmth of the cookie to melt the edges of the ice cream, creating a delightful contrast in temperatures and textures. For a more decadent experience, try a drizzle of dark chocolate sauce or a sprinkle of flaky sea salt over the top just before serving. They also make an exquisite accompaniment to a cheese board, believe it or not! The slightly bitter coffee notes and buttery sweetness beautifully complement sharper cheeses like aged cheddar or a creamy blue. Don’t be afraid to experiment!
If you’re feeling adventurous, consider a few simple variations to make these cookies truly your own. Imagine adding a pinch of cinnamon or cardamom to the dough for an extra layer of aromatic spice. A handful of finely chopped toasted pecans or walnuts would introduce a delightful crunch and nutty undertone. For the ultimate chocolate lover, fold in some miniature chocolate chips or chunks; the combination of coffee and chocolate is a timeless classic for a reason. You could also experiment with different types of coffee—maybe a robust dark roast for an intense flavor, or a lighter, more aromatic blend for a subtle hint. Even a touch of orange zest could brighten the profile unexpectedly, adding a zesty counterpoint to the deep coffee and butter notes. The beauty of this recipe lies in its adaptability; it’s a wonderful canvas for your culinary creativity. Picture them as sandwich cookies, filled with a rich cream cheese frosting or a simple espresso buttercream – pure bliss!
Your Turn to Bake!
So, what are you waiting for? I wholeheartedly encourage you to roll up your sleeves, gather your ingredients, and give these fantastic Coffee Butter Cookies a try this weekend. I am genuinely confident that you’ll fall head over heels for their exquisite flavor and delightful texture, just as I have. And please, please, don’t keep your triumphs (or even your amusing mishaps!) to yourself. I absolutely adore hearing about your experiences in the kitchen. Come back and leave a comment, share your photos on social media, or tell us about any delightful variations you came up with. Let’s build a community around the joy of baking and sharing delicious treats. Happy baking, my friends, and get ready to indulge in something truly special!
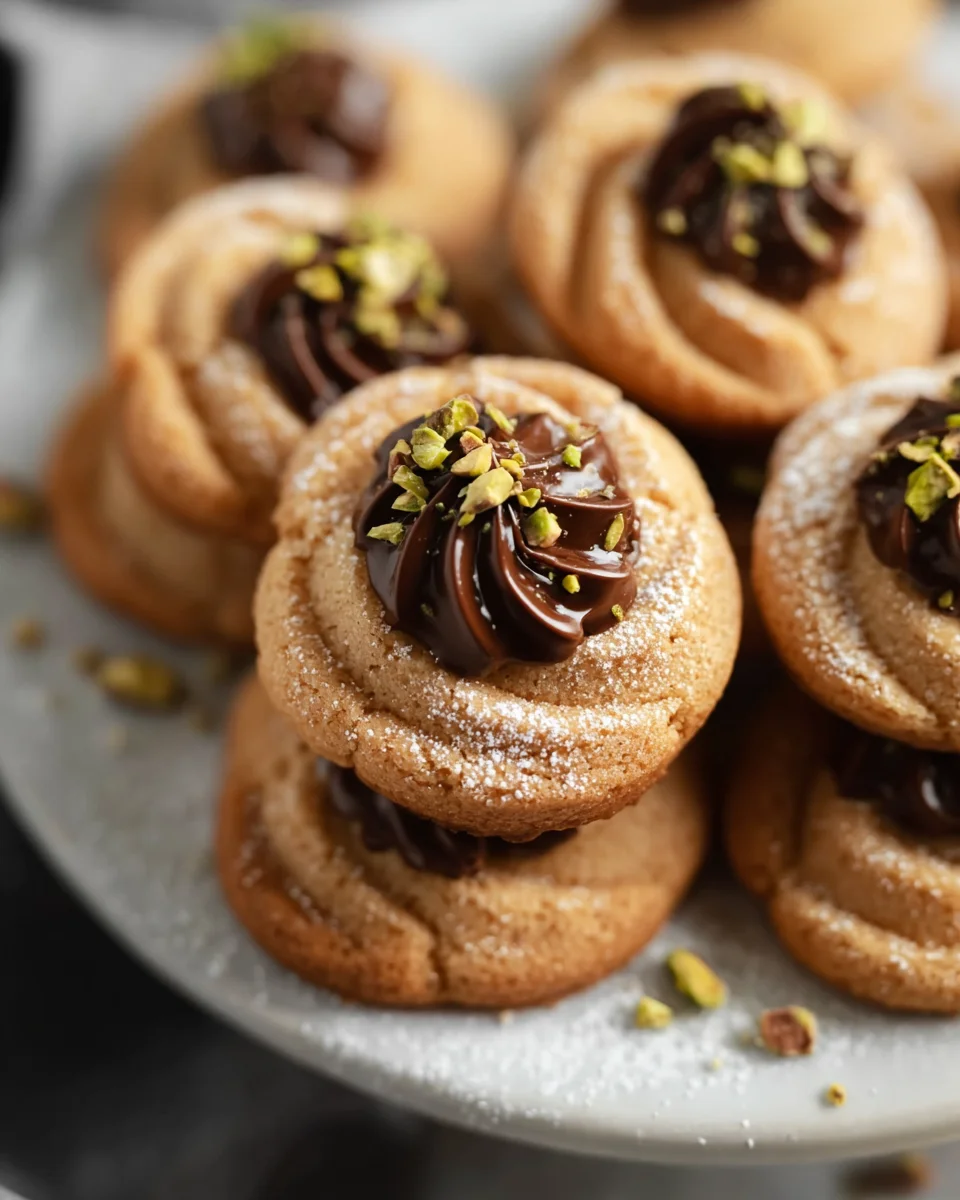
Coffee Butter Cookies
Indulge in these rich, aromatic Coffee Butter Cookies. A delightful treat with a crisp exterior and a melt-in-your-mouth interior, infused with prominent coffee notes and finished with melted chocolate and pistachios. Simple to make and perfect for any occasion.
Ingredients
Instructions
Important Information
Nutrition Facts (Per Serving)
It is important to consider this information as approximate and not to use it as definitive health advice.
Allergy Information
Please check ingredients for potential allergens and consult a health professional if in doubt.