• Skip to primary navigation
  • Skip to main content
  • Skip to primary sidebar
Homesmad

Homesmad

  • Home
  • Breakfast & Brunch
  • Appetizers & Snacks
  • Dinner
  • Dessert
  • About
  • Privacy Policy
  • Contact
Homesmad
  • Home
  • Breakfast & Brunch
  • Appetizers & Snacks
  • Dinner
  • Dessert
  • About
  • Privacy Policy
  • Contact

Creamy Garlic Grilled Chicken Broccoli Bowls Recipe

November 26, 2025 by Lily author

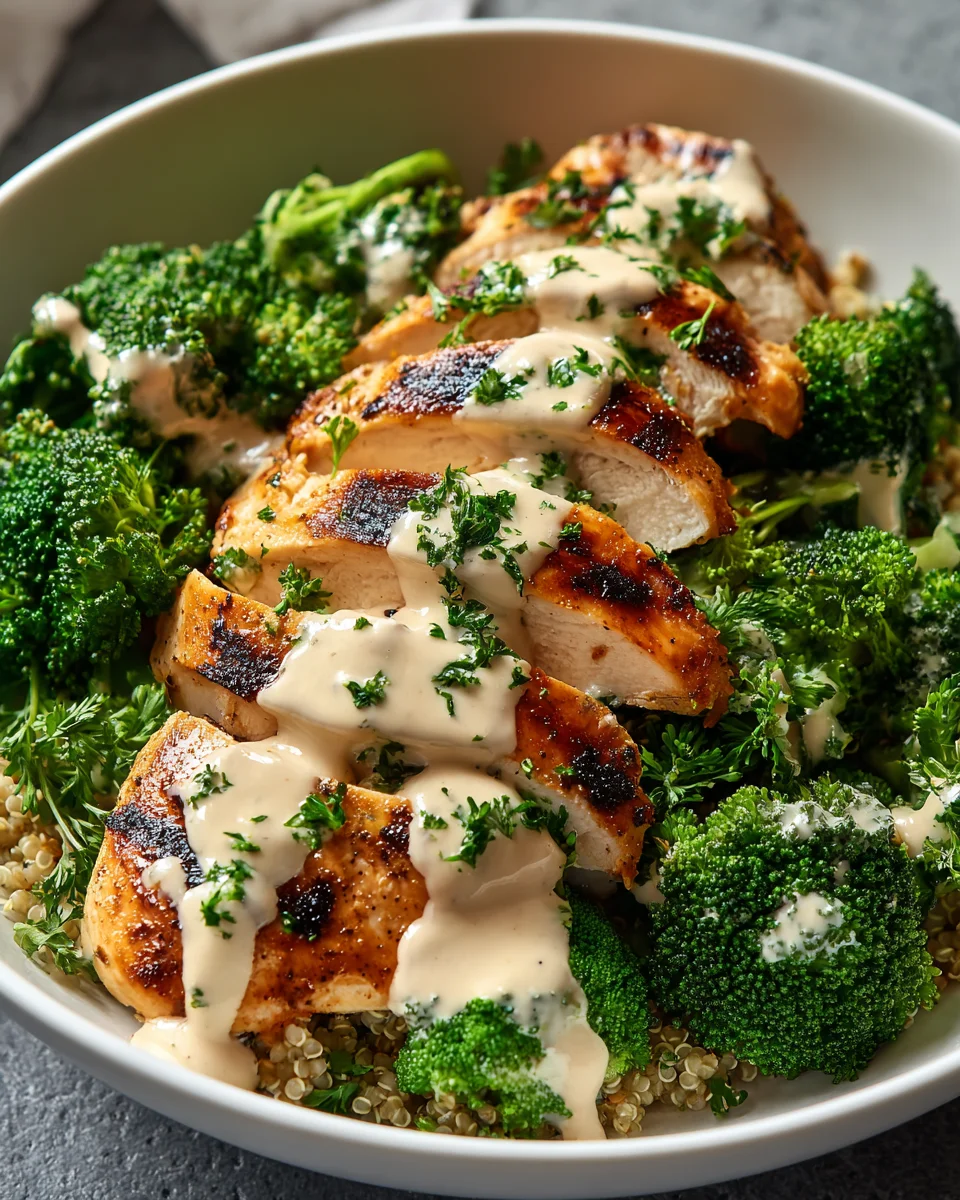
Grilled Chicken Broccoli Bowls With Creamy Garlic Sauce are about to become your new favorite weeknight dinner, and for very good reason. Imagine perfectly seasoned, tender grilled chicken, paired with vibrant, slightly crisp broccoli florets, all brought together by an irresistibly smooth and aromatic creamy garlic sauce. This isn’t just a meal; it’s a symphony of flavors and textures designed to satisfy both your taste buds and your health goals. In an era where healthful eating meets busy schedules, bowls like this have surged in popularity. They represent the perfect confluence of convenience and nutrition, evolving from simple meal prep ideas into sophisticated, satisfying dishes that cater to a wide range of palates. It’s a testament to how modern culinary preferences embrace wholesome ingredients without sacrificing incredible taste. I’ve found that people absolutely adore the simplicity of preparation combined with the gourmet feel of this dish. The harmonious blend of protein, fiber, and healthy fats makes it incredibly satiating, while the star of the show – that indulgent creamy garlic sauce – elevates humble ingredients into something truly special. Preparing these Grilled Chicken Broccoli Bowls With Creamy Garlic Sauce allows for a delightful, balanced meal that feels both comforting and surprisingly elegant.

Creamy Garlic Grilled Chicken Broccoli Bowls Recipe this RECIPE

Ingredients:

  • For the Grilled Chicken:

    • 1 ½ lbs boneless, skinless chicken breasts or thighs (I often prefer thighs for their juiciness, but breasts work beautifully too!)
    • 2 tablespoons olive oil
    • 1 tablespoon lemon juice (freshly squeezed is always best!)
    • 1 teaspoon dried oregano
    • ½ teaspoon garlic powder
    • ½ teaspoon onion powder
    • ¼ teaspoon black pepper
    • ½ teaspoon salt (or to taste)
  • For the Roasted Broccoli:

    • 2 large heads of broccoli (about 4-5 cups of florets)
    • 1 ½ tablespoons olive oil
    • ½ teaspoon garlic powder
    • ¼ teaspoon black pepper
    • ½ teaspoon salt (or to taste)
  • For the Creamy Garlic Sauce:

    • ½ cup mayonnaise (full-fat for the creamiest texture!)
    • ¼ cup sour cream or plain Greek yogurt (Greek yogurt adds a lovely tang and protein!)
    • 2-3 cloves garlic, minced (adjust to your love for garlic!)
    • 1 tablespoon fresh chives, finely chopped (or ½ teaspoon dried chives)
    • 1 tablespoon fresh lemon juice
    • 1 tablespoon milk (any kind, to adjust consistency if needed)
    • ¼ teaspoon salt
    • ⅛ teaspoon black pepper
  • Optional for Serving:

    • Cooked quinoa or brown rice (for building those hearty bowls!)
    • Fresh parsley or cilantro, chopped (for garnish and a burst of freshness)
    • Extra lemon wedges

Preparing the Flavorful Grilled Chicken:

Let’s dive into making our star ingredient – the perfectly grilled chicken! This part is all about infusing the chicken with bright, herbaceous flavors before we even hit the grill, ensuring every bite is a delightful experience in your Grilled Chicken Broccoli Bowls With Creamy Garlic Sauce.

  1. Prepare the Chicken: First things first, get your chicken ready. If you’re using chicken breasts, I recommend patting them dry with paper towels. This simple step helps the marinade adhere better and also promotes better browning when grilling. If your chicken breasts are particularly thick, you might want to gently pound them to an even thickness of about ¾ to 1 inch. This ensures they cook evenly and prevents them from drying out on the grill. For chicken thighs, simply pat them dry.
  2. Whisk the Marinade: In a medium-sized bowl or a resealable plastic bag, whisk together the olive oil, lemon juice, dried oregano, garlic powder, onion powder, black pepper, and salt. Take a moment to really combine these ingredients; you want a uniform mixture to coat every piece of chicken. The lemon juice not only adds a zesty kick but also helps tenderize the chicken slightly, while the oregano, garlic, and onion powders build a fantastic savory base.
  3. Marinate the Chicken: Add the prepared chicken to the bowl or bag with the marinade. Make sure each piece is thoroughly coated. You can use your hands to really massage the marinade into the chicken – this is a friendly, hands-on cooking experience! Once coated, cover the bowl or seal the bag and refrigerate for at least 30 minutes. For the best flavor and tenderness, I highly recommend marinating for at least 2 hours, or even overnight if you have the time! A longer marination time truly allows those beautiful flavors to penetrate deeply into the chicken, making your Grilled Chicken Broccoli Bowls With Creamy Garlic Sauce incredibly flavorful.
  4. Preheat Your Grill: About 15-20 minutes before you’re ready to cook, preheat your grill to medium-high heat. You’re aiming for a consistent heat of around 400-450°F (200-230°C). If you don’t have a thermometer, you should be able to hold your hand about 5 inches above the grates for only 4-5 seconds before it feels too hot. A well-preheated grill is crucial for achieving those beautiful grill marks and preventing the chicken from sticking.
  5. Prepare Grill Grates: Once the grill is hot, clean the grates thoroughly with a grill brush. Then, lightly oil the grates. You can do this by folding a paper towel, dipping it in a little cooking oil (like vegetable or canola), and carefully wiping it over the hot grates using tongs. This step helps create a non-stick surface, ensuring your chicken releases easily and those gorgeous grill marks form perfectly.
  6. Grill the Chicken: Carefully place the marinated chicken on the hot, oiled grill grates. Close the lid and cook for about 5-7 minutes per side, depending on the thickness of your chicken. You’re looking for an internal temperature of 165°F (74°C) when measured with a meat thermometer at the thickest part. Resist the urge to move the chicken too often! Let it cook undisturbed on one side to develop those coveted sear marks before flipping. Once flipped, allow the other side to cook evenly.
  7. Rest the Chicken: Once the chicken reaches the desired internal temperature, remove it from the grill and transfer it to a clean cutting board. It’s absolutely critical to let the chicken rest for 5-10 minutes before slicing. This resting period allows the juices to redistribute throughout the meat, ensuring that your grilled chicken remains wonderfully moist and tender. If you slice it too soon, all those delicious juices will run out, leaving you with dry chicken.
  8. Slice and Serve: After resting, slice the chicken against the grain into strips or bite-sized pieces, perfect for layering into your wholesome Grilled Chicken Broccoli Bowls With Creamy Garlic Sauce.

Roasting the Perfect Broccoli:

While our chicken is marinating, or perhaps even while it’s resting, let’s turn our attention to the vibrant, nutrient-packed broccoli. Roasting broccoli is my absolute favorite way to prepare it for these bowls; it brings out a natural sweetness and creates wonderfully tender-crisp florets with irresistible caramelized edges. This method truly elevates the humble broccoli to a star player in our Grilled Chicken Broccoli Bowls With Creamy Garlic Sauce.

  1. Preheat Oven & Prepare Baking Sheet: First, preheat your oven to a robust 400°F (200°C). While the oven heats, line a large baking sheet with parchment paper. This makes for super easy cleanup and helps prevent sticking, especially when we want those nice browned bits without them fusing to the pan.
  2. Prepare the Broccoli: Wash the broccoli heads thoroughly under cold water. Then, trim off the very end of the thick stalks and cut the broccoli into bite-sized florets. Try to keep the florets relatively uniform in size so they cook evenly. If you have any thick stalks, you can peel them and chop them into smaller pieces to roast as well; they’re delicious and prevent waste! I usually aim for pieces that are about 1 to 1.5 inches in size.
  3. Season the Broccoli: In a large bowl, combine the broccoli florets with olive oil, garlic powder, black pepper, and salt. Use your hands to toss everything together until all the florets are lightly and evenly coated with the oil and seasonings. You want a thin, even layer of oil, not drenched. This ensures that each piece gets a chance to crisp up beautifully.
  4. Arrange on Baking Sheet: Spread the seasoned broccoli florets out in a single layer on your prepared baking sheet. It’s important not to overcrowd the pan. If the broccoli is too packed, it will steam instead of roast, leading to soggy rather than crisp florets. If you have a lot of broccoli, use two baking sheets to give them enough space. You want some air circulation around each floret for that perfect roast.
  5. Roast to Perfection: Place the baking sheet in the preheated oven and roast for 15-20 minutes, or until the broccoli is tender-crisp and has beautiful caramelized edges. Around the halfway mark (about 10 minutes in), give the pan a gentle shake or use tongs to flip the florets to ensure even roasting and browning on all sides. You’re looking for a slight char, a vibrant green color, and a tender interior that still offers a little bite. This roasted broccoli adds incredible texture and flavor to your Grilled Chicken Broccoli Bowls With Creamy Garlic Sauce.

Crafting the Creamy Garlic Sauce:

Now, for the pièce de résistance – the creamy, dreamy garlic sauce that ties everything together! This sauce is the heart of our “creamy garlic” focus keyword and brings a luxurious finish to our Grilled Chicken Broccoli Bowls With Creamy Garlic Sauce. It’s incredibly easy to make and can be prepared while your chicken is grilling or resting.

  1. Combine Base Ingredients: In a small mixing bowl, combine the mayonnaise, sour cream (or Greek yogurt), minced garlic, fresh chives, and fresh lemon juice. I always recommend using full-fat mayonnaise and sour cream here for the richest, most decadent sauce. The Greek yogurt offers a slightly lighter, tangier alternative that’s also fantastic.
  2. Whisk Until Smooth: Using a small whisk or a fork, vigorously whisk all the ingredients together until the sauce is completely smooth and well combined. You want a uniform texture with no lumps. Really get in there and ensure that minced garlic is well distributed, so every spoonful delivers that wonderful garlicky punch.
  3. Season and Adjust Consistency: Add the salt and black pepper to the sauce. Taste it and adjust the seasoning as needed. This is your chance to make it perfect for your palate! If you feel it needs a bit more tang, add a touch more lemon juice. If you’re a garlic fiend, another tiny bit of minced garlic wouldn’t hurt! If the sauce is too thick for your liking, gradually whisk in the milk, one teaspoon at a time, until you reach your desired drizzly consistency. You want it thick enough to coat, but thin enough to pour over your bowls.
  4. Chill for Enhanced Flavor (Optional but Recommended): For the absolute best flavor, cover the bowl and refrigerate the creamy garlic sauce for at least 15-30 minutes before serving. This allows the flavors to meld and deepen, especially the garlic and chives. It makes a noticeable difference in the overall richness and complexity of the sauce, making it an irresistible topping for your Grilled Chicken Broccoli Bowls With Creamy Garlic Sauce.

Assembling Your Delicious Bowls:

With our perfectly grilled chicken, tender-crisp roasted broccoli, and luscious creamy garlic sauce all ready, it’s time to bring everything together into a satisfying and beautiful meal! This is where your Grilled Chicken Broccoli Bowls With Creamy Garlic Sauce truly come to life.

  1. Prepare Your Base (Optional): If you’re using a grain base like cooked quinoa or brown rice, spoon a generous portion into the bottom of each serving bowl. This creates a hearty foundation that soaks up all the wonderful flavors.
  2. Add the Roasted Broccoli: Arrange a good helping of your delicious roasted broccoli florets next to, or on top of, the grain. Enjoy the vibrant green color and those tempting caramelized edges.
  3. Layer on the Grilled Chicken: Neatly place the sliced, rested grilled chicken over the broccoli and grain. You can arrange it artfully or simply pile it on – it’s your bowl!
  4. Drizzle with Creamy Garlic Sauce: Now for the grand finale! Generously drizzle the creamy garlic sauce over the chicken, broccoli, and grain. Don’t be shy; this sauce is what brings all the components together with its rich, savory, and tangy notes. Feel free to add as much or as little as you like!
  5. Garnish and Serve: For an extra touch of freshness and color, sprinkle some freshly chopped parsley or cilantro over the top. If you love a little extra citrus kick, a fresh lemon wedge on the side is a fantastic addition. Serve your Grilled Chicken Broccoli Bowls With Creamy Garlic Sauce immediately and enjoy the harmonious blend of flavors and textures you’ve created!
  6. Enjoy Your Creation: Take a moment to appreciate the vibrant colors and enticing aromas of your homemade bowls. Each spoonful offers tender chicken, perfectly cooked broccoli, and that irresistible creamy garlic goodness. This dish is not just a meal; it’s a wonderfully balanced and utterly delicious experience perfect for any weeknight or weekend gathering.

Creamy Garlic Grilled Chicken Broccoli Bowls Recipe

Conclusion:

Well, my friends, we’ve come to the end of our culinary journey for today, and I genuinely hope you’re feeling inspired and hungry! If there’s one recipe I could implore you to try this week, it truly is the Grilled Chicken Broccoli Bowls With Creamy Garlic Sauce. It’s more than just a meal; it’s a delightful experience that hits all the right notes for a satisfying, wholesome, and incredibly flavorful dish. From the perfectly tender, smoky chicken to the crisp, vibrant broccoli, all brought together by that utterly irresistible creamy garlic sauce, every single bite is a testament to how simple ingredients can create something extraordinary. It’s a complete package, offering lean protein, essential greens, and a burst of savory goodness that genuinely makes healthy eating feel like a treat, not a chore. I promise you, this isn’t just another weeknight dinner; it’s a dish that will quickly become a cherished part of your regular rotation.

Why You Absolutely Need to Make This Recipe

What makes this particular combination so special, you ask? It’s the impeccable balance. The grilling process infuses the chicken with a wonderful depth of flavor, adding that much-loved char and smoky aroma that perfectly complements the earthiness of the broccoli. And then there’s the sauce – oh, the sauce! It’s rich, garlicky, and velvety smooth, tying everything together in a harmonious symphony of tastes and textures. It elevates the entire bowl from good to truly exceptional. This isn’t just a meal that fills you up; it’s one that nourishes your body and delights your taste buds, leaving you feeling utterly content. It’s incredibly adaptable, making it perfect for busy weeknights, meal prep, or even a casual gathering with friends. The sheer joy of assembling and devouring such a vibrant, fresh, and flavorful meal is something everyone deserves to experience. It truly embodies the ideal weeknight hero – easy to prepare, packed with nutrients, and bursting with flavor that will have everyone asking for seconds.

Make It Your Own: Serving Suggestions & Creative Variations

One of the many beauties of this recipe is its incredible versatility. While the core combination of grilled chicken, tender-crisp broccoli, and the creamy garlic sauce is perfect as is, don’t hesitate to let your culinary creativity shine! For a heartier meal, consider serving your magnificent bowls over a bed of fluffy quinoa or wholesome brown rice. If you’re looking to keep things low-carb, cauliflower rice makes an excellent substitute, soaking up all that delicious sauce beautifully. You could even toss the ingredients with some whole wheat pasta for a complete one-bowl pasta salad experience, perfect for lunchboxes or a light dinner. Feeling adventurous with your vegetables? Absolutely go for it! Add some vibrant sliced bell peppers to the grill alongside your chicken, or toss in some sautéed mushrooms, asparagus spears, or even cherry tomatoes during the last few minutes of cooking the broccoli. A sprinkle of fresh herbs like chopped parsley, chives, or a dash of fresh dill can brighten the flavors even further. For those who love a bit of heat, a tiny swirl of sriracha or a pinch of red pepper flakes in your creamy garlic sauce will add a delightful kick without overpowering the other elements. And why not finish your bowl with some toasted slivered almonds or crunchy croutons for an added textural dimension? You could also crumble a little feta or goat cheese on top for a tangy, creamy finish. This dish truly invites experimentation, allowing you to tailor it perfectly to your family’s preferences or whatever fresh ingredients you happen to have on hand. Imagine serving this at your next casual get-together – your guests will be raving!

Your Culinary Adventure Awaits!

Now that you’ve discovered the magic of these bowls, all that’s left is for you to roll up your sleeves and dive in! I truly believe that once you try this recipe, you’ll understand why I’m so enthusiastic about it. It’s genuinely simple to prepare, yet yields results that taste like they came from a gourmet kitchen. Don’t be intimidated; the steps are straightforward, and the reward is a truly memorable meal that will satisfy everyone at your table. Picture yourself enjoying that first forkful – the tender chicken, the crisp broccoli, all coated in that luscious, savory garlic sauce. Pure bliss, I tell you! I am so excited for you to experience this deliciousness firsthand. Once you’ve created your own masterpiece, please don’t keep it a secret! I absolutely love hearing from you and seeing your culinary creations. Share your experiences, your clever variations, and especially your photos with me. Let me know what you loved most about the recipe, or any tweaks you made to make it uniquely yours. Your feedback not only brightens my day but also helps inspire other home cooks in our wonderful community. So, go ahead, gather your ingredients, fire up that grill, and get ready to create something truly special. Happy cooking, and I can’t wait to hear all about your delightful experience!


Creamy Garlic Grilled Chicken Broccoli Bowls

Grilled Chicken Broccoli Bowls with Creamy Garlic Sauce are a symphony of tender grilled chicken, crisp broccoli, and an irresistibly smooth creamy garlic sauce. Perfect for a satisfying, healthy, and convenient weeknight dinner, this dish combines protein, fiber, and healthy fats for a gourmet feel.

Prep Time
30 Minutes
Cook Time
35 Minutes
Total Time
5 Minutes
Servings
4 servings

Ingredients


Instructions


Important Information

Nutrition Facts (Per Serving)

It is important to consider this information as approximate and not to use it as definitive health advice.

Allergy Information

Please check ingredients for potential allergens and consult a health professional if in doubt.

« Previous Post
Million Dollar Beef Bacon Goat Cheese Log: Party Favorite!
Next Post »
Honey Garlic Ground Turkey: Easy & Flavorful Dinner!

If you enjoyed this…

Easy Slow Cooker Korean Beef: Tender & Flavorful Recipe

Creamy Ricotta Chicken Pasta

Creamy Ricotta Chicken Pasta – A Comforting & Easy Weeknight Dinner

Delicious Greek Chicken Bowls Recipe for a Healthy Meal

Primary Sidebar

Browse by Diet

BreakfastDinnerLunchDessertAppetizer

Sweet Peach Yogurt Parfait Delight

One of my fondest memories is from a lazy summer afternoon spent at my grandmother’s house. The sun filtered through the kitchen window, casting a warm glow over the table where she would create her culinary magic. It was during one of those blissful moments that I first tasted her Peach Yogurt Parfait with Honey and Granola. The sweet aroma of ripe peaches mingling with creamy yogurt and the crunch of granola was nothing short of heavenly. It felt like summer captured in a bowl, and I still remember the joy of diving in with a spoon, each layer revealing a new burst of flavor.

When I think about that parfait, I can almost hear the gentle hum of the bees outside, reminding me of the floral notes that honey brings to every bite. The vibrant yellows and soft oranges of the peaches contrast beautifully with the creamy white yogurt and the golden crunch of granola. It’s a dish that not only looks delightful but also tastes like a celebration of fresh, wholesome ingredients.

What makes my version of this Peach Yogurt Parfait special is the careful balance of flavors and textures. I use ripe, juicy peaches, drizzled with locally sourced honey, and a homemade granola that’s bursting with nuts and seeds for an extra crunch. It’s a simple dish, but every layer is crafted with love and attention.

Let me show you exactly how to make this delightful parfait, so you can bring a bit of that summer magic into your kitchen!

Sweet Peach Yogurt Parfait Delight

Why You’ll Love This Recipe

  • Delightfully creamy texture from the Greek yogurt, paired with the juicy sweetness of fresh peaches.
  • Ready in under 20 minutes, making it a quick and satisfying breakfast or snack option.
  • Budget-friendly, using common ingredients that you may already have in your pantry.
  • Customizable with your favorite granola and nuts, allowing you to tailor each parfait to your taste.
  • Perfectly balanced flavors with the bright acidity of lemon juice and the sweetness of honey enhancing the peaches.

Ingredients

  • For the Parfait:
  • 2 cups plain Greek yogurt (or vanilla yogurt for a sweeter option)
  • 2 large ripe peaches, diced (about 2 cups)
  • 1 tablespoon fresh lemon juice (to prevent browning of peaches)
  • 2 tablespoons honey (plus more for drizzling)
  • 1 teaspoon vanilla extract (optional for extra flavor)
  • For the Granola:
  • 1 cup granola (store-bought or homemade; see notes for a simple granola recipe)
  • 1/4 cup sliced almonds (optional for added crunch)
  • 1/4 cup shredded coconut (optional for added flavor)

Let’s dive into some key ingredients that make this Peach Yogurt Parfait so delightful! First, the Greek yogurt is not only creamy but also packed with protein, making it a satisfying option for breakfast or a snack. If you’re looking for a sweeter option, you can easily substitute it with vanilla yogurt, though it may alter the overall flavor balance. Next, the ripe peaches are the star of the show; their natural sweetness shines through, so I recommend choosing peaches that yield slightly to pressure, indicating they’re perfectly ripe. If peaches aren’t in season, feel free to use nectarines or even frozen peaches—just thaw them before use. Finally, honey adds a lovely floral sweetness that ties everything together. If you prefer, maple syrup can serve as a delicious substitute.

Step-by-Step Instructions

  1. Start by preparing the peaches. Wash them thoroughly, then slice and dice them into bite-sized pieces. In a medium bowl, toss the diced peaches with 1 tablespoon of fresh lemon juice to prevent browning. Set aside for about 5 minutes while the lemon juice works its magic.
  2. In a separate bowl, combine the Greek yogurt, 2 tablespoons of honey, and 1 teaspoon of vanilla extract if using. Stir the mixture until smooth and thoroughly blended. This should take about a minute. Avoid overmixing to maintain the creaminess of the yogurt.
  3. Now it’s time to layer your parfait. Grab a clear glass or bowl to showcase your beautiful creation. Start with a generous spoonful of the yogurt mixture at the bottom—about 1/4 cup will do. Use a spoon to spread it evenly.
  4. Add a layer of the diced peaches over the yogurt, ensuring they cover the yogurt completely. You might want to use about half of what you have prepared—roughly 1 cup. This layer should be visually appealing, so arrange the peaches neatly.
  5. Sprinkle 1/4 cup of granola over the peaches. This adds a delightful crunch. Make sure to distribute it evenly to ensure every bite has that satisfying texture. Avoid packing it down too tightly, as you want it to maintain its crunch.
  6. Repeat the layers: spoon in another 1/4 cup of yogurt, followed by another cup of peaches, and another sprinkle of granola. You should have at least two layers, but feel free to add more depending on your glass size.
  7. Finish off your parfait with a drizzle of honey on top for added sweetness and a touch of elegance. If you’re using sliced almonds or shredded coconut, sprinkle them on top now. It adds a lovely visual contrast and extra flavor.
  8. Serve immediately or refrigerate for up to 30 minutes before serving to allow the flavors to meld together. However, I recommend enjoying it fresh to maintain the granola’s crunch.

Pro Tips for the Best Peach Yogurt Parfait With Honey And Granola

  • Make sure to choose ripe peaches for the best flavor and texture. A common mistake is using unripe fruit, which can lead to a less enjoyable parfait. Look for peaches that are fragrant and slightly soft to the touch.
  • Use a clear glass to assemble your parfait; this not only makes for a beautiful presentation but also allows you to see the colorful layers, which adds to the enjoyment of eating it.
  • For an even creamier texture, consider whipping the Greek yogurt with a hand mixer for a couple of minutes before layering. This small adjustment makes a huge difference in mouthfeel.
  • Be mindful of the granola-to-yogurt ratio. Too much granola can overwhelm the parfait, while too little can make it feel too creamy. Aim for about 1/4 cup of granola per layer for the perfect balance.
  • If you’re making this for a gathering, consider preparing the yogurt and peaches ahead of time and layering them just before serving. This ensures the granola stays crunchy!

Variations & Serving Ideas

There are so many ways to get creative with your Peach Yogurt Parfait! For a tropical twist, swap out the peaches for mangoes or pineapples and top with coconut flakes. If you prefer a berry flavor, mix in some blueberries or strawberries with the peaches for added color and taste. For a nutty version, incorporate chopped walnuts or pecans instead of almonds.

As for serving ideas, this parfait pairs beautifully with a side of scrambled eggs for a hearty breakfast or fresh fruit salad for a light lunch. You might also enjoy it alongside whole grain toast with almond butter for an energizing snack. The contrast of flavors and textures will elevate your meal experience!

Storage, Make-Ahead & Reheating

The Peach Yogurt Parfait is best enjoyed fresh, but you can prepare some components ahead of time. Store the layered parfait in an airtight container in the refrigerator for up to 24 hours. However, be cautious; the granola may lose its crunch if stored too long. You can freeze the yogurt and peach mixture for up to 2 months; just remember to thaw it in the refrigerator overnight before serving.

If you plan to enjoy this dish the next day, it can taste even better as the flavors meld together. Just remember to add the granola right before serving to keep its delightful crunch!

Frequently Asked Questions

Can I make Peach Yogurt Parfait With Honey And Granola ahead of time?

Yes — in fact, it tastes even better the next day as the flavors meld. However, I recommend waiting to add the granola until just before serving to maintain its crunch.

What can I substitute for Greek yogurt?

If you prefer a lighter option, you can substitute Greek yogurt with regular yogurt or a dairy-free alternative like coconut yogurt. Just remember that this may alter the creaminess and flavor profile slightly.

Can I use frozen peaches for this parfait?

Absolutely! Just make sure to thaw the frozen peaches before using them. They will still add great flavor, though the texture may be slightly softer than fresh peaches.

How do I make the parfait vegan?

To make a vegan version, substitute the Greek yogurt with a plant-based yogurt alternative, and replace honey with maple syrup or agave nectar. This keeps the parfait sweet while adhering to a vegan diet.

What other fruits can I use in this recipe?

You can mix and match fruits based on your preference. Try using strawberries, blueberries, raspberries, or even bananas. Just make sure to adjust the lemon juice as needed to prevent browning.

Sweet Peach Yogurt Parfait Delight

Final Thoughts

The Peach Yogurt Parfait with Honey and Granola is a delightful blend of creamy yogurt, sweet peaches, and crunchy granola that creates a satisfying and nourishing treat. Each layer bursts with flavor, making it a perfect choice for breakfast or a light dessert.

This is the kind of recipe I come back to again and again, especially when I want something refreshing and wholesome to start my day. The harmony of sweet and tart flavors, combined with the delightful crunch, never fails to lift my spirits!

I encourage you to give this parfait a try and indulge in its comforting goodness. Feel free to share your results or even add your own twist—perhaps a sprinkle of cinnamon or a handful of nuts. Enjoy creating your perfect parfait!

Print
clock clock iconcutlery cutlery iconflag flag iconfolder folder iconinstagram instagram iconpinterest pinterest iconfacebook facebook iconprint print iconsquares squares iconheart heart iconheart solid heart solid icon

Peach Yogurt Parfait


  • Author: Lily author
  • Total Time: 15 minutes
  • Yield: 4 servings 1x
Pin Recipe
Print Recipe

Description

This Peach Yogurt Parfait combines creamy Greek yogurt, juicy peaches, and crunchy granola for a delightful treat. It’s a perfect breakfast or snack that captures the essence of summer in every bite.


Ingredients

Scale
  • For the Parfait:
  • 2 cups plain Greek yogurt (or vanilla yogurt for a sweeter option)
  • 2 large ripe peaches, diced (about 2 cups)
  • 1 tablespoon fresh lemon juice (to prevent browning of peaches)
  • 2 tablespoons honey (plus more for drizzling)
  • 1 teaspoon vanilla extract (optional for extra flavor)
  • For the Granola:
  • 1 cup granola (store-bought or homemade; see notes for a simple granola recipe)
  • 1/4 cup sliced almonds (optional for added crunch)
  • 1/4 cup shredded coconut (optional for added flavor)

Instructions

  1. Start by preparing the peaches. Wash them thoroughly, then slice and dice them into bite-sized pieces. In a medium bowl, toss the diced peaches with 1 tablespoon of fresh lemon juice to prevent browning. Set aside for about 5 minutes while the lemon juice works its magic.
  2. In a separate bowl, combine the Greek yogurt, 2 tablespoons of honey, and 1 teaspoon of vanilla extract if using. Stir the mixture until smooth and thoroughly blended. This should take about a minute. Avoid overmixing to maintain the creaminess of the yogurt.
  3. Now it’s time to layer your parfait. Grab a clear glass or bowl to showcase your beautiful creation. Start with a generous spoonful of the yogurt mixture at the bottom—about 1/4 cup will do. Use a spoon to spread it evenly.
  4. Add a layer of the diced peaches over the yogurt, ensuring they cover the yogurt completely. You might want to use about half of what you have prepared—roughly 1 cup. This layer should be visually appealing, so arrange the peaches neatly.
  5. Sprinkle 1/4 cup of granola over the peaches. This adds a delightful crunch. Make sure to distribute it evenly to ensure every bite has that satisfying texture. Avoid packing it down too tightly, as you want it to maintain its crunch.
  6. Repeat the layers: spoon in another 1/4 cup of yogurt, followed by another cup of peaches, and another sprinkle of granola. You should have at least two layers, but feel free to add more depending on your glass size.
  7. Finish off your parfait with a drizzle of honey on top for added sweetness and a touch of elegance. If you’re using sliced almonds or shredded coconut, sprinkle them on top now. It adds a lovely visual contrast and extra flavor.
  8. Serve immediately or refrigerate for up to 30 minutes before serving to allow the flavors to meld together. However, I recommend enjoying it fresh to maintain the granola’s crunch.
  • Prep Time: 15 mins
  • Cook Time: 0 mins
  • Category: Breakfast
  • Method: No-cook
  • Cuisine: American

Nutrition

  • Serving Size: 1 parfait
  • Calories: 250
  • Sugar: 20 g
  • Sodium: 50 mg
  • Fat: 5 g
  • Saturated Fat: 2 g
  • Unsaturated Fat: 3 g
  • Trans Fat: 0 g
  • Carbohydrates: 40 g
  • Fiber: 3 g
  • Protein: 10 g
  • Cholesterol: 10 mg

Keywords: Choose ripe peaches for the best flavor and texture. Use a clear glass for a beautiful presentation. For creaminess, consider whipping the yogurt before layering. Be mindful of the granola-to-yogurt ratio. Prepare yogurt and peaches ahead of time for gatherings, layering just before serving.

Did you make this recipe?

Share a photo and tag us — we can't wait to see what you've made!

Sun-Kissed Frozen Orange Cream Slush

As a child, summer days felt like they lasted forever. I remember the sticky heat wrapping around me as I played outside, my laughter mingling with the sounds of the neighborhood. But nothing could cool me down quite like the moment I’d spot my grandmother, laboring over her blender, whipping up her famous Frozen Orange Creamsicle Slush. That vibrant orange treat, with its frosty texture and sweet citrus aroma, was like a burst of sunshine in a cup. Just one sip, and I could feel the coolness wash over me, sparking pure joy.

This Frozen Orange Creamsicle Slush has a way of making you feel like a kid again. Its creamy, dreamy consistency is a delightful balance of bright orange and soft vanilla, inviting you to dive right in. The refreshing tang of orange dances on your tongue, while the smooth creaminess envelops you in a comforting embrace. It’s a nostalgic treat that’s perfect for hot summer afternoons or anytime you need a little pick-me-up.

What makes my version of this slush stand out is the addition of a hint of vanilla bean, which elevates the flavor and adds an extra layer of richness. Plus, it’s super easy to whip up with just a few simple ingredients that you probably already have on hand! So, if you’re ready to relive those sun-soaked memories, let me show you exactly how to make it.

Sun-Kissed Frozen Orange Cream Slush

Why You’ll Love This Recipe

  • Each slush is a perfect blend of creamy vanilla and zesty orange, creating a nostalgic flavor reminiscent of summer days.
  • This refreshing treat is ready in under 15 minutes, making it an ideal quick dessert for unexpected guests or hot afternoons.
  • With just 8 simple ingredients, it’s budget-friendly, ensuring you don’t have to break the bank to enjoy a delicious slush.
  • The slush has a perfectly smooth texture, thanks to the combination of ice and ice cream, providing a delightful contrast to the bright citrus flavors.
  • It’s highly customizable; you can easily adjust the sweetness and add fresh herbs for a unique twist that suits your taste.

Ingredients

  • 2 cups orange juice (freshly squeezed or store-bought)
  • 1 cup vanilla ice cream
  • 1 cup crushed ice
  • 1/2 cup milk (whole or 2%)
  • 1/4 cup granulated sugar (adjust based on sweetness preference)
  • 1 teaspoon vanilla extract
  • Zest of 1 orange (for added flavor)
  • Fresh orange slices and mint leaves (for garnish)

The star of this Frozen Orange Creamsicle Slush is the orange juice, which provides the vibrant, citrusy base. Freshly squeezed juice will yield the brightest flavor, but store-bought options can be just as convenient. If you’re opting for store-bought, choose 100% pure juice with no added sugars for the best results. Another essential ingredient is the vanilla ice cream; it adds creaminess and sweetness. You can substitute it with dairy-free ice cream if you’re looking for a vegan option. Whole or 2% milk complements the ice cream, creating a smooth blend. If you want a lower-calorie version, almond or oat milk can be good alternatives.

Lastly, the granulated sugar can be adjusted based on your sweetness preference. If you prefer a more natural sweetener, consider using honey or agave syrup. The orange zest enhances the flavor profile, providing an aromatic pop that brings the whole slush together. Don’t skip it! It adds an extra layer of brightness that makes this slush truly special.

Step-by-Step Instructions

  1. Start by preparing your ingredients. Gather 2 cups of orange juice, 1 cup of vanilla ice cream, and 1 cup of crushed ice. Make sure the ice is finely crushed, as larger chunks can make blending difficult.
  2. In a blender, combine the orange juice, vanilla ice cream, crushed ice, and 1/2 cup of milk. Add 1/4 cup of granulated sugar and 1 teaspoon of vanilla extract. If you like a sweeter slush, consider adding a bit more sugar at this stage.
  3. Add the zest of 1 orange to the blender. This step is crucial for enhancing the citrus flavor of your slush. Make sure not to include the bitter white pith—only the flavorful zest.
  4. Blend the mixture on medium-high speed for about 30-45 seconds. Stop once the ingredients are fully combined and the slush has a smooth, even consistency. If you notice large chunks of ice, blend for an additional 10-15 seconds. Avoid over-blending, as this can make the slush too liquidy.
  5. Once blended, taste the slush. If it needs more sweetness, add a little more sugar and blend for a few more seconds. If it’s too thick, you can add a splash of milk to reach your desired consistency.
  6. Pour the slush into glasses. This recipe typically serves 4, but you can easily double it for larger gatherings. Use a spoon to help guide the slush into the glasses if needed.
  7. Garnish each serving with fresh orange slices and mint leaves. The mint not only adds a pop of color but also a refreshing aroma that complements the citrus flavors beautifully.
  8. Serve immediately and enjoy! If you’ve made extra, you can refrigerate it for a short time, but it’s best enjoyed fresh.

Pro Tips for the Best Frozen Orange Creamsicle Slush

  • Don’t skip the orange zest! It’s a game-changer for flavor. Always zest before juicing to make it easier.
  • Use a high-powered blender for the best texture. A standard blender may struggle with ice, leading to uneven consistency. If you have a food processor, that can work too, but ensure the ice is finely crushed.
  • Adjust the ice-to-liquid ratio carefully. If your slush is too thick, it won’t blend well. Start with less ice and add more until you reach your preferred texture.
  • Be cautious with the sugar! Always start with the lower amount, as you can easily add more, but it’s hard to fix an overly sweet slush.
  • For a fun twist, consider adding a splash of coconut milk or a handful of fresh fruit like strawberries or pineapple. This not only enhances the flavor but also adds a beautiful color contrast.

Variations & Serving Ideas

There are countless ways to put a spin on your Frozen Orange Creamsicle Slush. Consider making a tropical version by adding in some pineapple juice or coconut milk for a delightful tropical twist. If you’re feeling adventurous, try incorporating a handful of frozen mango or peach slices for added sweetness. For a lighter version, swap out the vanilla ice cream for Greek yogurt for a creamy yet tangy alternative.

As for serving ideas, this refreshing slush pairs wonderfully with light summer dishes like grilled chicken skewers, fish tacos, or a simple salad topped with citrus vinaigrette. The bright, zesty flavors of the slush complement these dishes perfectly, making them an ideal pairing for a sunny day.

Storage, Make-Ahead & Reheating

This Frozen Orange Creamsicle Slush is best enjoyed fresh, but if you have leftovers, you can store them in an airtight container in the fridge for up to 2 days. Just keep in mind that the slush may lose some of its texture over time as the ice melts. It doesn’t freeze well, as the ice will turn into a solid block. If you must freeze it, blend again after thawing to restore the slushy consistency. This treat is best the day you make it, as the flavors meld together beautifully overnight, enhancing its deliciousness.

Frequently Asked Questions

Can I make Frozen Orange Creamsicle Slush ahead of time?

Yes — in fact, it tastes even better the next day as the flavors meld. However, it’s best to enjoy it fresh, as the texture can change if stored for too long. If you need to prepare it ahead, keep it in the fridge and re-blend before serving.

What kind of orange juice should I use?

For the best flavor, use freshly squeezed orange juice. However, if you’re short on time, opt for 100% pure store-bought juice without added sugars. This will ensure that your slush remains flavorful and refreshing.

Can I substitute the vanilla ice cream?

Absolutely! If you’re looking for a dairy-free option, coconut milk ice cream or a non-dairy vanilla ice cream can work wonderfully. They will still provide the creamy texture and sweetness you desire.

How can I adjust the sweetness of my slush?

You can easily adjust the sweetness by modifying the amount of sugar added. Start with 1/4 cup and taste the mixture before blending. If you prefer it sweeter, add more sugar gradually until it reaches your desired level.

What should I do if my slush is too thick?

If your slush is too thick, simply add a splash of milk or orange juice and blend again. This will help achieve a more drinkable consistency while maintaining the slushy texture. Adjust gradually to reach your preferred thickness.

Sun-Kissed Frozen Orange Cream Slush

Final Thoughts

The Frozen Orange Creamsicle Slush is a delightful blend of refreshing citrus and creamy goodness, making it a perfect treat for warm days or any time you crave a taste of nostalgia. The way the bright orange flavor dances with the creamy texture truly elevates this slush, transforming it into a satisfying escape from the everyday.

This is the kind of recipe I come back to again and again, especially when I’m looking to cool down or impress guests at a summer gathering. It’s simple to make and always brings smiles all around! I encourage you to try this recipe for yourself—don’t hesitate to share your results or even put your own spin on it. Happy slushing!

Print
clock clock iconcutlery cutlery iconflag flag iconfolder folder iconinstagram instagram iconpinterest pinterest iconfacebook facebook iconprint print iconsquares squares iconheart heart iconheart solid heart solid icon

Frozen Orange Creamsicle Slush


  • Author: Lily author
  • Total Time: 15 minutes
  • Yield: 4 servings 1x
Pin Recipe
Print Recipe

Description

This Frozen Orange Creamsicle Slush is a refreshing treat that combines creamy vanilla and zesty orange flavors. Perfect for hot summer days, it brings back nostalgic memories with every sip.


Ingredients

Scale
  • 2 cups orange juice (freshly squeezed or store-bought)
  • 1 cup vanilla ice cream
  • 1 cup crushed ice
  • 1/2 cup milk (whole or 2%)
  • 1/4 cup granulated sugar (adjust based on sweetness preference)
  • 1 teaspoon vanilla extract
  • Zest of 1 orange (for added flavor)
  • Fresh orange slices and mint leaves (for garnish)

Instructions

  1. Start by preparing your ingredients. Gather 2 cups of orange juice, 1 cup of vanilla ice cream, and 1 cup of crushed ice. Make sure the ice is finely crushed, as larger chunks can make blending difficult.
  2. In a blender, combine the orange juice, vanilla ice cream, crushed ice, and 1/2 cup of milk. Add 1/4 cup of granulated sugar and 1 teaspoon of vanilla extract. If you like a sweeter slush, consider adding a bit more sugar at this stage.
  3. Add the zest of 1 orange to the blender. This step is crucial for enhancing the citrus flavor of your slush. Make sure not to include the bitter white pith—only the flavorful zest.
  4. Blend the mixture on medium-high speed for about 30-45 seconds. Stop once the ingredients are fully combined and the slush has a smooth, even consistency. If you notice large chunks of ice, blend for an additional 10-15 seconds. Avoid over-blending, as this can make the slush too liquidy.
  5. Once blended, taste the slush. If it needs more sweetness, add a little more sugar and blend for a few more seconds. If it’s too thick, you can add a splash of milk to reach your desired consistency.
  6. Pour the slush into glasses. This recipe typically serves 4, but you can easily double it for larger gatherings. Use a spoon to help guide the slush into the glasses if needed.
  7. Garnish each serving with fresh orange slices and mint leaves. The mint not only adds a pop of color but also a refreshing aroma that complements the citrus flavors beautifully.
  8. Serve immediately and enjoy! If you’ve made extra, you can refrigerate it for a short time, but it's best enjoyed fresh.
  • Prep Time: 15 min
  • Cook Time: 0 min
  • Category: Dessert
  • Method: Blending
  • Cuisine: American

Nutrition

  • Serving Size: 1 serving
  • Calories: 200
  • Sugar: 30 g
  • Sodium: 50 mg
  • Fat: 5 g
  • Saturated Fat: 3 g
  • Unsaturated Fat: 2 g
  • Trans Fat: 0 g
  • Carbohydrates: 40 g
  • Fiber: 1 g
  • Protein: 2 g
  • Cholesterol: 20 mg

Keywords: Don't skip the orange zest! It's a game-changer for flavor. Always zest before juicing to make it easier.

Did you make this recipe?

Share a photo and tag us — we can't wait to see what you've made!

Zesty Lemon Poppy Seed Delight

One rainy afternoon, I found myself in my grandmother’s cozy kitchen, the kind that always smelled like warmth and love. She was whipping up her famous Lemon Poppy Seed Loaf, a recipe that had been passed down through generations. As the batter came together, the zesty aroma of fresh lemons filled the air, mingling perfectly with the nutty fragrance of poppy seeds. I can still picture her, apron-clad, as she expertly drizzled a vibrant citrus icing over the loaf, creating a glossy, sun-kissed finish that beckoned us to dive in. It was a moment that sparked my own passion for baking, and this recipe has become a cherished staple in my home ever since.

When you take a bite of this Lemon Poppy Seed Loaf, it’s like a burst of sunshine on your palate. The loaf is beautifully golden, with a tender crumb that melts in your mouth. Each slice is speckled with tiny poppy seeds, adding a delightful crunch that contrasts beautifully with the tangy sweetness of the lemon. And that citrus icing? It’s the finishing touch that elevates this loaf from ordinary to extraordinary, with its bright, zesty flavor dancing on your taste buds.

This recipe stands out because it embraces simplicity while delivering on flavor. I’ve added a hint of vanilla to the batter, enhancing the overall taste and making it even more indulgent. Trust me, once you make this Lemon Poppy Seed Loaf With Citrus Icing, it’ll become a go-to in your baking repertoire.

So, let me show you exactly how to make it!

Zesty Lemon Poppy Seed Delight

Why You’ll Love This Recipe

  • Moist and tender crumb that melts in your mouth, thanks to the perfect balance of butter and buttermilk.
  • Bright, zesty lemon flavor paired with crunchy poppy seeds, creating a delightful texture and taste experience.
  • Easy to whip up in just about an hour, perfect for last-minute gatherings or a cozy afternoon treat.
  • Budget-friendly with everyday ingredients, making it an accessible option for all home bakers.
  • The citrus icing adds a sweet tang that elevates the loaf, turning a simple recipe into a showstopper!

Ingredients

  • 1 ½ cups (190g) all-purpose flour
  • 1 teaspoon baking powder
  • ½ teaspoon baking soda
  • ½ teaspoon salt
  • 3 tablespoons poppy seeds
  • ½ cup (115g) unsalted butter, softened to room temperature
  • 1 cup (200g) granulated sugar
  • 2 large eggs
  • 1 teaspoon vanilla extract
  • 1 teaspoon lemon zest (from about 1 medium lemon)
  • ½ cup (120ml) buttermilk
  • 2 tablespoons fresh lemon juice

For the Citrus Icing:

  • 1 cup (120g) powdered sugar
  • 2 tablespoons fresh lemon juice
  • 1 tablespoon orange juice
  • 1 teaspoon lemon zest (for garnish, optional)

Let’s dive into the key ingredients that make this Lemon Poppy Seed Loaf so special. The all-purpose flour provides the structure and base for the loaf, while the baking powder and baking soda ensure it rises perfectly, giving the loaf a light texture. For a gluten-free variation, you could substitute the flour with a gluten-free all-purpose blend. Poppy seeds not only add a delightful crunch but also contribute to the unique flavor profile that pairs well with the citrus notes.

Unsalted butter is crucial for achieving the buttery richness that makes this loaf so moist. If you’re looking for a dairy-free option, coconut oil or a vegan butter can be used instead. The buttermilk is another essential component, providing acidity that activates the baking soda for a fluffy texture. If you don’t have buttermilk on hand, you can easily make a substitute by mixing ½ cup of milk with 1 tablespoon of vinegar or lemon juice and letting it sit for about 5 minutes.

Step-by-Step Instructions

  1. Preheat your oven to 350°F (175°C). Grease a 9×5-inch loaf pan or line it with parchment paper for easy removal later.
  2. In a medium mixing bowl, whisk together 1 ½ cups of all-purpose flour, 1 teaspoon of baking powder, ½ teaspoon of baking soda, ½ teaspoon of salt, and 3 tablespoons of poppy seeds. This helps to evenly distribute the baking agents and ensures a uniform rise.
  3. In a large mixing bowl, cream together ½ cup of softened unsalted butter and 1 cup of granulated sugar using an electric mixer on medium speed for about 3-4 minutes, until the mixture is light and fluffy. Make sure to scrape down the sides of the bowl occasionally.
  4. Add 2 large eggs, 1 teaspoon of vanilla extract, and 1 teaspoon of lemon zest to the creamed butter and sugar, mixing until fully combined. You want a smooth consistency, so ensure there are no lumps of butter.
  5. In a small bowl, combine ½ cup of buttermilk and 2 tablespoons of fresh lemon juice. Alternately add the dry ingredients and buttermilk mixture to the butter mixture, starting and ending with the dry ingredients. Mix just until combined; do not overmix, as this can lead to a dense loaf.
  6. Pour the batter into the prepared loaf pan. Smooth the top with a spatula, ensuring it’s even. Bake in the preheated oven for 50-60 minutes, or until a toothpick inserted in the center comes out clean. The edges should be lightly golden brown, and the center should feel just set.
  7. Once baked, remove the loaf from the oven and allow it to cool in the pan for about 10 minutes. Then, transfer it to a wire rack to cool completely. Resist the urge to slice too soon, as it will be crumbly if it’s still warm.
  8. While the loaf is cooling, prepare the citrus icing. In a medium bowl, whisk together 1 cup of powdered sugar, 2 tablespoons of fresh lemon juice, and 1 tablespoon of orange juice until smooth. If the icing is too thick, you can add a little more juice to reach your desired consistency.
  9. Once the loaf is completely cool, drizzle the citrus icing over the top. If you like, sprinkle with an additional teaspoon of lemon zest for an extra pop of flavor and color.

Pro Tips for the Best Lemon Poppy Seed Loaf With Citrus Icing

  • Be careful not to overmix your batter; this is a common mistake that can lead to a dense loaf. Mix just until the dry ingredients are incorporated for a light and fluffy texture.
  • Use room temperature ingredients, especially the butter and eggs. This helps to create a smoother batter and ensures even baking. Take your eggs out of the fridge about 30 minutes before you start.
  • For a more pronounced lemon flavor, consider adding a little lemon extract in addition to the zest and juice. Just a half teaspoon can elevate the citrus notes significantly.
  • When measuring your flour, spoon it into the measuring cup and level it off with a knife instead of scooping directly from the bag. This prevents packing and ensures you don’t end up with a dry loaf.
  • Invest in a good quality loaf pan; it makes a difference in heat distribution, which ensures even baking. If your pan is dark-coated, reduce the oven temperature by 25°F to prevent over-browning.

Variations & Serving Ideas

For a delightful twist, consider adding blueberries or raspberries to the batter for a fruity burst of flavor. You can also experiment with different citrus fruits—try lime or grapefruit zest and juice for a refreshing change. For a healthier option, substitute half of the all-purpose flour with whole wheat flour for added fiber without compromising too much on texture.

This Lemon Poppy Seed Loaf pairs beautifully with a light salad, such as a mixed greens salad with a vinaigrette, or a cup of tea for a cozy afternoon treat. It also complements a creamy cheese platter, as the acidity of the loaf balances rich cheeses perfectly. Lastly, a scoop of vanilla ice cream on the side creates a delightful contrast of temperatures and flavors!

Storage, Make-Ahead & Reheating

This Lemon Poppy Seed Loaf can be stored at room temperature for up to 3 days if wrapped tightly in plastic wrap. If you want to keep it longer, it freezes well for up to 3 months. To freeze, wrap the loaf tightly in plastic wrap and then in aluminum foil to prevent freezer burn.

When you’re ready to enjoy it again, simply thaw it in the fridge overnight. Reheat individual slices in the microwave for 15-20 seconds or in a toaster oven until warmed through. Interestingly, many people find that this loaf tastes even better the next day, as the flavors have time to meld!

Frequently Asked Questions

Can I make Lemon Poppy Seed Loaf With Citrus Icing ahead of time?

Yes — in fact, it tastes even better the next day! You can make the loaf a day in advance, allowing the flavors to develop. Just be sure to store it in an airtight container to maintain its moisture.

Can I substitute the poppy seeds?

Absolutely! If you don’t have poppy seeds on hand or prefer an alternative, you can use sesame seeds for a similar crunch or omit them entirely for a smooth loaf.

What can I use instead of buttermilk?

If you don’t have buttermilk, you can easily create a substitute by mixing ½ cup of milk (dairy or plant-based) with 1 tablespoon of vinegar or lemon juice. Let it sit for 5 minutes before using in the recipe.

How can I make this recipe gluten-free?

To make a gluten-free version of this Lemon Poppy Seed Loaf, substitute the all-purpose flour with a gluten-free all-purpose flour blend. Just ensure that the blend contains a binding agent like xanthan gum for the best results.

What is the best way to store leftover loaf?

Leftover Lemon Poppy Seed Loaf should be stored in an airtight container at room temperature for up to 3 days. For longer storage, wrap it tightly and freeze for up to 3 months. Thaw it before serving for the best texture.

Zesty Lemon Poppy Seed Delight

Final Thoughts

The Lemon Poppy Seed Loaf with Citrus Icing is truly a delightful treat that brings a burst of brightness to any occasion. The zesty lemon flavor combined with the subtle crunch of poppy seeds creates a satisfying balance, while the citrus icing adds a touch of sweetness that perfectly complements the loaf’s tanginess.

This is the kind of recipe I come back to again and again, especially when I want to brighten up a gloomy day or celebrate a small victory. The aroma that fills the kitchen as it bakes is absolutely heavenly! I encourage you to give this recipe a try; you might just find it becoming a beloved staple in your home. Don’t forget to share your results or even add your own unique twist—I can’t wait to see what you create!

Print
clock clock iconcutlery cutlery iconflag flag iconfolder folder iconinstagram instagram iconpinterest pinterest iconfacebook facebook iconprint print iconsquares squares iconheart heart iconheart solid heart solid icon

Lemon Poppy Seed Loaf


  • Author: Lily author
  • Total Time: 13 minute
  • Yield: 1 loaf 1x
Pin Recipe
Print Recipe

Description

This Lemon Poppy Seed Loaf is a delightful treat that combines zesty lemon flavor with crunchy poppy seeds. Topped with a citrus icing, it’s perfect for any occasion.


Ingredients

Scale
  • 1 ½ cups (190g) all-purpose flour
  • 1 teaspoon baking powder
  • ½ teaspoon baking soda
  • ½ teaspoon salt
  • 3 tablespoons poppy seeds
  • ½ cup (115g) unsalted butter, softened to room temperature
  • 1 cup (200g) granulated sugar
  • 2 large eggs
  • 1 teaspoon vanilla extract
  • 1 teaspoon lemon zest (from about 1 medium lemon)
  • ½ cup (120ml) buttermilk
  • 2 tablespoons fresh lemon juice
  • 1 cup (120g) powdered sugar
  • 2 tablespoons fresh lemon juice
  • 1 tablespoon orange juice
  • 1 teaspoon lemon zest (for garnish, optional)

Instructions

  1. Preheat your oven to 350°F (175°C). Grease a 9×5-inch loaf pan or line it with parchment paper for easy removal later.
  2. In a medium mixing bowl, whisk together 1 ½ cups of all-purpose flour, 1 teaspoon of baking powder, ½ teaspoon of baking soda, ½ teaspoon of salt, and 3 tablespoons of poppy seeds. This helps to evenly distribute the baking agents and ensures a uniform rise.
  3. In a large mixing bowl, cream together ½ cup of softened unsalted butter and 1 cup of granulated sugar using an electric mixer on medium speed for about 3-4 minutes, until the mixture is light and fluffy. Make sure to scrape down the sides of the bowl occasionally.
  4. Add 2 large eggs, 1 teaspoon of vanilla extract, and 1 teaspoon of lemon zest to the creamed butter and sugar, mixing until fully combined. You want a smooth consistency, so ensure there are no lumps of butter.
  5. In a small bowl, combine ½ cup of buttermilk and 2 tablespoons of fresh lemon juice. Alternately add the dry ingredients and buttermilk mixture to the butter mixture, starting and ending with the dry ingredients. Mix just until combined; do not overmix, as this can lead to a dense loaf.
  6. Pour the batter into the prepared loaf pan. Smooth the top with a spatula, ensuring it’s even. Bake in the preheated oven for 50-60 minutes, or until a toothpick inserted in the center comes out clean. The edges should be lightly golden brown, and the center should feel just set.
  7. Once baked, remove the loaf from the oven and allow it to cool in the pan for about 10 minutes. Then, transfer it to a wire rack to cool completely. Resist the urge to slice too soon, as it will be crumbly if it’s still warm.
  8. While the loaf is cooling, prepare the citrus icing. In a medium bowl, whisk together 1 cup of powdered sugar, 2 tablespoons of fresh lemon juice, and 1 tablespoon of orange juice until smooth. If the icing is too thick, you can add a little more juice to reach your desired consistency.
  9. Once the loaf is completely cool, drizzle the citrus icing over the top. If you like, sprinkle with an additional teaspoon of lemon zest for an extra pop of flavor and color.
  • Prep Time: 15 mins
  • Cook Time: 50-60 mins
  • Category: Dessert
  • Method: Baking
  • Cuisine: American

Nutrition

  • Serving Size: 1 slice
  • Calories: 200
  • Sugar: 15 g
  • Sodium: 150 mg
  • Fat: 8 g
  • Saturated Fat: 5 g
  • Unsaturated Fat: 3 g
  • Trans Fat: 0 g
  • Carbohydrates: 30 g
  • Fiber: 1 g
  • Protein: 3 g
  • Cholesterol: 40 mg

Keywords: Be careful not to overmix your batter; this is a common mistake that can lead to a dense loaf. Use room temperature ingredients for a smoother batter and even baking.

Did you make this recipe?

Share a photo and tag us — we can't wait to see what you've made!

  • Privacy Policy
  • Terms Of Service
  • Contact
  • About
  • GDPR

Copyright © 2025 Homesmad