• Skip to primary navigation
  • Skip to main content
  • Skip to primary sidebar
Homesmad

Homesmad

  • Home
  • Breakfast & Brunch
  • Appetizers & Snacks
  • Dinner
  • Dessert
  • About
  • Privacy Policy
  • Contact
Homesmad
  • Home
  • Breakfast & Brunch
  • Appetizers & Snacks
  • Dinner
  • Dessert
  • About
  • Privacy Policy
  • Contact

Homemade Honey Cinnamon Oatmeal Bread: Easy & Delicious!

December 2, 2025 by Lily author

Honey Cinnamon Oatmeal Bread Recipe Easy Homemade Breakfast Treat is more than just a catchy title; it’s an invitation to a truly delightful culinary experience. Imagine waking up to the warm, inviting aroma of freshly baked bread filling your home, its sweet and spicy scent a comforting embrace even before your first cup of coffee. That’s exactly the kind of joy and anticipation this recipe promises to bring into your kitchen!

While bread itself has been a foundational part of human diets for millennia, this particular combination of oats, honey, and cinnamon elevates a simple loaf into something truly special. Oatmeal bread gained popularity as a hearty, wholesome choice, often cherished in homes looking for nutritious and satisfying options. The addition of aromatic cinnamon and golden honey takes this rustic concept and imbues it with a warmth and sweetness that feels both nostalgic and utterly modern. These ingredients have long been valued, not just for their exquisite flavors, but also for the comforting touch they bring to any dish, connecting us to age-old traditions of home baking.

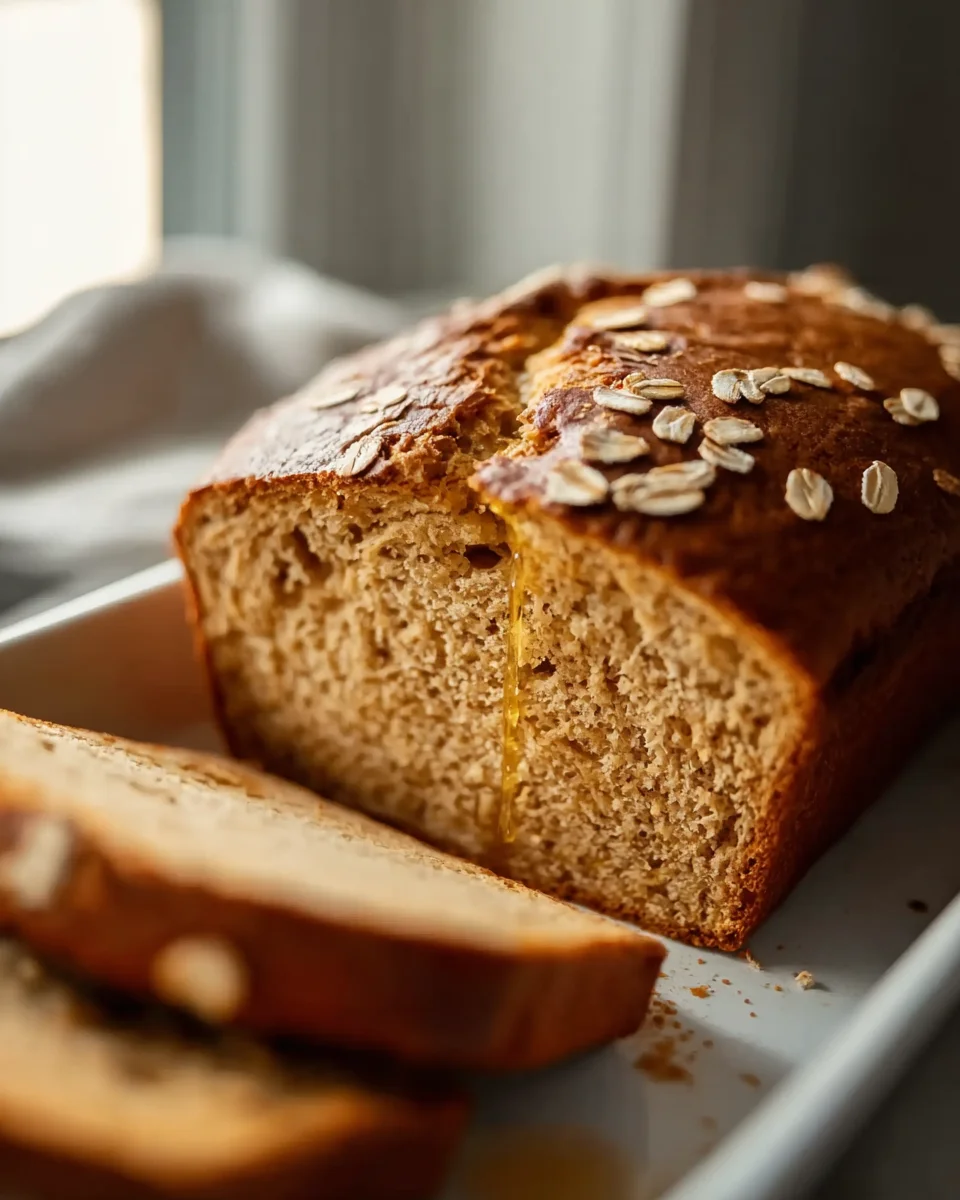
What truly makes this bread a cherished staple in countless kitchens? It’s the irresistible taste – a perfect balance of subtle sweetness from the honey, a gentle, warming spice from the cinnamon, and a delightful chewiness provided by the wholesome oats. The texture is incredibly tender and moist, making each slice a pure indulgence, whether enjoyed plain, toasted, or slathered with butter. Beyond the incredible flavor and texture, I find that making this bread offers a wonderfully satisfying experience. It’s surprisingly easy to achieve bakery-quality results right in your own kitchen, transforming your breakfast table into a haven of warmth and deliciousness. This is why our Honey Cinnamon Oatmeal Bread Recipe Easy Homemade Breakfast Treat is destined to become a new family favorite, offering a comforting start to any day.

Homemade Honey Cinnamon Oatmeal Bread: Easy & Delicious! this RECIPE

Ingredients:

  • For the Oatmeal Base:
    • 1 cup (240ml) whole milk, warmed
    • ½ cup (120ml) water, warm (around 105-115°F / 40-46°C)
    • ½ cup (50g) rolled oats (not instant), plus extra for sprinkling
    • ¼ cup (60g) unsalted butter, melted
    • ¼ cup (85g) honey, plus 2 tablespoons for topping
  • For the Dough:
    • 2 ¼ teaspoons (1 packet or 7g) active dry yeast
    • ½ cup (100g) granulated sugar
    • 1 teaspoon salt
    • 4 ½ to 5 cups (540-600g) all-purpose flour, plus more for dusting
    • 1 large egg, room temperature
  • For the Honey Cinnamon Topping:
    • 2 tablespoons melted unsalted butter
    • 2 tablespoons honey
    • 1 teaspoon ground cinnamon

Preparing Your Workspace and Ingredients

  1. Gather Your Tools and Ingredients: Before you even think about mixing, I always recommend a good “mise en place.” This French culinary term simply means having all your ingredients measured, prepped, and ready to go. For this particular Honey Cinnamon Oatmeal Bread Recipe Easy Homemade Breakfast Treat, you’ll need a large mixing bowl, a stand mixer with a dough hook (if you have one, otherwise your strong hands will do!), measuring cups and spoons, a saucepan, a whisk, a rubber spatula, a couple of loaf pans (9×5 inches or similar), and a clean kitchen towel. It truly makes the baking process so much smoother and more enjoyable.
  2. Warm the Milk and Water: In a small saucepan over low heat, or in the microwave, gently warm the milk and water until it reaches about 105-115°F (40-46°C). This temperature is crucial because it’s warm enough to activate the yeast without being too hot and killing it. If it’s too cool, the yeast won’t activate properly, and your bread won’t rise. I like to use a kitchen thermometer for accuracy, but if you don’t have one, it should feel comfortably warm to the touch, like a baby’s bathwater, not hot.

Making the Oatmeal Base

  1. Hydrate the Oats: Once your milk and water are at the correct temperature, pour them into your large mixing bowl. Add the ½ cup of rolled oats to the warm liquid. Stir briefly to ensure all the oats are submerged. Let this mixture sit for about 5-10 minutes. This step allows the oats to soften and absorb some of the liquid, which contributes to the moist, tender crumb of our Honey Cinnamon Oatmeal Bread Recipe Easy Homemade Breakfast Treat. You’ll notice the oats will plump up slightly.
  2. Melt the Butter and Add Honey: While the oats are hydrating, melt ¼ cup of unsalted butter. You can do this in the microwave in a small bowl or in a small saucepan on the stove. Once melted, add the ¼ cup of honey to the warm butter. Stir them together until well combined. The warmth of the butter will help the honey mix in smoothly.
  3. Combine Oatmeal Mixture with Butter and Honey: After the oats have softened, pour the melted butter and honey mixture into the bowl with the oats and milk. Stir everything together gently with your rubber spatula or whisk until fully incorporated. This creates a rich, flavorful base for our dough.

Combining Dry and Wet Ingredients

  1. Activate the Yeast: To the oatmeal mixture, sprinkle the 2 ¼ teaspoons of active dry yeast over the surface. Then, add the ½ cup of granulated sugar. Stir gently just enough to moisten the yeast. Now, let it sit for another 5-10 minutes. During this time, the yeast should “bloom” – you’ll see a foamy, bubbly layer form on the surface. This is a clear sign that your yeast is alive and active, ready to work its magic and help your bread rise beautifully. Don’t skip this step, especially if you’re unsure about the freshness of your yeast!
  2. Add Remaining Wet Ingredients: Once the yeast is foamy, crack the room temperature egg into the mixture. Whisk everything together until thoroughly combined. The egg adds richness, structure, and helps with the browning of the crust.
  3. Incorporate Dry Ingredients (Initial Mix): Add the 1 teaspoon of salt and 3 cups of the all-purpose flour to the wet mixture. If using a stand mixer, attach the dough hook and begin mixing on low speed. If mixing by hand, use a sturdy wooden spoon or rubber spatula. Mix until just combined, forming a shaggy dough. At this stage, it will be quite sticky and not very cohesive.
  4. Gradually Add Remaining Flour: Continue adding the remaining flour, about ½ cup at a time, mixing well after each addition. You’re looking for a dough that pulls away from the sides of the bowl (if using a mixer) or starts to form a ball that you can handle (if mixing by hand). The total amount of flour can vary slightly depending on factors like humidity and how well you measured your ingredients, so trust your judgment. You might use slightly less or slightly more than the specified amount. The goal is a dough that is soft and slightly tacky, but not overly sticky.

Kneading the Dough

  1. Kneading by Stand Mixer: If you’re using a stand mixer, increase the speed to medium-low and let the dough hook do the work. Knead for 8-10 minutes. During this time, the dough will transform from a shaggy, somewhat rough mass into a smooth, elastic, and supple ball. You’ll notice it starts to develop a beautiful elasticity as the gluten forms. It should clear the sides of the bowl but might stick a little to the bottom.
  2. Kneading by Hand: If you’re kneading by hand, turn the dough out onto a lightly floured surface. Begin to knead vigorously. The technique involves pushing the dough away from you with the heels of your hands, then folding it back towards you, rotating it slightly, and repeating the process. Initially, it will be quite sticky, so resist the urge to add too much extra flour, as this can make your bread tough. A bench scraper can be very helpful here to scrape up any sticky bits. Continue kneading for 12-15 minutes. This is a fantastic arm workout! You’ll feel the dough become smoother, more elastic, and less sticky over time. A good way to check for sufficient kneading is the “windowpane test.” Take a small piece of dough and gently stretch it. If you can stretch it thin enough to see light through it without tearing, your gluten is well-developed, and your dough is ready for its first rise. This is the secret to a perfectly chewy and soft texture in your Honey Cinnamon Oatmeal Bread Recipe Easy Homemade Breakfast Treat.

First Rise (Bulk Fermentation)

  1. Prepare for the First Rise: Lightly grease a clean large bowl with a tiny bit of olive oil or non-stick spray. Transfer the kneaded dough to this bowl, turning it once to coat the entire surface with oil. This prevents a dry skin from forming.
  2. Proofing Environment: Cover the bowl tightly with plastic wrap or a clean, damp kitchen towel. Place the bowl in a warm, draft-free spot. Ideal temperatures for rising dough are between 75-80°F (24-27°C). Some great warm spots include:
    • A slightly warmed oven (turn it on for just 1-2 minutes, then turn it off completely before placing the dough inside).
    • Near a sunny window (but not in direct blazing sun, which can overheat it).
    • In a microwave that’s not in use.

    Patience is key during this stage.

  3. First Rise Duration: Allow the dough to rise for 1 to 1.5 hours, or until it has visibly doubled in size. The exact time will depend on the temperature of your rising environment. You’ll know it’s ready when you gently poke it with a floured finger, and the indentation remains. If it springs back immediately, it needs more time.

Shaping the Loaves

  1. Deflate and Divide the Dough: Once the dough has doubled, gently punch it down to release the air. This is a satisfying step! Turn the dough out onto a lightly floured surface. Using a bench scraper or a sharp knife, divide the dough in half. Each half will form one loaf of your delightful Honey Cinnamon Oatmeal Bread Recipe Easy Homemade Breakfast Treat.
  2. Shape Each Loaf:
    • Method 1 (Simple Loaf): Take one half of the dough and gently pat it into a rough rectangle. Fold the top edge down to the center, pressing firmly. Then fold the bottom edge up to the center, overlapping the first fold, and press firmly to seal. Finally, gently roll the dough into a tight log, sealing the seam along the bottom by pinching it together. Tuck the ends under slightly to create a neat, uniform shape.
    • Method 2 (Braided Loaf – for extra flair!): Divide each half of the dough into three equal pieces. Roll each piece into a rope about 12-14 inches long. Lay the three ropes side-by-side and braid them gently, tucking and pinching the ends securely. This creates a beautiful presentation for your homemade breakfast treat.

    Repeat with the second half of the dough.

  3. Prepare Loaf Pans: Lightly grease two 9×5-inch loaf pans with butter or non-stick spray. You can also line them with parchment paper for easier removal, leaving an overhang on the long sides to use as handles.
  4. Place Dough in Pans: Carefully transfer each shaped loaf into its prepared loaf pan, seam-side down if you rolled them into logs.

Second Rise (Proofing)

  1. Prepare for the Second Rise: Loosely cover the loaf pans with plastic wrap or a clean, damp kitchen towel. Again, place them in a warm, draft-free spot.
  2. Second Rise Duration: Allow the loaves to rise for another 45-60 minutes, or until they have nearly doubled in size and look puffy, rising about 1 inch above the rim of the pans. This second rise, often called proofing, is vital for the bread’s final texture and volume. A well-proofed loaf will be light and airy, while an under-proofed loaf can be dense.
  3. Preheat Oven: About 20 minutes before the second rise is complete, preheat your oven to 375°F (190°C). Make sure an oven rack is in the center position.

Preparing the Honey Cinnamon Topping

  1. Mix the Topping Ingredients: While the bread is finishing its second rise, prepare the irresistible honey cinnamon topping. In a small bowl, combine the 2 tablespoons of melted unsalted butter, 2 tablespoons of honey, and 1 teaspoon of ground cinnamon. Whisk these ingredients together until they are thoroughly combined and smooth. This creates a wonderfully fragrant and delicious glaze that will bake onto the crust, adding a layer of sweet, spiced flavor to our Honey Cinnamon Oatmeal Bread Recipe Easy Homemade Breakfast Treat.

Baking the Bread

  1. Apply Topping and Oats: Once the loaves have completed their second rise, gently brush the tops of each loaf with the honey cinnamon topping. Be very careful not to press down too hard, as this can deflate your beautifully proofed dough. After brushing, you can sprinkle a light dusting of extra rolled oats on top for a rustic appearance and added texture.
  2. Bake the Loaves: Carefully place the loaf pans into the preheated 375°F (190°C) oven.
  3. Baking Time: Bake for 30-35 minutes. The baking time can vary slightly depending on your oven. You’ll know the bread is done when the crust is a deep golden brown, and when tapped on the bottom, it sounds hollow. For absolute certainty, you can use an instant-read thermometer; the internal temperature of the bread should register 200-210°F (93-99°C).
  4. Cool Briefly in Pans: Once baked, carefully remove the loaf pans from the oven. Let the bread cool in the pans for about 10-15 minutes. This allows the bread to set and makes it easier to remove without sticking or breaking.

Cooling and Enjoying Your Homemade Breakfast Treat

  1. Transfer to a Wire Rack: After the initial cooling in the pans, carefully invert the pans to release the loaves onto a wire cooling rack. Allow the bread to cool completely, or at least until it’s just warm to the touch, before slicing. Resist the urge to slice into it too early! Slicing hot bread can result in a gummy texture because the internal moisture hasn’t fully redistributed. This cooling period is crucial for the final texture and quality of your homemade bread.
  2. Slice and Serve: Once cooled, slice your beautiful Honey Cinnamon Oatmeal Bread Recipe Easy Homemade Breakfast Treat using a serrated knife. It’s truly a delight when freshly baked and still slightly warm. This bread is incredibly versatile – it’s wonderful on its own, toasted, or spread with a little extra butter or jam. It makes for an absolutely perfect breakfast or snack, offering a comforting blend of wholesome oats, sweet honey, and warm cinnamon. Enjoy the fruits of your labor!

Homemade Honey Cinnamon Oatmeal Bread: Easy & Delicious!

Conclusion:

This delightful loaf isn’t just another bread recipe; it’s a comforting hug in edible form, promising warmth and joy with every single slice. If you’ve been searching for that perfect balance of wholesome goodness and irresistible flavor, your quest truly ends here. I truly believe this is a must-try for anyone who appreciates the simple pleasures of baking and the incredible reward of a homemade treat. The aroma alone, as it bakes, is enough to transform your kitchen into the coziest, most inviting place on earth, a wonderful prelude to the deliciousness that awaits your eager taste buds.

What makes this bread stand out so uniquely? It’s the harmonious, carefully balanced blend of robust oats, the sweet whisper of golden honey, and the comforting, familiar embrace of cinnamon, all coming together in a tender, incredibly moist crumb that simply melts in your mouth with each bite. This isn’t your average, dry, or otherwise uninspired run-of-the-mill loaf you might find in a store. Instead, it offers a satisfyingly chewy texture from the wholesome oats and a delicate, natural sweetness that isn’t at all overpowering, making it incredibly versatile for various occasions and palates.

Imagine waking up to the glorious smell of fresh-baked bread filling your home, a truly unparalleled sensory experience that sets a wonderfully delightful tone for your entire day.

It’s more than just food; it’s an experience, a cherished memory in the making that you’ll want to revisit time and again. The profound satisfaction of pulling a perfectly golden-brown loaf from your own oven, knowing every single wholesome ingredient that lovingly went into it, is immense and deeply rewarding.

Now, how best to enjoy this culinary masterpiece once it has cooled enough to slice? While a warm slice, unadorned and utterly simple, is absolutely divine in its own right, there are countless ways to elevate your experience and truly savor its flavors. I personally love it lightly toasted, with a generous smear of high-quality unsalted butter that slowly melts into every single crevice, enhancing its inherent sweetness and adding a rich, creamy texture. For a more decadent and indulgent treat, try it with a luscious dollop of cream cheese or a vibrant fruit jam – strawberry or apricot are personal favorites that beautifully complement the warm cinnamon notes. But don’t limit it strictly to breakfast, though! This versatile bread makes an excellent afternoon snack, perfectly paired with a comforting cup of tea or a robust coffee. You could even transform it into extraordinary, fluffy French toast on a lazy weekend morning, soaking up eggs and milk before being griddled to golden-brown perfection, serving it with fresh berries and maple syrup. Or, for a truly comforting and indulgent dessert, cube any stale pieces and turn them into a heartwarming, spiced bread pudding that will satisfy any sweet craving.

One of the most wonderful and liberating aspects of baking at home is the unparalleled freedom to personalize and make a recipe truly your own, and this particular recipe is incredibly adaptable to your preferences and pantry staples. Feeling a bit adventurous and wanting to add more texture? Try folding in a handful of chopped walnuts or pecans for an added satisfying crunch and a lovely nutty flavor. Dried cranberries or golden raisins would introduce a delightful tart sweetness, perfectly suited for the cozy autumn months or as a festive touch. A gentle pinch of ground nutmeg or a dash of fragrant allspice could deepen the spice profile even further, adding yet another layer of warmth and complexity. For those with an undeniable sweet tooth, a simple powdered sugar glaze (just powdered sugar mixed with a touch of milk, orange juice, or lemon juice for a zesty kick) drizzled artistically over the cooled loaf would be a delightful addition, creating an even more indulgent dessert bread. Or, for a truly special and memorable touch, a thin, creamy layer of homemade cream cheese frosting could miraculously transform it into a cake-like treat, perfect for celebrations or a truly indulgent brunch. The possibilities for customization are truly endless, allowing you to make this recipe uniquely yours every single time you bake it.

So, what are you waiting for, my dear baking enthusiasts? I wholeheartedly encourage you to carve out some precious time this week to bring the undeniable magic of this Honey Cinnamon Oatmeal Bread Recipe Easy Homemade Breakfast Treat into your very own kitchen. There’s an undeniable, profound joy in the entire process, from carefully mixing the wholesome ingredients to patiently watching the dough rise beautifully, and an even greater satisfaction in proudly sharing the warm, fragrant finished product with your cherished loved ones. Once you’ve personally experienced the sheer deliciousness and comforting aroma of this incredible bread, I’m absolutely confident it will quickly become a cherished and frequently revisited staple in your baking repertoire, bringing smiles and warmth to your home. Please, don’t keep your successes (or even your ingenious experimental twists!) entirely to yourself. I’d absolutely love to hear all about your experience in the comments below, what delightful variations you tried, and how your family thoroughly enjoyed this truly wonderful bread. Happy baking, my friends!


Honey Cinnamon Oatmeal Bread: Easy Homemade Breakfast Treat

Imagine the comforting aroma of freshly baked bread filling your home. This recipe brings a delightful culinary experience, combining wholesome oats with the warm, inviting notes of honey and cinnamon for a tender, moist loaf. Perfect for breakfast or a satisfying snack, it’s an easy way to achieve bakery-quality results right in your own kitchen.

Prep Time
45 Minutes
Cook Time
35 Minutes
Total Time
35 Minutes
Servings
2 loaves

Ingredients


Instructions


Important Information

Nutrition Facts (Per Serving)

It is important to consider this information as approximate and not to use it as definitive health advice.

Allergy Information

Please check ingredients for potential allergens and consult a health professional if in doubt.

« Previous Post
Dill Pickle Parmesan Chicken Recipe – So Delicious!
Next Post »
Get Crispy Air Fryer Apple Fries! Easy & Healthy Snack

If you enjoyed this…

Dairy Free Carrot Banana Bread: The Ultimate Recipe

Cajun Beef Sausage Breakfast Hash with Eggs & Potatoes Recipe

Irresistible Apple Pumpkin Muffins with Crumb Topping

Primary Sidebar

Browse by Diet

BreakfastDinnerLunchDessertAppetizer

Sweet Peach Yogurt Parfait Delight

One of my fondest memories is from a lazy summer afternoon spent at my grandmother’s house. The sun filtered through the kitchen window, casting a warm glow over the table where she would create her culinary magic. It was during one of those blissful moments that I first tasted her Peach Yogurt Parfait with Honey and Granola. The sweet aroma of ripe peaches mingling with creamy yogurt and the crunch of granola was nothing short of heavenly. It felt like summer captured in a bowl, and I still remember the joy of diving in with a spoon, each layer revealing a new burst of flavor.

When I think about that parfait, I can almost hear the gentle hum of the bees outside, reminding me of the floral notes that honey brings to every bite. The vibrant yellows and soft oranges of the peaches contrast beautifully with the creamy white yogurt and the golden crunch of granola. It’s a dish that not only looks delightful but also tastes like a celebration of fresh, wholesome ingredients.

What makes my version of this Peach Yogurt Parfait special is the careful balance of flavors and textures. I use ripe, juicy peaches, drizzled with locally sourced honey, and a homemade granola that’s bursting with nuts and seeds for an extra crunch. It’s a simple dish, but every layer is crafted with love and attention.

Let me show you exactly how to make this delightful parfait, so you can bring a bit of that summer magic into your kitchen!

Sweet Peach Yogurt Parfait Delight

Why You’ll Love This Recipe

  • Delightfully creamy texture from the Greek yogurt, paired with the juicy sweetness of fresh peaches.
  • Ready in under 20 minutes, making it a quick and satisfying breakfast or snack option.
  • Budget-friendly, using common ingredients that you may already have in your pantry.
  • Customizable with your favorite granola and nuts, allowing you to tailor each parfait to your taste.
  • Perfectly balanced flavors with the bright acidity of lemon juice and the sweetness of honey enhancing the peaches.

Ingredients

  • For the Parfait:
  • 2 cups plain Greek yogurt (or vanilla yogurt for a sweeter option)
  • 2 large ripe peaches, diced (about 2 cups)
  • 1 tablespoon fresh lemon juice (to prevent browning of peaches)
  • 2 tablespoons honey (plus more for drizzling)
  • 1 teaspoon vanilla extract (optional for extra flavor)
  • For the Granola:
  • 1 cup granola (store-bought or homemade; see notes for a simple granola recipe)
  • 1/4 cup sliced almonds (optional for added crunch)
  • 1/4 cup shredded coconut (optional for added flavor)

Let’s dive into some key ingredients that make this Peach Yogurt Parfait so delightful! First, the Greek yogurt is not only creamy but also packed with protein, making it a satisfying option for breakfast or a snack. If you’re looking for a sweeter option, you can easily substitute it with vanilla yogurt, though it may alter the overall flavor balance. Next, the ripe peaches are the star of the show; their natural sweetness shines through, so I recommend choosing peaches that yield slightly to pressure, indicating they’re perfectly ripe. If peaches aren’t in season, feel free to use nectarines or even frozen peaches—just thaw them before use. Finally, honey adds a lovely floral sweetness that ties everything together. If you prefer, maple syrup can serve as a delicious substitute.

Step-by-Step Instructions

  1. Start by preparing the peaches. Wash them thoroughly, then slice and dice them into bite-sized pieces. In a medium bowl, toss the diced peaches with 1 tablespoon of fresh lemon juice to prevent browning. Set aside for about 5 minutes while the lemon juice works its magic.
  2. In a separate bowl, combine the Greek yogurt, 2 tablespoons of honey, and 1 teaspoon of vanilla extract if using. Stir the mixture until smooth and thoroughly blended. This should take about a minute. Avoid overmixing to maintain the creaminess of the yogurt.
  3. Now it’s time to layer your parfait. Grab a clear glass or bowl to showcase your beautiful creation. Start with a generous spoonful of the yogurt mixture at the bottom—about 1/4 cup will do. Use a spoon to spread it evenly.
  4. Add a layer of the diced peaches over the yogurt, ensuring they cover the yogurt completely. You might want to use about half of what you have prepared—roughly 1 cup. This layer should be visually appealing, so arrange the peaches neatly.
  5. Sprinkle 1/4 cup of granola over the peaches. This adds a delightful crunch. Make sure to distribute it evenly to ensure every bite has that satisfying texture. Avoid packing it down too tightly, as you want it to maintain its crunch.
  6. Repeat the layers: spoon in another 1/4 cup of yogurt, followed by another cup of peaches, and another sprinkle of granola. You should have at least two layers, but feel free to add more depending on your glass size.
  7. Finish off your parfait with a drizzle of honey on top for added sweetness and a touch of elegance. If you’re using sliced almonds or shredded coconut, sprinkle them on top now. It adds a lovely visual contrast and extra flavor.
  8. Serve immediately or refrigerate for up to 30 minutes before serving to allow the flavors to meld together. However, I recommend enjoying it fresh to maintain the granola’s crunch.

Pro Tips for the Best Peach Yogurt Parfait With Honey And Granola

  • Make sure to choose ripe peaches for the best flavor and texture. A common mistake is using unripe fruit, which can lead to a less enjoyable parfait. Look for peaches that are fragrant and slightly soft to the touch.
  • Use a clear glass to assemble your parfait; this not only makes for a beautiful presentation but also allows you to see the colorful layers, which adds to the enjoyment of eating it.
  • For an even creamier texture, consider whipping the Greek yogurt with a hand mixer for a couple of minutes before layering. This small adjustment makes a huge difference in mouthfeel.
  • Be mindful of the granola-to-yogurt ratio. Too much granola can overwhelm the parfait, while too little can make it feel too creamy. Aim for about 1/4 cup of granola per layer for the perfect balance.
  • If you’re making this for a gathering, consider preparing the yogurt and peaches ahead of time and layering them just before serving. This ensures the granola stays crunchy!

Variations & Serving Ideas

There are so many ways to get creative with your Peach Yogurt Parfait! For a tropical twist, swap out the peaches for mangoes or pineapples and top with coconut flakes. If you prefer a berry flavor, mix in some blueberries or strawberries with the peaches for added color and taste. For a nutty version, incorporate chopped walnuts or pecans instead of almonds.

As for serving ideas, this parfait pairs beautifully with a side of scrambled eggs for a hearty breakfast or fresh fruit salad for a light lunch. You might also enjoy it alongside whole grain toast with almond butter for an energizing snack. The contrast of flavors and textures will elevate your meal experience!

Storage, Make-Ahead & Reheating

The Peach Yogurt Parfait is best enjoyed fresh, but you can prepare some components ahead of time. Store the layered parfait in an airtight container in the refrigerator for up to 24 hours. However, be cautious; the granola may lose its crunch if stored too long. You can freeze the yogurt and peach mixture for up to 2 months; just remember to thaw it in the refrigerator overnight before serving.

If you plan to enjoy this dish the next day, it can taste even better as the flavors meld together. Just remember to add the granola right before serving to keep its delightful crunch!

Frequently Asked Questions

Can I make Peach Yogurt Parfait With Honey And Granola ahead of time?

Yes — in fact, it tastes even better the next day as the flavors meld. However, I recommend waiting to add the granola until just before serving to maintain its crunch.

What can I substitute for Greek yogurt?

If you prefer a lighter option, you can substitute Greek yogurt with regular yogurt or a dairy-free alternative like coconut yogurt. Just remember that this may alter the creaminess and flavor profile slightly.

Can I use frozen peaches for this parfait?

Absolutely! Just make sure to thaw the frozen peaches before using them. They will still add great flavor, though the texture may be slightly softer than fresh peaches.

How do I make the parfait vegan?

To make a vegan version, substitute the Greek yogurt with a plant-based yogurt alternative, and replace honey with maple syrup or agave nectar. This keeps the parfait sweet while adhering to a vegan diet.

What other fruits can I use in this recipe?

You can mix and match fruits based on your preference. Try using strawberries, blueberries, raspberries, or even bananas. Just make sure to adjust the lemon juice as needed to prevent browning.

Sweet Peach Yogurt Parfait Delight

Final Thoughts

The Peach Yogurt Parfait with Honey and Granola is a delightful blend of creamy yogurt, sweet peaches, and crunchy granola that creates a satisfying and nourishing treat. Each layer bursts with flavor, making it a perfect choice for breakfast or a light dessert.

This is the kind of recipe I come back to again and again, especially when I want something refreshing and wholesome to start my day. The harmony of sweet and tart flavors, combined with the delightful crunch, never fails to lift my spirits!

I encourage you to give this parfait a try and indulge in its comforting goodness. Feel free to share your results or even add your own twist—perhaps a sprinkle of cinnamon or a handful of nuts. Enjoy creating your perfect parfait!

Print
clock clock iconcutlery cutlery iconflag flag iconfolder folder iconinstagram instagram iconpinterest pinterest iconfacebook facebook iconprint print iconsquares squares iconheart heart iconheart solid heart solid icon

Peach Yogurt Parfait


  • Author: Lily author
  • Total Time: 15 minutes
  • Yield: 4 servings 1x
Pin Recipe
Print Recipe

Description

This Peach Yogurt Parfait combines creamy Greek yogurt, juicy peaches, and crunchy granola for a delightful treat. It’s a perfect breakfast or snack that captures the essence of summer in every bite.


Ingredients

Scale
  • For the Parfait:
  • 2 cups plain Greek yogurt (or vanilla yogurt for a sweeter option)
  • 2 large ripe peaches, diced (about 2 cups)
  • 1 tablespoon fresh lemon juice (to prevent browning of peaches)
  • 2 tablespoons honey (plus more for drizzling)
  • 1 teaspoon vanilla extract (optional for extra flavor)
  • For the Granola:
  • 1 cup granola (store-bought or homemade; see notes for a simple granola recipe)
  • 1/4 cup sliced almonds (optional for added crunch)
  • 1/4 cup shredded coconut (optional for added flavor)

Instructions

  1. Start by preparing the peaches. Wash them thoroughly, then slice and dice them into bite-sized pieces. In a medium bowl, toss the diced peaches with 1 tablespoon of fresh lemon juice to prevent browning. Set aside for about 5 minutes while the lemon juice works its magic.
  2. In a separate bowl, combine the Greek yogurt, 2 tablespoons of honey, and 1 teaspoon of vanilla extract if using. Stir the mixture until smooth and thoroughly blended. This should take about a minute. Avoid overmixing to maintain the creaminess of the yogurt.
  3. Now it’s time to layer your parfait. Grab a clear glass or bowl to showcase your beautiful creation. Start with a generous spoonful of the yogurt mixture at the bottom—about 1/4 cup will do. Use a spoon to spread it evenly.
  4. Add a layer of the diced peaches over the yogurt, ensuring they cover the yogurt completely. You might want to use about half of what you have prepared—roughly 1 cup. This layer should be visually appealing, so arrange the peaches neatly.
  5. Sprinkle 1/4 cup of granola over the peaches. This adds a delightful crunch. Make sure to distribute it evenly to ensure every bite has that satisfying texture. Avoid packing it down too tightly, as you want it to maintain its crunch.
  6. Repeat the layers: spoon in another 1/4 cup of yogurt, followed by another cup of peaches, and another sprinkle of granola. You should have at least two layers, but feel free to add more depending on your glass size.
  7. Finish off your parfait with a drizzle of honey on top for added sweetness and a touch of elegance. If you’re using sliced almonds or shredded coconut, sprinkle them on top now. It adds a lovely visual contrast and extra flavor.
  8. Serve immediately or refrigerate for up to 30 minutes before serving to allow the flavors to meld together. However, I recommend enjoying it fresh to maintain the granola’s crunch.
  • Prep Time: 15 mins
  • Cook Time: 0 mins
  • Category: Breakfast
  • Method: No-cook
  • Cuisine: American

Nutrition

  • Serving Size: 1 parfait
  • Calories: 250
  • Sugar: 20 g
  • Sodium: 50 mg
  • Fat: 5 g
  • Saturated Fat: 2 g
  • Unsaturated Fat: 3 g
  • Trans Fat: 0 g
  • Carbohydrates: 40 g
  • Fiber: 3 g
  • Protein: 10 g
  • Cholesterol: 10 mg

Keywords: Choose ripe peaches for the best flavor and texture. Use a clear glass for a beautiful presentation. For creaminess, consider whipping the yogurt before layering. Be mindful of the granola-to-yogurt ratio. Prepare yogurt and peaches ahead of time for gatherings, layering just before serving.

Did you make this recipe?

Share a photo and tag us — we can't wait to see what you've made!

Sun-Kissed Frozen Orange Cream Slush

As a child, summer days felt like they lasted forever. I remember the sticky heat wrapping around me as I played outside, my laughter mingling with the sounds of the neighborhood. But nothing could cool me down quite like the moment I’d spot my grandmother, laboring over her blender, whipping up her famous Frozen Orange Creamsicle Slush. That vibrant orange treat, with its frosty texture and sweet citrus aroma, was like a burst of sunshine in a cup. Just one sip, and I could feel the coolness wash over me, sparking pure joy.

This Frozen Orange Creamsicle Slush has a way of making you feel like a kid again. Its creamy, dreamy consistency is a delightful balance of bright orange and soft vanilla, inviting you to dive right in. The refreshing tang of orange dances on your tongue, while the smooth creaminess envelops you in a comforting embrace. It’s a nostalgic treat that’s perfect for hot summer afternoons or anytime you need a little pick-me-up.

What makes my version of this slush stand out is the addition of a hint of vanilla bean, which elevates the flavor and adds an extra layer of richness. Plus, it’s super easy to whip up with just a few simple ingredients that you probably already have on hand! So, if you’re ready to relive those sun-soaked memories, let me show you exactly how to make it.

Sun-Kissed Frozen Orange Cream Slush

Why You’ll Love This Recipe

  • Each slush is a perfect blend of creamy vanilla and zesty orange, creating a nostalgic flavor reminiscent of summer days.
  • This refreshing treat is ready in under 15 minutes, making it an ideal quick dessert for unexpected guests or hot afternoons.
  • With just 8 simple ingredients, it’s budget-friendly, ensuring you don’t have to break the bank to enjoy a delicious slush.
  • The slush has a perfectly smooth texture, thanks to the combination of ice and ice cream, providing a delightful contrast to the bright citrus flavors.
  • It’s highly customizable; you can easily adjust the sweetness and add fresh herbs for a unique twist that suits your taste.

Ingredients

  • 2 cups orange juice (freshly squeezed or store-bought)
  • 1 cup vanilla ice cream
  • 1 cup crushed ice
  • 1/2 cup milk (whole or 2%)
  • 1/4 cup granulated sugar (adjust based on sweetness preference)
  • 1 teaspoon vanilla extract
  • Zest of 1 orange (for added flavor)
  • Fresh orange slices and mint leaves (for garnish)

The star of this Frozen Orange Creamsicle Slush is the orange juice, which provides the vibrant, citrusy base. Freshly squeezed juice will yield the brightest flavor, but store-bought options can be just as convenient. If you’re opting for store-bought, choose 100% pure juice with no added sugars for the best results. Another essential ingredient is the vanilla ice cream; it adds creaminess and sweetness. You can substitute it with dairy-free ice cream if you’re looking for a vegan option. Whole or 2% milk complements the ice cream, creating a smooth blend. If you want a lower-calorie version, almond or oat milk can be good alternatives.

Lastly, the granulated sugar can be adjusted based on your sweetness preference. If you prefer a more natural sweetener, consider using honey or agave syrup. The orange zest enhances the flavor profile, providing an aromatic pop that brings the whole slush together. Don’t skip it! It adds an extra layer of brightness that makes this slush truly special.

Step-by-Step Instructions

  1. Start by preparing your ingredients. Gather 2 cups of orange juice, 1 cup of vanilla ice cream, and 1 cup of crushed ice. Make sure the ice is finely crushed, as larger chunks can make blending difficult.
  2. In a blender, combine the orange juice, vanilla ice cream, crushed ice, and 1/2 cup of milk. Add 1/4 cup of granulated sugar and 1 teaspoon of vanilla extract. If you like a sweeter slush, consider adding a bit more sugar at this stage.
  3. Add the zest of 1 orange to the blender. This step is crucial for enhancing the citrus flavor of your slush. Make sure not to include the bitter white pith—only the flavorful zest.
  4. Blend the mixture on medium-high speed for about 30-45 seconds. Stop once the ingredients are fully combined and the slush has a smooth, even consistency. If you notice large chunks of ice, blend for an additional 10-15 seconds. Avoid over-blending, as this can make the slush too liquidy.
  5. Once blended, taste the slush. If it needs more sweetness, add a little more sugar and blend for a few more seconds. If it’s too thick, you can add a splash of milk to reach your desired consistency.
  6. Pour the slush into glasses. This recipe typically serves 4, but you can easily double it for larger gatherings. Use a spoon to help guide the slush into the glasses if needed.
  7. Garnish each serving with fresh orange slices and mint leaves. The mint not only adds a pop of color but also a refreshing aroma that complements the citrus flavors beautifully.
  8. Serve immediately and enjoy! If you’ve made extra, you can refrigerate it for a short time, but it’s best enjoyed fresh.

Pro Tips for the Best Frozen Orange Creamsicle Slush

  • Don’t skip the orange zest! It’s a game-changer for flavor. Always zest before juicing to make it easier.
  • Use a high-powered blender for the best texture. A standard blender may struggle with ice, leading to uneven consistency. If you have a food processor, that can work too, but ensure the ice is finely crushed.
  • Adjust the ice-to-liquid ratio carefully. If your slush is too thick, it won’t blend well. Start with less ice and add more until you reach your preferred texture.
  • Be cautious with the sugar! Always start with the lower amount, as you can easily add more, but it’s hard to fix an overly sweet slush.
  • For a fun twist, consider adding a splash of coconut milk or a handful of fresh fruit like strawberries or pineapple. This not only enhances the flavor but also adds a beautiful color contrast.

Variations & Serving Ideas

There are countless ways to put a spin on your Frozen Orange Creamsicle Slush. Consider making a tropical version by adding in some pineapple juice or coconut milk for a delightful tropical twist. If you’re feeling adventurous, try incorporating a handful of frozen mango or peach slices for added sweetness. For a lighter version, swap out the vanilla ice cream for Greek yogurt for a creamy yet tangy alternative.

As for serving ideas, this refreshing slush pairs wonderfully with light summer dishes like grilled chicken skewers, fish tacos, or a simple salad topped with citrus vinaigrette. The bright, zesty flavors of the slush complement these dishes perfectly, making them an ideal pairing for a sunny day.

Storage, Make-Ahead & Reheating

This Frozen Orange Creamsicle Slush is best enjoyed fresh, but if you have leftovers, you can store them in an airtight container in the fridge for up to 2 days. Just keep in mind that the slush may lose some of its texture over time as the ice melts. It doesn’t freeze well, as the ice will turn into a solid block. If you must freeze it, blend again after thawing to restore the slushy consistency. This treat is best the day you make it, as the flavors meld together beautifully overnight, enhancing its deliciousness.

Frequently Asked Questions

Can I make Frozen Orange Creamsicle Slush ahead of time?

Yes — in fact, it tastes even better the next day as the flavors meld. However, it’s best to enjoy it fresh, as the texture can change if stored for too long. If you need to prepare it ahead, keep it in the fridge and re-blend before serving.

What kind of orange juice should I use?

For the best flavor, use freshly squeezed orange juice. However, if you’re short on time, opt for 100% pure store-bought juice without added sugars. This will ensure that your slush remains flavorful and refreshing.

Can I substitute the vanilla ice cream?

Absolutely! If you’re looking for a dairy-free option, coconut milk ice cream or a non-dairy vanilla ice cream can work wonderfully. They will still provide the creamy texture and sweetness you desire.

How can I adjust the sweetness of my slush?

You can easily adjust the sweetness by modifying the amount of sugar added. Start with 1/4 cup and taste the mixture before blending. If you prefer it sweeter, add more sugar gradually until it reaches your desired level.

What should I do if my slush is too thick?

If your slush is too thick, simply add a splash of milk or orange juice and blend again. This will help achieve a more drinkable consistency while maintaining the slushy texture. Adjust gradually to reach your preferred thickness.

Sun-Kissed Frozen Orange Cream Slush

Final Thoughts

The Frozen Orange Creamsicle Slush is a delightful blend of refreshing citrus and creamy goodness, making it a perfect treat for warm days or any time you crave a taste of nostalgia. The way the bright orange flavor dances with the creamy texture truly elevates this slush, transforming it into a satisfying escape from the everyday.

This is the kind of recipe I come back to again and again, especially when I’m looking to cool down or impress guests at a summer gathering. It’s simple to make and always brings smiles all around! I encourage you to try this recipe for yourself—don’t hesitate to share your results or even put your own spin on it. Happy slushing!

Print
clock clock iconcutlery cutlery iconflag flag iconfolder folder iconinstagram instagram iconpinterest pinterest iconfacebook facebook iconprint print iconsquares squares iconheart heart iconheart solid heart solid icon

Frozen Orange Creamsicle Slush


  • Author: Lily author
  • Total Time: 15 minutes
  • Yield: 4 servings 1x
Pin Recipe
Print Recipe

Description

This Frozen Orange Creamsicle Slush is a refreshing treat that combines creamy vanilla and zesty orange flavors. Perfect for hot summer days, it brings back nostalgic memories with every sip.


Ingredients

Scale
  • 2 cups orange juice (freshly squeezed or store-bought)
  • 1 cup vanilla ice cream
  • 1 cup crushed ice
  • 1/2 cup milk (whole or 2%)
  • 1/4 cup granulated sugar (adjust based on sweetness preference)
  • 1 teaspoon vanilla extract
  • Zest of 1 orange (for added flavor)
  • Fresh orange slices and mint leaves (for garnish)

Instructions

  1. Start by preparing your ingredients. Gather 2 cups of orange juice, 1 cup of vanilla ice cream, and 1 cup of crushed ice. Make sure the ice is finely crushed, as larger chunks can make blending difficult.
  2. In a blender, combine the orange juice, vanilla ice cream, crushed ice, and 1/2 cup of milk. Add 1/4 cup of granulated sugar and 1 teaspoon of vanilla extract. If you like a sweeter slush, consider adding a bit more sugar at this stage.
  3. Add the zest of 1 orange to the blender. This step is crucial for enhancing the citrus flavor of your slush. Make sure not to include the bitter white pith—only the flavorful zest.
  4. Blend the mixture on medium-high speed for about 30-45 seconds. Stop once the ingredients are fully combined and the slush has a smooth, even consistency. If you notice large chunks of ice, blend for an additional 10-15 seconds. Avoid over-blending, as this can make the slush too liquidy.
  5. Once blended, taste the slush. If it needs more sweetness, add a little more sugar and blend for a few more seconds. If it’s too thick, you can add a splash of milk to reach your desired consistency.
  6. Pour the slush into glasses. This recipe typically serves 4, but you can easily double it for larger gatherings. Use a spoon to help guide the slush into the glasses if needed.
  7. Garnish each serving with fresh orange slices and mint leaves. The mint not only adds a pop of color but also a refreshing aroma that complements the citrus flavors beautifully.
  8. Serve immediately and enjoy! If you’ve made extra, you can refrigerate it for a short time, but it's best enjoyed fresh.
  • Prep Time: 15 min
  • Cook Time: 0 min
  • Category: Dessert
  • Method: Blending
  • Cuisine: American

Nutrition

  • Serving Size: 1 serving
  • Calories: 200
  • Sugar: 30 g
  • Sodium: 50 mg
  • Fat: 5 g
  • Saturated Fat: 3 g
  • Unsaturated Fat: 2 g
  • Trans Fat: 0 g
  • Carbohydrates: 40 g
  • Fiber: 1 g
  • Protein: 2 g
  • Cholesterol: 20 mg

Keywords: Don't skip the orange zest! It's a game-changer for flavor. Always zest before juicing to make it easier.

Did you make this recipe?

Share a photo and tag us — we can't wait to see what you've made!

Zesty Lemon Poppy Seed Delight

One rainy afternoon, I found myself in my grandmother’s cozy kitchen, the kind that always smelled like warmth and love. She was whipping up her famous Lemon Poppy Seed Loaf, a recipe that had been passed down through generations. As the batter came together, the zesty aroma of fresh lemons filled the air, mingling perfectly with the nutty fragrance of poppy seeds. I can still picture her, apron-clad, as she expertly drizzled a vibrant citrus icing over the loaf, creating a glossy, sun-kissed finish that beckoned us to dive in. It was a moment that sparked my own passion for baking, and this recipe has become a cherished staple in my home ever since.

When you take a bite of this Lemon Poppy Seed Loaf, it’s like a burst of sunshine on your palate. The loaf is beautifully golden, with a tender crumb that melts in your mouth. Each slice is speckled with tiny poppy seeds, adding a delightful crunch that contrasts beautifully with the tangy sweetness of the lemon. And that citrus icing? It’s the finishing touch that elevates this loaf from ordinary to extraordinary, with its bright, zesty flavor dancing on your taste buds.

This recipe stands out because it embraces simplicity while delivering on flavor. I’ve added a hint of vanilla to the batter, enhancing the overall taste and making it even more indulgent. Trust me, once you make this Lemon Poppy Seed Loaf With Citrus Icing, it’ll become a go-to in your baking repertoire.

So, let me show you exactly how to make it!

Zesty Lemon Poppy Seed Delight

Why You’ll Love This Recipe

  • Moist and tender crumb that melts in your mouth, thanks to the perfect balance of butter and buttermilk.
  • Bright, zesty lemon flavor paired with crunchy poppy seeds, creating a delightful texture and taste experience.
  • Easy to whip up in just about an hour, perfect for last-minute gatherings or a cozy afternoon treat.
  • Budget-friendly with everyday ingredients, making it an accessible option for all home bakers.
  • The citrus icing adds a sweet tang that elevates the loaf, turning a simple recipe into a showstopper!

Ingredients

  • 1 ½ cups (190g) all-purpose flour
  • 1 teaspoon baking powder
  • ½ teaspoon baking soda
  • ½ teaspoon salt
  • 3 tablespoons poppy seeds
  • ½ cup (115g) unsalted butter, softened to room temperature
  • 1 cup (200g) granulated sugar
  • 2 large eggs
  • 1 teaspoon vanilla extract
  • 1 teaspoon lemon zest (from about 1 medium lemon)
  • ½ cup (120ml) buttermilk
  • 2 tablespoons fresh lemon juice

For the Citrus Icing:

  • 1 cup (120g) powdered sugar
  • 2 tablespoons fresh lemon juice
  • 1 tablespoon orange juice
  • 1 teaspoon lemon zest (for garnish, optional)

Let’s dive into the key ingredients that make this Lemon Poppy Seed Loaf so special. The all-purpose flour provides the structure and base for the loaf, while the baking powder and baking soda ensure it rises perfectly, giving the loaf a light texture. For a gluten-free variation, you could substitute the flour with a gluten-free all-purpose blend. Poppy seeds not only add a delightful crunch but also contribute to the unique flavor profile that pairs well with the citrus notes.

Unsalted butter is crucial for achieving the buttery richness that makes this loaf so moist. If you’re looking for a dairy-free option, coconut oil or a vegan butter can be used instead. The buttermilk is another essential component, providing acidity that activates the baking soda for a fluffy texture. If you don’t have buttermilk on hand, you can easily make a substitute by mixing ½ cup of milk with 1 tablespoon of vinegar or lemon juice and letting it sit for about 5 minutes.

Step-by-Step Instructions

  1. Preheat your oven to 350°F (175°C). Grease a 9×5-inch loaf pan or line it with parchment paper for easy removal later.
  2. In a medium mixing bowl, whisk together 1 ½ cups of all-purpose flour, 1 teaspoon of baking powder, ½ teaspoon of baking soda, ½ teaspoon of salt, and 3 tablespoons of poppy seeds. This helps to evenly distribute the baking agents and ensures a uniform rise.
  3. In a large mixing bowl, cream together ½ cup of softened unsalted butter and 1 cup of granulated sugar using an electric mixer on medium speed for about 3-4 minutes, until the mixture is light and fluffy. Make sure to scrape down the sides of the bowl occasionally.
  4. Add 2 large eggs, 1 teaspoon of vanilla extract, and 1 teaspoon of lemon zest to the creamed butter and sugar, mixing until fully combined. You want a smooth consistency, so ensure there are no lumps of butter.
  5. In a small bowl, combine ½ cup of buttermilk and 2 tablespoons of fresh lemon juice. Alternately add the dry ingredients and buttermilk mixture to the butter mixture, starting and ending with the dry ingredients. Mix just until combined; do not overmix, as this can lead to a dense loaf.
  6. Pour the batter into the prepared loaf pan. Smooth the top with a spatula, ensuring it’s even. Bake in the preheated oven for 50-60 minutes, or until a toothpick inserted in the center comes out clean. The edges should be lightly golden brown, and the center should feel just set.
  7. Once baked, remove the loaf from the oven and allow it to cool in the pan for about 10 minutes. Then, transfer it to a wire rack to cool completely. Resist the urge to slice too soon, as it will be crumbly if it’s still warm.
  8. While the loaf is cooling, prepare the citrus icing. In a medium bowl, whisk together 1 cup of powdered sugar, 2 tablespoons of fresh lemon juice, and 1 tablespoon of orange juice until smooth. If the icing is too thick, you can add a little more juice to reach your desired consistency.
  9. Once the loaf is completely cool, drizzle the citrus icing over the top. If you like, sprinkle with an additional teaspoon of lemon zest for an extra pop of flavor and color.

Pro Tips for the Best Lemon Poppy Seed Loaf With Citrus Icing

  • Be careful not to overmix your batter; this is a common mistake that can lead to a dense loaf. Mix just until the dry ingredients are incorporated for a light and fluffy texture.
  • Use room temperature ingredients, especially the butter and eggs. This helps to create a smoother batter and ensures even baking. Take your eggs out of the fridge about 30 minutes before you start.
  • For a more pronounced lemon flavor, consider adding a little lemon extract in addition to the zest and juice. Just a half teaspoon can elevate the citrus notes significantly.
  • When measuring your flour, spoon it into the measuring cup and level it off with a knife instead of scooping directly from the bag. This prevents packing and ensures you don’t end up with a dry loaf.
  • Invest in a good quality loaf pan; it makes a difference in heat distribution, which ensures even baking. If your pan is dark-coated, reduce the oven temperature by 25°F to prevent over-browning.

Variations & Serving Ideas

For a delightful twist, consider adding blueberries or raspberries to the batter for a fruity burst of flavor. You can also experiment with different citrus fruits—try lime or grapefruit zest and juice for a refreshing change. For a healthier option, substitute half of the all-purpose flour with whole wheat flour for added fiber without compromising too much on texture.

This Lemon Poppy Seed Loaf pairs beautifully with a light salad, such as a mixed greens salad with a vinaigrette, or a cup of tea for a cozy afternoon treat. It also complements a creamy cheese platter, as the acidity of the loaf balances rich cheeses perfectly. Lastly, a scoop of vanilla ice cream on the side creates a delightful contrast of temperatures and flavors!

Storage, Make-Ahead & Reheating

This Lemon Poppy Seed Loaf can be stored at room temperature for up to 3 days if wrapped tightly in plastic wrap. If you want to keep it longer, it freezes well for up to 3 months. To freeze, wrap the loaf tightly in plastic wrap and then in aluminum foil to prevent freezer burn.

When you’re ready to enjoy it again, simply thaw it in the fridge overnight. Reheat individual slices in the microwave for 15-20 seconds or in a toaster oven until warmed through. Interestingly, many people find that this loaf tastes even better the next day, as the flavors have time to meld!

Frequently Asked Questions

Can I make Lemon Poppy Seed Loaf With Citrus Icing ahead of time?

Yes — in fact, it tastes even better the next day! You can make the loaf a day in advance, allowing the flavors to develop. Just be sure to store it in an airtight container to maintain its moisture.

Can I substitute the poppy seeds?

Absolutely! If you don’t have poppy seeds on hand or prefer an alternative, you can use sesame seeds for a similar crunch or omit them entirely for a smooth loaf.

What can I use instead of buttermilk?

If you don’t have buttermilk, you can easily create a substitute by mixing ½ cup of milk (dairy or plant-based) with 1 tablespoon of vinegar or lemon juice. Let it sit for 5 minutes before using in the recipe.

How can I make this recipe gluten-free?

To make a gluten-free version of this Lemon Poppy Seed Loaf, substitute the all-purpose flour with a gluten-free all-purpose flour blend. Just ensure that the blend contains a binding agent like xanthan gum for the best results.

What is the best way to store leftover loaf?

Leftover Lemon Poppy Seed Loaf should be stored in an airtight container at room temperature for up to 3 days. For longer storage, wrap it tightly and freeze for up to 3 months. Thaw it before serving for the best texture.

Zesty Lemon Poppy Seed Delight

Final Thoughts

The Lemon Poppy Seed Loaf with Citrus Icing is truly a delightful treat that brings a burst of brightness to any occasion. The zesty lemon flavor combined with the subtle crunch of poppy seeds creates a satisfying balance, while the citrus icing adds a touch of sweetness that perfectly complements the loaf’s tanginess.

This is the kind of recipe I come back to again and again, especially when I want to brighten up a gloomy day or celebrate a small victory. The aroma that fills the kitchen as it bakes is absolutely heavenly! I encourage you to give this recipe a try; you might just find it becoming a beloved staple in your home. Don’t forget to share your results or even add your own unique twist—I can’t wait to see what you create!

Print
clock clock iconcutlery cutlery iconflag flag iconfolder folder iconinstagram instagram iconpinterest pinterest iconfacebook facebook iconprint print iconsquares squares iconheart heart iconheart solid heart solid icon

Lemon Poppy Seed Loaf


  • Author: Lily author
  • Total Time: 30 minute
  • Yield: 1 loaf 1x
Pin Recipe
Print Recipe

Description

This Lemon Poppy Seed Loaf is a delightful treat that combines zesty lemon flavor with crunchy poppy seeds. Topped with a citrus icing, it’s perfect for any occasion.


Ingredients

Scale
  • 1 ½ cups (190g) all-purpose flour
  • 1 teaspoon baking powder
  • ½ teaspoon baking soda
  • ½ teaspoon salt
  • 3 tablespoons poppy seeds
  • ½ cup (115g) unsalted butter, softened to room temperature
  • 1 cup (200g) granulated sugar
  • 2 large eggs
  • 1 teaspoon vanilla extract
  • 1 teaspoon lemon zest (from about 1 medium lemon)
  • ½ cup (120ml) buttermilk
  • 2 tablespoons fresh lemon juice
  • 1 cup (120g) powdered sugar
  • 2 tablespoons fresh lemon juice
  • 1 tablespoon orange juice
  • 1 teaspoon lemon zest (for garnish, optional)

Instructions

  1. Preheat your oven to 350°F (175°C). Grease a 9×5-inch loaf pan or line it with parchment paper for easy removal later.
  2. In a medium mixing bowl, whisk together 1 ½ cups of all-purpose flour, 1 teaspoon of baking powder, ½ teaspoon of baking soda, ½ teaspoon of salt, and 3 tablespoons of poppy seeds. This helps to evenly distribute the baking agents and ensures a uniform rise.
  3. In a large mixing bowl, cream together ½ cup of softened unsalted butter and 1 cup of granulated sugar using an electric mixer on medium speed for about 3-4 minutes, until the mixture is light and fluffy. Make sure to scrape down the sides of the bowl occasionally.
  4. Add 2 large eggs, 1 teaspoon of vanilla extract, and 1 teaspoon of lemon zest to the creamed butter and sugar, mixing until fully combined. You want a smooth consistency, so ensure there are no lumps of butter.
  5. In a small bowl, combine ½ cup of buttermilk and 2 tablespoons of fresh lemon juice. Alternately add the dry ingredients and buttermilk mixture to the butter mixture, starting and ending with the dry ingredients. Mix just until combined; do not overmix, as this can lead to a dense loaf.
  6. Pour the batter into the prepared loaf pan. Smooth the top with a spatula, ensuring it’s even. Bake in the preheated oven for 50-60 minutes, or until a toothpick inserted in the center comes out clean. The edges should be lightly golden brown, and the center should feel just set.
  7. Once baked, remove the loaf from the oven and allow it to cool in the pan for about 10 minutes. Then, transfer it to a wire rack to cool completely. Resist the urge to slice too soon, as it will be crumbly if it’s still warm.
  8. While the loaf is cooling, prepare the citrus icing. In a medium bowl, whisk together 1 cup of powdered sugar, 2 tablespoons of fresh lemon juice, and 1 tablespoon of orange juice until smooth. If the icing is too thick, you can add a little more juice to reach your desired consistency.
  9. Once the loaf is completely cool, drizzle the citrus icing over the top. If you like, sprinkle with an additional teaspoon of lemon zest for an extra pop of flavor and color.
  • Prep Time: 15 mins
  • Cook Time: 50-60 mins
  • Category: Dessert
  • Method: Baking
  • Cuisine: American

Nutrition

  • Serving Size: 1 slice
  • Calories: 200
  • Sugar: 15 g
  • Sodium: 150 mg
  • Fat: 8 g
  • Saturated Fat: 5 g
  • Unsaturated Fat: 3 g
  • Trans Fat: 0 g
  • Carbohydrates: 30 g
  • Fiber: 1 g
  • Protein: 3 g
  • Cholesterol: 40 mg

Keywords: Be careful not to overmix your batter; this is a common mistake that can lead to a dense loaf. Use room temperature ingredients for a smoother batter and even baking.

Did you make this recipe?

Share a photo and tag us — we can't wait to see what you've made!

  • Privacy Policy
  • Terms Of Service
  • Contact
  • About
  • GDPR

Copyright © 2025 Homesmad