Spinach And Artichoke Wonton Cups are about to become your new favorite party trick, and frankly, they’ve become one of mine too – a culinary marvel that combines irresistible flavor with effortless elegance! Have you ever wished your beloved creamy spinach and artichoke dip could be perfectly portioned, easy to grab, and wonderfully mess-free? Well, prepare to have your wishes granted, because I am so excited to share this recipe with you. These delightful little cups take all the craveable goodness of the classic dip and nestle it into a golden, crispy wonton shell, creating an appetizer that’s as beautiful to look at as it is absolutely delicious to devour.
While the traditional spinach and artichoke dip has been a beloved fixture at American gatherings for decades, often tracing its roots to hearty, comforting European influences adapted for modern entertaining, this particular rendition offers a fantastic fusion that I believe you’ll adore. It brilliantly marries that familiar savory warmth with the crisp, versatile charm of Asian-inspired wonton wrappers. It’s the kind of ingenious creation that consistently makes guests ask me for the recipe!
Why I Think Everyone Admires This Appetizer
I find that people absolutely adore these Spinach And Artichoke Wonton Cups for a multitude of reasons. Firstly, the harmonious blend of flavors – the rich, tangy artichokes, the earthy spinach, and the melty, gooey cheese – is simply irresistible. Then there’s the magical textural interplay: the satisfying crunch of the baked wonton cup giving way to the smooth, creamy filling is a pure delight. They are also incredibly convenient; there’s no need for communal dipping, just grab a perfect, self-contained bite. Ideal for entertaining, game nights, or even a sophisticated snack, these cups deliver big on taste with minimal fuss, ensuring you’ll effortlessly shine at any gathering.
Ingredients:
- For the Crispy Wonton Cups:
- 24-36 square wonton wrappers (depending on whether you layer them for extra crispness, I usually go for 24 single layers).
- Non-stick cooking spray or a light brushing of olive oil.
- For the Creamy Spinach and Artichoke Filling:
- 10 oz package frozen chopped spinach, thawed completely and very, very thoroughly squeezed dry. This step is absolutely critical to prevent a watery filling that could make your wonton cups soggy! I usually use a clean kitchen towel or several layers of paper towels to get out every last drop of moisture.
- 14 oz can artichoke hearts, packed in water (not oil), drained well and finely chopped. You can roughly chop them or go for a finer dice, depending on your preference for texture.
- 8 oz block cream cheese, softened at room temperature. This makes it so much easier to mix into a smooth, lump-free filling.
- ½ cup sour cream. This adds a lovely tang and extra creaminess to our “Spinach And Artichoke Wonton Cups.”
- ¼ cup mayonnaise. Just a touch for richness and binding, ensuring a silky-smooth texture.
- 2 cloves garlic, minced. Fresh garlic really makes a difference here, providing a wonderful aromatic foundation.
- ½ cup grated Parmesan cheese, plus extra for sprinkling on top. I love using freshly grated Parmesan for its superior flavor.
- 1 cup shredded mozzarella cheese, plus extra for sprinkling. Mozzarella gives us that classic gooey, melty texture.
- ¼ teaspoon salt, or to taste.
- ⅛ teaspoon black pepper, or to taste.
- A tiny pinch of red pepper flakes (optional, for a subtle kick).
- A dash of nutmeg (optional, but it truly enhances the spinach flavor).
- For Garnish (Optional):
- Fresh chopped parsley or chives.
Preparing the Spinach and Artichoke Filling
- First things first, and I cannot stress this enough: properly prepare your spinach! If you’re using frozen chopped spinach, it needs to be completely thawed. Once thawed, you must squeeze every single drop of excess water out of it. I usually place the thawed spinach in a clean kitchen towel or several layers of paper towels and twist and squeeze with all my might over the sink. A watery filling is the nemesis of crispy wonton cups, so take your time with this. Once dried, set it aside.
- Next, turn your attention to the artichoke hearts. Drain them very well from their can and give them a good, fine chop. You want them distributed throughout the filling, not in large chunks. Place the chopped artichokes in a medium-sized mixing bowl.
- Now, let’s build the creamy base for our “Spinach And Artichoke Wonton Cups.” In a large mixing bowl, combine the softened cream cheese, sour cream, and mayonnaise. Use a sturdy spatula or a hand mixer on low speed to beat these ingredients together until they are perfectly smooth and well combined, with no lumps of cream cheese remaining. This ensures a luxurious, even texture for your filling.
- Add the minced garlic to the creamy mixture. If you love garlic, feel free to add an extra clove; I certainly do sometimes! Stir it in until just combined, so its flavor infuses throughout the base.
- It’s cheese time! Incorporate the ½ cup of grated Parmesan cheese and 1 cup of shredded mozzarella cheese into the bowl. These cheeses are essential for the classic “Spinach And Artichoke Wonton Cups” flavor and melty goodness. Mix thoroughly, ensuring the cheeses are evenly distributed throughout the creamy base.
- Gently fold in your thoroughly dried spinach and chopped artichoke hearts. Mix until everything is just combined. You don’t want to overmix at this stage, just enough to ensure the vegetables are evenly distributed within the cheesy mixture.
- Season the filling with ¼ teaspoon of salt and ⅛ teaspoon of black pepper. This is your chance to really make the flavors pop! I always recommend tasting a tiny bit of the mixture (before adding eggs, if any, but none here!) and adjusting the seasoning to your liking. Sometimes I add a tiny pinch of red pepper flakes for a subtle warmth or a dash of nutmeg, which surprisingly enhances the flavor of spinach beautifully without making it taste like dessert. Make it yours!
- Cover the bowl with plastic wrap and refrigerate the filling for at least 30 minutes. This step allows the flavors to meld together wonderfully and helps the filling firm up slightly, making it much easier to spoon into the wonton wrappers later. Trust me, patience here pays off for perfectly structured “Spinach And Artichoke Wonton Cups.”
Assembling the Spinach And Artichoke Wonton Cups
- Preheat your oven to 375°F (190°C). While the oven heats, grab a 12-cup standard muffin tin. Lightly spray each muffin cup with non-stick cooking spray or brush with a little olive oil. This prevents sticking and helps the wonton cups achieve that lovely golden crispness.
- Now for the wonton wrappers. You have a couple of options here, depending on how sturdy and crispy you want your “Spinach And Artichoke Wonton Cups” to be. For a more delicate cup, you can use a single wonton wrapper per muffin slot. For a sturdier, extra-crispy cup that can hold more filling, you might opt to use two wrappers, placing them in an “X” shape in each muffin cup. I often go for the single layer for ease and because they crisp up beautifully. Carefully press each wonton wrapper into the prepared muffin cup, gently easing it down to form a cup shape. Try to make sure the bottom is flat so it sits nicely.
- Retrieve your chilled spinach and artichoke filling from the refrigerator. Give it a quick stir.
- Using a small spoon or a cookie scoop (about 1 tablespoon in size), carefully spoon a generous amount of the filling into each wonton cup. You want to fill them almost to the top, but be careful not to overfill them, as the cheese will bubble up a bit during baking. Each “Spinach And Artichoke Wonton Cup” should have a nice, rounded mound of delicious filling.
- Once all the wonton cups are filled, you can optionally sprinkle a tiny bit more shredded mozzarella or Parmesan cheese over the top of each cup. This adds an extra layer of cheesiness and makes for a beautiful golden-brown crust.
Baking the Wonton Cups
- Carefully place the muffin tin filled with your “Spinach And Artichoke Wonton Cups” into your preheated 375°F (190°C) oven.
- Bake for 12-18 minutes. The exact baking time can vary depending on your oven and how dark and crispy you like your wonton edges. Keep a close eye on them! You are looking for the wonton wrappers to turn a beautiful golden brown and become wonderfully crispy around the edges. The filling should be hot, bubbly, and the cheese on top (if you added extra) should be melted and lightly golden.
- Once baked to perfection, carefully remove the muffin tin from the oven.
- Allow the “Spinach And Artichoke Wonton Cups” to cool in the muffin tin for about 5 minutes. This cooling period is important because it allows the wontons to firm up and makes them much easier to remove without breaking. Plus, the filling will be scorching hot straight out of the oven, so a brief cool-down is practical.
- After 5 minutes, use a small offset spatula or a butter knife to gently loosen the edges of each wonton cup, then carefully lift them out of the muffin tin. Transfer them to a serving platter.
Serving Suggestions and Variations
- Immediate Enjoyment: These “Spinach And Artichoke Wonton Cups” are truly at their best when served warm, shortly after they come out of the oven. The wrappers will be perfectly crisp, and the filling will be wonderfully creamy and gooey. They make an absolutely fantastic appetizer for parties, game nights, or even just a cozy evening snack.
- Garnish for Flair: For an extra touch of freshness and visual appeal, consider sprinkling a little fresh chopped parsley or chives over the top of the “Spinach And Artichoke Wonton Cups” just before serving. A tiny grating of fresh Parmesan cheese over the top can also elevate their presentation and flavor.
- Dipping Delight: While these are incredibly flavorful on their own, some people enjoy dipping them! A small dollop of extra sour cream, a touch of marinara sauce, or even a spicy sriracha mayo can add a fun twist. My personal favorite is just a little extra squeeze of fresh lemon juice, which brightens all the flavors.
- Add Some Protein: If you’re looking to make these “Spinach And Artichoke Wonton Cups” a bit heartier, consider adding some cooked and finely diced chicken breast or crispy crumbled bacon to the spinach and artichoke filling. Just be sure to reduce the amount of other chunky ingredients slightly to accommodate the addition.
- Cheese Swaps: Feel free to experiment with different cheeses! A touch of provolone, Fontina, or even a smoked Gouda could add unique and delicious dimensions to the “Spinach And Artichoke Wonton Cups.” Just make sure they melt well.
- Spice it Up: For those who love a bit of heat, a pinch more red pepper flakes in the filling, or a tiny dash of cayenne pepper, can add a welcome zing.
- Make-Ahead Tips: The spinach and artichoke filling can be prepared up to 2 days in advance and stored in an airtight container in the refrigerator. This is a brilliant trick for entertaining, as it significantly cuts down on prep time on the day of your event. Just let it come to room temperature for about 15-20 minutes before filling the wonton cups to make it easier to scoop. You can also assemble the “Spinach And Artichoke Wonton Cups” up to a few hours in advance, keeping them covered lightly with plastic wrap in the refrigerator, then baking just before serving. The wontons might not be quite as crisp as freshly assembled ones, but they will still be delicious.
- Reheating Instructions: If you happen to have any leftover “Spinach And Artichoke Wonton Cups” (which is rare in my house!), they can be reheated. Place them on a baking sheet and warm them in a preheated oven at 300°F (150°C) for about 8-10 minutes, or until heated through and the wontons have re-crisped slightly. Avoid the microwave, as it will make the wontons soft and chewy rather than crispy.
- Batch Cooking: This recipe is easily scalable! If you’re feeding a crowd, simply double or triple the ingredients. You might need multiple muffin tins or to bake in batches. These “Spinach And Artichoke Wonton Cups” are always a hit, so don’t be shy about making a big batch!
Conclusion:
Well, my friends, we’ve reached the end of our culinary journey, and I genuinely hope you’re feeling as inspired as I am about this incredible recipe. If there’s one thing I want you to take away from this, it’s that these Spinach And Artichoke Wonton Cups are more than just a dish; they’re an experience. They represent the perfect marriage of convenience and gourmet flavor, a truly irresistible appetizer that consistently steals the show, no matter the occasion. I’ve made them countless times, and without fail, they vanish from the platter in record time, always eliciting oohs and aahs from anyone who tries them. The crispy wonton exterior, perfectly golden and delicate, gives way to a creamy, tangy, and utterly addictive filling of savory spinach and marinated artichoke hearts, all bound together with a generous helping of cheesy goodness. It’s a symphony of textures and tastes that’s surprisingly easy to achieve, making it a powerful contender for your new go-to party starter or even a delightful snack for a quiet evening at home.
What I particularly adore about this recipe is its sheer versatility. While these wonderful cups are absolutely perfect on their own, imagine elevating the experience even further! For a casual gathering, a simple marinara dipping sauce or a tangy ranch dressing can be a fantastic addition, offering an extra layer of flavor that complements the richness of the filling beautifully. If you’re feeling a bit more adventurous, a homemade roasted red pepper aioli or even a spicy sriracha mayo could introduce an exciting kick. Don’t limit these to just appetizers, either. I’ve often served them alongside a fresh, crisp green salad for a light lunch, or even as a surprisingly satisfying accompaniment to grilled chicken or fish, transforming them from a mere snack into a component of a well-rounded meal. For brunch, consider them a unique savory bite amidst a spread of sweeter offerings – they provide a wonderful counterpoint that guests will adore.
Get Creative with Your Wonton Cups!
And that’s not all – this recipe is also incredibly forgiving and open to your personal touches. Feel free to experiment with different cheeses; a blend of mozzarella and provolone could offer a milder, meltier finish, while some crumbled feta or goat cheese could introduce a delightful tang. For those who love a bit of heat, a pinch of red pepper flakes stirred into the filling adds a subtle warmth that really wakes up the palate. You could even swap out some of the spinach for finely chopped kale or Swiss chard for a slightly earthier flavor profile and an extra nutritional boost. If you’re looking to make them a bit heartier, a tablespoon or two of finely diced, pre-cooked chicken or crumbled sausage could be mixed into the filling, turning them into miniature savory pies. For anyone with dietary considerations, gluten-free wonton wrappers are readily available, and dairy-free cream cheese and parmesan alternatives can be used to create a similarly delicious version without compromising on flavor.
This truly is a recipe that gives back. The satisfaction you’ll feel from pulling these perfectly golden, bubbling Spinach And Artichoke Wonton Cups from the oven is immense, and the joy on the faces of those you share them with is even better. It’s about creating something delicious with your own hands, and then watching it bring smiles and satisfied sighs. So please, don’t hesitate! Gather your ingredients, set aside a little time, and dive into making these fantastic bites. I promise you won’t regret it. Once you’ve whipped up your own batch, I would absolutely love to hear about your experience. Did you add any unique twists? What did your friends and family think? Sharing your culinary adventures is what makes the cooking community so vibrant and inspiring, and I’m always thrilled to see how you make a recipe your own. Happy cooking, and I can’t wait to hear all about your delicious success!
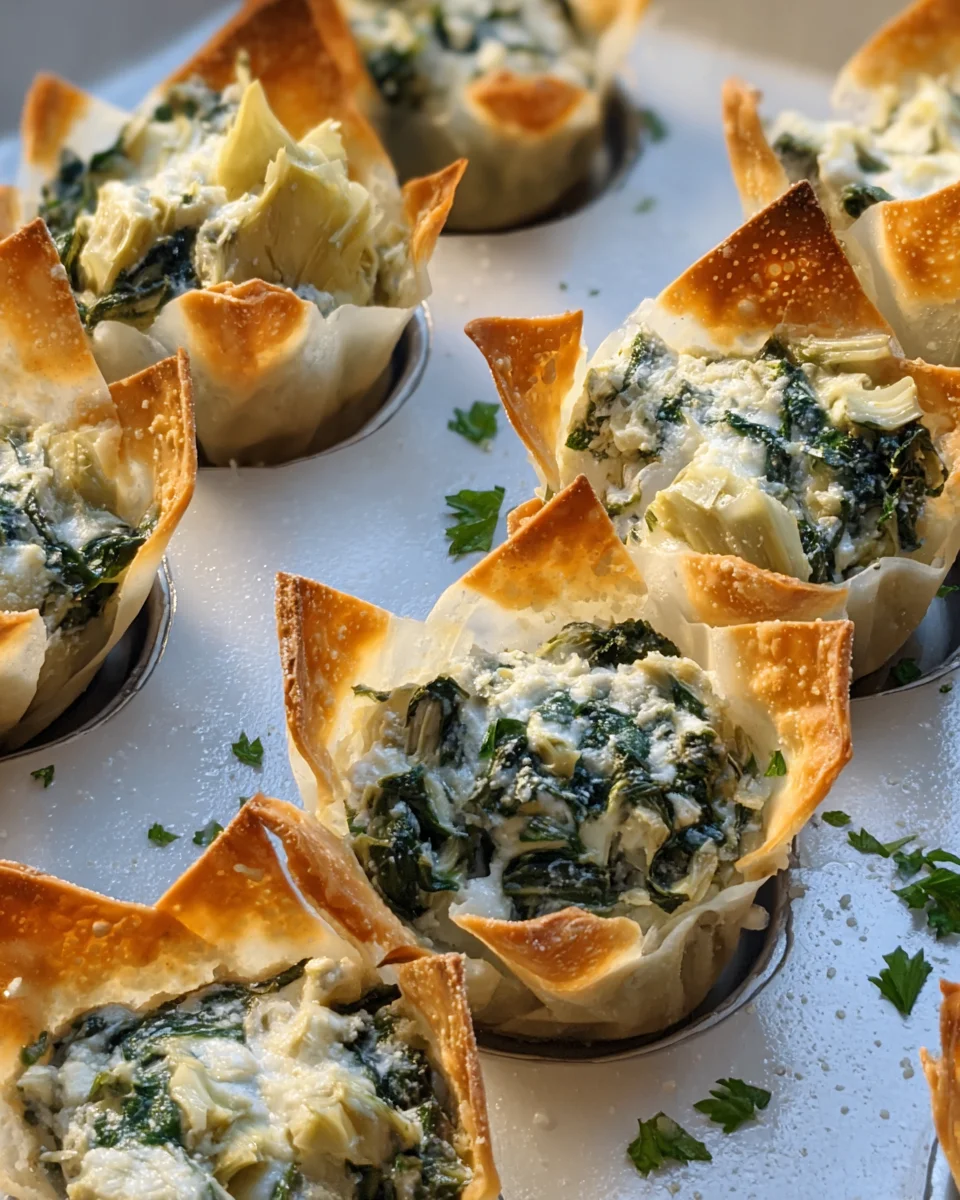
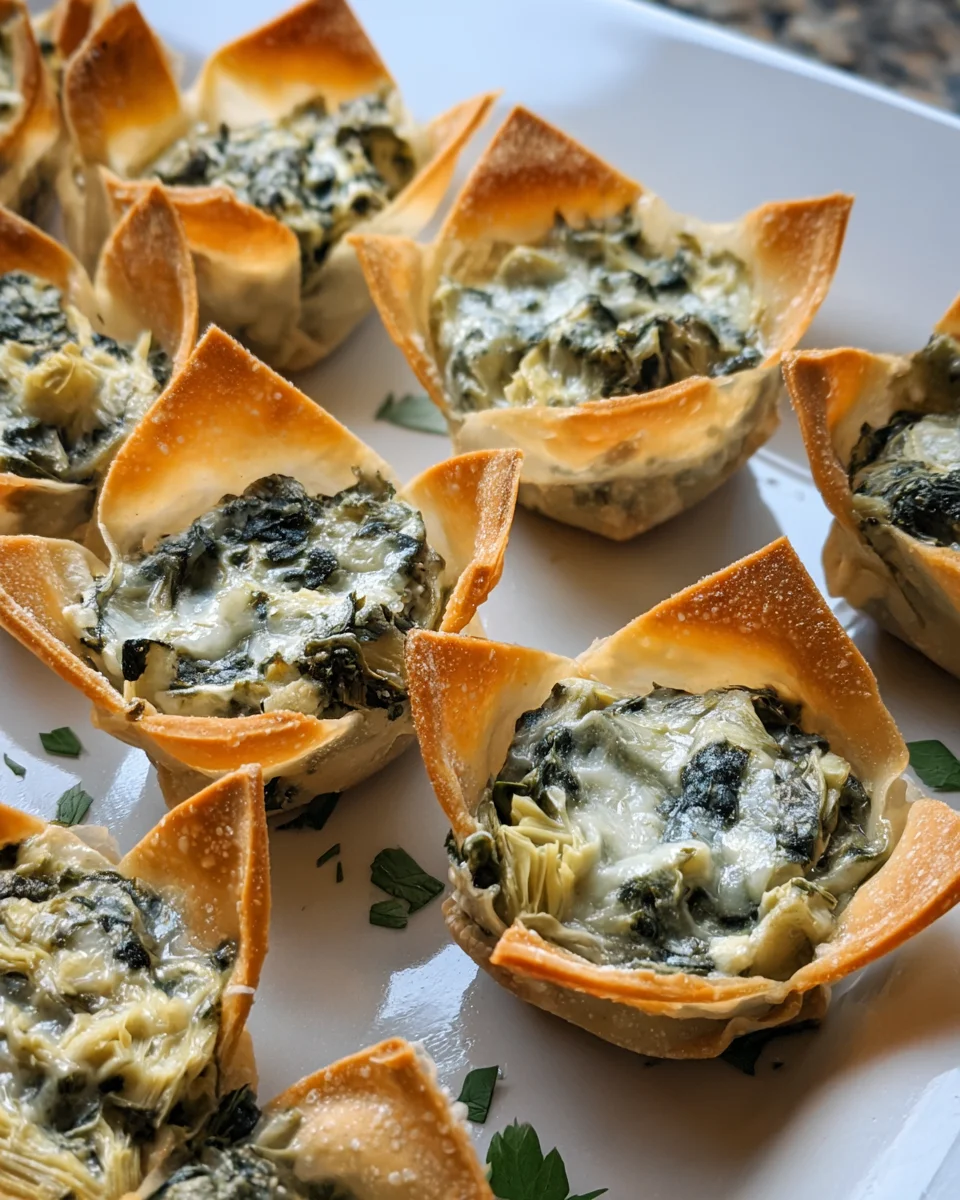
Spinach & Artichoke Wonton Cups
These delightful Wonton Cups take all the craveable goodness of classic spinach and artichoke dip and nestle it into a golden, crispy wonton shell, creating an appetizer that’s as beautiful to look at as it is absolutely delicious to devour. Perfectly portioned, easy to grab, and wonderfully mess-free, they’re ideal for any gathering.
Ingredients
Instructions
Important Information
Nutrition Facts (Per Serving)
It is important to consider this information as approximate and not to use it as definitive health advice.
Allergy Information
Please check ingredients for potential allergens and consult a health professional if in doubt.