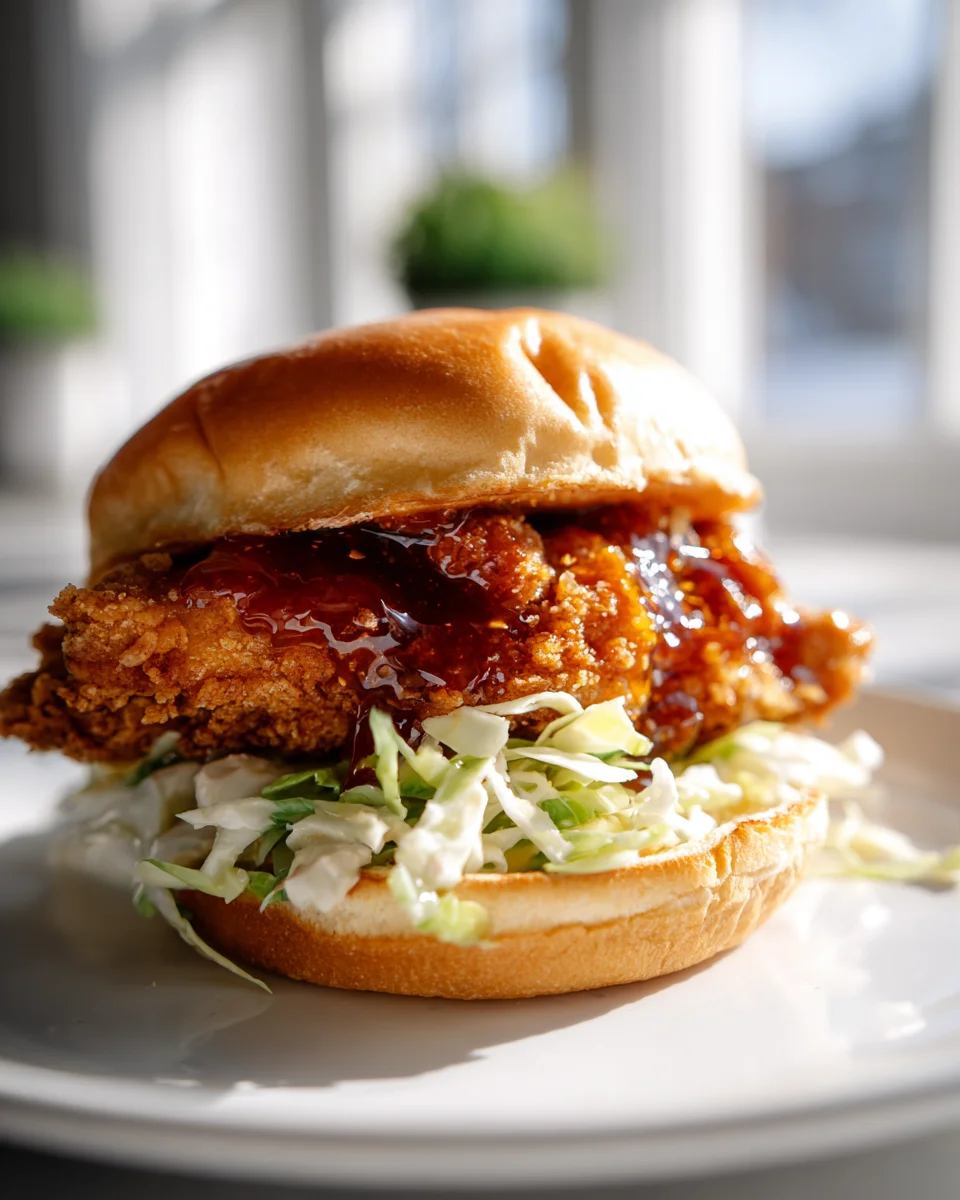
Crazy Good Hot Honey Chicken Sandwich Crispy And Juicy Recipe
Oh boy, have I got something special for you today! Get ready to dive headfirst into what I can only describe as a flavor explosion with the Crazy Good Hot Honey Chicken Sandwich Crispy And Juicy Recipe. If you’re anything like me, you’re constantly on the hunt for that perfect bite – something that hits all the right notes: crispy, juicy, sweet, spicy, and utterly satisfying. Well, my friends, consider your search officially over. This isn’t just a chicken sandwich; it’s an experience, a revelation, a masterpiece of textures and tastes that will make your taste buds sing!
What makes this recipe so unbelievably special? It’s all about the glorious contrast. We’re talking about a golden, crunchy exterior on our chicken that shatters with every bite, revealing an interior so tender and juicy you won’t believe it came out of your own kitchen. Then, we generously drench that beauty in a homemade hot honey sauce – a magical concoction that perfectly balances sweetness with a warming kick of heat, creating an addictive glaze that you’ll want to put on everything. Nestled between a soft, toasted bun and perhaps a few tangy pickles or a creamy slaw, it’s a symphony of flavors and sensations that transforms a simple sandwich into something truly extraordinary.
You are absolutely going to love this recipe because it takes a beloved comfort food and elevates it to gourmet status, right from the comfort of your home. Forget those drive-thru versions; this homemade beauty is in a league of its own. It’s perfect for a weekend treat, a special dinner, or whenever you just need a serious flavor boost. Prepare to be amazed by the incredible textures and the mouth-watering sweet and spicy kick that makes every single bite of this Crazy Good Hot Honey Chicken Sandwich unforgettable. Let’s get cooking!

Ingredient Notes
Oh, prepare yourselves! This “Crazy Good Hot Honey Chicken Sandwich” isn’t just a catchy name; it’s a promise. Every single ingredient here plays a crucial role in delivering that irresistible crispy, juicy, spicy, and sweet symphony. Let’s dive into what you’ll need to create this masterpiece, along with some handy substitutions I’ve picked up along the way.
For the Crispy, Juicy Chicken:
- Boneless, Skinless Chicken Thighs: For me, thighs are the secret weapon for ultimate juiciness. They stay incredibly moist even when fried to golden perfection. If you prefer, boneless, skinless chicken breasts can work, but I highly recommend pounding them to an even thickness (about ¾-inch) to ensure even cooking and prevent dryness.
- Buttermilk: This is non-negotiable for tenderizing the chicken and helping the breading adhere beautifully. The acidity works wonders! If you don’t have buttermilk, don’t fret! You can easily make your own by adding 1 tablespoon of white vinegar or lemon juice to a measuring cup, then filling it with regular milk (dairy or non-dairy) until it reaches 1 cup. Let it sit for 5-10 minutes until it slightly curdles.
- All-Purpose Flour & Cornstarch: This dynamic duo forms the backbone of our crispy coating. The cornstarch is key for that extra-crisp texture that holds up so well. For a gluten-free option, a good quality gluten-free all-purpose flour blend (one that includes rice flour or potato starch) works surprisingly well here.
- Spices: My go-to blend includes paprika, garlic powder, onion powder, cayenne pepper (for a little extra kick in the breading!), salt, and black pepper. Feel free to adjust the cayenne to your spice preference, or add a pinch of smoked paprika for depth.
- Frying Oil: A neutral-flavored oil with a high smoke point is essential. I typically use peanut oil or vegetable oil for deep frying. You’ll need enough to submerge the chicken pieces, usually around 6-8 cups depending on your pot.
For the Irresistible Hot Honey:
- Honey: Any good quality honey will do! I usually go for a local wildflower honey, but clover or even a more robust buckwheat honey can be fun to experiment with.
- Hot Sauce: This is where the “hot” in hot honey comes in! A cayenne-pepper-based hot sauce like Frank’s RedHot or Texas Pete is classic, offering a great balance of heat and tang. Feel free to use your favorite or even a spicier one if you dare!
- Apple Cider Vinegar: A splash of apple cider vinegar brightens up the hot honey, cutting through the sweetness and heat with a lovely tang. White vinegar can be used in a pinch.
- Butter: A small knob of unsalted butter melted into the hot honey gives it a beautiful sheen and helps emulsify it, making it wonderfully smooth.
For the Perfect Sandwich Assembly:
- Brioche Buns: These are my absolute favorite for this sandwich! Their rich, slightly sweet, and buttery nature stands up perfectly to the bold flavors of the chicken and hot honey. Toasting them is a must! Potato rolls are also an excellent alternative.
- Dill Pickle Slices: The tangy, briny crunch of dill pickles is absolutely essential for balancing the richness and sweetness of the sandwich. Don’t skip these! Bread and butter pickles offer a sweeter counterpoint if you prefer.
- Optional Creamy Slaw or Sauce: While not strictly necessary, a simple coleslaw or a creamy mayonnaise-based sauce (like a spicy mayo or a ranch dressing) can add another layer of texture and flavor, cooling the heat just a touch.
Step-by-Step Instructions
Alright, let’s get down to business! Follow these steps, and you’ll be sinking your teeth into the crazy good hot honey chicken sandwich of your dreams in no time. I promise, it’s worth every single step!
Step 1: Prep the Chicken (The Juiciness Secret!)
- First things first, pat your boneless, skinless chicken thighs (or breasts, pounded thin) really dry with paper towels. This helps the buttermilk cling better.
- Place the chicken in a large bowl or a zip-top bag. Pour in enough buttermilk to completely submerge the chicken. For optimal tenderness and flavor, let it marinate in the refrigerator for at least 30 minutes, or ideally, for 2-4 hours. If you can, an overnight soak really makes a difference for juiciness!
Step 2: Get Your Breading Ready
- In a large, shallow dish or pie plate, whisk together the all-purpose flour, cornstarch, paprika, garlic powder, onion powder, cayenne pepper, salt, and black pepper until well combined. This is your crispy coating mix.
- Set up your dredging station: You’ll have the bowl of marinated chicken, then the flour mixture, and finally a wire rack set over a baking sheet (this is where the coated chicken will rest).
Step 3: Breading and Resting
- Working with one piece of chicken at a time, remove it from the buttermilk, letting any excess drip off.
- Dredge the chicken thoroughly in the flour mixture, pressing firmly to ensure the flour adheres to every nook and cranny. You want a really good coating here for maximum crispiness!
- Place the coated chicken on the wire rack. Repeat with the remaining chicken pieces.
- Crucial Step: Let the breaded chicken rest on the wire rack at room temperature for at least 15-20 minutes. This allows the breading to hydrate and adhere firmly to the chicken, preventing it from falling off during frying. This is a game-changer for crispiness!
Step 4: Fry that Chicken to Crispy Perfection!
- Pour your frying oil into a large, heavy-bottomed pot or Dutch oven, filling it about 3-4 inches deep. Attach a deep-fry thermometer to the side of the pot.
- Heat the oil over medium-high heat until it reaches a consistent temperature of 350-375°F (175-190°C). Maintaining this temperature is key for crispy, non-greasy chicken.
- Carefully lower 1-2 pieces of breaded chicken into the hot oil (don’t overcrowd the pot, or the oil temperature will drop too much).
- Fry for about 6-8 minutes, flipping halfway through, until the chicken is a beautiful golden brown and cooked through. The internal temperature should reach 165°F (74°C). Use a meat thermometer to check!
- Once cooked, remove the chicken from the oil and place it back on the wire rack set over a baking sheet to drain excess oil. Sprinkle lightly with a pinch of salt while it’s hot. Repeat with the remaining chicken.
Step 5: Whip Up the Hot Honey
- While the chicken is frying or resting, make your hot honey. In a small saucepan, combine the honey, hot sauce, apple cider vinegar, and butter.
- Heat over low to medium-low heat, stirring occasionally, until the butter is melted and the mixture is warm and well combined. Taste and adjust the hot sauce if you want more heat! Keep warm.
Step 6: Assemble Your Crazy Good Sandwich!
- Slice your brioche buns in half. I like to lightly butter them and toast them in a skillet or under the broiler until golden brown. A toasted bun adds so much!
- On the bottom half of each toasted bun, you can add a layer of your optional creamy slaw or a drizzle of spicy mayo if you’re using it.
- Place a hot, crispy fried chicken thigh on top.
- Generously drizzle the hot honey over the chicken. Don’t be shy!
- Top with plenty of dill pickle slices.
- Place the top bun on, press lightly, and serve immediately. Get ready for a flavor explosion!
Tips & Suggestions
Making a truly epic hot honey chicken sandwich is an art form, and I’ve learned a few tricks that make all the difference. Here are my top tips to ensure your sandwich is nothing short of “Crazy Good” every single time!
- Don’t Rush the Rest: I cannot stress this enough – letting the breaded chicken rest for 15-20 minutes before frying is paramount. This allows the moisture from the chicken to absorb into the flour, creating a “glue” that prevents the breading from separating in the hot oil, ensuring maximum crispiness.
- Maintain Oil Temperature: Use a thermometer! Oil that’s too cool will result in greasy chicken, while oil that’s too hot will burn the coating before the chicken is cooked through. Aim for 350-375°F (175-190°C) and adjust your heat as needed. Don’t overcrowd the pot; fry in batches to keep the temperature stable.
- Brining for Ultimate Juiciness: While the buttermilk soak is fantastic, if you have extra time, a quick saltwater brine (1/4 cup salt per 4 cups water) for an hour before the buttermilk soak will take your chicken’s juiciness to the next level! Just be sure to pat it very dry after brining.
- Double Dredge for Extra Crunch: For an even thicker, craggier, and extra-crispy crust, you can double dredge. After the first coating of flour, dip the chicken back into a little leftover buttermilk, then dredge again in the flour mixture. This builds up a serious crunch!
- Customize Your Hot Honey: This is your chance to shine! Want it hotter? Add more hot sauce or a pinch of cayenne pepper directly into the honey mixture. Prefer it sweeter? Reduce the hot sauce slightly. A little smoked paprika or garlic powder can also add a nice depth to the hot honey.
- Toasted Buns are Non-Negotiable: Seriously, toast your buns! Whether it’s in a dry skillet, under the broiler, or on a grill, a nicely toasted bun adds texture, prevents sogginess, and provides a much better foundation for your sandwich.
- The Power of Pickles: Don’t underestimate the role of the pickles. Their acidity and crunch cut through the richness and sweetness of the chicken and hot honey, creating a perfectly balanced bite.
- Serve Immediately: For peak crispiness, this sandwich is best enjoyed right after assembly. The hot honey and steam from the chicken can soften the crust over time.
- Air Fryer/Oven Option: If deep frying isn’t for you, an air fryer or oven can still yield good results, though the crispiness might be slightly different. For air frying, preheat to 375°F (190°C), lightly spray the breaded chicken with oil, and cook for 15-20 minutes, flipping halfway, until golden and cooked through. For oven baking, preheat to 400°F (200°C), place chicken on a wire rack over a baking sheet, spray with oil, and bake for 20-30 minutes, flipping halfway.
Storage
While this “Crazy Good Hot Honey Chicken Sandwich” is truly at its best when enjoyed immediately, I know sometimes life happens, or you just want to prep ahead! Here’s how I handle storage to maintain as much of that deliciousness as possible.
For Cooked Chicken:
- Separation is Key: The most important rule for leftovers is to store the fried chicken separately from the buns, hot honey, and any fresh toppings like pickles or slaw. This prevents the chicken from getting soggy.
- In the Fridge: Allow the fried chicken to cool completely to room temperature (this prevents condensation, which can make it soggy). Store the cooled chicken in an airtight container in the refrigerator for up to 3-4 days.
For Hot Honey:
- Room Temperature or Fridge: Your homemade hot honey can be stored in an airtight jar or container at room temperature for up to 2 weeks, or in the refrigerator for up to 1 month. If it solidifies slightly in the fridge, a quick warm-up in the microwave or a small saucepan will bring it back to its liquid state.
Reheating Fried Chicken:
- Best Method (Crispiness): To bring back that glorious crispiness, the oven or an air fryer are your best friends.
- Oven: Preheat your oven to 375°F (190°C). Place the chicken on a wire rack set over a baking sheet. Heat for 10-15 minutes, or until heated through and crispy.
- Air Fryer: Preheat your air fryer to 350°F (175°C). Cook the chicken for 5-8 minutes, flipping halfway, until it’s hot and crispy again.
- Microwave (Not Recommended for Crispiness): While you can microwave the chicken to heat it through, I really don’t recommend it if you want to maintain any semblance of crispiness. It will heat it, but it will inevitably make it soft and chewy.
Assembling Leftovers:
Once your chicken is reheated to crispy perfection, then you can assemble your sandwich fresh with a toasted bun, fresh pickles, and a generous drizzle of the warm hot honey. It’s almost as good as the first time, I promise!
Final Thoughts
Well, there you have it! We’ve journeyed through the steps, and now it’s time to reflect on the truly delicious outcome. I truly believe that the Crazy Good Hot Honey Chicken Sandwich Crispy And Juicy Recipe isn’t just another meal; it’s an experience waiting to happen right in your kitchen. From the incredibly satisfying crunch of that perfectly breaded chicken to the tender, juicy meat within, and then that glorious, sweet-and-spicy hot honey drizzle – every single element plays its part in creating something truly special and unforgettable.
This isn’t just a sandwich; it’s a testament to how incredible a few well-chosen ingredients, prepared with a little love and attention, can be. It’s absolutely perfect for a weekend treat, a casual gathering, or just when you need a little culinary pick-me-up that hits all the right notes. Trust me, once you sink your teeth into the Crazy Good Hot Honey Chicken Sandwich Crispy And Juicy Recipe, you’ll understand exactly why I’m so excited about it. Go ahead, give it a try – your taste buds will most definitely thank you!

Crazy Good Hot Honey Chicken Sandwich – Crispy & Juicy!
- Total Time: 1 hour
- Yield: 4 servings
Description
Dive into a flavor explosion with this Crazy Good Hot Honey Chicken Sandwich, featuring a crispy, juicy chicken thigh drizzled with homemade hot honey. Perfect for a weekend treat or a special dinner, this sandwich will elevate your comfort food experience!
Ingredients
- Boneless, Skinless Chicken Thighs
- Buttermilk
- All-Purpose Flour
- Cornstarch
- Paprika
- Garlic Powder
- Onion Powder
- Cayenne Pepper
- Salt
- Black Pepper
- Frying Oil (Peanut Oil or Vegetable Oil)
- Honey
- Hot Sauce (Cayenne-Pepper-Based)
- Apple Cider Vinegar
- Butter (Unsalted)
- Brioche Buns
- Dill Pickle Slices
- Optional Creamy Slaw or Sauce (like spicy mayo or ranch dressing)
Instructions
- Pat the boneless, skinless chicken thighs dry with paper towels.
- Place the chicken in a large bowl or zip-top bag and pour in enough buttermilk to completely submerge the chicken. Marinate in the refrigerator for at least 30 minutes, ideally 2-4 hours.
- In a large, shallow dish, whisk together the all-purpose flour, cornstarch, paprika, garlic powder, onion powder, cayenne pepper, salt, and black pepper until well combined.
- Set up your dredging station with the marinated chicken, flour mixture, and a wire rack over a baking sheet.
- Remove one piece of chicken from the buttermilk, letting excess drip off, and dredge it in the flour mixture, pressing firmly to adhere. Place on the wire rack and repeat with remaining chicken.
- Let the breaded chicken rest on the wire rack at room temperature for at least 15-20 minutes.
- Pour frying oil into a large pot or Dutch oven, filling it about 3-4 inches deep, and heat over medium-high until it reaches 350-375°F (175-190°C).
- Carefully lower 1-2 pieces of breaded chicken into the hot oil and fry for about 6-8 minutes, flipping halfway through, until golden brown and cooked through (internal temperature should reach 165°F or 74°C).
- Remove the chicken from the oil and place it back on the wire rack to drain excess oil, sprinkling lightly with salt while hot. Repeat with remaining chicken.
- In a small saucepan, combine honey, hot sauce, apple cider vinegar, and butter. Heat over low to medium-low heat until the butter is melted and the mixture is warm and well combined.
- Slice brioche buns in half and lightly butter them. Toast in a skillet or under the broiler until golden brown.
- On the bottom half of each toasted bun, add optional creamy slaw or spicy mayo if using.
- Place a hot, crispy fried chicken thigh on top, drizzle generously with hot honey, and top with dill pickle slices.
- Place the top bun on, press lightly, and serve immediately.
- Prep Time: 30 mins
- Cook Time: 30 mins
- Category: Dinner
- Method: Frying
- Cuisine: American
Nutrition
- Serving Size: 1 sandwich
- Calories: 600
- Sugar: 20 g
- Sodium: 800 mg
- Fat: 30 g
- Saturated Fat: 10 g
- Unsaturated Fat: 15 g
- Trans Fat: 0 g
- Carbohydrates: 50 g
- Fiber: 2 g
- Protein: 30 g
- Cholesterol: 100 mg
Keywords: Letting the breaded chicken rest for 15-20 minutes before frying is crucial for maximum crispiness. Maintain oil temperature between 350-375°F for best results.