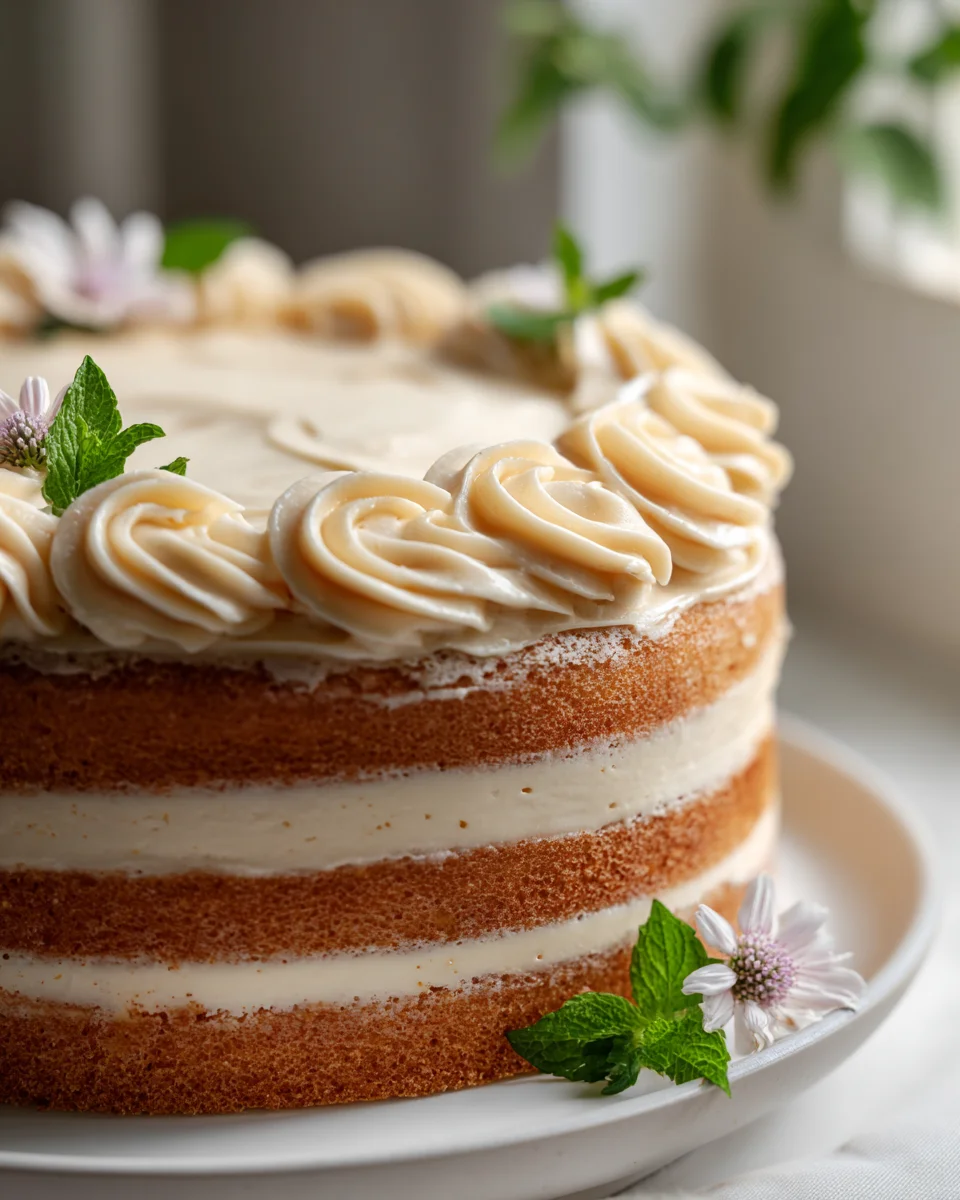
Vanilla Bean Birthday Cake With Buttercream Frosting
Oh, friends, if there’s one recipe I absolutely adore, it’s this one! There’s just something magical about a classic birthday cake, and this Vanilla Bean Birthday Cake With Buttercream Frosting takes that magic to a whole new level. Forget those plain vanilla cakes; we’re talking about a cake infused with real vanilla bean – you’ll see those gorgeous little flecks and taste the deep, aromatic warmth in every single bite. It’s not just a cake; it’s a celebration in itself, a nostalgic trip back to the best childhood parties, but with an elevated, sophisticated touch that adults will equally swoon over.
I promise you, this is the recipe you’ll want to bookmark for every special occasion. Why will you love it? Because it delivers on everything you dream of in a perfect birthday cake: a supremely moist, tender crumb that practically melts in your mouth, paired with the silkiest, richest, most cloud-like buttercream frosting you could imagine. This isn’t just any frosting; it’s the kind that makes you want to lick the spoon (and maybe the bowl!). The combination of the fragrant vanilla bean cake and the luscious buttercream is simply irresistible, a match made in dessert heaven.
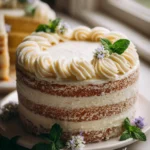
So, what exactly are we creating here? Imagine beautiful, golden layers of vanilla bean-speckled cake, tall and proud, generously filled and frosted with a magnificent, creamy buttercream. It’s truly the quintessential celebratory dessert, a showstopper that will bring smiles to everyone’s faces and make any birthday feel extra special. Get ready to bake a masterpiece that tastes as incredible as it looks!

Ingredient Notes
Creating a truly special vanilla bean birthday cake starts with the right ingredients, especially when we’re aiming for that irresistible, intense vanilla flavor. Here’s a breakdown of what you’ll need and some helpful substitutions:
- Vanilla Beans: This is the star of our show! I highly recommend using good quality, plump vanilla beans for both the cake and the buttercream. Madagascar Bourbon or Tahitian vanilla beans are excellent choices, offering distinct, rich aromas. To use them, simply split the bean lengthwise with a sharp knife and scrape out the tiny, fragrant seeds. The difference in flavor compared to extract is truly remarkable. If you absolutely can’t get your hands on vanilla beans, a high-quality vanilla bean paste (which often contains specks of vanilla bean) or pure vanilla extract can be substituted, but the depth of flavor won’t be quite the same. Use 1 tablespoon of paste or extract per bean specified.
- Unsalted Butter: For both the cake and the buttercream, ensure your butter is at room temperature. This is crucial for creaming it effectively with sugar, incorporating air for a light cake, and achieving a smooth, lump-free frosting. Unsalted butter allows us to control the salt content in the recipe.
- Cake Flour: For a tender, soft, and delicate crumb – characteristic of a perfect birthday cake – cake flour is my go-to. It has a lower protein content than all-purpose flour. If you don’t have cake flour, you can make a passable substitute by measuring out 1 cup of all-purpose flour, removing 2 tablespoons, and then replacing those 2 tablespoons with cornstarch. Sift this mixture several times to combine thoroughly.
- Granulated Sugar: Standard white sugar is perfect for sweetening our cake and helping achieve that lovely golden crust.
- Large Eggs: Like butter, eggs should be at room temperature. This helps them emulsify better with the other ingredients, leading to a more homogenous batter and a lighter cake.
- Buttermilk: Buttermilk contributes to the cake’s tender texture and moist crumb, and its slight acidity activates the baking soda for a good rise. If you don’t have buttermilk, you can easily make your own by adding 1 tablespoon of fresh lemon juice or white vinegar to a liquid measuring cup, then filling the rest of the way to 1 cup with whole milk. Let it sit for 5-10 minutes until it slightly curdles.
- Baking Powder & Baking Soda: These leavening agents work in harmony to give our cake its beautiful lift. Make sure yours aren’t expired for the best results.
- Powdered Sugar (Confectioners’ Sugar): Absolutely essential for the buttercream! Always sift your powdered sugar before adding it to the butter to prevent any lumps, ensuring a silky smooth frosting.
- Heavy Cream or Whole Milk: A splash of either of these helps achieve the perfect consistency for your buttercream, making it smooth and spreadable.
Step-by-Step Instructions
For the Vanilla Bean Birthday Cake:
- Prepare Your Pans: Preheat your oven to 350°F (175°C). Grease and flour three 8-inch round cake pans. For extra insurance against sticking, I always line the bottoms with parchment paper.
- Vanilla Bean Prep: Carefully split your vanilla beans lengthwise and scrape out all those beautiful tiny seeds. Set them aside.
- Combine Dry Ingredients: In a large bowl, whisk together the cake flour, granulated sugar, baking powder, baking soda, and salt. Make sure there are no lumps and everything is well combined.
- Cream Butter & Sugar: In the bowl of a stand mixer fitted with the paddle attachment (or using a hand mixer), beat the room temperature unsalted butter until light and fluffy, about 2 minutes. Gradually add the granulated sugar, continuing to beat on medium-high speed for another 3-5 minutes, until the mixture is very pale and fluffy. This step incorporates a lot of air, crucial for a light cake.
- Add Eggs & Vanilla: Reduce the mixer speed to medium-low and add the eggs one at a time, beating well after each addition until just combined. Scrape down the sides of the bowl as needed. Stir in the scraped vanilla bean seeds until evenly distributed.
- Alternate Dry & Wet: With the mixer on low speed, gradually add the dry ingredients to the wet ingredients in three additions, alternating with two additions of buttermilk, beginning and ending with the dry ingredients. Mix until just combined after each addition. Be careful not to overmix; overmixing can lead to a tough cake. A few streaks of flour are fine, they will disappear during baking.
- Bake: Divide the batter evenly among the prepared cake pans. Bake for 25-30 minutes, or until a wooden skewer inserted into the center of the cakes comes out clean.
- Cool: Let the cakes cool in their pans on a wire rack for 10-15 minutes before inverting them onto the rack to cool completely. Cooling completely before frosting is essential to prevent your buttercream from melting!
For the Buttercream Frosting:
- Cream Butter: In the clean bowl of your stand mixer with the paddle attachment, beat the room temperature unsalted butter on medium-high speed for 5-7 minutes, until it’s very light, pale, and fluffy. This step is key for a light and airy buttercream.
- Add Powdered Sugar: Reduce the mixer speed to low. Gradually add the sifted powdered sugar, about 1 cup at a time, mixing until fully incorporated before adding more. Once all the sugar is in, increase the speed to medium-high and beat for another 3-5 minutes.
- Add Vanilla & Liquid: Scrape the seeds from another vanilla bean (or add vanilla bean paste/extract). Add the vanilla seeds and 2 tablespoons of heavy cream or whole milk. Beat on medium-high speed until the frosting is incredibly light, fluffy, and smooth. If the frosting seems too thick, add more cream/milk, 1 teaspoon at a time, until you reach your desired consistency. If it’s too thin, add more sifted powdered sugar, 1 tablespoon at a time.
To Assemble the Cake:
- Level Cakes: Once the cakes are completely cool, use a serrated knife or a cake leveler to level any domed tops, creating flat surfaces for easy stacking.
- First Layer: Place one cake layer on your serving plate or cake stand. Spread about 1/2 to 3/4 cup of buttercream evenly over the top.
- Stack & Repeat: Place the second cake layer on top and repeat with more frosting. Add the third cake layer.
- Crumb Coat: Apply a very thin layer of buttercream all over the top and sides of the cake. This is called a “crumb coat” and it traps any loose crumbs, ensuring your final frosting layer is perfectly clean. Chill the cake in the refrigerator for 15-20 minutes to set the crumb coat.
- Final Frosting: Once the crumb coat is firm, apply the remaining buttercream generously over the top and sides of the cake, smoothing it with an offset spatula or bench scraper. Decorate as desired with sprinkles, candles, or simple piping.
Tips & Suggestions
- Room Temperature is Key: I can’t stress this enough! Ensuring your butter, eggs, and buttermilk are all at room temperature before you start mixing will make a huge difference. Room temperature ingredients emulsify better, leading to a smoother batter, a more tender cake, and a perfectly smooth buttercream.
- Don’t Overmix the Batter: Once you add the flour, mix only until just combined. Overmixing develops the gluten in the flour, resulting in a tough, dense cake. We want light and fluffy!
- Sift Your Powdered Sugar: This simple step prevents lumps in your buttercream, giving you that incredibly smooth, professional-looking finish. Trust me, it’s worth the extra minute!
- Level Your Cake Layers: For a stable and beautiful cake, use a serrated knife or a cake leveler to trim any domed tops off your cooled cake layers. This creates a flat surface for stacking and prevents your cake from leaning.
- The Crumb Coat is Your Friend: Don’t skip the crumb coat! It’s a thin layer of frosting that traps all those loose crumbs. Chill the cake briefly after the crumb coat, and then your final layer of frosting will be wonderfully smooth and free of unsightly crumbs.
- Adjust Frosting Consistency: If your buttercream is too stiff, add a tiny bit more heavy cream or milk (1 teaspoon at a time) until it’s spreadable. If it’s too thin, beat in a tablespoon or two of sifted powdered sugar until it thickens up.
- Quality Vanilla Beans: Since vanilla is the star, invest in good quality, plump, moist vanilla beans. They deliver a far superior, complex flavor compared to extract alone. You’ll literally see the specks of flavor throughout your cake and frosting!
- Patience with Cooling: Resist the urge to frost a warm cake. Warm cakes will melt your beautiful buttercream into a messy puddle. Ensure your cake layers are completely cool to the touch before you even think about frosting.
- Decorating Fun: This is a birthday cake, so don’t be shy with decorations! Sprinkles, a simple piped border, or even some fresh berries can make it extra festive.
Storage
Once you’ve gone to all the effort of baking and decorating this delightful vanilla bean birthday cake, you’ll want to ensure it stays fresh and delicious. Here’s how I recommend storing it:
- At Room Temperature (Short Term): If your cake contains dairy-based buttercream, it can safely sit at room temperature for up to 2-3 days, provided it’s covered. An airtight cake dome is ideal. If you don’t have one, cover the cut side of any slices with plastic wrap to prevent them from drying out. The high sugar content in buttercream acts as a preservative, so refrigeration isn’t strictly necessary immediately for food safety, and it often keeps the cake softer.
- In the Refrigerator (Longer Term): For longer storage, or if your kitchen is particularly warm, you can refrigerate the cake. Store the cake in an airtight container or cover it tightly with plastic wrap to prevent it from absorbing refrigerator odors and drying out. It will keep well for up to a week. When you’re ready to serve, I highly recommend letting the cake come back to room temperature for at least 1-2 hours before slicing. This allows the cake layers and the buttercream to soften again, resulting in a much better texture and flavor.
- Freezing (Extended Storage): This is a fantastic option for unfrosted cake layers or even a fully decorated cake!
- Unfrosted Layers: Once your cake layers are completely cool, wrap each layer tightly in several layers of plastic wrap, then an additional layer of aluminum foil. You can store them in the freezer for up to 2-3 months. Thaw them overnight in the refrigerator, then bring to room temperature before frosting and assembling.
- Frosted Cake: For a fully decorated cake, place it uncovered in the freezer for about an hour, until the frosting is firm to the touch. Then, wrap the entire cake tightly in several layers of plastic wrap, followed by aluminum foil. Freeze for up to 1 month. To thaw, unwrap the cake and place it in the refrigerator overnight, then let it come to room temperature for a few hours before serving. This method helps preserve the decorative elements.
- Protecting the Flavor and Moisture: The key to good storage is preventing air exposure, which can dry out the cake and lead to stale flavors. Always use airtight containers or wrap thoroughly.
Final Thoughts
And there you have it! My hope is that creating this Vanilla Bean Birthday Cake With Buttercream Frosting has been as joyful for you as it is for me. There’s something truly magical about a classic cake, and this one takes simple ingredients to extraordinary heights. The visible speckles of real vanilla bean throughout the tender, moist crumb tell a story of deep, aromatic flavor, while the rich, creamy buttercream frosting is the comforting embrace that brings it all together in perfect harmony.
This isn’t just any cake; it’s a centerpiece, a memory-maker, and a testament to the simple pleasure of homemade goodness. From the moment you take that first bite, you’ll understand why this Vanilla Bean Birthday Cake With Buttercream Frosting is a truly special creation. Whether you’re celebrating a birthday, an anniversary, or simply craving a slice of pure happiness, I promise you that baking and enjoying this cake will be an incredibly rewarding experience. So go ahead, share a slice (or two!), savor every bite, and revel in the sweet success of your culinary creation. Enjoy!
Best Ever Vanilla Bean Birthday Cake with Buttercream Frosting
- Total Time: 1 hour
- Yield: 12 servings 1x
Description
This Vanilla Bean Birthday Cake with Buttercream Frosting is a delightful celebration dessert that combines rich vanilla flavors with a moist, tender crumb. Perfect for any special occasion, this cake is sure to impress both kids and adults alike.
Ingredients
- 3 Vanilla Beans
- 1 cup Unsalted Butter, at room temperature
- 3 cups Cake Flour
- 2 1/2 cups Granulated Sugar
- 1 tablespoon Baking Powder
- 1 teaspoon Baking Soda
- 1 teaspoon Salt
- 5 Large Eggs, at room temperature
- 1 cup Buttermilk, at room temperature
- 1 cup Powdered Sugar (Confectioners' Sugar), sifted
- 2 tablespoons Heavy Cream or Whole Milk
Instructions
- Preheat your oven to 350°F (175°C). Grease and flour three 8-inch round cake pans. For extra insurance against sticking, line the bottoms with parchment paper.
- Carefully split your vanilla beans lengthwise and scrape out all the seeds. Set them aside.
- In a large bowl, whisk together the cake flour, granulated sugar, baking powder, baking soda, and salt until well combined.
- In the bowl of a stand mixer, beat the room temperature unsalted butter until light and fluffy, about 2 minutes. Gradually add the granulated sugar, continuing to beat on medium-high speed for another 3-5 minutes until very pale and fluffy.
- Reduce the mixer speed to medium-low and add the eggs one at a time, beating well after each addition. Stir in the scraped vanilla bean seeds until evenly distributed.
- With the mixer on low speed, gradually add the dry ingredients to the wet ingredients in three additions, alternating with two additions of buttermilk, beginning and ending with the dry ingredients. Mix until just combined.
- Divide the batter evenly among the prepared cake pans. Bake for 25-30 minutes, or until a wooden skewer inserted into the center comes out clean.
- Let the cakes cool in their pans on a wire rack for 10-15 minutes before inverting them onto the rack to cool completely.
- In the clean bowl of your stand mixer, beat the room temperature unsalted butter on medium-high speed for 5-7 minutes until very light and fluffy.
- Reduce the mixer speed to low and gradually add the sifted powdered sugar, mixing until fully incorporated. Once all the sugar is in, increase the speed to medium-high and beat for another 3-5 minutes.
- Scrape the seeds from another vanilla bean and add them along with 2 tablespoons of heavy cream or whole milk. Beat on medium-high speed until the frosting is light, fluffy, and smooth. Adjust the consistency with more cream or powdered sugar as needed.
- Once the cakes are completely cool, level any domed tops with a serrated knife.
- Place one cake layer on your serving plate and spread about 1/2 to 3/4 cup of buttercream evenly over the top.
- Add the second cake layer on top and repeat with more frosting. Add the third cake layer.
- Apply a thin layer of buttercream all over the top and sides of the cake (crumb coat) and chill in the refrigerator for 15-20 minutes.
- Once the crumb coat is firm, apply the remaining buttercream generously over the top and sides of the cake, smoothing it out with an offset spatula or bench scraper.
- Prep Time: 30 mins
- Cook Time: 30 mins
- Category: Dessert
- Method: Baking
- Cuisine: American
Nutrition
- Serving Size: 1 slice
- Calories: 450
- Sugar: 35 g
- Sodium: 250 mg
- Fat: 20 g
- Saturated Fat: 12 g
- Unsaturated Fat: 5 g
- Trans Fat: 0 g
- Carbohydrates: 60 g
- Fiber: 1 g
- Protein: 4 g
- Cholesterol: 90 mg
Keywords: Ensure all ingredients are at room temperature for better emulsification. Sift powdered sugar to avoid lumps in the buttercream. Don't skip the crumb coat to achieve a smooth finish.