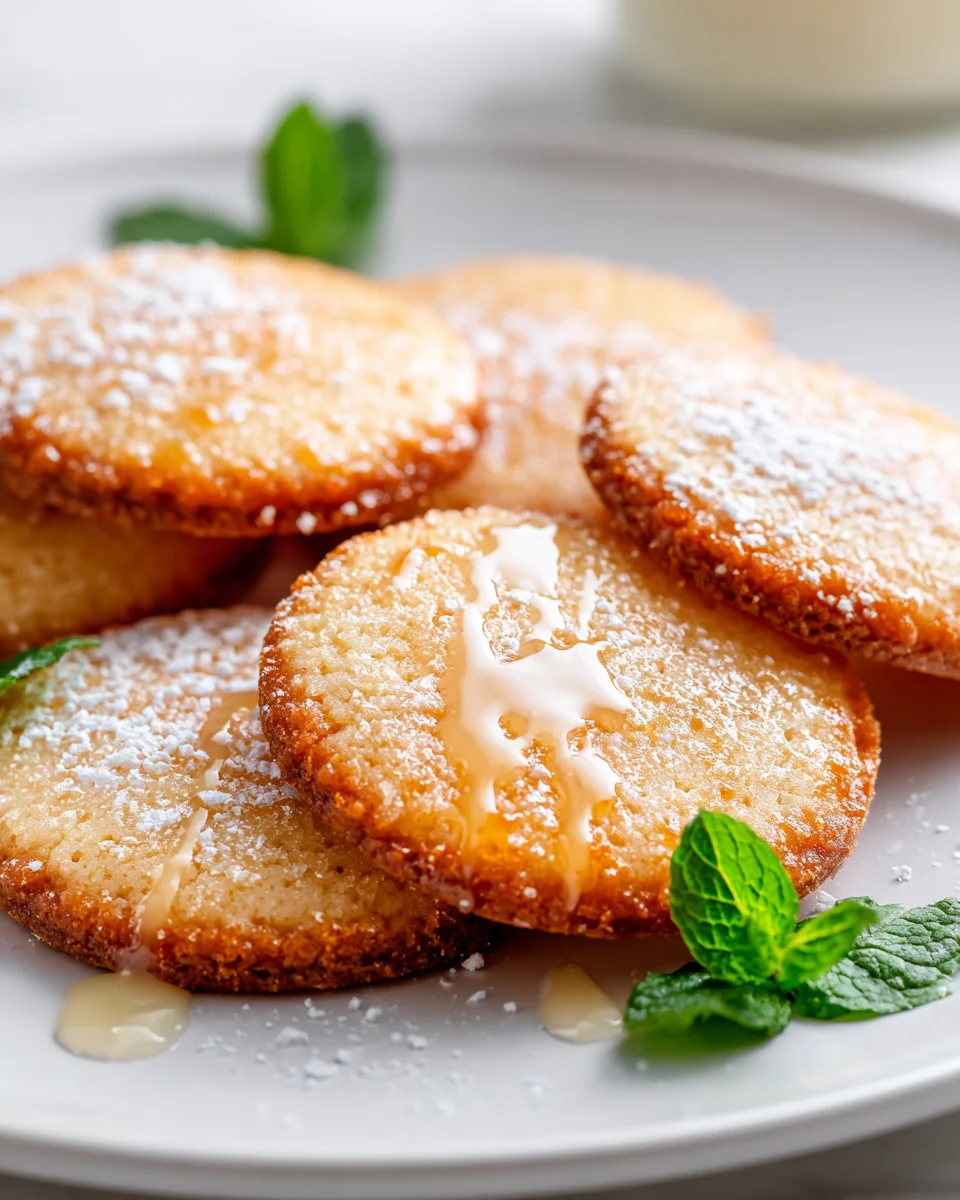
Creme Brûlée Shortbread Cookies
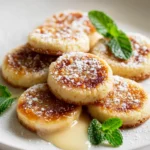
Oh my goodness, get ready to experience a little piece of dessert heaven! I’m so excited to share my recipe for Creme Brûlée Shortbread Cookies with you. This isn’t just any cookie; it’s a culinary mashup that takes two of my absolute favorite treats and brings them together in one spectacular bite. What makes these cookies so incredibly special is how they perfectly capture the essence of a classic creme brûlée – that glorious, crackly caramelized sugar crust and a hint of rich vanilla – all atop a wonderfully buttery, melt-in-your-mouth shortbread base. You’re going to absolutely adore these because they offer all the sophistication and delightful crunch of creme brûlée in a portable, easy-to-share cookie form. Imagine biting through that brittle, sweet caramelized sugar into a tender, buttery cookie – it’s pure magic! This dish is essentially a perfectly baked shortbread cookie, infused with subtle vanilla notes, then crowned with a layer of sugar that’s torched to a beautiful, golden, and audibly crisp finish, just like its namesake dessert. They’re perfect for impressing guests, elevating your afternoon tea, or simply treating yourself to something truly extraordinary.

I’m so excited to share this unique and utterly delightful recipe for Creme Brûlée Shortbread Cookies! Imagine the buttery, melt-in-your-mouth texture of classic shortbread combined with the creamy vanilla notes and signature crisp, caramelized sugar topping of a creme brûlée. It’s a dessert mash-up that’s truly greater than the sum of its parts, offering sophistication in a portable cookie form. These cookies are perfect for impressing guests or simply treating yourself to something extra special!
Ingredient Notes
Crafting these Creme Brûlée Shortbread Cookies relies on a few key ingredients for that perfect balance of shortbread and creme brûlée magic. Here’s what you’ll need and some thoughts on substitutions.
- Unsalted Butter: High-quality, softened butter is key for classic shortbread flavor. If using salted, reduce added salt by ¼ teaspoon.
- Granulated Sugar: Used for both the shortbread base and the brûlée topping. Superfine (caster) sugar is highly recommended for the topping as it caramelizes more evenly and quickly.
- All-Purpose Flour: Provides the structure for our tender shortbread. Do not overmix once added. While I haven’t tested it, a 1:1 gluten-free baking blend might work, but results may vary.
- Vanilla Extract: Essential for imparting that signature creme brûlée flavor. Use a good quality pure vanilla extract, vanilla bean paste, or scraped vanilla bean seeds for the best results. Alcohol-free vanilla extract is a suitable alternative if preferred.
- Heavy Cream: A touch of heavy cream goes into our dough to add richness and enhance that “custard” feel. Half-and-half can substitute if you don’t have heavy cream, though the cookies might be slightly less rich.
- Egg Yolk: A single egg yolk adds richness and helps create a more tender, custardy shortbread texture.
- Pinch of Salt: Balances the sweetness and enhances all the other wonderful flavors in the cookie.
- Extra Granulated Sugar for Brûlée Topping: You’ll need about 1 teaspoon per cookie. As mentioned, superfine sugar is ideal here for a superior caramelized crust.
Step-by-Step Instructions
Let’s get baking! Follow these steps carefully to create your perfect Creme Brûlée Shortbread Cookies.
- Prepare: Line a baking sheet with parchment paper or a silicone baking mat.
- Cream Butter & Sugar: In a large bowl, using an electric mixer, cream the softened unsalted butter and ¾ cup granulated sugar until light and fluffy, about 2-3 minutes. Scrape down the sides of the bowl.
- Add Wet Ingredients: Beat in the egg yolk, heavy cream, and vanilla extract until the mixture is well combined and smooth.
- Combine Dry: In a separate medium bowl, whisk together the all-purpose flour and salt.
- Incorporate Flour: Gradually add the flour mixture to the wet ingredients, mixing on low speed until just combined. Be careful not to overmix; stop as soon as no dry streaks of flour remain. The dough will be thick.
- Form Dough: Gently gather the dough into a ball. You can either roll it out to ¼-inch thickness between two sheets of parchment paper and cut out shapes (round or square work well), or press the dough evenly into an 8×8 or 9×9 inch square pan and score it into squares/rectangles. Transfer cutouts to your prepared baking sheet.
- Chill Dough: Refrigerate the baking sheet with your shaped cookies (or the pan with the pressed dough) for at least 30 minutes, or up to 1 hour. This crucial step prevents the cookies from spreading too much.
- Bake: Preheat your oven to 325°F (160°C). Bake the chilled cookies for 15-20 minutes, or until the edges are just lightly golden and the centers still look pale. Baking time depends on cookie size and thickness.
- Cool: Remove the cookies from the oven and let them cool on the baking sheet for about 5 minutes before transferring them to a wire rack to cool completely. They must be completely cool before the brûlée step.
- Brûlée Topping: Once the cookies are fully cool, sprinkle about 1 teaspoon of granulated sugar (superfine works best!) evenly over the top of each cookie. Using a kitchen torch, carefully caramelize the sugar until it turns a deep amber color and forms a crisp, glassy crust. Work quickly and keep the torch moving to prevent burning. If you don’t have a kitchen torch, you can briefly place the sugared cookies under a broiler for 1-2 minutes, watching them constantly as they can burn very quickly.
- Serve: For the best experience, serve these cookies shortly after caramelizing the sugar, while the brûlée topping is still crisp.
Tips & Suggestions
To ensure your Creme Brûlée Shortbread Cookies are nothing short of spectacular, here are a few extra tips and ideas:
- Don’t Overmix: This is a golden rule for shortbread! Overmixing develops gluten, which leads to tough, chewy cookies instead of tender, crumbly ones. Mix only until the flour is just incorporated.
- Chill Dough: Seriously, do not skip the chilling step. It’s vital for maintaining the cookie’s shape and achieving that perfect crumbly shortbread texture.
- Kitchen Torch is Best: While a broiler can work, a kitchen torch gives you far more control over the caramelization process, resulting in a more even and less likely-to-burn brûlée topping. It’s a worthwhile investment for dessert lovers!
- Flavor Variations:
- Citrus Zest: Add a teaspoon of orange or lemon zest to the dough for a brighter, aromatic note.
- Almond Extract: A drop or two of almond extract can complement the vanilla beautifully, adding a subtle nutty depth.
- Chocolate Drizzle: After the brûlée topping has set, a delicate drizzle of melted dark or white chocolate would add another layer of indulgence.
- Even Thickness: When rolling out your dough, strive for an even thickness. This ensures all your cookies bake uniformly and reach that perfect golden edge at the same time.
- Superfine Sugar: For the brûlée topping, superfine (caster) sugar truly makes a difference. Its smaller crystals melt and caramelize much faster and more evenly than regular granulated sugar.
Storage
To keep your Creme Brûlée Shortbread Cookies at their best, follow these storage guidelines.
- Un-brûléed Cookies: Shortbread cookies without the caramelized topping can be stored in an airtight container at room temperature for up to 5-7 days.
- Brûléed Cookies: The caramelized sugar topping is at its absolute best right after it’s torched, when it’s crisp and glassy. Over time, especially in humid environments, the sugar crust can start to soften and become sticky. For this reason, I highly recommend brûléeing the cookies just before serving for optimal texture. If you have leftovers with the topping already applied, store them in a single layer in an airtight container at room temperature. They will still be delicious for a day or two, but the topping may lose some of its crispness.
- Freezing Dough: You can prepare the shortbread dough, shape it, and freeze it unbaked. Wrap individual cookies or logs of dough tightly in plastic wrap, then place them in a freezer-safe bag or container for up to 2-3 months. Thaw in the refrigerator overnight before baking, or bake directly from frozen, adding a few extra minutes to the baking time.
- Freezing Baked Cookies (Un-brûléed): Baked and cooled shortbread cookies (without the caramelized topping) can be frozen for up to 1 month. Place them in a single layer on a baking sheet to freeze solid, then transfer to a freezer-safe bag or container. Thaw at room temperature before brûléeing and serving.
Final Thoughts
There’s something truly special about taking two beloved treats and expertly combining them into one unforgettable experience. These Creme Brûlée Shortbread Cookies do exactly that! I find their delicate, buttery shortbread base, paired with that signature crisp, caramelized sugar topping, to be an absolute revelation. They deliver all the comforting indulgence of classic shortbread and the delightful crack of a creme brûlée, all in one perfect bite. Whether you’re looking to impress friends, elevate your dessert table, or simply treat yourself to a moment of pure bliss, I wholeheartedly encourage you to try these. I know you’ll discover why these Creme Brûlée Shortbread Cookies are destined to become a new favorite!
Creme Brûlée Shortbread Cookies: A Sweet, Buttery Delight
- Total Time: 50 minutes
- Yield: 24 cookies 1x
Description
Indulge in the delightful fusion of classic shortbread and the rich flavors of creme brûlée with these exquisite cookies. Perfect for sharing or enjoying as a special treat, they offer a buttery texture and a crisp caramelized topping that will impress everyone.
Ingredients
- 1 cup Unsalted Butter, softened
- 3/4 cup Granulated Sugar
- 1 1/2 cups All-Purpose Flour
- 1 teaspoon Vanilla Extract
- 2 tablespoons Heavy Cream
- 1 Egg Yolk
- Pinch of Salt
- Extra Granulated Sugar for Brûlée Topping (about 1 teaspoon per cookie)
Instructions
- Line a baking sheet with parchment paper or a silicone baking mat.
- In a large bowl, using an electric mixer, cream the softened unsalted butter and ¾ cup granulated sugar until light and fluffy, about 2-3 minutes. Scrape down the sides of the bowl.
- Beat in the egg yolk, heavy cream, and vanilla extract until the mixture is well combined and smooth.
- In a separate medium bowl, whisk together the all-purpose flour and salt.
- Gradually add the flour mixture to the wet ingredients, mixing on low speed until just combined. Be careful not to overmix; stop as soon as no dry streaks of flour remain. The dough will be thick.
- Gently gather the dough into a ball. You can either roll it out to ¼-inch thickness between two sheets of parchment paper and cut out shapes (round or square work well), or press the dough evenly into an 8×8 or 9×9 inch square pan and score it into squares/rectangles. Transfer cutouts to your prepared baking sheet.
- Refrigerate the baking sheet with your shaped cookies (or the pan with the pressed dough) for at least 30 minutes, or up to 1 hour.
- Preheat your oven to 325°F (160°C). Bake the chilled cookies for 15-20 minutes, or until the edges are just lightly golden and the centers still look pale.
- Remove the cookies from the oven and let them cool on the baking sheet for about 5 minutes before transferring them to a wire rack to cool completely.
- Once the cookies are fully cool, sprinkle about 1 teaspoon of granulated sugar evenly over the top of each cookie. Using a kitchen torch, carefully caramelize the sugar until it turns a deep amber color and forms a crisp, glassy crust.
- For the best experience, serve these cookies shortly after caramelizing the sugar, while the brûlée topping is still crisp.
- Prep Time: 30 mins
- Cook Time: 20 mins
- Category: Dessert
- Method: Baking
- Cuisine: French
Nutrition
- Serving Size: 1 cookie
- Calories: 120
- Sugar: 8 g
- Sodium: 50 mg
- Fat: 7 g
- Saturated Fat: 4 g
- Unsaturated Fat: 2 g
- Trans Fat: 0 g
- Carbohydrates: 12 g
- Fiber: 0 g
- Protein: 1 g
- Cholesterol: 30 mg
Keywords: Do not overmix the dough to maintain the tender, crumbly texture. Chilling the dough is crucial for preventing spreading during baking. A kitchen torch is recommended for caramelizing the sugar for the best results.