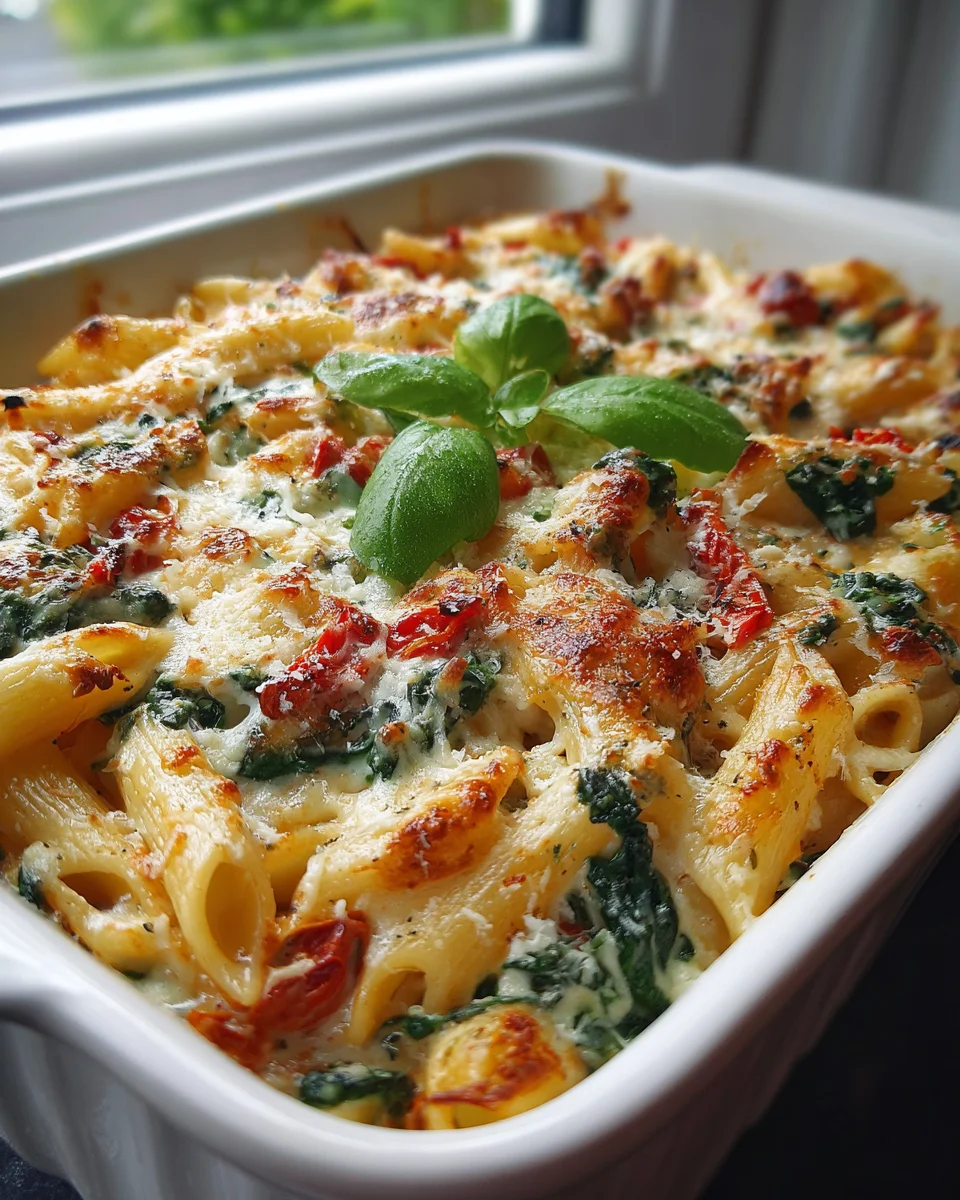
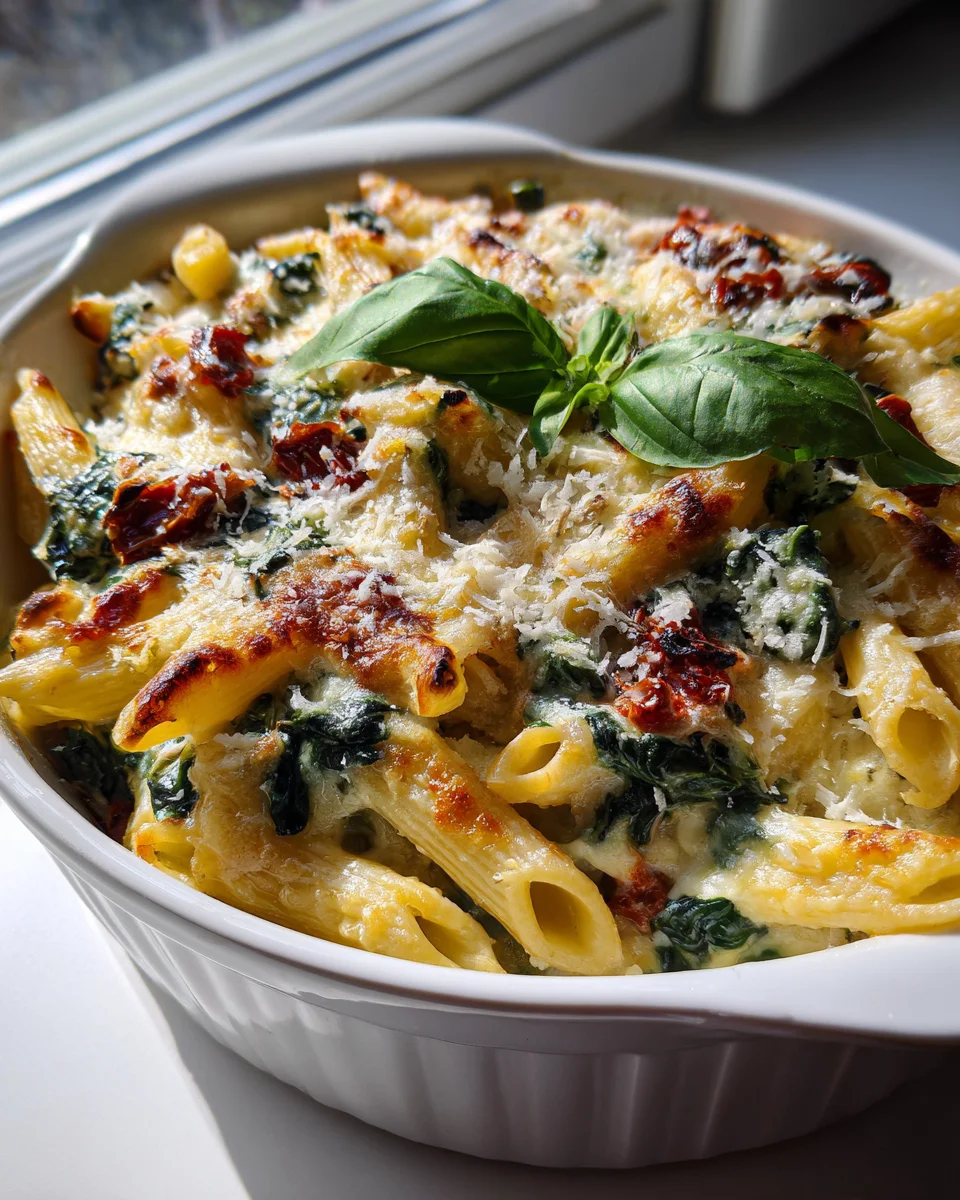
Spinach And Sun Dried Tomato Pasta Bake
Oh my goodness, do I have a treat for you today! Get ready to fall head over heels for our incredible Spinach And Sun Dried Tomato Pasta Bake. This isn’t just another pasta dish; it’s a vibrant symphony of flavors that manages to be both comforting and utterly exciting. I absolutely adore this bake because it brings together the wholesome goodness of fresh spinach with the intensely savory and slightly sweet punch of sun-dried tomatoes, all nestled in a creamy, dreamy sauce with perfectly cooked pasta. It’s the kind of meal that feels special enough for guests but is ridiculously easy to whip up on a busy weeknight.
You’re going to love how every forkful delivers a delightful combination of textures and tastes – from the tender pasta and the earthy freshness of the spinach, to the concentrated bursts of flavor from those beautiful sun-dried tomatoes, all blanketed under a golden, bubbly layer of cheese. It’s hearty, incredibly flavorful, and truly a crowd-pleaser that satisfies every time. Trust me, this dish is destined to become a beloved staple in your kitchen!
Ingredient Notes
Crafting a delicious Spinach and Sun Dried Tomato Pasta Bake starts with selecting quality ingredients, but don’t worry, there’s always room for personal touch and smart substitutions! Here’s what I recommend to make this dish truly sing.
Pasta
- My Go-To: I love using a medium-sized pasta shape that can really hold onto that glorious sauce and cheese. Think penne, rigatoni, ziti, or cavatappi. Their ridges and tubes are perfect for catching all the flavor.
- Substitutions: Feel free to use any robust pasta shape you have on hand. Even farfalle (bow-tie pasta) or fusilli would work beautifully. For a gluten-free option, simply opt for your favorite gluten-free pasta variety.
Spinach
- My Go-To: Fresh baby spinach is my absolute favorite for this bake. It wilts down beautifully and adds a lovely freshness and vibrant color. You’ll need a good amount, as it reduces significantly when cooked.
- Substitutions: Frozen chopped spinach is a fantastic alternative. Just make sure to thaw it completely and squeeze out as much excess water as possible. This is crucial; otherwise, your bake could end up watery.
Sun Dried Tomatoes
- My Go-To: I always reach for oil-packed sun-dried tomatoes. They’re typically softer and more pliable, and the oil they come in can be a fantastic flavorful addition to your sauce base.
- Substitutions: If you only have dry-packed sun-dried tomatoes, rehydrate them first by soaking them in hot water for about 15-20 minutes, then drain and chop. You might want to add a touch more olive oil to your sauce to compensate for the lost oil from the packed variety.
The Sauce Base
- My Go-To: A good quality marinara or classic tomato sauce is the backbone of this bake. I look for one with minimal added sugar and robust tomato flavor. A creamy element, like a splash of heavy cream or a dollop of cream cheese, takes it to the next level.
- Substitutions: If you’re feeling ambitious, you can absolutely make your own tomato sauce from scratch! For added depth without alcohol, consider simmering your sauce with a splash of vegetable broth, a bit of balsamic vinegar, or a non-alcoholic cooking wine alternative. This really enhances the savory notes.
Cheese Blend
- My Go-To: For a pasta bake, I love a combination of cheeses. Mozzarella is a must for that classic gooey stretch, and Parmesan or Pecorino Romano adds a salty, nutty bite.
- Substitutions: Feel free to experiment! Provolone, fontina, or even a good quality white cheddar can add different flavor profiles and excellent melt. For a dairy-free version, use your favorite plant-based shredded mozzarella and parmesan alternatives.
Aromatics & Other Flavor Boosters
- My Go-To: Fresh garlic and onion are essential for building a flavorful base. Fresh basil and oregano, either dried or fresh, are also fantastic. A pinch of red pepper flakes adds a lovely warmth.
- Optional Protein: If you’d like to make this a heartier meal, I often brown about a pound of lean ground beef with the onions and garlic before adding the sauce. It makes for a truly substantial and satisfying dish!
Step-by-Step Instructions
Let’s get cooking! This Spinach and Sun Dried Tomato Pasta Bake is incredibly satisfying to make, and even more so to eat. Follow these steps for a perfect bake every time.
-
Prep Your Oven and Pasta:
Start by preheating your oven to 375°F (190°C). Then, grab a large pot of salted water and bring it to a rolling boil. Add your chosen pasta and cook it according to package directions until it’s al dente – meaning it should still have a slight bite to it. Remember, it will continue to cook in the oven, so don’t overcook it now! Drain the pasta thoroughly and set it aside.
-
Build Your Flavor Base:
While the pasta is cooking, heat a couple of tablespoons of olive oil in a large skillet or Dutch oven over medium heat. Add your chopped onion and cook until it’s softened and translucent, usually about 5-7 minutes. If you’re adding ground beef, now’s the time! Add the ground beef to the skillet with the onions and cook, breaking it up with a spoon, until it’s fully browned. Drain any excess fat.
-
Infuse with Garlic and Sun Dried Tomatoes:
To the skillet, add your minced garlic and chopped sun-dried tomatoes. Sauté for another 1-2 minutes until the garlic is fragrant. Be careful not to burn the garlic!
-
Wilt the Spinach:
Now, add your fresh spinach to the skillet in batches if necessary. Stir constantly until it wilts down completely. If you’re using thawed frozen spinach, add it now and stir to combine, ensuring any remaining moisture evaporates slightly.
-
Combine with Sauce:
Pour in your marinara or tomato sauce. If you’re using a creamy element like heavy cream or cream cheese, stir that in now until it’s fully incorporated and smooth. Season the sauce with salt, black pepper, a pinch of red pepper flakes (if using), and your dried herbs like oregano and basil. Let it simmer gently for 5 minutes to allow the flavors to meld.
-
Assemble the Bake:
In a large mixing bowl, combine the drained al dente pasta with about two-thirds of your flavorful sauce mixture and half of your shredded mozzarella and Parmesan cheeses. Stir everything together until the pasta is evenly coated and the cheese is well distributed.
-
Layer and Top:
Transfer the pasta mixture into a 9×13 inch baking dish. Spread it out evenly. Pour the remaining sauce over the top of the pasta, ensuring good coverage. Finally, generously sprinkle the remaining mozzarella and Parmesan cheeses over the entire dish. This is where you get that beautiful golden, bubbly crust!
-
Bake to Perfection:
Place the baking dish in your preheated oven. Bake for 25-30 minutes, or until the sauce is bubbly around the edges and the cheese on top is melted, golden brown, and delightfully gooey. If the cheese starts to brown too quickly, you can loosely tent the dish with aluminum foil.
-
Rest and Serve:
Once baked, remove the pasta bake from the oven and let it rest for 5-10 minutes. This resting period is crucial; it allows the dish to set, making it much easier to portion and serve without it falling apart. Garnish with fresh basil or parsley if desired, and enjoy your amazing Spinach and Sun Dried Tomato Pasta Bake!
Tips & Suggestions
I’ve learned a few tricks over the years that really elevate this Spinach and Sun Dried Tomato Pasta Bake. Here are my top tips and suggestions to help you get the most out of your cooking experience!
- Don’t Overcook the Pasta: This is probably my most important tip for any pasta bake! Cook your pasta just until it’s al dente (firm to the bite). It will continue to absorb liquid and cook further in the oven, so if you start with overcooked pasta, you’ll end up with mushy pasta. Nobody wants that!
- Squeeze that Spinach Dry: Especially if you’re using frozen spinach, make sure to thaw it completely and squeeze out every last drop of water. Excess moisture can make your pasta bake watery and dilute the rich flavors of the sauce. For fresh spinach, ensure it’s well-drained after washing.
- Layering for Success: While mixing everything together is fine, for an extra impressive presentation and more even distribution of flavor and cheese, you can create layers. Start with a thin layer of sauce, then half the pasta, half the spinach and sun-dried tomato mixture, half the cheese, and repeat, finishing with cheese on top.
- Quality Cheese Matters: A good blend of cheeses makes all the difference. Freshly shredded mozzarella melts much better than pre-shredded (which often contains anti-caking agents). Combining it with a harder, saltier cheese like Parmesan or Pecorino Romano provides a wonderful depth of flavor and a beautiful golden crust.
- Add Protein for Heartiness: As I mentioned in the ingredient notes, browning some lean ground beef with your aromatics is a fantastic way to make this a more substantial and protein-packed meal. You could also try cooked, shredded chicken for a different twist.
- Spice it Up: Don’t be shy with seasonings! Besides salt and pepper, consider dried oregano, basil, a pinch of Italian seasoning, or a good sprinkle of red pepper flakes for a subtle kick. A dash of balsamic vinegar can also brighten the tomato sauce.
- Make Ahead Magic: This pasta bake is a fantastic make-ahead meal! You can assemble the entire dish up to 24 hours in advance. Cover it tightly with foil and refrigerate. When ready to bake, let it sit at room temperature for about 30 minutes while your oven preheats, then bake as directed, adding an extra 10-15 minutes to account for its cold temperature.
- The Importance of Resting: Don’t skip the resting period after baking! Letting the pasta bake sit for 5-10 minutes allows the cheese and sauce to set, preventing a watery, messy first slice. It truly makes a difference in presentation and enjoyment.
Storage
One of the best things about a hearty pasta bake like this Spinach and Sun Dried Tomato Pasta Bake is how well it stores, making it perfect for meal prep or enjoying delicious leftovers!
Refrigeration
- Cool Completely: Before storing, allow any leftover pasta bake to cool down to room temperature. This helps prevent condensation which can make your dish soggy and also ensures food safety.
- Airtight Container: Transfer the cooled leftovers into an airtight container.
- Duration: Stored properly in the refrigerator, your pasta bake will remain fresh and delicious for 3-4 days.
Reheating
- Oven Method (Recommended for Best Quality): This is my preferred way to reheat for the best texture. Preheat your oven to 300-325°F (150-160°C). Place individual portions or the entire dish (covered with foil to prevent drying out) in an oven-safe dish. Heat for 20-30 minutes, or until heated through and bubbly. Remove the foil for the last 5-10 minutes if you want the cheese on top to crisp up again.
- Microwave Method (Quick & Easy): For a quicker option, individual portions can be reheated in the microwave. Place a portion in a microwave-safe dish, cover it loosely (a damp paper towel helps keep moisture in), and heat on high for 1-3 minutes, stirring halfway through, until thoroughly heated. Be aware that the pasta might become slightly softer and the cheese won’t be as crispy as when reheated in the oven.
Freezing
- Freezing Whole or Portions: This pasta bake freezes wonderfully! You can freeze it as a whole dish (unbaked or baked) or in individual portions.
- For Unbaked Freezing: Assemble the pasta bake as directed but do not bake. Cover the dish tightly with plastic wrap, then a layer of aluminum foil. Label with the date.
- For Baked Freezing: Allow the baked and cooled pasta bake to solidify completely in the refrigerator first. Then, cut it into individual portions or cover the entire dish tightly with plastic wrap and foil.
- Duration: Frozen pasta bake will keep well for up to 3 months.
- Reheating from Frozen:
- Unbaked from Frozen: Remove plastic wrap and foil. Bake from frozen at 375°F (190°C), covered with foil, for about 60-75 minutes. Remove foil for the last 15-20 minutes to brown the cheese. You may need to add a splash of broth or sauce if it looks a bit dry.
- Baked from Frozen (Whole): Transfer to the oven, covered with foil, and bake at 350°F (175°C) for 45-60 minutes, or until heated through. Uncover for the last 10-15 minutes.
- Baked from Frozen (Individual Portions): Thaw in the refrigerator overnight, then reheat in the oven or microwave as described above. Alternatively, you can reheat small portions directly from frozen in the microwave, adding extra heating time.
Final Thoughts
And there you have it, friends! I truly believe that the Spinach And Sun Dried Tomato Pasta Bake isn’t just another dinner recipe; it’s a comforting hug in a bowl, bursting with incredible flavors. The rich, concentrated sweetness of sun-dried tomatoes perfectly complements the earthy freshness of the spinach, all baked into a cheesy, satisfying pasta dream. It’s incredibly easy to pull together, yet delivers a taste experience that feels gourmet. If you’re looking for a dish that’s both wholesome and utterly delicious, then this Spinach And Sun Dried Tomato Pasta Bake is absolutely a must-try. I promise, it will become a cherished favorite in your kitchen!
Spinach & Sun Dried Tomato Pasta Bake – Easy Weeknight Meal
- Total Time: 45 minutes
- Yield: 4 servings
Description
This Spinach And Sun Dried Tomato Pasta Bake is a comforting and vibrant dish that combines fresh spinach with savory sun-dried tomatoes in a creamy sauce. Perfect for a busy weeknight, it’s easy to prepare and sure to impress your guests!
Ingredients
- medium-sized pasta shape (penne, rigatoni, ziti, or cavatappi)
- fresh baby spinach
- oil-packed sun-dried tomatoes
- good quality marinara or classic tomato sauce
- heavy cream or cream cheese
- shredded mozzarella cheese
- Parmesan or Pecorino Romano cheese
- fresh garlic
- onion
- fresh basil
- oregano
- red pepper flakes
- lean ground beef (optional)
- olive oil
- salt
- black pepper
Instructions
- Start by preheating your oven to 375°F (190°C). Then, grab a large pot of salted water and bring it to a rolling boil. Add your chosen pasta and cook it according to package directions until it's al dente. Drain the pasta thoroughly and set it aside.
- While the pasta is cooking, heat a couple of tablespoons of olive oil in a large skillet or Dutch oven over medium heat. Add your chopped onion and cook until it's softened and translucent, usually about 5-7 minutes. If you're adding ground beef, now's the time! Add the ground beef to the skillet with the onions and cook, breaking it up with a spoon, until it's fully browned. Drain any excess fat.
- To the skillet, add your minced garlic and chopped sun-dried tomatoes. Sauté for another 1-2 minutes until the garlic is fragrant.
- Now, add your fresh spinach to the skillet in batches if necessary. Stir constantly until it wilts down completely. If you're using thawed frozen spinach, add it now and stir to combine.
- Pour in your marinara or tomato sauce. If you're using a creamy element like heavy cream or cream cheese, stir that in now until it's fully incorporated and smooth. Season the sauce with salt, black pepper, a pinch of red pepper flakes, and your dried herbs like oregano and basil. Let it simmer gently for 5 minutes.
- In a large mixing bowl, combine the drained al dente pasta with about two-thirds of your flavorful sauce mixture and half of your shredded mozzarella and Parmesan cheeses. Stir everything together until the pasta is evenly coated.
- Transfer the pasta mixture into a 9×13 inch baking dish. Spread it out evenly. Pour the remaining sauce over the top of the pasta, ensuring good coverage. Finally, generously sprinkle the remaining mozzarella and Parmesan cheeses over the entire dish.
- Place the baking dish in your preheated oven. Bake for 25-30 minutes, or until the sauce is bubbly around the edges and the cheese on top is melted and golden brown.
- Once baked, remove the pasta bake from the oven and let it rest for 5-10 minutes. Garnish with fresh basil or parsley if desired, and enjoy your amazing Spinach and Sun Dried Tomato Pasta Bake!
- Prep Time: 15 mins
- Cook Time: 30 mins
- Category: Dinner
- Method: Baking
- Cuisine: Italian
Nutrition
- Serving Size: 1 bowl
- Calories: 450
- Sugar: 5 g
- Sodium: 800 mg
- Fat: 20 g
- Saturated Fat: 10 g
- Unsaturated Fat: 8 g
- Trans Fat: 0 g
- Carbohydrates: 50 g
- Fiber: 4 g
- Protein: 20 g
- Cholesterol: 50 mg
Keywords: Don't overcook the pasta; it should be al dente. Squeeze out excess moisture from spinach, especially if using frozen. Layering ingredients can enhance flavor distribution. Quality cheese is key for a great texture and flavor. You can add protein like ground beef for a heartier meal.