• Skip to primary navigation
  • Skip to main content
  • Skip to primary sidebar
Homesmad

Homesmad

  • Home
  • Breakfast & Brunch
  • Appetizers & Snacks
  • Dinner
  • Dessert
  • About
  • Privacy Policy
  • Contact
Homesmad
  • Home
  • Breakfast & Brunch
  • Appetizers & Snacks
  • Dinner
  • Dessert
  • About
  • Privacy Policy
  • Contact

Addictively Crispy Garlic Herb Roasted Potato Skins

October 24, 2025 by Lily author

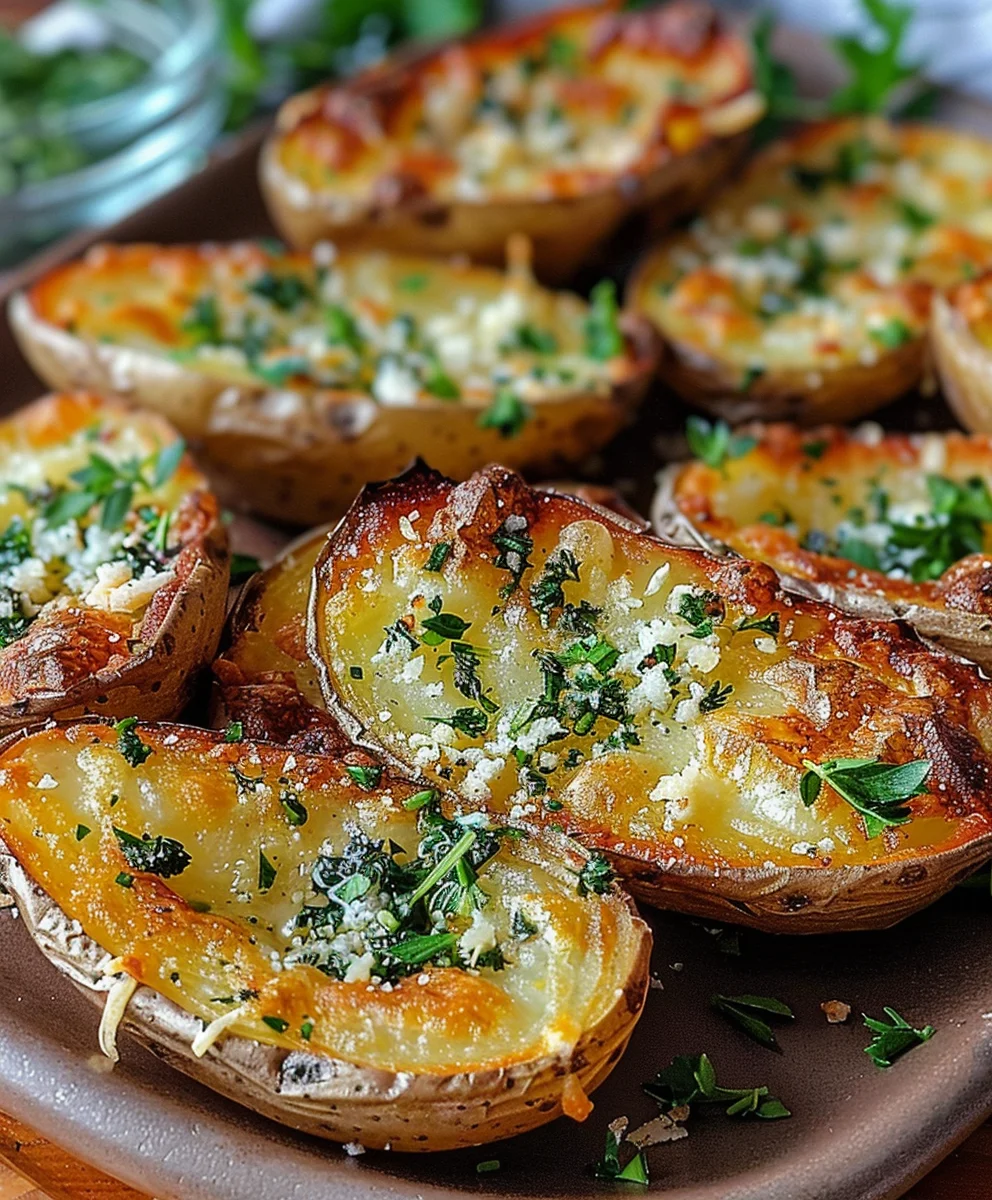
Crispy Garlic Herb Roasted Potato Skins are more than just a snack; they are a culinary experience waiting to elevate your next gathering or cozy night in. I’m excited to share my go-to recipe for these irresistible delights, which have become a staple in my kitchen and a guaranteed crowd-pleaser.

This beloved appetizer holds a cherished spot in countless cuisines, particularly within American pub culture, where they’ve long been celebrated for their comforting appeal and versatility. While the concept of utilizing potato peels might seem humble, transforming them into something utterly crave-worthy is a true testament to culinary ingenuity and simple, delicious preparation.

Why We Adore Crispy Garlic Herb Roasted Potato Skins

What truly sets these apart is the incredible symphony of textures and flavors. Imagine: a perfectly golden, undeniably crispy exterior, giving way to a soft, fluffy potato interior, all generously infused with aromatic garlic and fresh, vibrant herbs. Each bite delivers a burst of savory goodness that is both deeply satisfying and incredibly addictive. They’re ideal for sharing with friends during a game night, serving as a delightful appetizer at a dinner party, or even enjoying as a satisfying solo snack. The magic lies in the roasting process, which achieves that coveted crunch, making these Crispy Garlic Herb Roasted Potato Skins a perennial favorite that consistently earns rave reviews. I promise, once you try this recipe, you’ll understand why I’m so passionate about them!

Addictively Crispy Garlic Herb Roasted Potato Skins this RECIPE

Ingredients:

Creating these incredible Crispy Garlic Herb Roasted Potato Skins requires a careful selection of ingredients to ensure every bite is bursting with flavor and texture. Here’s what you’ll need:

  • For the Potato Skins:
    • 6 large Russet potatoes (about 8-10 ounces each), preferably uniform in size
    • 3 tablespoons extra virgin olive oil, plus extra for brushing
    • 1 teaspoon kosher salt, plus more for seasoning
    • ½ teaspoon freshly ground black pepper, plus more for seasoning
  • For the Garlic Herb Butter:
    • 4 tablespoons (½ stick) unsalted butter, softened
    • 3-4 cloves garlic, minced very finely
    • 2 tablespoons fresh chives, finely chopped
    • 2 tablespoons fresh parsley, finely chopped
    • 1 tablespoon fresh thyme leaves, picked from the stem
    • ¼ teaspoon kosher salt
    • ⅛ teaspoon freshly ground black pepper
  • For the Creamy, Savory Filling:
    • 8 slices thick-cut bacon, cooked until crispy and crumbled (about 1 cup)
    • 1 ½ cups sharp cheddar cheese, shredded (about 6 ounces), plus ½ cup for topping
    • ½ cup sour cream, plus extra for serving
    • ¼ cup whole milk or half-and-half
    • 2 green onions, thinly sliced (white and green parts separated)
    • ½ teaspoon kosher salt, or to taste
    • ¼ teaspoon freshly ground black pepper, or to taste
  • Optional Garnish:
    • Extra fresh chives or sliced green onions
    • Additional sour cream
    • A dash of your favorite hot sauce

Phase 1: Preparing the Potatoes for Roasting

The journey to our incredibly Crispy Garlic Herb Roasted Potato Skins begins with properly preparing the star ingredient: the potatoes themselves. This initial bake is crucial for achieving that fluffy interior and setting the stage for the ultimate crispiness of the skin.

  1. Preheat and Prep: Begin by preheating your oven to 400°F (200°C). While the oven heats up, thoroughly scrub your Russet potatoes under cold running water. It’s important to remove any dirt since we’ll be eating the skin! Pat them completely dry with a paper towel. Moisture is the enemy of crispiness, so don’t skip this step.
  2. Puncture and Season: Using a fork, generously pierce each potato several times all over. This allows steam to escape during baking, preventing them from exploding and ensuring they cook evenly. Drizzle the potatoes with 3 tablespoons of olive oil, using your hands to rub it all over each potato until lightly coated. Then, sprinkle them evenly with 1 teaspoon of kosher salt and ½ teaspoon of freshly ground black pepper. This initial seasoning is key to building flavor from the very first step.
  3. Initial Bake for Tenderness: Place the seasoned potatoes directly on the oven rack in the preheated oven. Bake for approximately 50-70 minutes, or until they are fork-tender. The exact time will depend on the size of your potatoes. You want them soft all the way through, but not mushy. My personal trick is to squeeze them gently – if they yield easily, they’re ready.
  4. Cooling and Halving: Once cooked, carefully remove the potatoes from the oven and let them cool on a wire rack until they are cool enough to handle, usually about 15-20 minutes. This cooling period is important because it allows the potato flesh to firm up slightly, making it easier to scoop. Once cooled, slice each potato in half lengthwise.
  5. Scoop with Care: Using a spoon, carefully scoop out the cooked potato flesh from each half, leaving about a ¼-inch thick border of potato attached to the skin. It’s crucial not to scoop too much, as a slightly thicker skin provides better structure and becomes much crispier. Reserve the scooped-out potato flesh in a large mixing bowl; we’ll use it for the delicious filling!
  6. Prepare the Garlic Herb Butter: In a small bowl, combine the softened unsalted butter with the minced garlic, chopped fresh chives, parsley, thyme, ¼ teaspoon kosher salt, and ⅛ teaspoon freshly ground black pepper. Mix thoroughly until all the herbs are evenly distributed throughout the butter. This garlic herb butter is going to infuse so much flavor into our skins!
  7. Brush the Skins: Lightly brush the inside and outside of each potato skin with the prepared garlic herb butter. Don’t be shy here; the butter is a major contributor to the rich flavor and the ultimate crispiness of our Crispy Garlic Herb Roasted Potato Skins.

Phase 2: Achieving the Crispy Garlic Herb Roasted Potato Skins

This is where the magic truly happens for the “crispy” part of our Crispy Garlic Herb Roasted Potato Skins. We’re going to give these potato shells a double roast to ensure they reach peak golden-brown perfection and a delightful crunch.

  1. First Roast, Skin-Side Down: Arrange the butter-brushed potato skins on a large baking sheet, cut-side down. My secret for extra crispiness is often to use a baking rack placed over a baking sheet, allowing air to circulate all around them. Roast in the 400°F (200°C) oven for 15-20 minutes. During this stage, the skins will begin to firm up and turn a beautiful golden color on the outside. This face-down method directly exposes the skin to the heat, guaranteeing that desirable crunch.
  2. Flip and Second Roast, Skin-Side Up: Carefully remove the baking sheet from the oven. Using tongs or a sturdy spatula, flip each potato skin over so that it is now cut-side up. Return the baking sheet to the oven and continue roasting for another 10-15 minutes, or until the edges are beautifully golden brown and the skins are visibly crispy. You’ll know they’re ready when they have that alluring, slightly rustic, roasted appearance. This two-stage roasting ensures both the exterior and interior edges of the skin are perfectly crisp, which is fundamental to the appeal of these Crispy Garlic Herb Roasted Potato Skins. Remove the skins from the oven and set them aside while you prepare the filling. Keep the oven on!

Phase 3: Crafting the Flavorful Filling

While our potato skins are getting perfectly crispy, it’s time to create the creamy, cheesy, and utterly delicious filling that will make these Crispy Garlic Herb Roasted Potato Skins truly irresistible.

  1. Mash the Potato Flesh: Take the reserved scooped-out potato flesh (from step 5) and add it to a large mixing bowl. Using a potato masher or a large fork, gently mash the potato until mostly smooth. A few small lumps are perfectly fine and even add to the texture.
  2. Creamy Additions: To the mashed potato, add the ½ cup sour cream, ¼ cup milk (or half-and-half), and the white parts of your sliced green onions. For an extra layer of richness, you can also add 1-2 tablespoons of melted butter here, though the sour cream and milk already contribute significantly to the creaminess. Mix everything together until well combined and the mixture is smooth and luxurious.
  3. Incorporate the Good Stuff: Now for the stars of the filling! Gently fold in the crumbled crispy bacon and 1 ½ cups of the shredded sharp cheddar cheese. The combination of savory bacon and sharp cheddar is a classic for a reason – it’s just pure comfort. Stir until everything is evenly distributed.
  4. Season to Perfection: Season the filling with ½ teaspoon kosher salt and ¼ teaspoon freshly ground black pepper. Now, here’s an important tip: Always taste your filling! This is your opportunity to adjust the seasoning. You might find you need a little more salt, pepper, or even a tiny pinch of garlic powder if you’re a garlic fiend like me. Remember, the filling is the heart of our Crispy Garlic Herb Roasted Potato Skins, so make sure it tastes amazing on its own.

Phase 4: Assembling and Final Baking the Ultimate Crispy Garlic Herb Roasted Potato Skins

We’re in the home stretch! With our perfectly crispy skins and incredibly flavorful filling, it’s time to bring everything together for the grand finale – the final bake that melts the cheese and warms everything through, creating the ultimate Crispy Garlic Herb Roasted Potato Skins.

  1. Generously Fill the Skins: Take your beautifully roasted potato skins and carefully spoon the potato filling into each one. Don’t be shy; mound the filling generously, ensuring each shell is overflowing with that delicious mixture. The goal is a hearty, satisfying potato skin! Place the filled skins back onto the same baking sheet (or a fresh one lined with parchment paper for easier cleanup).
  2. Top with More Cheese: Sprinkle the remaining ½ cup of shredded cheddar cheese evenly over the top of each filled potato skin. This extra layer of cheese will melt into a golden, bubbly crust, adding yet another dimension of flavor and texture to our Crispy Garlic Herb Roasted Potato Skins.
  3. Final Bake for Melty Perfection: Return the baking sheet with the filled potato skins to the 400°F (200°C) oven. Bake for 10-15 minutes, or until the cheese on top is completely melted, bubbly, and beautifully golden brown. The goal here is to warm the filling through and achieve that irresistible, slightly crispy cheese crust.
  4. Optional Broil for Extra Browning: If you desire an even more golden-brown and crispy cheese topping, you can carefully turn on your oven’s broiler for the last 1-2 minutes. Watch them very closely! Broilers can go from perfect to burnt in a matter of seconds. Stay right by the oven door and remove them as soon as they reach your desired level of golden perfection.
  5. Cool Slightly Before Serving: Once baked, remove the Crispy Garlic Herb Roasted Potato Skins from the oven. Let them rest on the baking sheet for 5 minutes before transferring them to a serving platter. This brief resting period allows the filling to set slightly and makes them easier to handle without falling apart.

Serving Your Delicious Crispy Garlic Herb Roasted Potato Skins

Congratulations! You’ve successfully created a batch of the most delicious Crispy Garlic Herb Roasted Potato Skins. Now it’s time to enjoy the fruits of your labor.

Before serving, sprinkle the freshly baked potato skins with the reserved green parts of your sliced green onions or a handful of fresh chopped chives for a burst of color and a fresh oniony note. I always like to offer a dollop of extra sour cream on the side for guests to add as they please. For those who enjoy a little heat, a dash of hot sauce can also be a fantastic addition.

These potato skins are absolutely perfect served warm, right out of the oven. The contrast between the incredibly crispy exterior, the fluffy, savory, cheesy, and bacon-filled interior, and the fresh herb garnish is simply divine. They make an excellent appetizer for game days, a fantastic addition to any party spread, or even a hearty side dish to grilled meats. You’ll find them disappearing quickly, so consider making a double batch!

Storage and Reheating Tips:

If by some miracle you have any leftovers, these Crispy Garlic Herb Roasted Potato Skins can be stored in an airtight container in the refrigerator for up to 3 days. To reheat, I recommend placing them on a baking sheet and warming them in a preheated oven at 350°F (175°C) for about 10-15 minutes, or until heated through and the skins crisp up again. Microwaving is an option for speed, but it will soften the crispy skin, so the oven is definitely the preferred method for maintaining that wonderful texture.

I genuinely believe that once you try these, they’ll become a staple in your recipe rotation. The depth of flavor from the garlic and herbs, combined with the perfectly roasted, crispy skin and the rich, savory filling, makes these Crispy Garlic Herb Roasted Potato Skins an unforgettable treat.

Addictively Crispy Garlic Herb Roasted Potato Skins

Conclusion:

And so, as we bring our culinary journey to a close, I genuinely hope your taste buds are tingling with anticipation! What we’ve just explored isn’t merely another recipe; it’s an invitation to experience a symphony of textures and flavors that will undoubtedly elevate your snack, appetizer, or side dish game. I am truly passionate about these Crispy Garlic Herb Roasted Potato Skins because they deliver an unparalleled combination of satisfying crunch, aromatic depth, and comforting warmth that transforms a simple potato into something truly extraordinary. Imagine biting into that perfectly golden-brown skin, followed by the soft, fluffy interior, all infused with the pungent kick of fresh garlic and the fragrant embrace of earthy herbs. It’s an experience that’s both gourmet and incredibly approachable, making it a must-try for home cooks of all skill levels.

I promise you, once you taste that first bite – the savory crispness, the inherent earthiness of the potato, the bright burst of fresh garlic, and the subtle, peppery undertones of the herbs – you’ll understand why I can’t stop raving about them. They’re deceptively simple to prepare, requiring just a few key steps and readily available ingredients, yet they consistently deliver a gourmet-level experience. This isn’t just a recipe; it’s an opportunity to impress your dinner guests with minimal fuss, delight your family with a healthier snack alternative, or simply treat yourself to something genuinely exceptional after a long day. The effort-to-reward ratio here is off the charts, making them an instant classic in any household.

Endless Serving Possibilities

But the magic of these roasted potato skins extends far beyond just enjoying them straight from the oven. Oh no, their versatility is one of their most charming attributes! For a classic and universally loved approach, imagine them piled high on a rustic platter, ready to be dipped into a cool, creamy dollop of homemade sour cream, a tangy ranch dressing, or even a zesty Greek yogurt dip for a lighter touch. For those seeking a slightly more indulgent experience, a warm, velvety cheese sauce, perhaps a sharp cheddar or a smooth Monterey Jack, would transform them into an irresistible appetizer that disappears in mere minutes at any gathering. Think game day parties, festive holiday potlucks, or just a cozy movie night in – they are the ultimate crowd-pleaser that caters to almost every palate.

And let’s not forget how wonderfully they complement a main meal. Picture these fantastic potato skins served alongside a juicy grilled steak, a hearty gourmet burger, or even as a sophisticated side to a simple roasted chicken or a pan-seared salmon. They add that much-needed textural contrast and a vibrant burst of savory flavor that can elevate an ordinary dinner into something truly special. If you’re hosting, these are fantastic served warm in a large bowl or a rustic basket, allowing guests to help themselves, which not only looks incredibly appealing but also makes your life as the host significantly easier.

Creative Variations to Inspire You

Feeling adventurous and ready to put your own spin on this delightful dish? The world of variations awaits! Try swapping out the fresh parsley and rosemary for an equally aromatic combination of fresh dill and chives, creating a lighter, more vibrant flavor profile that’s particularly lovely in the spring or summer months. For those who enjoy a little heat, a generous pinch of smoked paprika or a dash of cayenne pepper mixed with your garlic and herbs can add an exciting warmth and a beautiful depth of color. Don’t limit yourself to just one type of cheese either; while cheddar is a timeless choice, consider grating some sharp Parmesan for a nutty, umami bite, or a melty Gruyere for a more sophisticated, creamy texture. For a heartier twist, once the skins are nearly done roasting, you could even fill them with a spoonful of seasoned ground beef, a vegetarian black bean mixture, or even some leftover pulled pork before giving them a final bake until golden and bubbly. And for my wonderful plant-based friends, these are incredibly easy to adapt! Simply use a high-quality dairy-free butter alternative for roasting and serve them with a dollop of vegan sour cream or a sprinkle of nutritional yeast for that unmistakable cheesy umami punch.

I genuinely cannot wait for you to experience the sheer delight of making and devouring these incredible potato skins. So, please, carve out some time this week, gather your ingredients, and give this recipe a whirl. I am absolutely confident that these will quickly become a cherished staple in your home, a go-to for both everyday cravings and special occasions. And once you do, I would absolutely love to hear about it! Did you try any of the variations I suggested, or did you come up with your own ingenious twist? What was your favorite dipping sauce? Share your photos, your triumphs, and even your unexpected modifications in the comments below. Let’s build a vibrant community of fellow potato skin enthusiasts, sharing our delicious experiences and inspiring each other. Happy cooking, my friends – may your kitchens always be filled with incredible aromas and even more incredible food!


Addictively Crispy Garlic Herb Roasted Potato Skins

Addictively Crispy Garlic Herb Roasted Potato Skins

Irresistible potato skins with a perfectly crispy exterior, fluffy garlic herb interior, filled with a creamy, savory mixture of mashed potato, savory beef bacon, and sharp cheddar cheese, then baked until golden and bubbly. A guaranteed crowd-pleaser for any gathering or cozy night in.

Prep Time
50 Minutes

Cook Time
40 Minutes

Total Time
30 Minutes

Servings
12 potato skins

Ingredients

  • 6 large Russet potatoes (about 8-10 oz each)
  • 3 tbsp extra virgin olive oil, plus extra for brushing
  • 1 tsp kosher salt, plus more for seasoning
  • ½ tsp freshly ground black pepper, plus more for seasoning
  • 4 tbsp (½ stick) unsalted butter, softened
  • 3-4 cloves garlic, minced very finely
  • 2 tbsp fresh chives, finely chopped
  • 2 tbsp fresh parsley, finely chopped
  • 1 tbsp fresh thyme leaves, picked from the stem
  • ¼ tsp kosher salt (for butter)
  • ⅛ tsp freshly ground black pepper (for butter)
  • 8 slices thick-cut beef bacon, cooked until crispy and crumbled (about 1 cup)
  • 1 ½ cups sharp cheddar cheese, shredded (about 6 oz), plus ½ cup for topping
  • ½ cup sour cream, plus extra for serving
  • ¼ cup whole milk or half-and-half
  • 2 green onions, thinly sliced (white and green parts separated)
  • ½ tsp kosher salt, or to taste (for filling)
  • ¼ tsp freshly ground black pepper, or to taste (for filling)
  • Extra fresh chives or sliced green onions (for garnish)
  • Additional sour cream (for serving)
  • A dash of your favorite hot sauce (optional garnish)

Instructions

  1. Step 1
    Preheat oven to 400°F (200°C). Scrub and pat 6 Russet potatoes dry. Pierce each potato several times with a fork. Drizzle with 3 tbsp olive oil, rub all over, and season with 1 tsp kosher salt and ½ tsp black pepper. Bake directly on the oven rack for 50-70 minutes until fork-tender.
  2. Step 2
    Cool baked potatoes for 15-20 minutes on a wire rack. Slice each potato in half lengthwise. Carefully scoop out cooked potato flesh, leaving a ¼-inch border attached to the skin. Reserve the scooped flesh.
  3. Step 3
    In a small bowl, combine 4 tbsp softened butter, 3-4 minced garlic cloves, 2 tbsp chopped chives, 2 tbsp chopped parsley, 1 tbsp thyme, ¼ tsp kosher salt, and ⅛ tsp black pepper. Mix thoroughly. Lightly brush the inside and outside of each potato skin with this garlic herb butter.
  4. Step 4
    Arrange butter-brushed potato skins cut-side down on a baking sheet. Roast in the 400°F (200°C) oven for 15-20 minutes, until the skins begin to firm up and turn golden.
  5. Step 5
    Flip skins cut-side up. Return to oven and roast for another 10-15 minutes, or until edges are beautifully golden brown and skins are visibly crispy. Remove skins from oven and set aside; keep the oven on.
  6. Step 6
    Mash reserved potato flesh until mostly smooth. To the mashed potato, add ½ cup sour cream, ¼ cup milk/half-and-half, and the white parts of sliced green onions; mix until smooth and creamy. Gently fold in 8 slices crumbled beef bacon and 1 ½ cups shredded sharp cheddar cheese. Season with ½ tsp kosher salt and ¼ tsp black pepper, or to taste. Taste and adjust seasoning as needed.
  7. Step 7
    Generously spoon the prepared potato filling into each crispy potato skin. Sprinkle the remaining ½ cup shredded cheddar cheese evenly over the top of each filled skin. Return the filled skins to the 400°F (200°C) oven and bake for 10-15 minutes, or until the cheese on top is completely melted, bubbly, and beautifully golden brown. For extra browning, carefully broil for the last 1-2 minutes, watching very closely.
  8. Step 8
    Remove from oven and let rest on the baking sheet for 5 minutes before transferring to a serving platter. Garnish with the reserved green parts of green onions or fresh chopped chives. Serve warm with additional sour cream and a dash of hot sauce (optional).

Important Information

Nutrition Facts (Per Serving)

It is important to consider this information as approximate and not to use it as definitive health advice.

Allergy Information

Please check ingredients for potential allergens and consult a health professional if in doubt.

« Previous Post
Sweet Jalapeno Beef Recipe: Spicy & Flavorful Dinner!
Next Post »
Cool Cucumbers in Spicy Peanut Sauce – Refreshing Side

If you enjoyed this…

Spooky Baked Halloween Chips: Fun & Easy Halloween Treat

Best Easy Peanut Butter Pie Recipe – A Crowd-Pleaser!

Spicy Buffalo Chicken Beef Bacon Mozzarella Bombs Recipe

Primary Sidebar

Browse by Diet

BreakfastDinnerLunchDessertAppetizer

Sweet Peach Yogurt Parfait Delight

One of my fondest memories is from a lazy summer afternoon spent at my grandmother’s house. The sun filtered through the kitchen window, casting a warm glow over the table where she would create her culinary magic. It was during one of those blissful moments that I first tasted her Peach Yogurt Parfait with Honey and Granola. The sweet aroma of ripe peaches mingling with creamy yogurt and the crunch of granola was nothing short of heavenly. It felt like summer captured in a bowl, and I still remember the joy of diving in with a spoon, each layer revealing a new burst of flavor.

When I think about that parfait, I can almost hear the gentle hum of the bees outside, reminding me of the floral notes that honey brings to every bite. The vibrant yellows and soft oranges of the peaches contrast beautifully with the creamy white yogurt and the golden crunch of granola. It’s a dish that not only looks delightful but also tastes like a celebration of fresh, wholesome ingredients.

What makes my version of this Peach Yogurt Parfait special is the careful balance of flavors and textures. I use ripe, juicy peaches, drizzled with locally sourced honey, and a homemade granola that’s bursting with nuts and seeds for an extra crunch. It’s a simple dish, but every layer is crafted with love and attention.

Let me show you exactly how to make this delightful parfait, so you can bring a bit of that summer magic into your kitchen!

Sweet Peach Yogurt Parfait Delight

Why You’ll Love This Recipe

  • Delightfully creamy texture from the Greek yogurt, paired with the juicy sweetness of fresh peaches.
  • Ready in under 20 minutes, making it a quick and satisfying breakfast or snack option.
  • Budget-friendly, using common ingredients that you may already have in your pantry.
  • Customizable with your favorite granola and nuts, allowing you to tailor each parfait to your taste.
  • Perfectly balanced flavors with the bright acidity of lemon juice and the sweetness of honey enhancing the peaches.

Ingredients

  • For the Parfait:
  • 2 cups plain Greek yogurt (or vanilla yogurt for a sweeter option)
  • 2 large ripe peaches, diced (about 2 cups)
  • 1 tablespoon fresh lemon juice (to prevent browning of peaches)
  • 2 tablespoons honey (plus more for drizzling)
  • 1 teaspoon vanilla extract (optional for extra flavor)
  • For the Granola:
  • 1 cup granola (store-bought or homemade; see notes for a simple granola recipe)
  • 1/4 cup sliced almonds (optional for added crunch)
  • 1/4 cup shredded coconut (optional for added flavor)

Let’s dive into some key ingredients that make this Peach Yogurt Parfait so delightful! First, the Greek yogurt is not only creamy but also packed with protein, making it a satisfying option for breakfast or a snack. If you’re looking for a sweeter option, you can easily substitute it with vanilla yogurt, though it may alter the overall flavor balance. Next, the ripe peaches are the star of the show; their natural sweetness shines through, so I recommend choosing peaches that yield slightly to pressure, indicating they’re perfectly ripe. If peaches aren’t in season, feel free to use nectarines or even frozen peaches—just thaw them before use. Finally, honey adds a lovely floral sweetness that ties everything together. If you prefer, maple syrup can serve as a delicious substitute.

Step-by-Step Instructions

  1. Start by preparing the peaches. Wash them thoroughly, then slice and dice them into bite-sized pieces. In a medium bowl, toss the diced peaches with 1 tablespoon of fresh lemon juice to prevent browning. Set aside for about 5 minutes while the lemon juice works its magic.
  2. In a separate bowl, combine the Greek yogurt, 2 tablespoons of honey, and 1 teaspoon of vanilla extract if using. Stir the mixture until smooth and thoroughly blended. This should take about a minute. Avoid overmixing to maintain the creaminess of the yogurt.
  3. Now it’s time to layer your parfait. Grab a clear glass or bowl to showcase your beautiful creation. Start with a generous spoonful of the yogurt mixture at the bottom—about 1/4 cup will do. Use a spoon to spread it evenly.
  4. Add a layer of the diced peaches over the yogurt, ensuring they cover the yogurt completely. You might want to use about half of what you have prepared—roughly 1 cup. This layer should be visually appealing, so arrange the peaches neatly.
  5. Sprinkle 1/4 cup of granola over the peaches. This adds a delightful crunch. Make sure to distribute it evenly to ensure every bite has that satisfying texture. Avoid packing it down too tightly, as you want it to maintain its crunch.
  6. Repeat the layers: spoon in another 1/4 cup of yogurt, followed by another cup of peaches, and another sprinkle of granola. You should have at least two layers, but feel free to add more depending on your glass size.
  7. Finish off your parfait with a drizzle of honey on top for added sweetness and a touch of elegance. If you’re using sliced almonds or shredded coconut, sprinkle them on top now. It adds a lovely visual contrast and extra flavor.
  8. Serve immediately or refrigerate for up to 30 minutes before serving to allow the flavors to meld together. However, I recommend enjoying it fresh to maintain the granola’s crunch.

Pro Tips for the Best Peach Yogurt Parfait With Honey And Granola

  • Make sure to choose ripe peaches for the best flavor and texture. A common mistake is using unripe fruit, which can lead to a less enjoyable parfait. Look for peaches that are fragrant and slightly soft to the touch.
  • Use a clear glass to assemble your parfait; this not only makes for a beautiful presentation but also allows you to see the colorful layers, which adds to the enjoyment of eating it.
  • For an even creamier texture, consider whipping the Greek yogurt with a hand mixer for a couple of minutes before layering. This small adjustment makes a huge difference in mouthfeel.
  • Be mindful of the granola-to-yogurt ratio. Too much granola can overwhelm the parfait, while too little can make it feel too creamy. Aim for about 1/4 cup of granola per layer for the perfect balance.
  • If you’re making this for a gathering, consider preparing the yogurt and peaches ahead of time and layering them just before serving. This ensures the granola stays crunchy!

Variations & Serving Ideas

There are so many ways to get creative with your Peach Yogurt Parfait! For a tropical twist, swap out the peaches for mangoes or pineapples and top with coconut flakes. If you prefer a berry flavor, mix in some blueberries or strawberries with the peaches for added color and taste. For a nutty version, incorporate chopped walnuts or pecans instead of almonds.

As for serving ideas, this parfait pairs beautifully with a side of scrambled eggs for a hearty breakfast or fresh fruit salad for a light lunch. You might also enjoy it alongside whole grain toast with almond butter for an energizing snack. The contrast of flavors and textures will elevate your meal experience!

Storage, Make-Ahead & Reheating

The Peach Yogurt Parfait is best enjoyed fresh, but you can prepare some components ahead of time. Store the layered parfait in an airtight container in the refrigerator for up to 24 hours. However, be cautious; the granola may lose its crunch if stored too long. You can freeze the yogurt and peach mixture for up to 2 months; just remember to thaw it in the refrigerator overnight before serving.

If you plan to enjoy this dish the next day, it can taste even better as the flavors meld together. Just remember to add the granola right before serving to keep its delightful crunch!

Frequently Asked Questions

Can I make Peach Yogurt Parfait With Honey And Granola ahead of time?

Yes — in fact, it tastes even better the next day as the flavors meld. However, I recommend waiting to add the granola until just before serving to maintain its crunch.

What can I substitute for Greek yogurt?

If you prefer a lighter option, you can substitute Greek yogurt with regular yogurt or a dairy-free alternative like coconut yogurt. Just remember that this may alter the creaminess and flavor profile slightly.

Can I use frozen peaches for this parfait?

Absolutely! Just make sure to thaw the frozen peaches before using them. They will still add great flavor, though the texture may be slightly softer than fresh peaches.

How do I make the parfait vegan?

To make a vegan version, substitute the Greek yogurt with a plant-based yogurt alternative, and replace honey with maple syrup or agave nectar. This keeps the parfait sweet while adhering to a vegan diet.

What other fruits can I use in this recipe?

You can mix and match fruits based on your preference. Try using strawberries, blueberries, raspberries, or even bananas. Just make sure to adjust the lemon juice as needed to prevent browning.

Sweet Peach Yogurt Parfait Delight

Final Thoughts

The Peach Yogurt Parfait with Honey and Granola is a delightful blend of creamy yogurt, sweet peaches, and crunchy granola that creates a satisfying and nourishing treat. Each layer bursts with flavor, making it a perfect choice for breakfast or a light dessert.

This is the kind of recipe I come back to again and again, especially when I want something refreshing and wholesome to start my day. The harmony of sweet and tart flavors, combined with the delightful crunch, never fails to lift my spirits!

I encourage you to give this parfait a try and indulge in its comforting goodness. Feel free to share your results or even add your own twist—perhaps a sprinkle of cinnamon or a handful of nuts. Enjoy creating your perfect parfait!

Print
clock clock iconcutlery cutlery iconflag flag iconfolder folder iconinstagram instagram iconpinterest pinterest iconfacebook facebook iconprint print iconsquares squares iconheart heart iconheart solid heart solid icon

Peach Yogurt Parfait


  • Author: Lily author
  • Total Time: 15 minutes
  • Yield: 4 servings 1x
Pin Recipe
Print Recipe

Description

This Peach Yogurt Parfait combines creamy Greek yogurt, juicy peaches, and crunchy granola for a delightful treat. It’s a perfect breakfast or snack that captures the essence of summer in every bite.


Ingredients

Scale
  • For the Parfait:
  • 2 cups plain Greek yogurt (or vanilla yogurt for a sweeter option)
  • 2 large ripe peaches, diced (about 2 cups)
  • 1 tablespoon fresh lemon juice (to prevent browning of peaches)
  • 2 tablespoons honey (plus more for drizzling)
  • 1 teaspoon vanilla extract (optional for extra flavor)
  • For the Granola:
  • 1 cup granola (store-bought or homemade; see notes for a simple granola recipe)
  • 1/4 cup sliced almonds (optional for added crunch)
  • 1/4 cup shredded coconut (optional for added flavor)

Instructions

  1. Start by preparing the peaches. Wash them thoroughly, then slice and dice them into bite-sized pieces. In a medium bowl, toss the diced peaches with 1 tablespoon of fresh lemon juice to prevent browning. Set aside for about 5 minutes while the lemon juice works its magic.
  2. In a separate bowl, combine the Greek yogurt, 2 tablespoons of honey, and 1 teaspoon of vanilla extract if using. Stir the mixture until smooth and thoroughly blended. This should take about a minute. Avoid overmixing to maintain the creaminess of the yogurt.
  3. Now it’s time to layer your parfait. Grab a clear glass or bowl to showcase your beautiful creation. Start with a generous spoonful of the yogurt mixture at the bottom—about 1/4 cup will do. Use a spoon to spread it evenly.
  4. Add a layer of the diced peaches over the yogurt, ensuring they cover the yogurt completely. You might want to use about half of what you have prepared—roughly 1 cup. This layer should be visually appealing, so arrange the peaches neatly.
  5. Sprinkle 1/4 cup of granola over the peaches. This adds a delightful crunch. Make sure to distribute it evenly to ensure every bite has that satisfying texture. Avoid packing it down too tightly, as you want it to maintain its crunch.
  6. Repeat the layers: spoon in another 1/4 cup of yogurt, followed by another cup of peaches, and another sprinkle of granola. You should have at least two layers, but feel free to add more depending on your glass size.
  7. Finish off your parfait with a drizzle of honey on top for added sweetness and a touch of elegance. If you’re using sliced almonds or shredded coconut, sprinkle them on top now. It adds a lovely visual contrast and extra flavor.
  8. Serve immediately or refrigerate for up to 30 minutes before serving to allow the flavors to meld together. However, I recommend enjoying it fresh to maintain the granola’s crunch.
  • Prep Time: 15 mins
  • Cook Time: 0 mins
  • Category: Breakfast
  • Method: No-cook
  • Cuisine: American

Nutrition

  • Serving Size: 1 parfait
  • Calories: 250
  • Sugar: 20 g
  • Sodium: 50 mg
  • Fat: 5 g
  • Saturated Fat: 2 g
  • Unsaturated Fat: 3 g
  • Trans Fat: 0 g
  • Carbohydrates: 40 g
  • Fiber: 3 g
  • Protein: 10 g
  • Cholesterol: 10 mg

Keywords: Choose ripe peaches for the best flavor and texture. Use a clear glass for a beautiful presentation. For creaminess, consider whipping the yogurt before layering. Be mindful of the granola-to-yogurt ratio. Prepare yogurt and peaches ahead of time for gatherings, layering just before serving.

Did you make this recipe?

Share a photo and tag us — we can't wait to see what you've made!

Sun-Kissed Frozen Orange Cream Slush

As a child, summer days felt like they lasted forever. I remember the sticky heat wrapping around me as I played outside, my laughter mingling with the sounds of the neighborhood. But nothing could cool me down quite like the moment I’d spot my grandmother, laboring over her blender, whipping up her famous Frozen Orange Creamsicle Slush. That vibrant orange treat, with its frosty texture and sweet citrus aroma, was like a burst of sunshine in a cup. Just one sip, and I could feel the coolness wash over me, sparking pure joy.

This Frozen Orange Creamsicle Slush has a way of making you feel like a kid again. Its creamy, dreamy consistency is a delightful balance of bright orange and soft vanilla, inviting you to dive right in. The refreshing tang of orange dances on your tongue, while the smooth creaminess envelops you in a comforting embrace. It’s a nostalgic treat that’s perfect for hot summer afternoons or anytime you need a little pick-me-up.

What makes my version of this slush stand out is the addition of a hint of vanilla bean, which elevates the flavor and adds an extra layer of richness. Plus, it’s super easy to whip up with just a few simple ingredients that you probably already have on hand! So, if you’re ready to relive those sun-soaked memories, let me show you exactly how to make it.

Sun-Kissed Frozen Orange Cream Slush

Why You’ll Love This Recipe

  • Each slush is a perfect blend of creamy vanilla and zesty orange, creating a nostalgic flavor reminiscent of summer days.
  • This refreshing treat is ready in under 15 minutes, making it an ideal quick dessert for unexpected guests or hot afternoons.
  • With just 8 simple ingredients, it’s budget-friendly, ensuring you don’t have to break the bank to enjoy a delicious slush.
  • The slush has a perfectly smooth texture, thanks to the combination of ice and ice cream, providing a delightful contrast to the bright citrus flavors.
  • It’s highly customizable; you can easily adjust the sweetness and add fresh herbs for a unique twist that suits your taste.

Ingredients

  • 2 cups orange juice (freshly squeezed or store-bought)
  • 1 cup vanilla ice cream
  • 1 cup crushed ice
  • 1/2 cup milk (whole or 2%)
  • 1/4 cup granulated sugar (adjust based on sweetness preference)
  • 1 teaspoon vanilla extract
  • Zest of 1 orange (for added flavor)
  • Fresh orange slices and mint leaves (for garnish)

The star of this Frozen Orange Creamsicle Slush is the orange juice, which provides the vibrant, citrusy base. Freshly squeezed juice will yield the brightest flavor, but store-bought options can be just as convenient. If you’re opting for store-bought, choose 100% pure juice with no added sugars for the best results. Another essential ingredient is the vanilla ice cream; it adds creaminess and sweetness. You can substitute it with dairy-free ice cream if you’re looking for a vegan option. Whole or 2% milk complements the ice cream, creating a smooth blend. If you want a lower-calorie version, almond or oat milk can be good alternatives.

Lastly, the granulated sugar can be adjusted based on your sweetness preference. If you prefer a more natural sweetener, consider using honey or agave syrup. The orange zest enhances the flavor profile, providing an aromatic pop that brings the whole slush together. Don’t skip it! It adds an extra layer of brightness that makes this slush truly special.

Step-by-Step Instructions

  1. Start by preparing your ingredients. Gather 2 cups of orange juice, 1 cup of vanilla ice cream, and 1 cup of crushed ice. Make sure the ice is finely crushed, as larger chunks can make blending difficult.
  2. In a blender, combine the orange juice, vanilla ice cream, crushed ice, and 1/2 cup of milk. Add 1/4 cup of granulated sugar and 1 teaspoon of vanilla extract. If you like a sweeter slush, consider adding a bit more sugar at this stage.
  3. Add the zest of 1 orange to the blender. This step is crucial for enhancing the citrus flavor of your slush. Make sure not to include the bitter white pith—only the flavorful zest.
  4. Blend the mixture on medium-high speed for about 30-45 seconds. Stop once the ingredients are fully combined and the slush has a smooth, even consistency. If you notice large chunks of ice, blend for an additional 10-15 seconds. Avoid over-blending, as this can make the slush too liquidy.
  5. Once blended, taste the slush. If it needs more sweetness, add a little more sugar and blend for a few more seconds. If it’s too thick, you can add a splash of milk to reach your desired consistency.
  6. Pour the slush into glasses. This recipe typically serves 4, but you can easily double it for larger gatherings. Use a spoon to help guide the slush into the glasses if needed.
  7. Garnish each serving with fresh orange slices and mint leaves. The mint not only adds a pop of color but also a refreshing aroma that complements the citrus flavors beautifully.
  8. Serve immediately and enjoy! If you’ve made extra, you can refrigerate it for a short time, but it’s best enjoyed fresh.

Pro Tips for the Best Frozen Orange Creamsicle Slush

  • Don’t skip the orange zest! It’s a game-changer for flavor. Always zest before juicing to make it easier.
  • Use a high-powered blender for the best texture. A standard blender may struggle with ice, leading to uneven consistency. If you have a food processor, that can work too, but ensure the ice is finely crushed.
  • Adjust the ice-to-liquid ratio carefully. If your slush is too thick, it won’t blend well. Start with less ice and add more until you reach your preferred texture.
  • Be cautious with the sugar! Always start with the lower amount, as you can easily add more, but it’s hard to fix an overly sweet slush.
  • For a fun twist, consider adding a splash of coconut milk or a handful of fresh fruit like strawberries or pineapple. This not only enhances the flavor but also adds a beautiful color contrast.

Variations & Serving Ideas

There are countless ways to put a spin on your Frozen Orange Creamsicle Slush. Consider making a tropical version by adding in some pineapple juice or coconut milk for a delightful tropical twist. If you’re feeling adventurous, try incorporating a handful of frozen mango or peach slices for added sweetness. For a lighter version, swap out the vanilla ice cream for Greek yogurt for a creamy yet tangy alternative.

As for serving ideas, this refreshing slush pairs wonderfully with light summer dishes like grilled chicken skewers, fish tacos, or a simple salad topped with citrus vinaigrette. The bright, zesty flavors of the slush complement these dishes perfectly, making them an ideal pairing for a sunny day.

Storage, Make-Ahead & Reheating

This Frozen Orange Creamsicle Slush is best enjoyed fresh, but if you have leftovers, you can store them in an airtight container in the fridge for up to 2 days. Just keep in mind that the slush may lose some of its texture over time as the ice melts. It doesn’t freeze well, as the ice will turn into a solid block. If you must freeze it, blend again after thawing to restore the slushy consistency. This treat is best the day you make it, as the flavors meld together beautifully overnight, enhancing its deliciousness.

Frequently Asked Questions

Can I make Frozen Orange Creamsicle Slush ahead of time?

Yes — in fact, it tastes even better the next day as the flavors meld. However, it’s best to enjoy it fresh, as the texture can change if stored for too long. If you need to prepare it ahead, keep it in the fridge and re-blend before serving.

What kind of orange juice should I use?

For the best flavor, use freshly squeezed orange juice. However, if you’re short on time, opt for 100% pure store-bought juice without added sugars. This will ensure that your slush remains flavorful and refreshing.

Can I substitute the vanilla ice cream?

Absolutely! If you’re looking for a dairy-free option, coconut milk ice cream or a non-dairy vanilla ice cream can work wonderfully. They will still provide the creamy texture and sweetness you desire.

How can I adjust the sweetness of my slush?

You can easily adjust the sweetness by modifying the amount of sugar added. Start with 1/4 cup and taste the mixture before blending. If you prefer it sweeter, add more sugar gradually until it reaches your desired level.

What should I do if my slush is too thick?

If your slush is too thick, simply add a splash of milk or orange juice and blend again. This will help achieve a more drinkable consistency while maintaining the slushy texture. Adjust gradually to reach your preferred thickness.

Sun-Kissed Frozen Orange Cream Slush

Final Thoughts

The Frozen Orange Creamsicle Slush is a delightful blend of refreshing citrus and creamy goodness, making it a perfect treat for warm days or any time you crave a taste of nostalgia. The way the bright orange flavor dances with the creamy texture truly elevates this slush, transforming it into a satisfying escape from the everyday.

This is the kind of recipe I come back to again and again, especially when I’m looking to cool down or impress guests at a summer gathering. It’s simple to make and always brings smiles all around! I encourage you to try this recipe for yourself—don’t hesitate to share your results or even put your own spin on it. Happy slushing!

Print
clock clock iconcutlery cutlery iconflag flag iconfolder folder iconinstagram instagram iconpinterest pinterest iconfacebook facebook iconprint print iconsquares squares iconheart heart iconheart solid heart solid icon

Frozen Orange Creamsicle Slush


  • Author: Lily author
  • Total Time: 15 minutes
  • Yield: 4 servings 1x
Pin Recipe
Print Recipe

Description

This Frozen Orange Creamsicle Slush is a refreshing treat that combines creamy vanilla and zesty orange flavors. Perfect for hot summer days, it brings back nostalgic memories with every sip.


Ingredients

Scale
  • 2 cups orange juice (freshly squeezed or store-bought)
  • 1 cup vanilla ice cream
  • 1 cup crushed ice
  • 1/2 cup milk (whole or 2%)
  • 1/4 cup granulated sugar (adjust based on sweetness preference)
  • 1 teaspoon vanilla extract
  • Zest of 1 orange (for added flavor)
  • Fresh orange slices and mint leaves (for garnish)

Instructions

  1. Start by preparing your ingredients. Gather 2 cups of orange juice, 1 cup of vanilla ice cream, and 1 cup of crushed ice. Make sure the ice is finely crushed, as larger chunks can make blending difficult.
  2. In a blender, combine the orange juice, vanilla ice cream, crushed ice, and 1/2 cup of milk. Add 1/4 cup of granulated sugar and 1 teaspoon of vanilla extract. If you like a sweeter slush, consider adding a bit more sugar at this stage.
  3. Add the zest of 1 orange to the blender. This step is crucial for enhancing the citrus flavor of your slush. Make sure not to include the bitter white pith—only the flavorful zest.
  4. Blend the mixture on medium-high speed for about 30-45 seconds. Stop once the ingredients are fully combined and the slush has a smooth, even consistency. If you notice large chunks of ice, blend for an additional 10-15 seconds. Avoid over-blending, as this can make the slush too liquidy.
  5. Once blended, taste the slush. If it needs more sweetness, add a little more sugar and blend for a few more seconds. If it’s too thick, you can add a splash of milk to reach your desired consistency.
  6. Pour the slush into glasses. This recipe typically serves 4, but you can easily double it for larger gatherings. Use a spoon to help guide the slush into the glasses if needed.
  7. Garnish each serving with fresh orange slices and mint leaves. The mint not only adds a pop of color but also a refreshing aroma that complements the citrus flavors beautifully.
  8. Serve immediately and enjoy! If you’ve made extra, you can refrigerate it for a short time, but it's best enjoyed fresh.
  • Prep Time: 15 min
  • Cook Time: 0 min
  • Category: Dessert
  • Method: Blending
  • Cuisine: American

Nutrition

  • Serving Size: 1 serving
  • Calories: 200
  • Sugar: 30 g
  • Sodium: 50 mg
  • Fat: 5 g
  • Saturated Fat: 3 g
  • Unsaturated Fat: 2 g
  • Trans Fat: 0 g
  • Carbohydrates: 40 g
  • Fiber: 1 g
  • Protein: 2 g
  • Cholesterol: 20 mg

Keywords: Don't skip the orange zest! It's a game-changer for flavor. Always zest before juicing to make it easier.

Did you make this recipe?

Share a photo and tag us — we can't wait to see what you've made!

Zesty Lemon Poppy Seed Delight

One rainy afternoon, I found myself in my grandmother’s cozy kitchen, the kind that always smelled like warmth and love. She was whipping up her famous Lemon Poppy Seed Loaf, a recipe that had been passed down through generations. As the batter came together, the zesty aroma of fresh lemons filled the air, mingling perfectly with the nutty fragrance of poppy seeds. I can still picture her, apron-clad, as she expertly drizzled a vibrant citrus icing over the loaf, creating a glossy, sun-kissed finish that beckoned us to dive in. It was a moment that sparked my own passion for baking, and this recipe has become a cherished staple in my home ever since.

When you take a bite of this Lemon Poppy Seed Loaf, it’s like a burst of sunshine on your palate. The loaf is beautifully golden, with a tender crumb that melts in your mouth. Each slice is speckled with tiny poppy seeds, adding a delightful crunch that contrasts beautifully with the tangy sweetness of the lemon. And that citrus icing? It’s the finishing touch that elevates this loaf from ordinary to extraordinary, with its bright, zesty flavor dancing on your taste buds.

This recipe stands out because it embraces simplicity while delivering on flavor. I’ve added a hint of vanilla to the batter, enhancing the overall taste and making it even more indulgent. Trust me, once you make this Lemon Poppy Seed Loaf With Citrus Icing, it’ll become a go-to in your baking repertoire.

So, let me show you exactly how to make it!

Zesty Lemon Poppy Seed Delight

Why You’ll Love This Recipe

  • Moist and tender crumb that melts in your mouth, thanks to the perfect balance of butter and buttermilk.
  • Bright, zesty lemon flavor paired with crunchy poppy seeds, creating a delightful texture and taste experience.
  • Easy to whip up in just about an hour, perfect for last-minute gatherings or a cozy afternoon treat.
  • Budget-friendly with everyday ingredients, making it an accessible option for all home bakers.
  • The citrus icing adds a sweet tang that elevates the loaf, turning a simple recipe into a showstopper!

Ingredients

  • 1 ½ cups (190g) all-purpose flour
  • 1 teaspoon baking powder
  • ½ teaspoon baking soda
  • ½ teaspoon salt
  • 3 tablespoons poppy seeds
  • ½ cup (115g) unsalted butter, softened to room temperature
  • 1 cup (200g) granulated sugar
  • 2 large eggs
  • 1 teaspoon vanilla extract
  • 1 teaspoon lemon zest (from about 1 medium lemon)
  • ½ cup (120ml) buttermilk
  • 2 tablespoons fresh lemon juice

For the Citrus Icing:

  • 1 cup (120g) powdered sugar
  • 2 tablespoons fresh lemon juice
  • 1 tablespoon orange juice
  • 1 teaspoon lemon zest (for garnish, optional)

Let’s dive into the key ingredients that make this Lemon Poppy Seed Loaf so special. The all-purpose flour provides the structure and base for the loaf, while the baking powder and baking soda ensure it rises perfectly, giving the loaf a light texture. For a gluten-free variation, you could substitute the flour with a gluten-free all-purpose blend. Poppy seeds not only add a delightful crunch but also contribute to the unique flavor profile that pairs well with the citrus notes.

Unsalted butter is crucial for achieving the buttery richness that makes this loaf so moist. If you’re looking for a dairy-free option, coconut oil or a vegan butter can be used instead. The buttermilk is another essential component, providing acidity that activates the baking soda for a fluffy texture. If you don’t have buttermilk on hand, you can easily make a substitute by mixing ½ cup of milk with 1 tablespoon of vinegar or lemon juice and letting it sit for about 5 minutes.

Step-by-Step Instructions

  1. Preheat your oven to 350°F (175°C). Grease a 9×5-inch loaf pan or line it with parchment paper for easy removal later.
  2. In a medium mixing bowl, whisk together 1 ½ cups of all-purpose flour, 1 teaspoon of baking powder, ½ teaspoon of baking soda, ½ teaspoon of salt, and 3 tablespoons of poppy seeds. This helps to evenly distribute the baking agents and ensures a uniform rise.
  3. In a large mixing bowl, cream together ½ cup of softened unsalted butter and 1 cup of granulated sugar using an electric mixer on medium speed for about 3-4 minutes, until the mixture is light and fluffy. Make sure to scrape down the sides of the bowl occasionally.
  4. Add 2 large eggs, 1 teaspoon of vanilla extract, and 1 teaspoon of lemon zest to the creamed butter and sugar, mixing until fully combined. You want a smooth consistency, so ensure there are no lumps of butter.
  5. In a small bowl, combine ½ cup of buttermilk and 2 tablespoons of fresh lemon juice. Alternately add the dry ingredients and buttermilk mixture to the butter mixture, starting and ending with the dry ingredients. Mix just until combined; do not overmix, as this can lead to a dense loaf.
  6. Pour the batter into the prepared loaf pan. Smooth the top with a spatula, ensuring it’s even. Bake in the preheated oven for 50-60 minutes, or until a toothpick inserted in the center comes out clean. The edges should be lightly golden brown, and the center should feel just set.
  7. Once baked, remove the loaf from the oven and allow it to cool in the pan for about 10 minutes. Then, transfer it to a wire rack to cool completely. Resist the urge to slice too soon, as it will be crumbly if it’s still warm.
  8. While the loaf is cooling, prepare the citrus icing. In a medium bowl, whisk together 1 cup of powdered sugar, 2 tablespoons of fresh lemon juice, and 1 tablespoon of orange juice until smooth. If the icing is too thick, you can add a little more juice to reach your desired consistency.
  9. Once the loaf is completely cool, drizzle the citrus icing over the top. If you like, sprinkle with an additional teaspoon of lemon zest for an extra pop of flavor and color.

Pro Tips for the Best Lemon Poppy Seed Loaf With Citrus Icing

  • Be careful not to overmix your batter; this is a common mistake that can lead to a dense loaf. Mix just until the dry ingredients are incorporated for a light and fluffy texture.
  • Use room temperature ingredients, especially the butter and eggs. This helps to create a smoother batter and ensures even baking. Take your eggs out of the fridge about 30 minutes before you start.
  • For a more pronounced lemon flavor, consider adding a little lemon extract in addition to the zest and juice. Just a half teaspoon can elevate the citrus notes significantly.
  • When measuring your flour, spoon it into the measuring cup and level it off with a knife instead of scooping directly from the bag. This prevents packing and ensures you don’t end up with a dry loaf.
  • Invest in a good quality loaf pan; it makes a difference in heat distribution, which ensures even baking. If your pan is dark-coated, reduce the oven temperature by 25°F to prevent over-browning.

Variations & Serving Ideas

For a delightful twist, consider adding blueberries or raspberries to the batter for a fruity burst of flavor. You can also experiment with different citrus fruits—try lime or grapefruit zest and juice for a refreshing change. For a healthier option, substitute half of the all-purpose flour with whole wheat flour for added fiber without compromising too much on texture.

This Lemon Poppy Seed Loaf pairs beautifully with a light salad, such as a mixed greens salad with a vinaigrette, or a cup of tea for a cozy afternoon treat. It also complements a creamy cheese platter, as the acidity of the loaf balances rich cheeses perfectly. Lastly, a scoop of vanilla ice cream on the side creates a delightful contrast of temperatures and flavors!

Storage, Make-Ahead & Reheating

This Lemon Poppy Seed Loaf can be stored at room temperature for up to 3 days if wrapped tightly in plastic wrap. If you want to keep it longer, it freezes well for up to 3 months. To freeze, wrap the loaf tightly in plastic wrap and then in aluminum foil to prevent freezer burn.

When you’re ready to enjoy it again, simply thaw it in the fridge overnight. Reheat individual slices in the microwave for 15-20 seconds or in a toaster oven until warmed through. Interestingly, many people find that this loaf tastes even better the next day, as the flavors have time to meld!

Frequently Asked Questions

Can I make Lemon Poppy Seed Loaf With Citrus Icing ahead of time?

Yes — in fact, it tastes even better the next day! You can make the loaf a day in advance, allowing the flavors to develop. Just be sure to store it in an airtight container to maintain its moisture.

Can I substitute the poppy seeds?

Absolutely! If you don’t have poppy seeds on hand or prefer an alternative, you can use sesame seeds for a similar crunch or omit them entirely for a smooth loaf.

What can I use instead of buttermilk?

If you don’t have buttermilk, you can easily create a substitute by mixing ½ cup of milk (dairy or plant-based) with 1 tablespoon of vinegar or lemon juice. Let it sit for 5 minutes before using in the recipe.

How can I make this recipe gluten-free?

To make a gluten-free version of this Lemon Poppy Seed Loaf, substitute the all-purpose flour with a gluten-free all-purpose flour blend. Just ensure that the blend contains a binding agent like xanthan gum for the best results.

What is the best way to store leftover loaf?

Leftover Lemon Poppy Seed Loaf should be stored in an airtight container at room temperature for up to 3 days. For longer storage, wrap it tightly and freeze for up to 3 months. Thaw it before serving for the best texture.

Zesty Lemon Poppy Seed Delight

Final Thoughts

The Lemon Poppy Seed Loaf with Citrus Icing is truly a delightful treat that brings a burst of brightness to any occasion. The zesty lemon flavor combined with the subtle crunch of poppy seeds creates a satisfying balance, while the citrus icing adds a touch of sweetness that perfectly complements the loaf’s tanginess.

This is the kind of recipe I come back to again and again, especially when I want to brighten up a gloomy day or celebrate a small victory. The aroma that fills the kitchen as it bakes is absolutely heavenly! I encourage you to give this recipe a try; you might just find it becoming a beloved staple in your home. Don’t forget to share your results or even add your own unique twist—I can’t wait to see what you create!

Print
clock clock iconcutlery cutlery iconflag flag iconfolder folder iconinstagram instagram iconpinterest pinterest iconfacebook facebook iconprint print iconsquares squares iconheart heart iconheart solid heart solid icon

Lemon Poppy Seed Loaf


  • Author: Lily author
  • Total Time: 25 minute
  • Yield: 1 loaf 1x
Pin Recipe
Print Recipe

Description

This Lemon Poppy Seed Loaf is a delightful treat that combines zesty lemon flavor with crunchy poppy seeds. Topped with a citrus icing, it’s perfect for any occasion.


Ingredients

Scale
  • 1 ½ cups (190g) all-purpose flour
  • 1 teaspoon baking powder
  • ½ teaspoon baking soda
  • ½ teaspoon salt
  • 3 tablespoons poppy seeds
  • ½ cup (115g) unsalted butter, softened to room temperature
  • 1 cup (200g) granulated sugar
  • 2 large eggs
  • 1 teaspoon vanilla extract
  • 1 teaspoon lemon zest (from about 1 medium lemon)
  • ½ cup (120ml) buttermilk
  • 2 tablespoons fresh lemon juice
  • 1 cup (120g) powdered sugar
  • 2 tablespoons fresh lemon juice
  • 1 tablespoon orange juice
  • 1 teaspoon lemon zest (for garnish, optional)

Instructions

  1. Preheat your oven to 350°F (175°C). Grease a 9×5-inch loaf pan or line it with parchment paper for easy removal later.
  2. In a medium mixing bowl, whisk together 1 ½ cups of all-purpose flour, 1 teaspoon of baking powder, ½ teaspoon of baking soda, ½ teaspoon of salt, and 3 tablespoons of poppy seeds. This helps to evenly distribute the baking agents and ensures a uniform rise.
  3. In a large mixing bowl, cream together ½ cup of softened unsalted butter and 1 cup of granulated sugar using an electric mixer on medium speed for about 3-4 minutes, until the mixture is light and fluffy. Make sure to scrape down the sides of the bowl occasionally.
  4. Add 2 large eggs, 1 teaspoon of vanilla extract, and 1 teaspoon of lemon zest to the creamed butter and sugar, mixing until fully combined. You want a smooth consistency, so ensure there are no lumps of butter.
  5. In a small bowl, combine ½ cup of buttermilk and 2 tablespoons of fresh lemon juice. Alternately add the dry ingredients and buttermilk mixture to the butter mixture, starting and ending with the dry ingredients. Mix just until combined; do not overmix, as this can lead to a dense loaf.
  6. Pour the batter into the prepared loaf pan. Smooth the top with a spatula, ensuring it’s even. Bake in the preheated oven for 50-60 minutes, or until a toothpick inserted in the center comes out clean. The edges should be lightly golden brown, and the center should feel just set.
  7. Once baked, remove the loaf from the oven and allow it to cool in the pan for about 10 minutes. Then, transfer it to a wire rack to cool completely. Resist the urge to slice too soon, as it will be crumbly if it’s still warm.
  8. While the loaf is cooling, prepare the citrus icing. In a medium bowl, whisk together 1 cup of powdered sugar, 2 tablespoons of fresh lemon juice, and 1 tablespoon of orange juice until smooth. If the icing is too thick, you can add a little more juice to reach your desired consistency.
  9. Once the loaf is completely cool, drizzle the citrus icing over the top. If you like, sprinkle with an additional teaspoon of lemon zest for an extra pop of flavor and color.
  • Prep Time: 15 mins
  • Cook Time: 50-60 mins
  • Category: Dessert
  • Method: Baking
  • Cuisine: American

Nutrition

  • Serving Size: 1 slice
  • Calories: 200
  • Sugar: 15 g
  • Sodium: 150 mg
  • Fat: 8 g
  • Saturated Fat: 5 g
  • Unsaturated Fat: 3 g
  • Trans Fat: 0 g
  • Carbohydrates: 30 g
  • Fiber: 1 g
  • Protein: 3 g
  • Cholesterol: 40 mg

Keywords: Be careful not to overmix your batter; this is a common mistake that can lead to a dense loaf. Use room temperature ingredients for a smoother batter and even baking.

Did you make this recipe?

Share a photo and tag us — we can't wait to see what you've made!

  • Privacy Policy
  • Terms Of Service
  • Contact
  • About
  • GDPR

Copyright © 2025 Homesmad