Pumpkin Pie Crisp is more than just a dessert; it’s an invitation to experience the quintessential flavors of autumn in an exciting new way. Forget the fuss of a traditional pie crust and embrace the delightful simplicity and incredible textures this dish brings to your table. As we gather with loved ones during the harvest season, the aroma of cinnamon, nutmeg, and ginger wafting from the kitchen is truly heartwarming. While classic pumpkin pie holds a cherished spot in our holiday traditions, symbolizing bounty and gratitude, this innovative crisp offers a beloved twist on a timeless comfort food.
I find myself reaching for this recipe year after year because it brilliantly combines the creamy, spiced pumpkin filling we all adore with a wonderfully buttery, streusel-like topping that delivers an irresistible crunch. This harmonious blend of smooth and crispy textures, along with that iconic autumnal spice, is simply unparalleled. It’s the perfect solution for those who love the taste of pumpkin pie but crave an added layer of indulgence and ease, making it a crowd-pleaser for any occasion. Preparing a fantastic Pumpkin Pie Crisp means you’re not just baking a dessert; you’re crafting a memorable culinary experience that everyone will rave about, promising warmth and comfort in every single spoonful.

Ingredients:
-
For the Pumpkin Filling:
- 1 (15-ounce) can pure pumpkin puree (not pumpkin pie filling) – I always make sure it’s 100% pure pumpkin for the best, most authentic flavor in our “Pumpkin Pie Crisp.”
- 1 cup (200g) granulated sugar – This gives our pumpkin filling the perfect sweetness, balancing the earthy pumpkin.
- ½ cup (120ml) milk (whole milk or evaporated milk works beautifully for richness) – The milk adds a creamy consistency and helps blend all the flavors together seamlessly.
- 2 large eggs, lightly beaten – Eggs are crucial for binding the filling and ensuring it sets up perfectly into that classic custard-like texture we all love in a pumpkin dessert.
- 1 teaspoon ground cinnamon – The quintessential pumpkin spice, warming and aromatic, a must for any “Pumpkin Pie Crisp.”
- ½ teaspoon ground ginger – Adds a lovely, slightly peppery kick that complements the cinnamon beautifully.
- ¼ teaspoon ground cloves – Just a touch for deep, complex spice notes that elevate the overall flavor profile.
- ¼ teaspoon ground nutmeg – Another essential spice, providing warmth and a hint of sweetness that pairs perfectly with pumpkin.
- ½ teaspoon salt – Don’t skip the salt! It enhances all the other flavors, bringing them to life and preventing the dish from tasting flat.
- 1 teaspoon vanilla extract – A fragrant boost that rounds out all the spices and pumpkin, adding a final layer of deliciousness.
-
For the Crisp Topping:
- 1 ½ cups (180g) all-purpose flour – The base for our wonderfully crumbly topping, giving it structure and body.
- ¾ cup (150g) packed light brown sugar – Brown sugar not only sweetens but also adds a lovely caramel-like depth and moisture to the crisp.
- ½ cup (100g) granulated sugar – For additional sweetness and to help achieve that perfect crisp texture on top of our “Pumpkin Pie Crisp.”
- 1 teaspoon ground cinnamon – To tie the topping flavors beautifully with the pumpkin filling, creating a harmonious taste experience.
- ½ teaspoon salt – Again, crucial for flavor balance in the topping, ensuring it’s not just sweet but perfectly seasoned.
- 1 cup (226g) unsalted butter, very cold and cut into ½-inch cubes – Cold butter is key for a truly crumbly, tender crisp. It prevents the butter from melting too quickly and creates pockets of steam for that perfect texture.
- 1 cup (100g) old-fashioned rolled oats – These add a fantastic chewiness and rustic texture to our crisp topping. Quick oats can be used in a pinch, but old-fashioned are preferred for their superior bite.
- ½ cup (50g) chopped pecans or walnuts (optional, but highly recommended for crunch!) – I love the added nutty texture and flavor these bring to the crisp, making every bite even more satisfying.
-
Optional Garnishes:
- Whipped cream or cool whip – A classic pairing, adding a light, creamy contrast that makes our “Pumpkin Pie Crisp” even more decadent.
- A sprinkle of ground cinnamon or nutmeg – For a beautiful finishing touch and extra aroma, enhancing the overall presentation and experience.
- Caramel sauce drizzle – For those who love an extra touch of decadence and a sweet, sticky counterpoint to the warm spices.
Phase 1: Preparing the Pumpkin Filling
- Preheat Your Oven and Prepare Your Baking Dish: Before we dive into mixing, let’s get our oven ready to welcome our delicious “Pumpkin Pie Crisp.” I always start by preheating my oven to a cozy 350°F (175°C). This ensures that when our dish goes in, it starts baking immediately and evenly, preventing any delays or uneven cooking. While the oven is warming up, grab a 9×13 inch baking dish. There’s no need to grease it, as the pumpkin filling isn’t prone to sticking, and we’ll be layering a crisp topping over it which acts as a barrier. Just make sure it’s clean and ready for action. Having everything prepped in advance makes the whole process so much smoother and more enjoyable, allowing you to focus on the fun part: creating!
- Combine the Wet Ingredients for a Smooth Base: In a large mixing bowl, let’s start building the foundation of our creamy pumpkin filling. First, gently crack and lightly beat your two large eggs. This ensures they’re well-incorporated and lend a uniform, tender texture to the final product, acting as a perfect binder. Add the entire 15-ounce can of pure pumpkin puree to the bowl. Remember, we’re looking for pure pumpkin, not the pre-spiced pie filling, as we’re going to custom-blend our spices for the perfect, nuanced balance that defines a truly great “Pumpkin Pie Crisp.” Pour in the half-cup of milk – whole milk or evaporated milk really lends a luxurious creaminess that I adore, but any milk will work wonderfully. Finally, stir in the teaspoon of vanilla extract, which adds a warm, sweet, and aromatic depth. Give these ingredients a good whisk until they are thoroughly combined and you have a beautifully smooth, vibrant orange mixture. This forms the luscious, rich base for our “Pumpkin Pie Crisp.”
- Sweeten and Spice Things Up: Now for the magic – bringing all those wonderful dessert flavors to life! To your wet pumpkin mixture, add the granulated sugar. This is where the sweetness comes in, cutting through the natural earthiness of the pumpkin and creating that familiar comforting taste. Next, sprinkle in our delightful blend of warm spices: the full teaspoon of ground cinnamon, the half-teaspoon of ground ginger, a quarter-teaspoon of ground cloves, and a quarter-teaspoon of ground nutmeg. Each spice plays a vital role in creating that complex, autumnal flavor profile. Don’t forget that crucial half-teaspoon of salt; it truly amplifies all the sweet and savory notes, preventing the dish from tasting flat and allowing the spices to sing. Using a whisk or a sturdy spoon, mix everything together until all the spices and sugar are completely dissolved and evenly distributed throughout the pumpkin mixture. You’ll notice the aroma beginning to fill your kitchen, a sure sign that something incredibly delicious is on its way! The mixture should be smooth, thick, and uniformly colored, a vibrant autumnal orange. Make sure there are no streaks of unmixed spices or sugar. This careful blending ensures every bite of our “Pumpkin Pie Crisp” is bursting with perfectly balanced flavor.
- Pour the Filling into the Baking Dish: With our perfectly spiced and sweetened pumpkin filling ready, it’s time to transfer it to our prepared 9×13 inch baking dish. Carefully pour the entire contents of the mixing bowl into the dish. I like to do this slowly to avoid any splashes or spills. Once poured, use a spatula to gently spread the pumpkin mixture evenly across the bottom of the dish. You want a consistent layer, about an inch or so thick, across the entire base. This ensures uniform baking and a beautiful presentation once our “Pumpkin Pie Crisp” is complete, with every serving getting an equal amount of that creamy goodness. Take a moment to scrape down the sides of your mixing bowl to get every last bit of that delicious filling – we don’t want to waste a drop! Set this dish aside for just a moment while we prepare the glorious crisp topping.
Phase 2: Crafting the Irresistible Crisp Topping
- Combine Dry Ingredients for the Topping: In a separate, large mixing bowl – because we always keep our wet and dry preparations separate until the right moment for optimal texture – let’s prepare the foundation for our incredible crisp topping. Measure out and add the 1 ½ cups of all-purpose flour. This will provide the crucial structure for our crumbly deliciousness. Next, add the ¾ cup of packed light brown sugar. I love brown sugar here because it lends a wonderful molasses-like depth, a slight chewiness, and a richer color to the topping. Follow that with ½ cup of granulated sugar for additional sweetness and to help create those lovely crisp, slightly caramelized edges. Sprinkle in 1 teaspoon of ground cinnamon, which beautifully ties the topping’s flavor profile to our pumpkin filling, creating a cohesive and delightful taste experience. Finally, add ½ teaspoon of salt. The salt, once again, is vital for balancing the sweetness and enhancing all the other flavors, making the topping truly irresistible. Use a whisk or a fork to thoroughly combine these dry ingredients. You want to make sure there are no lumps of brown sugar and that the spices and salt are evenly distributed. This dry mixture should look light brown and smell faintly of cinnamon and sweet sugar, hinting at the deliciousness to come.
- Incorporate the Cold Butter: The Key to Crispness: This step is where the magic of a truly crispy topping happens! Take your very cold, ½-inch cubed unsalted butter and add it directly to your bowl of dry ingredients. It is absolutely crucial that your butter is cold – straight from the refrigerator. Cold butter prevents it from melting too quickly when you incorporate it, creating those wonderful pockets of butter coated in flour. As the crisp bakes, these tiny pockets release steam, which pushes the flour layers apart, resulting in a flaky, tender, and truly crisp topping. Now, you have a few options for incorporating the butter. My preferred method is using a pastry blender, which makes quick work of cutting the butter into the flour mixture without overworking it. If you don’t have one, two knives can be used in a crisscross motion, or you can even use your fingertips. If using your fingertips, work quickly and lightly to avoid warming the butter too much with the heat from your hands. You want to work the butter into the flour mixture until it resembles coarse crumbs, with some pieces of butter still visible, ranging from the size of small peas to tiny oat flakes. Avoid overworking the mixture, as this can lead to a tough, dense topping instead of the desired crumbly texture. The process takes a few minutes, but the effort is well worth the incredible texture it yields for our “Pumpkin Pie Crisp.”
- Add the Oats and Optional Nuts for Texture: Once your butter is nicely incorporated into the flour mixture, it’s time to add the final textural elements that make this crisp so delightful. Gently stir in the 1 cup of old-fashioned rolled oats. These oats contribute a lovely chewiness and a wholesome, rustic feel to the topping, adding another layer of interest to each bite. I find old-fashioned oats work best for their robust texture, but quick oats can be substituted if that’s all you have on hand, though the texture will be slightly softer and less distinct. If you’re using them, now is also the time to fold in your ½ cup of chopped pecans or walnuts. I highly, highly recommend adding the nuts; they introduce a fantastic crunch and a warm, earthy flavor that complements the pumpkin beautifully, adding a sophisticated dimension to our “Pumpkin Pie Crisp.” Use a spoon or your hands to gently combine the oats and nuts with the crumbly butter-flour mixture until everything is evenly distributed. You’ll end up with a wonderfully textured, sweet, and buttery crumb mixture that is just begging to be baked. This mixture is what gives our “Pumpkin Pie Crisp” its signature, irresistible crunch that makes it so incredibly satisfying.
Phase 3: Assembling and Baking Your Pumpkin Pie Crisp
- Layering the Crisp Topping: With both our velvety pumpkin filling and our glorious crisp topping ready, it’s time to bring them together in the baking dish for their grand transformation. Carefully take your bowl of crumbly crisp topping and sprinkle it evenly over the top of the pumpkin filling in the 9×13 inch dish. I like to use my hands for this, gently distributing the crumbs so that every inch of the pumpkin filling is covered with a generous, uniform layer. Don’t press the topping down; we want it to remain light and airy so it can get wonderfully crispy and golden in the oven. The goal is an even, thick layer of streusel-like topping that promises a delightful contrast to the smooth, creamy pumpkin beneath. This layer will be the star of our “Pumpkin Pie Crisp” in terms of texture, providing that satisfying crunch with every spoonful.
- Baking to Golden Perfection: Now for the moment of truth! Carefully transfer your assembled “Pumpkin Pie Crisp” to your preheated 350°F (175°C) oven. Place it on the middle rack for even baking, ensuring heat circulates optimally around the dish. The baking time will typically be between 50 to 60 minutes. As it bakes, keep a watchful eye on it, especially towards the end. You’re looking for a few key indicators of doneness. The crisp topping should turn a beautiful golden brown, looking wonderfully toasted and inviting, with a rich, nutty aroma. If you notice it browning too quickly before the filling is set, you can loosely tent the dish with aluminum foil for the last 15-20 minutes of baking. The pumpkin filling underneath should be set; you can test this by gently shaking the dish – the center should only jiggle slightly, if at all, indicating it’s cooked through to a lovely custard-like consistency, much like a baked pumpkin pie. A helpful tip: if you insert a knife into the center of the pumpkin filling (avoiding the crisp topping, of course!), it should come out mostly clean. The aroma filling your kitchen will be absolutely incredible – a warm, comforting blend of pumpkin and cinnamon that truly signals autumn and home.
- Cooling for Optimal Set and Flavor: Once your “Pumpkin Pie Crisp” emerges from the oven, bubbling gently at the edges and boasting a gorgeously golden-brown, crunchy topping, it’s time for the hardest part: waiting! While it’s tempting to dig right in, allowing the crisp to cool properly is essential for two main reasons. First, it allows the pumpkin filling to finish setting completely, ensuring that perfect custard-like texture that makes a pie so delightful. If you cut into it too soon, the filling might be a bit too loose and not hold its shape as well. Second, cooling deepens and melds all those incredible flavors, allowing them to fully develop and shine, resulting in a more complex and satisfying taste experience. Transfer the baking dish to a wire rack and let it cool for at least 30 minutes, or even longer, until it’s just warm or at room temperature. The crisp topping will continue to crisp up as it cools, achieving that satisfying, snappy crunch that gives this dessert its name. I know, patience is a virtue, especially when your kitchen smells this good, but trust me, it’s worth it!
Phase 4: Serving Suggestions and Enjoyment
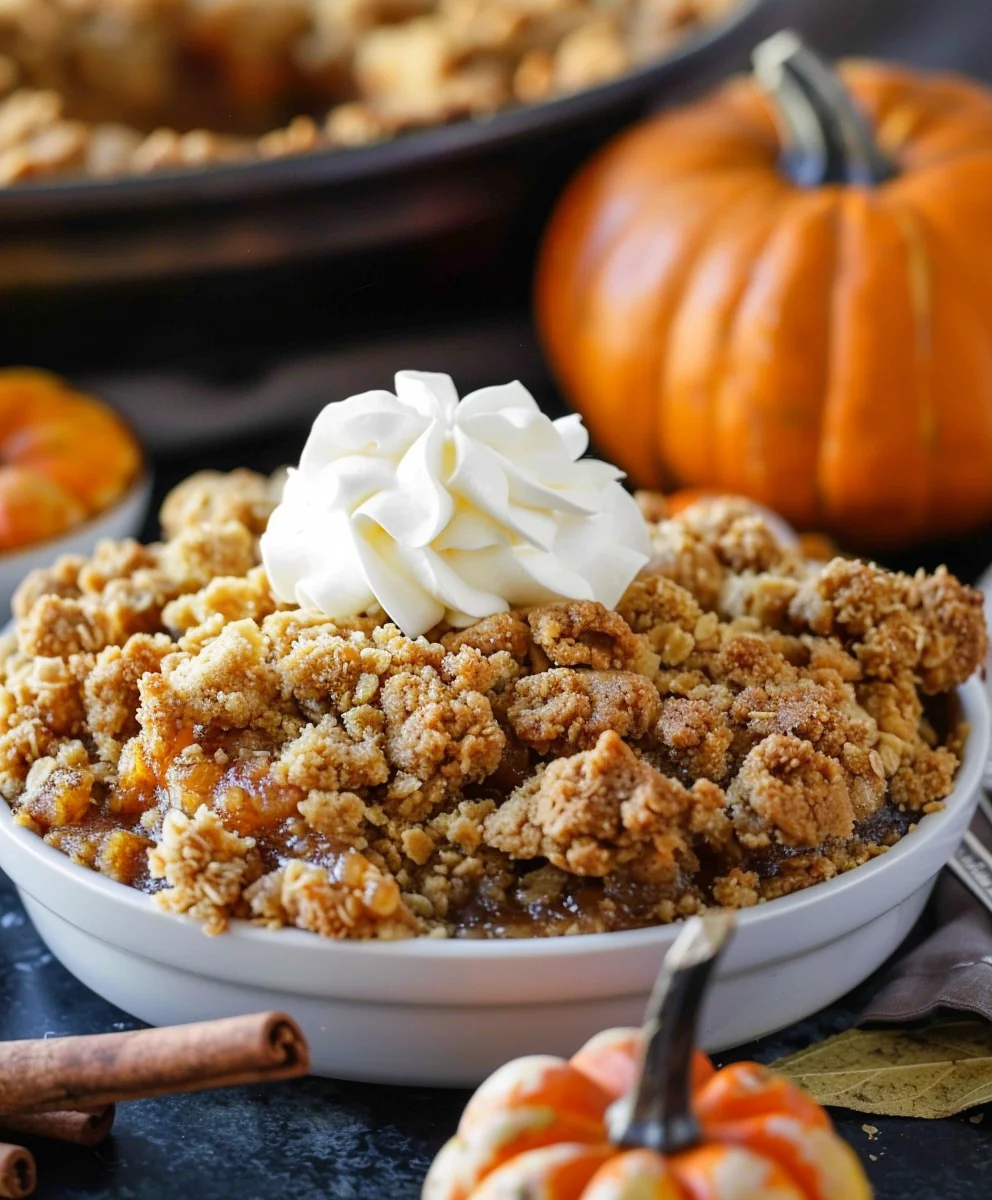
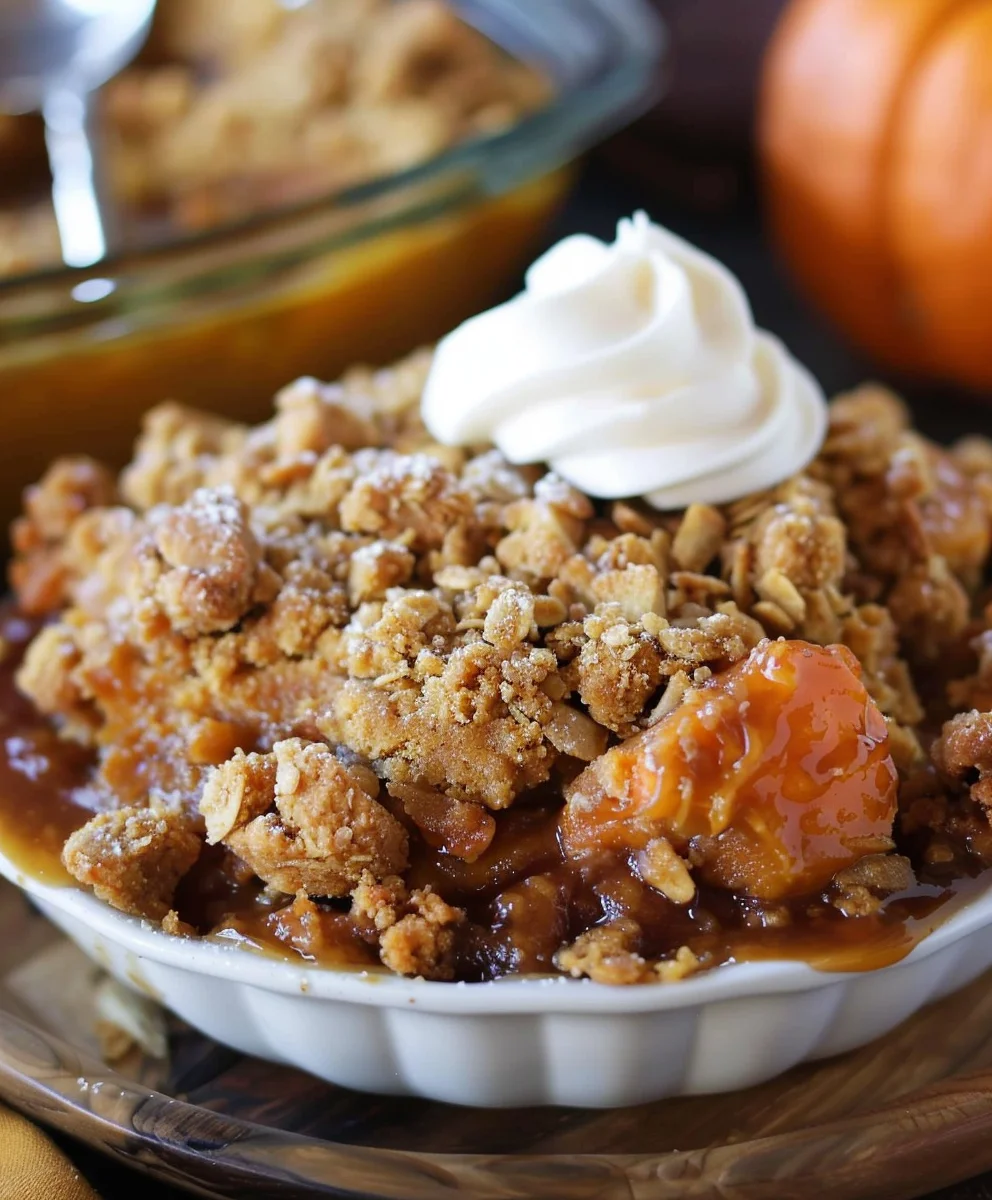
- Serving Your Delicious Creation: After the waiting game, it’s finally time to enjoy the fruits of your labor! Your “Pumpkin Pie Crisp” can be served warm, at room temperature, or even chilled – each temperature offers a slightly different, yet equally delightful, experience. I personally love it warm, as the aromas are more potent, and the topping has a delightful warmth against any cool garnishes you might add. To serve, simply scoop generous portions directly from the baking dish into individual bowls. The beauty of a crisp is its rustic nature; perfection in presentation isn’t required, just pure deliciousness! Each serving will feature a lovely balance of the smooth, creamy pumpkin filling beneath the golden, crumbly, and wonderfully textured crisp topping. This dessert is perfect for a cozy family dinner, a festive holiday gathering, or simply as a comforting and satisfying treat on a cool autumn evening. It’s a guaranteed crowd-pleaser that embodies the essence of fall.
- Enhance with Optional Garnishes: While our “Pumpkin Pie Crisp” is absolutely divine on its own, adding a garnish can elevate the experience to pure bliss, adding layers of texture and flavor. My top recommendation, and a classic for a reason, is a generous dollop of freshly whipped cream or a swirl of cool whip. The light, airy cream provides a beautiful contrast in temperature and texture to the richness of the pumpkin and the crunch of the topping, creating a truly harmonious bite. For an extra touch of elegance and aroma, you can lightly sprinkle a tiny bit of ground cinnamon or nutmeg over the whipped cream. If you’re feeling particularly indulgent, a drizzle of warm caramel sauce over the top adds a sweet, sticky layer that perfectly complements the pumpkin and spice notes. Imagine: a spoonful of warm, spiced pumpkin, crunchy oats, sweet caramel, and cool, cloud-like cream – truly a symphony of flavors and textures that makes this “Pumpkin Pie Crisp” an unforgettable dessert!
- Storing Leftovers for Future Enjoyment: Should you be so lucky as to have any leftovers of your incredible “Pumpkin Pie Crisp” (which, let’s be honest, is a rare occurrence in my house!), they store wonderfully, allowing you to savor the flavors for days to come. Simply cover the baking dish tightly with plastic wrap or aluminum foil. You can store it at room temperature for up to one day, especially if your kitchen isn’t overly warm. However, for optimal freshness and safety, particularly with the egg-based pumpkin filling, I highly recommend refrigerating it. It will keep beautifully in the refrigerator for up to 3-4 days, remaining fresh and delicious. When you’re ready to enjoy it again, you can either scoop and serve it cold – which is surprisingly refreshing and delicious on a different level! – or gently reheat individual portions in the microwave for a short burst until warm. If you want to try to revive some of that coveted crispness in the topping, you can pop a serving into a toaster oven for a few minutes until it warms through and crisps up a bit. This “Pumpkin Pie Crisp” truly is a gift that keeps on giving, bringing joy with every reheat!
Conclusion:
And there you have it, my friends! We’ve reached the sweet finale of our culinary journey with a recipe that I genuinely believe will become a cherished staple in your home, especially as the cooler weather sets in. This isn’t just another dessert; it’s an experience, a warm hug in a bowl, and an utterly irresistible treat that effortlessly combines the comforting familiarity of classic autumn flavors with a delightful textural contrast that truly sets it apart. I’ve poured my heart into perfecting this, and I can’t wait for you to discover its magic firsthand.
Why is this a must-try, you ask? Well, first and foremost, the flavor profile is simply divine. Imagine the rich, creamy essence of a traditional pumpkin pie, beautifully spiced with cinnamon, nutmeg, ginger, and cloves, all nestled beneath a golden, buttery, and slightly crunchy oat topping. It’s the perfect balance of sweet and spice, smooth and crisp, making every single spoonful an absolute delight for the senses. It’s comforting without being heavy, and decadent without being overly complicated. Beyond its incredible taste, its simplicity is another huge selling point. You don’t need a pastry chef’s skills to whip this up; the ingredients are straightforward, the steps are easy to follow, and the results are consistently spectacular. It’s the ideal dessert for a cozy family dinner, a bustling holiday gathering, or even just a quiet evening when you’re craving something truly special. This particular creation, our delightful Pumpkin Pie Crisp, truly embodies everything I love about autumn baking – it’s fuss-free, incredibly aromatic, and guaranteed to bring smiles all around.
Now, let’s talk about making this delightful creation truly your own. While it’s absolutely perfect as is, there are so many wonderful ways to elevate or customize your experience. For a classic serving, a generous dollop of freshly whipped cream, perhaps infused with a hint of vanilla or maple, is always a winner. If you’re a fan of ice cream, a scoop of vanilla bean, cinnamon swirl, or even a salted caramel ice cream alongside the warm crisp creates an unforgettable hot-and-cold sensation. Don’t hesitate to garnish with a sprinkle of extra cinnamon, a dusting of powdered sugar, or even a drizzle of homemade caramel or maple syrup for an extra touch of indulgence. For textural variations, consider adding chopped pecans or walnuts to the oat topping for an extra layer of crunch and nutty flavor. If you’re feeling adventurous with spices, a pinch of allspice or cardamom can introduce fascinating new dimensions to the pumpkin base. For those with dietary considerations, this recipe is remarkably adaptable. You can easily swap out the dairy butter for a plant-based alternative and use a dairy-free whipped topping or ice cream. Gluten-free oats and a good quality gluten-free flour blend can also be used in the topping to make it suitable for a wider audience, ensuring everyone can enjoy a slice of this autumnal bliss. This versatility is one of the many reasons why the Pumpkin Pie Crisp stands out—it caters to diverse preferences and occasions.
So, what are you waiting for? I wholeheartedly encourage you to roll up your sleeves, gather your ingredients, and give this incredible recipe a try. It’s more than just a dessert; it’s a moment of warmth, joy, and shared happiness. Don’t be shy about experimenting with the serving suggestions or adding your own unique twists – that’s the beauty of home cooking! Once you’ve experienced the pure delight of this Pumpkin Pie Crisp, I would absolutely love to hear from you. Share your baking triumphs, your favorite variations, and even photos of your beautiful creations! Your feedback and experiences mean the world to me and inspire me to keep sharing more delicious recipes. Happy baking, everyone!
Pumpkin Pie Crisp
This Pumpkin Pie Crisp offers a delightful twist on classic pumpkin pie, combining a creamy, spiced pumpkin filling with an irresistible, buttery, streusel-like topping. It’s an easy-to-make, crowd-pleasing dessert perfect for any fall gathering, delivering comforting autumnal flavors in every spoonful.
Ingredients
-
1 (15 oz) can pure pumpkin puree
-
1 cup granulated sugar
-
3 large eggs
-
2 teaspoons pumpkin pie spice
-
½ teaspoon salt (for filling)
-
2 teaspoons vanilla extract
-
⅔ cup heavy cream
-
2 cups all-purpose flour
-
1 ½ cups granulated sugar (for topping)
-
2 teaspoons cinnamon
-
½ teaspoon salt (for topping)
-
12 tablespoons (1 ½ sticks) unsalted butter, melted
Instructions
-
Step 1
Preheat your oven to 350°F (175°C). In a large bowl, whisk together the pumpkin puree, 1 cup granulated sugar, 3 large eggs, 2 teaspoons pumpkin pie spice, ½ teaspoon salt (for filling), 2 teaspoons vanilla extract, and ⅔ cup heavy cream until smooth. Pour the mixture evenly into an ungreased 9×13 inch baking dish. -
Step 2
In a separate large bowl, combine 2 cups all-purpose flour, 1 ½ cups granulated sugar (for topping), 2 teaspoons cinnamon, and ½ teaspoon salt (for topping). Pour in the 12 tablespoons (1 ½ sticks) of melted unsalted butter. Mix with a fork or your hands until the mixture resembles coarse, buttery crumbs. -
Step 3
Evenly sprinkle the prepared crisp topping over the pumpkin filling in the baking dish. Transfer to the preheated oven and bake for 50-60 minutes, or until the topping is golden brown and the pumpkin filling is set (a slight jiggle in the center is acceptable). -
Step 4
Remove the Pumpkin Pie Crisp from the oven and place it on a wire rack to cool for at least 30 minutes. This allows the filling to fully set and flavors to meld. Serve warm, at room temperature, or chilled. Optional garnishes include whipped cream, a sprinkle of cinnamon, or a drizzle of caramel sauce. -
Step 5
Cover any leftover Pumpkin Pie Crisp tightly with plastic wrap or aluminum foil and refrigerate for up to 3-4 days. It can be reheated gently in the microwave or enjoyed cold.
Important Information
Nutrition Facts (Per Serving)
It is important to consider this information as approximate and not to use it as definitive health advice.
Allergy Information
Please check ingredients for potential allergens and consult a health professional if in doubt.