• Skip to primary navigation
  • Skip to main content
  • Skip to primary sidebar
Homesmad

Homesmad

  • Home
  • Breakfast & Brunch
  • Appetizers & Snacks
  • Dinner
  • Dessert
  • About
  • Privacy Policy
  • Contact
Homesmad
  • Home
  • Breakfast & Brunch
  • Appetizers & Snacks
  • Dinner
  • Dessert
  • About
  • Privacy Policy
  • Contact

Irresistible Apple Crumble Cupcakes: Your New Favorite!

October 16, 2025 by Lily author

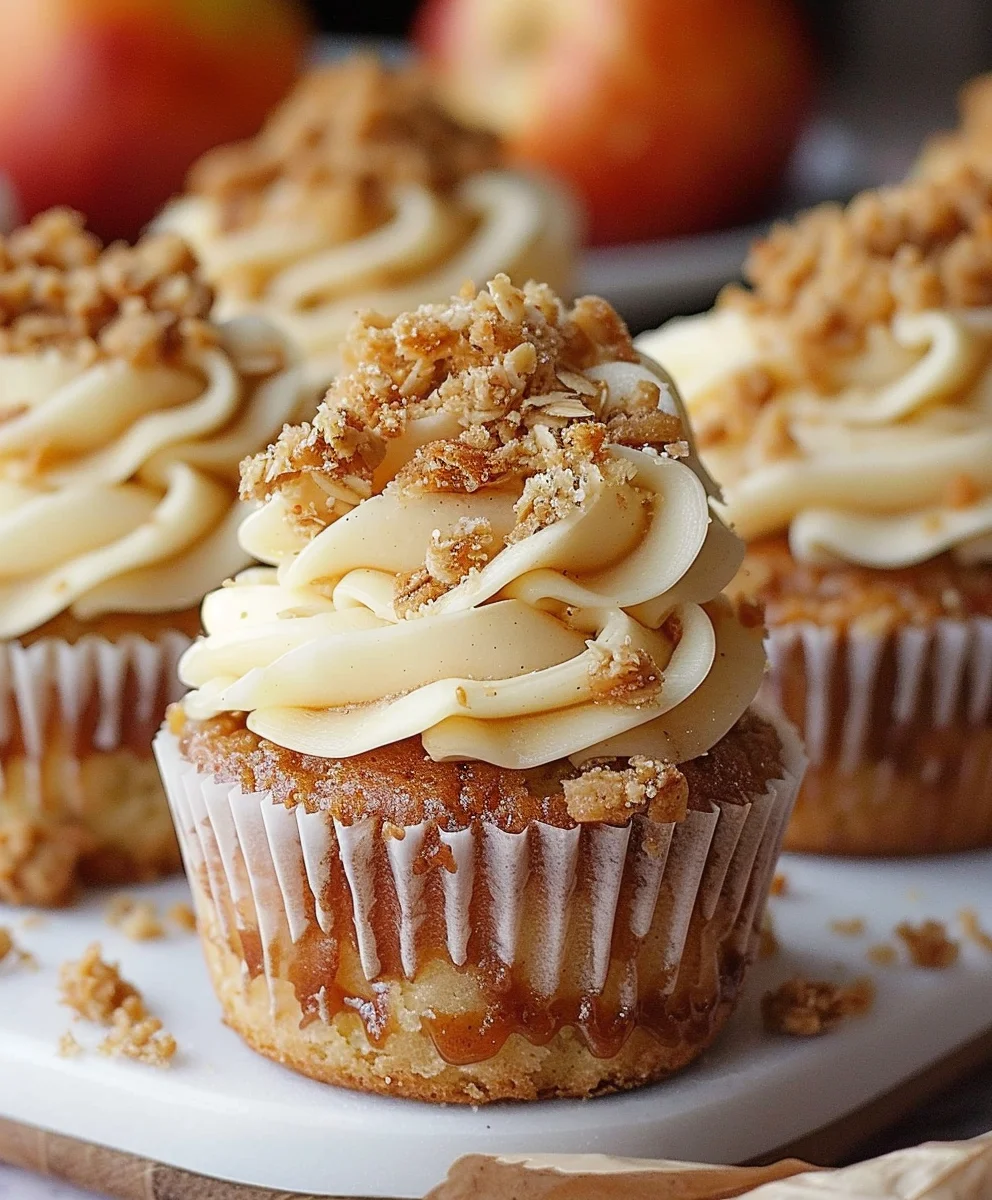
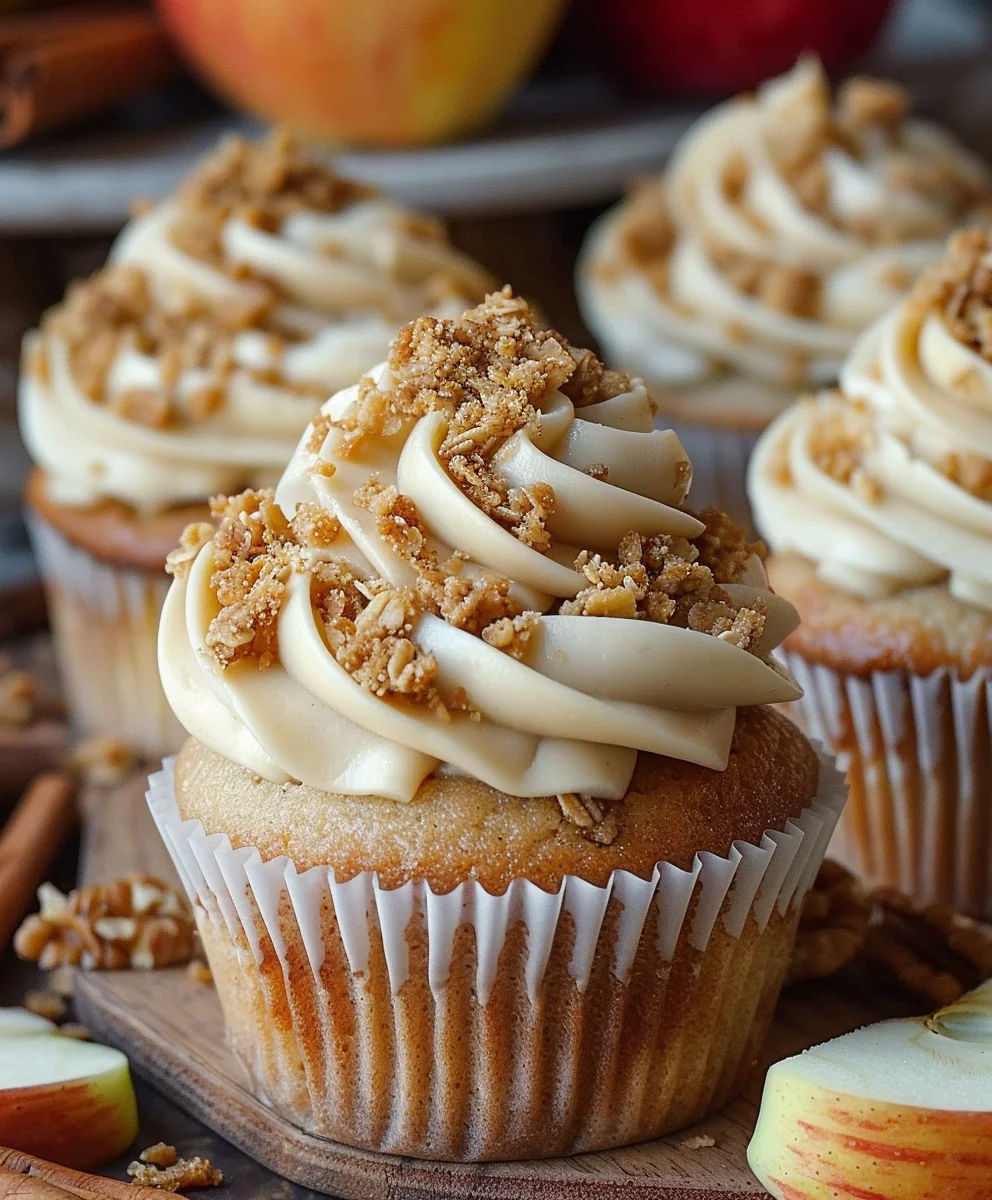
Apple Crumble Cupcakes offer a truly enchanting twist on two beloved classics, bringing together the comforting warmth of a traditional apple crumble with the delightful portability of a cupcake. I’m absolutely thrilled to share this recipe with you, as it consistently brings smiles to every face it graces. Imagine sinking your teeth into a perfectly moist, spiced cupcake, only to discover a tender, warmly spiced apple filling nestled within, all crowned with that irresistible, buttery, golden crumble topping we all adore.

A Beloved Classic, Reimagined for Delight

This ingenious fusion is more than just a dessert; it’s a celebration of cozy indulgence. While the classic apple crumble holds a special place in culinary history, particularly as a comforting staple in British homes, these individual treats elevate that experience. They provide all the nostalgic flavors you crave without the need for a fork and plate, making them ideal for gatherings, school lunches, or a simple, well-deserved treat. People adore these Apple Crumble Cupcakes not only for their innovative combination of textures – the soft cake, the tender fruit, and the crunchy topping – but also for the way they perfectly balance sweetness with a hint of tart apple. It’s truly a symphony of flavor in every bite!

Irresistible Apple Crumble Cupcakes: Your New Favorite! this RECIPE

Ingredients:

  • For the Apple Filling:

    • 2 medium-sized apples (about 300g), such as Honeycrisp, Gala, or Granny Smith, peeled, cored, and finely diced (about ¼-inch pieces)
    • 2 tablespoons unsalted butter
    • 2 tablespoons granulated sugar
    • ½ teaspoon ground cinnamon
    • ¼ teaspoon ground nutmeg
    • 1 tablespoon fresh lemon juice
    • 1 tablespoon cornstarch mixed with 2 tablespoons cold water (slurry)
  • For the Crumble Topping:

    • ½ cup (113g) all-purpose flour
    • ¼ cup (50g) granulated sugar
    • ¼ cup (55g) packed light brown sugar
    • ½ teaspoon ground cinnamon
    • ¼ teaspoon salt
    • 4 tablespoons (56g) cold unsalted butter, cut into small cubes
  • For the Apple Crumble Cupcakes:

    • 1 ½ cups (190g) all-purpose flour, sifted
    • 1 ½ teaspoons baking powder
    • ½ teaspoon baking soda
    • ¼ teaspoon salt
    • ½ cup (113g) unsalted butter, softened
    • 1 cup (200g) granulated sugar
    • 2 large eggs, at room temperature
    • 1 teaspoon pure vanilla extract
    • ½ cup (120ml) buttermilk, at room temperature (or homemade: ½ cup milk + ½ tablespoon lemon juice, let sit for 5 minutes)
    • ¼ cup (60ml) whole milk, at room temperature
  • For the Brown Sugar Cinnamon Buttercream:

    • 1 cup (226g) unsalted butter, softened
    • 1 ½ cups (180g) powdered sugar, sifted
    • ½ cup (110g) packed light brown sugar
    • 1 teaspoon ground cinnamon
    • ¼ teaspoon salt
    • 2-3 tablespoons heavy cream or milk, as needed
    • 1 teaspoon pure vanilla extract

For the Apple Filling:

  1. Prepare the Apples: First things first, let’s get those apples ready! Peel, core, and finely dice your chosen apples into small, uniform ¼-inch pieces. The smaller the dice, the more evenly they will cook and the better they will integrate into your Apple Crumble Cupcakes.
  2. Sauté the Apples: In a medium saucepan or skillet, melt the 2 tablespoons of unsalted butter over medium heat. Once the butter is shimmering, add the diced apples, 2 tablespoons of granulated sugar, ½ teaspoon of ground cinnamon, and ¼ teaspoon of ground nutmeg. Stir everything together to ensure the apples are well coated with the spices and sugar.
  3. Cook Until Tender: Cook the apples for about 8-10 minutes, stirring occasionally, until they have softened considerably but still retain a slight bite. You want them tender, not mushy. At this point, the mixture will be fragrant and delightful.
  4. Add Lemon Juice and Thicken: Stir in the 1 tablespoon of fresh lemon juice. This not only brightens the flavor but also helps prevent the apples from browning too much. Then, give your cornstarch slurry (1 tablespoon cornstarch mixed with 2 tablespoons cold water) a quick stir to re-combine, and pour it into the apple mixture. Continue to cook and stir for another 1-2 minutes, until the apple filling has thickened to a syrupy consistency. It should coat the back of a spoon.
  5. Cool the Filling: Remove the saucepan from the heat and transfer the apple filling to a shallow dish or plate. Spread it out to help it cool down quickly. It’s absolutely crucial that the apple filling is completely cooled to room temperature before incorporating it into the cupcakes or using it for assembly. Warm filling can melt your batter or frosting.

For the Crumble Topping:

  1. Combine Dry Ingredients: In a medium-sized bowl, whisk together the ½ cup of all-purpose flour, ¼ cup of granulated sugar, ¼ cup of packed light brown sugar, ½ teaspoon of ground cinnamon, and ¼ teaspoon of salt. Make sure there are no lumps of brown sugar and that all the dry ingredients are evenly distributed.
  2. Incorporate Cold Butter: Add the 4 tablespoons of cold unsalted butter, which you’ve cut into small cubes, to the dry ingredients. This step is key for achieving that wonderful crumbly texture.
  3. Create the Crumble: Using your fingertips, a pastry blender, or two forks, work the butter into the flour mixture. You want to rub and pinch the butter into the dry ingredients until the mixture resembles coarse crumbs with some pea-sized pieces of butter remaining. Avoid overworking the dough, as this can lead to a tough crumble. The cold butter prevents it from melting too quickly and creates pockets of steam, resulting in a perfectly crisp topping for your Apple Crumble Cupcakes.
  4. Chill the Crumble: Place the bowl with the crumble topping into the refrigerator while you prepare the cupcake batter. Chilling helps the butter stay firm, which in turn contributes to a crunchier topping when baked.

For the Apple Crumble Cupcakes:

  1. Prepare Your Muffin Tin: Preheat your oven to 350°F (175°C). Line a 12-cup muffin tin with paper liners. Lightly spray the inside of the liners with non-stick cooking spray for extra insurance against sticking, especially if your liners are prone to it.
  2. Whisk Dry Ingredients: In a medium bowl, whisk together the 1 ½ cups of sifted all-purpose flour, 1 ½ teaspoons of baking powder, ½ teaspoon of baking soda, and ¼ teaspoon of salt. Sifting the flour beforehand ensures a lighter, airier cupcake. Set this bowl aside.
  3. Cream Butter and Sugar: In a large mixing bowl, using an electric mixer on medium speed, cream together the ½ cup of softened unsalted butter and 1 cup of granulated sugar for 3-5 minutes, until the mixture is light, fluffy, and pale in color. Scrape down the sides of the bowl occasionally to ensure everything is well combined. This step is crucial for incorporating air into the batter, which contributes to the tender crumb of your Apple Crumble Cupcakes.
  4. Add Eggs and Vanilla: Beat in the two large eggs, one at a time, mixing well after each addition until fully incorporated. Then, stir in the 1 teaspoon of pure vanilla extract. Continue to beat until the mixture is smooth and creamy.
  5. Alternate Dry and Wet Ingredients: With the mixer on low speed, gradually add the dry ingredients to the wet ingredients, alternating with the buttermilk and whole milk, beginning and ending with the dry ingredients. Start by adding about one-third of the dry mixture, mix until just combined. Then add half of the buttermilk and half of the whole milk, mix until just combined. Repeat with another third of the dry mixture, followed by the remaining wet ingredients, and finally the last third of the dry mixture. Important: Mix only until just combined after each addition. Overmixing the batter can lead to tough cupcakes, so stop as soon as you see no streaks of flour.
  6. Fill Cupcake Liners: Divide the cupcake batter evenly among the 12 prepared muffin cups, filling each about two-thirds full. A regular ice cream scoop works wonderfully for this, ensuring consistent sizes.
  7. Add Apple Filling: Take your completely cooled apple filling. Using a small spoon, gently drop about a tablespoon of the apple filling into the center of each cupcake batter-filled liner. You can lightly swirl it into the batter with a toothpick, but it’s not strictly necessary. The goal is to have a little surprise of apple goodness in the middle of your Apple Crumble Cupcakes.
  8. Top with Crumble: Retrieve your chilled crumble topping from the refrigerator. Generously sprinkle about 1-2 tablespoons of the crumble mixture over the top of each cupcake. Don’t be shy; this is where a lot of the delicious texture and flavor will come from!
  9. Bake the Cupcakes: Bake in the preheated oven for approximately 20-25 minutes, or until a wooden skewer or toothpick inserted into the center of a cupcake (avoiding the apple filling if possible, or ensuring it comes out clean after passing through the apple filling) comes out clean. The crumble topping should be golden brown and crisp, and the cupcake tops should spring back gently when lightly pressed.
  10. Cool Completely: Allow the Apple Crumble Cupcakes to cool in the muffin tin for about 5-10 minutes before carefully transferring them to a wire rack to cool completely. It is absolutely essential that the cupcakes are fully cooled before you even think about frosting them, otherwise, your beautiful buttercream will melt into a messy puddle.

For the Brown Sugar Cinnamon Buttercream:

  1. Cream the Butter: In a large mixing bowl, using an electric mixer on medium-high speed, beat the 1 cup of softened unsalted butter for 3-5 minutes until it is very light and fluffy. This aeration is key to a smooth, airy buttercream for your Apple Crumble Cupcakes.
  2. Add Dry Ingredients: Reduce the mixer speed to low. Gradually add the 1 ½ cups of sifted powdered sugar, ½ cup of packed light brown sugar, 1 teaspoon of ground cinnamon, and ¼ teaspoon of salt. Start slowly to avoid a cloud of sugar! Once mostly combined, increase the speed to medium-high and beat for another 2-3 minutes until light and fluffy.
  3. Incorporate Liquids and Flavor: With the mixer on low speed, slowly add the 1 teaspoon of pure vanilla extract and 1 tablespoon of heavy cream or milk. Gradually add more cream, one tablespoon at a time, until the buttercream reaches your desired consistency – it should be smooth, spreadable, and easy to pipe, yet firm enough to hold its shape. You may not need all 3 tablespoons, or you might need a touch more.
  4. Beat Until Fluffy: Once you’ve reached the desired consistency, increase the mixer speed to high and beat for an additional 1-2 minutes. This final beat will make the buttercream extra light, fluffy, and luscious, perfect for topping your Apple Crumble Cupcakes.

Assembling Your Apple Crumble Cupcakes:

  1. Prepare for Frosting: Ensure your Apple Crumble Cupcakes are completely cool to the touch. This step truly cannot be overstated. If they are even slightly warm, your buttercream will melt.
  2. Pipe the Buttercream: Transfer the brown sugar cinnamon buttercream to a piping bag fitted with your favorite piping tip (a large star tip or round tip works beautifully). If you don’t have a piping bag, a zip-top bag with the corner snipped off will do the trick, or simply use an offset spatula to spread it on. Pipe or spread a generous swirl of buttercream onto each cooled cupcake. Aim for an elegant swirl that cradles the topping you’ll add next.
  3. Add Extra Crumble (Optional but Recommended!): For an extra flourish and delightful textural contrast, sprinkle a little bit of any remaining crumble topping (you might want to make extra just for this step!) or even a tiny pinch of extra cinnamon sugar over the top of the buttercream. This makes for a stunning presentation and adds to the “Apple Crumble Cupcakes” experience.
  4. Serve and Enjoy: Your magnificent Apple Crumble Cupcakes are now ready to be enjoyed! They are best served fresh on the day they are made, allowing that crumble topping to retain its crispness. If storing, keep them in an airtight container at room temperature for up to 2 days, or refrigerate for up to 4 days (bring to room temperature before serving for best flavor and texture).

Irresistible Apple Crumble Cupcakes: Your New Favorite!

Conclusion:

And there you have it, my friends! We’ve reached the delicious finale of our culinary journey together, and I truly hope you’re as excited as I am about these incredible treats. If there’s one recipe I could implore you to try, it would be this one. These aren’t just any cupcakes; they are a warm, comforting hug in cupcake form, a delightful symphony of flavors and textures that dance on your palate. Imagine the crisp, buttery crumble topping, giving way to a tender, moist vanilla cake, all infused with the sweet, spiced warmth of softened apples. It’s the ultimate autumn sensation, yes, but honestly, its timeless appeal makes it perfect for any season, any gathering, or simply for a quiet moment of self-indulgence with a cup of tea or coffee.

What truly sets these apart, beyond their undeniable deliciousness, is the magic of transformation they offer. You’re not just baking; you’re crafting an experience. The aroma alone, as these bake, is enough to fill your home with an inviting, nostalgic warmth that will have everyone eagerly peeking into the kitchen. They strike that perfect balance: elegant enough for a special occasion, yet comforting and approachable for a casual get-together. Plus, let’s be honest, who can resist a cupcake that promises both the soft crumb of a cake and the satisfying crunch of a crumble? It’s a genius combination that brings two beloved desserts into one perfect, portable package. I genuinely believe that once you taste the delightful contrast and harmony of flavors in these, they will earn a permanent, cherished spot in your baking repertoire.

Now, while these Apple Crum extractble Cupcakes are absolutely divine on their own, fresh from the oven, I have a few suggestions to elevate your experience even further, or to simply offer some delightful variations. For an ultimate dessert experience, try serving them still slightly warm, perhaps with a generous scoop of good quality vanilla bean ice cream melting gently over the crumble. The cold creaminess against the warm, spiced apple and cake is nothing short of heavenly. A drizzle of homemade salted caramel sauce or a sprinkle of toasted pecans on top before serving also adds another layer of complexity and texture that is simply irresistible. For a simple yet elegant touch, a light dusting of cinnamon sugar or powdered sugar once they’ve cooled completely can make them look even more appealing.

Thinking about variations? While the apple is the star here, you could experiment with different apple varieties to achieve varying levels of tartness or sweetness in your filling. Granny Smiths offer a lovely tart contrast, while Honeycrisp or Fuji apples will lend a sweeter, softer texture. For a slightly different spice profile, consider adding a pinch of cardamom or a touch of allspice to your apple mixture. If you’re feeling adventurous, a very thin, simple cream cheese glaze can be piped over the crumble once cooled, offering a tangy counterpoint that some might adore. Or, for a truly decadent touch, try folding in some dried cranberries or a few white chocolate chips into the cake batter itself – just be sure not to overload it! These cupcakes are incredibly versatile, allowing you to personalize them to your heart’s content while still maintaining that core, comforting goodness.

So, what are you waiting for? This is your sign, your invitation, your friendly nudge to preheat that oven and dive into the wonderful world of these fantastic cupcakes. I promise you, the joy of creating and then savoring these delicious bites is an experience you won’t regret. Don’t be shy; embrace the fun of baking something truly special. Once you’ve whipped up a batch, I would absolutely love to hear about your experience! Did you stick to the recipe, or did you put your own unique spin on it? Please feel free to share your thoughts, your successes, and even your delicious photos. Your feedback and creativity inspire me, and I can’t wait to see the wonderful creations you’ll bring to life. Happy baking, everyone!


Irresistible Apple Crumble Cupcakes: Your New Favorite!

Irresistible Apple Crumble Cupcakes: Your New Favorite!

Apple Crumble Cupcakes offer an enchanting twist on two beloved classics. Enjoy a moist, spiced cupcake with tender, warmly spiced apple filling, crowned with an irresistible, buttery, golden crumble topping. A delightful, portable treat for any occasion!

Prep Time
1 Hours

Cook Time
40 Minutes

Total Time
3 Hours

Servings
12 servings

Ingredients

  • 3 medium apples, peeled, cored, diced
  • 2 tablespoons unsalted butter (for apple filling)
  • 2 tablespoons granulated sugar (for apple filling)
  • 1/2 teaspoon ground cinnamon (for apple filling)
  • 1/4 teaspoon ground nutmeg (for apple filling)
  • 1 tablespoon lemon juice (for apple filling)
  • 1 tablespoon all-purpose flour (for apple filling slurry)
  • 2 tablespoons cold water (for apple filling slurry)
  • 1 cup all-purpose flour (for crumble topping)
  • 1/4 cup granulated sugar (for crumble topping)
  • 1/2 cup (1 stick) cold unsalted butter, cubed (for crumble topping)
  • 1 1/2 cups all-purpose flour, sifted (for cupcake batter)
  • 1 1/2 teaspoons baking powder (for cupcake batter)
  • 1/4 teaspoon baking soda (for cupcake batter)
  • 1/4 teaspoon salt (for cupcake batter)
  • 1/2 cup (1 stick) unsalted butter, softened (for cupcake batter)
  • 1 cup granulated sugar (for cupcake batter)
  • 2 large eggs (for cupcake batter)
  • 1 teaspoon pure vanilla extract (for cupcake batter)
  • 1/2 cup buttermilk (for cupcake batter)
  • 1/4 cup whole milk (for cupcake batter)
  • 1 cup (2 sticks) unsalted butter, softened (for buttercream)
  • 1 1/2 cups powdered sugar, sifted (for buttercream)
  • 1/2 cup packed light brown sugar (for buttercream)
  • 1 teaspoon ground cinnamon (for buttercream)
  • 2-3 tablespoons heavy cream or milk (for buttercream)
  • 1 teaspoon pure vanilla extract (for buttercream)

Instructions

  1. Step 1
    Dice 3 apples. Melt 2 tbsp butter in a saucepan. Add diced apples, 2 tbsp sugar, 1/2 tsp cinnamon, 1/4 tsp nutmeg. Cook 8-10 min until tender. Stir in 1 tbsp lemon juice. Add 1 tbsp all-purpose flour mixed with 2 tbsp cold water. Cook 1-2 min until thickened. Cool filling completely.
  2. Step 2
    Whisk 1 cup flour, 1/4 cup granulated sugar. Cut in 1/2 cup cold butter until coarse crumbs form. Chill crumble.
  3. Step 3
    Preheat oven to 350°F (175°C). Line a 12-cup muffin tin. Whisk 1 1/2 cups sifted flour, 1 1/2 tsp baking powder, 1/4 tsp baking soda, 1/4 tsp salt. Cream 1/2 cup softened butter and 1 cup granulated sugar until light and fluffy. Beat in 2 eggs, then 1 tsp vanilla. Alternately add dry ingredients with buttermilk and milk, mixing until just combined.
  4. Step 4
    Fill liners two-thirds with batter. Drop 1 tbsp cooled apple filling into the center of each. Sprinkle 1-2 tbsp chilled crumble over tops. Bake 20-25 min, until a toothpick comes out clean. Cool in tin 5-10 min, then transfer to wire rack to cool completely.
  5. Step 5
    Beat 1 cup softened butter until light and fluffy. Gradually add 1 1/2 cups sifted powdered sugar, 1/2 cup packed brown sugar, 1 tsp cinnamon. Beat until fluffy. Mix in 1 tsp vanilla and 1 tbsp heavy cream/milk, adding more cream/milk as needed for desired consistency. Beat 1-2 min on high until extra light and fluffy.
  6. Step 6
    Ensure cupcakes are completely cool. Pipe or spread buttercream onto each cupcake. Optional: Sprinkle extra crumble or cinnamon sugar on top. Serve fresh. Store in an airtight container at room temperature for up to 2 days, or refrigerate for up to 4 days (bring to room temperature before serving).

Important Information

Nutrition Facts (Per Serving)

It is important to consider this information as approximate and not to use it as definitive health advice.

Allergy Information

Please check ingredients for potential allergens and consult a health professional if in doubt.

« Previous Post
Chicken Avocado Melt Sandwich: Easy, Cheesy & Irresistible
Next Post »
Cheesesteak Tortellini in Rich Provolone Sauce

If you enjoyed this…

Easy Strawberry Custard Delight Cake Recipe: A Sweet Treat!

Oreo Cinnamon Rolls: A Delicious Twist on a Classic Treat

Best Frosted Non-Alcohol Gingerbread Brownies Recipe

Primary Sidebar

Browse by Diet

BreakfastDinnerLunchDessertAppetizer

Sweet Peach Yogurt Parfait Delight

One of my fondest memories is from a lazy summer afternoon spent at my grandmother’s house. The sun filtered through the kitchen window, casting a warm glow over the table where she would create her culinary magic. It was during one of those blissful moments that I first tasted her Peach Yogurt Parfait with Honey and Granola. The sweet aroma of ripe peaches mingling with creamy yogurt and the crunch of granola was nothing short of heavenly. It felt like summer captured in a bowl, and I still remember the joy of diving in with a spoon, each layer revealing a new burst of flavor.

When I think about that parfait, I can almost hear the gentle hum of the bees outside, reminding me of the floral notes that honey brings to every bite. The vibrant yellows and soft oranges of the peaches contrast beautifully with the creamy white yogurt and the golden crunch of granola. It’s a dish that not only looks delightful but also tastes like a celebration of fresh, wholesome ingredients.

What makes my version of this Peach Yogurt Parfait special is the careful balance of flavors and textures. I use ripe, juicy peaches, drizzled with locally sourced honey, and a homemade granola that’s bursting with nuts and seeds for an extra crunch. It’s a simple dish, but every layer is crafted with love and attention.

Let me show you exactly how to make this delightful parfait, so you can bring a bit of that summer magic into your kitchen!

Sweet Peach Yogurt Parfait Delight

Why You’ll Love This Recipe

  • Delightfully creamy texture from the Greek yogurt, paired with the juicy sweetness of fresh peaches.
  • Ready in under 20 minutes, making it a quick and satisfying breakfast or snack option.
  • Budget-friendly, using common ingredients that you may already have in your pantry.
  • Customizable with your favorite granola and nuts, allowing you to tailor each parfait to your taste.
  • Perfectly balanced flavors with the bright acidity of lemon juice and the sweetness of honey enhancing the peaches.

Ingredients

  • For the Parfait:
  • 2 cups plain Greek yogurt (or vanilla yogurt for a sweeter option)
  • 2 large ripe peaches, diced (about 2 cups)
  • 1 tablespoon fresh lemon juice (to prevent browning of peaches)
  • 2 tablespoons honey (plus more for drizzling)
  • 1 teaspoon vanilla extract (optional for extra flavor)
  • For the Granola:
  • 1 cup granola (store-bought or homemade; see notes for a simple granola recipe)
  • 1/4 cup sliced almonds (optional for added crunch)
  • 1/4 cup shredded coconut (optional for added flavor)

Let’s dive into some key ingredients that make this Peach Yogurt Parfait so delightful! First, the Greek yogurt is not only creamy but also packed with protein, making it a satisfying option for breakfast or a snack. If you’re looking for a sweeter option, you can easily substitute it with vanilla yogurt, though it may alter the overall flavor balance. Next, the ripe peaches are the star of the show; their natural sweetness shines through, so I recommend choosing peaches that yield slightly to pressure, indicating they’re perfectly ripe. If peaches aren’t in season, feel free to use nectarines or even frozen peaches—just thaw them before use. Finally, honey adds a lovely floral sweetness that ties everything together. If you prefer, maple syrup can serve as a delicious substitute.

Step-by-Step Instructions

  1. Start by preparing the peaches. Wash them thoroughly, then slice and dice them into bite-sized pieces. In a medium bowl, toss the diced peaches with 1 tablespoon of fresh lemon juice to prevent browning. Set aside for about 5 minutes while the lemon juice works its magic.
  2. In a separate bowl, combine the Greek yogurt, 2 tablespoons of honey, and 1 teaspoon of vanilla extract if using. Stir the mixture until smooth and thoroughly blended. This should take about a minute. Avoid overmixing to maintain the creaminess of the yogurt.
  3. Now it’s time to layer your parfait. Grab a clear glass or bowl to showcase your beautiful creation. Start with a generous spoonful of the yogurt mixture at the bottom—about 1/4 cup will do. Use a spoon to spread it evenly.
  4. Add a layer of the diced peaches over the yogurt, ensuring they cover the yogurt completely. You might want to use about half of what you have prepared—roughly 1 cup. This layer should be visually appealing, so arrange the peaches neatly.
  5. Sprinkle 1/4 cup of granola over the peaches. This adds a delightful crunch. Make sure to distribute it evenly to ensure every bite has that satisfying texture. Avoid packing it down too tightly, as you want it to maintain its crunch.
  6. Repeat the layers: spoon in another 1/4 cup of yogurt, followed by another cup of peaches, and another sprinkle of granola. You should have at least two layers, but feel free to add more depending on your glass size.
  7. Finish off your parfait with a drizzle of honey on top for added sweetness and a touch of elegance. If you’re using sliced almonds or shredded coconut, sprinkle them on top now. It adds a lovely visual contrast and extra flavor.
  8. Serve immediately or refrigerate for up to 30 minutes before serving to allow the flavors to meld together. However, I recommend enjoying it fresh to maintain the granola’s crunch.

Pro Tips for the Best Peach Yogurt Parfait With Honey And Granola

  • Make sure to choose ripe peaches for the best flavor and texture. A common mistake is using unripe fruit, which can lead to a less enjoyable parfait. Look for peaches that are fragrant and slightly soft to the touch.
  • Use a clear glass to assemble your parfait; this not only makes for a beautiful presentation but also allows you to see the colorful layers, which adds to the enjoyment of eating it.
  • For an even creamier texture, consider whipping the Greek yogurt with a hand mixer for a couple of minutes before layering. This small adjustment makes a huge difference in mouthfeel.
  • Be mindful of the granola-to-yogurt ratio. Too much granola can overwhelm the parfait, while too little can make it feel too creamy. Aim for about 1/4 cup of granola per layer for the perfect balance.
  • If you’re making this for a gathering, consider preparing the yogurt and peaches ahead of time and layering them just before serving. This ensures the granola stays crunchy!

Variations & Serving Ideas

There are so many ways to get creative with your Peach Yogurt Parfait! For a tropical twist, swap out the peaches for mangoes or pineapples and top with coconut flakes. If you prefer a berry flavor, mix in some blueberries or strawberries with the peaches for added color and taste. For a nutty version, incorporate chopped walnuts or pecans instead of almonds.

As for serving ideas, this parfait pairs beautifully with a side of scrambled eggs for a hearty breakfast or fresh fruit salad for a light lunch. You might also enjoy it alongside whole grain toast with almond butter for an energizing snack. The contrast of flavors and textures will elevate your meal experience!

Storage, Make-Ahead & Reheating

The Peach Yogurt Parfait is best enjoyed fresh, but you can prepare some components ahead of time. Store the layered parfait in an airtight container in the refrigerator for up to 24 hours. However, be cautious; the granola may lose its crunch if stored too long. You can freeze the yogurt and peach mixture for up to 2 months; just remember to thaw it in the refrigerator overnight before serving.

If you plan to enjoy this dish the next day, it can taste even better as the flavors meld together. Just remember to add the granola right before serving to keep its delightful crunch!

Frequently Asked Questions

Can I make Peach Yogurt Parfait With Honey And Granola ahead of time?

Yes — in fact, it tastes even better the next day as the flavors meld. However, I recommend waiting to add the granola until just before serving to maintain its crunch.

What can I substitute for Greek yogurt?

If you prefer a lighter option, you can substitute Greek yogurt with regular yogurt or a dairy-free alternative like coconut yogurt. Just remember that this may alter the creaminess and flavor profile slightly.

Can I use frozen peaches for this parfait?

Absolutely! Just make sure to thaw the frozen peaches before using them. They will still add great flavor, though the texture may be slightly softer than fresh peaches.

How do I make the parfait vegan?

To make a vegan version, substitute the Greek yogurt with a plant-based yogurt alternative, and replace honey with maple syrup or agave nectar. This keeps the parfait sweet while adhering to a vegan diet.

What other fruits can I use in this recipe?

You can mix and match fruits based on your preference. Try using strawberries, blueberries, raspberries, or even bananas. Just make sure to adjust the lemon juice as needed to prevent browning.

Sweet Peach Yogurt Parfait Delight

Final Thoughts

The Peach Yogurt Parfait with Honey and Granola is a delightful blend of creamy yogurt, sweet peaches, and crunchy granola that creates a satisfying and nourishing treat. Each layer bursts with flavor, making it a perfect choice for breakfast or a light dessert.

This is the kind of recipe I come back to again and again, especially when I want something refreshing and wholesome to start my day. The harmony of sweet and tart flavors, combined with the delightful crunch, never fails to lift my spirits!

I encourage you to give this parfait a try and indulge in its comforting goodness. Feel free to share your results or even add your own twist—perhaps a sprinkle of cinnamon or a handful of nuts. Enjoy creating your perfect parfait!

Print
clock clock iconcutlery cutlery iconflag flag iconfolder folder iconinstagram instagram iconpinterest pinterest iconfacebook facebook iconprint print iconsquares squares iconheart heart iconheart solid heart solid icon

Peach Yogurt Parfait


  • Author: Lily author
  • Total Time: 15 minutes
  • Yield: 4 servings 1x
Pin Recipe
Print Recipe

Description

This Peach Yogurt Parfait combines creamy Greek yogurt, juicy peaches, and crunchy granola for a delightful treat. It’s a perfect breakfast or snack that captures the essence of summer in every bite.


Ingredients

Scale
  • For the Parfait:
  • 2 cups plain Greek yogurt (or vanilla yogurt for a sweeter option)
  • 2 large ripe peaches, diced (about 2 cups)
  • 1 tablespoon fresh lemon juice (to prevent browning of peaches)
  • 2 tablespoons honey (plus more for drizzling)
  • 1 teaspoon vanilla extract (optional for extra flavor)
  • For the Granola:
  • 1 cup granola (store-bought or homemade; see notes for a simple granola recipe)
  • 1/4 cup sliced almonds (optional for added crunch)
  • 1/4 cup shredded coconut (optional for added flavor)

Instructions

  1. Start by preparing the peaches. Wash them thoroughly, then slice and dice them into bite-sized pieces. In a medium bowl, toss the diced peaches with 1 tablespoon of fresh lemon juice to prevent browning. Set aside for about 5 minutes while the lemon juice works its magic.
  2. In a separate bowl, combine the Greek yogurt, 2 tablespoons of honey, and 1 teaspoon of vanilla extract if using. Stir the mixture until smooth and thoroughly blended. This should take about a minute. Avoid overmixing to maintain the creaminess of the yogurt.
  3. Now it’s time to layer your parfait. Grab a clear glass or bowl to showcase your beautiful creation. Start with a generous spoonful of the yogurt mixture at the bottom—about 1/4 cup will do. Use a spoon to spread it evenly.
  4. Add a layer of the diced peaches over the yogurt, ensuring they cover the yogurt completely. You might want to use about half of what you have prepared—roughly 1 cup. This layer should be visually appealing, so arrange the peaches neatly.
  5. Sprinkle 1/4 cup of granola over the peaches. This adds a delightful crunch. Make sure to distribute it evenly to ensure every bite has that satisfying texture. Avoid packing it down too tightly, as you want it to maintain its crunch.
  6. Repeat the layers: spoon in another 1/4 cup of yogurt, followed by another cup of peaches, and another sprinkle of granola. You should have at least two layers, but feel free to add more depending on your glass size.
  7. Finish off your parfait with a drizzle of honey on top for added sweetness and a touch of elegance. If you’re using sliced almonds or shredded coconut, sprinkle them on top now. It adds a lovely visual contrast and extra flavor.
  8. Serve immediately or refrigerate for up to 30 minutes before serving to allow the flavors to meld together. However, I recommend enjoying it fresh to maintain the granola’s crunch.
  • Prep Time: 15 mins
  • Cook Time: 0 mins
  • Category: Breakfast
  • Method: No-cook
  • Cuisine: American

Nutrition

  • Serving Size: 1 parfait
  • Calories: 250
  • Sugar: 20 g
  • Sodium: 50 mg
  • Fat: 5 g
  • Saturated Fat: 2 g
  • Unsaturated Fat: 3 g
  • Trans Fat: 0 g
  • Carbohydrates: 40 g
  • Fiber: 3 g
  • Protein: 10 g
  • Cholesterol: 10 mg

Keywords: Choose ripe peaches for the best flavor and texture. Use a clear glass for a beautiful presentation. For creaminess, consider whipping the yogurt before layering. Be mindful of the granola-to-yogurt ratio. Prepare yogurt and peaches ahead of time for gatherings, layering just before serving.

Did you make this recipe?

Share a photo and tag us — we can't wait to see what you've made!

Sun-Kissed Frozen Orange Cream Slush

As a child, summer days felt like they lasted forever. I remember the sticky heat wrapping around me as I played outside, my laughter mingling with the sounds of the neighborhood. But nothing could cool me down quite like the moment I’d spot my grandmother, laboring over her blender, whipping up her famous Frozen Orange Creamsicle Slush. That vibrant orange treat, with its frosty texture and sweet citrus aroma, was like a burst of sunshine in a cup. Just one sip, and I could feel the coolness wash over me, sparking pure joy.

This Frozen Orange Creamsicle Slush has a way of making you feel like a kid again. Its creamy, dreamy consistency is a delightful balance of bright orange and soft vanilla, inviting you to dive right in. The refreshing tang of orange dances on your tongue, while the smooth creaminess envelops you in a comforting embrace. It’s a nostalgic treat that’s perfect for hot summer afternoons or anytime you need a little pick-me-up.

What makes my version of this slush stand out is the addition of a hint of vanilla bean, which elevates the flavor and adds an extra layer of richness. Plus, it’s super easy to whip up with just a few simple ingredients that you probably already have on hand! So, if you’re ready to relive those sun-soaked memories, let me show you exactly how to make it.

Sun-Kissed Frozen Orange Cream Slush

Why You’ll Love This Recipe

  • Each slush is a perfect blend of creamy vanilla and zesty orange, creating a nostalgic flavor reminiscent of summer days.
  • This refreshing treat is ready in under 15 minutes, making it an ideal quick dessert for unexpected guests or hot afternoons.
  • With just 8 simple ingredients, it’s budget-friendly, ensuring you don’t have to break the bank to enjoy a delicious slush.
  • The slush has a perfectly smooth texture, thanks to the combination of ice and ice cream, providing a delightful contrast to the bright citrus flavors.
  • It’s highly customizable; you can easily adjust the sweetness and add fresh herbs for a unique twist that suits your taste.

Ingredients

  • 2 cups orange juice (freshly squeezed or store-bought)
  • 1 cup vanilla ice cream
  • 1 cup crushed ice
  • 1/2 cup milk (whole or 2%)
  • 1/4 cup granulated sugar (adjust based on sweetness preference)
  • 1 teaspoon vanilla extract
  • Zest of 1 orange (for added flavor)
  • Fresh orange slices and mint leaves (for garnish)

The star of this Frozen Orange Creamsicle Slush is the orange juice, which provides the vibrant, citrusy base. Freshly squeezed juice will yield the brightest flavor, but store-bought options can be just as convenient. If you’re opting for store-bought, choose 100% pure juice with no added sugars for the best results. Another essential ingredient is the vanilla ice cream; it adds creaminess and sweetness. You can substitute it with dairy-free ice cream if you’re looking for a vegan option. Whole or 2% milk complements the ice cream, creating a smooth blend. If you want a lower-calorie version, almond or oat milk can be good alternatives.

Lastly, the granulated sugar can be adjusted based on your sweetness preference. If you prefer a more natural sweetener, consider using honey or agave syrup. The orange zest enhances the flavor profile, providing an aromatic pop that brings the whole slush together. Don’t skip it! It adds an extra layer of brightness that makes this slush truly special.

Step-by-Step Instructions

  1. Start by preparing your ingredients. Gather 2 cups of orange juice, 1 cup of vanilla ice cream, and 1 cup of crushed ice. Make sure the ice is finely crushed, as larger chunks can make blending difficult.
  2. In a blender, combine the orange juice, vanilla ice cream, crushed ice, and 1/2 cup of milk. Add 1/4 cup of granulated sugar and 1 teaspoon of vanilla extract. If you like a sweeter slush, consider adding a bit more sugar at this stage.
  3. Add the zest of 1 orange to the blender. This step is crucial for enhancing the citrus flavor of your slush. Make sure not to include the bitter white pith—only the flavorful zest.
  4. Blend the mixture on medium-high speed for about 30-45 seconds. Stop once the ingredients are fully combined and the slush has a smooth, even consistency. If you notice large chunks of ice, blend for an additional 10-15 seconds. Avoid over-blending, as this can make the slush too liquidy.
  5. Once blended, taste the slush. If it needs more sweetness, add a little more sugar and blend for a few more seconds. If it’s too thick, you can add a splash of milk to reach your desired consistency.
  6. Pour the slush into glasses. This recipe typically serves 4, but you can easily double it for larger gatherings. Use a spoon to help guide the slush into the glasses if needed.
  7. Garnish each serving with fresh orange slices and mint leaves. The mint not only adds a pop of color but also a refreshing aroma that complements the citrus flavors beautifully.
  8. Serve immediately and enjoy! If you’ve made extra, you can refrigerate it for a short time, but it’s best enjoyed fresh.

Pro Tips for the Best Frozen Orange Creamsicle Slush

  • Don’t skip the orange zest! It’s a game-changer for flavor. Always zest before juicing to make it easier.
  • Use a high-powered blender for the best texture. A standard blender may struggle with ice, leading to uneven consistency. If you have a food processor, that can work too, but ensure the ice is finely crushed.
  • Adjust the ice-to-liquid ratio carefully. If your slush is too thick, it won’t blend well. Start with less ice and add more until you reach your preferred texture.
  • Be cautious with the sugar! Always start with the lower amount, as you can easily add more, but it’s hard to fix an overly sweet slush.
  • For a fun twist, consider adding a splash of coconut milk or a handful of fresh fruit like strawberries or pineapple. This not only enhances the flavor but also adds a beautiful color contrast.

Variations & Serving Ideas

There are countless ways to put a spin on your Frozen Orange Creamsicle Slush. Consider making a tropical version by adding in some pineapple juice or coconut milk for a delightful tropical twist. If you’re feeling adventurous, try incorporating a handful of frozen mango or peach slices for added sweetness. For a lighter version, swap out the vanilla ice cream for Greek yogurt for a creamy yet tangy alternative.

As for serving ideas, this refreshing slush pairs wonderfully with light summer dishes like grilled chicken skewers, fish tacos, or a simple salad topped with citrus vinaigrette. The bright, zesty flavors of the slush complement these dishes perfectly, making them an ideal pairing for a sunny day.

Storage, Make-Ahead & Reheating

This Frozen Orange Creamsicle Slush is best enjoyed fresh, but if you have leftovers, you can store them in an airtight container in the fridge for up to 2 days. Just keep in mind that the slush may lose some of its texture over time as the ice melts. It doesn’t freeze well, as the ice will turn into a solid block. If you must freeze it, blend again after thawing to restore the slushy consistency. This treat is best the day you make it, as the flavors meld together beautifully overnight, enhancing its deliciousness.

Frequently Asked Questions

Can I make Frozen Orange Creamsicle Slush ahead of time?

Yes — in fact, it tastes even better the next day as the flavors meld. However, it’s best to enjoy it fresh, as the texture can change if stored for too long. If you need to prepare it ahead, keep it in the fridge and re-blend before serving.

What kind of orange juice should I use?

For the best flavor, use freshly squeezed orange juice. However, if you’re short on time, opt for 100% pure store-bought juice without added sugars. This will ensure that your slush remains flavorful and refreshing.

Can I substitute the vanilla ice cream?

Absolutely! If you’re looking for a dairy-free option, coconut milk ice cream or a non-dairy vanilla ice cream can work wonderfully. They will still provide the creamy texture and sweetness you desire.

How can I adjust the sweetness of my slush?

You can easily adjust the sweetness by modifying the amount of sugar added. Start with 1/4 cup and taste the mixture before blending. If you prefer it sweeter, add more sugar gradually until it reaches your desired level.

What should I do if my slush is too thick?

If your slush is too thick, simply add a splash of milk or orange juice and blend again. This will help achieve a more drinkable consistency while maintaining the slushy texture. Adjust gradually to reach your preferred thickness.

Sun-Kissed Frozen Orange Cream Slush

Final Thoughts

The Frozen Orange Creamsicle Slush is a delightful blend of refreshing citrus and creamy goodness, making it a perfect treat for warm days or any time you crave a taste of nostalgia. The way the bright orange flavor dances with the creamy texture truly elevates this slush, transforming it into a satisfying escape from the everyday.

This is the kind of recipe I come back to again and again, especially when I’m looking to cool down or impress guests at a summer gathering. It’s simple to make and always brings smiles all around! I encourage you to try this recipe for yourself—don’t hesitate to share your results or even put your own spin on it. Happy slushing!

Print
clock clock iconcutlery cutlery iconflag flag iconfolder folder iconinstagram instagram iconpinterest pinterest iconfacebook facebook iconprint print iconsquares squares iconheart heart iconheart solid heart solid icon

Frozen Orange Creamsicle Slush


  • Author: Lily author
  • Total Time: 15 minutes
  • Yield: 4 servings 1x
Pin Recipe
Print Recipe

Description

This Frozen Orange Creamsicle Slush is a refreshing treat that combines creamy vanilla and zesty orange flavors. Perfect for hot summer days, it brings back nostalgic memories with every sip.


Ingredients

Scale
  • 2 cups orange juice (freshly squeezed or store-bought)
  • 1 cup vanilla ice cream
  • 1 cup crushed ice
  • 1/2 cup milk (whole or 2%)
  • 1/4 cup granulated sugar (adjust based on sweetness preference)
  • 1 teaspoon vanilla extract
  • Zest of 1 orange (for added flavor)
  • Fresh orange slices and mint leaves (for garnish)

Instructions

  1. Start by preparing your ingredients. Gather 2 cups of orange juice, 1 cup of vanilla ice cream, and 1 cup of crushed ice. Make sure the ice is finely crushed, as larger chunks can make blending difficult.
  2. In a blender, combine the orange juice, vanilla ice cream, crushed ice, and 1/2 cup of milk. Add 1/4 cup of granulated sugar and 1 teaspoon of vanilla extract. If you like a sweeter slush, consider adding a bit more sugar at this stage.
  3. Add the zest of 1 orange to the blender. This step is crucial for enhancing the citrus flavor of your slush. Make sure not to include the bitter white pith—only the flavorful zest.
  4. Blend the mixture on medium-high speed for about 30-45 seconds. Stop once the ingredients are fully combined and the slush has a smooth, even consistency. If you notice large chunks of ice, blend for an additional 10-15 seconds. Avoid over-blending, as this can make the slush too liquidy.
  5. Once blended, taste the slush. If it needs more sweetness, add a little more sugar and blend for a few more seconds. If it’s too thick, you can add a splash of milk to reach your desired consistency.
  6. Pour the slush into glasses. This recipe typically serves 4, but you can easily double it for larger gatherings. Use a spoon to help guide the slush into the glasses if needed.
  7. Garnish each serving with fresh orange slices and mint leaves. The mint not only adds a pop of color but also a refreshing aroma that complements the citrus flavors beautifully.
  8. Serve immediately and enjoy! If you’ve made extra, you can refrigerate it for a short time, but it's best enjoyed fresh.
  • Prep Time: 15 min
  • Cook Time: 0 min
  • Category: Dessert
  • Method: Blending
  • Cuisine: American

Nutrition

  • Serving Size: 1 serving
  • Calories: 200
  • Sugar: 30 g
  • Sodium: 50 mg
  • Fat: 5 g
  • Saturated Fat: 3 g
  • Unsaturated Fat: 2 g
  • Trans Fat: 0 g
  • Carbohydrates: 40 g
  • Fiber: 1 g
  • Protein: 2 g
  • Cholesterol: 20 mg

Keywords: Don't skip the orange zest! It's a game-changer for flavor. Always zest before juicing to make it easier.

Did you make this recipe?

Share a photo and tag us — we can't wait to see what you've made!

Zesty Lemon Poppy Seed Delight

One rainy afternoon, I found myself in my grandmother’s cozy kitchen, the kind that always smelled like warmth and love. She was whipping up her famous Lemon Poppy Seed Loaf, a recipe that had been passed down through generations. As the batter came together, the zesty aroma of fresh lemons filled the air, mingling perfectly with the nutty fragrance of poppy seeds. I can still picture her, apron-clad, as she expertly drizzled a vibrant citrus icing over the loaf, creating a glossy, sun-kissed finish that beckoned us to dive in. It was a moment that sparked my own passion for baking, and this recipe has become a cherished staple in my home ever since.

When you take a bite of this Lemon Poppy Seed Loaf, it’s like a burst of sunshine on your palate. The loaf is beautifully golden, with a tender crumb that melts in your mouth. Each slice is speckled with tiny poppy seeds, adding a delightful crunch that contrasts beautifully with the tangy sweetness of the lemon. And that citrus icing? It’s the finishing touch that elevates this loaf from ordinary to extraordinary, with its bright, zesty flavor dancing on your taste buds.

This recipe stands out because it embraces simplicity while delivering on flavor. I’ve added a hint of vanilla to the batter, enhancing the overall taste and making it even more indulgent. Trust me, once you make this Lemon Poppy Seed Loaf With Citrus Icing, it’ll become a go-to in your baking repertoire.

So, let me show you exactly how to make it!

Zesty Lemon Poppy Seed Delight

Why You’ll Love This Recipe

  • Moist and tender crumb that melts in your mouth, thanks to the perfect balance of butter and buttermilk.
  • Bright, zesty lemon flavor paired with crunchy poppy seeds, creating a delightful texture and taste experience.
  • Easy to whip up in just about an hour, perfect for last-minute gatherings or a cozy afternoon treat.
  • Budget-friendly with everyday ingredients, making it an accessible option for all home bakers.
  • The citrus icing adds a sweet tang that elevates the loaf, turning a simple recipe into a showstopper!

Ingredients

  • 1 ½ cups (190g) all-purpose flour
  • 1 teaspoon baking powder
  • ½ teaspoon baking soda
  • ½ teaspoon salt
  • 3 tablespoons poppy seeds
  • ½ cup (115g) unsalted butter, softened to room temperature
  • 1 cup (200g) granulated sugar
  • 2 large eggs
  • 1 teaspoon vanilla extract
  • 1 teaspoon lemon zest (from about 1 medium lemon)
  • ½ cup (120ml) buttermilk
  • 2 tablespoons fresh lemon juice

For the Citrus Icing:

  • 1 cup (120g) powdered sugar
  • 2 tablespoons fresh lemon juice
  • 1 tablespoon orange juice
  • 1 teaspoon lemon zest (for garnish, optional)

Let’s dive into the key ingredients that make this Lemon Poppy Seed Loaf so special. The all-purpose flour provides the structure and base for the loaf, while the baking powder and baking soda ensure it rises perfectly, giving the loaf a light texture. For a gluten-free variation, you could substitute the flour with a gluten-free all-purpose blend. Poppy seeds not only add a delightful crunch but also contribute to the unique flavor profile that pairs well with the citrus notes.

Unsalted butter is crucial for achieving the buttery richness that makes this loaf so moist. If you’re looking for a dairy-free option, coconut oil or a vegan butter can be used instead. The buttermilk is another essential component, providing acidity that activates the baking soda for a fluffy texture. If you don’t have buttermilk on hand, you can easily make a substitute by mixing ½ cup of milk with 1 tablespoon of vinegar or lemon juice and letting it sit for about 5 minutes.

Step-by-Step Instructions

  1. Preheat your oven to 350°F (175°C). Grease a 9×5-inch loaf pan or line it with parchment paper for easy removal later.
  2. In a medium mixing bowl, whisk together 1 ½ cups of all-purpose flour, 1 teaspoon of baking powder, ½ teaspoon of baking soda, ½ teaspoon of salt, and 3 tablespoons of poppy seeds. This helps to evenly distribute the baking agents and ensures a uniform rise.
  3. In a large mixing bowl, cream together ½ cup of softened unsalted butter and 1 cup of granulated sugar using an electric mixer on medium speed for about 3-4 minutes, until the mixture is light and fluffy. Make sure to scrape down the sides of the bowl occasionally.
  4. Add 2 large eggs, 1 teaspoon of vanilla extract, and 1 teaspoon of lemon zest to the creamed butter and sugar, mixing until fully combined. You want a smooth consistency, so ensure there are no lumps of butter.
  5. In a small bowl, combine ½ cup of buttermilk and 2 tablespoons of fresh lemon juice. Alternately add the dry ingredients and buttermilk mixture to the butter mixture, starting and ending with the dry ingredients. Mix just until combined; do not overmix, as this can lead to a dense loaf.
  6. Pour the batter into the prepared loaf pan. Smooth the top with a spatula, ensuring it’s even. Bake in the preheated oven for 50-60 minutes, or until a toothpick inserted in the center comes out clean. The edges should be lightly golden brown, and the center should feel just set.
  7. Once baked, remove the loaf from the oven and allow it to cool in the pan for about 10 minutes. Then, transfer it to a wire rack to cool completely. Resist the urge to slice too soon, as it will be crumbly if it’s still warm.
  8. While the loaf is cooling, prepare the citrus icing. In a medium bowl, whisk together 1 cup of powdered sugar, 2 tablespoons of fresh lemon juice, and 1 tablespoon of orange juice until smooth. If the icing is too thick, you can add a little more juice to reach your desired consistency.
  9. Once the loaf is completely cool, drizzle the citrus icing over the top. If you like, sprinkle with an additional teaspoon of lemon zest for an extra pop of flavor and color.

Pro Tips for the Best Lemon Poppy Seed Loaf With Citrus Icing

  • Be careful not to overmix your batter; this is a common mistake that can lead to a dense loaf. Mix just until the dry ingredients are incorporated for a light and fluffy texture.
  • Use room temperature ingredients, especially the butter and eggs. This helps to create a smoother batter and ensures even baking. Take your eggs out of the fridge about 30 minutes before you start.
  • For a more pronounced lemon flavor, consider adding a little lemon extract in addition to the zest and juice. Just a half teaspoon can elevate the citrus notes significantly.
  • When measuring your flour, spoon it into the measuring cup and level it off with a knife instead of scooping directly from the bag. This prevents packing and ensures you don’t end up with a dry loaf.
  • Invest in a good quality loaf pan; it makes a difference in heat distribution, which ensures even baking. If your pan is dark-coated, reduce the oven temperature by 25°F to prevent over-browning.

Variations & Serving Ideas

For a delightful twist, consider adding blueberries or raspberries to the batter for a fruity burst of flavor. You can also experiment with different citrus fruits—try lime or grapefruit zest and juice for a refreshing change. For a healthier option, substitute half of the all-purpose flour with whole wheat flour for added fiber without compromising too much on texture.

This Lemon Poppy Seed Loaf pairs beautifully with a light salad, such as a mixed greens salad with a vinaigrette, or a cup of tea for a cozy afternoon treat. It also complements a creamy cheese platter, as the acidity of the loaf balances rich cheeses perfectly. Lastly, a scoop of vanilla ice cream on the side creates a delightful contrast of temperatures and flavors!

Storage, Make-Ahead & Reheating

This Lemon Poppy Seed Loaf can be stored at room temperature for up to 3 days if wrapped tightly in plastic wrap. If you want to keep it longer, it freezes well for up to 3 months. To freeze, wrap the loaf tightly in plastic wrap and then in aluminum foil to prevent freezer burn.

When you’re ready to enjoy it again, simply thaw it in the fridge overnight. Reheat individual slices in the microwave for 15-20 seconds or in a toaster oven until warmed through. Interestingly, many people find that this loaf tastes even better the next day, as the flavors have time to meld!

Frequently Asked Questions

Can I make Lemon Poppy Seed Loaf With Citrus Icing ahead of time?

Yes — in fact, it tastes even better the next day! You can make the loaf a day in advance, allowing the flavors to develop. Just be sure to store it in an airtight container to maintain its moisture.

Can I substitute the poppy seeds?

Absolutely! If you don’t have poppy seeds on hand or prefer an alternative, you can use sesame seeds for a similar crunch or omit them entirely for a smooth loaf.

What can I use instead of buttermilk?

If you don’t have buttermilk, you can easily create a substitute by mixing ½ cup of milk (dairy or plant-based) with 1 tablespoon of vinegar or lemon juice. Let it sit for 5 minutes before using in the recipe.

How can I make this recipe gluten-free?

To make a gluten-free version of this Lemon Poppy Seed Loaf, substitute the all-purpose flour with a gluten-free all-purpose flour blend. Just ensure that the blend contains a binding agent like xanthan gum for the best results.

What is the best way to store leftover loaf?

Leftover Lemon Poppy Seed Loaf should be stored in an airtight container at room temperature for up to 3 days. For longer storage, wrap it tightly and freeze for up to 3 months. Thaw it before serving for the best texture.

Zesty Lemon Poppy Seed Delight

Final Thoughts

The Lemon Poppy Seed Loaf with Citrus Icing is truly a delightful treat that brings a burst of brightness to any occasion. The zesty lemon flavor combined with the subtle crunch of poppy seeds creates a satisfying balance, while the citrus icing adds a touch of sweetness that perfectly complements the loaf’s tanginess.

This is the kind of recipe I come back to again and again, especially when I want to brighten up a gloomy day or celebrate a small victory. The aroma that fills the kitchen as it bakes is absolutely heavenly! I encourage you to give this recipe a try; you might just find it becoming a beloved staple in your home. Don’t forget to share your results or even add your own unique twist—I can’t wait to see what you create!

Print
clock clock iconcutlery cutlery iconflag flag iconfolder folder iconinstagram instagram iconpinterest pinterest iconfacebook facebook iconprint print iconsquares squares iconheart heart iconheart solid heart solid icon

Lemon Poppy Seed Loaf


  • Author: Lily author
  • Total Time: 5 minute
  • Yield: 1 loaf 1x
Pin Recipe
Print Recipe

Description

This Lemon Poppy Seed Loaf is a delightful treat that combines zesty lemon flavor with crunchy poppy seeds. Topped with a citrus icing, it’s perfect for any occasion.


Ingredients

Scale
  • 1 ½ cups (190g) all-purpose flour
  • 1 teaspoon baking powder
  • ½ teaspoon baking soda
  • ½ teaspoon salt
  • 3 tablespoons poppy seeds
  • ½ cup (115g) unsalted butter, softened to room temperature
  • 1 cup (200g) granulated sugar
  • 2 large eggs
  • 1 teaspoon vanilla extract
  • 1 teaspoon lemon zest (from about 1 medium lemon)
  • ½ cup (120ml) buttermilk
  • 2 tablespoons fresh lemon juice
  • 1 cup (120g) powdered sugar
  • 2 tablespoons fresh lemon juice
  • 1 tablespoon orange juice
  • 1 teaspoon lemon zest (for garnish, optional)

Instructions

  1. Preheat your oven to 350°F (175°C). Grease a 9×5-inch loaf pan or line it with parchment paper for easy removal later.
  2. In a medium mixing bowl, whisk together 1 ½ cups of all-purpose flour, 1 teaspoon of baking powder, ½ teaspoon of baking soda, ½ teaspoon of salt, and 3 tablespoons of poppy seeds. This helps to evenly distribute the baking agents and ensures a uniform rise.
  3. In a large mixing bowl, cream together ½ cup of softened unsalted butter and 1 cup of granulated sugar using an electric mixer on medium speed for about 3-4 minutes, until the mixture is light and fluffy. Make sure to scrape down the sides of the bowl occasionally.
  4. Add 2 large eggs, 1 teaspoon of vanilla extract, and 1 teaspoon of lemon zest to the creamed butter and sugar, mixing until fully combined. You want a smooth consistency, so ensure there are no lumps of butter.
  5. In a small bowl, combine ½ cup of buttermilk and 2 tablespoons of fresh lemon juice. Alternately add the dry ingredients and buttermilk mixture to the butter mixture, starting and ending with the dry ingredients. Mix just until combined; do not overmix, as this can lead to a dense loaf.
  6. Pour the batter into the prepared loaf pan. Smooth the top with a spatula, ensuring it’s even. Bake in the preheated oven for 50-60 minutes, or until a toothpick inserted in the center comes out clean. The edges should be lightly golden brown, and the center should feel just set.
  7. Once baked, remove the loaf from the oven and allow it to cool in the pan for about 10 minutes. Then, transfer it to a wire rack to cool completely. Resist the urge to slice too soon, as it will be crumbly if it’s still warm.
  8. While the loaf is cooling, prepare the citrus icing. In a medium bowl, whisk together 1 cup of powdered sugar, 2 tablespoons of fresh lemon juice, and 1 tablespoon of orange juice until smooth. If the icing is too thick, you can add a little more juice to reach your desired consistency.
  9. Once the loaf is completely cool, drizzle the citrus icing over the top. If you like, sprinkle with an additional teaspoon of lemon zest for an extra pop of flavor and color.
  • Prep Time: 15 mins
  • Cook Time: 50-60 mins
  • Category: Dessert
  • Method: Baking
  • Cuisine: American

Nutrition

  • Serving Size: 1 slice
  • Calories: 200
  • Sugar: 15 g
  • Sodium: 150 mg
  • Fat: 8 g
  • Saturated Fat: 5 g
  • Unsaturated Fat: 3 g
  • Trans Fat: 0 g
  • Carbohydrates: 30 g
  • Fiber: 1 g
  • Protein: 3 g
  • Cholesterol: 40 mg

Keywords: Be careful not to overmix your batter; this is a common mistake that can lead to a dense loaf. Use room temperature ingredients for a smoother batter and even baking.

Did you make this recipe?

Share a photo and tag us — we can't wait to see what you've made!

  • Privacy Policy
  • Terms Of Service
  • Contact
  • About
  • GDPR

Copyright © 2025 Homesmad