• Skip to primary navigation
  • Skip to main content
  • Skip to primary sidebar
Homesmad

Homesmad

  • Home
  • Breakfast & Brunch
  • Appetizers & Snacks
  • Dinner
  • Dessert
  • About
  • Privacy Policy
  • Contact
Homesmad
  • Home
  • Breakfast & Brunch
  • Appetizers & Snacks
  • Dinner
  • Dessert
  • About
  • Privacy Policy
  • Contact

Chocolate Peanut Butter Cookies Recipe – Classic & Easy!

October 31, 2025 by Lily author

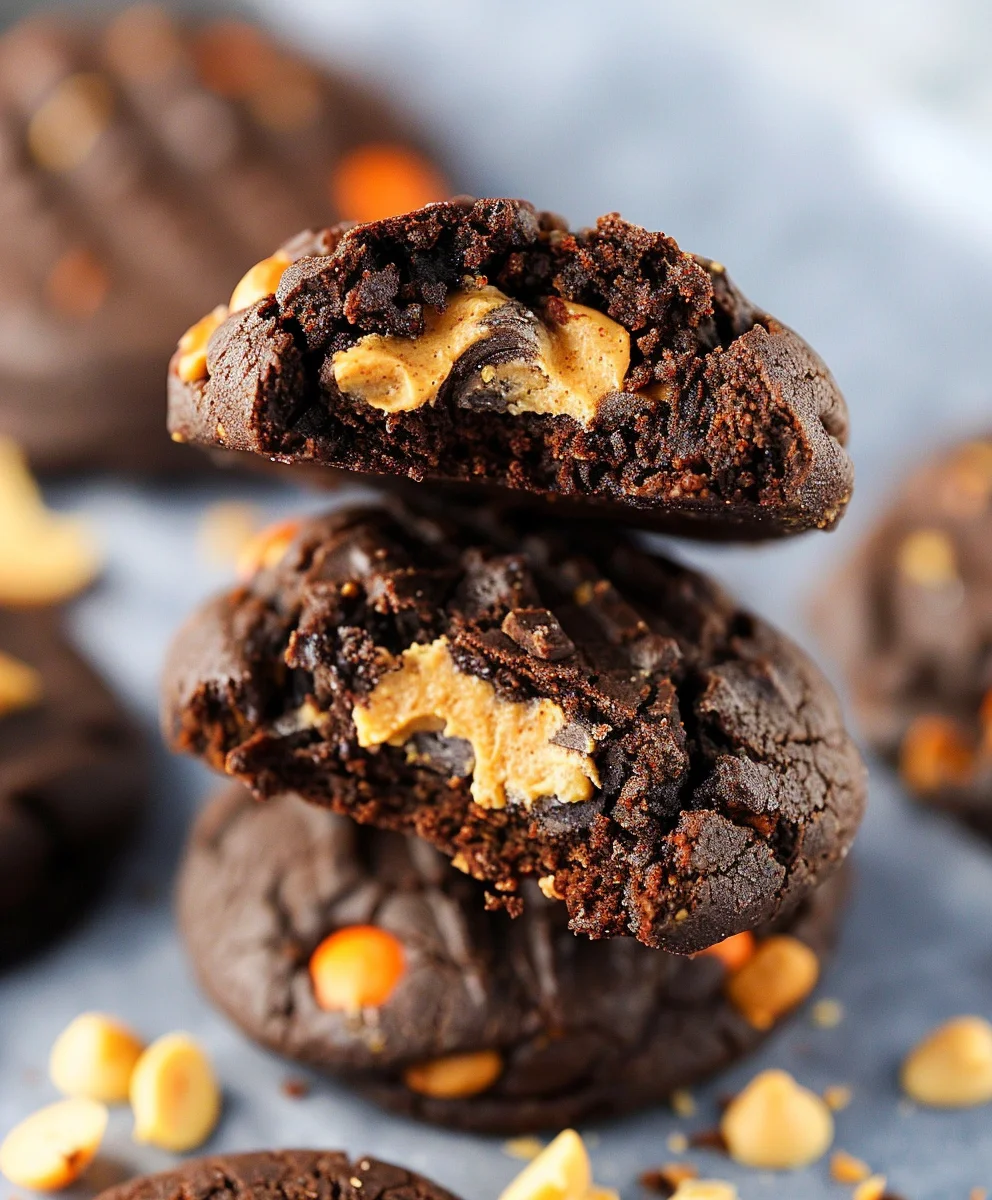
Chocolate Peanut Butter Cookies – is there a more universally beloved combination in the realm of sweet treats? I genuinely doubt it. As soon as that familiar aroma of roasted peanuts and rich cocoa fills the kitchen, you know you’re in for something truly special. This iconic pairing, a true staple in American baking, has captured hearts for generations, evolving from simple childhood delights into sophisticated gourmet sensations. We’re not just talking about any cookie here; we’re delving into a culinary masterpiece that perfectly balances contrasting flavors and textures.

What makes these particular Chocolate Peanut Butter Cookies so utterly irresistible? It’s the harmonious dance between the deep, comforting sweetness of chocolate and the salty, creamy indulgence of peanut butter. Every bite offers a delightful journey: a crisp edge yielding to a wonderfully soft and chewy center, studded with chocolate chips that melt in your mouth. Whether you’re a seasoned baker or just starting your culinary adventures, this recipe promises a batch of cookies that are easy to make, incredibly satisfying, and destined to become a cherished family favorite. Prepare to discover your new go-to cookie!

Chocolate Peanut Butter Cookies Recipe - Classic & Easy! this RECIPE

Ingredients:

  • 1 cup (2 sticks) unsalted butter, softened: I always reach for unsalted butter when baking because it gives me full control over the salt content in my Chocolate Peanut Butter Cookies. Ensuring it’s properly softened to room temperature is absolutely crucial. This isn’t just a suggestion; it genuinely impacts the texture of your cookies. If it’s too cold, it won’t cream properly with the sugars, leading to a denser, less airy cookie. If it’s melted, your dough will be too greasy, and the cookies might spread too much. I usually take mine out of the fridge an hour or two before I plan to bake.
  • 1 cup granulated sugar: White granulated sugar provides that classic sweetness and helps create a crisp edge on your Chocolate Peanut Butter Cookies. It also aids in the creaming process, working with the butter to incorporate air into the dough, which contributes to a lighter texture. Don’t skip sifting if your sugar tends to clump, though it’s usually not necessary for standard granulated sugar.
  • 1 cup packed light brown sugar: The addition of light brown sugar is key for achieving that wonderful chewiness and depth of flavor in these Chocolate Peanut Butter Cookies. The molasses content in brown sugar not only adds moisture but also imparts a subtle caramel note that beautifully complements both the chocolate and peanut butter. Make sure it’s packed firmly when measuring to ensure you’re getting the right amount.
  • 2 large eggs, at room temperature: Just like the butter, room temperature eggs are essential. They emulsify better with the other ingredients, creating a smoother, more homogenous dough. If your eggs are cold, they can cause the butter to seize up, leading to a lumpy batter. I often just place mine in a bowl of warm water for a few minutes if I forget to take them out ahead of time.
  • 1 teaspoon pure vanilla extract: Never underestimate the power of good vanilla extract! It’s not just a background flavor; it enhances and rounds out all the other flavors in your Chocolate Peanut Butter Cookies. I always recommend using a good quality pure vanilla extract for the best results, as imitation vanilla just doesn’t quite hit the same notes.
  • 1 ½ cups creamy peanut butter: This is where the magic happens for our Chocolate Peanut Butter Cookies! I personally prefer creamy peanut butter for a smooth, consistent texture throughout the cookie, but if you love a bit of crunch, feel free to use crunchy peanut butter. Just make sure to use a standard processed peanut butter (like Jif or Skippy) rather than natural, oil-separated varieties, as the latter can affect the cookie’s texture and spread. The oils in natural peanut butter tend to separate and can make the cookies greasy.
  • 2 ½ cups all-purpose flour: Flour provides the structure for our Chocolate Peanut Butter Cookies. I always measure my flour by spooning it into the measuring cup and then leveling it off with a straight edge. Scooping directly from the bag can compact the flour, leading to too much flour and a dry, crumbly cookie. A kitchen scale is even better for accuracy if you have one!
  • 1 teaspoon baking soda: This leavening agent helps our Chocolate Peanut Butter Cookies rise and achieve that soft, tender interior. Baking soda needs an acid to react, and in this recipe, it reacts with the brown sugar and the inherent acidity in the peanut butter.
  • ½ teaspoon salt: Salt is crucial in baking. It balances the sweetness, enhances all the other flavors, and prevents your Chocolate Peanut Butter Cookies from tasting flat. Don’t skip it, even if you’re using salted peanut butter – you’ll still need this extra pinch to truly make the flavors sing.
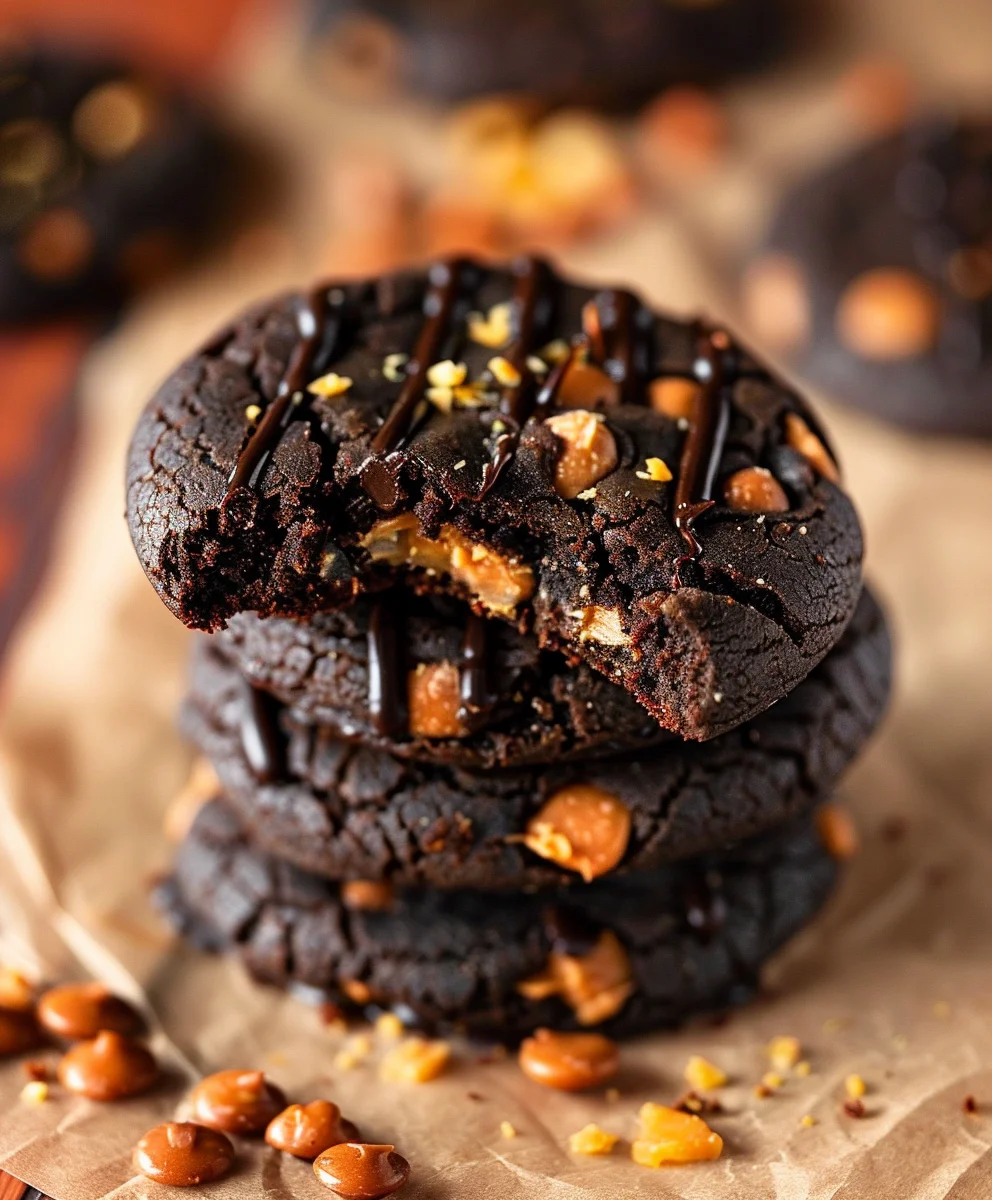
  • 1 ½ cups chocolate chips: For these Chocolate Peanut Butter Cookies, I love a good mix! I typically use semi-sweet chocolate chips, but dark chocolate chips or even milk chocolate chips would be absolutely divine. If you want to get fancy, a combination of different types of chocolate chips or even chopped chocolate bars can add wonderful complexity. Remember, you can always add a little more if you’re a serious chocoholic like me!

Preparing the Chocolate Peanut Butter Cookie Dough

  1. Cream the Butter and Sugars: First things first, in a large mixing bowl, I combine my softened unsalted butter with both the granulated sugar and the light brown sugar. Using an electric mixer (either a stand mixer with the paddle attachment or a hand mixer), I beat these ingredients together on medium speed until they are light, fluffy, and well-combined. This creaming process is incredibly important as it incorporates air into the mixture, which contributes significantly to the final texture of your Chocolate Peanut Butter Cookies, making them soft and tender. I usually let this go for about 2-3 minutes, occasionally scraping down the sides of the bowl with a rubber spatula to ensure everything is evenly mixed. You’ll notice the color lightening and the texture becoming noticeably aerated.
  2. Add Eggs and Vanilla: Once the butter and sugars are perfectly creamy, I crack in my two large, room-temperature eggs, one at a time. After each egg, I beat well, allowing it to fully incorporate into the mixture before adding the next. This ensures proper emulsification. Then, I stir in the pure vanilla extract. I continue to beat the mixture on medium speed until it’s smooth and homogeneous. This stage is crucial for building the foundational moisture and richness of the cookie dough, setting the stage for truly delightful Chocolate Peanut Butter Cookies. Make sure there are no streaks of unmixed egg yolk or white remaining.
  3. Incorporate the Peanut Butter: Now for the star ingredient! I add the creamy peanut butter to the wet mixture. I beat this on medium-low speed until it’s completely smooth and thoroughly combined with the rest of the wet ingredients. You want a consistent, uniform texture here, so take your time and scrape down the sides of the bowl frequently to ensure no pockets of unmixed peanut butter remain. This step infuses our cookies with that unmistakable, delicious peanut butter flavor that makes them so special.
  4. Combine Dry Ingredients: In a separate medium-sized bowl, I whisk together the all-purpose flour, baking soda, and salt. Whisking dry ingredients together before adding them to the wet mixture ensures that the leavening agent and salt are evenly distributed throughout the flour. This prevents having pockets of unmixed ingredients, which could lead to unevenly baked or oddly flavored cookies. This seemingly small step makes a big difference in the consistency of your Chocolate Peanut Butter Cookies.
  5. Gradually Add Dry to Wet: With the mixer on low speed, I gradually add the dry ingredients to the wet ingredients, a little at a time. I mix only until just combined, being very careful not to overmix. Overmixing develops the gluten in the flour too much, which can lead to tough, dense cookies instead of the soft, chewy Chocolate Peanut Butter Cookies we’re aiming for. As soon as you no longer see streaks of dry flour, stop the mixer. I usually finish the last few stirs by hand with a spatula just to be extra cautious.
  6. Fold in Chocolate Chips: Finally, I gently fold in the chocolate chips using a rubber spatula. I mix just until they are evenly distributed throughout the dough. You want every bite of your Chocolate Peanut Butter Cookies to have a delightful burst of chocolate! Be careful not to overmix at this stage either, as it can crush some of the chips or further develop gluten.
  7. Chill the Dough (Optional, but Recommended): For the best results and to prevent excessive spreading, I highly recommend chilling the cookie dough for at least 30 minutes in the refrigerator, or even up to 24 hours. While optional if you’re in a hurry, this step allows the flavors to meld together and the butter to firm up, resulting in a richer flavor and a thicker, chewier cookie. If chilling for longer than an hour, I usually cover the bowl with plastic wrap. This is a pro-tip for achieving truly excellent Chocolate Peanut Butter Cookies.

Baking the Chocolate Peanut Butter Cookies

  1. Preheat Oven and Prepare Baking Sheets: About 15-20 minutes before I’m ready to bake, I preheat my oven to 375°F (190°C). While the oven heats up, I line several baking sheets with parchment paper. Parchment paper is a true baking savior, preventing sticking and making cleanup a breeze. Plus, it helps the cookies bake more evenly. If you don’t have parchment paper, a light spray of non-stick cooking spray will work, but I prefer the consistent results of parchment.
  2. Scoop and Shape the Cookies: Using a medium cookie scoop (about 1.5 to 2 tablespoons), I scoop out portions of the chilled dough. I then roll each portion into a smooth ball between my palms. For a classic look, especially since these are Chocolate Peanut Butter Cookies, I sometimes gently flatten each ball slightly and then use the tines of a fork to create a crisscross pattern on top. This isn’t just for aesthetics; it helps press the cookies down slightly, promoting even baking. I place the shaped dough balls about 2 inches apart on the prepared baking sheets to allow for proper spreading without them merging into one giant cookie.
  3. Bake to Perfection: I place one baking sheet at a time into the preheated oven. I bake the Chocolate Peanut Butter Cookies for about 9 to 12 minutes. The exact baking time can vary depending on your oven, so I keep a close eye on them. You’re looking for the edges to be lightly golden brown and the centers to appear set, but still slightly soft. They might look a little underdone in the very middle, but that’s okay – they will continue to set as they cool on the baking sheet, ensuring a perfectly chewy center. Overbaking is the enemy of a soft, chewy cookie!
  4. Cooling Process: Once they come out of the oven, I let the Chocolate Peanut Butter Cookies cool on the baking sheet for about 5 minutes. This crucial step allows them to firm up slightly before you attempt to move them. They’re quite delicate right out of the oven, and trying to transfer them too soon might cause them to break apart. After 5 minutes, I carefully transfer the cookies to a wire cooling rack to cool completely. Cooling completely on a rack allows air to circulate around them, preventing condensation and ensuring they retain their perfect texture. Trust me, the wait is worth it for perfectly set Chocolate Peanut Butter Cookies.

Serving and Storing Your Chocolate Peanut Butter Cookies

  1. Enjoy Immediately or Store: These Chocolate Peanut Butter Cookies are absolutely divine warm, perhaps with a glass of cold milk or even alongside a scoop of vanilla bean ice cream for an extra indulgent treat. The melted chocolate and soft peanut butter texture are truly irresistible.
  2. Storage Tips: If you happen to have any cookies left (which is a rare occurrence in my house!), you can store them in an airtight container at room temperature for up to 3-5 days. To keep them extra fresh, I sometimes add a slice of plain bread to the container; it helps keep the cookies soft by transferring its moisture to them. You can also freeze the baked cookies for up to 3 months. Just layer them with parchment paper in an airtight freezer-safe container. When you’re ready to enjoy them, simply thaw them at room temperature or warm them gently in the microwave for a few seconds for that freshly baked taste.
  3. Creative Variations: Don’t be afraid to experiment with these Chocolate Peanut Butter Cookies! You could try different types of chocolate, like white chocolate chips or even chopped candy bars for an extra layer of flavor. A sprinkle of flaky sea salt on top of the warm cookies just after they come out of the oven can really elevate the flavors, creating that wonderful sweet and salty contrast. Sometimes I’ll even mix in some chopped roasted peanuts for an added textural crunch.

    A Note on Texture:

    Achieving the perfect balance of chewy and soft is key for these Chocolate Peanut Butter Cookies. The combination of both brown and granulated sugars, along with the room temperature butter and eggs, works harmoniously to create that delightful texture. Remember, slight underbaking is preferred to overbaking, as they continue to cook on the hot baking sheet. If you prefer a crispier cookie, you can bake them for an extra minute or two, but keep a very close eye on them to prevent burning.

Chocolate Peanut Butter Cookies Recipe - Classic & Easy!

Conclusion:

And there you have it, friends! We’ve reached the sweet finale of our delicious journey together. If there’s one recipe I truly believe deserves a permanent spot in your baking repertoire, it’s this one. What makes these cookies so utterly irresistible, you ask? It’s that magical synergy of rich, decadent chocolate and creamy, savory peanut butter, perfectly encapsulated in a tender, chewy bite that just melts in your mouth. This isn’t just another cookie recipe; it’s a delightful experience, a little moment of pure joy that’s surprisingly simple to create. I promise you, the aroma filling your kitchen alone will be enough to get everyone excited!

You might be wondering how best to enjoy your freshly baked batch. My absolute favorite way to savor these gems is straight from the oven, still warm and gooey, perhaps with a tall, frosty glass of milk. There’s something incredibly comforting about that classic combination. They’re also spectacular when paired with a hot cup of coffee or a robust espresso, making them an ideal pick-me-up for an afternoon treat. For an extra special dessert, try crumbling one over a scoop of vanilla bean ice cream, drizzling it with a little extra chocolate sauce, or even making them into ice cream sandwiches! Imagine two soft cookies hugging a generous scoop of your favorite ice cream – pure bliss. They also make an incredibly thoughtful gift for friends, neighbors, or to bring to any potluck or gathering; trust me, they’ll disappear in a flash and earn you rave reviews.

But the fun doesn’t stop there! One of the things I love most about baking is the endless possibility for customization, and these cookies are no exception. Feel free to get creative with your additions. For a little crunch, try stirring in some chopped roasted peanuts or even a handful of pretzels for a sweet and salty twist. If you’re a fan of different chocolate varieties, experiment with white chocolate chips, milk chocolate chunks, or even a mix of dark and semi-sweet. A sprinkle of flaky sea salt on top before baking can really elevate the flavors, enhancing both the chocolate and the peanut butter in a delightful way. You could also try swapping out some of the peanut butter for almond butter or cashew butter if you’re feeling adventurous, though nothing quite compares to the classic Chocolate Peanut Butter Cookies. For a more festive touch, colorful sprinkles can be folded into the dough or pressed on top before baking, making them perfect for celebrations.

Now that you have all the insider tips and tricks, I wholeheartedly encourage you to roll up your sleeves, preheat your oven, and embark on this delicious baking adventure. I am so confident you’re going to fall in love with these cookies, just as I have. Don’t be shy; once you’ve whipped up your own batch, I would absolutely adore hearing about your experience! Did you add any fun variations? What was your favorite part of the recipe? Did they become an instant family favorite? Please, share your baking triumphs, your photos, and your feedback. Your stories inspire me, and I can’t wait to see the delicious creations you come up with. Happy baking, everyone!


Chocolate Peanut Butter Cookies Recipe - Classic & Easy!

Chocolate Peanut Butter Cookies Recipe – Classic & Easy!

Indulge in these classic Chocolate Peanut Butter Cookies. This easy recipe promises a delightful journey: a crisp edge yielding to a wonderfully soft and chewy center, perfectly balancing the deep, comforting sweetness of chocolate and the salty, creamy indulgence of peanut butter. A guaranteed family favorite!

Prep Time
45 Minutes

Cook Time
36 Minutes

Total Time
45 Minutes

Servings
36 cookies

Ingredients

  • ½ cup peanut butter (130g)
  • 1 ½ cups powdered sugar (150g)
  • 1 ½ ounces whole milk
  • 1 teaspoon vanilla extract
  • ¾ teaspoon salt
  • 2 cups all-purpose flour (260g)
  • ¼ cup unsweetened cocoa powder (25g)
  • ¼ cup black cocoa powder (30g)
  • 1 (3.4oz) box instant chocolate fudge pudding mix (110g), unprepared
  • 2 tablespoons powdered milk (10g)
  • ¼ teaspoon baking soda
  • 1 cup granulated sugar (220g)
  • ½ cup salted butter (113g), softened
  • 1 large egg, room temperature

Instructions

  1. Step 1
    In a large mixing bowl, cream softened salted butter with granulated sugar and powdered sugar using an electric mixer until light and fluffy (2-3 minutes). Scrape down the sides of the bowl to ensure even mixing.
  2. Step 2
    Beat in the large room-temperature egg, then stir in pure vanilla extract. Continue to beat until smooth. Gradually add whole milk, mixing until fully incorporated.
  3. Step 3
    Add the creamy peanut butter to the wet mixture. Beat on medium-low speed until completely smooth and thoroughly combined, scraping down the bowl frequently to ensure a uniform texture.
  4. Step 4
    In a separate medium bowl, whisk together all-purpose flour, unsweetened cocoa powder, black cocoa powder, instant chocolate fudge pudding mix, powdered milk, ¾ teaspoon salt, and baking soda. Whisk thoroughly to ensure even distribution.
  5. Step 5
    With the mixer on low speed, gradually add the whisked dry ingredients to the wet mixture, a little at a time. Mix only until just combined, being careful not to overmix. Stop as soon as no dry streaks of flour remain, finishing with a rubber spatula if necessary.
  6. Step 6
    Gently fold in chocolate chips using a rubber spatula until they are evenly distributed throughout the dough. (Note: Chocolate chips are mentioned in the article’s instructions for flavor and texture, but not explicitly included in the provided ingredient list.)
  7. Step 7
    For best results and to prevent excessive spreading, chill the cookie dough in the refrigerator for at least 30 minutes, or up to 24 hours. Cover the bowl with plastic wrap if chilling for longer than an hour.
  8. Step 8
    Preheat your oven to 375°F (190°C) about 15-20 minutes before baking. Line several baking sheets with parchment paper to prevent sticking and aid in even baking.
  9. Step 9
    Using a medium cookie scoop (about 1.5 to 2 tablespoons), scoop out portions of the chilled dough. Roll each portion into a smooth ball. For a classic look, gently flatten each ball and create a crisscross pattern on top with a fork. Place dough balls about 2 inches apart on the prepared baking sheets.
  10. Step 10
    Bake one baking sheet at a time for about 9 to 12 minutes. Cookies are done when the edges are lightly golden brown and the centers appear set but are still slightly soft. They will continue to set as they cool; avoid overbaking.
  11. Step 11
    Once out of the oven, let the cookies cool on the baking sheet for about 5 minutes to allow them to firm up. Then, carefully transfer them to a wire cooling rack to cool completely. This prevents condensation and maintains texture.
  12. Step 12
    Enjoy these cookies warm, perhaps with a glass of cold milk. Store any leftover cookies in an airtight container at room temperature for 3-5 days, or freeze baked cookies for up to 3 months layered with parchment paper.

Important Information

Nutrition Facts (Per Serving)

It is important to consider this information as approximate and not to use it as definitive health advice.

Allergy Information

Please check ingredients for potential allergens and consult a health professional if in doubt.

« Previous Post
Irresistible Spicy Creamy Garlic Parmesan Chicken Fillet
Next Post »
Sugar Free Apple Crisp: Healthy & Delicious Dessert!

If you enjoyed this…

Churro Cheesecake Cookies: The Ultimate Recipe & Baking Guide

Easy Strawberry Shortcake Crunch Spring Cupcakes Recipe

Heaven On Earth Cake: Quick No Bake Recipe for Easy Dessert

Primary Sidebar

Browse by Diet

BreakfastDinnerLunchDessertAppetizer

Sweet Peach Yogurt Parfait Delight

One of my fondest memories is from a lazy summer afternoon spent at my grandmother’s house. The sun filtered through the kitchen window, casting a warm glow over the table where she would create her culinary magic. It was during one of those blissful moments that I first tasted her Peach Yogurt Parfait with Honey and Granola. The sweet aroma of ripe peaches mingling with creamy yogurt and the crunch of granola was nothing short of heavenly. It felt like summer captured in a bowl, and I still remember the joy of diving in with a spoon, each layer revealing a new burst of flavor.

When I think about that parfait, I can almost hear the gentle hum of the bees outside, reminding me of the floral notes that honey brings to every bite. The vibrant yellows and soft oranges of the peaches contrast beautifully with the creamy white yogurt and the golden crunch of granola. It’s a dish that not only looks delightful but also tastes like a celebration of fresh, wholesome ingredients.

What makes my version of this Peach Yogurt Parfait special is the careful balance of flavors and textures. I use ripe, juicy peaches, drizzled with locally sourced honey, and a homemade granola that’s bursting with nuts and seeds for an extra crunch. It’s a simple dish, but every layer is crafted with love and attention.

Let me show you exactly how to make this delightful parfait, so you can bring a bit of that summer magic into your kitchen!

Sweet Peach Yogurt Parfait Delight

Why You’ll Love This Recipe

  • Delightfully creamy texture from the Greek yogurt, paired with the juicy sweetness of fresh peaches.
  • Ready in under 20 minutes, making it a quick and satisfying breakfast or snack option.
  • Budget-friendly, using common ingredients that you may already have in your pantry.
  • Customizable with your favorite granola and nuts, allowing you to tailor each parfait to your taste.
  • Perfectly balanced flavors with the bright acidity of lemon juice and the sweetness of honey enhancing the peaches.

Ingredients

  • For the Parfait:
  • 2 cups plain Greek yogurt (or vanilla yogurt for a sweeter option)
  • 2 large ripe peaches, diced (about 2 cups)
  • 1 tablespoon fresh lemon juice (to prevent browning of peaches)
  • 2 tablespoons honey (plus more for drizzling)
  • 1 teaspoon vanilla extract (optional for extra flavor)
  • For the Granola:
  • 1 cup granola (store-bought or homemade; see notes for a simple granola recipe)
  • 1/4 cup sliced almonds (optional for added crunch)
  • 1/4 cup shredded coconut (optional for added flavor)

Let’s dive into some key ingredients that make this Peach Yogurt Parfait so delightful! First, the Greek yogurt is not only creamy but also packed with protein, making it a satisfying option for breakfast or a snack. If you’re looking for a sweeter option, you can easily substitute it with vanilla yogurt, though it may alter the overall flavor balance. Next, the ripe peaches are the star of the show; their natural sweetness shines through, so I recommend choosing peaches that yield slightly to pressure, indicating they’re perfectly ripe. If peaches aren’t in season, feel free to use nectarines or even frozen peaches—just thaw them before use. Finally, honey adds a lovely floral sweetness that ties everything together. If you prefer, maple syrup can serve as a delicious substitute.

Step-by-Step Instructions

  1. Start by preparing the peaches. Wash them thoroughly, then slice and dice them into bite-sized pieces. In a medium bowl, toss the diced peaches with 1 tablespoon of fresh lemon juice to prevent browning. Set aside for about 5 minutes while the lemon juice works its magic.
  2. In a separate bowl, combine the Greek yogurt, 2 tablespoons of honey, and 1 teaspoon of vanilla extract if using. Stir the mixture until smooth and thoroughly blended. This should take about a minute. Avoid overmixing to maintain the creaminess of the yogurt.
  3. Now it’s time to layer your parfait. Grab a clear glass or bowl to showcase your beautiful creation. Start with a generous spoonful of the yogurt mixture at the bottom—about 1/4 cup will do. Use a spoon to spread it evenly.
  4. Add a layer of the diced peaches over the yogurt, ensuring they cover the yogurt completely. You might want to use about half of what you have prepared—roughly 1 cup. This layer should be visually appealing, so arrange the peaches neatly.
  5. Sprinkle 1/4 cup of granola over the peaches. This adds a delightful crunch. Make sure to distribute it evenly to ensure every bite has that satisfying texture. Avoid packing it down too tightly, as you want it to maintain its crunch.
  6. Repeat the layers: spoon in another 1/4 cup of yogurt, followed by another cup of peaches, and another sprinkle of granola. You should have at least two layers, but feel free to add more depending on your glass size.
  7. Finish off your parfait with a drizzle of honey on top for added sweetness and a touch of elegance. If you’re using sliced almonds or shredded coconut, sprinkle them on top now. It adds a lovely visual contrast and extra flavor.
  8. Serve immediately or refrigerate for up to 30 minutes before serving to allow the flavors to meld together. However, I recommend enjoying it fresh to maintain the granola’s crunch.

Pro Tips for the Best Peach Yogurt Parfait With Honey And Granola

  • Make sure to choose ripe peaches for the best flavor and texture. A common mistake is using unripe fruit, which can lead to a less enjoyable parfait. Look for peaches that are fragrant and slightly soft to the touch.
  • Use a clear glass to assemble your parfait; this not only makes for a beautiful presentation but also allows you to see the colorful layers, which adds to the enjoyment of eating it.
  • For an even creamier texture, consider whipping the Greek yogurt with a hand mixer for a couple of minutes before layering. This small adjustment makes a huge difference in mouthfeel.
  • Be mindful of the granola-to-yogurt ratio. Too much granola can overwhelm the parfait, while too little can make it feel too creamy. Aim for about 1/4 cup of granola per layer for the perfect balance.
  • If you’re making this for a gathering, consider preparing the yogurt and peaches ahead of time and layering them just before serving. This ensures the granola stays crunchy!

Variations & Serving Ideas

There are so many ways to get creative with your Peach Yogurt Parfait! For a tropical twist, swap out the peaches for mangoes or pineapples and top with coconut flakes. If you prefer a berry flavor, mix in some blueberries or strawberries with the peaches for added color and taste. For a nutty version, incorporate chopped walnuts or pecans instead of almonds.

As for serving ideas, this parfait pairs beautifully with a side of scrambled eggs for a hearty breakfast or fresh fruit salad for a light lunch. You might also enjoy it alongside whole grain toast with almond butter for an energizing snack. The contrast of flavors and textures will elevate your meal experience!

Storage, Make-Ahead & Reheating

The Peach Yogurt Parfait is best enjoyed fresh, but you can prepare some components ahead of time. Store the layered parfait in an airtight container in the refrigerator for up to 24 hours. However, be cautious; the granola may lose its crunch if stored too long. You can freeze the yogurt and peach mixture for up to 2 months; just remember to thaw it in the refrigerator overnight before serving.

If you plan to enjoy this dish the next day, it can taste even better as the flavors meld together. Just remember to add the granola right before serving to keep its delightful crunch!

Frequently Asked Questions

Can I make Peach Yogurt Parfait With Honey And Granola ahead of time?

Yes — in fact, it tastes even better the next day as the flavors meld. However, I recommend waiting to add the granola until just before serving to maintain its crunch.

What can I substitute for Greek yogurt?

If you prefer a lighter option, you can substitute Greek yogurt with regular yogurt or a dairy-free alternative like coconut yogurt. Just remember that this may alter the creaminess and flavor profile slightly.

Can I use frozen peaches for this parfait?

Absolutely! Just make sure to thaw the frozen peaches before using them. They will still add great flavor, though the texture may be slightly softer than fresh peaches.

How do I make the parfait vegan?

To make a vegan version, substitute the Greek yogurt with a plant-based yogurt alternative, and replace honey with maple syrup or agave nectar. This keeps the parfait sweet while adhering to a vegan diet.

What other fruits can I use in this recipe?

You can mix and match fruits based on your preference. Try using strawberries, blueberries, raspberries, or even bananas. Just make sure to adjust the lemon juice as needed to prevent browning.

Sweet Peach Yogurt Parfait Delight

Final Thoughts

The Peach Yogurt Parfait with Honey and Granola is a delightful blend of creamy yogurt, sweet peaches, and crunchy granola that creates a satisfying and nourishing treat. Each layer bursts with flavor, making it a perfect choice for breakfast or a light dessert.

This is the kind of recipe I come back to again and again, especially when I want something refreshing and wholesome to start my day. The harmony of sweet and tart flavors, combined with the delightful crunch, never fails to lift my spirits!

I encourage you to give this parfait a try and indulge in its comforting goodness. Feel free to share your results or even add your own twist—perhaps a sprinkle of cinnamon or a handful of nuts. Enjoy creating your perfect parfait!

Print
clock clock iconcutlery cutlery iconflag flag iconfolder folder iconinstagram instagram iconpinterest pinterest iconfacebook facebook iconprint print iconsquares squares iconheart heart iconheart solid heart solid icon

Peach Yogurt Parfait


  • Author: Lily author
  • Total Time: 15 minutes
  • Yield: 4 servings 1x
Pin Recipe
Print Recipe

Description

This Peach Yogurt Parfait combines creamy Greek yogurt, juicy peaches, and crunchy granola for a delightful treat. It’s a perfect breakfast or snack that captures the essence of summer in every bite.


Ingredients

Scale
  • For the Parfait:
  • 2 cups plain Greek yogurt (or vanilla yogurt for a sweeter option)
  • 2 large ripe peaches, diced (about 2 cups)
  • 1 tablespoon fresh lemon juice (to prevent browning of peaches)
  • 2 tablespoons honey (plus more for drizzling)
  • 1 teaspoon vanilla extract (optional for extra flavor)
  • For the Granola:
  • 1 cup granola (store-bought or homemade; see notes for a simple granola recipe)
  • 1/4 cup sliced almonds (optional for added crunch)
  • 1/4 cup shredded coconut (optional for added flavor)

Instructions

  1. Start by preparing the peaches. Wash them thoroughly, then slice and dice them into bite-sized pieces. In a medium bowl, toss the diced peaches with 1 tablespoon of fresh lemon juice to prevent browning. Set aside for about 5 minutes while the lemon juice works its magic.
  2. In a separate bowl, combine the Greek yogurt, 2 tablespoons of honey, and 1 teaspoon of vanilla extract if using. Stir the mixture until smooth and thoroughly blended. This should take about a minute. Avoid overmixing to maintain the creaminess of the yogurt.
  3. Now it’s time to layer your parfait. Grab a clear glass or bowl to showcase your beautiful creation. Start with a generous spoonful of the yogurt mixture at the bottom—about 1/4 cup will do. Use a spoon to spread it evenly.
  4. Add a layer of the diced peaches over the yogurt, ensuring they cover the yogurt completely. You might want to use about half of what you have prepared—roughly 1 cup. This layer should be visually appealing, so arrange the peaches neatly.
  5. Sprinkle 1/4 cup of granola over the peaches. This adds a delightful crunch. Make sure to distribute it evenly to ensure every bite has that satisfying texture. Avoid packing it down too tightly, as you want it to maintain its crunch.
  6. Repeat the layers: spoon in another 1/4 cup of yogurt, followed by another cup of peaches, and another sprinkle of granola. You should have at least two layers, but feel free to add more depending on your glass size.
  7. Finish off your parfait with a drizzle of honey on top for added sweetness and a touch of elegance. If you’re using sliced almonds or shredded coconut, sprinkle them on top now. It adds a lovely visual contrast and extra flavor.
  8. Serve immediately or refrigerate for up to 30 minutes before serving to allow the flavors to meld together. However, I recommend enjoying it fresh to maintain the granola’s crunch.
  • Prep Time: 15 mins
  • Cook Time: 0 mins
  • Category: Breakfast
  • Method: No-cook
  • Cuisine: American

Nutrition

  • Serving Size: 1 parfait
  • Calories: 250
  • Sugar: 20 g
  • Sodium: 50 mg
  • Fat: 5 g
  • Saturated Fat: 2 g
  • Unsaturated Fat: 3 g
  • Trans Fat: 0 g
  • Carbohydrates: 40 g
  • Fiber: 3 g
  • Protein: 10 g
  • Cholesterol: 10 mg

Keywords: Choose ripe peaches for the best flavor and texture. Use a clear glass for a beautiful presentation. For creaminess, consider whipping the yogurt before layering. Be mindful of the granola-to-yogurt ratio. Prepare yogurt and peaches ahead of time for gatherings, layering just before serving.

Did you make this recipe?

Share a photo and tag us — we can't wait to see what you've made!

Sun-Kissed Frozen Orange Cream Slush

As a child, summer days felt like they lasted forever. I remember the sticky heat wrapping around me as I played outside, my laughter mingling with the sounds of the neighborhood. But nothing could cool me down quite like the moment I’d spot my grandmother, laboring over her blender, whipping up her famous Frozen Orange Creamsicle Slush. That vibrant orange treat, with its frosty texture and sweet citrus aroma, was like a burst of sunshine in a cup. Just one sip, and I could feel the coolness wash over me, sparking pure joy.

This Frozen Orange Creamsicle Slush has a way of making you feel like a kid again. Its creamy, dreamy consistency is a delightful balance of bright orange and soft vanilla, inviting you to dive right in. The refreshing tang of orange dances on your tongue, while the smooth creaminess envelops you in a comforting embrace. It’s a nostalgic treat that’s perfect for hot summer afternoons or anytime you need a little pick-me-up.

What makes my version of this slush stand out is the addition of a hint of vanilla bean, which elevates the flavor and adds an extra layer of richness. Plus, it’s super easy to whip up with just a few simple ingredients that you probably already have on hand! So, if you’re ready to relive those sun-soaked memories, let me show you exactly how to make it.

Sun-Kissed Frozen Orange Cream Slush

Why You’ll Love This Recipe

  • Each slush is a perfect blend of creamy vanilla and zesty orange, creating a nostalgic flavor reminiscent of summer days.
  • This refreshing treat is ready in under 15 minutes, making it an ideal quick dessert for unexpected guests or hot afternoons.
  • With just 8 simple ingredients, it’s budget-friendly, ensuring you don’t have to break the bank to enjoy a delicious slush.
  • The slush has a perfectly smooth texture, thanks to the combination of ice and ice cream, providing a delightful contrast to the bright citrus flavors.
  • It’s highly customizable; you can easily adjust the sweetness and add fresh herbs for a unique twist that suits your taste.

Ingredients

  • 2 cups orange juice (freshly squeezed or store-bought)
  • 1 cup vanilla ice cream
  • 1 cup crushed ice
  • 1/2 cup milk (whole or 2%)
  • 1/4 cup granulated sugar (adjust based on sweetness preference)
  • 1 teaspoon vanilla extract
  • Zest of 1 orange (for added flavor)
  • Fresh orange slices and mint leaves (for garnish)

The star of this Frozen Orange Creamsicle Slush is the orange juice, which provides the vibrant, citrusy base. Freshly squeezed juice will yield the brightest flavor, but store-bought options can be just as convenient. If you’re opting for store-bought, choose 100% pure juice with no added sugars for the best results. Another essential ingredient is the vanilla ice cream; it adds creaminess and sweetness. You can substitute it with dairy-free ice cream if you’re looking for a vegan option. Whole or 2% milk complements the ice cream, creating a smooth blend. If you want a lower-calorie version, almond or oat milk can be good alternatives.

Lastly, the granulated sugar can be adjusted based on your sweetness preference. If you prefer a more natural sweetener, consider using honey or agave syrup. The orange zest enhances the flavor profile, providing an aromatic pop that brings the whole slush together. Don’t skip it! It adds an extra layer of brightness that makes this slush truly special.

Step-by-Step Instructions

  1. Start by preparing your ingredients. Gather 2 cups of orange juice, 1 cup of vanilla ice cream, and 1 cup of crushed ice. Make sure the ice is finely crushed, as larger chunks can make blending difficult.
  2. In a blender, combine the orange juice, vanilla ice cream, crushed ice, and 1/2 cup of milk. Add 1/4 cup of granulated sugar and 1 teaspoon of vanilla extract. If you like a sweeter slush, consider adding a bit more sugar at this stage.
  3. Add the zest of 1 orange to the blender. This step is crucial for enhancing the citrus flavor of your slush. Make sure not to include the bitter white pith—only the flavorful zest.
  4. Blend the mixture on medium-high speed for about 30-45 seconds. Stop once the ingredients are fully combined and the slush has a smooth, even consistency. If you notice large chunks of ice, blend for an additional 10-15 seconds. Avoid over-blending, as this can make the slush too liquidy.
  5. Once blended, taste the slush. If it needs more sweetness, add a little more sugar and blend for a few more seconds. If it’s too thick, you can add a splash of milk to reach your desired consistency.
  6. Pour the slush into glasses. This recipe typically serves 4, but you can easily double it for larger gatherings. Use a spoon to help guide the slush into the glasses if needed.
  7. Garnish each serving with fresh orange slices and mint leaves. The mint not only adds a pop of color but also a refreshing aroma that complements the citrus flavors beautifully.
  8. Serve immediately and enjoy! If you’ve made extra, you can refrigerate it for a short time, but it’s best enjoyed fresh.

Pro Tips for the Best Frozen Orange Creamsicle Slush

  • Don’t skip the orange zest! It’s a game-changer for flavor. Always zest before juicing to make it easier.
  • Use a high-powered blender for the best texture. A standard blender may struggle with ice, leading to uneven consistency. If you have a food processor, that can work too, but ensure the ice is finely crushed.
  • Adjust the ice-to-liquid ratio carefully. If your slush is too thick, it won’t blend well. Start with less ice and add more until you reach your preferred texture.
  • Be cautious with the sugar! Always start with the lower amount, as you can easily add more, but it’s hard to fix an overly sweet slush.
  • For a fun twist, consider adding a splash of coconut milk or a handful of fresh fruit like strawberries or pineapple. This not only enhances the flavor but also adds a beautiful color contrast.

Variations & Serving Ideas

There are countless ways to put a spin on your Frozen Orange Creamsicle Slush. Consider making a tropical version by adding in some pineapple juice or coconut milk for a delightful tropical twist. If you’re feeling adventurous, try incorporating a handful of frozen mango or peach slices for added sweetness. For a lighter version, swap out the vanilla ice cream for Greek yogurt for a creamy yet tangy alternative.

As for serving ideas, this refreshing slush pairs wonderfully with light summer dishes like grilled chicken skewers, fish tacos, or a simple salad topped with citrus vinaigrette. The bright, zesty flavors of the slush complement these dishes perfectly, making them an ideal pairing for a sunny day.

Storage, Make-Ahead & Reheating

This Frozen Orange Creamsicle Slush is best enjoyed fresh, but if you have leftovers, you can store them in an airtight container in the fridge for up to 2 days. Just keep in mind that the slush may lose some of its texture over time as the ice melts. It doesn’t freeze well, as the ice will turn into a solid block. If you must freeze it, blend again after thawing to restore the slushy consistency. This treat is best the day you make it, as the flavors meld together beautifully overnight, enhancing its deliciousness.

Frequently Asked Questions

Can I make Frozen Orange Creamsicle Slush ahead of time?

Yes — in fact, it tastes even better the next day as the flavors meld. However, it’s best to enjoy it fresh, as the texture can change if stored for too long. If you need to prepare it ahead, keep it in the fridge and re-blend before serving.

What kind of orange juice should I use?

For the best flavor, use freshly squeezed orange juice. However, if you’re short on time, opt for 100% pure store-bought juice without added sugars. This will ensure that your slush remains flavorful and refreshing.

Can I substitute the vanilla ice cream?

Absolutely! If you’re looking for a dairy-free option, coconut milk ice cream or a non-dairy vanilla ice cream can work wonderfully. They will still provide the creamy texture and sweetness you desire.

How can I adjust the sweetness of my slush?

You can easily adjust the sweetness by modifying the amount of sugar added. Start with 1/4 cup and taste the mixture before blending. If you prefer it sweeter, add more sugar gradually until it reaches your desired level.

What should I do if my slush is too thick?

If your slush is too thick, simply add a splash of milk or orange juice and blend again. This will help achieve a more drinkable consistency while maintaining the slushy texture. Adjust gradually to reach your preferred thickness.

Sun-Kissed Frozen Orange Cream Slush

Final Thoughts

The Frozen Orange Creamsicle Slush is a delightful blend of refreshing citrus and creamy goodness, making it a perfect treat for warm days or any time you crave a taste of nostalgia. The way the bright orange flavor dances with the creamy texture truly elevates this slush, transforming it into a satisfying escape from the everyday.

This is the kind of recipe I come back to again and again, especially when I’m looking to cool down or impress guests at a summer gathering. It’s simple to make and always brings smiles all around! I encourage you to try this recipe for yourself—don’t hesitate to share your results or even put your own spin on it. Happy slushing!

Print
clock clock iconcutlery cutlery iconflag flag iconfolder folder iconinstagram instagram iconpinterest pinterest iconfacebook facebook iconprint print iconsquares squares iconheart heart iconheart solid heart solid icon

Frozen Orange Creamsicle Slush


  • Author: Lily author
  • Total Time: 15 minutes
  • Yield: 4 servings 1x
Pin Recipe
Print Recipe

Description

This Frozen Orange Creamsicle Slush is a refreshing treat that combines creamy vanilla and zesty orange flavors. Perfect for hot summer days, it brings back nostalgic memories with every sip.


Ingredients

Scale
  • 2 cups orange juice (freshly squeezed or store-bought)
  • 1 cup vanilla ice cream
  • 1 cup crushed ice
  • 1/2 cup milk (whole or 2%)
  • 1/4 cup granulated sugar (adjust based on sweetness preference)
  • 1 teaspoon vanilla extract
  • Zest of 1 orange (for added flavor)
  • Fresh orange slices and mint leaves (for garnish)

Instructions

  1. Start by preparing your ingredients. Gather 2 cups of orange juice, 1 cup of vanilla ice cream, and 1 cup of crushed ice. Make sure the ice is finely crushed, as larger chunks can make blending difficult.
  2. In a blender, combine the orange juice, vanilla ice cream, crushed ice, and 1/2 cup of milk. Add 1/4 cup of granulated sugar and 1 teaspoon of vanilla extract. If you like a sweeter slush, consider adding a bit more sugar at this stage.
  3. Add the zest of 1 orange to the blender. This step is crucial for enhancing the citrus flavor of your slush. Make sure not to include the bitter white pith—only the flavorful zest.
  4. Blend the mixture on medium-high speed for about 30-45 seconds. Stop once the ingredients are fully combined and the slush has a smooth, even consistency. If you notice large chunks of ice, blend for an additional 10-15 seconds. Avoid over-blending, as this can make the slush too liquidy.
  5. Once blended, taste the slush. If it needs more sweetness, add a little more sugar and blend for a few more seconds. If it’s too thick, you can add a splash of milk to reach your desired consistency.
  6. Pour the slush into glasses. This recipe typically serves 4, but you can easily double it for larger gatherings. Use a spoon to help guide the slush into the glasses if needed.
  7. Garnish each serving with fresh orange slices and mint leaves. The mint not only adds a pop of color but also a refreshing aroma that complements the citrus flavors beautifully.
  8. Serve immediately and enjoy! If you’ve made extra, you can refrigerate it for a short time, but it's best enjoyed fresh.
  • Prep Time: 15 min
  • Cook Time: 0 min
  • Category: Dessert
  • Method: Blending
  • Cuisine: American

Nutrition

  • Serving Size: 1 serving
  • Calories: 200
  • Sugar: 30 g
  • Sodium: 50 mg
  • Fat: 5 g
  • Saturated Fat: 3 g
  • Unsaturated Fat: 2 g
  • Trans Fat: 0 g
  • Carbohydrates: 40 g
  • Fiber: 1 g
  • Protein: 2 g
  • Cholesterol: 20 mg

Keywords: Don't skip the orange zest! It's a game-changer for flavor. Always zest before juicing to make it easier.

Did you make this recipe?

Share a photo and tag us — we can't wait to see what you've made!

Zesty Lemon Poppy Seed Delight

One rainy afternoon, I found myself in my grandmother’s cozy kitchen, the kind that always smelled like warmth and love. She was whipping up her famous Lemon Poppy Seed Loaf, a recipe that had been passed down through generations. As the batter came together, the zesty aroma of fresh lemons filled the air, mingling perfectly with the nutty fragrance of poppy seeds. I can still picture her, apron-clad, as she expertly drizzled a vibrant citrus icing over the loaf, creating a glossy, sun-kissed finish that beckoned us to dive in. It was a moment that sparked my own passion for baking, and this recipe has become a cherished staple in my home ever since.

When you take a bite of this Lemon Poppy Seed Loaf, it’s like a burst of sunshine on your palate. The loaf is beautifully golden, with a tender crumb that melts in your mouth. Each slice is speckled with tiny poppy seeds, adding a delightful crunch that contrasts beautifully with the tangy sweetness of the lemon. And that citrus icing? It’s the finishing touch that elevates this loaf from ordinary to extraordinary, with its bright, zesty flavor dancing on your taste buds.

This recipe stands out because it embraces simplicity while delivering on flavor. I’ve added a hint of vanilla to the batter, enhancing the overall taste and making it even more indulgent. Trust me, once you make this Lemon Poppy Seed Loaf With Citrus Icing, it’ll become a go-to in your baking repertoire.

So, let me show you exactly how to make it!

Zesty Lemon Poppy Seed Delight

Why You’ll Love This Recipe

  • Moist and tender crumb that melts in your mouth, thanks to the perfect balance of butter and buttermilk.
  • Bright, zesty lemon flavor paired with crunchy poppy seeds, creating a delightful texture and taste experience.
  • Easy to whip up in just about an hour, perfect for last-minute gatherings or a cozy afternoon treat.
  • Budget-friendly with everyday ingredients, making it an accessible option for all home bakers.
  • The citrus icing adds a sweet tang that elevates the loaf, turning a simple recipe into a showstopper!

Ingredients

  • 1 ½ cups (190g) all-purpose flour
  • 1 teaspoon baking powder
  • ½ teaspoon baking soda
  • ½ teaspoon salt
  • 3 tablespoons poppy seeds
  • ½ cup (115g) unsalted butter, softened to room temperature
  • 1 cup (200g) granulated sugar
  • 2 large eggs
  • 1 teaspoon vanilla extract
  • 1 teaspoon lemon zest (from about 1 medium lemon)
  • ½ cup (120ml) buttermilk
  • 2 tablespoons fresh lemon juice

For the Citrus Icing:

  • 1 cup (120g) powdered sugar
  • 2 tablespoons fresh lemon juice
  • 1 tablespoon orange juice
  • 1 teaspoon lemon zest (for garnish, optional)

Let’s dive into the key ingredients that make this Lemon Poppy Seed Loaf so special. The all-purpose flour provides the structure and base for the loaf, while the baking powder and baking soda ensure it rises perfectly, giving the loaf a light texture. For a gluten-free variation, you could substitute the flour with a gluten-free all-purpose blend. Poppy seeds not only add a delightful crunch but also contribute to the unique flavor profile that pairs well with the citrus notes.

Unsalted butter is crucial for achieving the buttery richness that makes this loaf so moist. If you’re looking for a dairy-free option, coconut oil or a vegan butter can be used instead. The buttermilk is another essential component, providing acidity that activates the baking soda for a fluffy texture. If you don’t have buttermilk on hand, you can easily make a substitute by mixing ½ cup of milk with 1 tablespoon of vinegar or lemon juice and letting it sit for about 5 minutes.

Step-by-Step Instructions

  1. Preheat your oven to 350°F (175°C). Grease a 9×5-inch loaf pan or line it with parchment paper for easy removal later.
  2. In a medium mixing bowl, whisk together 1 ½ cups of all-purpose flour, 1 teaspoon of baking powder, ½ teaspoon of baking soda, ½ teaspoon of salt, and 3 tablespoons of poppy seeds. This helps to evenly distribute the baking agents and ensures a uniform rise.
  3. In a large mixing bowl, cream together ½ cup of softened unsalted butter and 1 cup of granulated sugar using an electric mixer on medium speed for about 3-4 minutes, until the mixture is light and fluffy. Make sure to scrape down the sides of the bowl occasionally.
  4. Add 2 large eggs, 1 teaspoon of vanilla extract, and 1 teaspoon of lemon zest to the creamed butter and sugar, mixing until fully combined. You want a smooth consistency, so ensure there are no lumps of butter.
  5. In a small bowl, combine ½ cup of buttermilk and 2 tablespoons of fresh lemon juice. Alternately add the dry ingredients and buttermilk mixture to the butter mixture, starting and ending with the dry ingredients. Mix just until combined; do not overmix, as this can lead to a dense loaf.
  6. Pour the batter into the prepared loaf pan. Smooth the top with a spatula, ensuring it’s even. Bake in the preheated oven for 50-60 minutes, or until a toothpick inserted in the center comes out clean. The edges should be lightly golden brown, and the center should feel just set.
  7. Once baked, remove the loaf from the oven and allow it to cool in the pan for about 10 minutes. Then, transfer it to a wire rack to cool completely. Resist the urge to slice too soon, as it will be crumbly if it’s still warm.
  8. While the loaf is cooling, prepare the citrus icing. In a medium bowl, whisk together 1 cup of powdered sugar, 2 tablespoons of fresh lemon juice, and 1 tablespoon of orange juice until smooth. If the icing is too thick, you can add a little more juice to reach your desired consistency.
  9. Once the loaf is completely cool, drizzle the citrus icing over the top. If you like, sprinkle with an additional teaspoon of lemon zest for an extra pop of flavor and color.

Pro Tips for the Best Lemon Poppy Seed Loaf With Citrus Icing

  • Be careful not to overmix your batter; this is a common mistake that can lead to a dense loaf. Mix just until the dry ingredients are incorporated for a light and fluffy texture.
  • Use room temperature ingredients, especially the butter and eggs. This helps to create a smoother batter and ensures even baking. Take your eggs out of the fridge about 30 minutes before you start.
  • For a more pronounced lemon flavor, consider adding a little lemon extract in addition to the zest and juice. Just a half teaspoon can elevate the citrus notes significantly.
  • When measuring your flour, spoon it into the measuring cup and level it off with a knife instead of scooping directly from the bag. This prevents packing and ensures you don’t end up with a dry loaf.
  • Invest in a good quality loaf pan; it makes a difference in heat distribution, which ensures even baking. If your pan is dark-coated, reduce the oven temperature by 25°F to prevent over-browning.

Variations & Serving Ideas

For a delightful twist, consider adding blueberries or raspberries to the batter for a fruity burst of flavor. You can also experiment with different citrus fruits—try lime or grapefruit zest and juice for a refreshing change. For a healthier option, substitute half of the all-purpose flour with whole wheat flour for added fiber without compromising too much on texture.

This Lemon Poppy Seed Loaf pairs beautifully with a light salad, such as a mixed greens salad with a vinaigrette, or a cup of tea for a cozy afternoon treat. It also complements a creamy cheese platter, as the acidity of the loaf balances rich cheeses perfectly. Lastly, a scoop of vanilla ice cream on the side creates a delightful contrast of temperatures and flavors!

Storage, Make-Ahead & Reheating

This Lemon Poppy Seed Loaf can be stored at room temperature for up to 3 days if wrapped tightly in plastic wrap. If you want to keep it longer, it freezes well for up to 3 months. To freeze, wrap the loaf tightly in plastic wrap and then in aluminum foil to prevent freezer burn.

When you’re ready to enjoy it again, simply thaw it in the fridge overnight. Reheat individual slices in the microwave for 15-20 seconds or in a toaster oven until warmed through. Interestingly, many people find that this loaf tastes even better the next day, as the flavors have time to meld!

Frequently Asked Questions

Can I make Lemon Poppy Seed Loaf With Citrus Icing ahead of time?

Yes — in fact, it tastes even better the next day! You can make the loaf a day in advance, allowing the flavors to develop. Just be sure to store it in an airtight container to maintain its moisture.

Can I substitute the poppy seeds?

Absolutely! If you don’t have poppy seeds on hand or prefer an alternative, you can use sesame seeds for a similar crunch or omit them entirely for a smooth loaf.

What can I use instead of buttermilk?

If you don’t have buttermilk, you can easily create a substitute by mixing ½ cup of milk (dairy or plant-based) with 1 tablespoon of vinegar or lemon juice. Let it sit for 5 minutes before using in the recipe.

How can I make this recipe gluten-free?

To make a gluten-free version of this Lemon Poppy Seed Loaf, substitute the all-purpose flour with a gluten-free all-purpose flour blend. Just ensure that the blend contains a binding agent like xanthan gum for the best results.

What is the best way to store leftover loaf?

Leftover Lemon Poppy Seed Loaf should be stored in an airtight container at room temperature for up to 3 days. For longer storage, wrap it tightly and freeze for up to 3 months. Thaw it before serving for the best texture.

Zesty Lemon Poppy Seed Delight

Final Thoughts

The Lemon Poppy Seed Loaf with Citrus Icing is truly a delightful treat that brings a burst of brightness to any occasion. The zesty lemon flavor combined with the subtle crunch of poppy seeds creates a satisfying balance, while the citrus icing adds a touch of sweetness that perfectly complements the loaf’s tanginess.

This is the kind of recipe I come back to again and again, especially when I want to brighten up a gloomy day or celebrate a small victory. The aroma that fills the kitchen as it bakes is absolutely heavenly! I encourage you to give this recipe a try; you might just find it becoming a beloved staple in your home. Don’t forget to share your results or even add your own unique twist—I can’t wait to see what you create!

Print
clock clock iconcutlery cutlery iconflag flag iconfolder folder iconinstagram instagram iconpinterest pinterest iconfacebook facebook iconprint print iconsquares squares iconheart heart iconheart solid heart solid icon

Lemon Poppy Seed Loaf


  • Author: Lily author
  • Total Time: 20 minute
  • Yield: 1 loaf 1x
Pin Recipe
Print Recipe

Description

This Lemon Poppy Seed Loaf is a delightful treat that combines zesty lemon flavor with crunchy poppy seeds. Topped with a citrus icing, it’s perfect for any occasion.


Ingredients

Scale
  • 1 ½ cups (190g) all-purpose flour
  • 1 teaspoon baking powder
  • ½ teaspoon baking soda
  • ½ teaspoon salt
  • 3 tablespoons poppy seeds
  • ½ cup (115g) unsalted butter, softened to room temperature
  • 1 cup (200g) granulated sugar
  • 2 large eggs
  • 1 teaspoon vanilla extract
  • 1 teaspoon lemon zest (from about 1 medium lemon)
  • ½ cup (120ml) buttermilk
  • 2 tablespoons fresh lemon juice
  • 1 cup (120g) powdered sugar
  • 2 tablespoons fresh lemon juice
  • 1 tablespoon orange juice
  • 1 teaspoon lemon zest (for garnish, optional)

Instructions

  1. Preheat your oven to 350°F (175°C). Grease a 9×5-inch loaf pan or line it with parchment paper for easy removal later.
  2. In a medium mixing bowl, whisk together 1 ½ cups of all-purpose flour, 1 teaspoon of baking powder, ½ teaspoon of baking soda, ½ teaspoon of salt, and 3 tablespoons of poppy seeds. This helps to evenly distribute the baking agents and ensures a uniform rise.
  3. In a large mixing bowl, cream together ½ cup of softened unsalted butter and 1 cup of granulated sugar using an electric mixer on medium speed for about 3-4 minutes, until the mixture is light and fluffy. Make sure to scrape down the sides of the bowl occasionally.
  4. Add 2 large eggs, 1 teaspoon of vanilla extract, and 1 teaspoon of lemon zest to the creamed butter and sugar, mixing until fully combined. You want a smooth consistency, so ensure there are no lumps of butter.
  5. In a small bowl, combine ½ cup of buttermilk and 2 tablespoons of fresh lemon juice. Alternately add the dry ingredients and buttermilk mixture to the butter mixture, starting and ending with the dry ingredients. Mix just until combined; do not overmix, as this can lead to a dense loaf.
  6. Pour the batter into the prepared loaf pan. Smooth the top with a spatula, ensuring it’s even. Bake in the preheated oven for 50-60 minutes, or until a toothpick inserted in the center comes out clean. The edges should be lightly golden brown, and the center should feel just set.
  7. Once baked, remove the loaf from the oven and allow it to cool in the pan for about 10 minutes. Then, transfer it to a wire rack to cool completely. Resist the urge to slice too soon, as it will be crumbly if it’s still warm.
  8. While the loaf is cooling, prepare the citrus icing. In a medium bowl, whisk together 1 cup of powdered sugar, 2 tablespoons of fresh lemon juice, and 1 tablespoon of orange juice until smooth. If the icing is too thick, you can add a little more juice to reach your desired consistency.
  9. Once the loaf is completely cool, drizzle the citrus icing over the top. If you like, sprinkle with an additional teaspoon of lemon zest for an extra pop of flavor and color.
  • Prep Time: 15 mins
  • Cook Time: 50-60 mins
  • Category: Dessert
  • Method: Baking
  • Cuisine: American

Nutrition

  • Serving Size: 1 slice
  • Calories: 200
  • Sugar: 15 g
  • Sodium: 150 mg
  • Fat: 8 g
  • Saturated Fat: 5 g
  • Unsaturated Fat: 3 g
  • Trans Fat: 0 g
  • Carbohydrates: 30 g
  • Fiber: 1 g
  • Protein: 3 g
  • Cholesterol: 40 mg

Keywords: Be careful not to overmix your batter; this is a common mistake that can lead to a dense loaf. Use room temperature ingredients for a smoother batter and even baking.

Did you make this recipe?

Share a photo and tag us — we can't wait to see what you've made!

  • Privacy Policy
  • Terms Of Service
  • Contact
  • About
  • GDPR

Copyright © 2025 Homesmad