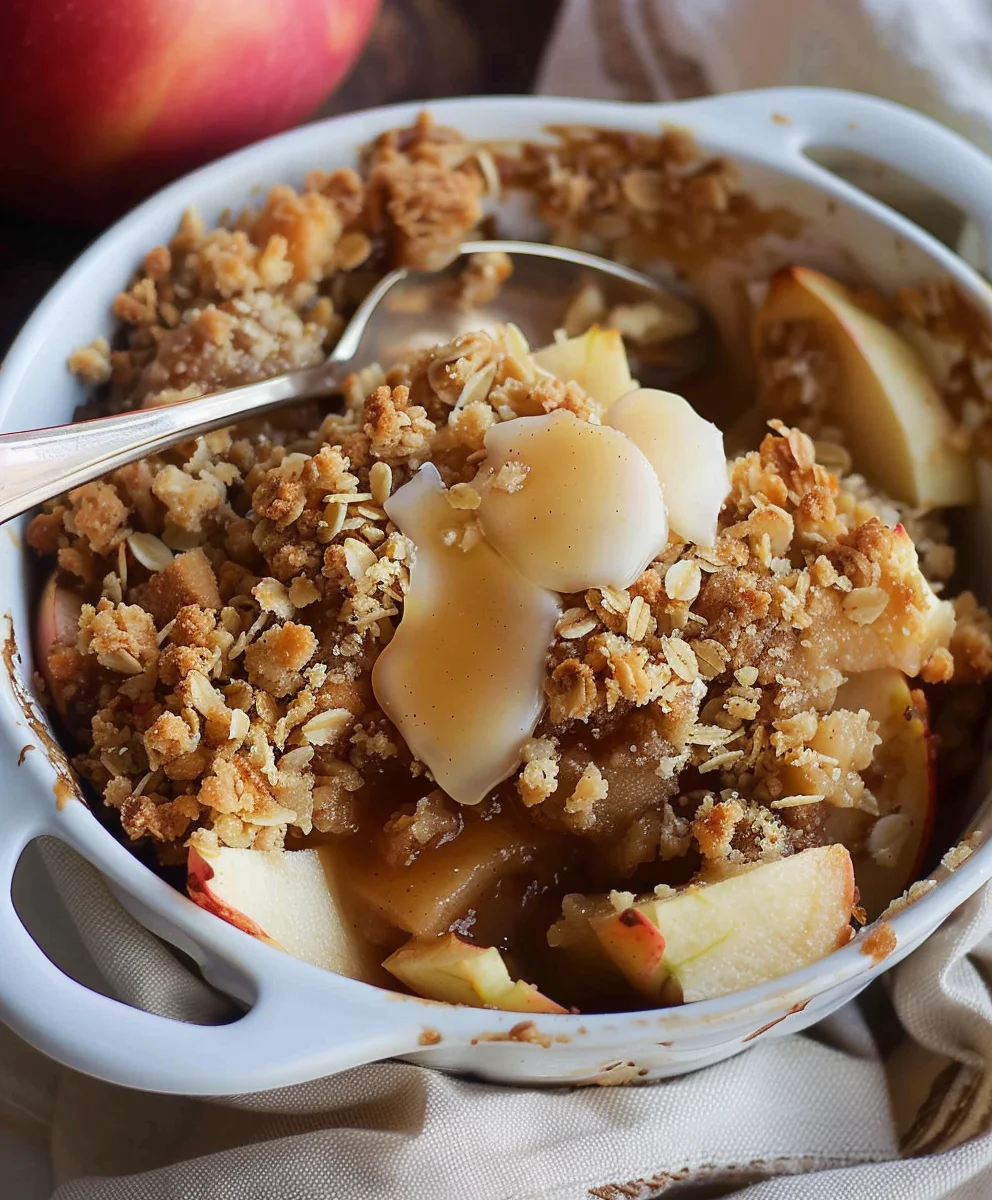
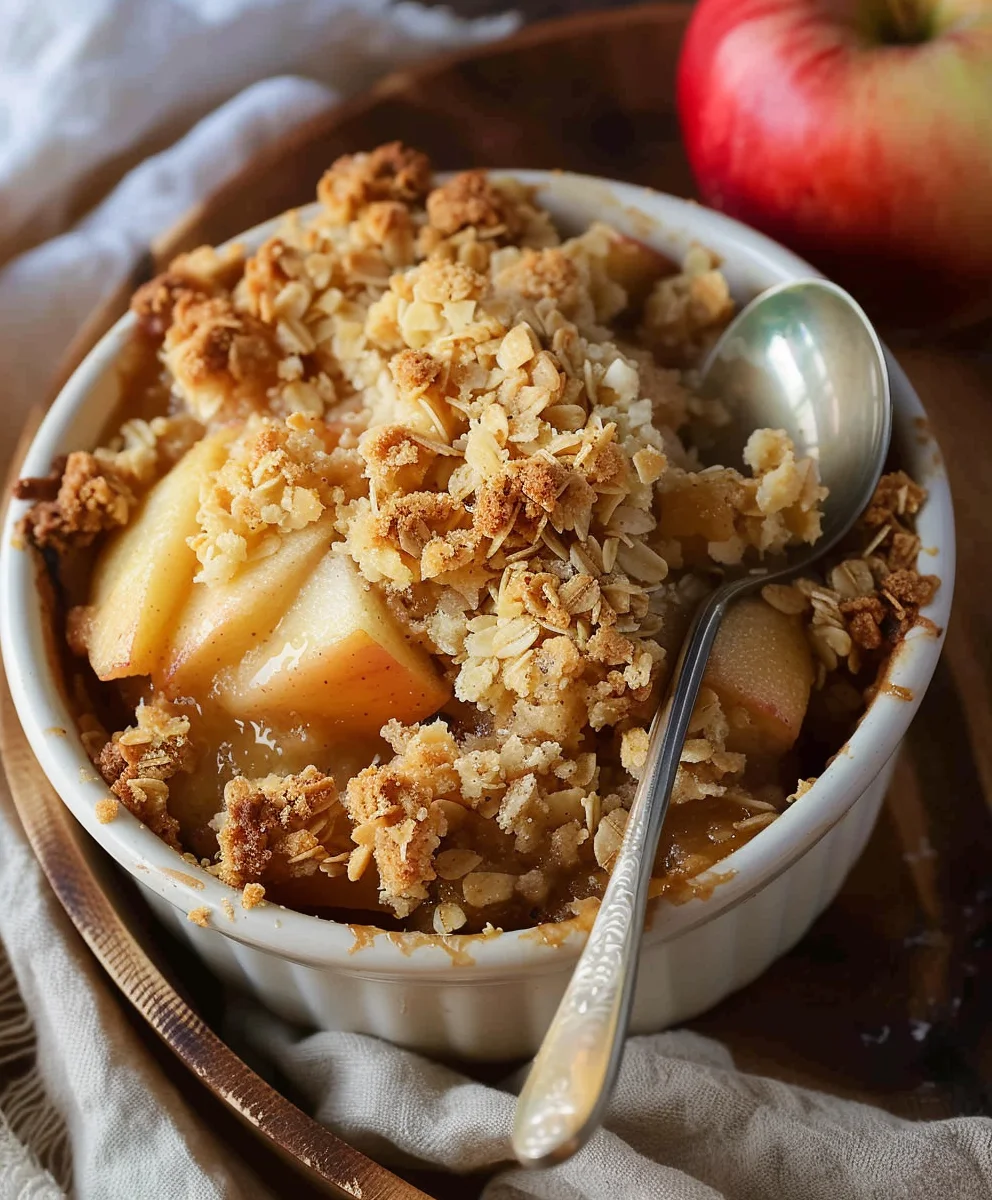
Sugar Free Apple Crisp is a true testament to how classic comfort can be reinvented for modern palates and dietary needs. There’s something undeniably enchanting about the aroma of cinnamon-spiced apples baking to golden perfection, crowned with a crunchy, buttery oat topping. For generations, apple crisp has held a special place at tables across North America, emerging as a beloved, simpler alternative to the more intricate apple pie. It’s a dish that evokes memories of cozy autumn evenings, family gatherings, and the simple pleasures of home baking.
I find that people absolutely adore this dessert for its harmonious blend of tender, slightly tart apples and that irresistible, warmly spiced crisp topping. The beauty of a perfectly executed apple crisp lies in its contrasting textures and comforting flavors. And now, with my meticulously crafted recipe, you can savor every single spoonful without any guilt. This exquisite Sugar Free Apple Crisp delivers all the warmth, sweetness, and satisfying crunch you crave, making it an ideal treat for anyone looking to enjoy a healthier dessert option without compromising on taste. It’s not just a recipe; it’s an invitation to indulge wisely.
Ingredients:
- For the Sugar Free Apple Filling:
- 6-8 medium-sized apples (about 2.5-3 pounds), a mix of tart and sweet varieties works beautifully. I highly recommend Granny Smith for their firm texture and tartness, paired with something like Fuji, Honeycrisp, or Gala for a touch of natural sweetness and complexity.
- 1/2 cup granular erythritol blend (like Swerve, Lakanto Monk Fruit, or similar, that measures cup-for-cup like sugar). I find a blend often provides the best taste without a strong aftertaste.
- 1 tablespoon fresh lemon juice. This isn’t just for flavor; it helps prevent the apples from browning and brightens the overall taste.
- 1 teaspoon ground cinnamon.
- 1/4 teaspoon ground nutmeg.
- Pinch of ground cloves or allspice (optional, but adds a lovely warmth).
- 2 tablespoons cornstarch or arrowroot powder. This is our secret weapon for a perfectly thickened, not watery, filling. For a lower carb option, you could use 1 teaspoon of xanthan gum mixed with 2 tablespoons of the sweetener blend before adding to the apples.
- 1/2 teaspoon pure vanilla extract (optional, but I think it elevates the flavor profile immensely).
- For the Sugar Free Crisp Topping:
- 1 cup blanched almond flour. This provides a wonderful crumbly texture and keeps the crisp low-carb and gluten-free.
- 1/2 cup rolled oats (certified gluten-free if needed). These contribute to the classic crisp texture and a satisfying chewiness.
- 1/2 cup granular erythritol blend (the same one you used for the filling).
- 1/2 teaspoon ground cinnamon.
- 1/4 teaspoon salt. Don’t skip this; it really brings out the flavors and balances the sweetness!
- 1/2 cup (1 stick) unsalted butter, very cold and cut into small cubes. For a dairy-free option, use cold virgin coconut oil.
- 1/2 cup chopped pecans or walnuts (optional, but highly recommended for an extra layer of crunch and healthy fats).
Preparing the Apple Filling
Oh, the aroma of apples and cinnamon is just divine, isn’t it? This is where our Sugar Free Apple Crisp truly begins to take shape, promising a delightful treat without the added sugars. Let’s get these beautiful apples ready!
- Preheat Your Oven: First things first, get your oven nice and hot. Preheat it to 375°F (190°C). While it’s warming up, lightly grease an 8×8 inch or 9×9 inch baking dish (or a similar 2-quart capacity dish) with a little butter or cooking spray. This small step ensures nothing sticks and cleanup is a breeze.
- Peel, Core, and Slice the Apples: This is arguably the most therapeutic part of the preparation for me. Using a good vegetable peeler, carefully peel all your apples. Then, core them and slice them into roughly 1/4 to 1/2-inch thick pieces. I aim for slices that are uniform in thickness so they cook evenly. If they’re too thin, they’ll turn to mush; too thick, and they might be a bit too firm after baking. Remember, we want tender, not crunchy, apples! As you slice, place them into a large mixing bowl.
- Season the Apples: Now for the magic! To your bowl of sliced apples, add the granular erythritol blend, fresh lemon juice, ground cinnamon, ground nutmeg, and the optional pinch of cloves or allspice. The lemon juice is crucial here; it not only brightens the apple flavor but also helps prevent them from browning, keeping them looking fresh and appealing.
- Thicken the Filling: Sprinkle the cornstarch (or arrowroot powder, or your xanthan gum pre-mix) evenly over the apple mixture. Gently toss everything together until the apples are well coated. You’ll notice the dry ingredients clinging to the apples, and that’s exactly what we want. This coating is going to create that luscious, thick, and syrupy filling we all adore in a good apple crisp, preventing it from being watery. Make sure to get every apple slice coated for the best results.
- Add Vanilla (Optional but Recommended): If you’re using vanilla extract, pour it in now and give it one last gentle toss. Vanilla adds a beautiful depth and warmth that complements the apples and spices wonderfully.
- Transfer to Baking Dish: Pour the seasoned apple mixture into your prepared baking dish. Spread it out evenly so that the apples form a nice, consistent layer. Don’t press them down too hard; we want some air circulation for even baking. Set this aside while we prepare our irresistible topping.
Crafting the Sugar Free Crisp Topping
Ah, the crisp topping! This is what gives our Sugar Free Apple Crisp its signature crunch and satisfying texture. The contrast between the soft, warm apple filling and the crumbly, sweet topping is pure bliss. Let’s make it perfect!
- Combine Dry Ingredients: In a separate medium-sized mixing bowl, combine the blanched almond flour, rolled oats, granular erythritol blend, ground cinnamon, and salt. Give these dry ingredients a good whisk or stir to ensure they are thoroughly mixed. This step is important for even flavor distribution throughout our topping. Don’t underestimate the power of salt here; it truly enhances all the other flavors.
-
Incorporate the Cold Butter: Now for the key to a truly “crispy” crisp: very cold butter. Take your pre-cubed, cold unsalted butter (or coconut oil if you’re going dairy-free) and add it to the dry ingredients. There are a few ways to incorporate the butter:
- Using a Pastry Blender: This is my preferred method. Cut the butter into the flour mixture until it resembles coarse crumbs, with some pea-sized pieces remaining. This creates little pockets of butter that will melt and create steam, resulting in a delightfully crisp texture.
- Using Your Fingertips: If you don’t have a pastry blender, your clean fingertips work wonderfully. Rub the butter into the flour mixture quickly, using only the pads of your fingers, until you achieve that coarse, crumbly consistency. The key is to work quickly so the butter stays as cold as possible.
- Using a Food Processor: For a quick option, pulse the dry ingredients with the cold butter in a food processor a few times until coarse crumbs form. Be careful not to overmix, or you’ll end up with a paste instead of a crumble!
You should see a mixture that looks like lumpy sand, with visible pieces of butter. These butter bits are what make the topping so wonderfully tender and crisp as it bakes.
- Add Optional Nuts: If you’re including chopped pecans or walnuts, fold them into the topping mixture now. They add an extra layer of texture and a nutty flavor that pairs beautifully with the apples and spices. Just a quick stir to distribute them evenly is all you need.
Assembling and Baking the Sugar Free Apple Crisp
We’re on the home stretch! The kitchen is starting to fill with the most inviting aromas, and soon, we’ll be pulling a golden-brown masterpiece from the oven. This is where all our hard work comes together.
- Top the Apples with the Crisp Mixture: Take your baking dish with the prepared apple filling. Evenly sprinkle the crisp topping mixture over the apples. I like to make sure there’s a good layer across the entire surface, ensuring every spoonful of crisp gets that delightful crunch. You can gently pat it down, but don’t compact it too much; we want some airiness.
-
Bake to Golden Perfection: Carefully place your baking dish into your preheated 375°F (190°C) oven. Now, let the magic happen! Bake for approximately 40-50 minutes.
- What to Look For: You’ll know it’s done when the topping is beautifully golden brown and incredibly crisp, and when you can see the apple filling bubbling up around the edges. This bubbling indicates that the apples are tender and the juices have thickened nicely.
- Checking for Doneness: If you’re unsure if the apples are tender, you can gently insert a thin knife or skewer through the topping into the apples. It should slide in with very little resistance.
- Preventing Over-Browning: If you notice the topping browning too quickly during the last 15-20 minutes of baking, you can loosely tent the dish with aluminum foil. This protects the topping while allowing the apples to finish cooking through.
-
Cool Before Serving: This step requires immense willpower, I know! Once baked, carefully remove the Sugar Free Apple Crisp from the oven and place it on a wire rack to cool for at least 15-20 minutes. This cooling period is crucial for two reasons:
- First, it allows the apple filling to set up further, preventing it from being too runny when you scoop it.
- Second, it lets the topping firm up and become even crispier. Trust me, it’s worth the wait for that perfect texture and to avoid burning your tongue!
The aroma filling your kitchen right now is probably one of the most comforting smells in the world!
Serving Suggestions and Storage
Your homemade Sugar Free Apple Crisp is a true triumph – a warm, comforting dessert that satisfies without the sugar overload. Here’s how to enjoy every last bit of it!
- Serve Warm: While the brief cooling period is essential for setting, this crisp is absolutely best served warm. The tender, spiced apples and the buttery, crunchy topping create an incredible contrast that is simply irresistible.
-
Perfect Pairings:
- Sugar Free Vanilla Ice Cream: This is a classic pairing for a reason! A scoop of your favorite sugar-free vanilla ice cream melting over the warm crisp is pure heaven.
- Sugar Free Whipped Cream: A dollop of unsweetened whipped cream or coconut cream adds a lovely richness and lightness.
- Plain Greek Yogurt: For a lighter, tangier option, a spoonful of plain Greek yogurt provides a wonderful balance to the sweetness of the apples.
- A Dash of Cinnamon: Sometimes, all you need is a final sprinkle of ground cinnamon before serving to enhance those warm spice notes.
I personally love it with a generous scoop of sugar-free vanilla bean ice cream; the temperature contrast is just divine!
-
Storage Instructions:
- Room Temperature: If you anticipate finishing the crisp within a day, you can store it loosely covered with foil or plastic wrap at room temperature for up to 12-24 hours. However, for best quality and to extend its shelf life, refrigeration is recommended.
- Refrigeration: For longer storage, cover the baking dish tightly with plastic wrap or transfer any leftovers to an airtight container. It will keep well in the refrigerator for 3-4 days. The topping may soften slightly over time, but the flavor will still be fantastic.
- Reheating: To reheat, you can warm individual servings in the microwave for 30-60 seconds, or for a crispier topping, place the entire dish (uncovered, or individual portions on an oven-safe plate) in a preheated oven at 300°F (150°C) for 10-15 minutes, or until warmed through and the topping crisps up again.
- Freezing (Optional): While technically possible, freezing apple crisp can sometimes alter the texture of the topping, making it less crisp upon thawing. However, if you wish to freeze it, bake the crisp completely, cool it entirely, then cover it very tightly with plastic wrap and then foil. It can be frozen for up to 2-3 months. Thaw in the refrigerator overnight and reheat in the oven for best results.
Enjoy your delectable, guilt-free Sugar Free Apple Crisp! It’s a testament to how wonderful healthy eating can be without sacrificing flavor.
Conclusion:
I am so thrilled you’ve made it to the end of this recipe journey with me! I truly believe this isn’t just another dessert; it’s a promise of comfort, a hug in a bowl, and a delightful way to enjoy a classic without any of the guilt. We’ve explored the magic of taking simple, wholesome ingredients and transforming them into something truly spectacular.
This Sugar Free Apple Crisp isn’t merely a recipe; it’s a testament to the fact that healthy eating can be incredibly delicious and satisfying. I’ve poured my heart into crafting a recipe that brings together the tender, spiced apples bubbling underneath that perfectly crisp, buttery, and oaty topping, creating a symphony of textures and flavors that will undoubtedly become a staple in your kitchen. I’ve designed it to be straightforward, using accessible ingredients, ensuring that even on your busiest days, you can whip up a batch of this wholesome goodness. The natural sweetness from the apples, enhanced by a touch of carefully selected sugar substitute, means you get all the dessert joy without the sugar crash. It’s perfect for those managing blood sugar, following a low-carb lifestyle, or simply looking to make more mindful choices without sacrificing taste. Think of the incredible aroma filling your kitchen as it bakes – that alone is worth the effort, but the first spoonful? Pure, unadulterated bliss that truly feels like a warm hug from the inside out.
Elevate Your Sugar Free Apple Crisp Experience: Serving & Variation Ideas
While this crisp is absolutely divine served warm, straight from the oven, there are so many ways to enjoy and customize it to your heart’s content. For a truly indulgent yet healthy treat, I love serving a generous scoop with a dollop of plain Greek yogurt or a sugar-free vanilla ice cream. The cool creaminess against the warm, spiced apples is simply heavenly, creating a contrast that is both refreshing and comforting. If you’re enjoying it for breakfast (and why not? It’s packed with fiber and fruit!), a sprinkle of toasted pecans or walnuts adds an extra layer of crunch and healthy fats, turning it into a wholesome morning meal. A drizzle of unsweetened almond milk can also add a lovely richness without any added calories or sugars. You can even enjoy it chilled the next day – it’s wonderfully refreshing and takes on a slightly different, equally delightful character.
But don’t stop there! The true beauty of this recipe lies in its adaptability and your creative freedom. Feel free to experiment with different fruits. Imagine a mixed berry and apple crisp, where the tartness of raspberries or blueberries adds a bright counterpoint, or a pear and apple crisp, bringing in new nuances of flavor and a silky texture. A handful of fresh blueberries or raspberries added to the apple mixture before baking can introduce a delightful tartness and vibrant color, making it even more appealing. For an extra layer of sophisticated spice, a pinch of ground cardamom or allspice alongside the cinnamon and nutmeg would be absolutely divine, adding depth and warmth. If you’re catering to gluten-free dietary needs, simply ensure your oats are certified gluten-free, and you’re all set to go – it’s incredibly versatile!
Your Turn to Bake & Share!
Now that you have all the tips, tricks, and inspiration, it’s your turn to bring this incredible recipe to life in your own kitchen. I genuinely can’t wait for you to experience the comforting warmth and delectable taste of this Sugar Free Apple Crisp for yourself. I promise, the smiles it will bring to your face and the faces of your loved ones will be worth every moment spent baking, creating memories around a truly wholesome and delicious dessert.
Once you’ve made it, I would absolutely love to hear about your experience! Did you stick to the original, or did you venture into some exciting variations? What was your favorite way to serve it? Did it become an instant family favorite, or perhaps a new go-to for healthy indulgence? Please, don’t keep the delicious details to yourself! Share your thoughts, your photos, and your triumphs in the comments below. Your feedback and creativity inspire me and our entire community of home bakers. Let’s create a wonderful collection of stories around this guilt-free indulgence that proves healthy can be heavenly. Happy baking, my friends, and I look forward to hearing all about your crisp adventures!
Sugar Free Apple Crisp
A healthy and delicious dessert, this Sugar Free Apple Crisp offers the classic comfort of cinnamon-spiced apples with a crunchy oat topping, reinvented for modern dietary needs without compromising on taste. Indulge wisely with this guilt-free treat.
Ingredients
-
½ cup old fashioned oats
-
½ cup almond flour
-
¼ cup brown sweetener (for topping)
-
½ teaspoon cinnamon (for topping)
-
½ teaspoon baking powder
-
¼ cup unsalted butter, cold
-
½ teaspoon salt
-
2 medium apples, peeled and sliced
-
3 tablespoon unsalted butter, melted
-
2 tablespoon almond flour (for filling)
-
1 tablespoon lemon juice
-
3 tablespoon unsweetened almond milk
-
½ teaspoon vanilla extract
-
¼ cup brown sweetener (for filling)
-
½ teaspoon cinnamon (for filling)
Instructions
-
Step 1
Preheat oven to 375°F (190°C). Lightly grease a small baking dish (e.g., 6×6 or 5×7 inch) suitable for 2 apples. -
Step 2
In a bowl, combine sliced apples, 2 tablespoons almond flour, 1 tablespoon lemon juice, 3 tablespoons unsweetened almond milk, ½ teaspoon vanilla extract, ¼ cup brown sweetener, and ½ teaspoon cinnamon. Add 3 tablespoons melted unsalted butter and toss to coat apples evenly. Transfer the apple mixture to the prepared baking dish. -
Step 3
In a separate bowl, combine ½ cup almond flour, ½ cup rolled oats, ¼ cup brown sweetener, ½ teaspoon cinnamon, ½ teaspoon baking powder, and ½ teaspoon salt. Cut in ¼ cup cold unsalted butter (cubed) using a pastry blender, fingertips, or food processor until coarse crumbs form. -
Step 4
Sprinkle the crisp topping evenly over the apples in the baking dish. Bake for approximately 40-50 minutes, or until the topping is golden brown and crisp, and the apple filling is bubbling and tender. If the topping browns too quickly, loosely tent the dish with aluminum foil. -
Step 5
Remove from oven and let cool on a wire rack for at least 15-20 minutes before serving warm. This allows the filling to set and the topping to firm up. Serve with sugar-free vanilla ice cream or unsweetened whipped cream. -
Step 6
Store leftovers covered in the refrigerator for 3-4 days. Reheat individual servings in the microwave or entire dish in a 300°F (150°C) oven until warmed through.
Important Information
Nutrition Facts (Per Serving)
It is important to consider this information as approximate and not to use it as definitive health advice.
Allergy Information
Please check ingredients for potential allergens and consult a health professional if in doubt.