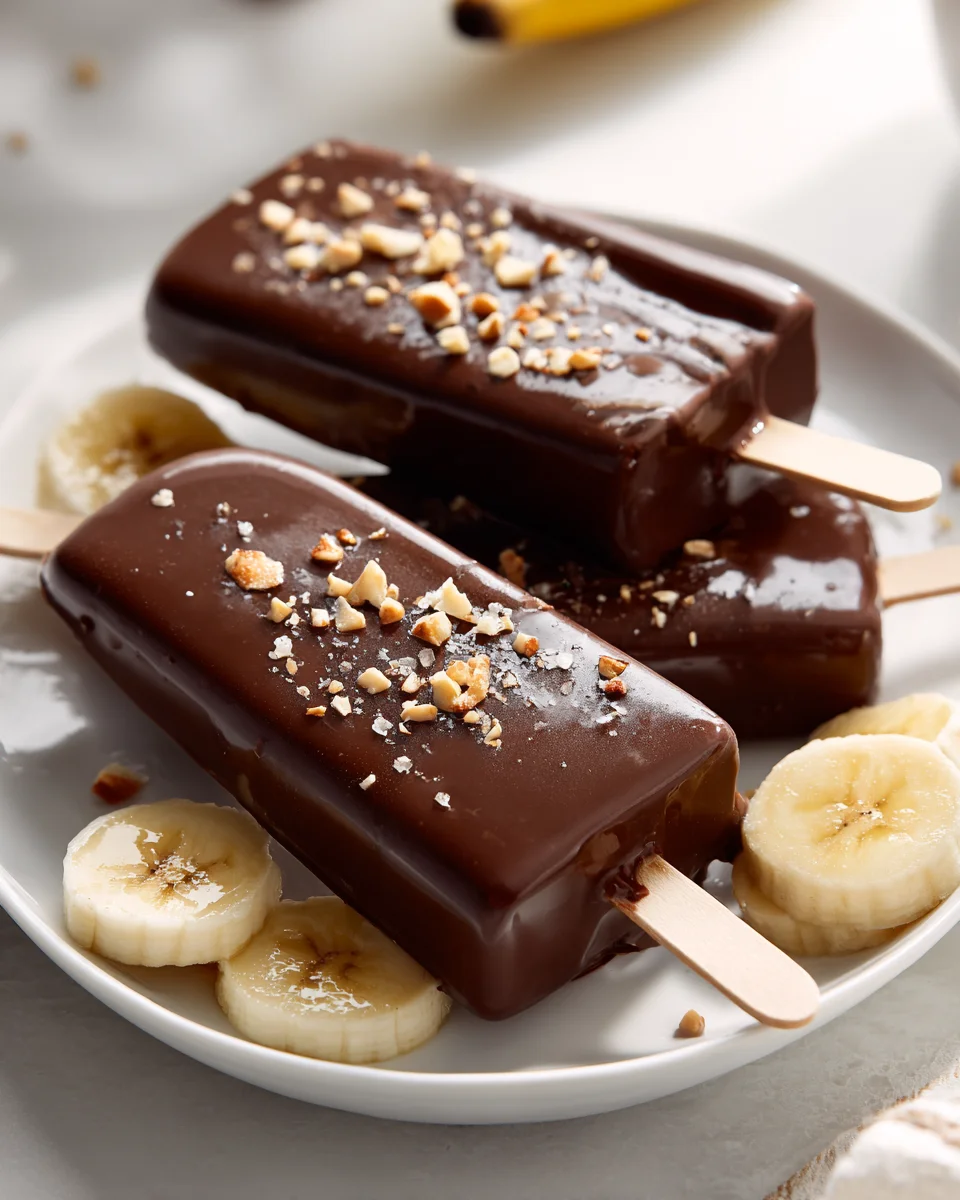
One of my fondest childhood memories is of sweltering summer afternoons spent in my grandmother’s kitchen. The sun would blaze outside, but inside, it was a delightful haven filled with laughter and the sweet scent of ripe bananas and melting chocolate. I can still picture her, with her apron on and a mischievous grin, as she whipped up her famous Chocolate Banana Frozen Popsicles. She would let me help—dipping fresh banana slices into rich, velvety chocolate, and then watching in anticipation as they froze into creamy, dreamy treats. Those popsicles were like summer captured in a bite, blending the sweetness of bananas with the indulgent richness of chocolate.
What makes my version of Chocolate Banana Frozen Popsicles special is the perfect balance of flavors and textures. I use ripe, naturally sweet bananas, which add a luscious creaminess, and I dip them in high-quality dark chocolate, creating a satisfying crunch with every bite. The combination is simply irresistible—each popsicle bursts with the tropical essence of banana while the chocolate envelops it in a decadent hug. Plus, they’re easy to whip up, making them an ideal treat for any occasion, whether you’re lounging by the pool or hosting a backyard BBQ.
So grab your blender and let me show you exactly how to make these delightful Chocolate Banana Frozen Popsicles that will transport you straight back to those sunny days of my childhood!
Why You’ll Love This Recipe
- Only requires 7 simple ingredients, making it both budget-friendly and easy to prepare.
- Each popsicle is creamy and smooth, blending the rich flavor of chocolate with the natural sweetness of ripe bananas.
- Ready in just 10 minutes, plus freezing time — a perfect treat for a hot day that doesn’t require hours in the kitchen!
- Can be customized with optional toppings, allowing you to personalize each popsicle to your taste.
- Healthier than store-bought frozen treats, with no artificial ingredients and can easily be made vegan.
Ingredients
- 3 ripe bananas
- 1 cup (240 ml) unsweetened almond milk (or any milk of your choice)
- 1/4 cup (60 ml) honey or maple syrup (adjust based on sweetness preference)
- 1/4 cup (60 g) unsweetened cocoa powder
- 1 tsp vanilla extract
- 1/4 tsp salt
- 1/2 cup (90 g) semi-sweet chocolate chips (optional, for dipping)
- 1 tbsp coconut oil (optional, for dipping)
Let’s dive into the key ingredients that make these Chocolate Banana Frozen Popsicles so delightful. First, the ripe bananas are essential; their natural sweetness and creamy texture serve as the base, blending beautifully with the other flavors. Choose bananas that are spotty and soft for the best results. If you don’t have bananas, consider using frozen banana slices, though fresh is preferable for flavor.
Next, the unsweetened almond milk provides a smooth consistency while keeping the popsicles dairy-free. You can easily swap it for coconut milk for a richer flavor or any other non-dairy milk you prefer. The unsweetened cocoa powder is what gives these popsicles their chocolatey goodness, so opt for a high-quality brand. If you need a healthier alternative, you could use carob powder, but the taste will differ slightly. Lastly, the honey or maple syrup allows you to adjust sweetness to your liking, making this recipe perfect for everyone’s palate.
Step-by-Step Instructions
- Begin by peeling the 3 ripe bananas and cutting them into chunks. This will help them blend more easily. Make sure the bananas are well-ripened for optimal sweetness and creaminess.
- In a blender, combine the banana chunks, 1 cup of unsweetened almond milk, 1/4 cup of honey or maple syrup, 1/4 cup of unsweetened cocoa powder, 1 tsp of vanilla extract, and 1/4 tsp of salt. Blend on high until the mixture is completely smooth, about 30-45 seconds. Scrape down the sides of the blender if necessary to ensure everything is incorporated.
- Once blended, taste the mixture and adjust sweetness if desired by adding a little more honey or maple syrup. This is your chance to make it just right for your taste buds!
- Next, pour the chocolate banana mixture into popsicle molds, filling them almost to the top, leaving a little space for expansion as they freeze. Tap the molds gently on the counter to remove any air bubbles.
- Insert the popsicle sticks into each mold, ensuring they are centered. If your molds are designed for it, you can freeze them without sticking; otherwise, you may need to freeze for about 30 minutes before inserting the sticks to prevent them from sinking.
- Place the molds in the freezer and freeze for at least 4 hours or until completely solid. You’ll know they’re ready when they feel firm to the touch.
- To remove the popsicles, run warm water over the outside of the molds for about 10-15 seconds. This helps loosen them without melting the popsicles. Gently pull on the sticks to remove.
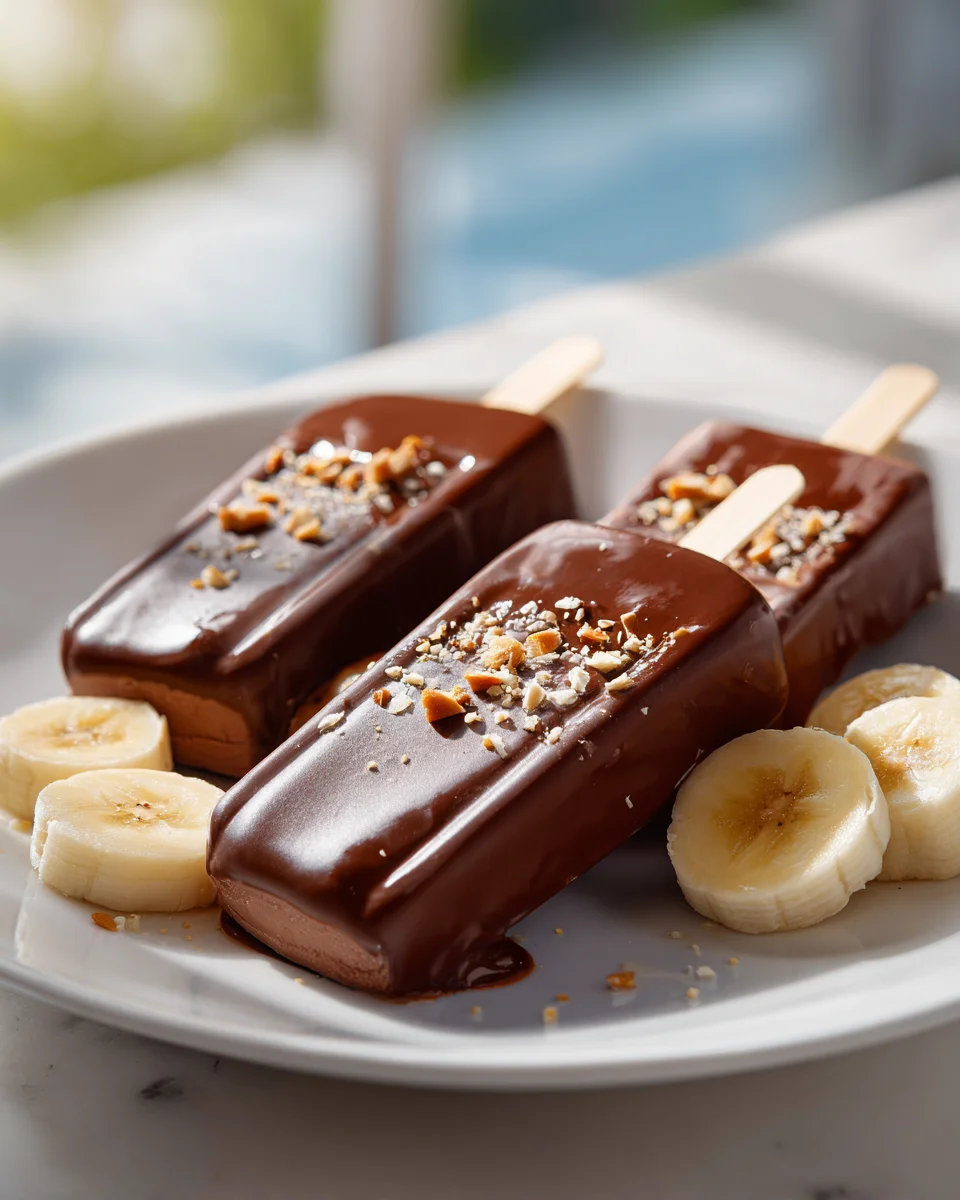
- If you want to dip your popsicles in chocolate, melt 1/2 cup of semi-sweet chocolate chips with 1 tbsp of coconut oil in a microwave-safe bowl. Heat in 30-second intervals, stirring in between, until smooth. Quickly dip the popsicles in the melted chocolate, then place them on parchment paper to set. Enjoy!
Pro Tips for the Best Chocolate Banana Frozen Popsicles
- Ensure your bananas are very ripe to achieve the best sweetness and flavor. Overripe bananas are perfect for this recipe, as they blend smoothly and provide a rich taste.
- If you’re using popsicle molds, opt for silicone molds for easier removal. They flex easily, allowing you to pop out the frozen treats effortlessly.
- Be careful not to over-blend the mixture; blending for too long can introduce air, which might make the texture less creamy. Aim for a smooth consistency without aerating the mixture.
- When dipping in chocolate, work quickly! The chocolate will harden as it cools, so have your popsicles ready and dip them right after melting.
- Don’t skip the salt! It enhances the flavor of the chocolate and balances the sweetness, making each bite more enjoyable.
Variations & Serving Ideas
If you’re looking to mix things up, here are a few variations you might love: try adding a tablespoon of peanut butter or almond butter to the blender for a nutty twist. For a tropical flavor, consider adding a handful of shredded coconut to the mix. You could also incorporate a spoonful of espresso powder for a mocha flavor that coffee lovers will adore.
As for serving ideas, these popsicles pair wonderfully with a scoop of vanilla yogurt for a refreshing dessert. They also complement a light summer salad with fresh berries, adding a sweet touch. Finally, serve them alongside a homemade granola bar for a perfect afternoon snack!
Storage, Make-Ahead & Reheating
Store your Chocolate Banana Frozen Popsicles in the freezer for up to 2 months. To freeze them properly, ensure they are secured in an airtight container or wrapped in plastic wrap to prevent freezer burn. These popsicles do taste even better the next day, as the flavors meld beautifully overnight, making them a perfect make-ahead treat!
Frequently Asked Questions
Can I make Chocolate Banana Frozen Popsicles ahead of time?
Yes — in fact, they taste even better the next day! The flavors have time to meld perfectly, creating a richer chocolate banana flavor that you’ll love.
Can I substitute the almond milk with dairy milk?
Absolutely! You can substitute almond milk with any dairy milk of your choice. Whole milk will give a creamier texture, while skim milk will be lighter.
How can I make these popsicles vegan?
This recipe is almost vegan as is! Just ensure you use maple syrup instead of honey, and stick to dairy-free chocolate chips if you choose to dip them.
What can I use instead of cocoa powder?
If you don’t have cocoa powder, you can try carob powder for a caffeine-free alternative. Keep in mind that the flavor will be different, so adjust sweetness accordingly.
How do I know when the popsicles are ready to eat?
The popsicles are ready when they feel firm to the touch and have been frozen for at least 4 hours. If they are still soft, leave them in the freezer for another hour.
Final Thoughts
These Chocolate Banana Frozen Popsicles are not just a treat; they’re a delightful blend of creamy banana and rich chocolate that satisfy both your sweet tooth and your cravings for something refreshing. The combination of natural banana sweetness and the indulgent chocolate coating makes them a perfect guilt-free dessert for any occasion.
This is the kind of recipe I come back to again and again, especially when I want to impress guests or simply enjoy a quick, wholesome snack on a hot day. I love experimenting with different toppings or adding a sprinkle of sea salt for a touch of sophistication.
So why not give them a try? I encourage you to whip up a batch, and don’t forget to share your results or your own creative twists on this delicious recipe!
Chocolate Banana Frozen Popsicles
- Total Time: 10 minutes
- Yield: Approximately 6 popsicles 1x
Description
These Chocolate Banana Frozen Popsicles are a delightful treat that combines the sweetness of ripe bananas with rich chocolate. They are easy to make and perfect for hot summer days.
Ingredients
- 3 ripe bananas
- 1 cup (240 ml) unsweetened almond milk (or any milk of your choice)
- 1/4 cup (60 ml) honey or maple syrup (adjust based on sweetness preference)
- 1/4 cup (60 g) unsweetened cocoa powder
- 1 tsp vanilla extract
- 1/4 tsp salt
- 1/2 cup (90 g) semi-sweet chocolate chips (optional, for dipping)
- 1 tbsp coconut oil (optional, for dipping)
Instructions
- Begin by peeling the 3 ripe bananas and cutting them into chunks. This will help them blend more easily. Make sure the bananas are well-ripened for optimal sweetness and creaminess.
- In a blender, combine the banana chunks, 1 cup of unsweetened almond milk, 1/4 cup of honey or maple syrup, 1/4 cup of unsweetened cocoa powder, 1 tsp of vanilla extract, and 1/4 tsp of salt. Blend on high until the mixture is completely smooth, about 30-45 seconds. Scrape down the sides of the blender if necessary to ensure everything is incorporated.
- Once blended, taste the mixture and adjust sweetness if desired by adding a little more honey or maple syrup. This is your chance to make it just right for your taste buds!
- Next, pour the chocolate banana mixture into popsicle molds, filling them almost to the top, leaving a little space for expansion as they freeze. Tap the molds gently on the counter to remove any air bubbles.
- Insert the popsicle sticks into each mold, ensuring they are centered. If your molds are designed for it, you can freeze them without sticking; otherwise, you may need to freeze for about 30 minutes before inserting the sticks to prevent them from sinking.
- Place the molds in the freezer and freeze for at least 4 hours or until completely solid. You’ll know they’re ready when they feel firm to the touch.
- To remove the popsicles, run warm water over the outside of the molds for about 10-15 seconds. This helps loosen them without melting the popsicles. Gently pull on the sticks to remove.
- If you want to dip your popsicles in chocolate, melt 1/2 cup of semi-sweet chocolate chips with 1 tbsp of coconut oil in a microwave-safe bowl. Heat in 30-second intervals, stirring in between, until smooth. Quickly dip the popsicles in the melted chocolate, then place them on parchment paper to set. Enjoy!
- Prep Time: 10 mins
- Cook Time: 0 mins
- Category: Dessert
- Method: Freezing
- Cuisine: American
Nutrition
- Serving Size: 1 popsicle
- Calories: 150
- Sugar: 10 g
- Sodium: 50 mg
- Fat: 7 g
- Saturated Fat: 4 g
- Unsaturated Fat: 3 g
- Trans Fat: 0 g
- Carbohydrates: 20 g
- Fiber: 2 g
- Protein: 2 g
- Cholesterol: 0 mg
Keywords: Ensure your bananas are very ripe to achieve the best sweetness and flavor. Use silicone molds for easier removal and work quickly when dipping in chocolate to prevent it from hardening.